RSS
 

Posts Tagged ‘Improving’

5 Hot Tips For Improving Your Summer Photography

01 Jul

TopImage

We aren’t going to talk about cleaning your lenses (although you should), I’m not going to tell you to use a tripod (you should know that), and I’m definitely not going to tell you to compare last year’s photography to this year’s (but that’s not a bad idea). No, I’m going to suggest you get out of your comfort zone and do something new.

If you open up your Flickr, 500px, or wherever you store your thousands of kitty cat photographs you might notice that there may be a lot of similar shots. Different subjects, but a similar style perhaps? Different styles, but the same type of subjects? Most of us have done it, it sounds like this: “I only do portraits”, “I only shoot landscapes”, or “I never use a flash”.

So, in an attempt to bust out of your comfort zones I’m going to share 5 tips with you to use this summer that have helped me overcome my own creative plateaus over the years.

Interesting fact: 77% of all photographers have at least one cat photograph in their portfolio. Another interesting fact: I have no idea if that is true, but there is a 50% chance that it is.

Five tips for improving your summer photography

Tip 1 – Same Place, Different Time

It’s time to master light, your photography will improve leaps and bounds with the mastering of one specific element – timing. Mastering the light means many different things in the art of photography; mastering your manual settings, mastering the flash, or mastering your timing. All of these things impact one another but the one that I want to focus on is timing. Besides, they say timing is everything.

ZionTrail

Knowing when and where the light will be gives you a huge advantage over other photographers. Knowing that at around 2:30 p.m. the sun will be at an angle that paints light into the pathway is priceless if you are visiting this place and may not return in the future.

Knowing where the sun sets, where the sun rises, and how the light will illuminate various subjects during different times of the day will help you master your timing. The sun rises in the east and sets in the west, if you know which direction you are facing when the sun is directly above you you’ll have a better idea what time of the day to photograph any interesting subjects or scenes you may find.

There are apps and websites all over the Google machine that can assist you when you are traveling to new and exotic places. There is a program you can download onto your phone, computer, watch (not yet but maybe someday) called The Photographer’s Ephemeris that allows you to input a location and figure out exactly where the sun will be at a given time. You can plot your position on top of a topographical map and determine what direction the sunlight will fall, and then plan accordingly.

*Topographical maps are helpful when planning a photography trip where mountains raise up high enough to throw large shadows on areas you may be planning to photograph. The topographical map gives you the height and depth of the contours of the landscape of your location.

Tip 2 – Be Specific, Don’t Spray And Pray

Do you need a fresh 16GB SD card every time you take a photo walk? Maybe you take 100 photographs in the hopes that one ends up being acceptable. Before you take a photograph ask yourself if it’s really that interesting. Is it throwing a unique shadow? Does the light hit it in a way that will catch viewers eyes? Will it cause viewers to ask a question (other than “Why would you photograph that?”)?

Taking a great photograph doesn’t generally happen by accident. Ansel Adams once said a great photograph is one that fully expresses what one feels, in the deepest sense, about what is being photographed. How many of the thousands of photographs squirrelled away on your hard drive were taken with the type of forethought Ansel Adams described?

This summer, challenge yourself to contemplate each shot, think about whether or not the subject is interesting enough to take the time to photograph. What you will find is that if you take the time to contemplate a shot before you press the shutter you’ll have less overall shots but more “keepers”.

Tip 3 – Use A Different Focal Length

Get out of your comfort zone and force yourself to use a different focal length this summer. If you don’t have multiple lenses then use a different focal length on your zoom lens. By using a different focal length you’re forcing yourself to think before you shoot. You’re forcing yourself to compose the image in your mind before ever putting the viewfinder up to your little peepers.

Renowned photographer Henri Cartier-Bresson used a 50mm lens almost exclusively when he wasn’t on assignment. By using the 50mm lens so frequently he was able to see, and compose, an image without putting the camera up to his eye. If you focus on a single focal length long enough you’ll learn what will be in or out of the frame without having to take the shot.

Tip 4 – Roam Free Like Buffalo. You know, before we shot them all.

Get off the beaten path. Literally, get off of the trails, paths, and otherwise marked walking areas to find hidden gems buried in hard to reach places. The summer’s dry weather creates safer hiking conditions as well as the longer days which allow you to venture further off the beaten path without worry of being eaten by wolves in the dark.

OffThePath

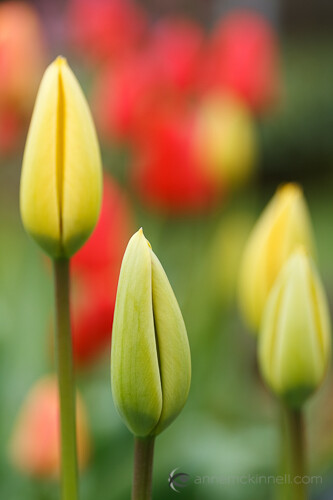
This shot was taken with the Nikon 16-35mm at 19mm, ISO 100, f/10, 15 seconds.

There are a couple of ways to find hidden gems around where you live, searching the internet is the easiest. Flickr is a great resource, you can search the name of your home town and once you find an interesting area you can check the photographs info for a location (assuming the photographer included it). The other way is to grab a hand held GPS (or your phone) and venture off into areas you have not explored before, like Indiana Jones minus the whip and man-purse.

Tip 5 – Photograph In Bad Weather

Bad weather can be a bummer, moods get bent and plans are spoiled. Most people pack up their gear and head home (or don’t go out at all) if the weather is anything but perfect. Take advantage of the warmer weather and plan a photo outing next time the weather looks foul.

Plan to visit places that are normally bustling with people for an opportunity to capture unique shots. When bad weather strikes you’ll have an opportunity to capture people scrambling for a dry place or reflections in puddles. Alternatively, you have an opportunity to capture photographs of places that are normally busy, void of life (think empty sidewalks in the city).

FoggyDay

Beaches are a great place to go right before or after a storm, the ominous clouds and rolling fog create dramatic scenes. Be sure to be prepared for rain and/or strong wind, Adorama has cheap covers for your camera that will keep the water and sand from damaging your precious gear. Try not to change lenses in sandy, windy, and wet conditions, there is a good chance that you’ll end up with debris inside your camera or lens.

Summer photography offers hundreds, if not thousands, of opportunities to practice photography morning, noon, and night. The weather is warmer and the days are longer, there are festivals for everything almost every weekend. If you’re having trouble coming up with something to photograph check out local towns websites for their calendar of events, there is a good chance something is going on near you.

The post 5 Hot Tips For Improving Your Summer Photography by John Barbiaux appeared first on Digital Photography School.


Digital Photography School

 
Comments Off on 5 Hot Tips For Improving Your Summer Photography

Posted in Photography


Improving Composition with Tonal Contrast

18 Jun

A contribution by Andrew S. Gibson author of Understanding EOS: A Beginner’s Guide to Canon EOS Cameras.

Tonal contrast 1

If you were to ask me for two ways that you could improve the composition of your photos, the first piece of advice I would give you is to keep the composition as simple as possible. Eliminate anything that isn’t part of the story from the frame.

The second part of the answer is to focus on tonal contrast. Now, many discussions of composition tend to concentrate on the basics, such as the rule-of-thirds, leading lines, use of colour and so on. Not many people seem to be talking about tonal contrast. That’s a shame, because it’s an element that can really improve your composition.

What is Tonal Contrast?

Tonal contrast is created when light tones and dark tones lie alongside each other. Here’s an example:

Tonal contrast 2

The tonal contrast in this photo is created by the difference in brightness between the white flower and the dark green background.

In any photo it is natural for the eye to go straight to the highlights. That is what is happening here – the viewer’s eye is pulled by the lightest tones in the image, the flower, and then travels slowly around the rest of the image, taking in the detail. It sets up a kind of visual dynamism between the light and dark tones.

Here’s another example of tonal contrast in action:

Tonal contrast 3

Here, the tonal contrast is provided by the difference in brightness between the white parts of the waterfall and my model’s clothing, and the dark tones of the water and the rocks.

Working in Black and White

Tonal contrast is the basis of many successful black and white images. Indeed, if you need help to see the tones in your colour photos an easy way to do so is to open them in Photoshop and reduce the colour saturation to zero. This is what happens to the two photos above when we do that:

Tonal contrast 4

Tonal contrast 5

It is easier to see tonal contrast in black and white images because there is no colour to distract your eye from the brightness values within the photo.

You will also notice that the composition of these images is very simple. Simplicity helps improve composition by eliminating distractions.

Let’s look at another example:

Tonal contrast 6

This is a photo that I took in an antiques market in Shanghai. You can see my two principles of composition in action here:

Simplicity: I moved in close to concentrate on the dominoes.

Tonal contrast: The ivory coloured dominoes are offset by the dark tones of the box they are in.

Tonal contrast 7

Here is the desaturated version. The tonal contrast is even clearer in this image.

There are a few more points I’d like to make here:

  1. Tonal contrast is a great basis for a successful black and white image. The desaturated versions of the above photos all work fairly well. It won’t take much more work to turn them into striking monochrome images.
  2. Images with strong tonal contrast tend to work well in both black and white and colour. An interesting exercise you could try is to go back through photos that you have already taken and select some that feature strong tonal contrast. Then convert them to black and white. I think you will be able to create some strong monochrome images if you do this.
  3. Keeping your compositions simple helps make the most out of tonal contrast. If you include too much within the frame, the impact of any tonal contrast is lessened.

Finally, please note that reducing the colour saturation to zero is usually not the best way to convert a colour image to monochrome. The aim here is purely to make the tones easier to recognise by eliminating the distraction of colour.

Does that mean that every image requires tonal contrast to be successful? No, it doesn’t. It is merely one tool of many at your disposal. The key concept to understand is that learning to recognise and utilise tonal contrast helps you create stronger photos.

For example, if you have arranged a photo shoot with a model in a location with a dark background, you could ask her to wear something light in order to set up tonal contrast between her clothes and the background.

Lack of tonal Contrast

There are times when tonal contrast is not evident in a photo, yet the composition is still successful. Here’s an example:

Tonal contrast 8

Now let’s look at the desaturated version:

Tonal contrast 9

You can see that there isn’t much tonal contrast. Yet the photo works because the purple flower is complemented nicely by the green background. This is called colour contrast and in this image more than compensates for the lack of tonal contrast.

Andrew S. Gibson is the author of Understanding EOS: A Beginner’s Guide to Canon EOS Cameras. He is a professional writer and photographer based in Wellington, New Zealand.

Post originally from: Digital Photography Tips.

Check out our more Photography Tips at Photography Tips for Beginners, Portrait Photography Tips and Wedding Photography Tips.

Improving Composition with Tonal Contrast


Digital Photography School

 
Comments Off on Improving Composition with Tonal Contrast

Posted in Photography


10 Tips for Improving Your Flower Photos

25 Mar

Spring is here!

For those of us in the Northern Hemisphere who have been hunkered down for winter, enduring the rain and the snow, the time has finally come to get outside and enjoy some long awaited sunshine.

As the flowers start to emerge from the soil, all the neighbours begin emerging from their houses with gardening tools in hand. I, on the other hand, have my camera in hand ready to capture the spring flowers and I hope you do too!

Here are 10 tips that will help you make the most of your flower photography this spring.

1. Photograph flowers on an overcast day

Okay, not every day in spring is a sunshiny blue sky day. But that’s okay because the white sky days are perfect for photographing flowers.

The soft even light of an overcast day compliments the delicacy of the flowers and there are no shadows and no harsh bright spots, which makes it easier to get a good exposure.

Flowers in soft light by Anne McKinnell

2. Backlight will make your flowers glow

Another type of light that is excellent for flower photography is backlight. Backlight happens when the sun is directly in front of you lighting your flower from behind. Because flower petals are translucent, backlight makes flowers appear to glow.

Try to capture backlit flowers late in the day when the sun is close to the horizon which will cast nice warm light on the rest of your image too. You might even be able to catch some rays of light filtering through the trees.

Backlit flowers by Anne McKinnell

3. Watch out for wind

When it comes to photographing flowers, wind is your enemy. The easiest way to avoid it is to do your photography early in the morning when there is less chance of wind. If there is a bit of wind, you can use a piece of cardboard or your reflector to create a block.

Your other option is to bring a flower inside. I photographed the flower below by taking it inside and placing it in front of a white sheet.

Gerbera by Anne McKinnell

4. Get closer

There are a number of ways to go about making the close up images of flowers we all love.

First, you can use a telephoto lens and zoom in to the flower. In this case, make sure you take note of the minimum focussing distance of the lens. This is usually marked on the outside of the lens. For example, my 70-300mm telephoto lens has a minimum focusing distance of 1.5 meters (or 5 feet). It simply will not focus on anything closer.

There are a couple of solutions for getting around the minimum focussing distance problem. One is to use extension tubes which are hollow tubes that you place between the camera and the lens. Essentially the tubes move the lens farther away from the camera’s sensor which allows the lens to focus on closer objects. The other solution is to use a close-up filter which works like a magnifying glass and attaches to the end of your lens.

Finally, you can use a dedicated macro lens which has the ability to focus on objects that are close to the end of the lens.

Spring Tulips by Anne McKinnell

5. Use a reflector

If your subject is in the shade, you can use a reflector to bounce some light back towards your subject and make the flower more vibrant.

6. Avoid a cluttered background

As with every photograph, the background can make or break the image. Try to change your position so that there is nothing distracting behind your flower.

7. Use a shallow depth of field

Shallow depth of field is when only part of the image is sharp and the rest is soft and out-of-focus. You can achieve this by using a wide aperture (low aperture number) such as f/4 or f/2.8. The effect is even more pronounced if you are using a telephoto lens with a wide aperture.

Flowers and water drops by Anne McKinnell

8. Make it sharp

Even if you are using a shallow depth of field, it is essential that at least part of the flower is sharp. Use a tripod, a cable release or your camera’s two second timer, and the mirror lock up function for the best results.

Remember that even if there doesn’t appear to be much wind, flowers always move. If your flower isn’t sharp, try using a faster shutter speed.

Finally, check your focus and if necessary use manual focus to ensure the camera is focussed on the most important part of the subject.

9. Change your point of view

Move around and try some different angles for more interesting images. Try photographing the flower from behind or underneath to capture a point of view that is different from what we see from a standing perspective.

Behind the flower by Anne McKinnell

10. Focus through another flower

One technique I love is focussing through another flower. Remember how I said in tip #4 that your lens has a minimum focussing distance? You can use that to your advantage! Try positioning yourself so that another flower is in front of your main subject and very close to the end of your lens. The secondary flower will become a blur of colour and your final image will have a more abstract feel.

Flowers using the shoot through technique by Anne McKinnell

If your camera has been gathering dust this winter, now is the perfect time to get yourself and your camera outside to enjoy the sunshine and the flowers and make some beautiful images!

Post originally from: Digital Photography Tips.

Check out our more Photography Tips at Photography Tips for Beginners, Portrait Photography Tips and Wedding Photography Tips.

10 Tips for Improving Your Flower Photos


Digital Photography School

 
Comments Off on 10 Tips for Improving Your Flower Photos

Posted in Photography


5 Tips for Improving Your Portrait Photography

15 Mar

Here are some techniques that you may not be aware of if you’re new to portrait photography. It takes practice, but being aware of these ideas can get you experimenting, and inspire you to try shots you might not have otherwise tried.

1. Frame Tight

Next time you’re watching a movie, pay attention to the close-up shots. See the top of anyone’s head? Probably not very often.

Tightly framed natural light portrait

Tightly framed natural light portrait

Leaving too much space above the head is a common mistake in portrait photography. For a close-up portrait, just cut off the top of the head. You don’t need it. I know it feels weird at first, and to be honest, I would never have tried this if someone hadn’t told me to. But it works because we connect to faces, not the tops of people’s heads. Also cropping out the top of the head (either in camera or in post) brings the eyes higher in the frame and helps you achieve rule of thirds or golden section placement of the face in the frame.

Tight portrait with golden-section crop overlay to show composition.

Tight portrait with golden-section crop overlay to show composition.

2. The eyes have it

The eyes often look best when the iris is centered in the eye. Direct the subject’s gaze to position her eyes such that the iris is about centered. By centered, I mean centered from the camera’s point of view, not the subject’s point of view.

Natural light portrait

Natural light portrait with good eye position and catchlights

I do this one of two ways, depending on the situation. If possible, I raise my left hand and have the subject follow my hand with her eyes until her eyes are positioned favorably. If this isn’t possible, I give directions like “keep your head still and just move your eyes a tiny bit to the left.”

In addition to directing your subject’s gaze to position the eyes, also take note of the catchlights in the eyes. A large, soft light source will create the most attractive catchlight. Windows without direct sunlight shining through them work great, as well as clear open sky.

3. Let the kids run wild!

You’ve heard this before but I’ll mention it again. When photographing children, one of the best ways to get natural smiles and fun photos is to shoot them in their natural habitat, which probably isn’t a photo studio.

Boy on a swing

And he only kicked me once.

Aside from a great portrait tip, this is also good all around practice to improve your photography skills. Kids at play are fast and unpredictable. Learning to frame, focus, and shoot before the moment has passed takes practice and patience.

4. Watch the hands

When it comes to portrait photography, hands are rarely neutral. Usually they are either adding to your photo, or taking from it. Make it a point to pay attention to your subject’s hands.

When photographing women, showing the hand in profile with the fingers curled works well. Often this looks more feminine and alluring than showing the back of the hand. Consider this example:

Natural light portrait

For portraits of women, showing the hand in profile with the fingers curled often works well.

Have you ever heard a subject complain “I don’t know what to do with my hands?” If you’ve ever stood in front of a large group of people to give a speech, then you know this feeling. When we’re put on the spot, it’s hard to do know what to do with our hands.

If idle hands are messing with your portrait, then put them to work. Sometimes solving the hand problem is as simple as handing the hands something to handle. Think creatively about using a prop to give your subject something to do with her hands.

Woman trying on an earring

Woman trying on an earring

Woman playing with a classic Konica

Woman playing with a classic Konica

5. Shoot into the sun

Morning and evening are great times for backlit portraits. When the sun is low in the sky, you can use it as a rim light to highlight the subject’s hair. This works best if you can position your subject against a darker background, like a shaded area, without loosing the light on the subject’s head.

Backlit portrait using the sun as a rim light

Backlit portrait using the sun as a rim light

I hope I’ve given you a few new ideas to try next time you set out to shoot a portrait. Let me know your thoughts on this article by commenting below or reaching out to me on my Facebook page. I do my best to respond to questions and comments.

Post originally from: Digital Photography Tips.

Check out our more Photography Tips at Photography Tips for Beginners, Portrait Photography Tips and Wedding Photography Tips.

5 Tips for Improving Your Portrait Photography


Digital Photography School

 
Comments Off on 5 Tips for Improving Your Portrait Photography

Posted in Photography


Photoshop: Improving skin with the Healing Brush | lynda.com tutorial

31 Oct

This Photoshop tutorial discusses how to reduce and simplify skin variations using the Healing Brush tool. Watch more at www.lynda.com This specific tutorial is just a single movie from chapter four of the Photoshop CS5: Fashion Retouching Projects course presented by lynda.com author Chris…

FREE Download Photoshop CS 6 here: www.creativestation.ru Adobe Photoshop CS6 Image restoration from Black and white to color Picer www.creativestation.ru
Video Rating: 0 / 5

 
Comments Off on Photoshop: Improving skin with the Healing Brush | lynda.com tutorial

Posted in Retouching in Photoshop


Improving Photos: Enhancing Details [Part 2]

18 Oct

*Be sure to ‘Like’ this video to help my channel grow! 🙂 In this video I’ll be showing you how to enhance some of the details within your photos. This can be used to sharpen your overall image, or just selective parts as I’ll show you. My DeviantART: infuzedmedia.deviantart.com
Video Rating: 5 / 5

Learn how to replace a boring grey sky with a more interesting one in this series of Photoshop Elements 7 tutorials from www.digitalphotographycourses.co.uk

 
Comments Off on Improving Photos: Enhancing Details [Part 2]

Posted in Retouching in Photoshop


Improving Wedding Photography

13 Nov

Bring photographs of that special day to life with the power of Corel Paint Shop Pro Photo X2. Improve images and make them really stand out. The result? Images you’ll be proud to share and display. Tutorial created by Corel
Video Rating: 4 / 5

Product photography tutorial presented by Gavin Hoey showing the high power tabletop lighting kit from smick.co.uk shows how to take pictures on whit and black backgrounds using home made lighting table.
Video Rating: 4 / 5