RSS
 

Posts Tagged ‘Images’

Using Photoshop Filters During Post-Processing to Correct and Enhance Images

24 Nov

When you think of filters in photography, your first thought might be those specialized glass pieces you affix to the end of your lens. Most of these filters serve a specific purpose (e.g. a polarizing filter to reduce glare), although some are for artistic effects (e.g. colored filters).

But if you want to apply artistic/special effects in post-processing, Photoshop has a number of filters you can apply during this stage of your workflow. They can also be used to clean up or retouch images.

Recommendation

When working with an image, it’s good practice to work non-destructively (i.e. you don’t change the pixels). Using Photoshop filters directly on a pixel layer will change the pixels, so wherever possible you should use Smart Filters.

A Smart Filter is a filter that’s applied to a Smart Object – a layer that saves the image’s source information with its original characteristics and allows you to edit non-destructively. So before you start applying filters, convert the layer you’re working on to a Smart Object.

Note: Depending on your version of Photoshop, you may not be able to apply some filters as Smart Filters.

Filter Gallery

The filter gallery in Photoshop gives you quick access to a number of filters. From the menu choose Filter, and then Filter Gallery to view them on the screen. It’s an easy way to see the effect a filter would have without changing the original image. Here you can apply one or a combination of filters to your image.

The easiest way to understand what they all do is to select each one and look at the preview. It’s a simple artistic edit that can come in handy when used selectively.

The Filter Gallery showing the options that can be applied.

Adaptive Wide Angle Filter

This is also available in the Filter menu and can be useful for correcting distortion issues resulting from wide-angle or fisheye lenses. These lenses sometimes introduce curves that weren’t actually there. You can also use the adaptive wide angle filter to straighten lines that appear curved in panoramic shots.

To straighten a curved horizon, click and drag from the left side of the horizon to the right. This adds a blue line (called a constraint) around the area of distortion. The constraint marks the area and straightens it.

An image taken with a fish-eye lens

This filter has a number of correction types:

  • Fisheye corrects those extreme curves made with a fisheye lens
  • Perspective corrects converging lines resulting from your angle of view or camera tilt
  • Full Spherical corrects 360-degree panoramas with a 1:2 aspect ratio
  • Auto applies what Photoshop deems an appropriate correction

Image adjusted using Adaptive Wide Angle filter

Note: The Panorama correction type is also available if you apply this filter to a photomerged panorama.

Lens Correction

The Lens Correction filter fixes different kinds of distortions. Similar to the Adaptive Wide Angle filter, it remedies distortion created by wide-angle and fisheye lenses. It can also straighten images taken at an angle and make them appear as if shot straight on. One of the great things with this filter is you can choose to either manually correct the image or have Photoshop correct it automatically.

Angled image.

  • Geometric Distortion is another easy way to remove a fish-eye effect.
  • Chromatic Aberration can remove any colored fringes around your subjects on high contrast edges.
  • Vignette does a good job of adding a vignette.
  • Transform gives you sliders to help you correct perspectives, with options for vertical and horizontal perspectives, as well as rotating to compensate for camera tilt.

Edited with the Lens Correction filter.

Liquify

The Liquify filter can be used to push and pull pixels around and is one of the most powerful filters under the Filter menu. You may associate liquify with body transformations, but it can do much more than that.

Within the liquify filter menu, the forward warp tool (at the top left) is the most popular. The key to using this tool successfully is to use a brush size slightly larger than you think you need. You should also use a lower pressure brush (for more subtlety) and increase your density (to affect a bigger area within your brush circle).

The Liquify Tool used to reshape a piece of fruit.

Vanishing Point

The Vanishing Point filter brings an image in line with the perspective of another. For example, if you want to composite a picture frame into a room, this filter will help you match the perspective of the frame to any wall in the right perspective.

Third-Party Filters

Photoshop lets you easily add hundreds of third-party filters (available via plugins) to your arsenal.

These can help you make the most of your images or get super creative. Many simplify the steps Photoshop is capable of achieving so you can perform them in a shorter time. Some of these include the Nik Collection, Topaz and ON1.

Above Image with two Nik filters applied: Paper Toner and Vignette

Conclusion

Using Photoshop Filters is an easy option if you want to get creative. Photoshop has a few standard ones you can experiment with, and stacking them can create a unique image.

Which filters do you use? Share some of your results with us.

The post Using Photoshop Filters During Post-Processing to Correct and Enhance Images appeared first on Digital Photography School.


Digital Photography School

 
Comments Off on Using Photoshop Filters During Post-Processing to Correct and Enhance Images

Posted in Photography


How to Batch Resize Your Images Quickly Using Photoshop

17 Nov

While it’s relatively easy to write an Action to resize a series of images in Photoshop, it’s easier still to get Photoshop to do all the work for you. Photoshop comes with an image processor script that will open, resize, and save a series of images for you – very quickly. Here are the steps to make the batch resize process work for your images.

How to Batch Resize Your Images Using Photoshop

Batch resizing images in PS CC 2019 is fast and easy – no need to run an action. You can just run a script in the Image Processor menu option.

Step 1 – Image Processor

How to Batch Resize Your Images Using Photoshop

The Image Processor option lives under the Scripts tab in the main File menu of Photoshop.

Choose File -> Scripts -> Image Processor. The image processor dialog shows a simple four-step process for resizing the images.

Step 2 – Choose images

In Section 1 of the Image Processor dialog, select to either resize the images already open in Photoshop (if you have them open) or click ‘Select Folder’ and choose a folder of images to resize. Select ‘Include all Subfolders’ if you wish to also include them.

How to Batch Resize Your Images Using Photoshop

I prefer to open my images prior to resizing in Photoshop. That way I am not hunting for the folder I need. But if you have all your images organized in a folder you can choose the ‘Select Folder’ option in Step 1 of the Image Processor window.

Step 3 – Save images location

In Section 2 of the Image Processor dialog box, you can select where to save the images. When selecting ‘Save in Same Location,’ Photoshop creates a subfolder to save the images in so you don’t have to worry about overwriting them. When a subfolder of the same name already exists with images of the same names in it, Photoshop saves to that folder but adds a sequential number to the file. That way, you won’t lose your other files. Alternatively, you can select a different folder for the resized images.

How to Batch Resize Your Images Using Photoshop

Indicate where you want Photoshop to save the resized images.

Step 4 – File Type and Size

In Section 3 of the Image Processor dialog box, select the file type you want Photoshop to save your image as. For the web ‘Save as JPEG’ is the obvious choice. You can set a Quality value in the range 0 to 12 where 12 is the highest quality and 0 the lowest.

For better color on the web, you can also select ‘Convert profile to sRGB.’ Ensure that ‘Include ICC Profile’ at the foot of the dialog is checked so the profile will be saved with the image.

How to Batch Resize Your Images Using Photoshop

Option 3 in the Image Processor dialog box is where you can select the type of file you want to save the resized image. You can choose the size in terms of W (width) and H (height) in pixels.

To batch resize the images, select the ‘Resize to Fit’ checkbox. Set the desired maximum width and height for the final image. For example, if you type ‘300’ for the width and ‘300’ for the height, the image will be resized so that the longest side of the image (whether it be in portrait or landscape orientation) will be 300 pixels.

The images are scaled in proportion so they aren’t skewed out of shape. If desired, you can save in another format as well. Just select its checkbox so you can save the same image in different formats and at different sizes in the one process.

The Width and Height measurements do not have to be the same. So you could, for example, specify a Width of 500 and a Height of 700 and no image will have a width greater than 500 or a height greater than 700.

Step 5 – Run Action

In Section 4 of the Image Processor panel, you can also select ‘Run an Action’ on the images if desired.

Step 6 – Run

Once you’re ready, click ‘Run’ and the images are automatically opened (if they are not already), resized, saved, and closed.

To see your resized images, choose File -> Open and navigate to the folder that you specified the images to be saved to. If you chose to save as a JPEG, the images will be in a subfolder called JPEG. PSDs are in a folder called PSD and so on.

How to Batch Resize Your Images Using Photoshop

In conclusion, whenever you need to resize a large number of images for uploading to the web, for example, the batch resize in the Photoshop Image Processor script makes the job fast, efficient, and painless.

The post How to Batch Resize Your Images Quickly Using Photoshop appeared first on Digital Photography School.


Digital Photography School

 
Comments Off on How to Batch Resize Your Images Quickly Using Photoshop

Posted in Photography


NASA shares high-resolution satellite images of California’s Camp wildfire

15 Nov

NASA has shared images of the California Camp Fire as seen from space. The wildfire started on November 8 and quickly spread, ultimately destroying nearly 8,000 buildings and burning 135,000 acres, according to Cal Fire, as well as claiming at least 50 lives.

Some of the images were captured using the Moderate Resolution Imaging Spectrometer on NASA’s Terra satellite, according to the space agency, which says the images show natural colors. Unlike images from the ground, NASA’s aerial snapshots reveal the sheer scale of the blaze and how far its smoke has dispersed westward across the state and over the ocean.

$ (document).ready(function() { SampleGalleryV2({“containerId”:”embeddedSampleGallery_2611990689″,”galleryId”:”2611990689″,”isEmbeddedWidget”:true,”selectedImageIndex”:0,”isMobile”:false}) });

NASA is home to its Earth Observing System Data and Information System (EOSDIS) Worldview, a platform that provides access to high-resolution images from more than 700 satellites. The images in this application are updated within three hours of being captured, according to NASA, providing a near-real time look at every corner of the planet. Imagery of the Camp Fire, as well as other California wildfires, can be accessed through the platform.

Articles: Digital Photography Review (dpreview.com)

 
Comments Off on NASA shares high-resolution satellite images of California’s Camp wildfire

Posted in Uncategorized


Blur and Creative Photography – Why Your Images Don’t Need To Be 100% Sharp

06 Nov

Blur and creative photography – Why your images don’t need to be 100% sharp all of the time.

Blur and Creative Photography - Why Your Images Don't Need To Be 100% Sharp 1

I have an image of a blueberry shot on the end of a spoon with my macro lens. It has a very narrow depth of field (DOF).  Only the front of the blueberry is in focus. The rest has a lovely soft blur.

The first comment when I posted it on Facebook was ‘it would look better if it were all in focus.’

No.

There is a perception amongst some photographers who are very invested in the technicalities of shooting, that absolutely every image has to be 100% sharp. While it is an entirely valid choice – and I fully support the decision to shoot their images that way – it is not the ‘only’ choice.

For those of us who want to explore different creative styles, have fun with different lenses and push the boundaries of what photography can allow us to do in creating art, there are plenty of alternatives.

NOTE: To clarify, sometimes an image ‘just is’ out of focus for whatever reason. This article addresses the photographers deliberate creative choice to use softness or blur in a picture.  It may be a subtle difference for some, but it is a difference.

Blur and Creative Photography - Why Your Images Don't Need To Be 100% Sharp 2

Beyond Bokeh

It amuses me that many photographers believe all images ‘must be tack sharp.’ Still, they are out there taking photos of birds, portraits or wedding shots with very soft blurred bokeh backgrounds. However, the reasons they do so are perfectly valid.

Some photographers do so to:

  • soften a distracting background
  • bring the subject into prominence
  • make it aesthetically pleasing
  • give depth and 3D feel to the image

But for bokeh to work well, you need to have some specific elements present and happening. Such as decent quality lenses, a lot of distance behind the subject to the background, and good soft light. Not every shoot offers those situations, nor can everyone afford the best lens.

What if we want even more softness in our image, including the subject? Maybe we want the background sharp, and the subject blurred – a technique often used in some street photography styles.

What about ICM – Intentional Camera Movement? Or Wabi-Sabi, the Japanese/Zen aesthetic of the beauty of imperfection.

There are so many other ways to see the world and present our images with our unique creative viewpoint. If that means smearing stuff on a filter in front of your lens, then smear-away :).

Blur and Creative Photography - Why Your Images Don't Need To Be 100% Sharp 3

Learn To Love the Blur

Bring your hand as close to your face as you can, so you can still focus on it. What happens to the background?  If you shift focus to the background instead, your hand blurs.

Distant mountains are blurred as we physically cannot focus clearly that far away.

So its natural for blur to be present in our images. Therefore if we choose to use it more creatively to give our pictures a different feel or mood, we are enhancing a natural element in our world.

Painters can represent a tree in different ways depending on their technique and style. It may be rendered beautifully with every leaf painted as an individual element. It may have stark lines representing a trunk and branches, or colorful blobs in the background.

Photography can be playful, creative, stylistic and artistic as well. We can allow ourselves to love blur.

Blur and Creative Photography - Why Your Images Don't Need To Be 100% Sharp 4

Intentional camera movement is popular with stands of trees, soft beach scenes, and fields of flowers. To enhance it, even more, some people stretch plastic film in front of the lens. Or wrap it around the front leaving a small opening to shoot through.

I know flower/macro photographers who wrap gauze fabric around the front of their lens for an alternative soft effect and to add some color as well. Stretching pantyhose across the front of the lens is also cheap and effective.

Smearing petroleum jelly on a filter screwed to the front of the lens is reasonably common for an effective soft blur effect.

Blur and Creative Photography - Why Your Images Don't Need To Be 100% Sharp 5

Lens Choices

Lenses with an F stop of 2.8 to 1.4 give a very narrow depth of field, which highlights the subject and softens the background. Macro lenses are excellent for this effect.

Many portrait and wedding photographers will have an 85mm portrait lens with an F-stop in this range. Often specifically used to blur the background for a nice effect.

Lensbaby are well known for their special effect lenses. Their lenses offer lots of creative blur effects.  The ‘Composer’ range allows you to select a specific point in the image to be in focus while softening the remainder. The ‘Twist’ range gives a swirly bokeh effect in the background, and there are other options too.

‘Helios’ and ‘Vivitar’ vintage lenses are experiencing a renaissance in popularity. They have many creative bokeh effects (including the swirl style) and are quite cheap in comparison to Lensbaby. They are vintage manual-focus lenses and may need a specialist mount to attach to your modern camera, but can they can be purchased at very affordable prices.

Blur and Creative Photography - Why Your Images Don't Need To Be 100% Sharp 6

Vintage ‘Helios’ lens gives very swirly bokeh blur in this image

Have Fun

For some people, it can be scary to let go of the need for sharpness and embrace the softer side. Other people sit happily in that place and rarely shoot a classically sharp shot.

There is room within photography as a creative medium for us to be artistic. To let go of the perceived rules, relax and have some fun doing something different.

Yes, some effects are niche, and you may not want to use them all the time. But you wouldn’t use a Fish-Eye lens every day either.

Having a range of choices gives you much more scope to shoot differently, add your unique take on an image. Using different lenses can help us see the world in new exciting ways and open up opportunities to create memorable images.

Blur and Creative Photography - Why Your Images Don't Need To Be 100% Sharp 7

Ways to Play

1. Bokeh

Bokeh relates to the quality and smoothness of your blurred background when you shoot the subject with a shallow depth of field. Different lenses give a varied type of bokeh. Usually, the better quality fast primes or macro lenses have the smoothest, most pleasing bokeh.

Bokeh happens when the subject is closer to the camera than it is to the background. Shooting wide open, i.e., F2.8 to F1.2 will give maximum blur of the background.

So try to shoot your subjects wide open with a narrow depth of field. With the background further away from them, you will achieve the nice soft blur.

Blur and Creative Photography - Why Your Images Don't Need To Be 100% Sharp 8

2. Selective Focus

When you combine a narrow depth of field, such as F2.8, with selecting a specific part of the subject, it will soften everything else in the image.

Doing so creates a lovely effect with flowers and macro imagery.

Blur and Creative Photography - Why Your Images Don't Need To Be 100% Sharp 9

3. Shoot Through

Place something in front of the lens to add some level of softness.  It can either completely cover the lens or be wrapped around it to only soften the edges.

You can use:

  • nylons stretched across the lens
  • gauzy fabric wrapped around the lens
  • plastic film across or wrapped around the lens
  • filters smeared with petroleum jelly
  • hold fabric or flowers in front of part of the lens to add softness (common in flower photography)

4. ICM (Intentional Camera Movement)

Intentional Camera Movement is when the camera is deliberately moved during the shutter opening and closing to add blur to the image. A neutral density filter can assist with giving you a slightly longer shutter speed if shooting in daylight.

You may have seen this used in shots of forests with vertical stands of tree trunks.

5. Vintage Lenses

Try purchasing ‘Helios’ or ‘Vivitar’ Lenses (or other options) and related mounts for your camera. Many of these lenses have unexpected visual effects (sometimes seen as a fault) but can be used effectively for creative shots.

6. Specialty Lenses

Lensbaby offers a range of lens solutions to give you a variety of soft effects.

Blur and Creative Photography - Why Your Images Don't Need To Be 100% Sharp 10

Lensbaby Velvet 56 at F1.8 is very soft and adds a glamour effect

7. Filters

Soft Focus filters get screwed in front of your lens and are useful in portrait and glamour work. Otherwise, many people mimic this effect in post-processing via Photoshop.

Blur and Creative Photography - Why Your Images Don't Need To Be 100% Sharp 12

Conclusion

For those who strive to have every image as sharp as possible, continue with your efforts. If you who want more variation, flexibility, and creativity in your work, there is space to play and create that style of an image too.

It doesn’t have to be expensive. The vintage lenses can be bought online for under $ 100 (depending on freight and exchange rates).

Give yourself permission to relax, experiment and play, and create something unique!

Come over to the soft side. We like it here! ?

Share your images with us in the comments below.

Blur and Creative Photography - Why Your Images Don't Need To Be 100% Sharp 13


The post Blur and Creative Photography – Why Your Images Don’t Need To Be 100% Sharp appeared first on Digital Photography School.


Digital Photography School

 
Comments Off on Blur and Creative Photography – Why Your Images Don’t Need To Be 100% Sharp

Posted in Photography


Our favorite images from 2018’s Wildlife Photographer of the Year winners

28 Oct

Wildlife Photographer of the Year winners

Now in its 54th year, the Wildlife Photographer of the Year competition continues to celebrate photography of the natural world. This year’s winners were selected from over 45,000 entries, with Dutch photographer Marsel van Oosten’s portrait of two Qinling golden snub-nosed monkeys taking the top prize. See our favorites from the winning images here, and head to the Natural History Museum’s website to enter the 2019 competition – open to submissions through December 13th, 2018.

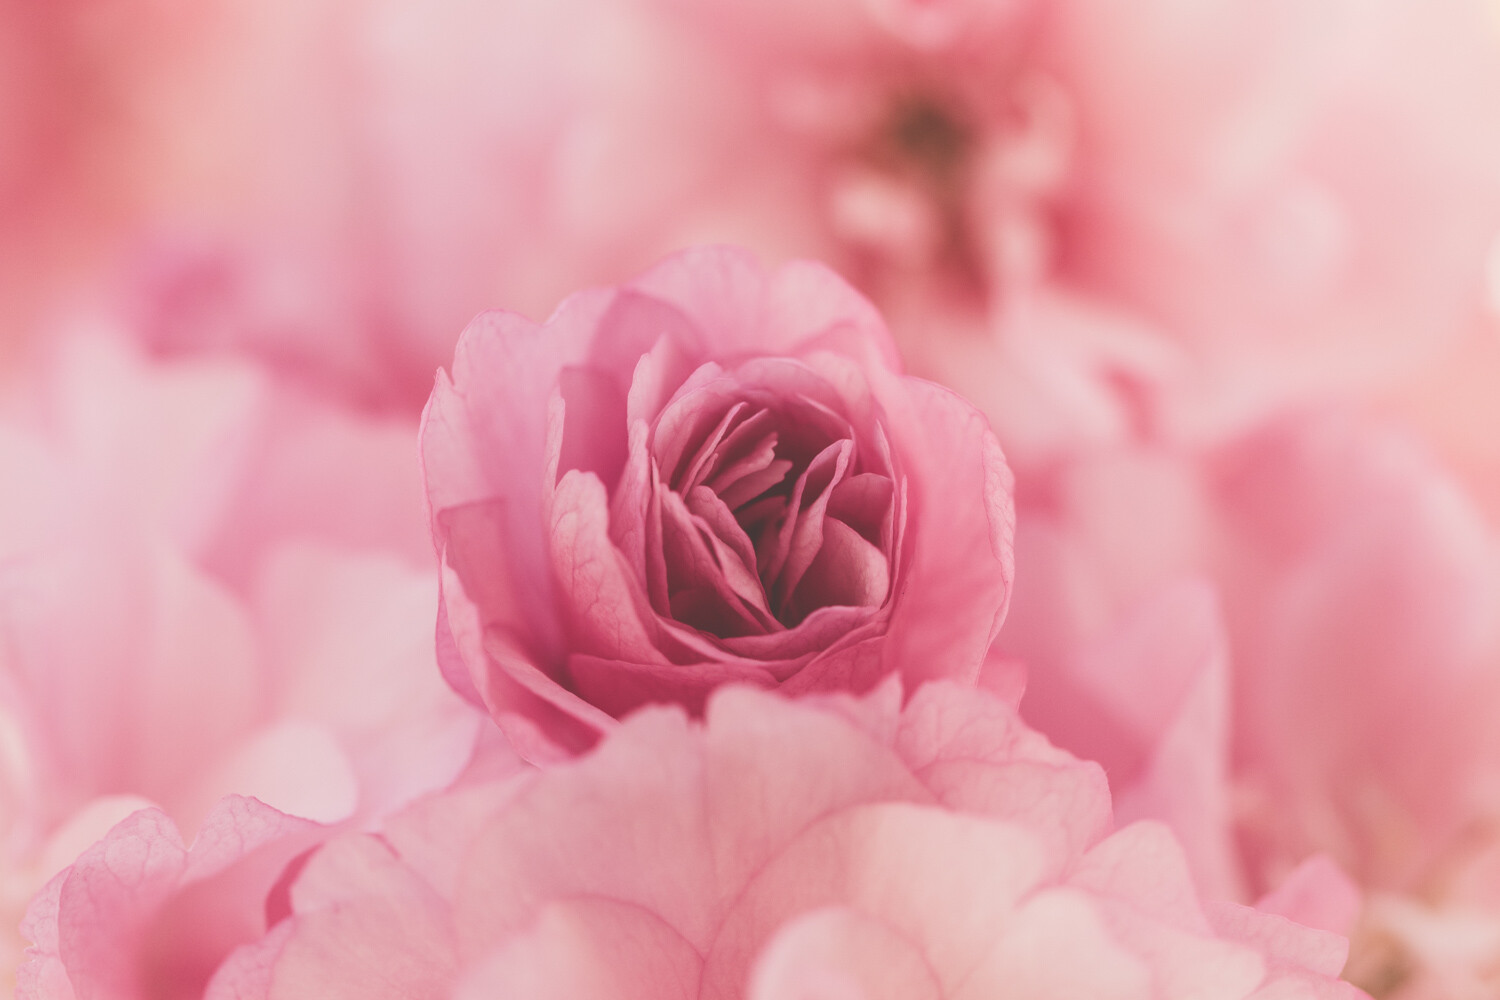
The golden couple by Marsel van Oosten, The Netherlands
Grand Title Winner 2018, Animal Portraits

A male Qinling golden snub-nosed monkey rests briefly on a stone seat. He has been joined by a female from his small group. Both are watching intently as an altercation takes place down the valley between the lead males of two other groups in the 50-strong troop. It’s spring in the temperate forest of China’s Qinling Mountains, the only place where these endangered monkeys live.

They spend most of the day foraging in the trees, eating a mix of leaves, buds, seeds, bark and lichen, depending on the season. Though they are accustomed to researchers observing them, they are also constantly on the move, and as Marsel couldn’t swing through the trees, the steep slopes and mountain gorges proved challenging. Whenever he did catch up and if the monkeys were on the ground, the light was seldom right. Also, the only way to show both a male’s beautiful pelage and his striking blue face was to shoot at an angle from the back. That became Marsel’s goal.

It took many days to understand the group’s dynamics and predict what might happen next, but finally his perseverance paid off with this gift of a perfect situation, with a perfect forest backdrop and perfect light filtering through the canopy. A low flash brought out the glow of the male’s golden locks to complete the perfect portrait.

Nikon D810 + Tamron 24–70mm f2.8 lens at 24mm; 1/320 sec at f8; ISO 1600; Nikon SB-910 flash.

Wildlife Photographer of the Year winners

Lounging leopard by Skye Meaker, South Africa
Grand Title Winner 2018, 15-17 Years Old

Mathoja was dozing when they finally found her, lying along a low branch of a nyala tree. And she continued to doze all the time they were there, unfazed by the vehicle. ‘She would sleep for a couple of minutes. Then look around briefly. Then fall back to sleep,’ says Skye.

Mathoja’s home is Botswana’s Mashatu Game Reserve, which Skye and his family regularly visit, always hoping to see leopards, though they are notoriously elusive. In Bantu language, Mathoja means ‘the one that walks with a limp’. Skye calls her Limpy. She limps because of an injury as a cub, but otherwise she is now a healthy eight-year-old, and she remains the calmest of leopards around vehicles.

Though she dozed just metres away from Skye, she blended into the background, the morning light was poor, leaves kept blowing across her face, and her eyes were only ever open briefly, making it hard for Skye to compose the shot he was after. Finally, just as she opened her eyes for a second, the overhead branches moved enough to let in a shaft of light that gave a glint to her eyes, helping him to create his memorable portrait.

Canon EOS-1D X + 500mm f4 lens; 1/80 sec at f4; ISO 1250.

Wildlife Photographer of the Year winners

Pipe owls by Arshdeep Singh, India
Winner 2018, 10 Years and Under

Huddled together at the opening of an old waste-pipe, two spotted owlets look straight into Arshdeep’s lens. He and his father had been driving out of Kapurthala, a city in the Indian state of Punjab, going on a birding trip, when he saw one of them dive into the pipe. His father didn’t believe what he’d seen but stopped the car and backed up.

It wasn’t long before one of the owlets popped its head out. Guessing this might be a nest site and keen to photograph such an unusual setting, Arshdeep begged to borrow his father’s camera and telephoto lens. Using skills accrued from photographing birds since he was six years old, Arshdeep rested the lens on the car’s open window and waited. He wasn’t at eye level, though. Realizing that if the window was half open, he could place the lens at the right height, he knelt on the seat and waited.

It wasn’t long before the curious owlet – less than 20 centimetres (8 inches) high – put its head out again, closely followed by the larger female. Framing the pair off-centre, and using a shallow depth of field to isolate them from the building behind, he created a characterful portrait of a species that has adapted to urban life.

Nikon D500 + 500mm f4 lens; 1/1600 sec at f4 (-0.7 e/v); ISO 450.

Wildlife Photographer of the Year winners

Duck of dreams by Carlos Perez Naval, Spain
Winner 2018, 11-14 Years Old

The long-tailed ducks were the most beautiful Carlos had ever seen. In fact, it had been the sea ducks that he most wanted to see when the family planned their holiday to Norway. They were staying on the Varanger Peninsula, on the northern coast of the Barents Sea. But to get close enough to photograph the ducks meant booking a floating hide in the harbour and an early-morning boat, so he and his mother and father would be in the hide before sunrise, before the ducks flew in to feed.

It was March, and still bitterly cold, and lying on his belly on the floor of the hide, he felt he might gradually freeze. But the discomfort was worth it. As the light broke, the ducks flew in – eider ducks and long-tailed ducks in their breeding plumage. The only sound was the water lapping against the hide as the ducks dived for fish.

He focused on one male that was resting after feeding. An overcast sky muted the dawn light and allowed Carlos to capture the subtle colours of the duck’s plumage, and reflected lights from the village added a golden sparkle to the ripples, caught in a perfect frame.

Nikon D7100 + 200–400mm f4 lens at 400mm; 1/320 sec at f4; ISO 1000.

Wildlife Photographer of the Year winners

Bed of seals by Cristobal Serrano, Spain
Winner 2018, Animals in their environment

A small ice floe in the Errera Channel at the tip of the Antarctic Peninsula provides barely enough room for a group of crabeater seals to rest, and the cracks are starting to show. It’s the end of summer in the Antarctic, and so sea ice here is in short supply. Crabeater seals are widespread in Antarctica and possibly the most abundant of all seals anywhere. But they are also dependent on sea ice, for resting, breeding, avoiding predators such as killer whales and leopard seals, and accessing feeding areas.

Despite their name, crabeaters are adapted to feed almost exclusively on Antarctic krill, using their interlocking, finely lobed teeth to sieve krill from the water. The krill itself is also dependent on sea ice, which provides winter shelter and food (algae). So any decline in sea ice will have a knock-on effect on such specialist krill predators, as will overfishing of krill.

For the moment, there is no evidence of any decline in crabeaters, though in the vastness of their pack-ice habitat, it is very difficult to estimate their numbers. Positioned in a rubber dinghy in the channel beside the floe, Cristobal waited until the sea was relatively calm before launching his drone.

The batteries would not last long in the cold, so he flew the drone ‘high and smoothly … using low-noise propellers to avoid disturbing the seals’. The picture portrays the group, dozing, with a spattering of krill-coloured seal excrement symbolizing their dependence on Antarctica’s keystone species.

DJI Phantom 4 Pro Plus + 8.8–24mm f2.8–11 lens; 1/200 sec at f5.6; ISO 100.

Wildlife Photographer of the Year winners

Blood thirsty by Thomas P Peschak, Germany/South Africa
Winner 2018, Behaviour: Birds

When rations run short on Wolf Island, in the remote northern Galápagos, the sharp-beaked ground finches become vampires. Their sitting targets are Nazca boobies and other large birds on the plateau. Boobies thrive here, nesting among dense cactus thickets and fishing in the surrounding ocean, but the finches have a tougher time. The island has no permanent water and little rainfall.

The finches – among the species that inspired Darwin’s theory of evolution – rely on a scant diet of seeds and insects, which regularly dries up. Pecking away at the base of booby flight feathers with their sharp beaks – a trait that may have evolved from feeding on the birds’ parasites – they drink blood to survive.

‘I’ve seen more than half a dozen finches drinking from a single Nazca booby,’ says Tom. Rather than leave and expose their eggs and chicks to the sun, the boobies appear to tolerate the vampires, and the blood loss doesn’t seem to cause permanent harm.

Working on a climate-change story (the Galapagos may offer an early warning of the effects on biodiversity of global changes), Tom had secured a rare permit to land on the island. He made it up the steep cliffs, scrambling over loose rocks to reach the plateau. For maximum impact, he shot the bloody scene at bird’s eye level to capture the one female feeding and another waiting just behind.

Nikon D5 + 16–35mm f4 lens; 1/200 sec at f20; ISO 160; Profoto B1X 500 AirTTL flash.

Wildlife Photographer of the Year winners

Kuhirwa mourns her baby by Ricardo Núñez Montero, Spain
Winner 2018, Behaviour: Mammals

Kuhirwa, a young female member of the Nkuringo mountain gorilla family in Uganda’s Bwindi Impenetrable Forest, would not give up on her dead baby. What Ricardo first thought to be a bundle of roots turned out to be the tiny corpse. Forced by the low light to work with a wide aperture and a very narrow depth of field, he chose to focus on the body rather than Kuhirwa’s face.

Guides told him that she had given birth during bad weather and that the baby probably died of cold. At first Kuhirwa had cuddled and groomed the body, moving its legs and arms up and down and carrying it piggyback like the other mothers. Weeks later, she started to eat what was left of the corpse, behaviour that the guide had only ever seen once before.

Kuhirwa’s initial reactions to her bereavement echo responses to death seen in other species. From elephants stroking the bones of dead family members to dolphins who try to keep dead companions afloat, there is an abundance of credible evidence that many animals – ranging from primates and cetaceans to cats, dogs, rabbits, horses and some birds – behave in ways that visibly express grief, though individual reactions vary. Kuhirwa’s behaviour can be understood as mourning, without the need to speculate about her thoughts.

Nikon D610 + 70–300mm f4.5–5.6 lens at 185mm; 1/750 sec at f5; ISO 2200.

Wildlife Photographer of the Year winners

Desert relic by Jen Guyton by Germany/USA
Winner 2018, Plants and Fungi

The cones of a female welwitschia reach for the skies over the Namib Desert, proffering sweet nectar to insect pollinators. These desert survivors have an extraordinary biology. There are male and female plants, both producing distinctive cones. Each plant comprises just two leaves, a stem base and a tap root. The woody stem stops growing at the apex but widens with age, forming a concave disc, but the two original seedling leaves continue to grow, gradually splitting and fraying.

With a slow growth rate and the largest specimens spanning more than 8 metres (26 feet), some may be 1,000 years old or more (twice that has been claimed). Endemic to Namibia and Angola, welwitschia endures harsh, arid conditions, usually within 150 kilometres (90 miles) of the coast, where its leaves capture moisture from sea fog.

Jen’s challenge was to find a striking way to photograph what can be seen as just a pile of old leaves. After trekking all day over hot sand, scouting widely scattered plants, Jen found one about 1.5 metres (5 feet) across, and with ‘the right shape and lively colours’. It had ripening cones, some with their papery wings ready to detach and carry the seeds away on the wind.

Adopting a low, wide angle to catch the vibrant tones and to display the plant’s architecture against the expansive landscape, she started shooting just as the sun was going down and while a scattering of clouds rolled in and diffused the light.

Canon EOS 7D + Sigma 10–20mm f4–5.6 lens at 10mm; 1/100 sec at f22; ISO 400; Venus Laowa flash; Manfrotto tripod.

Wildlife Photographer of the Year winners

Night flight by Michael Patrick O’Neill, USA
Winner 2018, Under Water

On a night dive over deep water – in the Atlantic, far off Florida’s Palm Beach – Michael achieved a long-held goal, to photograph a flying fish so as to convey the speed, motion and beauty of this ‘fantastic creature’.

By day, these fish are almost impossible to approach. Living at the surface, they are potential prey for a great many animals, including tuna, marlin and mackerel. But they have the ability to sprint away from danger, rapidly beating their unevenly forked tails (the lower lobe is longer than the upper one) to build enough speed to soar up and out of the water. Spreading their long, pointed pectoral fins like wings, flying fish can glide for several hundred metres (more than 650 feet).

At night, they are more approachable, moving slowly as they feed on planktonic animals close to the surface. In a calm ocean, Michael was able to get closer and closer to this individual, which became relaxed in his presence. In the pitch black, he tried various camera and light settings, all the while keeping track of both his subject – a mere 13 centimetres (5 inches) long – and his dive boat. The result is his ‘innerspace’ vision of a flying fish.

Nikon D4 + 60mm f2.8 lens; 1/8 sec at f16; ISO 500; Aquatica housing; two Inon Z-220 strobes.

Wildlife Photographer of the Year winners

Windsweep by Orlando Fernandez Miranda, Spain
Winner 2018, Earth’s Environments

Standing at the top of a high dune on Namibia’s desert coastline, where mounds of wind-sculpted sand merge with crashing Atlantic waves, Orlando faced a trio of weather elements: a fierce northeasterly wind, warm rays of afternoon sunshine and a dense ocean fog obscuring his view along the remote and desolate Skeleton Coast.

Such eclectic weather is not unusual in this coastal wilderness. It is the result of cool winds from the Benguela Current, which flows northwards from the Cape of Good Hope, mixing with the heat rising from the arid Namib Desert to give rise to thick fog that regularly envelopes the coast. As it spills inland, the moisture from this fog is the life-blood for plants and insects in the dry dunes.

Orlando framed his shot using as a focal point the sharp ridge of sand snaking out in front, ensuring that the sweep of wind-patterned dunes to his right remained in focus, and kept the distant fog?shrouded coast as a mysterious horizon.

Canon EOS 5D Mark III + 70–200mm f2.8 lens at 110mm; 1/500 sec at f11; ISO 100.

Wildlife Photographer of the Year winners

The vision by Jan van der Greef, The Netherlands
Winner 2018, Black and White

Perfectly balanced, its wings vibrating, its tail opening and closing, with its tiny feet touching the spike for just an instant, an eastern mountaineer hummingbird siphons nectar from the florets of a red-hot-poker plant.

Positioned by the flower, Jan had anticipated the bird’s behaviour. For a number of days he had been stationed in the garden of his hotel in southern Peru, observing hummingbirds. He noticed that an eastern mountaineer – a species found only in Peru, characterized by its long, black-and-white forked tail – would rotate around the red-hot-poker spikes as it fed.

He also saw that, when the bird moved behind a spike and its tail closed for a moment, a beautiful cross appeared. Determining to capture this strange vision, he staked out a spot underneath a single red-hot-poker plant (native to Africa, where it is pollinated by nectar?drinkers such as sunbirds). It proved to be the hummingbird’s preferred garden source of energy-rich nectar.

The low position of his wheelchair allowed him to set the spike against the sky, framing it with a dark surround of bushes. It took two half days to get the perfect shot, setting his camera to capture 14 frames a second, as the cross appeared for just a fraction of a second before its creator, with a burst of power, went on to the next flower on its route.

Canon EOS-1D X Mark II + 500mm f4 lens; 1.4x III extender; 1/5000 sec at f5.6; ISO 4000; Gitzo tripod + Jobu gimbal head.

Wildlife Photographer of the Year winners

The ice pool by Cristobal Serrano, Spain
Winner 2018, Creative Visions

On a cloudy day – perfect for revealing textures of ice – Cristobal scoured the Errera Channel on the west coast of the Antarctic Peninsula. The constant current through this relatively calm stretch of water carries icebergs of all shapes and sizes. These mighty chunks of frozen fresh water have broken off (calved) from glaciers, ice shelves or larger icebergs. Their beauty – towering above the water and looming even larger beneath – is familiar, but their impact from above, less so.

Selecting one that looked promising – about 40 metres (130 feet) long and rising up to 14 metres (46 feet) tall) – Cristobal launched his low-noise drone and flew it high over the top, so as not to disturb any wildlife that might be using it for resting. The drone’s fresh perspective revealed an ice carving, whittled by biting winds and polar seas. Warmer air had melted part of the surface to create a clear, heart-shaped pool, within the sweeping curves of ice. The sculpture was set off by the streamlined forms of a few crabeater seals, in dark shades following their summer moult, and simply framed by the deep water.

DJI Phantom 4 Pro Plus + 8.8–24mm f2.8–11 lens; 1/120 sec at f4.5; ISO 100.

Wildlife Photographer of the Year winners

Signature tree by Alejandro Prieto, Mexico.
Winner 2018, Wildlife Photojournalist Award: Story

A male jaguar sharpens his claws and scratches his signature into a tree on the edge of his mountain territory in the Sierra de Vallejo in Mexico’s western state of Nayarit. The boundary-post has been chosen with care – the tree has soft bark, allowing for deep scratch marks that are a clear warning, backed by pungent scent, not to trespass.

Alejandro set up his custom-built camera trap some 6 metres (20 feet) up the tree and returned every month to change the batteries. Eight months elapsed before the jaguar eventually returned to this corner of his realm to refresh his mark.

Jaguars need vast territories to have access to enough prey. But in Mexico, habitat is being lost at a rapid rate as forest is cleared for crops or livestock or for urban development, and much of what remains is fragmented. The loss of even a small area of habitat can cut a jaguar highway between one part of a territory and another and isolate the animal to such an extent that it cannot feed itself or find a mate.

Nikon D3300 + Sigma 10–20mm lens; 1/200 sec at f9; ISO 200; home-made waterproof camera box; two Nikon flashes + plexiglas tubes; Trailmaster infrared remote trigger.

Wildlife Photographer of the Year winners

Dream duel by Michel d’Oultremont, Belgium
Winner 2018, Rising Star Portfolio Award

As storm clouds gathered over the Ardennes forest in Belgium, Michel hid behind a tree under a camouflage net. It was the best spot for viewing any action on the ridge – a place he knew well – but he needed luck for all the elements to come together.

The thrilling sound of two red deer stags, roaring in competition over females, echoed through the trees, but infuriatingly the action was taking place further down the slope. Well matched, neither challenger was giving way, and the contest escalated into a noisy clash of antlers.

For years, Michel had wanted to picture this highlight of the rut in the dramatic light of dusk, but the stags were never in quite the right place at the right time. At last, the stags appeared on the ridge, antlers locked, silhouetted. Michel had time to capture the clash – through branches of the tree to create the atmosphere – before the light faded and he had to leave the fighters, still locked in battle.

Canon EOS 5D Mark IV + 400mm f2.8 lens + 2x extender; 1/400 sec at f8; ISO 400; Gitzo tripod + Uniqball head.

Articles: Digital Photography Review (dpreview.com)

 
Comments Off on Our favorite images from 2018’s Wildlife Photographer of the Year winners

Posted in Uncategorized


Focus on Autofocus – Achieving Sharp Images Every Time

25 Oct

Focus on Autofocus 1

Focus on autofocus – this article goes out to all my fellow focus-obsessed shooters who strive for consistently tack-sharp images no matter what the scene, subject matter, or lighting situation.

Have you ever walked away from a shoot feeling confident that you nailed every last shot only to discover, upon closer review, that the majority of your captures are slightly or significantly front or rear focused? If so, this article is most definitely for you!

My eyes have been drawn to and compelled by explicitly sharp, detailed, and descriptive imagery since I was a young man pouring over the works of photojournalists such as Gordon Parks, Diane Arbus, Elliot Erwitt, and Eugene Richards to name a few.

These photographers not only captured substantive and spectacular content (moments) but did so with a technical acumen that titillated my visual senses and sent chills down my spine. I wanted to create images just as clean and captivating as those I idolized.

Focus on Autofocus 2

Autofocus in the age of modern digital technology offers quick, responsive subject acquisition and focus, but that technology sometimes yields inconsistent and unreliable results when creating images in chaotic environments or adverse situations—and, surprisingly, sometimes even in ideal situations.

My intention with this article is to discuss autofocus (AF): how it works and the various AF modes and points that are available to help ensure more consistent focus even under the most challenging circumstances.

Autofocus systems are incredibly complex and providing an in-depth explanation of precisely how they work, would take far too long and lead us astray. So here’s a concise breakdown of the two types of passive autofocus modes.

Phase Detection

Focus on Autofocus 3

Phase detection is most common in DSLRs and employs what is known as a beam-splitter. The beam-splitter directs the light (the image) onto two different microsensors, thus creating two separate and identical images. These are aligned (brought into focus) automatically using the camera’s internal software.

If you’ve ever used an older film camera with manual focus lenses, you may recall how the image or scene would appear split in the center of the viewfinder, and focus was achieved by aligning the two misaligned images. Phase detection works this way.

Contrast Detection

Focus on Autofocus 4

Contrast detection is arguably more accurate than phase detection, especially when shooting subjects (portraits) close-up with a wide aperture (i.e., f/1.4–f/2.8). The technology behind it is less cumbersome (lightweight) and less expensive. We see contrast detection AF systems most commonly in smaller and lighter mirrorless cameras.

Phase detection is more robust and more expensive, but it is also more responsive and reliable with subjects that are in motion or moving erratically. The mechanics of contrast detection are much leaner, lightweight and less expensive, but this system is notably slower and less responsive than phase detection.

For this article, I focus (no pun intended) on DSLR systems since they remain—for the time being—the mainstay for fast-action, low-light photography (i.e., photojournalism, sports, wildlife, and wedding photography).

Focus on Autofocus 5

I’ve worked extensively with both Canon and Nikon systems (each has their strengths and weaknesses), but based on my personal experience Nikon prevails when it comes to fast, accurate focus acquisition under adverse low-light situations with subjects in motion.

I shoot mostly using available light, fixed lenses, and wide apertures—typically between f/1.4 and f.2.8. There is no margin for missed shots when it comes to capturing key moments for wedding clients.

I need speed and accuracy and strive for consistency. I need to be able to capture those decisive moments as they unfold, but I also want tack-sharp images. Nothing frustrates me more than capturing great content that is slightly out of focus.

I need my focus to land precisely where I want the viewer’s eye to arrive first. Typically, that focal point is the main subject present in the scene or that subject’s eyes if the image is more portrait-like (rather than a scene with multiple subjects).

The issue of precise and accurate focus becomes even more pronounced and problematic when focusing on subjects close to the lens or when using fast lenses with wide-open apertures. A thorough and comprehensive understanding of your camera’s autofocus modes and AF points prove to be paramount in these cases.

Focus on Autofocus 6

When capturing stationary or slow-moving subjects, I achieve the best results with AF-S. I use the camera’s center focus point, which is considered the most accurate and reliable AF point. I acquire and lock focus with the center AF point then quickly recompose and capture.

Today’s cameras come equipped with many focal points. Depending on which make and model of camera you’re using, you could choose from up to 153 points. AF points typically light up in red or green when the shutter-release button is halfway depressed.

Focusing Modes (for Both Nikon & Canon)

Focus on Autofocus 7

Autofocus Automatic (AF-A) Nikon | AI Focus AF Canon

In Autofocus Automatic (AF-A), the camera analyzes the scene and determines which AF point/s to use. Based on whether or not the subject is moving or stationary, it automatically switches between AF-S and AF-C to achieve focus.

Single Servo AF (AF-S) Nikon | One-shot AF Canon

In Single-Servo AF (AF-S), the selected AF point locks focus on the subject as long as the shutter release button remains partially depressed. Focus lock is typically indicated in the viewfinder by the illumination of a solid circle.

Once focus is acquired and locked, the scene is recomposed without losing focus on the chosen subject/s. This AF mode is ideal for subjects that are stationary.

Continuous Servo AF (AF-C) Nikon | AI Servo AF Canon

In Continuous Servo AF (AF-C) focus, the camera continues to focus (and adjust focus) on the selected AF point up until the moment the shutter is activated. This AF mode is ideal for subjects that are moving.

The AF Area Mode (AF points)

In addition to these focusing modes, Nikon and Canon DSLRs come equipped with numerous AF points and AF area mode options.

Focus on Autofocus 8

Nikon AF Area Modes

Nikon allows you to choose the following AF area mode options:

Single Point – The photographer determines a single AF point manually, and the camera focuses on the subject in the selected AF point, working best with stationary subjects.

Dynamic Area – The photographer determines the AF point manually, as with Single Point AF (above). However, if the subject moves and leaves the selected AF point area, the camera adjusts accordingly based on surrounding AF points and refocuses accordingly. This setting works best with subjects that are moving unpredictably.

Auto – The camera determines which AF point contains the subject and focuses automatically.

3D – The photographer determines the AF point manually. Once the shutter release button is partially depressed, and the camera achieves focus, the photographer recomposes the scene, and the camera automatically shifts to a new AF point to maintain focus for the selected subject.

Canon AF Area Modes

Canon’s AF Area Mode options are very similar to Nikon’s but are predicated more so on groupings of AF points to achieve focus.

AF Point Expansion – This mode allows you to select a primary AF point accompanied by a surrounding 4 or 8 additional AF points for subjects that are moving or don’t offer much contrast for quick focus acquisition.

Zone AF – This provides a cluster of either 9 or 12 moveable AF point groupings to achieve focus on the nearest subject that falls within in the zone you’ve selected.

Auto AF Point Selection – In this mode, all AF points are active and track focus much like Nikon’s 3D AF mode.

If you’re anything like me, options can be exciting but also incredibly overwhelming. When reading camera manuals or highly technical tutorials, I want to ball up in the fetal position and go to my happy place.

So, I urge you to take a deep breath and read on as I speak more prosaically about how to synthesize and integrate this information for the practical application and use in the field.

I’m primarily a portrait and wedding photographer whose obsession with making sharp images has led to a great deal of experimentation throughout my 20-year career. I have worked with every pro DSLR body and lens combination imaginable and what I’m about to tell you isn’t a secret; it’s an affirmation.

Lens Calibration

First, I have achieved my best focus and image sharpness results by using fixed proprietary lenses. Proper lens calibration is also instrumental in achieving optimal results with DSLRs and proprietary lens combinations – both fixed and zooms. Lens calibration is the very first step you must take to achieve consistency and accuracy when it comes to focus.

Nikon offers AF fine-tuning with some of their newer or newly released DSLR pro bodies, and I can’t rave enough about what a valuable tool this is. Canon also allows its shooters to fine-tune and calibrate their pro lenses with their pro bodies, but for right now it remains a manual process.

If you’re interested in learning more about Nikon’s AF fine-tuning, please visit https://fstoppers.com/gear/how-get-most-nikons-auto-af-fine-tune-194063. This video provides a great tutorial that enables you to harness the power of this awesome feature!

Focus on Autofocus 9

Know that no camera body lens combination is ever a perfect match and that all body/lens combinations can benefit from calibrating your lenses. Whether you have a newer Nikon that allows you to calibrate automatically, or you own a Canon system and have to perform lens calibration manually, this is the genesis of consistently tack-sharp imagery.

My experimentation with AF points and AF modes is equally extensive. I have come to find that center point focus, and Single-Servo AF (AF-S) delivers more consistently for stationary or slow-moving objects than any other available combination of AF point and focusing mode.

I prefer to use the AF center point to achieve and lock focus, then recompose my scene for final image capture, rather than using AF points located nearer to the edge of the viewfinder. I haven’t always shot this way but discovered through comparison that this method was quicker and more reliable and that the focus was also far more accurate shot after shot.

Your camera’s AF points and focusing modes rely heavily upon contrasts present in the scene. The AF center point discerns contrast and thus achieves focus faster and more accurately than points closer to the edge of the viewfinder or image. Here contrast, clarity, and brightness get stifled by vignetting and optical aberrations that occur in all lenses—especially toward their edges and corners.

Additionally, the AF center points are cross-type focusing points, which are capable of focusing on lines in two directions, horizontally and vertically.

Focusing on Moving Subjects

Focus on Autofocus 10

When focusing for moving subjects, I have found that using Continuous-Servo AF (AF-C) in combination with Dynamic Area AF mode (Nikon) or Zone AF (Canon) delivers the best, most consistent results even in extreme low-lighting conditions.

Remember, Dynamic and Zone AF modes allow for the selection of AF point groupings ranging from 4-8 point groups to maintain constant focus tracking for subjects in motion.

When I’m a bit further away from subjects that are moving, I find that shooting in Continuous-Servo AF (AF-C) in combination with 3D area AF mode (Nikon) or Auto AF (Canon) produces the most consistent results.

For example, when I’m shooting the bride and groom’s first dance, 3D AF-C is my go-to, as it allows me to tell the camera which subject/s I want in focus and maintain that focus continuously as the subject/s move within the frame or I recompose the scene myself.

More on shooting moving subjects here.

Shooting Portraits

I think the most significant focus challenges come with shooting portraits or close-up details with longer lenses (50mm or greater) at apertures of f/1.2–f/2.8. This is where the pros separate from the amateurs.

Many photographers want to achieve the striking visual effect (bokeh) we see when shooting a subject wide open (f/1.2 – f/2.8) and nailing focus on the eyes. In these instances, there is no margin for error. Sometimes you see just a centimeter of sharpness—and if you miss it, the image is unusable (at least in my opinion). It’s a significant risk with huge rewards.

I’m often asked if there is a trick to nailing eye sharpness in portraits shot at such shallow depths of field. The ‘trick’ is to know how all of your equipment works. Know how each lens works with the body to which it’s paired, and which AF point or focusing mode produces best results when shooting shallow for that particular subject or scene.

Focus on Autofocus 11

For me, the reward is only worth the risk if I possess the technical acumen and confidence to achieve the desired result at least 8 out of 10 times (that’s my standard).

Consider the following: When shooting at 85mm set to f/1.8 with a subject to camera distance of 1 meter, you only have around a 1.3cm depth of field. If you use the center AF point in AF-S to set, lock focus, and recompose before capturing the image, it is highly unlikely your razor thin plane of focus will land where you initially locked focus.

It’s basic trigonometry.

The slight change in camera angle from recomposing (or even breathing), drastically affects (shifts) the plane of focus, resulting in the cheek, nose, ears, or chin (rather than the eyes) being in focus.

So unless you want the subject’s eyes positioned dead-center of the frame in all the portraits you shoot with a shallow aperture, you’ll need a more creative and effective strategy.

In my experience, using Continuous Servo AF (AF-C) and selecting a group of 4 to 6 Dynamic AF points near the eye is the best way to achieve eye sharpness in this precarious scenario.

However, I have found shooting in Continuous Frame or High-Speed mode, and manually making micro adjustments to the focus while the shutter is activated, is the only surefire way you’ll capture at least 1 or 2 frames where eyes are tack-sharp.

Conclusion

Autofocus is a powerful and convenient tool that has helped evolve and elevate photography to heights I would have never imagined 20 years ago.

However, with all things mechanical and humanmade, there exists weakness and limitations. That aside, there are no limitations when we speak of imagination or the creative wills that enable us—and compel us—to push those tools well beyond their limits to achieve optimal and desired results; something only possible when we possess the proper knowledge of how those tools work.

As I stated earlier in this article, Autofocus and AF systems are incredibly complex. It’s a topic of great interest and value to many photographers – from novices to seasoned pros alike.

It’s also a rapidly evolving technology, which means that what we know today may not apply tomorrow. Many variables and factors impact and affect AF accuracy and consistency – it’s a multifarious topic for sure. One article alone could never address all of these facets.

I hope that with this article I’ve been able to break the ice and provide useful information that inspires you to hone your skills further. We as photographers rely upon technology to articulate our vision and voices, so it’s not only crucial but also incumbent upon us to understand the technology – so that we may advance our artistry.

That said, I’m looking forward to writing more articles on this topic and carrying forward this conversation so that we may examine more closely and improve our collective focus.


The post Focus on Autofocus – Achieving Sharp Images Every Time appeared first on Digital Photography School.


Digital Photography School

 
Comments Off on Focus on Autofocus – Achieving Sharp Images Every Time

Posted in Photography


These are the first portfolio images captured on Kodak’s revived Ektachrome E100 film

21 Oct
“Here, cotton candy-hued skies are reflected in Rockland, Maine’s calm harbor, speckled with ferries, yachts, yawls and mighty windjammers, such as the red-striped Victory Chimes, America’s largest schooner readying its sailors for a wind blown journey across Penobscot Bay,” Guttman explained on Kodak’s Instagram.

Ahead of its global distribution late last month, Kodak released its new Ektachrome 100 film to select photographers for beta testing. One of those photographers was award-winning photographer Peter Guttman, who was given access to the Kodak Professional Instagram account starting on September 12. Guttman used the account to share several images captured with the new Ektachrome E100 film.

Kodak bills its resurrected Ektachrome E100 as an extremely fine grain film that produces vibrant colors with low contrast and a neutral tonal scale. Guttman put the film to the test in a variety of scenes, capturing photos of a colorful sunset, bright daylight, high-contrast environments, and more.

$ (document).ready(function() { SampleGalleryV2({“containerId”:”embeddedSampleGallery_0657114780″,”galleryId”:”0657114780″,”isEmbeddedWidget”:true,”selectedImageIndex”:0,”isMobile”:false}) });

The new Kodak Ektachrome E100 film is available to preorder now from B&H Photo, Adorama, and other online retailers for $ 12.99. The film is listed as back-ordered with an availability date of December 2018. You can find out more information on Guttman by reading through his interview with YAG University


Credit: Photographs by Peter Guttman, used with permission

Articles: Digital Photography Review (dpreview.com)

 
Comments Off on These are the first portfolio images captured on Kodak’s revived Ektachrome E100 film

Posted in Uncategorized


How to Create Fine Art Images from the Mundane

02 Oct

It’s easy to feel defeated before you’ve even started when it comes to creating fine art images. A quick search of any of the popular photography sites brings up beautiful and humbling images from the far corners of the world.

However, you don’t need a round-the-world ticket and a six-month career break to shoot beautiful fine art photography. You can do this at home in your living room with minimal expenses if you’re prepared to think a little outside the box!

Physalis color duo - How to Create Fine Art Images from the Mundane

What does fine art mean anyway?

Fine art photography is one of those terms that is tricky to pin down. There are two ways that the term “fine art” is usually used so it’s important not to get confused between the two.

The first is usually in the context of museums and galleries. Fine art in European academic traditions is most often used to describe a work that was created primarily for beauty and has no other function. It is the opposite of “applied art” which describes everyday objects (such as ceramics) which have been decorated to make them more aesthetically pleasing.

When people talk about fine art photography though, they tend to be talking about a style of photography rather than a method of production. In this context, it’s usually art that was created for art’s sake. An image that was always designed to be primarily enjoyed for its beauty rather than its subject matter.

Sometimes there are lighting and processing styles that maybe associated with the term “fine art photography” but fashions and trends come and go, even in the world of art!

Physalis colour triptych

For a more in-depth look at fine art photography read: The dPS Ultimate Guide to Fine Art Photography

Flat Perspectives

Flat lay images have been gaining popularity for a while now. If you scroll through Instagram or Pinterest you’ll almost certainly find them in your feed. But most of the flat lay images out there on social media are heavily focussed on creating a real commercial vibe that sells a product or an experience.

Even those photographers not selling anything have often adopted this commercial style for their personal feeds. While there’s nothing wrong with this approach at all, there is room for a different interpretation of this style of an image by creative photographers who want to shoot fine art.

Searching for Inspiration

It’s always a good idea to start with a vision of how your final shots will look. A close study of the detail and texture of an object was the idea that I had in mind for this image. There’s a real trend in interior design right now for groups of artfully curated objects placed creatively on walls and it was this trend that I wanted to explore.

These images are also heavily inspired by the work of Edward Weston over the past few years, someone who has been inspiring me in my work for years.

Weston used photography to explore natural forms. He strived to capture details of the reality around him with real precision. Between 1927-30 he would shoot a portfolio of images based around peppers, shells, and cabbages. Through these images, Weston translated reality into something much more abstracted and Modernism-inspired.

Physalis - How to Create Fine Art Images from the Mundane

A trip to the supermarket was in the cards as a homage to Weston’s visionary images of food. I auditioned pomegranates, gnarly heirloom tomatoes, and unusually long, thin peppers. But it was finding a bag of physalis (sometimes also called ground cherries or Chinese Lanterns) on the top shelf that really stoked my imagination.

Shooting Techniques

Lighting is everything when it comes to creating close photographic studies of objects. I am lucky enough to have an east-facing bay window in my studio. Around about early afternoon, it has the most perfect light for shooting really natural looking fine art images. You could create similar images using any large window on a bright overcast day.

Place a background onto your shooting table first – I selected a faux-wooden finish – and then set your camera up on a tripod looking directly down at the table (use a spirit level here if you have one).

If you don’t have a tripod that can flip its central column and tilt it horizontally you’ll want to purchase an accessory arm in order to shoot flat lays. Getting the camera directly above the subject without the tripod’s legs getting in the way is crucial to this style.

Physalis bw triptych - How to Create Fine Art Images from the Mundane

Finding the Light

There’s a theory that humans read images in a similar way to how they read written text. For me, because English is my primary language, I read from left to right. That means when I shoot I almost always start with the light coming from the left and the shadows on the right as default.

This way your viewer would be reading the image from the light to dark in the same way that they would read a book. It should feel very natural and easy.

If the light isn’t right for the image then wait until later in the day or even another day altogether. Shooting with available light isn’t always the quickest process but it can be very rewarding. When you’re using available light always have black and white cards on hand to bounce or block the light. Just because it’s not coming from a studio light, doesn’t mean you can’t modify it.

Controlling the Camera, Creating Compositions

One of the best things about the Fuji range of cameras is the iPhone app that goes with them. Although the screen on some cameras, like my Fuji, tilt so that you can see what you’re shooting – when you’re set up for flat lay shots it can still be a little awkward. The app gets around this problem and allows you to see exactly what you’re doing in real time.

Physalis fuji app - How to Create Fine Art Images from the Mundane

When you’re shooting overhead flat lay images, a smart thing to do is to connect the phone and camera, start the app, and then place it on the table next to the arrangement of objects (but out of the shot). That way you can watch the scene as you move objects around to get the perfect composition before you push the shutter button.

It’s an extraordinarily useful feature to have the images transmit live so that you can watch them as you work. It really allows you to perfect your styling in a much shorter time than it might otherwise take.

Look for More Images

It was too easy to be content with the first flat lay group of physalis that I shot, but I knew that there were more images to be had of such a beautifully delicate subject. A physalis is quite small so I grabbed my old DSLR and its macro lens and begun the process all over again of finding a shot.

Changing lenses, especially if you shoot with primes, can really help you find another great image if you’re stuck for ideas or you think you’ve already got “the one.”

An even better image emerged – a single lone physalis still encased in its delicate shell! I shot this image by getting myself between the window and the shooting table and placing a black card behind the fruit.

Physalis05

The soft, beautiful light made the semitransparent physalis appear to glow and I knew at once I had shot an image I’d be happy to print large on my wall. Changing your perspective and getting down low or up high can also stimulate new ideas when it comes to shooting the same subject.

color or Black and White?

Physalis bw color - How to Create Fine Art Images from the Mundane

I once interviewed a great boudoir photographer who was very candid about why people spent money with her. She said it was because she gave them images that they couldn’t easily create at home – and she did that by color grading every image.

It is relatively easy nowadays with modern cameras and phones to get an image that’s in focus with colors which are true to life. Auto settings will get you pretty close most of the time. In that respect, it’s also much harder to make an image stand out from the crowd.

If everyone can shoot images that look like what’s in front of you then you need to go beyond image selection, focus, and composition to get a truly unique image.

Physalis color lightroom - How to Create Fine Art Images from the Mundane

On the color images of the physalis the saturation was dropped, and then blues were added to the shadows and a warm tan color to the highlights using the split toning panel in Lightroom.

For the black and whites, I experimented to find settings that created a deep contrast between the subject and the background, adding some clarity and darkening the shadows. For some of the images, the background texture was removed altogether by selectively decreasing the exposure, thereby referencing Edward Weston’s images that are usually shot on dark backgrounds.

Seeing Art Everywhere

With some practice, you can start to see potential in every object to become a subject for a piece of photographic fine art images. Many artists have preoccupied themselves with close studies of the world around them.

Edward Weston, the painters of The Pre-Raphaelite Brotherhood, even Michelangelo all produced bodies of work that reflected on reality and how best to translate that into art.

You don’t need expensive trips around the world to exotic places or whole teams of people to create fine art photography. You just need a keen eye, your camera, and your kitchen table.

The post How to Create Fine Art Images from the Mundane appeared first on Digital Photography School.


Digital Photography School

 
Comments Off on How to Create Fine Art Images from the Mundane

Posted in Photography


Five Ways to Take Stunningly Sharp Images

25 Sep

You can take sharp images. You can take them consistently, quickly, efficiently. However, you just may not realize it yet.

sharp images sanderling reflection

The Problem

The thing is, getting acceptably sharp images is a common problem among photographers. It’s something that I myself often struggled with getting consistently. I can’t tell you the number of times I used to come home, only to find my memory cards full of blurry or out of focus images.

I used to think the problem was my camera optics. In order to take pin-sharp images, I thought I needed a top of the line camera and lens. But it turns out that, when it comes to sharpness, the problem is generally the photographer (or the choices that the photographer makes).

And fortunately, that problem is very easy to fix.

sharp images purple flower

In this tutorial, you’ll learn five ways that you can get sharp images. And then, next time you go out shooting, you’ll consistently take pin-sharp images. Sound good? Read on to find out how.

sharp images tulip abstract

1. Use a fast enough shutter speed

When you press the shutter button on your camera, the internal sensor is briefly exposed to the light. This is how the camera actually captures an image.

The length of time that the sensor is exposed to the light is called the shutter speed.

sharp images yellow flower

Depending on your camera settings, the sensor might be exposed to the light for a long period of time (a slow shutter speed) or a short period of time (a fast shutter speed).

One of the main reasons your images are coming back blurry is that you’re not using a fast enough shutter speed. If you use a slow shutter speed, then your camera sensor remains open to the light for too long. It captures too much. That is, it captures motion.

But if you want to freeze the motion and capture only a sliver of a second so that everything is crystal clear, frozen. To do this, you need a fast shutter speed.

sharp images white ibis

Fortunately, it’s not difficult to do this. In your camera’s settings, you can generally increase the shutter speed. Or you can use the Action (Sports) setting, which many cameras have.

Even if your subject isn’t moving, your hands might not be rock-steady. This causes camera shake which in turn causes image blur.

A faster shutter speed will help fix this.

2. Tuck in your elbows

A shutter speed increase solves many issues with blurry photographs. But what if you can’t use a fast shutter speed?

photography without tripod golden retriever sunset

When the light is low, for instance, when you’re indoors or when you’re outside at night – a fast shutter speed lets in too little light, causing the image to be dark (we call this underexposure). Your camera will compensate for the low light by keeping the shutter open for longer, exposing the sensor to more light.

This is when it becomes important to eliminate camera shake completely. If the camera shakes, your image will come out blurred. So how do you stop your camera from shaking?

The first way that I’m going to talk about is simple: You tuck in your elbows. Don’t shoot with your arms out. Instead, firmly grip your camera while pulling your elbows in. This will serve to stabilize the camera and reduce camera shake.

sharp images woman in window

I tucked in my elbows in order to get a sharp shot of my model in low light.

3. Stabilize your body against a wall (or the ground!)

Sometimes, tucking in your elbows isn’t enough. If the light is really low, you may need to take more drastic measures to reduce camera shake.

One big tip is to stabilize your body against a feature of the landscape, something solid.

sharp images reddish egret

When photographing birds, I often stabilize my elbows against the ground, ensuring a sharper image. If you’re a street photographer, for instance, you can search for walls to lean against. If you’re a landscape photographer, you can hold onto a rock or tree.

It also helps to get down on the ground. You can kneel and stabilize your arms on your knee. Or you can get down on your stomach and use the grass, concrete or dirt as a stabilizer for your camera.

Trust me, it works!

4. Use a tripod

I’ve been talking a lot about stabilizing your camera, and the ways I’ve suggested will generally work well, especially if you’re in a pinch. But there is a more dedicated solution – use a tripod.

With a good tripod, you can completely eliminate camera shake. This will do wonders for keeping your images sharp.

sharp images ann arbor nickel's arcade

I used a tripod to capture this image of a musician at night.

There are a few downsides to using a tripod, however. The first is that you lose flexibility. It takes time to set up a new composition when you’re using a tripod, time that you might not want to spend. This is especially true if you’re photographing in a fast-paced atmosphere (e.g., portraiture or events).

The second downside is that good, solid tripods are expensive, especially if you want one that’s lightweight. Cheaper tripods may seem like a bargain, but they often don’t do the job well, or at all and replacing them costs more than buying one good one in the first place.

So be careful before choosing to invest in a good solid tripod.

5. Use a Shorter Lens

I have one more recommendation for eliminating blurry photographs, that is to use a shorter lens.

This is for a few reasons, but I’ll focus on the simplest one. A longer lens is harder to keep steady. It destabilizes the camera (and the image is magnified), and will, therefore, cause camera shake.

sharp images golden retriever

I used a wide-angle lens to photograph this golden retriever as the sun dipped below the horizon.

Hence, this tip is short and sweet. Especially when shooting in low light, put away your longer lenses and your telephoto zooms. Bring out your wide-angle and portrait lenses, ones that you can easily hold steady.

That’s how you’ll take sharp images.

Conclusion

Capturing consistently sharp images may have seemed daunting, but I hope that you now realize the truth. Getting sharp images is easy!

sharp images cosmos

I urge you to get out and try these tips now.

  1. Use a fast shutter speed.
  2. Tuck in your elbows.
  3. Stabilize your body.
  4. If you want, invest in a tripod.
  5. Use a wider lens.

And admire those crystal clear images!

Do you have any other tips for taking sharper images? Please share them in the comments below.

sharp images wilson's plover

The post Five Ways to Take Stunningly Sharp Images appeared first on Digital Photography School.


Digital Photography School

 
Comments Off on Five Ways to Take Stunningly Sharp Images

Posted in Photography