RSS
 

Posts Tagged ‘Identify’

Google Images launches ‘Licensable’ badge, making it easier for users to identify creators and license images

01 Sep

In collaboration with Shutterstock, Google has announced the launch of licensable images on Google Images. This feature entered beta testing earlier this year and is now fully launched and integrated into Google Images, hopefully benefiting photographers. With the new ‘Licensable’ badge on Google Image search results, viewers can immediately identify which images can be licensed for varying uses and better understand the usage rights of individual images.

Shutterstock worked closely with Google to ensure the licensable images feature works effectively. Of the new features, Shutterstock’s VP of Content Operations, Paul Brennan, says:

‘Google Images’ new features help both image creators and image consumers by bringing visibility to how creators’ content can be licensed properly. We are pleased to have worked closely with Google on this feature, by advocating for protections that result in fair compensation for our global community of over 1 million contributors. In developing this feature, Google has clearly demonstrated its commitment to supporting the content creation ecosystem.’

When an image has specified license information on a website, the image can be displayed with the Licensable badge on image thumbnails in Google Images. This badge indicates to viewers that license information is available for the image and then provides a link directly to the license in the image viewer. From here, someone can learn how the image can be licensed and used.

Here you can see the ‘Licensable’ badge on the bottom left corner of images. When clicking on an image and accessing the image viewer, Google Images displays the creator, where the image can be licensed and also license details for the selected image. Image credit: Google

For Google to be able to discover and index images on a website, the images must be accessible without an account or by logging in. You must also follow Google’s Webmaster Guidelines and Google Images Best Practices. In addition to these existing steps, the new Licensable badge requires structured data or IPTC photo metadata to follow Google’s new guidelines. You can learn more about these requirements here.

Close-up image of the new image viewer in Google Images. Click to view larger. Image credit: Google

With the introduction of the Licensable badge, search results in Google Images can now be filtered to only display images that include licensing. Further, the dropdown Usage Rights filter has been streamlined, such that it now includes only options for ‘All’, ‘Creative Commons licenses’ and ‘Commercial & other licenses’.

It has long been far too easy for people to search for images on Google and use them without a license or permissions. Today’s changes to Google Images will hopefully reduce image misuse. At the very least, assuming a photographer has taken the steps to ensure their images are properly badged and filtered on Google Images, it will now be much easier for Google Images users to view creator information and licensing requirements.

Articles: Digital Photography Review (dpreview.com)

 
Comments Off on Google Images launches ‘Licensable’ badge, making it easier for users to identify creators and license images

Posted in Uncategorized


DJI developing app that will allow anyone to identify a drone with their smartphone

15 Nov

Chinese company DJI, the world’s leading drone manufacturer, is developing technology that will allow anyone with a WiFi-enabled smartphone to access information on unmanned aerial vehicles flying nearby.

The industry, in general, has been under scrutiny following high profile disruptions, including incidents at Gatwick and Heathrow airports that left flights grounded for days. In a bid for more transparency, DJI wants the public to be able to access basic info on a drone including its remote ID, altitude, speed, and location. The app will be available sometime in 2020, pending regulatory approval.

‘Remote ID functions as an electronic license plate for drones, allowing anyone who is curious about a drone in the sky to learn more about what it’s doing,’ said Brendan Schulman, DJI Vice President of Policy & Legal Affairs. ‘Around the world, aviation authorities have said remote ID is the key to allowing more complex drone use, and to solving concerns about safety and security. DJI’s direct drone-to-phone remote ID shows we’re committed to providing a solution in a way that is instantly usable worldwide without any additional infrastructure.’

The direct drone-to-phone remote ID system was first demoed to participants this week at a park in Montreal, Canada, during the International Civil Aviation Organization’s third annual Drone Enable conference. Smartphones from Samsung, Google, and Xiaomi received Wi-Fi Aware signals from DJI Mavic Air and DJI Mavic 2 Enterprise drones. The app, in its current form, is able to identify drones operating within a 1 kilometer (0.62 miles) range.

DJI currently holds over 70% of market share worldwide for consumer-grade drones. Global spending on consumer-grade unmanned aerial vehicles is expected to reach $ 12.3 billion in 2019, up from $ 9 billion the previous year, according to research firm IDC. As demand continues to increase, aviation regulators including the Federal Aviation Administration (FAA) and European Union Aviation Safety Agency (EASA) are pushing for a requirement on remote ID systems for drones. The FAA is on track to complete a mandatory proposal by year’s end, but rulemaking will take another year to complete. EASA will start imposing requirements by June 2020.

‘As more drones take to the skies every day, remote ID addresses the public’s interest in understanding what’s happening in the airspace,’ said Christian Struwe, DJI Policy Director, Europe. ‘DJI’s drone-to-phone implementation helps accomplish that by allowing drone pilots to broadcast a simple description of their flights, so anyone viewing the smartphone app can understand that they are inspecting a roof, surveying a construction site, or performing another beneficial task with a drone.’

Some remote pilots are already skeptical of allowing anyone to access information about their flights.

DJI developed AeroScope back in 2017 to address similar concerns. It’s a much more powerful system, offering a range of up to several miles away. While other drone manufacturers rejected the system, it’s being used by prisons, stadiums, airports, and even car dealerships to detect any unauthorized drone usage. Now, they want to eliminate the requirement for adding telecommunications equipment, subscribing to an ID service provider, connecting to a cell tower, or buying a data plan in order to fly safely and legally. DJI plans to make their latest drone-to-phone technology available to competing manufacturers, though a list hasn’t materialized yet.

Articles: Digital Photography Review (dpreview.com)

 
Comments Off on DJI developing app that will allow anyone to identify a drone with their smartphone

Posted in Uncategorized


Google lens can now identify pet breeds, create pet photo books and compile pet movies

13 Apr

Google first introduced Google Lens with the Pixel 2 smartphone. The feature uses Artificial Intelligence to power its visual recognition algorithms and provide information about whatever your smartphone’s camera is pointed at, and recently it was made available on iOS devices and integrated in the Google Photos app.

With Google Lens now available to a very large customer base many more users will be able to enjoy some new functions. The app is now capable of not just identifying the pet you are pointing the camera at, but also the exact breed – pretty impressive. This works for cats and dogs, and reportedly also some other kinds of animals. Some additional information about the breed is provided as well.

In addition, Google Photos can now automatically create a photo book starring your pet. Again, artificial intelligence is used to find the best pictures. If you look what you see and are based in the US or Canada, all you need to do is decide if you prefer a hardcover or softcover and hit the order button.

There is also a movie option which in a similar way as the photo book feature. In the Assistant tab in Google Photos you’ll find a movie button. You’ll then be able to choose the “Meow Movie” or “Doggie Movie” option and select your pet. The best photos of your pet are then compiled into a movie, accompanied by pet-themed music.

Articles: Digital Photography Review (dpreview.com)

 
Comments Off on Google lens can now identify pet breeds, create pet photo books and compile pet movies

Posted in Uncategorized


AI-powered Google Lens can identify types of flowers, give info about restaurants

19 May

At Google I/O 2017 the company showed off its new Google Lens technology. This AI-powered capability uses visual recognition to provide information about whatever your smartphone’s camera is pointed at. Examples given by the company include identifying a type of flower or providing reviews and other information about a restaurant.

You will also be able to point the camera at a concert sign and have the opportunity to buy tickets, or get connected to a Wi-Fi network by aiming at the router’s ID ‘setting sticker.’

Google Lens will be incorporated into the company’s Photos and Assistant apps, but specific release dates aren’t given.

Articles: Digital Photography Review (dpreview.com)

 
Comments Off on AI-powered Google Lens can identify types of flowers, give info about restaurants

Posted in Uncategorized


How to Identify Three Common Image Problems and Fix Them in Lightroom

06 Dec

I hear it over and over, “I have a nice camera but my pictures just don’t come out as good as I expect.”

What ensues is an interrogation first about equipment selection, settings, and general technique. More often than not when we finally get down to the nitty gritty, the fact is that many people not only have a difficult time identifying what’s wrong with their photos, let alone determining how to prevent it, or fix it in post-processing.

jumping through hoops

Common problems that plague your images might be able to be fixed, but you might have to jump through some hoops to do it.

Although there are two sides to this topic (one side being nailing the shot in-camera), we are going to take a look at some common image problems that might be plaguing your photos, and ways to fix them in post-processing. This may be helpful if you want to revisit images you have in your library that may be salvageable.

I’ll be referring to Lightroom (LR) as the post-processing software, although the general adjustments can be adapted for use in other software.

#1 Washed Out

The term washed out refers to a photo which seems to have been shot through a translucent fabric. There is a uniform haze which reduces color saturation, sharpness, clarity, and contrast. There are several factors that can contribute to your pictures being washed out. It could be anything from poor quality lenses, to ghosting from shooting directly into a light source (lens flare).

The good news is that with the features and power that we have in LR, this problem can often be overcome.

Let’s look at this photo of a beautiful wave, shot early in the morning. It was shot at 200mm with a 2x teleconverter (an effective focal length of 400mm). Teleconverters increase focal length, but are notorious for eating light, and reducing contrast and sharpness.

washed out image

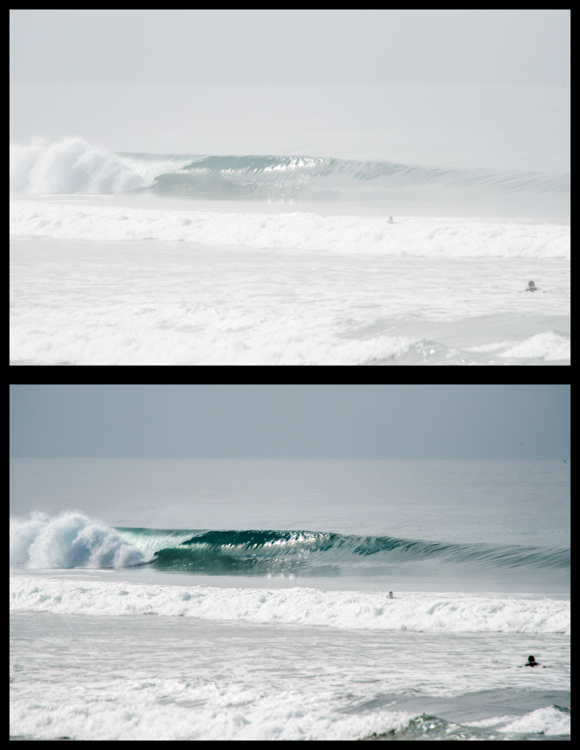
Although teleconverters can wreak havoc on your images, all is not lost.

As you can see, the original shot is not very appealing. In an attempt to bring it back from the brink of unacceptability, I have made the following adjustments:

Basics panel

  • Contrast increased (+)
  • Highlights decreased (-)
  • Shadows decreased (-)
  • Whites increased (+)
  • Blacks decreased (-)
  • Clarity increased (+)
  • Vibrance increased (+)
  • Saturation increased slightly *+)

Tone Curve panel

  • Lights decreased
  • Darks decreased
  • Shadows increased

The trick here is to go back and forth between the different sliders that control darks and lights. For example, I will adjust the Highlights and Whites sliders, go to the Tone Curve panel and adjust the Highlights and Lights, then return to the Highlights and Whites again to fine tune how I want that end of the spectrum to look.

#2 Color or Tint

In my opinion, this is one of the strongest arguments for shooting in RAW format. Shooting in RAW allows you way more control correcting White Balance in post-processing, opposed to other file formats – and incorrect White Balance is the primary cause of off-colored images, or ones with a color tint.

If you haven’t developed an eye for identifying this problem, you might miss it. I see many really nice photos that have a slight tint, which is unintentional. The key is to look at areas of the image which are a neutral color, or white – this is where it is easiest to notice the off-color tint. Note that editing on a monitor which is not color calibrated may limit your ability to achieve correct White Balance.

incorrect white balance and tint

Sometimes noticing if an image has incorrect White Balance, or a color tint, can be tricky. I used LR’s White Balance eye dropper tool where the red square is (top image) – it got pretty close, but still a bit too magenta.

The first line of defence is to give LR’s Auto White Balance tool a shot. I find it to be somewhat inaccurate, but a good starting point nonetheless. Once activating the eye dropper tool, a pop-up window will show a magnified view to allow you to select pixels as close to a neutral color as possible.

From this point, you can use the White Balance and Tint sliders to fine tune the image. If there are people in the photo, your goal should be making the skin tones look as natural, and pleasing as possible.

#3 Too Much Variation in Contrast

Being confronted with a drastic contrast range is one of the most common problems you are likely to face in your shooting. After all, this is why many photographers are equipped with a polarizing filter, and why new camera models strive for an expanded dynamic range.

Luckily, you are not stuck with the image that you download onto your computer. If you are shooting in RAW there is a lot of information about details, color, etc., which you can exploit in post-processing.

Let’s take a look at this photo I snapped from inside a bookstore. It was pretty dark inside with the midday sun shining outside the window. Sure, I could have shot bracketed photos to merge into an HDR (high dynamic range) image, used a flash to balance the dark interior with the lighter exterior, or used a polarizer to darken the window portion of the scene. But I only had my camera with one lens, just grabbing some snapshots while out and about for the afternoon, so I didn’t have the means.

high contrast image

The camera struggled with this high contrast scene, but a little work in LR breathed new life into it.

So to what extent can this image be salvaged?

As you can see, the camera actually captured a lot of information, and it was just a matter of telling LR what to do with it. Here is a list of changes made to this image to give you an idea of how to do this yourself:

Basics panel

  • Contrast decreased slightly (-)
  • Highlights decreased (-)
  • Shadows increased (+)
  • Whites decreased (-)
  • Blacks decreased (-)
  • Clarity increased (+)
  • Vibrance increased slightly (+)
  • Saturation increased slightly (+)

Tone Curve panel

  • Highlights decreased
  • Lights decreased
  • Darks increased
  • Shadows decreased

Lastly, I used the Adjustment Brush to mask off the window portion and made these adjustments:

  • Exposure decreased (-)
  • Contrast increased (+)
  • Highlights increased (+)
  • Shadows decreased (-)
  • Clarity increased (+)

Conclusion

Of course, there are a host of other problems you can run into while out shooting, but these are a few of the most common you’re most likely to encounter. Don’t overlook the fact that you should try and get the best image possible while out in the field. Although editing software is very powerful, you will get best results when you don’t have to push the limitations of your editing software.

Hopefully this article has given you some guidance on how to salvage images that you may once have considered lost. Show us some examples of photos that you have saved in the comments below.

googletag.cmd.push(function() {
tablet_slots.push( googletag.defineSlot( “/1005424/_dPSv4_tab-all-article-bottom_(300×250)”, [300, 250], “pb-ad-78623” ).addService( googletag.pubads() ) ); } );

googletag.cmd.push(function() {
mobile_slots.push( googletag.defineSlot( “/1005424/_dPSv4_mob-all-article-bottom_(300×250)”, [300, 250], “pb-ad-78158” ).addService( googletag.pubads() ) ); } );

The post How to Identify Three Common Image Problems and Fix Them in Lightroom by Jeremie Schatz appeared first on Digital Photography School.


Digital Photography School

 
Comments Off on How to Identify Three Common Image Problems and Fix Them in Lightroom

Posted in Photography


Tinkernut – Tinkernut – Identify Faked Photos

06 Nov

Want to know if a photo has been faked in Photoshop? Here are some tips to help you find out the truth. Links used in this video: www.fotoforensics.com
Video Rating: 4 / 5

Best-selling Photoshop & photography book author, Scott Kelby, goes over his personal workflow for retouching photographs using Lightroom, Photoshop, and a Wacom tablet. Scott also shares his Wacom settings and retouch workflow from start to finish! Learn more about Scott’s association, NAPP – www.PhotoshopUser.com Get Scott’s latest book on retouching photos www.kelbytraining.com

 
Comments Off on Tinkernut – Tinkernut – Identify Faked Photos

Posted in Photography Videos