RSS
 

Posts Tagged ‘Healing’

Capture One releases Nikon-specific version, also adds improved clone and healing brushes

18 May

Earlier this month, Capture One teased a variety of new features in an upcoming free update to Capture One 20. Today, this free update has been released to all existing Capture One 20 users. Further, Capture One has released a new dedicated version of their software specifically for Nikon users, Capture One for Nikon.

The new Nikon version of Capture One follows the same pattern as existing Fujifilm and Sony versions, meaning that the software will only work with files from Nikon cameras. Profiles for each supported Nikon camera have been specifically built for Capture One by the software team in Denmark using an exhaustive lab-based process. Further, the Vivid, Neutral, Standard, Landscape and Monochrome profiles in Nikon’s cameras are supported, allowing Capture One for Nikon to match the colors you see on your camera.

The list of supported Nikon cameras is exhaustive and includes the company’s DSLR and mirrorless Z cameras. Many cameras also support tethered capture. You can view the full list of supported cameras and features by clicking here.

Returning to the newly-released update for all versions of Capture One 20, we were previously shown the new heal and clone brushes plus an improved before/after viewer. The revised healing and clone brushes now create dedicated healing and clone layers, respectively, and utilize more intelligent source point technology. You can also now utilize as many source points per layer as you desire with no discernible impact on performance.

With respect to the before/after view, users can now click a button in the toolbar to select from new before/after view modes. This is a much simpler and more streamlined process than in prior versions of Capture One and can be used across multiple images at varying zoom levels.

Capture One has released additional videos showing off these new features, which you can view below:

Another new feature that was not shown off during Capture One’s livestream in early May is an improved Lightroom Catalog Import tool. The tool now allows for importing files located on disconnected drives. Capture One will automatically import the files once the drive has been connected. Further, when importing a Lightroom catalog, some basic image adjustments and catalog structure can be imported into Capture One 20. To see how this works, refer to a new video tutorial from Capture One below.

The update to Capture One 20 is available now at no cost for all existing users. If you don’t own Capture One 20 and would like to try it, there is a free trial available on Capture One’s website.

Capture One 20 is available both as a subscription and as a lifetime license. An annual subscription is $ 180 USD and a lifetime license for new users is $ 299 USD. For a full pricing breakdown and to view additional bundles, click here. Further, there is an ongoing promotion for new purchasers, allowing for 12-month access to SmugMug Portfolio or Power plans, depending on their selected product.

Capture One for Nikon can be purchased for $ 9.99 USD per month, $ 99 per year or as a perpetual license for $ 129.

Articles: Digital Photography Review (dpreview.com)

 
Comments Off on Capture One releases Nikon-specific version, also adds improved clone and healing brushes

Posted in Uncategorized


How to Super-Charge the Spot Healing Brush Tool in Photoshop

28 Oct

The Spot Healing Brush Tool is often used in portrait photography to remove blemishes, wrinkles, and other distracting elements. By default, this tool works great, but sometimes you will need to add an extra level of control to get the results that you want.

In this tutorial, you will learn how to use the Spot Healing Brush Tool with Content-Aware to quickly remove blemishes and other imperfections from your photos.

Getting Started

First, create a new layer to work non-destructively (Shift + Ctrl/Command + N).

Then select the Spot Healing Brush from the Toolbar. Make sure that “Content-Aware” is the selected Type and that “Sample All Layers” is checked in the Options Bar.

How to Super-Charge the Spot Healing Brush Tool in Photoshop

Spot Healing Brush Tool – Normal Mode

With the Spot Healing Brush Tool active, just paint over any distraction to remove it. In most cases, the Spot Healing Brush Tool will do an excellent job in eliminating the problem.

02 spot healing comparison

However, there are times where the Spot Healing Brush Tool will destroy the original detail and texture found in the photo, giving you very unrealistic results.

In the example below, the Spot Healing Brush Tool removed the wrinkles under the eye by adding a skin texture that made the image and problem worse.

03 spot healing normal

Left before using the Spot Healing Brush. Right – after using it in Normal mode.

Using Modes to Enhance the Spot Healing Brush

For a more realistic result, you need to keep as much of the original detail as possible and only remove the distracting element.

To do so, first consider the blemish, wrinkle, or distraction you are trying to remove. Is it darker than the skin tone? Or is it brighter than the skin tone?

If the distraction is lighter, select Darken from the Mode in the Options bar. If the distraction is darker, select Lighten. In this case, the wrinkle is darker than the skin tone. That means that we want to lighten the wrinkles. So in the Options Bar, under Mode, select Lighten.

04 lighten

With the brush mode set to Lighten, Photoshop will only replace pixels that are darker than the good portion of the skin. Since the wrinkles and other skin distractions in this photo are darker than normal skin tone, only the distracting elements are removed, leaving more of the original texture surrounding it intact.

Notice that as you paint over a wrinkle, you don’t lose the original highlights and you keep a lot of detail. The example below shows the results between using Normal and Lighten to apply the same correction.

05 spot healing normal

Comparing results from different brush modes. Left: Spot Healing Brush in Normal Mode. Right: Spot Healing Brush in Lighten mode.

Additional Notes

To work faster, keep in mind that you can switch between Modes by holding the Shift key and pressing the + or – keys.

This technique also helps you remove blemishes in areas that contain detail that you would like to keep.

In the example, below you can see how by using the Lighten mode we were able to remove the skin blemishes while leaving the white hair strands intact.

06 spot healing forehead

This technique works in this case because the hair strands are lighter than the skin tone, and the blemishes are darker than the skin tone. The Lighten Mode makes the Spot Healing Brush target only darker pixels, so the fine white strands of hair are left intact.

This tutorial is part of my Content-Aware series on YouTube. There are more videos there if you would like to learn more about how content-aware works in Photoshop.

The post How to Super-Charge the Spot Healing Brush Tool in Photoshop by Jesus Ramirez appeared first on Digital Photography School.


Digital Photography School

 
Comments Off on How to Super-Charge the Spot Healing Brush Tool in Photoshop

Posted in Photography


Photo of the week: Drone portraits bring healing and awareness after wildfire

19 Aug

On November 23, 2016, a fire started along the Chimney Tops 2 that would spread throughout Gatlinburg and become the worst fire in Tennessee of the last 100 years. It claimed 14 lives and over 2,000 homes and businesses.

As the devastation became apparent, I had an idea to use my camera to bring healing and awareness to the region’s victims in a series of photos. From December 14-20, 2016, I photographed as many individuals and families as I could. There were already lots of photographers and drone enthusiasts there but I don’t find that more cameras help in times of need. There has to be a specific idea or angle to tell the story in a different, emotionally-compelling way.

As story-tellers, we have to use the creative director parts of our minds to think differently.

So I had the idea to place a stark white mattress in the middle of these blackened, charred homes and then place the homeowners on the mattress and photograph it from a drone. I had never used drones before but I knew it was the right solution for this project. And I was hopeful that it would be a bit therapeutic for the homeowners to lay down one last time in their former home… a moment of quiet remembrance in a time of distress.

This is the very first photo I took for the project, a portrait of a new friend named Kirk Fleta. He’s a famous musician and had built his home himself, with his own hands.

We had him lay down and then started flying the drone. As soon as I took this first photo, I started crying. I’ve never cried in my entire career, upon seeing one of my images for the first time. But this one got me on every level. Not only was it a successful vision but it uniquely displayed Kirk’s loss and it seemed to represent such a vulnerable moment for him… the end of one chapter and the beginning of a new one.

We used a variety of different drones and DSLRs to capture the aerial shots and portraits for the project, respectively. For this shot, we were using a DJI Inspire Pro (X5). You can see the entire project here.


Jeremy Cowart is an award-winning photographer, artist, and entrepreneur whose mission in life is to “explore the intersection of creativity and empathy.” His work ranges from celebrity portraiture to deeply personal projects like the Gatlinburg portraits. To see more of his work, visit his website or follow him on Facebook and Instagram.

Articles: Digital Photography Review (dpreview.com)

 
Comments Off on Photo of the week: Drone portraits bring healing and awareness after wildfire

Posted in Uncategorized


Quick and Dirty Method of Using the Photoshop Spot Healing Brush Tool

21 Jul

Let’s say you use Lightroom and you’ve tried and tried to get rid of those distracting spots using Lightroom’s Spot Removal Tool but no matter how you set it – using Clone or Heal or changing the Opacity or increasing the Feather – you have a giant, obvious repair on your image. Not good!

Photoshop Spot Healing Brush Tool - wild horses

This is my final, processed image but I had to dive into Photoshop to get there.

You’re a good photographer

For kicks, let’s agree that in addition to knowing your way around Lightroom, you’re a skilled photographer. You also subscribe to Adobe CC, but honestly, you don’t use Photoshop much. Perhaps you’re even a little bit afraid of it. You loaded the software and update it whenever Adobe tells you to but other than the PS icon looking cool and professional in your dock, you don’t actually use it.

You just don’t use Photoshop

I mean, Layers, Masks, Blending? Ugh. I know. I do 90% of my work in Lightroom. No one has ever called me out on that so I keep on keepin’ on with Lightroom. I love Lightroom but – and it’s a great big but – LR’s Spot Removal Tool is no match for Photoshop’s Spot Healing Brush Tool.

Because I know this issue affects so many of us, I’m going to teach you the quick and dirty method for how to Spot Heal in Photoshop. No layers. No tricky stuff. Just easy, quick simple repairs for the problem areas in your images.

Practice as you read this

Grab an image that has a problem area that you can’t seem to fix in Lightroom and follow along with me. Practice is the best way to learn so repeat these steps a few times today. After you Spot Heal a few images in PS, it will naturally become part of your image processing tool kit.

Step #1 – Process the image in Lightroom

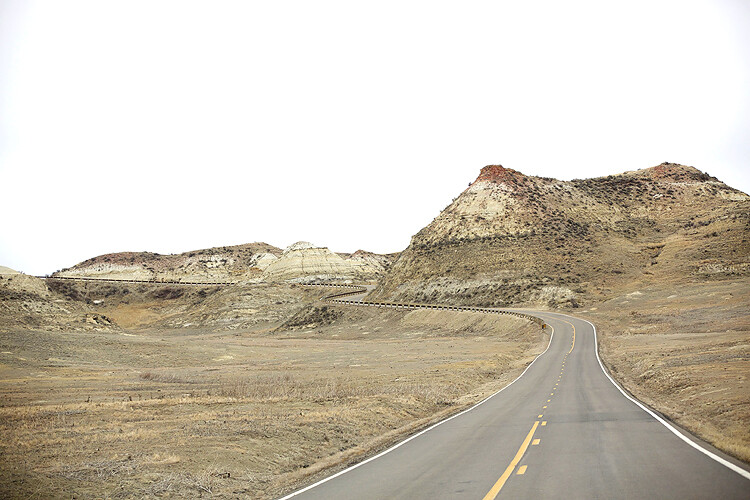
In Lightroom, process your image as normal. Here’s my RAW  image before I’ve made any adjustments.

Photoshop Spot Healing Brush Tool - raw image

Canon 7D Mark II, 70-200 plus 1.4x @ 280mm, f/6/3, 1/1600, ISO 400.

Below is a screenshot of all the adjustments I’ve made on my image. I started with a pretty aggressive crop. You can see the White Balance and Basic adjustments but I also dropped in several Radial Filters to add clarity and brightness to key elements like the horses’ eyes. However, I struggled to get rid of the flecks of mud around the black horse’s eye.

Photoshop Spot Healing Brush Tool - Lightroom adjustments

Step #2 – Edit in > Photoshop

Right-click on your image. Select Edit in Adobe Photoshop CC.

Photoshop Spot Healing Brush Tool - Edit in Photoshop

It is very important that you don’t skip this step. Do not open your image directly in Photoshop. For the down and dirty method to be most effective, you must start this process in Lightroom.

NOTE: If you haven’t updated to PS CC 2017 or if you use an older version of PS, you might need to modify these steps. Instead of Edit in Adobe Photoshop CC 2017, you might see Edit a Copy in PS.

Step #3 – Select the Spot Healing Brush

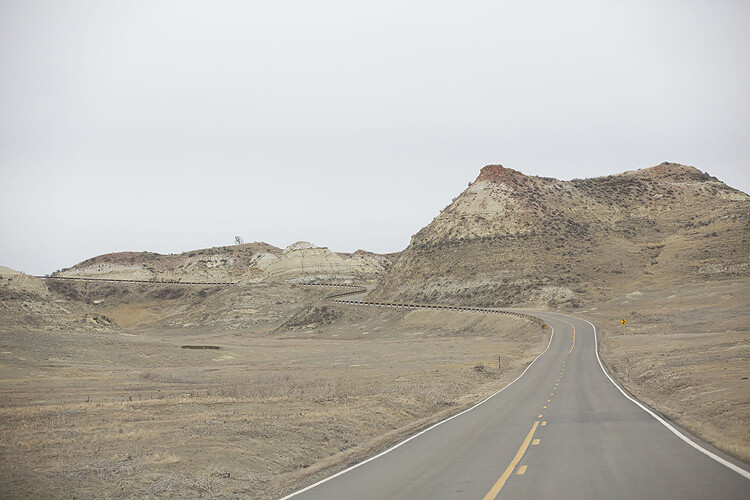
It takes a minute, but eventually, your image will appear in the Photoshop window. Here’s the image I’m working on. Check and make sure your screen looks pretty similar to mine.

Photoshop Spot Healing Brush Tool - PS interface

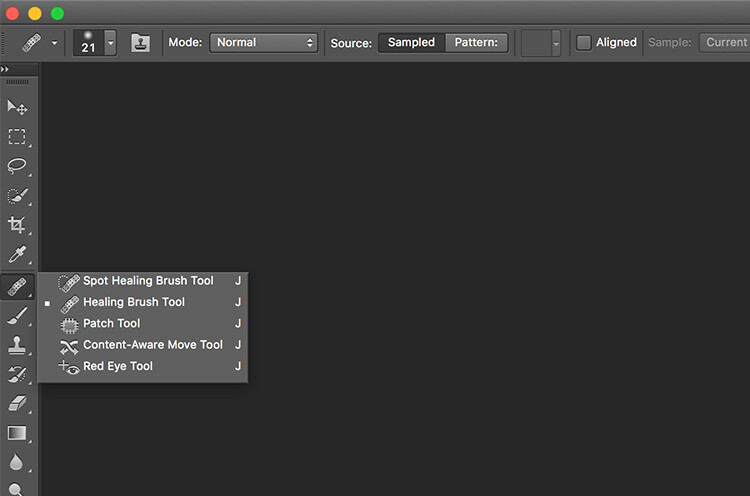
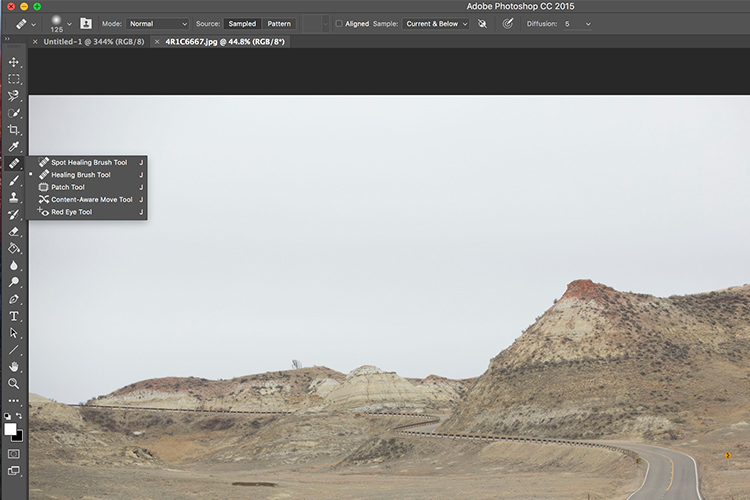
Click on the Spot Healing Brush Tool. It looks like a band-aid except that it has a little semi-circle handle over it.

Photoshop Spot Healing Brush Tool - band-aid icon

If you can’t find this tool, count seven icons down on the tools pallet and right-click on that. Once you right-click, you should see the rest of the tools. Hover your cursor over the band-aid icon that says Spot Healing Brush Tool. Click to select it. It will now show as the active tool.

Step #4 – Setup the Spot Healing Brush

Review the settings for the tool bar that runs across the top of your Photoshop window.

Photoshop Spot Healing Brush Tool - mode and type

If your Spot Healing Brush Tool doesn’t default to these settings, change them to:

  • Mode = Normal
  • Type = Content Aware

Step #5 – Zoom in

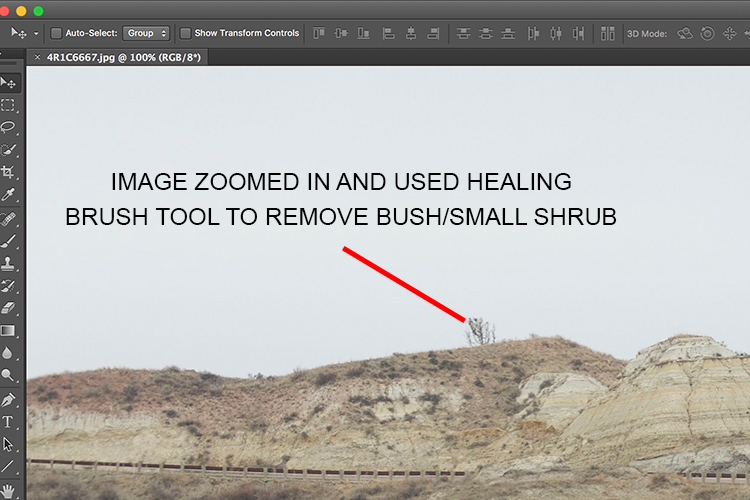
Zoom in and increase the size of your image so you can see the problem area more clearly. Click the Command/Alt key and the + (plus) key simultaneously. Click again to zoom in more. If you’ve zoomed in too far, click the Command/Alt Key and the – (minus) key simultaneously to zoom back out. Grab the drag bars on the bottom and right side of the image to reposition the problem area so that it’s in the middle of the screen and easy to see and repair.

Photoshop Spot Healing Brush Tool - zoom in

Zoomed into 200%, I can see the problem area clearly.

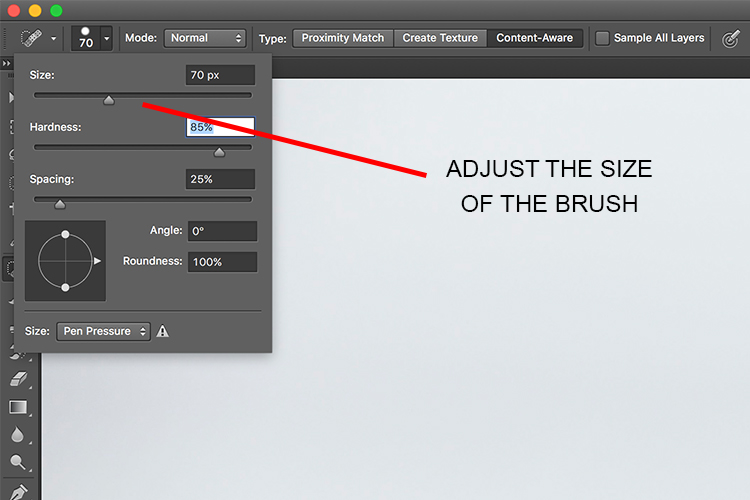
Step #6 – Size the Brush Tool

Hover the Spot Healing Brush Tool over the problem area. You may need to change the size of the brush. The easiest way to do that is to use the square bracket keys on your keyboard.

  • Click the Left Bracket Key [ to decrease the size of the brush.
  • Click the Right Bracket Key ] to increase the size.

Notice that as you click on the bracket keys, the Size number in the bar that runs across the top of your image increases or decreases. (If you click on that number, you’ll get more tool options. Don’t worry about those for now.)

Photoshop Spot Healing Brush Tool - 20px brush

Using the Left Bracket Key, I adjusted my Spot Healing Brush Tool to 20 pixels and started making small repairs around the eye.

Step #7 – Brush over the bad area

After you’ve adjusted the size of your brush, start clicking on the area of your image that you want to repair. You can also drag the brush to make short strokes.

Photoshop is smart and should fill in the area with an appropriate selection but if it doesn’t, click Edit > Undo Spot Healing Brush in the top menu (or Cmd/Ctrl+Z will also undo). That will undo the last thing that you did.

If you want to undo multiple things, go to Edit and click Step Backward repeatedly till you’re at the last point that you liked. Step Backward does have limitations so work slowly and check your repair work often. Note: you can aslo open the History panel and go back to any previous step.

Photoshop Spot Healing Brush Tool - undo

Step #8 – Save

Evaluate your work. Do you like the repairs? If Yes, go to File > Save in the top menu. Photoshop defaults to saving images as a TIFF file. If it doesn’t, select the TIFF option if/when the menu pops up. This will also import the newly edited image into Lightroom.

Photoshop Spot Healing Brush Tool - save

If you don’t like the repairs you made, quit Photoshop without doing anything. Photoshop will ask if you want to save your work. Just say No. Go sip some coffee and try again another day when you’re fresh.

Step #9 – Head back to Lightroom

Almost done!

Go back to Lightroom. You’ll still be in the Develop Module with the original RAW image that you were working on still open. Press G for Grid which will take you to the Library Module. Check to make sure that next to your original RAW file is a new TIFF file. Select the two images and view them in Survey Mode so that you can look at them side by side (N on your keyboard).

If the two files don’t show up right next to each other in Lightroom resort your images by Capture Time (or file name), or drag and drop so that they do.

Photoshop Spot Healing Brush Tool - compare

Side by side of RAW file adjusted in LR (on the left) and TIFF with the addition of spot healing (on the right).

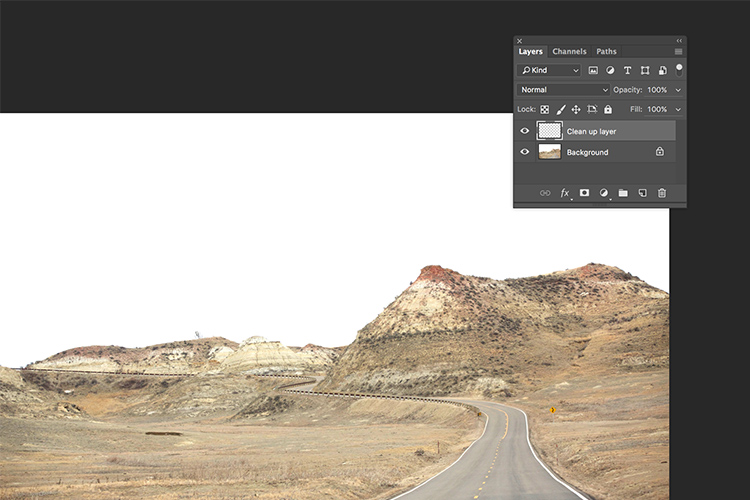
Wait, don’t you have to use layers in Photoshop?

That’s the down and dirty part. When you’re doing simple fixes like this, you don’t need to worry about layers. Why? Well, layers are excellent if you’re doing quite a few things to your image and you want to be able to turn different effects on and off. They’re also important so that you preserve your original image in a background layer (non-destructive editing).

But with this method, you still have your original RAW file. That’s why you want to start in Lightroom and then open your image from there into Photoshop. Lightroom sends a copy of your image to Photoshop. When you save your work in Photoshop in step #8, Photoshop generates a totally separate image file. That new TIFF file shows up in your Lightroom catalog next to your original RAW file.

NOTE: If you haven’t updated to PS CC 2017 or if you use an older version of PS, you might need to modify these steps. You might need to select “Edit a copy” and not “Edit Original.”

Photoshop Spot Healing Brush Tool - final image

This is a wild horse so I didn’t go too crazy fixing every little thing, but the distracting mud around the eye and on the neck is cleaned away nicely, don’t you think?

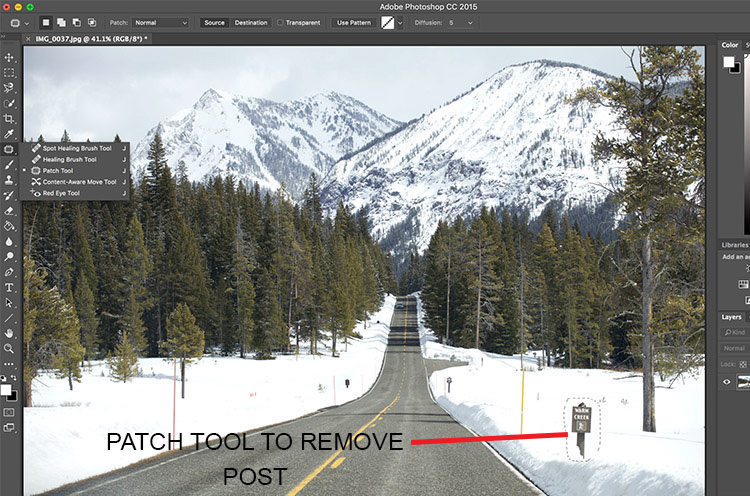
What if the down and dirty method doesn’t work?

This might not work for your image. Some repairs are finicky and this is definitely a hack method that won’t work for everything. My advice is to experiment. Remember the other tools that were grouped with the Spot Healing Brush Tool? Try one of those. Or, keep using the Spot Healing Brush Tool but change the Mode from Normal to Replace or even Multiply.

Remember when we clicked the Size number? Click that again and adjust the Hardness of the brush or the Roundness. Make only one change at a time and make notes on what each change does. If something works, click File, then Save and remember what you did. If nothing works, exit out of Photoshop without saving (and go have more coffee).

You can always experiment again another day because you still have your RAW image. It’s cataloged in Lightroom right next to the TIFF file. As long as you always start in Lightroom, you’ll be able to try again later.

Photoshop Spot Healing Brush Tool - Essaouira cafe

In this image of an outdoor seafood market in Essaouira, I experimented with a variety of tools to zip out the distracting bit of tree on the left, the construction equipment and the light posts. The RAW image, with Lightroom only adjustments, is on the left. The spot-healed TIFF is on the right.

Share with the dPS community: What hack or down and dirty methods do you use when you process your images?

The post Quick and Dirty Method of Using the Photoshop Spot Healing Brush Tool by Lara Joy Brynildssen appeared first on Digital Photography School.


Digital Photography School

 
Comments Off on Quick and Dirty Method of Using the Photoshop Spot Healing Brush Tool

Posted in Photography


Landscape shooter Lisa Bettany shares her story of healing through photography

27 Jan


$ (document).ready(function() { SampleGalleryV2({“containerId”:”embeddedSampleGallery_7608234858″,”galleryId”:”7608234858″,”isEmbeddedWidget”:true,”standalone”:false,”selectedImageIndex”:0,”startInCommentsView”:false,”isMobile”:false}) });

Lisa Bettany is a renowned landscape photographer whose career began as she was recovering from a traumatic injury. Born in Canada, she was a competitive figure skater until the age of 21 when she suffered a back injury while skating. Years into her recovery it was still extremely difficult to walk and sit up, but when she acquired a camera things started to change for the better. One day at a time she ventured farther and farther from home, increasing each trip minute by minute, growing stronger and learning the art of photography. For her, learning photography was very much a journey from darkness into light, and nothing has slowed her down since then.

You can read the inspiring account of how her career started and the success she’s achieved as a pro photographer over on Resource Travel. You can also take a look at a few of her images above.

Has photography helped you achieve things that previously seemed impossible? Tell us in the comments below.


Articles: Digital Photography Review (dpreview.com)

 
Comments Off on Landscape shooter Lisa Bettany shares her story of healing through photography

Posted in Uncategorized


How to Use the Healing Tool in Photoshop

23 May

We all have those moments in our photographic careers where things just don’t pan out exactly how we imagined them. Our image is almost exactly as we imagined it to be, but perhaps there are some spots, blemishes, marks or distractions that just don’t fit in the frame.

In most cases, all the elements of the image tend to work together to tell the story, but sometimes we just to clean the image up a tad, to get rid of some of the distracting elements that take away from that story. Luckily, most editing software, including Photoshop, have very easy, yet powerful tools, that you can use to clean up your image and get rid of the distractions.

Memorable Jaunts Landscape Image cleaned using healing brush tools Artcile for DPS 01

The Healing Tool in Photoshop

This article provides a basic explanation of the Healing Tool in Photoshop, that is very effective in removing or cleaning out distracting elements in an image. For the purposes of this article, I am using Photoshop version CS6. The Healing Brush Tool in Photoshop is made of three parts. These are probably the most used tools in the healing tool family, and 90% of the time they get the job done.

  • Spot Healing Brush Tool
  • Healing Brush Tool
  • Patch Tool
Memorable Jaunts Landscape Image cleaned using healing brush tools Artcile for DPS 07

The Healing tool in PS has the bandaid icon. When clicked, it opens up this menu. You can also click the J key on your keyboard to access this tool.

Here is an example of a simple landscape image that was cleaned up using the Spot Healing Brush Tool, and the Healing Brush Tool.

Memorable Jaunts Landscape Image cleaned using healing brush tools Artcile for DPS 02

Original Image – SOOC. I am looking to clean out some of the distracting elements here like the ‘Road curves’ sign on the right, the dead bushes on the left and the little tree on the top of the hill to the left of the image.

The first step, before any cleanup is done, is to perform any basic edits to the image. I consider adjustments in exposure, contrast and temperature to be basic adjustments. For this image, I increased the exposure and added some contrast, to highlight the browns in the hillside. This image was taken from a stopped car because I really liked the curve in the road along the small hill on the top right side. But I wanted to get rid of the road sign and the dead branches on the sides of the road leading up to the hill.

Once I brightened and adjusted the contrast of the image, I created a new layer in PS to add my cleanup edits. I called it, “Clean up layer” for easy identification. This keeps all the cleanup elements together, so I can toggle between the On and Off to see the affects of the cleanup at any time (toggling a layer On and Off is done by clicking on the eyeball symbol to the left of the layer.)

Memorable Jaunts Landscape Image cleaned using healing brush tools Artcile for DPS 06

The Spot Healing Brush Tool is used for quick, easy cleanups. Once you select the it, and adjust the size of the brush (use the left square bracket key [ to decrease size of the brush and right square bracket key ] to increase the size), you simply click on the blemish to remove it. Also set Sample to “Current & Below” or “All Layers” so it will pull pixels from your base layer (otherwise you’re just healing with a blank layer).

The Spot Healing Brush automatically selects the source area from which to clone. So sometimes it might not be completely accurate, because the software is making the judgement on where is the best source to take a sample. A good tip is to zoom in to the specific area and watch the pixels closely while making the adjustments. The Spot Healing Brush works best on small areas and easy cleanups.

Memorable Jaunts Landscape Image cleaned using healing brush tools Artcile for DPS 05

The Healing Brush Tool

I use the Healing Brush Tool is for slightly more complex cleanups, especially areas that have sharp edges, curved, or straight lines that separate areas of different textures and color. As you can see here, the top of the hill has a small tree which sticks out against the overcast sky. For more accurate editing, zoom in to the area that needs to be edited, so as to eliminate any errors. It is hard to be completely accurate if you are not zoomed in accurately to the specific area that needs to be edited.

Once selected, theHealing Brush Tool requires you to set a source point from which to heal the affected area (that is the easiest way to think about the healing action, in my opinion). I set the right size of the brush (use the [ ]  keys to increase or decrease brush size, OR click on the slider as shown in the image below), then I select the edge of the line closest in texture to the source area. Holding my cursor down (holding down the mouse button), I drag the cursor from start to finish over the object to be removed.

Memorable Jaunts Landscape Image cleaned using healing brush tools Artcile for DPS 04

After

After cleanup

The Patch Tool

I use the Patch Tool in Photoshop for any bigger areas that need to be adjusted. For example, in the image below, there are many sign posts along the road that are larger. I could use the healing brush tool but it would be a little bit more time-consuming as I would have to go over the adjustments several times, to clean it out completely. Instead I used the Patch Tool to fix the affected spot, and replace it with another area sampled from the surrounding landscape. Using the Patch Tool, select the area to be cleaned up, then select the area close to it to sample from, to do the patch.

Notes about the Patch Tool:

  • To do your editing non-destructively use the patch tool on a duplicate layer (it cannot be an empty layer).
  • You must select a Patch type as Normal or Content Aware. For most things Content Aware does a better job, so try that first and resort to Normal if it doesn’t work.
  • If you select Normal you have to choose either Source or Destination. The difference is that when Source is highlighted, the area you select will be Patched with the area you drag it over to. When Destination is highlighted the area you select will be cloned over to the area you move it to.

Final image where all the posts, signs and snow measurement sticks have been removed using a combination of patch tool, spot healing brush and healing brush tool.

As you can see, the healing tools in Photoshop are quite effective. With such a wide variety of options, any cleanup is easy and effective. One tip that I have learnt from experience is to do all the adjustments while zooming in to the affected area. This ensures that right amount of cleanup is done to all the pixels. If you find that the cleanup effect is too stark and harsh, an easy fix is to adjust the Opacity (i.e. visibility) of the cleanup layer. Especially when cleaning up blemishes on the face, this gives a more natural, blended effect. There is no right opacity percentage, simply choose the value that seems more natural to the eye.

How do you use the Healing Tools in Photoshop? Please share in the comments below.

googletag.cmd.push(function() {
tablet_slots.push( googletag.defineSlot( “/1005424/_dPSv4_tab-all-article-bottom_(300×250)”, [300, 250], “pb-ad-78623” ).addService( googletag.pubads() ) ); } );

googletag.cmd.push(function() {
mobile_slots.push( googletag.defineSlot( “/1005424/_dPSv4_mob-all-article-bottom_(300×250)”, [300, 250], “pb-ad-78158” ).addService( googletag.pubads() ) ); } );

The post How to Use the Healing Tool in Photoshop by Karthika Gupta appeared first on Digital Photography School.


Digital Photography School

 
Comments Off on How to Use the Healing Tool in Photoshop

Posted in Photography


Photoshop CC 2015.0.1 update addresses healing tool issue

05 Aug

Adobe has issued an update for Photoshop CC 2015 with a number of bug fixes. Notably, an issue with the healing brush tool has been addressed, as users reported that the tool was creating unwanted artifacts in images. Read more

Articles: Digital Photography Review (dpreview.com)

 
Comments Off on Photoshop CC 2015.0.1 update addresses healing tool issue

Posted in Uncategorized


Adobe Creative Cloud update introduces de-haze feature and speedier healing brush

16 Jun

Adobe has announced a number of updates to its Creative Cloud suite, including some feature enhancements and additions to Photoshop CC and Lightroom CC. A previously demonstrated de-haze tool has been added to CC versions of Photoshop and Lightroom, and the effects of Photoshop’s popular healing brush will now be displayed in real time as the tool is used. Read more

Articles: Digital Photography Review (dpreview.com)

 
Comments Off on Adobe Creative Cloud update introduces de-haze feature and speedier healing brush

Posted in Uncategorized


Photoshop: Improving skin with the Healing Brush | lynda.com tutorial

31 Oct

This Photoshop tutorial discusses how to reduce and simplify skin variations using the Healing Brush tool. Watch more at www.lynda.com This specific tutorial is just a single movie from chapter four of the Photoshop CS5: Fashion Retouching Projects course presented by lynda.com author Chris…

FREE Download Photoshop CS 6 here: www.creativestation.ru Adobe Photoshop CS6 Image restoration from Black and white to color Picer www.creativestation.ru
Video Rating: 0 / 5

 
Comments Off on Photoshop: Improving skin with the Healing Brush | lynda.com tutorial

Posted in Retouching in Photoshop


How To Remove Blemishes With Healing Brush Tool Photoshop Lesson 21

12 May

wwww.1stoptutorials.com – This is one of those tools in photoshop that just makes you go wow. We are going to get into the healing brush tool and start removing some of those blemishes. Watch the tutorial below to learn how to use this amazing tool
Video Rating: 5 / 5

Actor Headshots need to be retouched. Nuff’ said. But how much retouching is enough, and what, really, should be retouched? This video walks an actor through the basic elements that need retouching in their headshot. More headshot info at ColemanPhotoGraphix.com