RSS
 

Posts Tagged ‘Harsh’

Here’s How to Shoot in Harsh Light [Video]

02 May

The post Here’s How to Shoot in Harsh Light [Video] appeared first on Digital Photography School. It was authored by Jaymes Dempsey.

It’s a tip often given to beginners:

Only photograph when the light is soft and beautiful.

But what if you can’t find the time to get out during the soft light, and you still want to take photos? Or what if you’re in a jaw-dropping, once-in-a-lifetime location and the light is just too bright? What then?

That’s when it pays to know how to create stunning shots in harsh light.

In this video, professional photographer Nigel Danson explains how to capture gorgeous images even in the worst lighting situations. Danson’s discussion centers around landscape photography, but the tips apply to many photographic genres.

To discover how to create beautiful images in harsh light, check out the video below. And then leave a comment with your favorite tip, trick, or piece of advice for harsh light photography!

The post Here’s How to Shoot in Harsh Light [Video] appeared first on Digital Photography School. It was authored by Jaymes Dempsey.


Digital Photography School

 
Comments Off on Here’s How to Shoot in Harsh Light [Video]

Posted in Photography


Texas report details the harsh realities, risks of being a wedding photographer during the COVID-19 pandemic

17 Dec

A recent report of out South Texas reveals the harsh reality of being a wedding photographer in the middle of the COVID-19 pandemic in the United States. In an article titled ‘Texas Wedding Photographers Have Seen Some $ #!+’ shared by Texas Monthly, reporter Emily McCullar tells the story of a wedding photographer who was diagnosed with COVID-19 after it was revealed the groom of the party had tested positive for COVID-19 and didn’t inform the wedding photographer.

The photographer, who remains unnamed throughout the article, was informed of the groom’s positive diagnosis by a bridesmaid in the party. But not before the photographer had spent ‘an hour or two inside the unmasked wedding party’ taking photographs. The photographer said ‘[the bridesmaid] was looking for me to be like, “Oh, that’s crazy,” like I was going to agree with her that it was fine.’

That wasn’t the case though. The photographer suffers from asthma, a serious comorbidity factor that can increase the risks of a positive COVID-19 diagnosis. Additionally, the photographer has three kids and a husband at home that she didn’t want to infect, should she end up COVID-19 positive.

After discovering the groom’s secret, the photographer and her assistant left. Texas Monthly notes ‘her exit was tense.’ ‘The wedding planner said it was the most unprofessional thing she’d ever seen […] Bridesmaids accused her of heartlessly ruining an innocent woman’s wedding day.’ The photographer even recollected a bridesmaid telling her ‘I’m a teacher, I have fourteen students. If I’m willing to risk it, why aren’t you?’

After leaving, the photographer ‘canceled her Thanksgiving plans with family, sent her kids to relatives’ houses so they wouldn’t get sick, and informed the brides of her upcoming weddings that she’d be subcontracting to other shooters,’ says Texas Monthly. Sure enough, a few days after the wedding, the photographer started feeling symptoms and eventually tested positive for the novel coronavirus.

The photographer said the couple whose wedding she was photographing ‘didn’t care’ about the diagnosis and ‘didn’t offer to compensate her for the test, nor did they apologize for getting her sick.’

The article goes on to point out that this incident is far from an isolated one. As you browse through the hashtag ‘#TexasWedding’ on Instagram, there are a handful of images that show groups of friends and family celebrating matrimony with what appears to be little regard for protocols suggested for mitigating the spread of COVID-19, a disease that’s confirmed to have killed over 302,000 individuals in the United States alone.

A screenshot of a few images that show up when you search ‘#TexasWedding’ on Instagram. Faces have been blurred for privacy sake.

The report details statements from other photographers, who share their experiences trying to shoot weddings throughout the pandemic. A reoccurring theme is a lack of masks, proper social distancing and little means of sanitation options, such as hand sanitizer.

As for the original wedding photographer, she recalled a heartbreaking conversation she had with a bridesmaid at the wedding:

‘I have children,’ she told a bridesmaid, ‘What if my children die?’ The bridesmaid responded, ‘I understand, but this is her wedding day.’

The report notes that not all wedding anecdotes it came across from photographers were as reckless as the featured one, but even in the anecdotes that featured more responsible weddings, nearly half of the guests were unmasked, including those who had high risk factors. While Texas reduced the size of wedding gatherings — from 500 to 250 individuals — there’s still plenty of risk in having that many individuals together at a single venue.

Vaccines are being distributed around the globe, but according to experts on the matter, it will still be a while before anything gets back to ‘normal,’ whatever that may look like. And until then, this unfortunate reality is what many wedding photographers (and other professions) will have to face as the death toll continues to rise, particularly in the United States.

Articles: Digital Photography Review (dpreview.com)

 
Comments Off on Texas report details the harsh realities, risks of being a wedding photographer during the COVID-19 pandemic

Posted in Uncategorized


3 Tips For Photographing Kids in Harsh Light

02 Aug

You’ve probably heard that the absolute best time for taking gorgeous portraits is before sunset at golden hour. I love the golden hour as much as the next photographer. But I’m also a mom, and I know the importance of being able to capture photographs of your kids throughout day-to-day life, not just when the lighting conditions are ideal.

Let’s face it – birthday parties, parades, celebrations, and field trips often happen in the middle of the day when the light is harsh and more difficult to work with. How do you capture those special midday moments?!

kids eating popsicles - 3 Tips For Photographing Kids in Harsh Light

You can absolutely take amazing photos of your kids no matter the time of day! In this article, I’ll share three quick and easy tips for those times when you want to capture memories and are photographing kids in harsh lighting conditions.

1. Find or Make Some Shade

One of the easiest ways to approach photographing kids in harsh lighting conditions is to find or make some open shade.

If you’re outdoors, look for a group of trees, a small hill, a tall building, or even part of a play structure that can provide you with a bit of shade for your photo. When you’re looking at the shadows on the ground, try to find a patch of shade that doesn’t have “hot spots” of sunlight mixed in with the shade. Mottled light is generally not the most flattering type of light for photographs.

If you aren’t able to find open shade, you can also create it. I’ve used everything from a sun hat to a couple of friends holding a beach towel in the air to create a small patch of shade for a photo of my kiddos. Be creative!

girl in a watermelon hat - 3 Tips For Photographing Kids in Harsh Light

2. Find Your Light

Unless you’re shooting right at high noon, the light from the sun will still have some direction to it. If you’re familiar with the circle trick, this is a great time to utilize it so that you can easily visualize the direction of the light.

Snapping photos without taking the direction of light into account often results in lackluster images with squinting subjects and uneven unflattering lighting.

kids squinting in the sun - 3 Tips For Photographing Kids in Harsh Light

This is an example of what NOT to do when shooting in harsh lighting conditions. See how the girls are squinting and the light is uneven across their faces?

However, spending just a few seconds thinking about the direction of the source of light makes for a much better image in exactly the same location. One simple way that I often communicate this to kiddos is to ask them to stand with their feet pointing towards the head of their shadow.

two girls backlit by the sun - 3 Tips For Photographing Kids in Harsh Light

Nine times out of ten, this simple instruction quickly orients kids so that the direction of light (backlit) is most flattering. You may still end up with some hot spots across their shoulders and the tops of their heads, but typically the light will be nice and even across their faces, which is really my goal when shooting in harsh light or full sun.

3. Try a Fill Flash

girl backlit with water in the background - 3 Tips For Photographing Kids in Harsh Light

So, what if the background you’re trying to capture doesn’t allow you to orient your child in the best way given the direction of light?

Whether you’re taking photos of a historical landmark or a hometown parade, there is another trick you can utilize in harsh lighting conditions. That is to use your on-camera flash as a fill light to help diffuse any harsh shadows and brighten your subject’s face.

For example, the above image was taken at a local lake. Because of the location of the dock coupled with the time of day, I wasn’t quite able to get the sun all the way behind my daughter, resulting in a bit of a hot spot on the right edge of her face, while the rest of her face is just a bit dark.

If this effect bothers you, give fill flash a try!

This second image (above) was taken at the same time, in the same place. But this time I used my camera’s flash to soften some of the highlights near her face. You’ll notice that the coloring of the water is entirely different when using a fill flash versus without it. Additionally, her eyes seem to have more pop with the flash compared to without it.

Whether or not to use fill flash in harsh lighting conditions is really a matter of aesthetic preference. But it’s certainly worth a try if something feels a bit off when you’re shooting in harsh light.

In a nutshell, don’t be afraid of photographing kids in full sun – it’s easier than you may think. Give it a try, and chime in and share your best images with us below.

The post 3 Tips For Photographing Kids in Harsh Light appeared first on Digital Photography School.


Digital Photography School

 
Comments Off on 3 Tips For Photographing Kids in Harsh Light

Posted in Photography


How to Photograph in the Harsh Midday Sun

05 May

It’s all about the light! The golden hour when the sun is just above the horizon shining its low angle golden rays on the scene; sunrise and sunset when the clouds light up pink, orange, and red; and the blue hour when the sun is below the horizon but it is not yet totally dark. Those are the best times to photograph.

But midday? That’s when tourists make snap-shots, right?

Well, yes, but that doesn’t mean there aren’t options for you too. You just have to know what to do when the sun is high in the sky shining its harshest light on a day with no clouds to soften the rays.

How to Make the Most of Harsh Midday Sun

We don’t always have the option to shoot on the edges of the day when the conditions are best. On a recent trip, I was in between two destinations and had a few spare hours to visit a small village on route. It turned out to be an amazing location, but the light was harsh and the buildings were white. I could barely look at them let alone photograph them. I had to put my harsh light tactics to the test.

Here are some midday photography tips to help you:

1. Look for shade

The first thing I did was look for shady spots under trees and on the opposite side of the bright white buildings I was facing. Shade provides a nice soft, even, light, which is perfect for colorful subjects and ones with interesting shapes. I especially like to photograph flowers under soft light because the delicate nature of the subject lends itself to soft light.

How to Make the Most of Harsh Midday Sun - lotus flower

2. Look for shadows

Subjects with really distinct shapes will also have very distinct shadows in the harsh lighting conditions of midday. So you can make your photograph all about the shadows. Look for patterns in shadows, leading lines made by shadows, and shadows that create interesting shapes in your frame. Remember, you don’t necessarily have to include the object itself, sometimes just the shadow makes your photo a bit more mysterious.

Shadow Patterns - How to Make the Most of Harsh Midday Sun

3. Look for reflections in water

Whenever there is a body of water near a subject that has harsh light on it, you’ll get a bright reflection. This works best when the subject being reflected has a lot of color. Ideally, the subject will be in direct light and the water will be in the shade. Again you don’t have to include the object with the direct light on it. Sometimes photographing just a reflection can make an interesting abstract image.

Half Dome reflects in the Merced River in Yosemite National Park - How to Make the Most of Harsh Midday Sun

4. Use the time for scouting

When all else fails, rather than photographing, you can use the time to scout out locations for the future. Walk around, find a great subject and play with different compositions. Make “sketch” images by trying different compositions and choosing which one has the most impact. Then, when you find it, make a note of the exact location and make an image so you remember your camera angle.

It’s also a good idea to take note of how long it takes you to walk to that location, what the trail or route is like, and anything you may want to make note of should you need to return in the dark, like before sunrise for example. You’ll thank yourself later when you don’t have to guess at a location and composition before you can really see what is in your frame.

Mono Lake Tufa State Natural Reserve, California - How to Make the Most of Harsh Midday Sun

5. Rest up

When you’re on a long trip, sometimes it’s best not to wear yourself out by doing three photo shoots a day. Of course, you’re going to go out for sunrise and sunset. During the day you might want to clean your gear, get out some maps and do some planning, research stuff on the internet, or even take a nap.

Sometimes the best thing you can do for your photography is simply to have a rest so you have lots of energy for your next outing.

Conclusion

What tips to you have for working with the midday sun in your photography? Please share them in the comments below.

The post How to Photograph in the Harsh Midday Sun by Anne McKinnell appeared first on Digital Photography School.


Digital Photography School

 
Comments Off on How to Photograph in the Harsh Midday Sun

Posted in Photography


3 Quick Tips for Photographing in the Harsh Midday Sun

15 Jun

One of the most important elements of photography is light. So it’s only natural that as photographers, one of the most important skills to have under your belt is the understanding of different kinds of light, and how to SEE it before taking a single shot. Every photographic frame needs some sort of light but the intensity, direction, and quality is always in question.

3 Quick Tips for Photographing in Harsh Midday Sun(1)

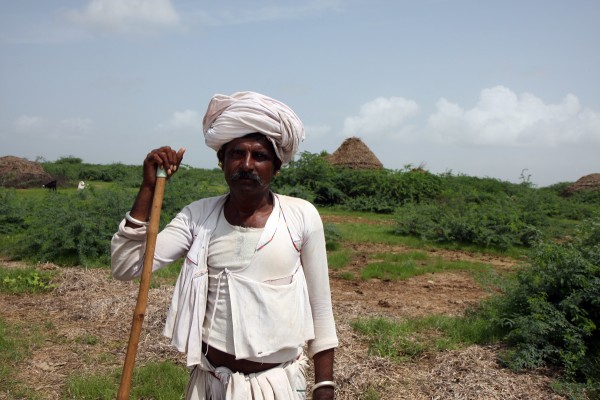
For natural light or outdoor photographs, early morning sunlight (when the sun is low in the horizon and has a soft quality), or beautiful golden light of the setting sun is ideal. However this is not always practical, especially when dealing with clients. Firstly, not all clients are open to early morning or sunset photoshoots. Secondly, particularly in wedding photography, timing is not something the photographer has much control over. Many wedding ceremonies are scheduled outdoors at noon, when the sun is the highest in the sky, and the light is the harshest.

As photographers we know that good quality light does wonders to an image, almost giving it an ethereal, magical look, but we cringe when we have to deal with harsh midday sun. Luckily there are a few tips and tricks to deal with this harsh light source, while still achieving beautiful images. In this article, my aim is to help explain some of these simple tips, using my newly purchased rose bushes that are waiting to be planted, and also prove that they will work for any subject, not just people!

Memorable Jaunts Tips for photographing in the harsh midday sun-2-2

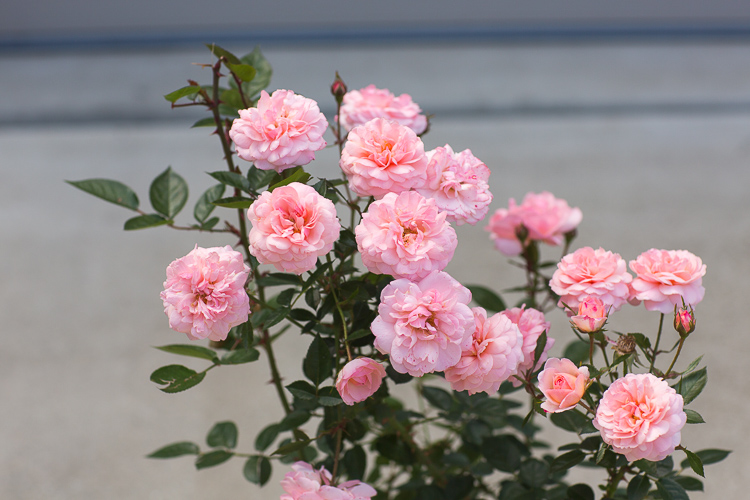
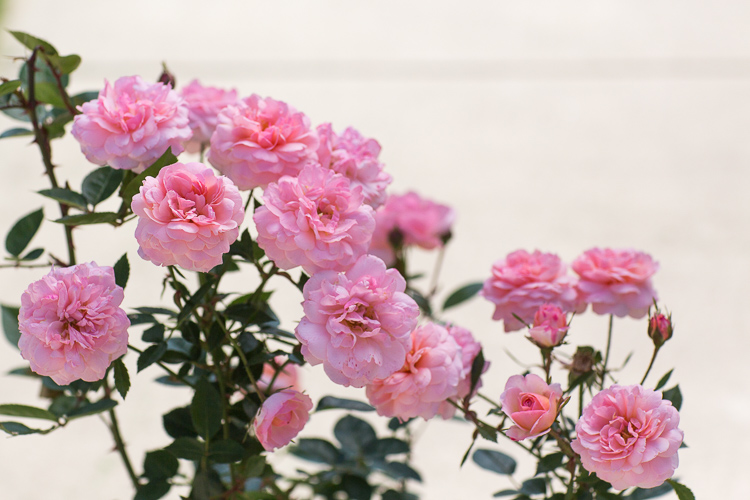
Beautiful roses photographed at noon, under the shade cast by the front of my home.

Please note – most of the images used in this article are SOOC (straight out of camera). I have applied minimal to no processing, because I want to show the direct results of shooting in harsh light, similar to what a photographer would experience, so as to fix as much as possible in camera, not via post-processing later.

#1 Put the subject’s back to the sun – backlighting

If there is no shade is available, and your only choice is to position your subject in full sun, an easy tip to follow is to position your subject with their back to the sun. This will help block most of the direct light from falling on their face, which causes them to squint their eyes. Instead, their face or the main part of the subject will be evenly shaded. This technique is called back lighting.

As you can see, in the first image below, the roses are in full sun. To backlight them, I simply moved the plant so that the roses I wanted to photograph, had their backs to the sun. This is sometimes easier to do with one subject because you can position them perfectly, to make sure no sunspots are making their way onto their face. If you are dealing with two or more subjects, particularly people, then have their faces closer together or even have them turn their bodies slightly inward towards each other. This helps eliminate any harsh light spots on their face.

Make sure to expose for the subjects’ faces or they will be too dark to see any detail. Something to note, is that when metering for the face in a situation like this, your background may be overexposed and may lose all the details, that’s okay.

Memorable Jaunts Tips for photographing in the harsh midday sun-1

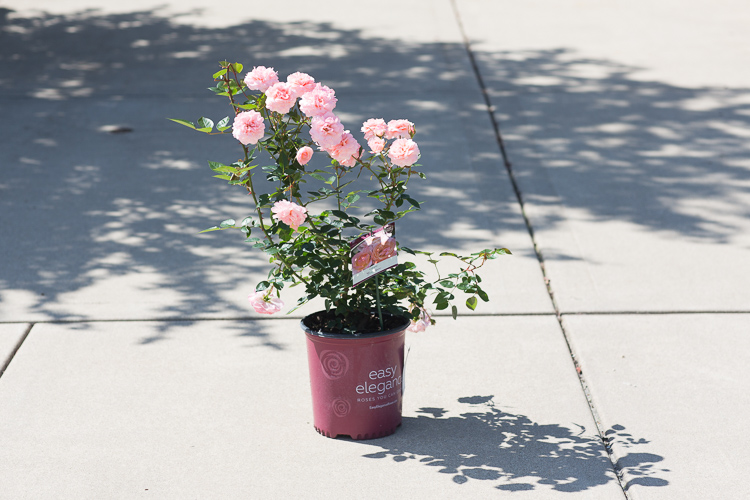
Roses in full sun. You can see from the shadows that the sun was high in the sky, almost overhead at the time of these pictures.

Memorable Jaunts Tips for photographing in the harsh midday sun-5

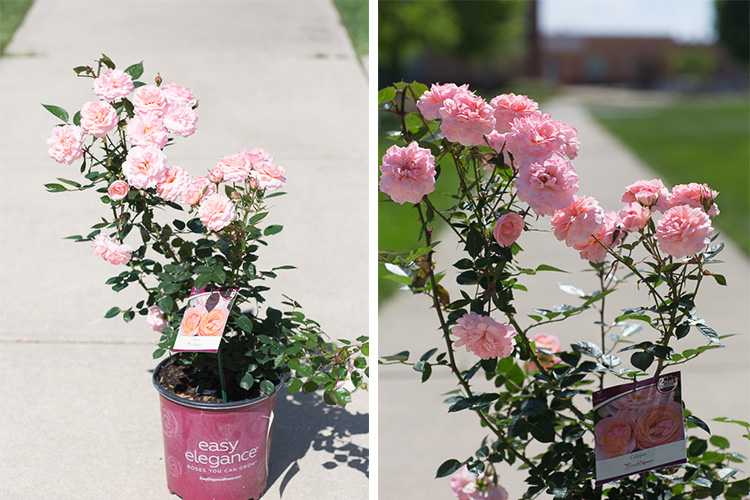
Image on the left – Roses are facing the bright sun and almost appear washed out. Image on the right – Roses are in shadow and are darker when backlit.

If you want to maintain detail in the background or sky in a backlighting situation, you should use a reflector to bounce some light back into the subject’s face. This eliminates the need to overexpose the background especially when metering for the face (or part of the subject in the shade). Depending on the strength of the reflector, and the position of the sun, you can even underexpose the image to retain more highlights in the background while evenly lighting the subject by way of the reflector.

Memorable Jaunts Tips for photographing in the harsh midday sun-7

Left: A reflector with the silver side facing the roses is used to add more directional light on the flowers. Right: A close-up picture of the roses, slightly underexposed to maintain the clear blue in the sky, the light from the reflector is adding the pop of light on the flowers.

#2 Open shade or even lighting

The best way to avoid distracting facial shadows from midday lighting, is to bring your subjects into a shaded area. Shade can be provided by a large tree, an open garage, a building, an awning, or anything that casts a big enough shadow to cover your subject. The benefit of shade is that it creates even lighting where no direct sun is hitting the face or body, allowing the subject to be evenly lit. The key is to place your subject at the very edge of the shade, so that while they are evenly lit there is still enough light to illuminate them. If you place your subject in the darkest part of the shade, the light hitting them may be lost. Also make sure you are not using patchy shade, especially when subject is placed under a tree. This can cast what is called dappled light on your subject, causing uneven spots of light on their face and body.

Memorable Jaunts Tips for photographing in the harsh midday sun-8

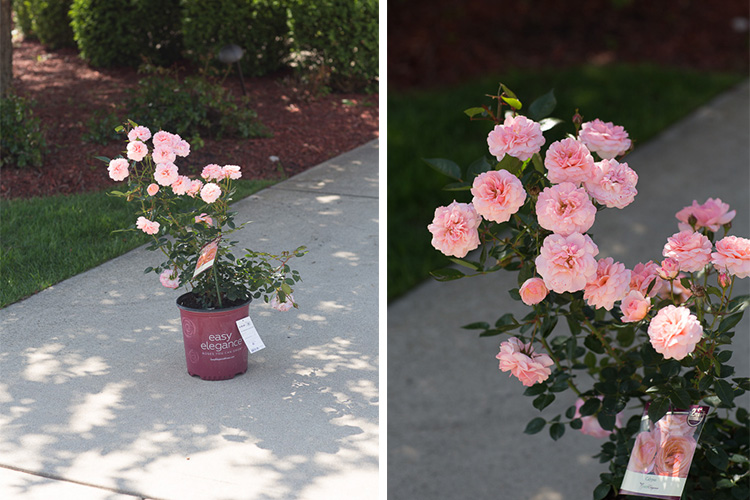
Left: Rose bush under the shade of a tree. Right: An example of dappled lighting on the roses. Notice how some roses are in the sun, while other are in the shade. This type of uneven lighting can cause undesired hot spots, especially on skin and hair.

Memorable Jaunts Tips for photographing in the harsh midday sun-10

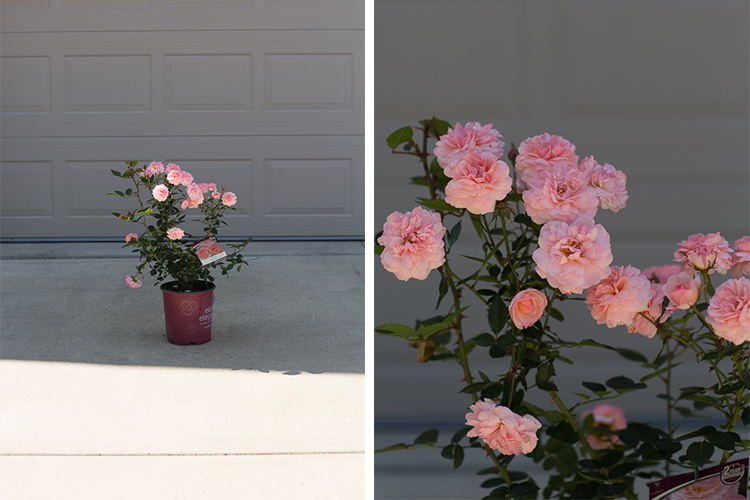
Left: Rose bush at the edge of the shadow cast by the front of the house. This type of open shade is more even and uniform. Right: Close-up of the roses in the shade.

Memorable Jaunts Tips for photographing in the harsh midday sun-11

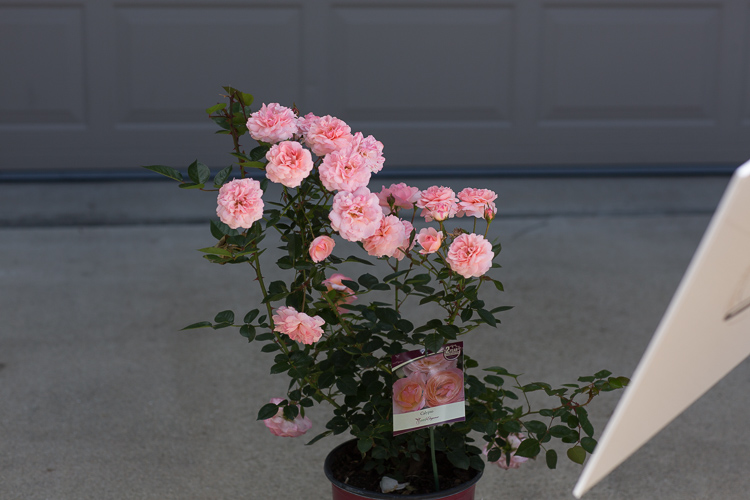
A simple white foam core board was used to add a little pop of reflected, directional light, onto the roses in the shade.

#3 Full sun with a diffuser

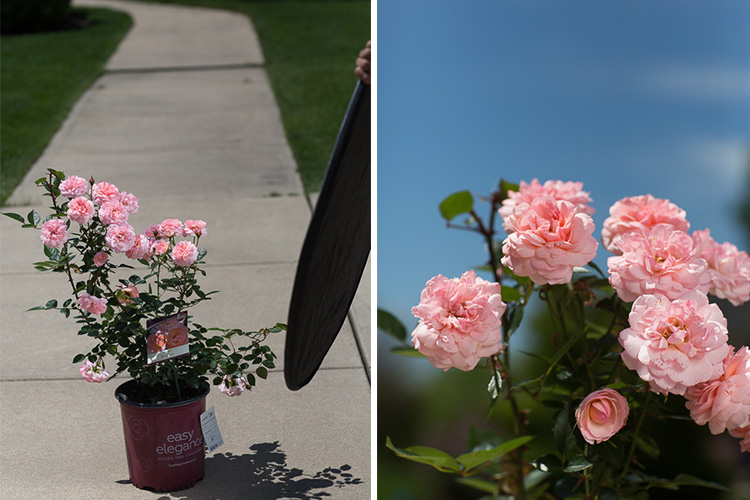
If all else fails, and you have no other alternative but to place your subject in the full, harsh sunlight, either because of location restrictions, or time of day limitations, then using a diffuser (translucent panel of your reflector) might be the next best option.

A diffuser takes in the harsh sunlight and spreads it evenly over your subjects. This also gives your subject some respite from the harsh sun, and casts a shadow on them so they are not squinting into the sun. In the simplest form a diffuser can be a piece of translucent white fabric (like a bedsheet). Of course, this does assume that you have an extra pair of helping hands to hold up the diffuser, when you’re shooting on location. I have been known to solicit the help of strangers, to help hold the diffuser for a quick minute or so while I take the shot – be resourceful!

Memorable Jaunts Tips for photographing in the harsh midday sun-16

Left: Roses in full sun. Right: A simple diffuser panel that casts even, soft light onto the flowers

Memorable Jaunts Tips for photographing in the harsh midday sun-15

Close-up of the roses with diffused lighting for a more even tone and color under harsh midday sun.

So the next time you have a client wanting to shoot in the middle of the day, don’t hyperventilate and come up with excuses to avoid the situation. Instead take up the challenge and try these techniques. If nothing else, it will make you more confident as a photographer, and also help you understand light a bit better.

For more reading check out: Portrait Photography: How to Photograph People in the Harsh Midday Sun or 5 Ways to Create Dramatic Landscape Photos at Midday.

What other tips do you have for photographing in the harsh midday sun? Please share in the comments below.

googletag.cmd.push(function() {
tablet_slots.push( googletag.defineSlot( “/1005424/_dPSv4_tab-all-article-bottom_(300×250)”, [300, 250], “pb-ad-78623” ).addService( googletag.pubads() ) ); } );

googletag.cmd.push(function() {
mobile_slots.push( googletag.defineSlot( “/1005424/_dPSv4_mob-all-article-bottom_(300×250)”, [300, 250], “pb-ad-78158” ).addService( googletag.pubads() ) ); } );

The post 3 Quick Tips for Photographing in the Harsh Midday Sun by Karthika Gupta appeared first on Digital Photography School.


Digital Photography School

 
Comments Off on 3 Quick Tips for Photographing in the Harsh Midday Sun

Posted in Photography


Cruelty of Concrete: Harsh Architecture in Berlin & Beyond

17 Nov

[ By Steph in Architecture & Public & Institutional. ]

berlin brutalism fem 1

There is an innate coldness and harshness to concrete that lends it a sinister air, as if unsavory practices are carried out within, even if the building is actually in use as a church or monastery. Spanning a range of architectural styles and movements from Bauhaus to Constructivism, most of these concrete wonders of Europe are in use as animal research facilities, former bunkers, libraries and hotels, while others remain abandoned.

Mouse Bunker, Berlin: FEM Animal Testing Facility

berlin brutalism fem 2

berlin brutalism fem 3

The imposing exterior of the FEM facility at Berlin’s Research Institute for Experimental Medicine is fittingly frightening for the activities that take place within: namely, testing on 88,000 laboratory animals. Known locally as the ‘Mouse Bunker,’ FEM was built in 1980 and its shape was ironically inspired by the sheep-stalls of Lower Saxony.

Sainte Bernadette Church, Nevers
cruel concrete st bernadette 1

cruel concrete st bernadette 2

cruel concrete st bernadette 3

Designed by French architect Claude Parent and built in 1966, the Sainte Bernadette Church in the city of Nevers is about as un-churchlike as churches get. The solid concrete Brutalist structure eschews ornamentation for a utilitarian appearance that continues into the interior.

Bibliotheque Louis Nucera, Nice, France

crucl concrete bibliotheque

cruel concrete bibliotheque 2

This modern library in Nice is among the world’s most unusual, with a square block sitting atop a giant sculpted neck. Named for author Louis Nucera, the building is a joint project between architects Bayard and Chaps and sculptor Sacha Sosno.

IBM France Research Center

cruel concrete ibm france

cruel concrete ibm france 2

cruel concrete ibm france 3

Marcel Breuer’s 1962 IBM Research Centre and Forum features a double Y-shaped plan situated on a sloping site overlooking the French Riviera. Precast concrete units on the facade disguise a system of in-situ concrete columns

Ghostly World War II Boat Pen, Bordeaux, France
cruel concrete sous marine 1

cruel concrete sous marine 2

cruel concrete sous marine 3

cruel concrete base sous marine 4

Sections of the abandoned Base Sous-Marine in Bordeaux are occasionally put to use as a dramatic backdrop for special events, but otherwise, this World War II wonder completed by the Germans in 1944 remains hauntingly empty. It once served as a home base for supply boats, torpedo transports, U-boats and the 12th Flotilla of long-range boats in the war and features a nearly indestructible 30-foot-thick roof. The whole thing occupies a total area of nearly 463,000 square feet and was made from 21,188,800 cubic feet of concrete.

Forum Hotel, Krakow

cruel concrete forum hotel

cruel concrete forum hotel 2

cruel concrete forum hotel 3

Constructed between 1978 and 1989, Krakow’s Hotel Forum remains one of Poland’s most sci-fi-looking structures, but today, it’s deteriorating, its facades often covered in oversized billboards.

St. Agnes Church, Berlin

cruel concrete st. agnes church

Once adorned with a neon blue cross that gently illuminated its harsh silhouette in the geographical center of Berlin, St. Agnes Church (built in 1967) was recently turned into an art gallery.

Jesuit Cloister by Paul Schneider-Elsleben, Nymphenburg
cruel concrete jesuit cloister

Life must have felt harsh for the Jesuit monks who inhabited this Nymphenburg monastery by Paul Schneider-Esleben, completed in 1965.

Water Towers in Germany by Bernd & Hilla Becher
cruel concrete water towers 3

cruel concrete water tower 2

Water towers take on all sorts of weird shapes around the world, but Germany has its own special collection of Brutalist concrete versions by Bernd & Hilla Becher and Helmut Erdle.

Tour Vigie et Reservoir, Gaston, France
cruel concrete tour vigie

Undeniably weird, this watchtower and reservoir designed by Gaston Jaubert and built in 1974 looks over the port of Fos-sur-Mer in France.

Radio Kootwijk, Netherlands
cruel concrete radio netherlands

cruel concrete radio netherlands 2

Pre-dating most Brutalist and modernist architecture by several decades, the Radio Kootwijk building began construction in 1918. Designed by Dutch architect Julius Maria Luthmann in Art Deco style, it’s an interesting juncture of a typically ornate architectural style and a rather impersonal material. The Germans blew up the transmitter during World War II and the building has been in disuse ever since.

Pilgrimage Church by Gottfried Bohm, Neviges, Germany
cruel concrete pilgrimage church 1

cruel concrete pilgrimage church 2

Designed by Pritzker Prize-winnign architect Gottfried Böhm and built in 1963, the Pilgrimage Church in Neviges, Germany resembles nothing more than an organic composition made from an unnatural medium, like a cluster of oversized crystals rising from the green hillside.

Share on Facebook


[ By Steph in Architecture & Public & Institutional. ]

[ WebUrbanist | Archives | Galleries | Privacy | TOS ]


WebUrbanist

 
Comments Off on Cruelty of Concrete: Harsh Architecture in Berlin & Beyond

Posted in Creativity


Tips to Protect your Gear in Harsh Weather Conditions

18 Dec

Do you live in a cold and snowy climate? Are you planning a trip to a desert or a tropical island? Although adverse weather or harsh environments can yield some of the best images, those situations can also play havoc with your camera gear if you don’t plan accordingly. Here are some simple steps to help you shoot without ruining your equipment.

Tips to Protect your Gear

Rain

I love photographing in the rain. Of all adverse weather conditions, rain is one of the easiest to deal with to protect your camera. ©Valérie Jardin

I love photographing in the rain. Of all adverse weather conditions, rain is one of the easiest to deal with in regards to protecting your camera. ©Valérie Jardin

Don’t let a rainy day stop you from making amazing photographs. Just protect your camera, and yourself, and get out there! Although some of the most expensive DSLRs and lenses are weather sealed and can be used in the rain without protection, most cannot. The good news is that they can easily be fitted inside a rain sleeve specifically designed to keep them dry on rainy days. Rain sleeves will cost from a few dollars for a clear plastic model, to $ 30+ for a more durable water proof material. The more expensive rain sleeves come is different sizes to fit your lens. Note that they work best when you use a lens hood.

It’s harder to find rain protection for smaller camera systems. A makeshift cover with a shower cap or a freezer bag will usually do the trick. Since I mostly shoot street photography with a mirrorless camera, I find that holding an umbrella is quite convenient if it’s not too windy. The camera is small and light, one hand to shoot is all you need!

Snow and cold

Again, what most would consider adverse weather makes for a photographer’s ideal playground. Heavy snow falls should be treated like rain and the same protection applies. Dealing with the cold, on the other hand, is a different story. When out in the cold, your camera doesn’t need any special protection as long as it stays dry. One of the biggest issues with shooting in cold weather is the moisture and condensation that can build up on your camera and lens when you go from cold, to the warmth of your home or car. Excessive moisture on your lenses can cause mold to form inside the lens, which will ruin it.

To prevent damage from condensation, here is what you need to do: Before you go back inside your house or car, make sure you seal your camera in an air-tight plastic bag. This will allow the camera to reach room temperature while the condensation builds on the outside of the bag, not on your precious gear.

Mirror lock-up can also happen in very cold temperatures when the lubricant that helps activate the moving parts freezes. Cameras can usually handle colder temperatures than stated in the manual, but be aware that this type of lock-up could happen if you end up in the arctic circle.

Another thing to worry about when the temperature dips, the battery will drain much faster. So, make sure you carry a spare or two that you keep in a pocket, as close to your body heat as possible. Smaller cameras don’t have as many moving parts, and no mirror freeze up to worry about, but their batteries will drain even faster, so be prepared for that.

Your camera needs some special attention in cold and wet conditions. ©Valérie Jardin

Don’t hibernate with your camera in cold weather. Just take some special steps to protect it and yourself! ©Valérie Jardin

Extreme humidity

Besides the obvious inconvenience of your lens fogging up as soon as you leave your air conditioned room and step into the hot and humid environment, humidity can also lead to mold. You can alleviate the fogging up of the lens by placing your gear in a sealed plastic bag and letting it slowly adjust to the change of temperature. Avoid changing lenses as much as possible and remember that zooming in and out will pump humidity inside. Favor prime lenses!

Keep sensitive equipment in sealed bags and keep small silica desiccant packets in your camera bag to absorb some of the moisture. Dry your hands before you change batteries or memory cards to prevent trapping moisture in the compartment.

Tropical environments bring a lot of great photo opportunities, just make sure the moisture doesn't get inside your camera! ©Valérie Jardin

Tropical environments bring a lot of great photo opportunities. Just make sure the moisture doesn’t get inside your camera! ©Valérie Jardin

Heat

Just like extreme cold, the opposite can also give you some gear trouble. Use common sense and avoid prolonged exposure to direct sunlight. Keep your camera cool, and in the shade when not in use. Cameras can overheat and this can cause damage to the internal components. You can use an empty cooler which will help keep your camera cool when you’re not using it. It’s also a good idea to carry one of those space blankets when you are out in the wild or extreme weather. You can use it to protect your camera from the sun as well.

Sand and dust

Have you ever been on a beach during a sand storm? I have! No matter what you do, sand will get everywhere! If you are going to be in an extremely dusty environment, I would highly recommend protecting the front element of your lens with a good quality filter. An occasional scratch from wiping some of the dust or sand off the front of your lens won’t hurt as much if it happens on the filter rather than the lens itself. Also, don’t set your camera bag on the sand! Camera bags are perfect sand traps.

Salt

If you shoot near the sea on a windy day, there will surely be some spray of salty water on your gear. Again, a UV filter will help protect the front element of your lens. Make sure your battery is full and your memory card is empty before you head out so that you avoid opening the battery or memory card compartment at all costs to prevent corrosion to form inside. It may not be a good time to change lens on the beach either.

Never leave home without them

A blower such as the Giottos Rocket blower. It’s such a small investment and one of the best accessories you can have in your camera bag at all times. I not only use it to blow any dust from the lens before I wipe it with a lens cloth. But I also blow the back of the lens before I put it on the camera to prevent dust from reaching the sensor. I also use it to blow air on the lens and camera before I wipe them clean.

Microfiber cloths. Keep one separate that you will use for the front of your lens only. Carry extras to wipe the dust or water from your lens and camera body. The key is to remove as must moisture or dust as quickly as possible.

Common sense when changing lenses

Avoid changing lenses in adverse weather. If you absolutely have to, follow these simple steps: Do it in your car if you can. If not, turn your back to the wind and be ready to do it quickly. Place the new lens on a clean, flat surface. Unscrew the back cover but leave it on. While shielding your camera from the elements with your body, put the camera upside down and quickly switch lenses. This should only take a second or two to minimize the amount of dust that will get to your sensor.

Protect yourself

Protecting your gear from extreme weather won’t do much good if you don’t make it back alive! Whether you are dealing with extreme cold or heat, don’t mess with extreme weather if you’re not prepared. No picture is worth risking your life for!

I hope you found some of those tips useful. Please share your own with the community in the comment section below.

More reading on this subject

  • How to protect your gear in extreme conditions
  • Storm jacket cameras cover – a review by Valérie Jardin
  • 7 digital camera predators and how to keep them at bay
  • Camera insurance – assure peace of mind


The post Tips to Protect your Gear in Harsh Weather Conditions by Valerie Jardin appeared first on Digital Photography School.


Digital Photography School

 
Comments Off on Tips to Protect your Gear in Harsh Weather Conditions

Posted in Photography


Portrait Photography: How to Photograph People in the Harsh Midday Sun

13 Aug

By: Oded Wagenstein

Great tips and tricks on overcoming the harsh mid-day sun to create beautiful portraits on either side of the “golden hours”

The Golden Time

The best time to take almost any kind of  picture, is in the “golden hours”: around one hour before sun down and one hour after sunrise, because that’s when the light is at its softest, lacking hard shadows, rich in colors, bathing your subject in even light, which entering from the side and that gives your subjects face definition.

-Uzbekistan-  Canon EFS 17-55mm f/2.8  Fstop of 3.5, shutter speed@10 ISO 160

-Uzbekistan-
Canon EFS 17-55mm f/2.8
Fstop of 3.5, shutter speed@10 ISO 160

-Tajikistan- Canon EFS 17-55mm f/2.8 Fstop of 5.6, shutter speed@15, ISO 200.

-Tajikistan-
Canon EFS 17-55mm f/2.8
Fstop of 5.6, shutter speed@15, ISO 200.

-China - Canon EFS 17-55mm f/2.8 Fstop of 2.8, shutter speed@10 and ISO 400 Natural light (sunrise) entering the frame from the right

-China –
Canon EFS 17-55mm f/2.8
Fstop of 2.8, shutter speed@10 and ISO 400
Natural light (sunrise) entering the frame from the right

-Tajikistan- Canon EFS 17-55mm f/2.8 Fstop of 5.6, shutter speed@10 and ISO 100 Natural light (sunrise) reflecting from the mountains, which are about 45 degrees to the woman (you can see it in the window).

-Tajikistan-
Canon EFS 17-55mm f/2.8
Fstop of 5.6, shutter speed@10 and ISO 100
Natural light (sunrise) reflecting from the mountains, which are about 45 degrees to the woman (you can see it in the window).

Once this time (golden time) has passed, we are left with harsh, unflattering light that is low in saturation and makes the images look dull and flat as you can see in this photo:

-India- Canon EFS 17-55mm f/2.8 Fstop of 8, shutter speed@10 and ISO 100 The harsh mid-day sun is just above him.

-India-
Canon EFS 17-55mm f/2.8
Fstop of 8, shutter speed@10 and ISO 100
The harsh mid-day sun is just above him.

The Problem

In order to provide solutions, first let’s understand the “problem”: Your camera doesn’t see as well as your eyes.  The “problem” is the camera’s dynamic range.  In plain English, the dynamic range is the distance between the brightest and darkest points in the frame.  Let’s say you take a shot of a man wearing a hat in the middle of the day, when the sun is at its highest and harshest. Your eyes will be able to make out his eyes even under the shadow of his hat, as well as his chin in the strong daylight. That’s because your eyes have the ability to see a large dynamic range.

Your camera however has a far more limited ability to see the dynamic range .If you we go back to our man in the hat, your camera will see his eyes, which are in shadow under his hat as black, while his chin which is in strong sunlight will be blown out and very white.

You might try to “fix it” by changing your aperture/shutter or ISO parameters but, this would only make your image lighter or darker as these actions have no bearing on the dynamic range. Even if we try to use an ND filter, again, this would only make your image darker and would not solve the problem or alter the range.

The Solutions

Move to the shade
Try moving the subject to the shade, or perhaps indoors. When I asked Steve McCurry, the creator of the “Afghan Girl” image, how he works in the mid day sun, he told me that he prefers to work indoors with the harsh light coming in through a window so that it turns to soft even light, and that’s really change my way of “seeing” the harsh light as an opportunity of creating great images by moving to the shade or indoors.

-Thailand- Canon EF 24-70 mm f/2.8L Fstop of 3.5, shutter speed@10 and ISO 160 This woman is sitting in the shade with strong light coming from the street (to her left). A small piece of paper was held above her head to block the light (flag).

-Thailand-
Canon EF 24-70 mm f/2.8L
Fstop of 3.5, shutter speed@10 and ISO 160
This woman is sitting in the shade with strong light coming from the street (to her left). A small piece of paper was held above her head to block the light (flag).

Try turning your subject 45 degrees to the light source (exp: window) by doing so you will be able to create a nice 3D effect.

-Uzbekistan- Canon EFS 17-55mm f/2.8 Fstop of 2.8, shutter speed@10 and ISO 500 Natural light (only) coming from the window on the left side of the frame (about 45 degrees)

-Uzbekistan-
Canon EFS 17-55mm f/2.8
Fstop of 2.8, shutter speed@10 and ISO 500
Natural light (only) coming from the window on the left side of the frame (about 45 degrees)

-Laos- Canon EF 24-70 mm f/2.8L Fstop of 3.5, shutter speed@100 and ISO 1000 I used the soft light coming through a red robe which was on the right side of the frame, in order to "sculpture" the light on his face. It also gave the whole image some sort of orange glow.

-Laos-
Canon EF 24-70 mm f/2.8L
Fstop of 3.5, shutter speed@100 and ISO 1000
I used the soft light coming through a red robe which was on the right side of the frame, in order to “sculpture” the light on his face. It also gave the whole image some sort of orange glow.

Create a Silhouette

Expose your image from the background, so your subject becomes a silhouette in some cases it makes for a wonderful image.

You can do so by using the manual exposure (M mode) or by changing the metering mode to spot and measure from the background.

-Thailand- Canon EF 24-70 mm f/2.8L Fstop of 5, shutter speed@10 and ISO 100 (on spot metering) Natural light only

-Thailand-
Canon EF 24-70 mm f/2.8L
Fstop of 5, shutter speed@10 and ISO 100 (on spot metering)
Natural light only

Burn it Down

Burning the background is not always a bad thing. On the contrary it creates a unique portrait that’s different and interesting

-India- Assistant: Hardik Pandya Canon EFS 17-55mm f/2.8 Fstop of 4.5, shutter speed@10 and ISO 200 Natural light only

-India-
Assistant: Hardik Pandya
Canon EFS 17-55mm f/2.8
Fstop of 4.5, shutter speed@10 and ISO 200
Natural light only

Reflector

By using a reflector, you can minimize the light range by bouncing light back onto your subject, which will add light to the dark areas. Like this image below.  I used a small folding reflector, which I held in my hand while taking the photo.

-Tajikistan- Canon EFS 17-55mm f/2.8 Fstop of 8, shutter speed@10and ISO 100 Natural light+ Reflector (gold color) I held in my hand on the lower left side of the frame + warm natural light bouncing off the mud wall

-Tajikistan-
Canon EFS 17-55mm f/2.8
Fstop of 8, shutter speed@10and ISO 100
Natural light+ Reflector (gold color) I held in my hand on the lower left side of the frame + warm natural light bouncing off the mud wall

-India- Assistant: Hardik Pandya Canon EFS 17-55mm f/2.8 Fstop of 2.8, shutter speed@10 and ISO 100 This nice lady was sitting in the shade of her house + silver color reflector, coming from the right upper side of the frame.

-India-
Assistant: Hardik Pandya
Canon EFS 17-55mm f/2.8
Fstop of 2.8, shutter speed@10 and ISO 100
This nice lady was sitting in the shade of her house + silver color reflector, coming from the right upper side of the frame.

External Flash

Like the reflector, the flash will add more light to the dark areas in turn creating a smaller dynamic range.

-India- Canon EFS 17-55mm f/2.8 Assistant: Hardik Pandya Fstop of 9, shutter speed@10 and ISO 100 Natural light of the background sky + fill light flash (off camera and inside a small soft box) coming from the right side of the frame, about 1 meter in front of the man's face.

-India-
Canon EFS 17-55mm f/2.8
Assistant: Hardik Pandya
Fstop of 9, shutter speed@10 and ISO 100
Natural light of the background sky + fill light flash (off camera and inside a small soft box) coming from the right side of the frame, about 1 meter in front of the man’s face.

HDR

Taking 3 (or more) exposures of your subject and using this technique in post processing could come in very handy.

-India- Canon EFS 17-55mm f/2.8 Assistant: Hardik Pandya Fstop of 11, shutter speed@10 and ISO 100 Natural light of the background sky + fill light flash (off camera and inside a small soft box, coming from the left side of the frame) + HDR effect in Photoshop.

-India-
Canon EFS 17-55mm f/2.8
Assistant: Hardik Pandya
Fstop of 11, shutter speed@10 and ISO 100
Natural light of the background sky + fill light flash (off camera and inside a small soft box, coming from the left side of the frame) + HDR effect in Photoshop.

I would like to thank Hardik Pandya and Linda Burnette for their help on making this article.

Do you have any interesting techniques or methods to overcome the harsh light? Please share in the comments.

Oded Wagenstein is a Travel photographer and writer. He is a regular contributor to the National Geographic Traveler magazine (Israeli Edition) and he is known for his intimate culture portraits. You can join his Portrait & Travel Photography blog and continue to discuss on travel and people photography and get more amazing tips!

Post originally from: Digital Photography Tips.

Check out our more Photography Tips at Photography Tips for Beginners, Portrait Photography Tips and Wedding Photography Tips.

Portrait Photography: How to Photograph People in the Harsh Midday Sun


Digital Photography School

 
Comments Off on Portrait Photography: How to Photograph People in the Harsh Midday Sun

Posted in Photography


Sun Too Harsh? Modify It!

19 Feb
For guys, a little harshness in the light can be a good thing.  So for this shot, I positioned the sun over his left shoulder, and a reflector to the right and in front of him. EOS-1D X, EF 85mm f/1.2L II. 1/320, f4, ISO 100.

For guys, a little harshness in the light can be a good thing. So for this shot, I positioned the sun over his left shoulder, and a reflector to the right and in front of him. EOS-1D X, EF 85mm f/1.2L II. 1/320, f4, ISO 100.

I’m big on shooting portraits outdoors.  I love the natural light, the variety of locations available, and the more natural feel.  I think for the average subject, a studio can be an intimidating place.  The problem with shooting outdoors is that you are at the mercy of Mother Nature, for the most part, when it comes to light.  But not to worry.  Just as a simple speedlite can be modified, so can the sun.

When the sun is harsh, there are a few things I can do to soften it. I will use fill-flash outdoors when I have to, but I’m not a fan of straight, on camera flash of any kind if I can help it.  And some situations it’s just not possible to move the flash off camera to act as fill.  I these situations, I go with one of two options. First, I can use a reflector kick light back into the subject’s face.  I will place the sun behind my subject, at an angle so I’m not shooting straight into it. The reflector, I will position the reflector to the exact opposite of the sun, in front of my subject, and to the side. The beauty of using a reflector with the sun is that you can see the effect immediately, unlike with flash.  Have someone hold the reflector and move it around so you can see the effect with it as it moves.  If I have no one available to hold the reflector, I will use a light stand with a reflector holder.  Additionally, a weight of some kind may be helpful if it’s breezy since the reflector will act as a sail.  Your camera back can work for this, or sandbags are ideal. The drawback with a reflector will also be an equally bright object in the eyes of your subject, and could cause him to squint.

Here you can see the difference with and without a scrim. On the left is straight sunlight with no modifiers.  It's not terrible, but harsher than I wanted on her face. I turned her around to face the sun, and used a scrim to soften the light on her. The result, in my eyes, was much more pleasing. EOS-1D X, EF 85mm f/1.2L II. Exposure for the image without the scrim was 1/1000, f/1.2, ISO 100 with +1 exposure compensation.  For the image on the right, 1/3200, ISO 100, f/1.2.

Here you can see the difference with and without a scrim. On the left is straight sunlight with no modifiers. It’s not terrible, but harsher than I wanted on her face. I turned her around to face the sun, and used a scrim to soften the light on her. The result, in my eyes, was much more pleasing. EOS-1D X, EF 85mm f/1.2L II. Exposure for the image without the scrim was 1/1000, f/1.2, ISO 100 with +1 exposure compensation. For the image on the right, 1/3200, ISO 100, f/1.2.

Sometimes, even with a reflctor, the light is much too harsh for what I’m looking for. In cases like this, I will use a scrim. In my case, my reflector and scrim are part of the same tool.  I currently use a Westcott 5-in-1 40-inch reflector.  It has a gold side, silver side, black side, white side, and a translucent disc as the center when the outer casing (which makes up the other four sides) is removed.  Using a tool like this means I always have both the reflector and the scrim with me, so I’m able to use whichever best suits the lighting conditions.

When using a scrim, I will position my subject so they are looking into the sun, and place the scrim between them and the sun. The scrim is the translucent part of reflector, and will allow the light to come through, although more diffuse than unmodified sunlight.   It’s easy to make a homemade scrim as well, using PVC piping or a wood frame, with nylon from a fabric store.  When making your own, it’s important to get neutral fabric, or else it will create a color cast on your subject.

The sunlight on her face was far too harsh for the effect I wanted.  I had her friend hold a scrim up to soften the light on her face, which gave me just what I was looking for.  EOS-1D X, EF 85mm f/1.2L II. ISO 100, 1/1000, f/1.2.

The sunlight on her face was far too harsh for the effect I wanted. I had her friend hold a scrim up to soften the light on her face, which gave me just what I was looking for. EOS-1D X, EF 85mm f/1.2L II. ISO 100, 1/1000, f/1.2.


Post originally from: Digital Photography Tips.

Check out our more Photography Tips at Photography Tips for Beginners, Portrait Photography Tips and Wedding Photography Tips.

Sun Too Harsh? Modify It!


Digital Photography School

 
Comments Off on Sun Too Harsh? Modify It!

Posted in Photography


Football Photography – Harsh Shadows

25 Oct

How to deal with harsh shadows when shooting football

 
Comments Off on Football Photography – Harsh Shadows

Posted in Photography Videos