There is a spot about 25 minutes west of the city. It is a spot right along the highway with a big sign that says, “Scenic Viewpoint”. Naturally it draws a lot of photographers. A quick look on Google will show a lot of sunsets shots, most with the guard rail along the bottom.
Having 45 minutes before sunset, with a 20 minute drive, plus 10 minute walk, leaves no time to find and compose a shot. Being able to walk into the spot, set up and shoot makes some shots possible.
I know, I am one of them, making the scramble to get set up. Of course, it’s natural not to know the cool little spots when you are just passing through the area. However, after living in a place for some time, you start to learn of some go-to spots. You know, those places you can confidently walk into as the light is building, set up, and be there when the shot happens? If you don’t have a list of go-to spots you may want to consider making one, it can help you improve your photography.
Over the past couple of years that I’ve been shooting, I have developed a lengthy list of very specific spots (down to where the tripod stands) that all have their ideal season, weather, and time of day combination.

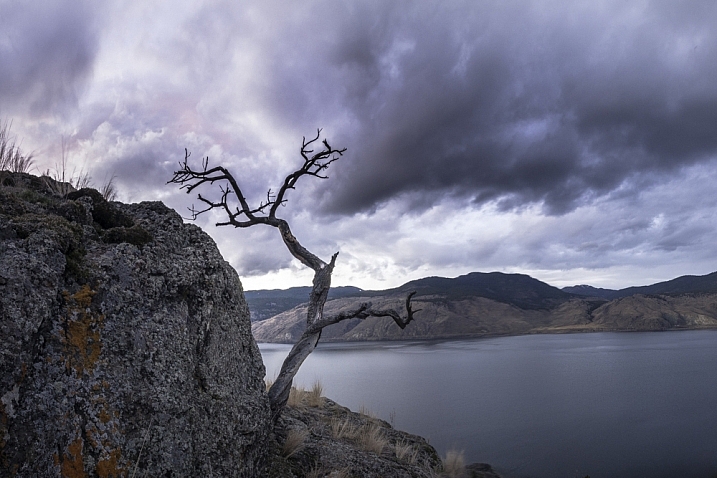
After an hour of walking this area, I found the spot that aligns the features of this shot. This way if it looks like a certain shot might have good light, I can save myself a ton of hassle and just get to where I need to be quickly.
This is particularly important when shooting at night, the Milky Way, northern lights, etc. Night photography requires a lot of planning. To make an interesting shot, having good foreground and mid-ground objects is key, and just cannot be done blindly in the dark. Thus a lot of mediocre shots are required while scouting a new area. Learning the angles to line up items in your shot with features in the sky.

This photo was taken on the third trip in to this spot. I knew everything would work, so when the auroras started up I was ready.
The whole process takes some time, but as you revisit locations you will become so confident about it being right, that you can walk up to that certain rock and set up. There’s no second guessing, and wasting time repositioning for a better composition.
Building your list of go-to spots
Most places I shoot, I return to many times. The first trip in is often just to gather info, and shoot some images to use for planning purposes. Here are a few tools that I use:
1. Facebook:
Yes Facebook can be useful, I am part of several Facebook photography groups and specifically one for my local area. Going out to photograph with other people, is a great way to learn an area. Just be careful not to poach another photographers exact go-to spot. I also find groups for other places that I plan to visit.

Being invited along to an area with another photographers is a privilege. Be sure not to steal their go-to spot.
2. Google Maps and Images:
I use Google all the time to find new areas, specifically Maps, for looking into an area to see the lay of the land. The terrain is critical as to how the natural light will play into the shot. If a waterfall only shoots facing north, but you want the sunset behind it, then that will quickly rule out this spot for that shoot. However, it might make a fantastic spot to photograph the auroras.
3. The Photographer’s Ephemeris:
I use the Photographer’s Ephemeris to place celestial events. I won’t go into the ins and outs of the Ephemeris, but it will allow planning of moonrise, sunset, sunrise, etc., type of shots. It shows the azimuth, and time when certain events occur for any day of the year. Very handy if you plan to photograph the moonrise in a notch along a ridge, or something.

If you are interested in getting a shot of the sun rising at the end of the lake you will have to wait.
4. Boots on the ground:
Research can only take you so far before you have to get your feet dirty. Making day hikes into a new area is by far the best way to explore a specific spot. Just make sure to get off the beaten path, if possible, to see what others might miss. This is also the time to get some shots which I call taking notes. The images can even be iPhone shots, because their purpose is to gather info. I always look at my images and quickly see better positions to shoot from, or a feature that went unnoticed.
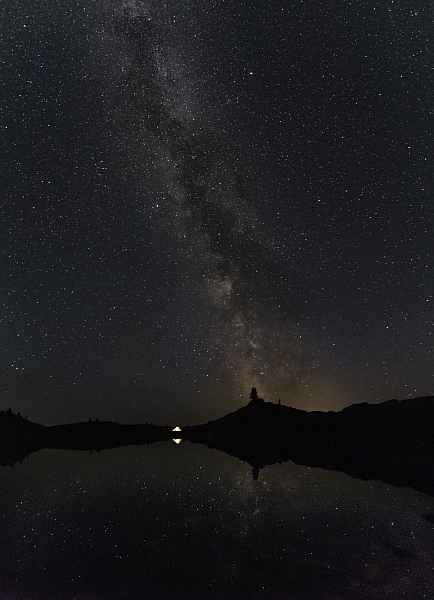
Timing is everything when lining up celestial objects. Knowing your go to spot can help you get the most out of your shots. I wasn’t by chance that the Milky Way lines up with that point of rock.
You get the idea. I guess there is a fifth note, and that is to just keep going into places and taking shots. I always see better positions to shoot from while going through my images. Having a lot of go-to spots is the result of simply going to a lot of places. Remembering how each spot shoots, and knowing when the conditions will work best.
Although I am a landscape and nature photographer, who focuses on night sky photography, I also know the value of go-to spots for portrait and wedding photographers as well. Knowing when and where to shoot can make or break your shots. Being able to reduce harsh shadows and wrong angles to make more of your shots usable.
Do you have any go-to spots near where you live? Share your images and comments with us below.
googletag.cmd.push(function() {
tablet_slots.push( googletag.defineSlot( “/1005424/_dPSv4_tab-all-article-bottom_(300×250)”, [300, 250], “pb-ad-78623” ).addService( googletag.pubads() ) ); } );
googletag.cmd.push(function() {
mobile_slots.push( googletag.defineSlot( “/1005424/_dPSv4_mob-all-article-bottom_(300×250)”, [300, 250], “pb-ad-78158” ).addService( googletag.pubads() ) ); } );
The post Improve Your Photography by Having Go-To Places to Shoot by Dave Markel appeared first on Digital Photography School.

Digital Photography School


You must be logged in to post a comment.