RSS
 

Posts Tagged ‘Gimp’

GIMP 2.8.22 fixes crash issues and 10-year-old bug

16 May

Developers of the GNU Image Manipulation Program, or GIMP, have released an updated version that corrects a number of problems that could cause the software to crash. The free-to-use ‘Photoshop alternative’ is now in version 2.8.22 for Mac and PC and includes fixes for a number of operations, such as drag-and-drop/copy-and-paste uses of the clip board and use of the color picker, that could make the program crash.

A new arrangement for the way the main image window appears in single-window mode is also said to make painting easier when particular themes created in the GIMP tool kit are in use. A further issue solved is one that has bothered the developers since 2007 – that of a vulnerability that allowed attackers to crash the import plug-in for ICO files.
For more information see the GIMP website. 

Developer’s information

GIMP 2.8.22 Released

We are releasing GIMP 2.8.22 with various bug fixes.

All platforms will benefit from a change to the image window hierarchy in single window mode, which improves painting performance when certain GTK+ themes are used.

This version fixes an ancient CVE bug, CVE-2007-3126. Due to this bug, the ICO file import plug-in could be crashed by specially crafted image files. Our attempts to reproduce the bug failed with 2.8 and thus the impact had likely been minimal for years, but now it is gone for good.

Users on the Apple macOS platforms will benefit from fixes for crashes during drag&drop and copy&paste operations. On the Microsoft Windows platforms, crashes encountered when using the color picker with special multi-screen setups are gone, and picking the actual color instead of black from anywhere on the screen should finally be possible.

Check out the full list of fixed issues since 2.8.20.

The source code, the Microsoft Windows installer and the Apple Disk Image for GIMP 2.8.22 are available from our downloads page; so yes, this time we made an effort to publish everything in one go 🙂

Overview of Changes from GIMP 2.8.20 to GIMP 2.8.22
===================================================

GUI:

– improve drawing performance in single window mode, especially with
pixmap themes

macOS DMG:

– Make the launcher script also set BABL_PATH
– Add patch for GTK+ Bug 743717 to the build which concerns crashes
during clipboard operations with a clipboard manager active
– Add patch for GTK+ Bug 767091 to the build which concerns crashes
on some drag & drop operations
– generate OSX package metadata during build

Plug-ins:

– Fix for CVE-2007-3126, a bug in the ICO plug-in which allowed
context-dependent attackers to cause a denial of service (crash)
via an ICO file with an InfoHeader containing a Height of zero.
We couldn’t reproduce any crash in recent version, but fixed the
error messages for good measure
– Avoid creating wrong layer group structure when importing PSD
files (already fixed in 2.8.20, didn’t make it to the NEWS)
– Prevent a crash in PDF plug-in if images or resolution are large
– stop parsing invalid PCX files early and prevent a segmentation fault

General:

– if NOCONFIGURE is set, autogen.sh won’t run configure
– VPATH builds for win32 targets have been fixed

Updated Translations:

– Basque
– Brazilian Portuguese
– Catalan
– Chinese (PRC)
– Finnish
– Greek
– Hungarian
– Italian
– Kazakh
– Norwegian
– Polish
– Slovenian
– Spanish
– Swedish

Articles: Digital Photography Review (dpreview.com)

 
Comments Off on GIMP 2.8.22 fixes crash issues and 10-year-old bug

Posted in Uncategorized


GIMP seeks funding for future advanced features

20 Jan

Open source image editing application GIMP has always been free, but the work required to continue building and improving the software doesn’t come without cost. In a recent post, the team asks GIMP’s users to lend financial support to Øyvind Kolås, the man behind the Generic Graphics Library (GEGL) and 42% of its commits.

Kolås is responsible for numerous improvements to the graphics engine GEGL, as well as the pixel data conversion library babl. Thanks to this work, in part, GIMP 2.10 will offer numerous notable features including the previously announced 16-bit and 32-bit color channel processing. However, some requested features are still missing, including CMYK and spot colors support, additional filters, better GPU usage and more. 

To help get the ball rolling on those features and others like them, GIMP is pointing users toward a Patreon page for Kolås, where he explains, “GIMP does not redistribute donations to developers/contributors — and I am currently living off savings…” Thus far 186 patrons have lended a total of $ 793/month support for Kolås. Support options for prospective patrons starts at $ 2/month, and ranges up to $ 128/month or higher for institutions.

Via: GIMP

Articles: Digital Photography Review (dpreview.com)

 
Comments Off on GIMP seeks funding for future advanced features

Posted in Uncategorized


Make your Photos Sparkle with GIMP

19 May

A Guest Contribution by Anotherphotograpbynoob.com.

What this tutorial will show you
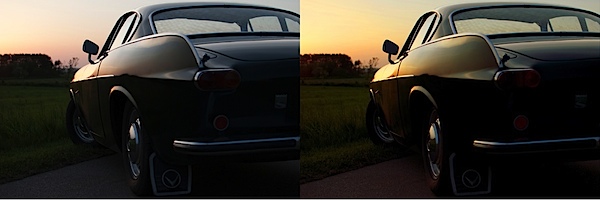
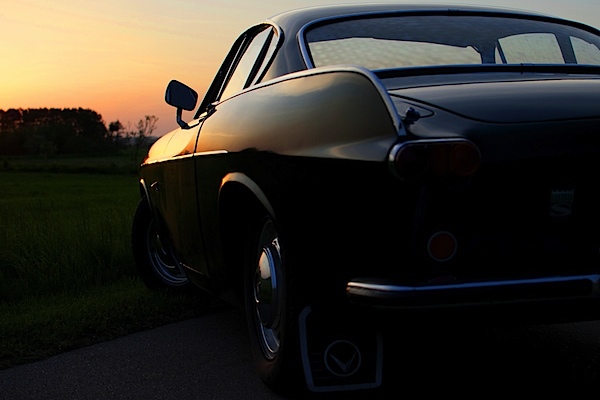
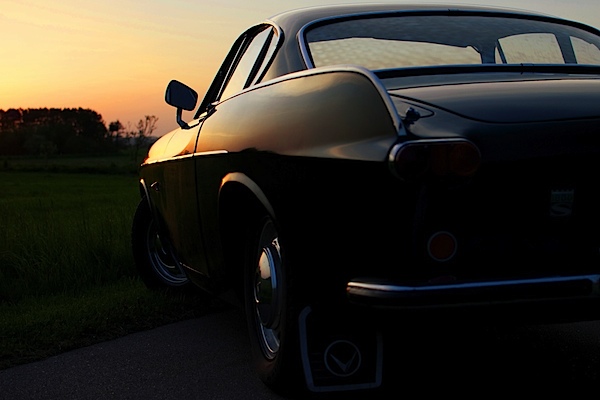
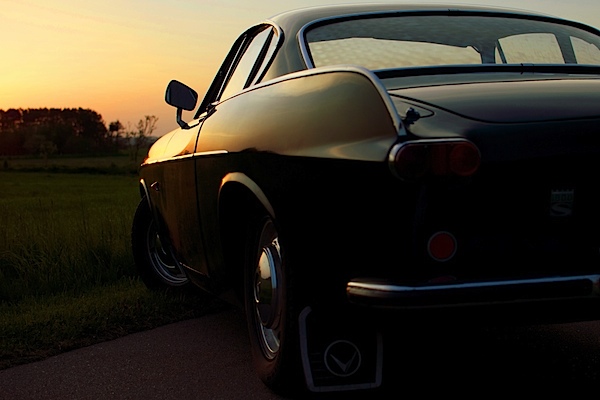
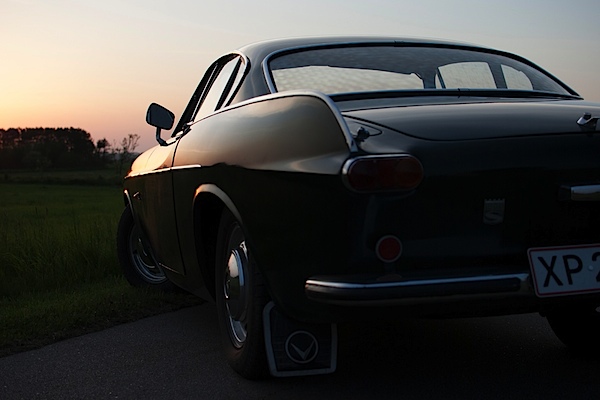
In short: how I made the photo on the right become the photo on the left.

before_and_after_gimp_dps_tuts.jpg

In this tutorial, we will cover basic tools of the free photo editing software GIMP.
Here is a quick rundown of the features covered in this tutorial:

  • Crop a photo in GIMP
  • Increase contrast with the Levels panel
  • Make the colors pop with the Hue & Saturation panel
  • Adjust colors with the Color Balance panel
  • Add a color filter to boost the warm colors in your photo.

Sound hard? Don’t worry. I’ll guide you through the whole process, step by step.

Resources

First of all, you need to have GIMP installed. Click here to download GIMP, and then follow the instructions provided with the software.

If you want to follow along with me in this tutorial, the original photo can be downloaded here. I shot the photo myself last year. The sportscar is a racing green Volvo P1800, just like the one Roger Moore drove in The Saint – yep, my dad tells me the story every time we ride in that car.

You are free to use the photo for whatever you may want, as long as it isn’t illegal of course.

If you are interested in the specifications of my camera, it is:

  • Nikon D3000
  • Nikon DX AF-s NIKKOR 35mm 1.8G
  • Shot at f/3.2, 1/200 seconds and ISO 100
  • The exposure compensation was set to -2.7

Enough with the anecdotes; let’s start editing.

Start it all Up

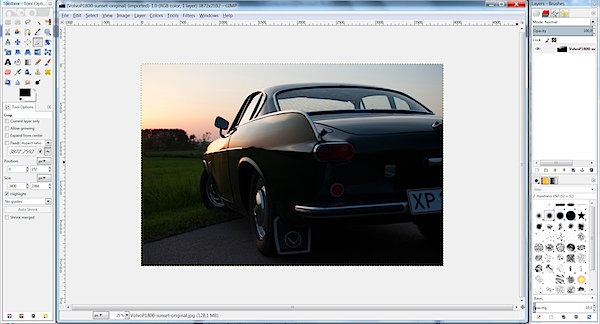
After you have started up GIMP, open up the image you want to edit. If you have chosen to follow along and you haven’t changed too much in the standard layout in GIMP, it should look like this.

gimp-dps-tut-1.jpg

Fixing the Composition

The first thing I want to fix is how I composed the image. I don’t like the license plate showing in the original photo. Ideally, I would like to see no license plate and at the same time as much as possible of both the car and sky.

The easiest way would be just cropping off the right of the photo until the license plate is gone.

But…

I know my mother will most likely print this photo – just as with all the other photos I’ve sent her. In order to make the process of printing the images as smooth as possible, I need to keep the proportions of the image in tact (I don’t want the print service computer system to decide how the photo is cropped).

With that in mind, choose the Crop tool from the toolbox on the left (Shortcut Shift + C).

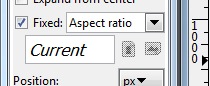
To make sure proportions are kept, check the box labeled Fixed. From the drop-down menu, you should select Aspect Ratio and the value should be set to current. Like this:

gimp-dps-tut-2.jpg

Now you can drag out the area you want to keep. You can adjust it by dragging the corners around the image. When you are satisfied, hit enter and your photo is cropped.

gimp-dps-tut-3.jpg

So far, so good. The image is still dull, I know. Let’s get moving.

Quick Tip – Duplicate the Background Layer

When you open up a photo in GIMP, a background layer will be created automatically. Don’t edit directly on that. Instead, you should make a copy of the layer by pressing Ctrl + Shift + D (Mac: Cmd + Shift + D).

Now you have the original background layer for reference while editing, and no matter the mess you make, you can easily start from scratch.

And now we must go back to the sports car!

Use Levels to Increase Contrast

The first thing I want to do is increase the contrast. This is mainly to darken the ugly details on the back of the car, in order to let the more shiny parts sparkle.

First, open op the Levels panel Color > Levels:

gimp-dps-tut-4.jpg

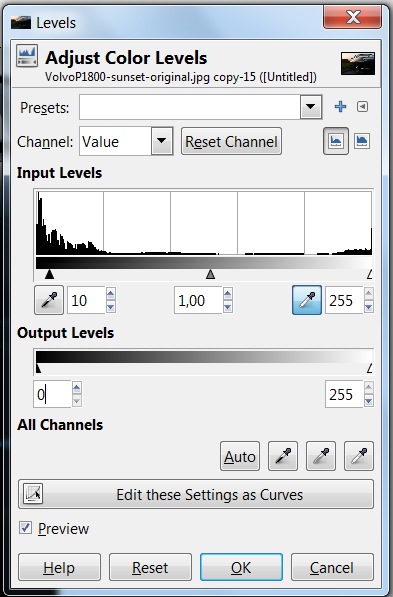
I’ve made a simple move. I just increased the darks by 10 and kept the whites at 255. I kept the whites at 255 to ensure most details are preserved in the sky; we’ve now set the best base for boosting the color of the image.

Work the Colors

The first panel I use in this process is Adjust Hue/Lightness/Saturation.
Go to Colors > Hue-Saturation:

gimp-dps-tut-5.jpg

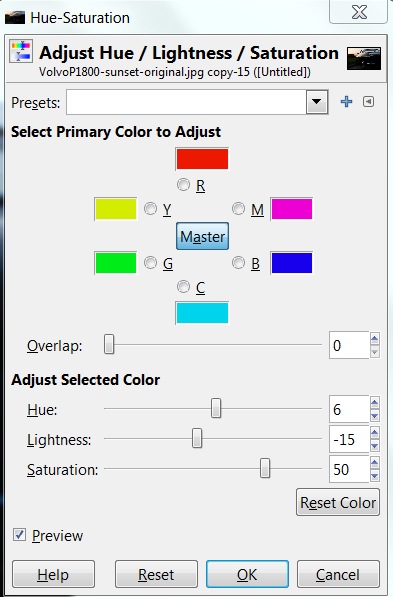
I won’t be explaining every panel I use in detail. Instead, I’ll focus on the settings I needed for this tutorial. I’ve only adjusted the master channel in this panel.

Hue
I’ve increased the hue a little. Six steps up isn’t a lot, but you’ll easily notice the difference. Increasing the hue removes the slight magenta shade in the sky.

Lightness
Even though I adjusted the Levels before, I want an even more warm and dark feeling. Almost like a classical sunset-silhouette – just keeping the details in the photo.

By decreasing the Lightness, I darken the photo and turn up the colors even more in the sky. The Volvo P1800 even starts looking right with dark green colour (the actual name is British Racing Green – another dad anecdote).

Saturation
The final step in the Hue-Saturation panel is increasing Saturation – a lot! I’m putting the pedal to the metal now. All in on sunset.

gimp-dps-tut-6.jpg

The Color Needs more Attention

This is much better. But, I want to adjust it a little bit more. Next stop: the Color Balance panel.

Go to Color > Color Balance:

gimp-dps-tut-7.jpg

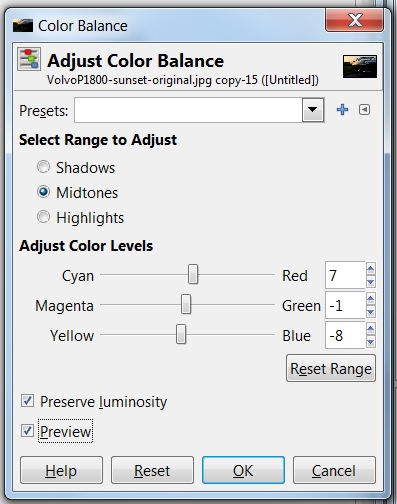
Again, I’m not going into detail on all functions. Just the ones I altered. In this case, it’s the Color Levels of the Midtones.

Cyan <> Red

Everything got a little too blue when I boosted Saturation – especially the car. The first step is decreasing Cyan (by increasing Red). Now the car is getting warmer.

Magenta <> Green

One step down is not doing much, but I really think it helped. It needed some compensation after increasing Red and Yellow.

Yellow <> Blue

Let’s add even more color to the sky and some warmth to the chrome on the car.

gimp-dps-tut-8.jpg

Adding a Color Filter is the Last Thing

I still don’t like the blue shade on the chrome. The last step is to add a color filter. It’s really simple.

First, add a new transparent layer. Just go to Layer > New Layer (Ctrl + Shift + N).
Name the layer “Warm Color Filter.” Choose a transparent layer and click Ok.

gimp-dps-tut-9.jpg

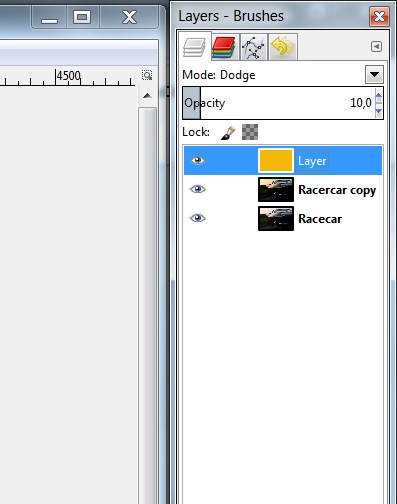
Now select the foreground color and set it to #F4B905. Actually, I just went for a warm orange and landed on this. Not freakishly important. Just go for a warm orange color.

Select the Bucket Fill Tool (Ctrl + B) and fill your new transparent layer with warm orange.

This should turn your entire image warm orange. Looking great, ay?

Ok. Now change the layer opacity to 10%, and set the blend mode to Dodge.

gimp-dps-tut-10.jpg

The result is a nice and warm feeling to the overall photo. And it also got us rid of that blue trouble in the chrome details. Nice.

Saving is now Exporting

As you may already know, GIMP does no longer save in JPEG. But don’t worry, the good people working with GIMP has just moved the function a bit and it is now called Export (Ctrl + E) and Export As (Shift + Ctrl + E), if you need to rename the file.
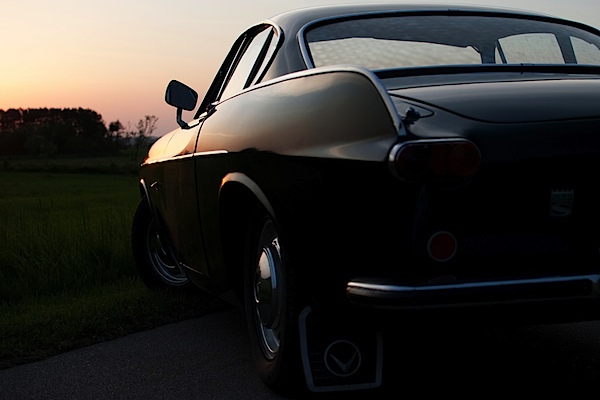
The Final Result

VolvoP1800-sunset-original.jpg

My mom actually ended up printing all the photos of my dad’s sports car. If you want to check out the rest of the sports car photos and even more GIMP tutorials, head over to my blog at http://anotherphotographynoob.com.

More specifically, the images of the sports car are here: http://anotherphotographynoob.com/sportscar/

And all my tutorials for GIMP are here: http://anotherphotographynoob.com/gimp-tutorial/

Anotherphotographynoob is a European blogger and photo enthusiast, blogging daily at Anotherphotograpbynoob.com. It all started as a simple blog posting a photo a day, but recently the blog has moved to a self-hosted solution and now tutorials are being written on a daily basis to help other photo nerds.

Post originally from: Digital Photography Tips.

Check out our more Photography Tips at Photography Tips for Beginners, Portrait Photography Tips and Wedding Photography Tips.

Make your Photos Sparkle with GIMP


Digital Photography School

 
Comments Off on Make your Photos Sparkle with GIMP

Posted in Photography


Gimp Tutorial (3D effect, coming out of tv) by Dom Bwer

18 Dec

Blog www.dombowerphoto.blogspot.com In this video i show you how to work a bit more with layers. using 3 photos taken in my livingroom then with a bit of cutting and pasting i then make it look like i am coming or reaching out of the tv. the software used is free GIMP and it is just like adobe photoshop but…. free. hope this helps regards dom bower www.dombower.com
Video Rating: 5 / 5


Enhancing Zooey Deschanel Using Gimp

01 Nov

I was bored and I haven’t done a photo edit in a while so why not 😛 Song is That Girl by All Time Low ^-^ I do not own picture or music used in the background all rights go to Zooey Deschanel and All Time Low
Video Rating: 0 / 5

 
Comments Off on Enhancing Zooey Deschanel Using Gimp

Posted in Retouching in Photoshop


Male Gimp Touch Up.wmv

30 Oct

Using The Gimp software, a Male Touch up video
Video Rating: 4 / 5

 
Comments Off on Male Gimp Touch Up.wmv

Posted in Retouching in Photoshop


Enhancing the Gimp flame plugin

27 Oct

WARNING: Loud Audio. Learn the basics of the flame plugin and enhance it with glows and lens flares. Go to davidwoodfx.blogspot.com to learn more!
Video Rating: 4 / 5

Very quick semi tutorial (you need to hit pause if you want to read the text, sorry about that, also there’s no sound..) on how to fix a scanned document or sheetmusic in Photoshop so that it comes out in strong black and white, and straight. (I was adjusting a scanned sheet so I can tape it to the piano, and I wanted to test out my new video editing software, and the free screenrecorder..I might have to google for one that does sound.) 1. Add Level adjustment layer and select black and white point. 2. Flatten. 3. Make straight. 4. Desaturate. 5. Save. Done.

 
Comments Off on Enhancing the Gimp flame plugin

Posted in Retouching in Photoshop


GIMP Tutorial – Eye Enhancement

19 Oct

hope u enjoy the vid! its pretty self-explanatory =)
Video Rating: 5 / 5

 
Comments Off on GIMP Tutorial – Eye Enhancement

Posted in Retouching in Photoshop


Extreme Gimp Makeover

02 Aug

Add me on facebook! www.facebook.com
Video Rating: 4 / 5


Change You Lip/Eye Color with GIMP – Tutorial

07 Jun

One of our more simple tutorials. How to change your lip and eye color with GIMP, a basic free alternative to PhotoShop. Download GIMP here: gimp.orgIgnore these tags how to computer tutorials hacks cmd never again will i be able to make money online with youtube ebay myspace hacks crack white black facebook he was so cute irfanview audacity photoshop retouching effects sony vegas platinum eight 8 1 2 3 4 5 6 7 8 9 10 lol he got owned everyone lets party like a rock star rockstar sean paul ownage hitting drunk these are my tags lol coming for pizza eating pig squealing technician techie making cash with your profile account on youtube haha charlie bit me smosh fred fred gets his finger bit off the song charlie the unicorn funny stuff to look at making cash online scratched chalk videos scratchedchalkvideos we own the tutorial making industry the how to masters
Video Rating: 4 / 5