RSS
 

Posts Tagged ‘Flattering’

How to Use Facial View and Camera Angle to take Flattering Portraits

10 Jan

The post How to Use Facial View and Camera Angle to take Flattering Portraits appeared first on Digital Photography School. It was authored by Darlene Hildebrandt.

How to Use Facial View and Camera Angle to take Flattering Portraits
use face angle and camera angle for flattering portrait photography

How do camera and face angles affect your portrait photography? And how can you use different angles to create gorgeous portraits?

It’s all in this article!

Because today, we’re going to examine facial views and camera angles. I’ll discuss how to use both these concepts to your advantage – and how you can use them to flatter your subject.

Let’s get started!

What is facial view? What is camera angle?

Simply put, facial view is the portion or angle of the face that is showing toward the camera. It’s how the subject’s face is turned or angled relative to the lens.

Your camera angle is where you place your camera in relation to the subject – that is, the height, distance, and angle relative to the subject’s face.

Sounds pretty straightforward, right? It is – but small differences in facial view or camera angle can produce undesirable results. We’ll dig a bit deeper into that in a bit, so stay with me!

Facial views

First, let’s look at the four main facial views used in portraiture. They are:

Full face, where your subject’s nose is pointing directly toward the lens. You’ll see equal amounts of both sides of their face:

Full face view

3/4 view, where your subject turns their face just slightly in one direction until you cannot see their far ear anymore:

three quarter face view

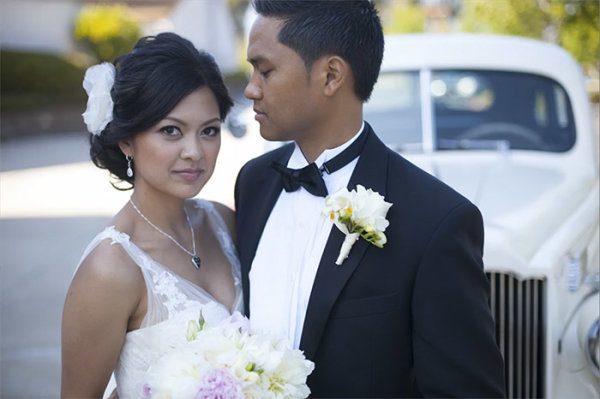
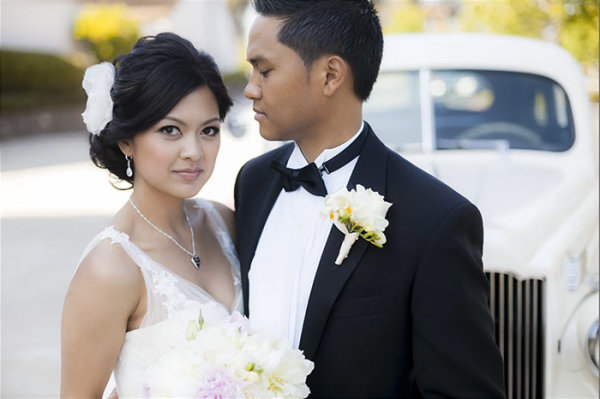
2/3 view, where the subject turns their head until the line of the nose is almost touching the outline of their cheek on the far side. Be careful not to turn them past that point, because you don’t want the nose to break the line of the cheek. This isn’t a rule, but it doesn’t look as flattering.

Note: Check out the subject’s earrings in the image above, and how her right earring is not showing below her jawline. When she turned her face just a little more, the earring looked like it was coming out of her face, so I had her remove it for the image. Watch for things like that as the facial angle changes.

two thirds face view

Profile, where the subject’s face is turned almost exactly 90 degrees from front, so that their nose is basically pointing sideways. In a true profile, you should only be able to see one side of the subject’s face and not the eye on the far side.

Note: Once again, watch for things like earrings and hair hanging down under the chin, which can look a bit odd. I usually brush the hair back and have the subject remove an earring if it doesn’t look right or if it looks like it’s dangling under the chin or neck.

Profile view

Camera angle

Where you place your camera makes a huge difference to how your subject appears in the final image.

However, keep in mind that I can’t offer hard and fast rules here. Instead, use my advice as guidelines and starting points, then use your best judgment – because each person is unique. Portray the subject how they wish to be portrayed. When you learn these tips and see how they work in practice, it becomes easier and easier to know how to approach each portrait.

Here are your camera angle tips:

  • A high camera angle (above the subject’s eye level) will emphasize the face more than the body. This is good for a heavy-set person to help them appear slimmer if that’s desired. (Most women will not get upset if you make them look slimmer!)
  • A low camera angle (below their eye level or even below their chin level) can make a person look taller or make them seem more powerful. But this is not very flattering for most people. You end up looking up their nostrils, and the body appears larger than the head and face, which is generally unflattering.
  • For group portraits, the camera position should be about eye level or slightly lower. This cuts down on distortion of body parts and prevents the subjects from looking oddly proportioned.
  • For a portrait of one or two people, having the camera at eye level or slightly higher is often the most flattering option.

Lenses

In addition to the camera height and angle, the lens you select will change the look of your portrait drastically.

Consider what you know about different lenses:

  • Wide-angle lenses emphasize perspective, distort things, and make scenes seem more three-dimensional
  • Telephoto or long lenses compress things, isolate subjects, and make them look less three-dimensional

That’s all I’m going to tell you about this; I want you to find out what I’m talking about by trying it yourself. Look at my examples below, then find yourself a person to photograph. Use different lenses and see how they change the image.

portraits at different focal lengths and camera angles

What do you notice about the examples here? What changes in each photo?

portraits at different focal lengths and camera angles

How long does it take to master this stuff?

One of the most common questions I get asked by my students is “How long did it take you to learn all this stuff?”

The answer is two-fold: 4 weeks and 25 years!

I say that tongue in cheek, but it’s true. I “learned” all the concepts and guidelines relatively quickly, because I was in a two-year program that immersed me completely in photography. It’s like learning a new language; if you move to a new country and you have to speak the language all the time, you will learn a lot faster than if you only speak it once a month. So the best advice I can give you on how to learn faster is to get out and photograph more often.

The second part of my answer, the “25 years” bit, means that I’m still learning. I’ve learned things from my students and from other photographers and do so continually. Don’t ever expect to suddenly “get” it so that you can stop learning. Photography education is a process and it’s always ongoing. As soon as you think you’ve learned it all, or that you know it all, then it’s time to quit – because you’ve probably lost the passion. That’s my opinion, anyway.

Camera and face angles: Practice at home

This is not an assignment, but rather a suggestion for improvement.

Whenever possible, notice the facial view of your subject and how you can adjust it. If you sit a person by a light source such as a window, you can see that turning their head toward the light will also change the lighting pattern that falls on their face. See how this information can then be used to your advantage.

Different facial views will be flattering for different people. Experiment and see what works best for each person you photograph. Have the person sit and just turn their face, then see how the shape of their face changes and how the light falls on them differently.

While you’ve got your subject for the last exercise, see if you can slip this in, too:

Take five images of your subject from different camera heights. Don’t change the focal length or distance to the subject – just the camera height.

Here are the photos I recommend you take:

  • One slightly below the subject’s chin
  • One slightly below the subject’s eye level
  • One at eye level
  • One slightly above the subject’s eye level
  • One at quite a bit above the subject’s eye level

Then ask yourself:

Which is the most flattering angle for that person? From which angle would they most want to be photographed? Why?

Facial views and camera angles: Conclusion

Now that you’ve finished this article, you should be well on your way to using face angles and camera angles to create stunning portraits.

face angles photography

Just make sure you practice frequently. And before you know it, you’ll be an expert!

What’s your favorite face angle? What’s your favorite camera angle? Do you have any tips for working with these angles? Share your thoughts in the comments!

The post How to Use Facial View and Camera Angle to take Flattering Portraits appeared first on Digital Photography School. It was authored by Darlene Hildebrandt.


Digital Photography School

 
Comments Off on How to Use Facial View and Camera Angle to take Flattering Portraits

Posted in Photography


4 Tips for Achieving Flattering Portraits

19 Jul

The post 4 Tips for Achieving Flattering Portraits appeared first on Digital Photography School. It was authored by Lily Sawyer.

Flattering portraits rarely happen as a default. Some people are photogenic, yes, and look good at every angle. But often, we work hard to get flattering photos that the sitter loves. There is no one-trick as every person’s face, form, and shape are different. We have to tailor our angles to each portrait sitter. However, there are basic fundamental tools we can use that help us achieve flattering portraits.

dps-tips-flattering-photos-lily-sawyer-photo

1. Use the right lens

Having photographed people for a decade now, I have learned that there is no great all-around lens that can do the best job for everything. Sure there are good lenses that achieve good results, but I’d favor specialist lenses for specific purposes.

dps-tips-flattering-photos-lily-sawyer-photo

Let’s take portraits, for example. A basic kit lens that comes with a camera purchase is usually an 18mm – 55mm zoom. It is expected to be good for wide angles and normal-range views. Yes, it’s good for day-to-day standard snaps. But for portraits? A longer zoom, such as the 85mm, 105mm, and 200mm, are a much better choice for stunning portraits. These give a shallow depth of field, great compression to the background and produce flattering portraits. There is no distortion similar to what you would get when using wider lenses for portraits.

You can read more about choosing the best portrait lens on here.

2. Use the right angle for the person

Many women I have photographed do not like having their portrait taken. They are aware of various imperfections on their faces, angles they do not like, and features they are self-conscious about. This is normal and certainly rings true for me. I’m the worst portrait sitter.

dps-tips-flattering-photos-lily-sawyer-photo

In order to achieve portraits that women like, I usually shoot both sides and show them the first few photos I take on the LCD screen of the camera. They choose a preferred side, and we take a few more from that angle. The worst thoughts are usually just in their minds. When they see their photos, even on the back of the camera, they realize it’s not as bad as they thought and there is a better side. They usually relax more from then on.

Generally, I photograph at slightly higher than eye level for most women. This angle hides any unwanted necklines, slims down cheeks and tapers the face down a little for a more flattering portrait.

If I’m photographing from an even higher level than usual, I ask them to look up at me just ever so slightly, and that gives me a confident posture and stance too.

With men, it is usually quite the opposite. Most male portraits get taken within seconds. I find them less self-conscious with a “let’s get on with it, over and done with attitude” in a nice way. I ask them to stand as they usually do. If they slouch, I ask them to straighten their spines a bit, square their shoulders and look straight into the camera. Sometimes I get them to lean slightly against a wall. I generally photograph men at eye-level.

dps-tips-flattering-photos-lily-sawyer-photo

Children, on the other hand, I look best when photographed from waist high. That means I’m always a little lower than them – often sitting on the floor and looking up to them a bit. This means they don’t look too small, and they get a boost of confidence that they are being looked up at and not down to. Children often look down towards whatever they are holding or playing with. By shooting from a lower angle, I get to see their faces clearly too.

3. Use the right type of lighting

Simply put, short lighting is when the shadowed side of the face is closer to the camera. Being in the shadow, this side of the face is darker and therefore usually ‘shorter’ in terms of the span of the light hitting this side of the face. Broad lighting is the opposite when lit and the brighter side of the face is closer to the camera. Because it’s brighter, it appears much broader with more light reaching much of the area of the face.

dps-tips-flattering-photos-lily-sawyer-photo

Short lighting makes the face appear slimmer due to the shadows created on the face. This can also produce strong contrasts although you can soften the dark areas by using a reflector.

Broad lighting helps in making the face appear wider. Because this area is usually brightly lit compared to other areas, stronger contrast between dark and light is usually created.

Use these two lighting types to the advantage of the sitter for more flattering outcomes. You can read a more in-depth explanation of these two types of lighting on here.

4. Crop correctly

Because I always edit my photographs, I feel I can afford to change my composition in post-processing rather than always trying to get everything right in-camera. Don’t get me wrong, I strive to get my compositions right, but I have found I can always tweak it in post to improve it. I shoot fast and can’t always get the horizontals completely straight, so I correct this in post. This means I have to shoot a little wider than the final outcome.

dps-tips-flattering-photos-lily-sawyer-photo

I have no problems with cropping as long as it’s not too aggressive and there are ample pixels left in the image to produce great prints.

There are a few caveats in cropping though. For flattering portraits, never crop or compose your photos so that the edges and tangents are on body joints like elbows, knees, neck, wrist, shoulders and across the belly. These look odd and somewhat disturbing. Always crop in between or partway through the joints, so chest, arms, hips, leg, calves, forehead are acceptable. You can read more about tips on cropping to improve your image on here.

I have photographed many a woman who was very conscious of her body. For example, she was self-conscious of her arms, and yet she turns up in a sleeveless top. In those cases, I zoom in and crop the arms lengthways down so the photo only shows a third of the bare arm.

dps-tips-flattering-photos-lily-sawyer-photo

You can also crop to reposition your image and strengthen your composition as a result. I find using the rule of thirds as a very strong compositional tool and tend to lean towards it a lot. A symmetrical composition is also strong and effective. This is a good article on factors to consider when composing portraits.

I hope you found these four tips for flattering portraits helpful. If you have more tips to contribute, share them on here in the comments below.


achieving-flattering-portraits

The post 4 Tips for Achieving Flattering Portraits appeared first on Digital Photography School. It was authored by Lily Sawyer.


Digital Photography School

 
Comments Off on 4 Tips for Achieving Flattering Portraits

Posted in Photography


Soft Flattering Color Portraits in Lightroom 4 and Lightroom 5

05 Aug

Introduction

The Following is an excerpt from the SLR Lounge Lightroom Preset System v5, a preset system designed to take you from Ordinary to Extraordinary photos in just a few seconds and clicks.

We have just launched the new Lightroom Preset System v5, and in this first tutorial we want to create a soft and flattering look for color portraits. We want to maintain good overall contrast, while flattening out highlights and smoothing out the details a bit for a more flattering look. Each one of you will probably have different preferences in regards to overall contrast and color temperature, but this Base preset and modification are pretty much our foundation for all of our color portraits within the Lin and Jirsa Photography studio. Here is what the photo looked like before and after the effect is applied.

beforeafter

Lightroom Preset System v5 Mixology Recipe

For those that own the SLR Lounge Lightroom Preset System v5, you can follow this two click recipe. If you like, you can save it as a new custom Mixology, however, since it is only a 1-click modification on our existing Base Preset, we will not be adding this to a new custom Mixology Preset.

Develop Mixology
1) 01-10 Base-Soft 11a. Extra Soft-Skin Desat
2) 03-40 Adjust Shadows Blacks 42. Darken-Medium -15, -30

Adjust Exposure, Temperature and Tint to taste.

Local Adjustments
We used the Graduated Filter and used the “04 Dodge (Brighten) +.5 stop” to brighten up the bottom left of the photo. To see exactly how it was applied, watch the video tutorial below.

Watch the Video Tutorial

If you would like to follow along with the Video Tutorial, watch the video blow.

Complete Written Tutorial

This written tutorial is meant for those who don’t have the SLR Lounge Lightroom Preset System v5. If you follow along you’ll be able to edit your photos with the same settings we used to edit this one. For any photo we edit we like to check the EXIF data by pressing “i”. This will show us exactly what camera the photo was taken one, what lens, and the settings. You can customize what EXIF data you want to see by pressing “CMD + J” or “CTRL + J”. This photo was taken on a 5D Mark II at 1/800 sec at f/2.0 ISO 100 with a 50mm lens.

The first thing we did was go into our “01-10 Base – Soft” preset folder and applied the “11a. Extra Soft – Skin Desat preset”. This preset does most of our work for us, adjusting our exposure, highlights, shadows, whites, and blacks the way we would want them for a portrait like this. The clarity, vibrance, and saturation have all been dropped, giving us a nice soft portrait look. Here’s what our settings look like on the right side panel.

developsettings

Our “1) 01-10 Base-Soft 11a. Extra Soft-Skin Desat” preset lowered our Red and Orange levels, desaturating the skin and taking out the red and orange highlighting that can appear in shadows and highlight areas of our subjects skin.

  • Red: -20
  • Orange: -10

In the Tone Curve we have a standard “S” curve, giving us a subtle contrast boost by raising the highlights and dropping the shadows.

tonecurve

We add a bit of Noise Reduction Luminance in our portraits because it does a great job smoothing out the pores and making skin look great. We had to raise the sharpening a bit on this photo because it was shot at such a wide aperture, making the depth of field very shallow. Here are what our “Sharpening” and “Noise Reduction” settings look like.

sharpening

The vignetting in this photo underexposed her skin slightly in the corners of the photo. This is a great opportunity to use a graduated filer. You can simply go to the Graduated Filter and raise your exposure to “0.50″. Then raise the graduated filter from the bottom left of the photo and come up to the strap of her dress. Watch the video tutorial to see exactly where we put it. After the graduated filter we’re left with our final image, here’s a before and after.

Before

before

After

after

Conclusion and Learn More

We hope you all enjoyed this tutorial. If you are interested in learning more or purchasing the SLR Lounge Lightroom Preset System v5

Post originally from: Digital Photography Tips.

Check out our more Photography Tips at Photography Tips for Beginners, Portrait Photography Tips and Wedding Photography Tips.

Soft Flattering Color Portraits in Lightroom 4 and Lightroom 5


Digital Photography School

 
Comments Off on Soft Flattering Color Portraits in Lightroom 4 and Lightroom 5

Posted in Photography