RSS
 

Posts Tagged ‘first’

Fujifilm FinePix S1 is ‘world’s first’ weather-resistant superzoom

12 Jan

S1_Black_Front_Left.png

CES 2014: Amid a string of pre-CES compact announcements, Fujifilm unveils the FinePix S1, the ‘world’s first’ weather-resistant superzoom. It offers a 16 megapixel CMOS sensor and an F2.8-5.6, 24-1200mm equivalent zoom lens. With an articulating 3.0-inch LCD its specifications line up with the FinePix SL1000 in Fuji’s current lineup, though with a slightly faster lens and the addition of Wi-Fi connectivity. While not a fully ruggedized camera, the S1 offers protection against dust and rain exposure.

News: Digital Photography Review (dpreview.com)

 
Comments Off on Fujifilm FinePix S1 is ‘world’s first’ weather-resistant superzoom

Posted in Uncategorized


A smart camera gets smarter? Samsung NX30 first impressions review

03 Jan

NX30-and-18-55mm-1.png

The Samsung NX30 puts the NX300’s 20 megapixel APS-C sensor and Hybrid AF in a DSLR-like body. It also features a tilting electronic viewfinder and a fully articulated 3-inch AMOLED display, along with Samsung’s familiar suite of connectivity features. Built-in Wi-Fi is available, as is NFC to mediate faster connections with compatible smart devices. We spent a little time getting acquainted with a pre-production model, and have put together some quick first impressions.

News: Digital Photography Review (dpreview.com)

 
Comments Off on A smart camera gets smarter? Samsung NX30 first impressions review

Posted in Uncategorized


Your First DSLR – now what?!

03 Jan

Yikes! You’ve got your first DSLR! Now what?

My first dslr 03

One of my friends recently received a DSLR from her husband for her birthday. She was over the moon! One afternoon over coffee, she asked if I had any advice to help her get started with her new camera. I’ll share some of the top tips that I shared with her, with you too:

Nine tips to help you with your first DSLR

#1 – Get off Auto as a soon as possible and start shooting on Manual mode

Cameras these days are very clever when put on Auto. You will certainly get some lovely photos shooting on auto, but it will limit you from taking your images to the next level. Go from creating something that’s good to creating something that’s amazing! Learn how your camera works and its capabilities. Getting off Auto and shooting in Manual mode will open up a world of possibilities such as shooting in low lighting conditions or bright sunshine, shooting fast moving objects, creating a soft blurry background, the list is endless.

#2 – Understand the terms ISO, shutter speed and aperture and how to use them

Use these as your starting point for learning how to control your camera. There are some great articles on dPS to help get you started, as well as a good eBook to start you off right:

  • Learning the exposure triangle
  • ISO
  • Shutter speed
  • Aperture
  • Photo Nuts and Bolts – a dPS ebook by Neil Creek

My first dslr 04

#3 – Google is your best friend

There are lots of free tutorials, blogs and YouTube videos to help develop your skills and knowledge. Use what’s already out there and easily accessible before buying expensive books and enrolling in expensive courses. dPS was, and still is my ‘go to’ website for inspiration and learning new techniques when I was starting out. If you haven’t found it yet, they have a great ‘tips for beginners’ page too.

#4 – your camera manual is your second best friend

Do you actually read instruction manuals when you get something new or do you just put them back in the box never to see the light of day again? I must confess that I’m probably one of the world’s worst culprits for this! Some of the best advice I received when I was starting out on my photography journey, was to read my camera instruction manual cover to cover, and when I’d finished, to go back and read it all again! I remember going through my manual for the first time; it was like a series of mini light bulbs going off, followed by lots of ‘oohs’ and ‘ahhs’! If you haven’t already picked up that little white book that came in the box, put it at the top of your to ‘do list’ – you’ll be glad you did! (Note: if you bought you camera used and it didn’t come with a manual, see #3 above! You can usually find a PDF version online somewhere, just search by brand and model number of your camera.)

My first dslr 01

#5 – Take your camera EVERYWHERE

By this I mean, don’t just have it tucked away somewhere; take it out of its bag and hang it round your neck. You’re more likely to use the camera if it’s within reach, than if you have to negotiate getting it out of its bag, taking off the lens cap, turning it on etc. By the time you’ve done all that, the moment’s gone! Get yourself a UV filter to protect the front of your lens, and leave the lens cap off so you’re ready to go whenever an opportunity presents itself.

#6 – Friends make great models but then again so do apples and pears

Friends make great models to practice on, and will usually be flattered when you ask them if you can take a few photos of them. All my early portrait images are of friends; even the most reluctant ones were bribed with chocolate or a bottle of wine to model for me! While having a ‘person’ to photograph is great, don’t let it stop you from practicing portrait photography skills if you don’t have any willing subjects. Fruit also makes for an amazing model; yep you read right–fruit!

Place an apple on a table top or chair in front of a window, and shoot it from every angle. Look at the way light falls on it and what happens when you move it closer or further away from the light. Draw a face on it using a marker pen, and turn it from left to right to see how the light behaves. Once you have exhausted all the options, look at your images and compare them to see what worked well, and what didn’t work so well.

My first dslr 02

#7- Practice, practice, practice

As the saying goes ‘practice makes perfect’! We’re lucky to be living in a digital world. We’re not limited by number of photographs we can take. We can easily upload thousands of images to our computer, or delete them all in one go with the press of a single button. Don’t be afraid to take hundreds of photos. The key is to spend time looking at your images and thinking about what you could have done differently to make them better.

#8 – Mistakes are good – don’t be scared to make them

Yes it can be frustrating when something doesn’t quite go as planned but mistakes help you learn. The more you learn, the fewer mistakes you’ll make, and the better your photography skills will become. Don’t give up because your images aren’t as good as you want them to be. Read, learn more, then go out and shoot again.

My first dslr 06

I remember the first wedding I shot. I was second shooting for a friend; she always liked to work with a back up photographer for weddings. Her usual second shooter was on holiday and as a result she asked if I’d like to do it. I jumped at the chance! I did my homework prior to the big day and carried out a Reiki of the church and planned what lens and camera settings I’d be using. After the ceremony, I followed the bride and groom from the inside of the church to the bright sunshine outside. I kept on clicking away getting swept up in all the excitement. It wasn’t until about the 10th frame that I looked at the back of my camera and saw that all of my images were over exposed! I hadn’t adjusted my ISO when I went outside. It was too high and there was nothing I could do with those images, they were beyond repair. Luckily I was only second shooting and the main photographer had lots of her own perfectly exposed photos. It was still a steep learning curve for me though and I can assure you that I’ve never made that mistake again.

#9 – Master using the gear you have now before you upgrade

Becoming a master of the camera gear you currently own will give you an advantage for the really cool stuff you’ll purchase later. You need to know how both your camera and lens behave, and how to control them; how light affects an image; and how you can work with your environment to create the perfect shot. Once you can do this, you’ll find that when you upgrade your camera or purchase a new lens, you’ll be able to get the best out of it and use it to its full potential.

Feeling inspired? Pick up your camera, get outside and start shooting!

Profile:

Daniela Beddall from Ferri Photography is a Northamptonshire photographer who specialises in working with natural light. She shoots weddings and portraits and loves all things vintage! You can follow her on Facebook, Twitter on Pinterest or drop her line – she’d love to hear from you!

The post Your First DSLR – now what?! by Daniela Beddall appeared first on Digital Photography School.


Digital Photography School

 
Comments Off on Your First DSLR – now what?!

Posted in Photography


Roger Cicala reveals winners of First Annual Photogeek contest

02 Dec

retina-crop2.jpg

Roger Cicala of LensRentals has revealed the winners of his ‘First Annual Photogeek Geek Photo Contest’. What was originally intended as a light-hearted joke ended up receiving over 400 entries from at least 20 countries, and the impressive quality of the entries caused a real headache for the judges. After a lot of deliberation, Rishi Sanyal won ‘Best in Show’ for his remarkable ‘MacroSetUp’ series. Click through to see the extraordinarily geeky winning images, and a link to the full contest gallery.

News: Digital Photography Review (dpreview.com)

 
Comments Off on Roger Cicala reveals winners of First Annual Photogeek contest

Posted in Uncategorized


Nikon Df test scene samples added to first impressions review

28 Nov

ImOnMyWay.jpg

Having spent a little more time with a full production unit, we’ve updated our Nikon Df coverage with images from our studio test scene and some more handling impressions. Nikon’s thoroughly retro full-frame Df uses the same 16MP chip first seen in the D4, and provides an unprecedented level of support for legacy lenses. The new scene shows its performance in both daylight and low light, with downloadable image files. As always, you can compare the Df to the increasing number of cameras in our test scene.

News: Digital Photography Review (dpreview.com)

 
Comments Off on Nikon Df test scene samples added to first impressions review

Posted in Uncategorized


5 Pieces of Photography Gear to Consider as Your First Upgrade

26 Nov

Neil Creek is the author of our newest ebook Photo Nuts and Gear. In this post he offers some advice to the beginning photographer about the first upgrade they should buy for their camera.

So you’ve been getting into this photography thing pretty seriously ever since you bought that “good” camera you wanted. It turns out that you really enjoy photography, and you think you’ll be doing it for a while. You want to know what cool camera gear is out there, and you know there’s a lot, but what should you get first?

Where to start on the photography gear upgrade trail

When you’re just starting your photography journey, it’s intimidating how much gear there is and how much it costs. It’s obvious that some photos are impossible without certain gear, and sometimes it’s not obvious when gear has helped a photo.

I’ve been shooting and helping new photographers to get the most out of their gear for years, so I have a few suggestions for great first investments in photography to suit your varying interests and budget.

A 5-in-1 reflector

5in1reflector

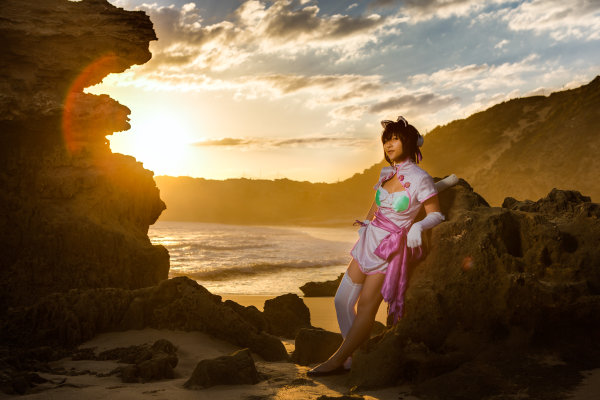
Light is everything in photography, but sometimes you can’t quite get the right kind of light where you need it. A great example is outdoor portraits. With the light predominantly coming from overhead, there are often dark circles under the eyebrows. A reflector can be used to reflect some light back up into the face of your subject to fill these shadows.

A 5-in-1 reflector is cheap and very versatile. Built around a collapsible steel ring spanned by diffusion material, it has a reversible cover with four different surfaces. The diffusion material inside is great for turning full sun into bright shade, for small and macro subjects as well as head and shoulder portraits. I’ve even used it as a flash diffuser in a pinch. The cover has three reflective surfaces: white for gentle fill, silver for strong fill, gold for a warm strong fill, and a black surface for eliminating light to bring shade back to a scene which is too evenly lit.

This is an incredibly versatile tool at a very affordable price, and it neatly fits into the “laptop pouch” in camera bags which have one. This item should be in every portrait photographer’s kit.

Who is this for: photographers on a budget who shoot in natural light
Approximate cost: $ 20-50 depending on size

creek-130310-051

The Nifty 50 lens

Lenses are a critical part of the optical system that creates the photographic image. Unfortunately almost every lens choice is a compromise between price, speed, image quality and more. Plus, lenses are expensive!

creek-131028-048

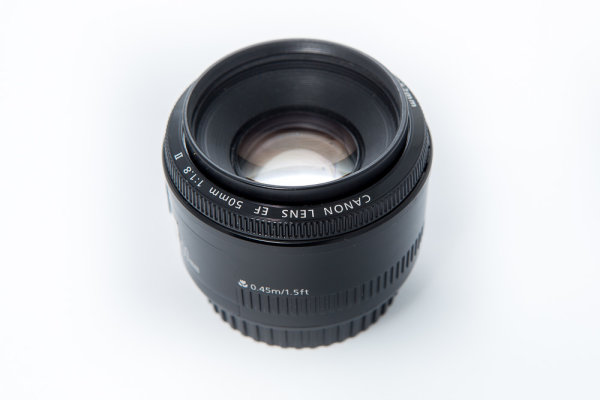
There is one lens however that is possibly the best of all worlds: the 50mm prime, also known as the “Nifty 50″. Several lens makers have their own or similar versions of this lens, but the most famous is probably the Canon 50mm f/1.8. This lens is small, fast (thanks to its wide f/1.8 aperture), tack sharp and extremely affordable. If you are looking for an excellent portrait lens that will take well exposed photos in low light, it’s hard to go past the Nifty 50 especially if you are on a budget.

These lenses aren’t without their weaknesses of course: cheap plastic body construction keeps the price and weight down, but negatively affects the durability; weather sealing is also thus not an option; it is notoriously slow to focus in low light; there’s no image stabilization; andthe focus ring is very small. Despite all this, it is hard to resist the appeal of professional level image quality, at a hobbyist price.

Who is this for? Anyone looking for a high image quality, fast, small lens on a budget
Approximate cost: $ 100-200 depending on brand

A good solid tripodcreek-131031-028-Edit

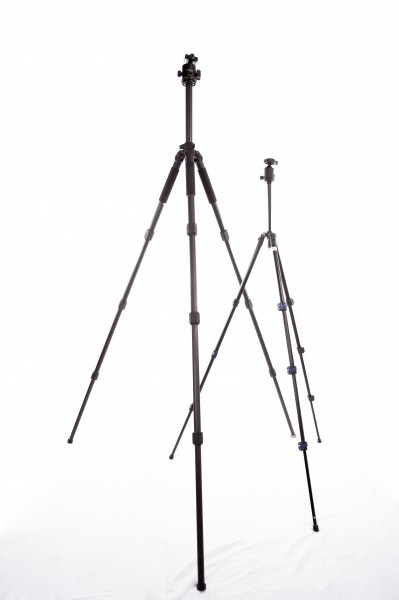
Photographers are always limited by the amount of light, and without adequate amount, you are forced to make compromises with your settings. When you have to use a slower shutter speed you risk getting blurry photos from camera shake. A tripod fixes that. By providing a stable platform you can almost eliminate camera movement from short, to incredibly long shutter speeds.

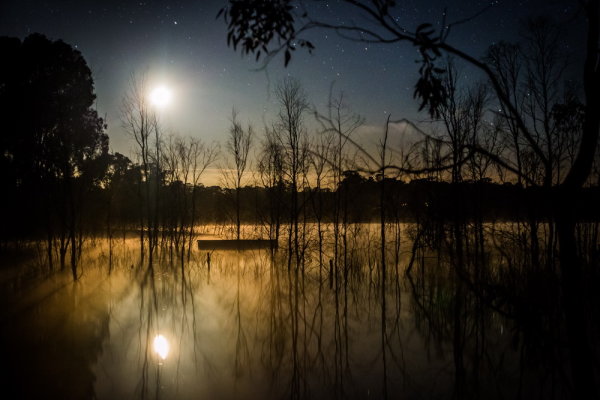
Not only does a tripod fix the problem of a shaky camera, it opens up whole new photographic and creative opportunities. Seven of the eleven special effects photography techniques discussed in my ebook Photo Magic use a tripod. A Tripod is possibly the most versatile piece of photography equipment you can buy. You will be able to try photos and techniques otherwise impossible.

Buying a tripod can be like walking through a minefield however. There are so many options from the very bad to the very expensive so it pays to do your research. For a first time tripod for a small DSLR user, I recommend one of the base end models from the big name tripod makers. I go into a lot of detail in Photo Nuts and Gear on choosing the right tripod for you. One tip – avoid department store tripods!

Who is this for? Photographers shooting in low light, with macro subjects, landscapes, and creative low light photography such as light painting.
Approximate cost: $ 100-200 for a first tripod

creek-130928-341 - Copy

An external hot-shoe flash or speedlight (speedlite)

creek-131102-035

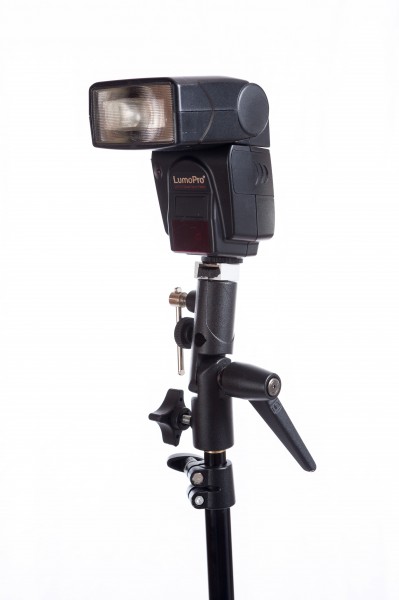
A flash unit or speedlight is often one of the first big purchases camera owners make, and unfortunately it’s very easy to pay more than necessary. The flagship units from Canon and Nikon are very expensive and packed with features, many of which a new photographer won’t need. I personally recommend buying a cheaper, manual power, third party flash first. The ETTL, or auto exposure, feature of the expensive flashes is handy, but I find that manual power control is pretty easy to master, and it will save you a lot of money: enough to buy one or two more flashes for the price of a flagship model. Manual flashes are also compatible with the more affordable radio triggers that let you fire your flash off the camera and enter the amazing world of Strobist photography.

Flashes adds a good deal of versatility when shooting in low light, but their real power comes when you get them off camera. A couple of flashes, triggers, light stands and simple modifiers can utterly transform your photography, and add creative options that match those offered by a tripod. A little research and careful spending can put all of these within reach for the about same price as a top of the line flash from Nikon or Canon.

Who is this for? Photographers shooting indoors in low light, Strobist wannabes

Approximate cost: $ 100-200

creek-130426-192-hdr

Walk-around lenscreek-131028-056

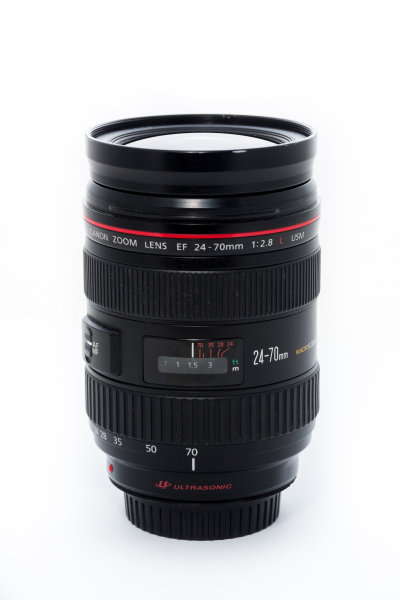
Like most people, you likely bought your camera with a kit lens. These lenses are often good enough for most photographers, but unless you buy a top end DSLR (which come with higher quality lenses as standard), they’re not going to be the best you can find. Most kit lenses are a bit slow, a bit soft, a bit “plastic-y”. If you’re getting serious about being a photographer, you’ll probably want something better. A walk-around lens is one you leave on your camera by default, and use all of the time you don’t have a specific need for another lens. As such, most of your photos will be taken with it, and you’ll probably want to upgrade it once you can afford to grow your lens collection.

There are a lot of options available, so you need to think a bit about how you use your camera, and what features are important to you. You will want to consider:

  • how heavy is the lens
  • how often you shoot in low light
  • what frustrates you most about your current lens
  • whether you’re always wanting to fit more in your shots or if you want to bring distant things closer

All of these issues will affect the best choice of walk-around lens for you. Be prepared to possibly spend a lot of money. Lenses are expensive, especially high quality ones. Since there are so many options and factors to consider it’s hard to offer much practical advice in a blog post, but I go into a lot more detail in Photo Nuts and Gear. In short however, be prepared to do a lot of research to understand your options and how to choose between them. A good walk-around lens will get a lot of use over many years, and the quality of your images will be impacted by the choice you make.

Who is this for?  Someone who is taking the first big step into turning photography from a pastime into a serious hobby
Approximate cost:  $ 300-1800

Post originally from: Digital Photography Tips.

Check out our more Photography Tips at Photography Tips for Beginners, Portrait Photography Tips and Wedding Photography Tips.

5 Pieces of Photography Gear to Consider as Your First Upgrade

The post 5 Pieces of Photography Gear to Consider as Your First Upgrade by Neil Creek appeared first on Digital Photography School.


Digital Photography School

 
Comments Off on 5 Pieces of Photography Gear to Consider as Your First Upgrade

Posted in Photography


Do you Shoot in the Rain or Pack up at the First Drop?

25 Nov

In line with this week’s photography challenge, weather, I want to do a quick survey to see if you shoot in the rain or not.

I get a lot of questions from my students about shooting in the rain (or snow, or on the beach) and whether or not it will damage their camera. Of course that depends on the camera body you own (some are weather sealed, some are not – if you aren’t sure read your manual or check the manufacturer’s website), and the precautions you take.

Personally, I do get out in the rain and shoot. In fact this was done in the pouring rain in Melbourne (dPS headquarters) at the casino. I ducked under an overhang, covered up my camera and myself, and got puzzled looks from the passers by.

Photography of the Melbourne casino in the rain

So, my question for you is – do you brave it? Or do you play it safe?

Note: There is a poll embedded within this post, please visit the site to participate in this post’s poll.

Post originally from: Digital Photography Tips.

Check out our more Photography Tips at Photography Tips for Beginners, Portrait Photography Tips and Wedding Photography Tips.

Do you Shoot in the Rain or Pack up at the First Drop?

The post Do you Shoot in the Rain or Pack up at the First Drop? by Darlene Hildebrandt appeared first on Digital Photography School.


Digital Photography School

 
Comments Off on Do you Shoot in the Rain or Pack up at the First Drop?

Posted in Photography


Sony Alpha 7 test scene samples added to first impressions review

22 Nov

shared:TestScene2.jpg

We’ve updated our first impressions review of the Sony Alpha 7 with our studio test scene showing image quality for both JPEG and Raw files, making it easier to see the differences between it and its sister model, the Alpha 7R. The new scene also offers downloadable Raw samples of both daylight and low light scenes. As always, you can compare the A7 to the increasing number of cameras in our test scene.

News: Digital Photography Review (dpreview.com)

 
Comments Off on Sony Alpha 7 test scene samples added to first impressions review

Posted in Uncategorized


First Impressions on Flickr’s New Book Publishing Service

20 Nov

I Just Published My First Book

I just published my very first book.

I’ve been meaning to do a book forever and today I finally did it. Flickr launched their new book publishing service today and I wanted to try it out, so I created a 200 page book called America in Progress.

The book is comprised of 200 photos I hand selected from the almost 88,000 I’ve got published to Flickr. It cost me $ 137.94.

The basic charge for the new Flickr book is $ 34.95 for a 20 page book. Additional pages are 50 cents each with a 200 page maximum. In my case shipping was another $ 12.99. ($ 34.95 for the basic book + $ 90 for an extra 180 pages + $ 12.99 for shipping).

The Breakdown on What My New Book Costs
My book cost me about $ 138 for the maximum 200 page book.

The book should arrive in the next 5 to 7 business days.

It took me about 2.5 hours to make the book. It’s a photo only book and the only text I was able to add was the title of the book — which is on the cover and on the spine. I didn’t see any way to change the font of the title so I went with what they offered by default.

The Breakdown on What My New Book Costs
My book should be here in 5 to 7 business days.

There were a lot of glitches when I built my book — which is to be expected when you try out a new service within the first hour of launch. The first book I tried to create sent me to a non-existent page when I tried to check out. The publishing page was also running very slowly for me at one point. It would take me about 45 seconds to add a new page to my book. My session crashed and when I refreshed the page it went faster. Fortunately Flickr auto-saves the progress on your book as you go, so I didn’t lose any work when this happened.

The Layout Tool For Flickr's New Book Service Was Super Easy to Use
Despite some glitches, Flickr’s layout tool for creating books was really easy to use.

I was also warned when I tried to check out that there were print quality alerts on some pages of my books, but I carefully checked every single page and didn’t see any alerts anywhere. It would be nice if you could click a link which would tell you what pages specifically Flickr was concerned with.

As far as book publishing goes, it was really easy to create the book. I could either pull from my Flickr photostream or from any of my sets. You just drag and drop the photos into a book publishing sort of layout and you can move pages around so that things go where you want them.

Because I have so many photos in my Flickrstream and so many sets in my Flickrstream, I found it difficult to find all of the photos that I wanted to use in the book. Most users won’t have 88,000 Flickr photos though, so it should be easier for them. It would be nice if Flickr also offered a third way to find photos to publish, search.

The book will be 11” x 8.5 and will be a hardcover. Flickr says it will be printed on “premium white proPhoto paper with a Lustre finish,” and will come with a dust jacket.

If you change your mind on buying the book after you create it and check out, you have an hour to cancel your order.

I will report back more when I actually get the book as to the quality of it compared to other self publishing group books I’ve been involved with. Books can only be delivered to the Continental U.S.

I think it’s smart for Flickr to get into the book publishing business (and their timing is pretty good with the Holiday season approaching). It’s a natural way for them to grow and make money. I suspect that today’s offering is only the beginning. I could see Flickr also offering a way for book publishers to sell their books as well in the future, like blurb offers.

For more feedback on this new book service from Flickr you can check out this thread in the Flickr Help Forum.

When I First Tried to Check Out Flickr Took Me to a Non-Existent Page
An error sent me to a weird non-existent page when I first tried to checkout and pay for my book — Flickr seemed to want to send me to giantsouthern’s photostream instead.


Thomas Hawk Digital Connection

 
Comments Off on First Impressions on Flickr’s New Book Publishing Service

Posted in Photography


Only in Russia: World’s First Floating Nuclear Power Plant

16 Nov

[ By WebUrbanist in Technology & Vehicles & Mods. ]

russian floating power plant

It sounds at best far-fetched and at worst frightening, at least at first, but this unique water-based energy station is already under construction and is designed to (safely) generate power and fresh water to over 200,000 people.

russian nuclear power station

The Akademik Lomonosov is being built at a submarine construction facility and is set to launch before 2020. While it is set to be stationed offshore, it opens up a new world of possibilities for fueling remote settlements, temporary outposts, research stations or floating cities.

russian power plant design

The vessel will produce an impressive 70 megawatts of electricity – more than enough to support a mid-sized city. It will also desalinate ocean water to increase regional freshwater supplies.

russian mobile energy source

With the world wondering about the fate of the Fukushima plant in Japan, following its fateful impact by a tsunami and subsequent fallout, it seems like a strange time to be working on projects where water meats nuclear power. Still, in this case the uranium is far less enriched and of the same type being used in Russian icebreakers already. The power plant is a project of LLC Baltiysky Zavod Shipbuilding, a St. Petersburg division of United Shipbuilding Corporation (USC).

Share on Facebook


[ By WebUrbanist in Technology & Vehicles & Mods. ]

[ WebUrbanist | Archives | Galleries | Privacy | TOS ]


WebUrbanist

 
Comments Off on Only in Russia: World’s First Floating Nuclear Power Plant

Posted in Creativity