The post When NOT to use a Polarizing Filter appeared first on Digital Photography School. It was authored by Gavin Hardcastle.
There are times when a using a polarizing filter is a bad idea.
Yes, I just blasphemed against the gods of landscape photography. Not using a polarizing filter for landscape shooting could be considered sacrilegious in some circles, and indeed, I myself have written ad nauseam about the importance of this simple yet powerful photographer’s tool.
However, today I’m going to selectively contradict myself.
Because while a circular polarizing filter can hugely improve your photographs in most outdoor photography situations, there are times when leaving that shady piece of glass off the lens can actually give better results.
And that’s what this article is all about!
So if you’re ready to learn all about the times you should keep your polarizer packed away…
…let’s get started.
What does a circular polarizer do?
A polarizer reduces reflected light before it enters your lens.
Note that a polarizing filter can be turned by hand to engage or disengage the polarizing effect. This is useful for shooting reflective surfaces such as water, glass, wet rocks, and cars.
Most of the time, you want to control those reflective surfaces and reduce the glare of reflected light. But what if you like that super wet look and glare on certain surfaces?
Let me give you some examples where I felt that not using a polarizer actually made for a better image.
When the reflected light has color
For the image above, I decided to remove my polarizer.
And here’s why:
Because the reflected light on the wet rocks in the foreground had a distinct red color, which I really liked.
Using a polarizer would have reduced this red reflected light and would have made for a less dramatic image.
When you want that super wet look
When taking this image, I found that the wet rocks had lovely highlights that caused a soft glare from reflected sunlight.
Even though the highlights didn’t really have any dramatic color, I still felt that the wet look made for a better image, so I opted not to use the polarizer.
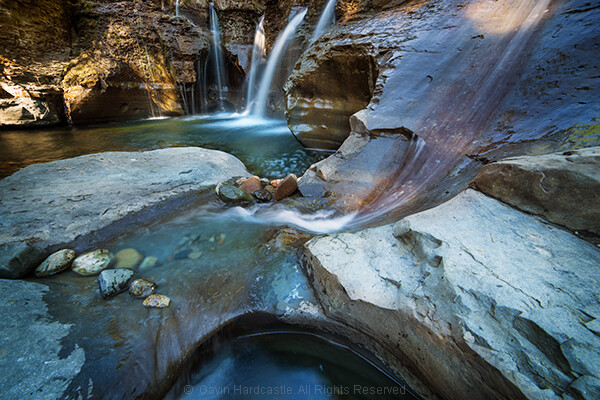
In very low light or when shooting totally shaded areas
This shot of a waterfall at Silver Falls State Park was a long exposure in very dim light, taken inside a canyon that had no direct sunlight at the time.
You see, when the sun has gone down and it’s starting to get dark, there’s little point in using a polarizer for a scene like this.
The only wet surfaces that could cause glare were the leaves in the foreground, and the light was so dim that there was no glare at all.
Night shooting
When you’re photographing at night, you want to get as much light as possible into your lens.
A polarizer is going to reduce the amount of light and force you to use a longer shutter speed or a higher ISO setting.
So if you’re shooting in the dark, do yourself a favor and remove the polarizer.
When capturing the full moon shot above, the polarizer would only have served to slow down my shutter speed.
When you want reflections in water
Here’s where you want the best of both worlds.
Let’s say you like the look of your image with the polarizer on. Your colors are nicely saturated and all of the glare has been reduced from the surfaces, but you’re annoyed to see that the lovely reflections in the water have either vanished or diminished.
What do you do?
The simple answer is to take two shots – one with the polarizer engaged and another without the polarizer.
Then you can blend the two exposures in Photoshop and take the best elements from each.
For the shot above, I really enjoyed the look of the reflected waterfall in the pool, so I took two shots with different polarizer settings and then combined them.
When you want to shoot rainbows
I’m sure I’ll be corrected by our more well-educated readers, but from a polarizer’s standpoint, a rainbow is reflected light.
So if your polarizer is engaged, the rainbow will perform a disappearing act in your photo.
Disengage or remove the polarizer and – presto! – the rainbow will be back in your photograph.
But still don’t forget your polarizer!
As I mentioned at the start of this article, a polarizer is a key landscape photography tool.
In fact, if I leave the house and forget my polarizers, I’ll actually turn around and drive home; they’re that important.
At the same time, I urge you to learn when conditions call for the removal of your polarizer.
And I hope this article helps you identify those golden moments so that you can get the best possible shots!
Now over to you:
Do you use a polarizing filter? How often? Are there times when you prefer to go without it? Share your thoughts in the comments below!
The post When NOT to use a Polarizing Filter appeared first on Digital Photography School. It was authored by Gavin Hardcastle.
The post NiSi Filter System Review (For Fujifilm X100 Cameras) appeared first on Digital Photography School. It was authored by Matt Murray.
The Fujifilm X100 camera line has consistently appeared in lists of the best compact cameras over the last decade. This is not surprising; the series boasts a sharp 23mm f/2 Fujinon lens, great ergonomics, and a ton of cool features.
The series started with the original X100 in 2010, but is now in its fifth iteration with the launch of the Fujifilm X100V in February 2020.
One of the best compact camera options of the last decade: the Fujifilm X100 series.
As a “take everywhere” camera, the X100 line has many advantages. But perhaps one of the drawbacks is that there isn’t a lot you can add to it to increase its versatility.
Or is there?
In this article, I take a look at the NiSi filter system for Fujifilm X100-series cameras.
So if you’re ready for a thorough NiSi filter system review, let’s get started.
Fujifilm X100-series accessories
Until recently, the only thing you could add to an X100-series camera that truly added to its versatility was one of Fujifilm’s teleconverters.
The fixed 23mm lens has a 35mm full-frame equivalent field of view. Adding the TCL-X100 teleconverter, this changes to a 50mm equivalent, whereas the WCL-X100 widens your field of view to 28mm.
Although the optical quality is excellent, the teleconverters are relatively heavy and quite pricey. If only there was something lighter and cheaper yet with excellent optical quality that would add to the X100 camera experience…
Enter the NiSi filter system for X100-series cameras.
The Fujifilm X100F shown alongside the NiSi filter system.
NiSi filters
As a long-time user of the X100 series, I was excited to see NiSi recently launch a filter system for this camera lineup.
NiSi has a great reputation among landscape and cityscape photographers, because their filters are made from high-definition optical glass and offer true-to-life color reproduction.
The waves were gently lapping against this old jetty, but with the NiSi ND8 filter attached to my Fujifilm X100F, a 5-second exposure was enough to smooth the ripples out.
I’ve been using the NiSi 100mm system for the last few years with my Fujifilm X-T3 and Fujifilm X-T2. And I have been impressed with the results.
So, as a long-time user of the X100 series, I couldn’t wait to try out this new NiSi filter system.
NiSi filter system for Fujifilm X100-series cameras
For this NiSi filter system review, I tested the filters designed for Fujifilm X100-series cameras on my Fujifilm X100F.
Here’s what’s included in the kit:
NiSi 3-stop medium-edge graduated filter
NiSi HD polarizer filter
NiSi ND8 3-stop neutral density filter
NiSi Natural Night filter
NiSi X100 filter holder
Filter carrying case
There is also a slightly cheaper starter kit that contains only two filters: the medium-edge graduated ND filter and the polarizer. I’m not sure why you would opt for the starter kit when, for a small additional cost, you can get two extra, very useful filters.
The NiSi filter system for the X100 series.
First impressions
My first impression of the kit was very positive: the quality and design of both the packaging and the filters is impressive.
The filters come in a light gray filter case, which has a tough shell and looks to be hard-wearing. Inside, each filter is wrapped individually in tissue paper. The filter case has several divider tabs inside, one for each filter as well as the filter holder.
The filters come wrapped in tissue paper.
My next thought was to marvel at how tiny the kit was, so much smaller than my 100mm NiSi filters. Of course, when you think about how big the lens is on the X100, it makes perfect sense for the set to be so small.
The filter set is as light as a feather and very compact. If weight matters to you, you’ll barely notice this new bit of kit in your bag.
Build quality
The build quality of the kit is excellent. The filter holder is constructed with aluminum alloy (the same material used in the popular NiSi V6 100mm filter kit). The filters themselves are made of high quality, precision-annealed optical glass, which is a point of difference as some other companies use resin.
Installation and usability
Getting your X100-series camera ready to use the filters is super easy.
First, unscrew the front ring on your camera’s lens. If you’ve never used a lens hood or teleconverter on your X100-series camera before, you may even be surprised to know there is a ring that comes off the front of the camera.
When this ring is taken off, it reveals a thread mount. The next step is to screw the NiSi filter holder onto the lens. Now you’re all ready to go!
For this image of Brisbane at night, I stacked the NiSi ND8 filter along with the NiSi Natural Night filter.
Using the filters
Once the filter holder is in place, take a filter out of the pouch and slide it carefully into the filter slot closest to the lens.
Note that the holder has two slots so you can add another filter to the holder if you wish.
Quite often, I found myself using filters in combination; for example, at dusk I was using the 3-stop ND filter to get longer exposure times for ferry trails on the Brisbane River, along with the Natural Night filter to correct the color of the light. In very bright conditions, I often used the graduated ND filter along with the polarizer filter.
My X100F with two Nisi filters attached, mounted on my rather large Manfrotto tripod.
The filter holder rotates 360 degrees, which is very handy for when you need to use the graduated ND filter in either horizontal or vertical orientation. Of course, for the other three filters, the orientation doesn’t matter.
NiSi 3-stop medium-edge graduated ND filter
The NiSi 3-stop medium-edge graduated ND filter is a fantastic piece of kit to have in your camera bag.
As with all graduated neutral density filters, it helps to darken specific areas of an image such as bright skies. But as a graduated filter, it allows normal exposure in other parts of the image.
The filter is quite long in comparison to the length of the filter holder, allowing you to move the filter up and down in the holder to control its exact placement.
An early morning scene with a bright, overexposed sky. For this image, I positioned the dark part of the graduated ND filter at the top of the image to darken the bright sky.
NiSi HD Polarizer
The NiSi HD Polarizer reduces reflections and glare by filtering out light that has become polarized due to reflection from non-metallic surfaces.
This comes in handy when you want to remove glare on the water or reflections when shooting through glass. The filter provides good color and saturation in scenes.
I enjoyed using the polarizer, though the effect is less noticeable compared to the other filters.
Early morning in Queensland; no polarizing filter. The same scene with the NiSi Polarizing filter. The effect is subtle, but to me the colors look slightly better and less washed out.
ND8 filter
The NiSi ND8 filter is a neutral density filter that gives a 3-stop exposure reduction. This allows you to photograph with slower shutter speeds or wider apertures than would usually be possible.
A neutral density filter is perfect for being able to show movement in your images. For example, you can use the NiSi ND8 to shoot traffic trails or flowing water.
This filter is probably the most fun and most dramatic filter to use in the kit. It’s fantastic to create long exposures using this filter; you can then see the effect it has on moving elements in your photos.
Here’s an extreme example of the ND8 filter in use. The longer exposure time makes the sea looks perfectly smooth!
Natural Night filter
The NiSi Natural Night filter is the perfect companion for night photography. When shooting cityscapes, many factors affect the color of the light; these include mercury vapor, sodium, and low-CRI streetlights. The glow from these light sources prevents your camera from seeing the sky properly and can negatively affect your images.
The NiSi Natural Night filter blocks out the most common wavelengths of light pollution, leaving you with a more natural-looking night image.
Here’s an image taken without the NiSi Natural Night filter:
Story Bridge and Howard Smith Wharves in Brisbane without the NiSi Natural Night filter.
And here’s the same composition, captured once the NiSi Natural Night filter had been added:
What a difference! Story Bridge and Howard Smith Wharves in Brisbane with the NiSi Natural Night filter.
NiSi filter system review: Conclusion
I’ve really enjoyed using the NiSi filter system for the Fujifilm X100 lineup.
The filters are a fantastic addition for anyone shooting with this series of cameras. They add another layer of versatility without compromising the compact nature of your setup.
Until recently, the only way to add to the versatility of the king of compact cameras was by purchasing a pricey (and heavy) teleconverter. But with this kit, you have multiple creative options to use depending on the conditions.
Boasting excellent build quality, the professional kit contains four useful filters. They are small, light, and come beautifully packaged in their own tough case.
The professional filter set is also fantastic value for money, widely available for around $ 65 USD. The starter kit, with two fewer filters, is available for around $ 49 USD.
In fact, I can’t recommend this filter set highly enough.
So now that you’ve finished this NiSi filter system review, the question is not, “Why would you buy the system?”
It’s rather: “Why wouldn’t you buy it?”
You can grab the NiSi filter system here.
The post NiSi Filter System Review (For Fujifilm X100 Cameras) appeared first on Digital Photography School. It was authored by Matt Murray.
San Francisco-based Breakthrough Filters has announced an all-new EF to RF filter adapter. This is the first EF to RF drop-in filter adapter released not made by Canon.
Breakthrough’s EF to RF Drop-In Filter Adapter is loaded with a variety of hardware improvements. The adapter has an all-metal aluminum alloy construction and includes dust and water resistance. The weather-sealed adapter has rubber gaskets around both the filter and rear mounts. The adapter includes a detachable tripod food and accepts mounting plates for ballheads, arca plates and more. Further, the interior has been blacked out to reduce specular reflections.
In terms of compatibility, Breakthrough states that you can mount your EF lenses to RF mounts on cameras such as the Canon EOS R, R5 and R6 cameras and the RED Komodo. The adapter supports autofocus, image stabilization and EXIF data recording.
The Breakthrough EF to RF Drop-In Filter Adapter includes numerous features, such as an all-metal construction, weather sealing and more. Click to enlarge. Image credit: Breakthrough
You can use either Canon’s own drop-in filters or filters from Breakthrough. Breakthrough Photography announced many drop-in filters in August, you can learn more about them by reading our coverage.
The Breakthrough EF to RF Drop-In Filter Adapter is available for preorder for $ 199 USD. The first 500 orders will also ship with a free Breakthrough XF Clear drop-in filter. Shipping is expected to begin on November 16.
Breakthrough offers many drop-in filters for their new filter adapter and for the existing Canon EF-EOS R drop-in filter adapter. Image credit: Breakthrough
This is a sizable discount when compared to Canon’s own EF-EOS R Drop-In Filter Mount Adapter. The version that comes with a circular polarizing filter costs $ 300 and the version that includes a drop-in variable ND filter is $ 400. If you already own a Canon Adapter and want to purchase Breakthrough’s new EF to RF drop-in filter adapter, Breakthrough is offering a buyback program.
After your new filter arrives, you can use an included pre-paid return label to ship your Canon unit back for a refund on your transaction with Breakthrough. Sending a regular Canon EF to RF adapter nets you a $ 69 refund and Canon’s Drop-In Filter Adapter is worth $ 149.
Breakthrough is offering a Canon Adapter Buyback program for purchasers of the new Breakthrough filter adapter. Click to enlarge. Image credit: Breakthrough
To learn more about the new Breakthrough EF to RF Drop-In Filter Adapter, head to Breakthrough’s website.
OnePlus has announced it’s working on an update for its OnePlus 8 Pro smartphone that will disable the 5MP near-infrared camera that was able to see through certain materials, including some clothing, when used with a ‘Photochrom’ mode in the native camera app.
The Color Filter camera onboard the 8 Pro has been known since the smartphone’s announcement back in April. However, not much was shared about the particular camera module at the time. It wasn’t until 8 Pro units started hitting the front doors of reviewers when it became clear what the 5MP near-infrared camera could see.
Last week in particular, a number of high-profile reviewers and pundits shared examples of just how much the Color Filter camera onboard the 8 Pro could reveal. Most notably, the below video, shared by YouTube channel Unbox Therapy, showed that beyond being able to see through the plastic IR shields built into numerous electronics, it could also see, at least to some degree, underneath certain clothing when stretched unusually thin.
Unsurprisingly, the see-through capability of the 8 Pro brought up privacy concerns, not unlike those that led to Sony recalling more than 700,000 ‘HandyCam’ camcorders back in 1998 when it was revealed the ‘Nightshot’ mode on its TRV 615 XR camcorders was revealing more than the general public was comfortable with.
Today @OnePlus decided to temporarily disable the ‘Color Filter’ camera functionality through software update in the coming week.
In order to eliminate the impact on users privacy under possible extreme circumstances and eliminate everyone’s concerns.https://t.co/uk3gn9iXvU
— Ben Geskin (@BenGeskin) May 19, 2020
OnePlus heard the response loud and clear and in an effort to get ahead of any further controversy, OnePlus announced, via Weibo, that it is temporarily disabling the Color Filter camera via a software update within the next week. In the post, OnePlus writes (machine-translated, edited with brackets for clarity):
‘When planning the [color] filter lens of OnePlus 8 Pro, we hope[d] to use this lens to perceive the characteristics of infrared light to provide users with a unique texture photography style effect. But recently, based on user feedback, we have found that under very specific environmental conditions, the filter lens may have a slight perspective effect on special materials at very close distances […] In order to eliminate the impact on user privacy under possible extreme circumstances and eliminate everyone’s concerns, we decided to temporarily disable the filter function through software upgrades.’
OnePlus doesn’t elaborate on how temporary this solution is or what the long-term fix will be, but it’s a start. It’s also unknown whether this will be a forced update or something optional users can opt out of to keep the near-infrared capabilities.
Aurora Aperture Inc. has announced a next-generation rear mount filter system for wide-angle lenses. The new filter system is designed to allow for the use of filters with many popular ultra wide-angle lenses, including those which do not include a front filter thread.
In 2017, Aurora Aperture released a rear mount filter system for the Canon EF 11-24mm F4L USM lens. The newly-announced next-generation system works with the 11-24mm lens, plus the Canon EF 8-15mm F4L Fisheye USM, EF 14mm F2.8L USM (versions I and II), EF 15mm F2.8 Fisheye, EF 16-35mm F2.8L USM (versions II and III are not supported), EF 17-35mm F2.8L USM and EF 17-40mm F4L USM. In addition to Canon lenses, Aurora Aperture’s new filter system is also compatible with the Nikon Nikkor AF-S 14-24mm F2.8G ED, Sigma 14-24mm F2.8 DG HSM Art (Canon EF, Sony E and L mount versions), Sigma’s 14mm F1.8 DG HSM Art for Canon EF mount and the Sony FE 12-24mm F4 G lens.
Not only is Aurora’s latest rear mount filter system compatible with a wider array of lenses, but it also includes other new features. The new rear mount filter system utilizes a magnetic quick-release structure, allowing for easier installation and removal from the lens. In addition, there are a variety of new filters available for the system, including graduated neutral density filters and light pollution reduction filters.
Neutral density – Aurora Aperture refers to them as PowerND – filters are available in 2, 4, 6, 8 and 12 stop variants. Graduated neutral density (GND) filters are available in 1.5, 2.5 and 3.5 stop densities. Each GND filter features a soft transition at 60 percent of the image frame height. Finally, the new PowerDusk filter is designed to filter out artificial lighting and reduce visible light pollution in urban areas, which Aurora Aperture states will allow for better astrophotography and even improved nighttime street photography. For specific information on how the PowerDusk filter reduces the light which hits your image sensor at different wavelengths, click here.
Image credit: Aurora Aperture
In order to utilize the magnetic filters on the rear of your wide-angle lens, you must first install the new rear mount filter system. The installation process will vary depending on the lens in question, but it ranges from using specialty adhesive to replacing existing gel filter holders. Once the filter holder adapter has been installed, using and changing filters is as placing a small glass filter into the magnetic filter holder.
The Aurora Aperture next generation rear mount filters will be available through a Kickstarter campaign starting this month and general availability is expected in September. The price of lens adapters range from $ 35 to $ 41 USD and filter prices range from $ 43 to $ 113. Stay tuned to Kickstarter and to Aurora Aperture’s website for additional information and availability.
Disclaimer: Remember to do your research with any crowdfunding project. DPReview does its best to share only the projects that look legitimate and come from reliable creators, but as with any crowdfunded campaign, there’s always the risk of the product or service never coming to fruition.
LEE Filters has revealed its upcoming LEE85 Filter System designed for smaller cameras and lenses. The system features a Holder component with a locking dial for use with the related Adaptor Ring, which will be available in sizes from 37mm to 72mm, according to the company. The Holder is made from aluminum and works with the LEE85 ND Graduated and Standard filters and a clip-on Polariser.
LEE Filters presents the new LEE85 Filter System as lightweight and ideal for photographers who use small cameras and who want a compact, easily deployed filter system. The Locking Ring makes it possible to lock the Holder at a specific angle or allow it to freely rotate, depending on shooting needs. As with the larger LEE100 system before it, the LEE85 Holder can be configured with 1 – 3 filter slots using modular guide blocks.
The compatible ND filters have been designed with large tabs on the top; these feature clear labels and make it easier to insert and remove the filters from the Holder without leaving fingerprints. The LEE85 Polarizer, meanwhile, clicks directly onto the Holder and can be rotated. The entire system, including the Polarizer and up to four filters, can be stored in the included System Pouch with strap and belt loop options.
The company will offer the LEE85 Filter System in multiple bundle options: Discover Kit, Develop Kit, Aspire Kit and Deluxe Kit. All four options include the 58mm, 67mm and 72mm adaptor rings, as well as the LEE85 Holder, System Pouch and 0.6 Medium ND Graduated filter. Depending on the kit selected, buyers will also get things like the ‘Big Stopper,’ the LEE85 Polarizer, a 0.9 Medium ND Graduated filter and a cleaning cloth.
Buyers who need adaptor rings in other sizes will be able to purchase them separately. It’s unclear how much each LEE85 kit will cost at this time; the company says that its new filter system is due for release in the second quarter of this year.
The post How to Use the Photoshop Camera Raw Filter for Better Photo Editing appeared first on Digital Photography School. It was authored by John McIntire.
Inside Photoshop, there are an awful lot of tools for you to use to get the very most out of your images. Some of these tools (while not simple) have very specific functions that you use for specific tasks (Unsharp Mask for example). The Photoshop Camera Raw Filter is different.
This filter opens up the use of the (almost) full functionality of Adobe Camera Raw (ACR) anywhere in your Photoshop workflow. If you’ve ever used ACR (or Lightroom) to process a raw file, you know exactly how feature-packed this tool is.
The Camera Raw Filter is a powerful tool that allows you access to the features of ACR anytime in your workflow.
In normal cases, you would use ACR to process your photos at the beginning of your workflow during raw processing, but the Camera Raw Filter opens up these tools to you anytime you may want them.
This article will outline how to use the Photoshop Camera Raw Filter, show you some instances where you might want to use it, and give you some tips to get the most out of it.
What is the Photoshop Camera Raw Filter?
Lightroom is great for processing your raw files (so is ACR), but what if you could use these tools inside Photoshop?
At its most basic, the Photoshop Camera Raw filter allows you to use the functions of the ACR interface at any time within Photoshop. This allows you to make any adjustments within ACR at any time during your workflow instead of just limiting its usage to the raw processing stage.
While it would be possible to import your working file into Lightroom to make the same sets of adjustments, doing this in Photoshop saves you from that cumbersome step. It allows you the use of these tools without any extra effort.
You can find the Camera Raw Filter under the filter menu.
To find the Photoshop Camera Raw Filter, simply choose Filter->Camera Raw Filter and the dialog box will pop up.
Before you do this, you may want to stamp all layers by pressing Ctrl+Shift+Alt+e (Cmd+Shift+Alt+e). This will combine all of your layers into a new layer from which you can work.
The top layer here is stamped from the two layers below it.
What it doesn’t allow
White Balance – Because you are not working from a raw file, you lose a lot of the functionality of the white balance setting in ACR. You will still be able to make drastic changes to the coloring of your images with this tool. It will be the same, for example, as adjusting a JPG in Lightroom.
Crop tool – You also lose the crop and rotate tools that you would have access to when working on RAW files.
There are others, but these are the most important to take note of.
In the various menus of the Photoshop Camera Raw Filter, you will find there are a few options missing that you would see in ACR.
It’s also important to realize that because you are not working with a raw file at this stage, you won’t have the same versatility that you would with a raw file in ACR.
Instead, the process will be more akin to working on a JPG file in Lightroom or ACR. This means you will have less information to work with, such as, dynamic range.
This is all fine and to be expected. However, it illustrates the importance of getting things as close to right as possible while in the raw stage of post-processing.
How can it be used?
With all of the power of ACR behind the Photoshop Camera Raw filter, there is no way to make anything resembling a complete list of what you could do with it. But here are a few potential uses that I find myself using often.
Fine-tune adjustments after raw
Make certain adjustments easier than in Photoshop
Make quick, extreme adjustments for certain parts of your image
Quick and easy vignetting
Final tweaks before finishing your image
1. Fine-tuning adjustments after raw
Once in Photoshop, and after a bit of healing work, I decided that I wanted to make the image a touch cooler and reduce the vibrancy as well. To not lose the healing work, I used the Photoshop Camera Raw Filter to make a quick adjustment.
If you’re like me, you mostly make decisions about adjustments on the spot. This is fine when you process your raw file and move it into Photoshop immediately. However, if you leave it for a day or two before you come to it, you might find that you no longer like the decisions you made.
Of course, you could always go back into Lightroom and start again, but what happens if you have already started making adjustments to your image?
Chances are, you don’t want to lose those. A quick and easy solution is to stamp the layers to a new layer and run the Camera Raw Filter. Once there, you can make any adjustments you might want and click Okay.
This works great if you want to make quick adjustments to things like the overall exposure, contrast or vibrancy in an image. I will often come back to a file after a few days to find that I want to reduce the highlights and whites before I get started properly.
2. Make trickier adjustments
I find the Clarity tool in ACR tricky to replicate in Photoshop. Here, I darkened the background and cranked up the clarity with the Camera Raw Filter. I also used a Layer Mask to keep the changes off of the subject.
Photoshop might be all-powerful on its own, but ACR (and Lightroom by extension) do make a few things easier. For example, the Clarity slider is a tricky tool to replicate in Photoshop. Using the Photoshop camera raw filter to make these adjustments is easier and can save you a lot of time.
Another example is the use of the Highlights, Whites, Darks, and Blacks sliders to make quick, intuitive global contrast adjustments. Using these tools in this way is useful if you’re not yet fully familiar or comfortable with options like curves adjustments.
3. Local adjustments
Here, the shirt sleeve was still to bright for my taste, so I used the radial filter as a local adjustment to bring it down a bit
A common way I use the Photoshop camera raw filter is to make adjustments specific to a target area (such as a background).
After the adjustments are made, you can then use a layer mask to ensure that the adjustments are only affecting the areas that you want.
This method suits textured backdrops well because you can adjust the clarity and contrast to your heart’s content knowing that your subject won’t be affected once you make the layer mask.
4. Vignettes
ACR’s vignette tool is easy, fast and intuitive and hard to beat in Photoshop unless you need absolute control.
There are tonnes of ways to create a vignette in Photoshop, but in my opinion, the vignette tool within the ACR is by far the easiest, fastest and most intuitive to use. By doing it this way, you can create a subtle (or extreme if you prefer) vignette in just a few seconds. It is also easy to mask out (as per the previous section) any part of the vignette that might be interfering with your subject.
5. Final tweaks
With a finished image, you can always load up the Camera Raw Filter and see if there’s any small tweaks (like the ones here) to help the image.
Another useful trick for the Photoshop Camera Raw Filter is to use it to make a set of final tweaks to your finished images.
Once you’ve completed your image, you can run the filter and see if there’s any further small adjustments you’d like to make. Tiny adjustments to exposure, contrast (via all the sliders) clarity and vibrance can all help to give your finished images just a little more polish.
At this point, your images should be good to go, so do try to keep any adjustments at this stage small and subtle.
Just the beginning
With the exception of a bit of skin work (maybe five minutes) and some sharpening at the end, this image’s Photoshop workflow was completed otherwise entirely with the Camera Raw Filter. Hopefully you can see just how useful a tool it is.
With a tool like the Photoshop camera raw filter, there are so, so many options for you to use in your images.
If you can do it in ACR (with a few minor exceptions), you can do it with this filter inside Photoshop. Feel free to use it in any way that you need to that gets the results that you want.
Side-by-side comparison of the starting image and the final image.
Smart objects
Depending on your workflow and your style of post-processing, using the Photoshop Camera Raw Filter as a Smart Object might be a good choice for you.
Smart Objects allow you to come back to any adjustment you have made (with certain tools) and tweak them.
To setup a Smart Object, right click the layer that you want to use and choose Convert to Smart Object.
To work with Smart Objects, right-click the layer that you will run the Camera Raw Filter on and click Convert to Smart Object.
Now run the Camera Raw Filter and make any adjustments that you want to and press okay.
In the Layers Palette, and under the layer that you are working on, you will now see the name of the filter below the box titled Smart Filters. If you double click this, you will be taken back to the Camera Raw Filter dialog box where you can adjust any of the settings that you have tweaked.
This is a useful technique for any time you think you might second guess your decisions a bit later on.
With the layer converted to a Smart Object, you can apply your filter. To alter the adjustments, simply double click on the name of the filter in the layers palette.
Having said that, Smart Objects won’t suit every photographer’s workflow.
For example, I like to use a lot of stamped layers in my workflow and by the time I might see something I want to modify, I’ve already created and worked on a new stamped layer above it.
Any adjustments made to a Smart Object in this situation, would not be visible.
Overall
I will admit, that the way that the Camera Raw Filter was used in this example was extreme and bit over the top, but by using it in this manner, I hope you can see just how powerful an option it is for various adjustments in Photoshop.
The Photoshop camera raw filter is a very powerful tool that you can use while post processing your images for a great many different effects. Add to that the fact that anyone who shoots in raw format is already familiar with the interface, it makes using the filter quick and painless to make any number of adjustments. I have discussed only a few ways that you can use this filter in your images, but if you have any other suggestions on how you use it, please leave it in the comments below for other readers to benefit from.
The post How to Use the Photoshop Camera Raw Filter for Better Photo Editing appeared first on Digital Photography School. It was authored by John McIntire.
At the end of 2019, Tiffen, a leading manufacturer of imaging accessories, announced 2 neutral density (ND) Filter Kits for the DJI Mavic Mini drone. Originally forecast for January 2020, the company revealed that their 3 filter and 6 filter kits of ND and ND polarizers are now shipping.
The Mavic Mini Filter Kits, which include a compact carrying case, are:
3 Filter Kit – $ 59.99
ND4/PL, ND8/PL, ND16/PL
6 Filter Kit – $ 89.99
ND4, ND8, ND16, ND4/PL, ND8/PL, ND16/PL
Each filter features multilayer and hydrophobic coating. Surfaces are waterproof and boast scratch prevention technology, according to Tiffen. The company states that beginners and professionals, alike, will be able to capture higher-quality in-flight content.
The 3 Filter and 6 Filter Kits are now available on tiffen.com and through their network of authorized retailers. Tiffen filter kits are also available for the DJI Mavic 2 Pro, Mavic 2 Zoom, Inspire 2, and Phantom 4 Pro.
Moment, known for creating camera gear and accessories for creative professionals, today released a 67mm filter set and mount. The company states that users can now mount a filter to any phone, even without a case. The 67mm mount was designed so a filter could be placed over a triple-lens camera system like, for example, the iPhone 11 Pro offers.
Designers at Moment also took additional measures by machining a speaker grill into the mount. It will allow creators to use the audio from their phone’s rear-facing microphone during filming, something the company says isn’t available on competing mobile filter solutions. The mount also works on laptop cameras.
The 67mm Variable Neutral Density (ND) Filter is a 2–5 stop or 6–9 stop. They are made with Schott B270 Pro Cinema Glass and are designed to control exposure while eliminating color fringing and cross polarization.
67mm Variable ND Filters are $ 149.99 each. Purchasing both in a bundle costs $ 279.99, which saves the buyer $ 20. The 67mm Filter Mount is currently marked down to $ 23.99 from $ 29.99. The filters are available today while the mount is expected to ship between April 21st – 28th.
PolarPro has released LiteChaser Pro, a mobile filter system for Apple’s latest iPhone devices. The kits, designed for compatibility with the iPhone 11, 11 Pro, and 11 Pro Max, offer a range of products that includes a line of neutralizing and polarizing filters, a filter and grip.
‘Since the launch of Apple’s iPhone 11 in September 2019, the goal was to develop a complete creative system worthy of replacing your DSLR/Mirrorless camera and help transform your iPhone 11 into the ‘A’ camera. Whether vlogging your travels or even producing your own short film; and PolarPro met that goal with the introduction of the LiteChaser Pro system,’ said Jeff Overall, Founder and CEO of, PolarPro ‘In the end, the outcome is a complete creative system built specifically for mobile filmmakers and photographers to deliver shots never before possible on iPhone.’
These are the filters created for the LightChaser Pro system:
ND8 (3-Stop) & ND64 (6-Stop)
These filters were designed to ensure you have the correct shutter speed to achieve more cinematic looking footage.
Variable (3-5 stop)
This aluminum-framed variable neutral density filter is engineered specifically for mobile filmmakers to lower shutter speeds to cinematic levels. Laser-etched stop indicators inform you of how much light you are reducing within the preset 3-5 range. The controlled stop range reduces cross-polarization on the two longer lenses.
Circular Polarizer
This filter helps capture deeper colors and reduce glare, reflections, and haze from your photos. Rotatable so you can control its effect based on your composition.
The LiteChaser Pro Case is made of rubber, has a reinforced frame, and an aluminum filter mount that is compatible with the range of circular, variable, and neutral density filters listed above. The Grip includes two 1?4”-20 thread mounts for a mobile tripod mount with features that allow you to add a light or mic. A rail system includes two 1?4”-20 thread mounts for a mobile tripod mount with features that allow you to add a light or mic. The rail system also adjusts to hand sizes and allows switches between landscape and portrait modes.
Launch pricing for kits is available for a limited time.


You must be logged in to post a comment.