RSS
 

Posts Tagged ‘Express’

Adobe Photoshop Express update brings perspective correction and vignetting

08 May

The Android version of Adobe’s popular mobile image editing app, Photoshop Express, has just received an update expanding the feature set with a few useful new functions.

Perspective Correction lets you correct converging lines and other types of perspective distortion. You can select a Full Auto setting or pick vertical or horizontal skew. The correction is then applied and fine-tuned using a slider.

Some type of vignette effect is available on most editing apps out there, so it’s about time the feature has made its way to Photoshop Express too. You can adjust the diameter of the vignetting effect by pinch-zooming and set the intensity on a slider to create the final result.

Additionally, it’s now also possible to share multiple images directly from the gallery, and change wallpaper and profile pictures directly from the app’s share screen.

The new functions are welcome additions to the app’s already quite extensive feature set, making Adobe Photoshop Express worth a closer look for anyone who edits images on a mobile device. The latest version of the app can be downloaded free of charge from the Google Play Store now.

Articles: Digital Photography Review (dpreview.com)

 
Comments Off on Adobe Photoshop Express update brings perspective correction and vignetting

Posted in Uncategorized


Adobe updates Lightroom for Android and web, Photoshop Express for iOS

12 Nov

Adobe today dropped a fresh round of updates to its mobile and web photo app offerings.

A new version of Lightroom for Android features a Raw Technology Preview for the mobile app — like the one introduced for iOS in July — that lets you import Raw images directly from the camera into your device. With this update, you can now capture, edit, share and access full resolution Raw photos with your Android app, now at version 2.2. In addition to Raw image-processing advantages, the Android app also syncs files with Lightroom on your other devices, including the desktop app and web, complete with edits, ratings and flags.

As explained in a new Adobe blog post to pull this off, you’ll need a special USB adapter — an on-the-go or OTG cable — to connect your camera to your mobile device, and transfer images via PTP mode. OTG cables are inexpensive and come in different configurations, so you’ll want to search for one that matches the ports built into both your camera and your device.

As with the iOS app, Lightroom for Android supports the same Raw files as the desktop app and Adobe Camera Raw. Check to see whether your camera is supported.

Lightroom for web updates include enhancements to the app’s share feature, now letting you add a header graphic, sections and text to promote better engagement and storytelling. That hooks into updates to Adobe Portfolio, the company’s utility that lets you create professional online portfolios: You can now send images from Lightroom on the web to Portfolio. Just create a new project in Portfolio from within Lightroom’s Web app and copy photos into the project. You can also now download original images (if they are available in the cloud) from within Lightroom on the web.

In separate news, Adobe has also announced a major update to Photoshop Express app for iOS. New features include Adobe Photoshop Express Collages, which create high-quality collages with intelligent layout and style transfer automation choices. The update also features Google photo integration, letting you select and import images from a Google Photos account, edit them in Photoshop Express, and share or export them.

All new Lightroom and Photoshop Express features are available now.

Articles: Digital Photography Review (dpreview.com)

 
Comments Off on Adobe updates Lightroom for Android and web, Photoshop Express for iOS

Posted in Uncategorized


R2-D2 Express: Take a Ride on a Real Star Wars-Themed Plane

23 Apr

[ By Steph in Technology & Vehicles & Mods. ]

star wars plane 1

Pretend like you’re on a journey to a galaxy far, far away while aboard a real Star Wars-themed aircraft painted to look like R2-D2 on a Japan-based ANA Airways flight. The R2-D2 Dreamliner aircraft is an officially Star Wars-branded 787-9, the logo writ large across the body of the plane, and is set to take flight for the first time in September 2015.

star wars plane 2

ANA chose R2-D2 not just because the shape happens to be convenient for the nose of a plane, but because the character is “not your typical droid,” they explain. “No matter the challenge, the highly loyal R2-D2 never fails to complete his mission and surprise us with his clever solutions.”

star wars plane 4

Never mind that as passengers on an international flight, most of us would prefer that clever solutions never have to come into play in the first place. The plane’s design is a welcome change from the usual airline logos, and it’ll be fun for unsuspecting onlookers to spot it from the ground.

star wars plane 3

The plane is a promotional tie-in for the upcoming film Star Wars: The Force Awakens, due to hit theaters on December 18th.

Share on Facebook


[ By Steph in Technology & Vehicles & Mods. ]

[ WebUrbanist | Archives | Galleries | Privacy | TOS ]


WebUrbanist

 
Comments Off on R2-D2 Express: Take a Ride on a Real Star Wars-Themed Plane

Posted in Creativity


Exocomet Express: How to Hitch Intersellar Rides on Comets

04 Feb

[ By WebUrbanist in Conceptual & Futuristic & Technology. ]

comet runner space concept

Gravitationally unbound to any star, resource-rich extrasolar comets could be the key to manned space flight beyond our solar system, providing a way for resourceful astronauts to hitch rides, mine supplies and ultimately travel far beyond the heliosphere.

exocomet material resource harvesting

Inspired by the Rosetta mission and drawing on images from the NASA, Caltech and the European Space Agency, this Comet Runner concept explores the idea of tethering expeditions to comets and using their materials to support long-distance journeys. The idea also dovetails with research by NASA’s Jet Propulsion Laboratory into the possibilities of leveraging comet momentum to propel or potentially slow down spacecrafts.

exocomet exploration mining architecture

Indeed, “many contain compounds such as water, methane, carbon monoxide and hydrogen cyanide — which can be converted to things useful for a long distance space mission, such as fuel, oxygen, plastics, refrigerant and fertilizer.”

exocomet astronaut image

The proposed system from Clouds AO, a New York City architecture firm, involves a modular space station carrying with it the means to sort, process, store and build from raw materials mined from a given comet, 3D-printing from surface dust and inducing artificial gravity by augmenting the object’s natural axial rotation.

exocomet tethered architectural idea

Just like a reluctant space vehicle (or Sandworm from Dune), inertia could be fought and adjustments could be made to the trajectory, providing the means for directional control or at least minor course corrections.

exocomet modular space station

Comets would be screened for suitability in terms of composition and stability before being boarded, as it were. Billions of comets are hypothesized to exist in the Oort cloud surrounding our solar system are estimated to be miles in diameter, “some of which are nudged into long-period orbits through the inner solar system, while many others are ejected from our solar system through gravitational scattering caused by passing stars and the galactic tide.”

comet runner orbital paths

Of course, this is just a thought experiment and design concept for now, but the constituent elements are there: comets abound, rich in materials and tracing all kinds of paths through and beyond our solar system – the question is not whether but when we might be able to harness them to suit our ends, or perhaps whether we will find better means in the meantime.

Share on Facebook


[ By WebUrbanist in Conceptual & Futuristic & Technology. ]

[ WebUrbanist | Archives | Galleries | Privacy | TOS ]


WebUrbanist

 
Comments Off on Exocomet Express: How to Hitch Intersellar Rides on Comets

Posted in Creativity


How to Calibrate your Monitor with the Spyder 4 Express

16 Aug

Monitor calibration with Spyder 4 Express

If you want to obtain accurate colours in your photos in Lightroom (or indeed any other software), no matter what you may read elsewhere, you need to calibrate your computer monitor. If you don’t, the colours in your photos won’t be accurate, and you will never produce a print (or any other form of output, such as a Blurb book) that matches the colours on your screen. If you undertake client work, or sell your photos through stock libraries, it is essential to calibrate your monitor so that you know the colours of your photo are as intended.

The reason for this is simple. When monitors are manufactured, the colour is set incorrectly. Most monitors have a strong blue colour cast. The only exception seems to be Apple Mac computers. They still have a colour cast, but it’s not as strong.

I have no idea why this is. Whenever I’ve searched for the answer all I find is vague references to blue computer screens looking better in the shops, or that the blue colour cast suits graphic designers. Neither of these ideas seems credible to me.

Regardless, even if monitors were calibrated prior to shipping, you would still need to calibrate your monitor yourself at regular intervals because the colour of monitors drifts over time.

Take a look at these two black and white images. One is completely neutral in tone, the other isn’t. Can you tell which is which?

Monitor calibration with Spyder 4 Express

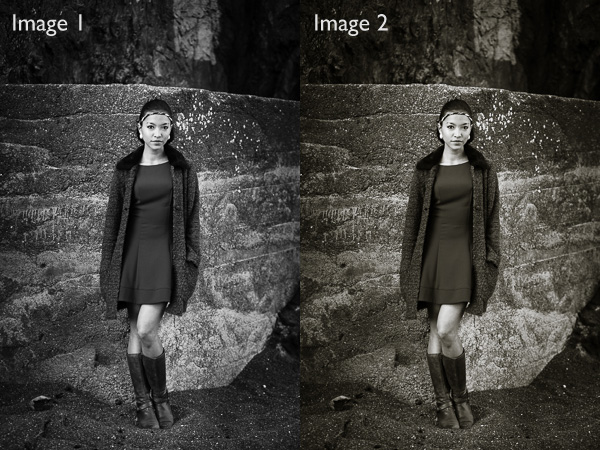
If you answered that Image 1 is neutral, you are correct. But it’s very difficult to tell on an uncalibrated monitor. If your monitor is uncalibrated (making everything look bluer than what it is) you probably picked Image 2 as the neutrally coloured one.

Using monitor calibration devices

The only way to calibrate your monitor accurately is to buy (or borrow) a device that measures the colours emitted by your monitor. They are called colorimetric devices and connect to your computer via the USB port.

If you research the topic online you will find articles that tell you how to calibrate your monitor without a colorimetric device. Pay no attention to them, their techniques don’t work. The only way to do it properly is with the correct device.

Colorimetric devices are easy to use, and come with software that guides you through the calibration process. It shows you where to place your device on the screen, then displays a series of colour patches for the device to measure.

It then compares the colour values recorded by the device, against the true colour values of the colour patches and creates a profile that compensates for the inaccuracies of the monitor. The profile is saved on your hard drive and used by your computer’s operating system to control the way colours are displayed on your monitor.

Computers and colour profiles

Once you have calibrated your monitor you can relax, knowing that the colours you see on your screen are as accurate as your monitor can render them. At least, that’s the idea. In real life, it’s a little more complex.

Mac owners will be fine. The Mac operating system (OS X) works very well with colour. Every program you use works with the monitor profile and displays accurate colour. It’s one of the reasons that many professional photographers use Apple computers.

If you have a Windows PC however the story is different. The operating system knows the monitor profile is there, but not all programs use it. It’s possible to have the same photo open in two programs, and for the colours in one to appear different to the other. One program is using the monitor profile, and the other isn’t.

All the professional level programs you use, such as Lightroom and Photoshop, utilize the monitor profile and display colours accurately. But not all software does. An example is ACDSee. It doesn’t use the monitor profile and won’t display colours accurately. If you’re unsure whether your software uses the monitor profile, a Google search should reveal the answer.

Just to make things even more complex, some PCs won’t load the monitor profile you created in the first place. It seems to be a problem with Windows Vista and Windows 7. This excellent article describes the problem in more detail and gives you a work around.

Another thing to watch out for is that the colours on your monitor drift over time. For that reason it’s a good idea to calibrate your monitor at monthly intervals, or before you carry out any critical work. The software that comes with your device can be set up to give you a reminder.

How to choose a monitor calibration device

Colorimetric devices are made by several manufacturers. The main players seem to be Datacolor (who make the Spyder models) and X-Rite (which makes Colormunki).

For many photographers, the least expensive model in each manufacturer’s range is probably sufficient. That’s good news because it means that you don’t have to spend a lot of money in order to calibrate your monitor.

But before you rush out and buy the cheapest device you can find, ask yourself these questions. Some photographers will require the features found in more expensive models.

  • Do you use a dual monitor set up? Some colorimetric devices only profile a single monitor.
  • Do you have a printer to profile as well? Some devices can calibrate printers as well as monitors, although they are a lot more expensive.
  • Do you want to adjust the gamma or white point of your monitor? Not all monitors let you do this, but if you have a monitor which allows it you will need a more advanced device to enable this feature.

The Spyder 4 Express

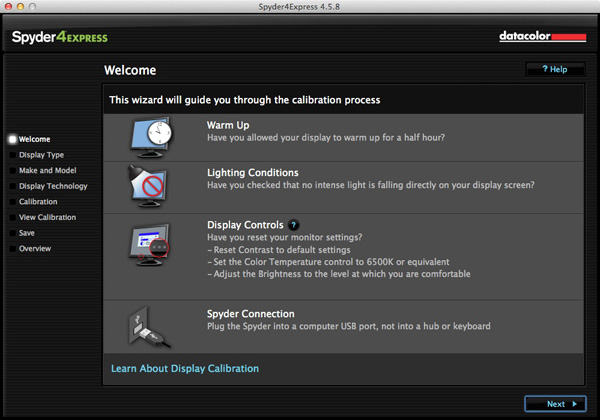
I use a Spyder 4 Express to calibrate my monitor. Here’s how the process works. If you have a different device, the process will be similar.

1. Run the Spyder4Express software that comes with the device

The first screen gives directions. The important points are that you should let your monitor warm up for half an hour before calibration and that there should be no intense light falling on the screen.

It also asks you to reset the contrast setting and set white balance to 6500K. This isn’t possible on all computers, especially laptops, so don’t worry about these settings if you can’t adjust them. The device will still work.

Monitor calibration with Spyder 4 Express

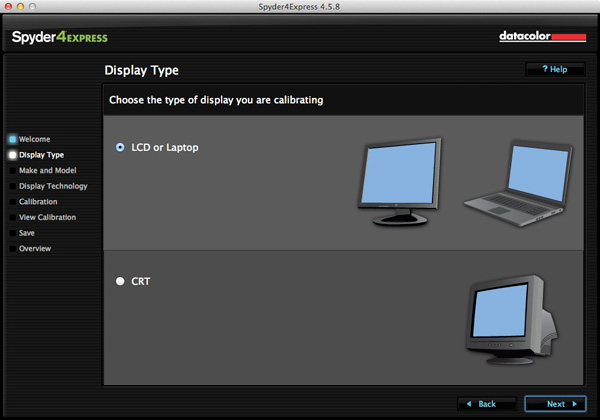
2. Then it asks you which type of display you have

Monitor calibration with Spyder 4 Express

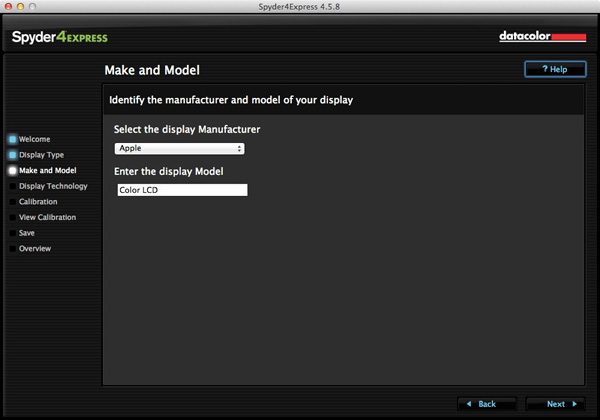
3. Next enter the manufacturer and model of your display

I selected Apple and the display model was filled in automatically. The Color LCD setting seems to be sufficient (confirmed by checking the monitor specs in System Information).
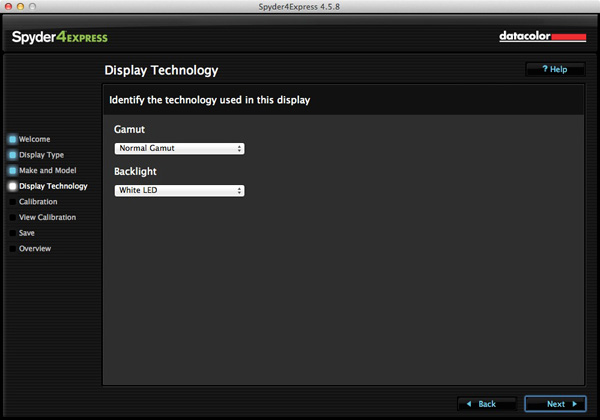
Monitor calibration with Spyder 4 Express

4. Set the Gamut

This next step is very important. Gamut is fairly easy. You’ll know if you have a wide gamut monitor because it will say so in the specs (that’s probably why you bought it). In fact, I tried setting wide gamut here to see what would happen and the software recognised that I didn’t have a wide gamut monitor and sent me back to change it.

The backlight setting is crucial. The instructions recommend that if you’re not sure what type of backlighting you have that you should set it to Unknown. I tried that and even I could see with my naked eye that the colour was wrong (the screen had a magenta cast).

If your monitor has the model number printed on it, simply Google the model number. You should find the spec sheet for the monitor which will tell you exactly what type of backlighting it has.

If you have a laptop it’s harder to verify. I found these instructions for my Macbook Pro. I’ve been unable to find any for Windows laptops, so if you how to do this I’d be grateful if you could let us know in the comments. Once you have the model, you can Google it for the spec sheet. That’s how I confirmed my laptop has a White LED backlight.

Monitor calibration with Spyder 4 Express

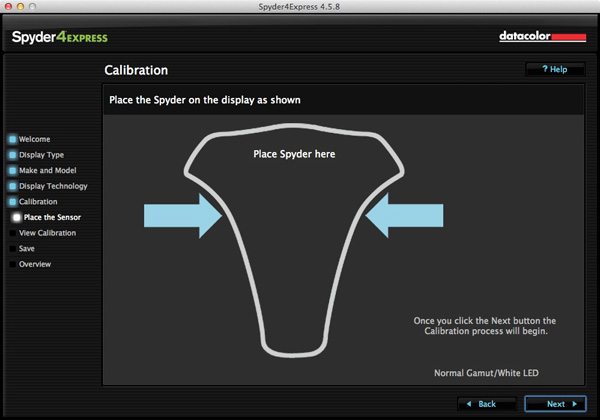
5. Placement of the device

The next screen shows where to place the Spyder 4 Express unit. It has a counterweight to hold it in position.

Monitor calibration with Spyder 4 Express

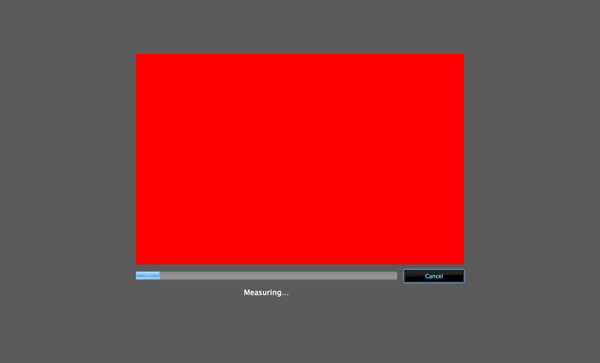
6. The software then displays a series of colour patches for the device to measure

Monitor calibration with Spyder 4 Express

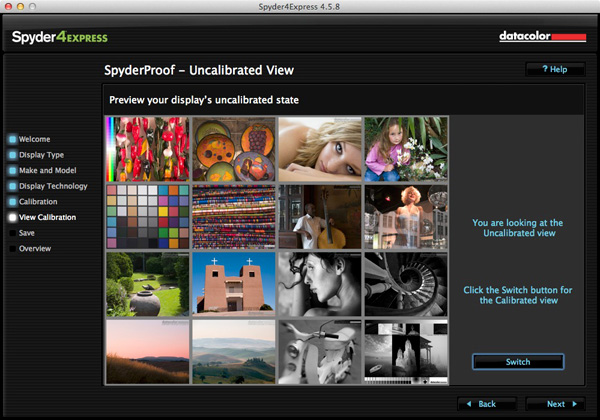
7. A new profile is created

When it’s finished, the program creates a new monitor profile that’s used by the computer from that point on. It also lets you switch between calibrated and uncalibrated versions to see the difference.

Monitor calibration with Spyder 4 Express

8. Gamut comparison

Finally, the program shows a graph comparing the colour gamut of the monitor compared to sRGB, NTSC and AdobeRGB colour spaces.

Monitor calibration with Spyder 4 Express

Conclusion

Monitor calibration is an essential part of your workflow as a photographer. Indeed, it’s an essential part of all post-processing. There’s no way around it, but luckily the process doesn’t have to be difficult or overly expensive.

I use the Spyder 4 Express, and it’s a great little unit. It’s easy to use and relatively inexpensive. The only potential sticking point seems to be working out what type of backlighting your LCD monitor has. It’s crucial to get that right or the calibration won’t be accurate. Also, if you need more advanced features, such as the ability to profile more than one monitor or set the colour temperature or white point, then you need a more advanced model of device.

Have you used a different model to calibrate your monitor? How did the device perform and how did you get on? Let us know in the comments.


Mastering Lightroom: Book Four – The Photos ebookMastering Lightroom: Book Four – The Photos

My new ebook Mastering Lightroom: Book Four – The Photos takes you through ten beautiful examples of photography and shows you how I processed them step-by-step in Lightroom. It explores some of my favourite Develop Presets and plug-ins as well as the techniques I use in Lightroom itself. Click the link to learn more.

The post How to Calibrate your Monitor with the Spyder 4 Express by Andrew S. Gibson appeared first on Digital Photography School.


Digital Photography School

 
Comments Off on How to Calibrate your Monitor with the Spyder 4 Express

Posted in Photography


Adobe Photoshop Express update brings Raw editing

15 Jul

Adobe has updated both the iOS and Android versions of its free Photoshop Express mobile app. The new version comes with a number of added features and improvements but to many photographers the most useful new function will be the ability to edit Raw files. We gave it a try – read more on our sister site, connect.dpreview.com.

Articles: Digital Photography Review (dpreview.com)

 
Comments Off on Adobe Photoshop Express update brings Raw editing

Posted in Uncategorized


Phase One releases Capture One Express 7

25 Feb

phaseone_captureoneexpress7.png

Phase One has announced Capture One Express 7, the latest version of its Raw image processing and workflow tool for enthusiasts. A stripped-down version of Capture One Pro, Capture One Express 7 gains features including HDR processing, lens correction and a new digital asset management tool. While the Express edition doesn’t support tethered shooting, images can be viewed remotely and wirelessly using either the Capture Pilot app for iOS or using a web browser on computers, Android devices and Windows phones. Capture One Express 7 will cost $ 99/€69 with discounts for upgraders from previous versions. Click through for the press release and more details.

News: Digital Photography Review (dpreview.com)

 
Comments Off on Phase One releases Capture One Express 7

Posted in Uncategorized


Express (Burlesque Original Motion Picture Soundtrack) (A…

01 Dec

Music video by Christina Aguilera performing Express. (C) 2010 Screen Gems, Inc. Motion Picture Artwork and Photography
Video Rating: 4 / 5

6 hours spent to teach and film. Went by like clockwork thanks to all these amazing dancers. Special shoutout to Shaun Evaristo, Nick DeMoura, Amanda Grind and Megan Curameng for the assistance that day. Also, shoutout to WorldStarHipHop.com for reposting this on their blog: www.worldstarhiphop.com – LB BENIGA.com twitter.com/lylebeniga youtube.com/lbeniga1 REGISTER FOR mL’s theTOUR www.themovementlifestyle.com/tour.php Concept by Lyle Beniga Choreographer Lyle Beniga Director of Photography Nick DeMoura Assistant Director of Photography Shaun Evaristo Editor Thad Reid Assistant to Choreographer Amanda Grind Featured Dancers in order of appearance: Johnny Erasme Devin Jamieson Vinh Nguyen Bam Martin Joesar Alva Mykell Wilson Amanda Grind Mike Fal Ian Eastwood Ellen Kim Jeka Kalotkin Jason Magsuci Marvin Millora JP Goldstein Brent Curtis Lando Wilkins Shaun Evaristo

 
Comments Off on Express (Burlesque Original Motion Picture Soundtrack) (A…

Posted in Photography Videos


Unified Color releases HDR Express 2 for Windows & Mac

06 Nov

unifiedcolor_hdrexpress2.png

HDR software maker Unified Color Technologies has announced version 2 of its HDR Express high dynamic range merge and editing software for Windows and Mac. New features include Image Stacking that automatically groups bracketed exposures and a browser with thumbnail previews. Along with improved de-ghosting algorithms, the software also includes single-click presets and a new slideshow feature. Its native .BEF format can be opened in Adobe Photoshop and Apple Aperture via a plug-in for further editing. HDR Express 2 is available for an introductory price of $ 84.00 or $ 59 for current Unified Color users.

News: Digital Photography Review (dpreview.com)

 
Comments Off on Unified Color releases HDR Express 2 for Windows & Mac

Posted in Uncategorized


Starlight Express 2nd US Tour 2004 Race 2

02 Aug

This is Race 2, from the Starlight Express 2nd US Tour, 2004. The film portion of the race was directed by Julian Napier and also used in the 1st and 2nd UK tours as well as the New Zealand Arena Tour. The double/blurry image in the film that you see here is because the films were presented in stereoscopic 3-D, designed to be viewed with polarized 3D glasses which caused the images to push out beyond the confines of the flat screen and into the audiences faces.
Video Rating: 5 / 5

 
5 Comments

Posted in 3D Videos