RSS
 

Posts Tagged ‘Ephemeris’

The Photographer’s Ephemeris app updated with support for what3words system

09 Feb

The Photographer’s Ephemeris (TPE), a mobile app that enables photographers to plan outdoor shots based on natural lighting conditions, has been updated with support for ‘what3words’ location tagging. With this system, photographers can tag a 3m x 3m (approx. 10ft x 10ft) area that is assigned three words by the what3words system.

The idea behind what3words is that it is easier to use than typical latitude and longitude coordinates, which involve long strings of numbers that can be difficult to accurately return to. The assigned words are completely random and are presented in a format like ‘jump.house.nine.’ Every spot on Earth has been assigned a three-word location tag.

The TPE app has been updated with support for this system so that photographers can save their favorite locations using what3words and lookup shared destinations using the same location tag format. The option to enter latitude and longitude remains. Users can now access what3words tagging in the iOS and Android versions of the app.

Articles: Digital Photography Review (dpreview.com)

 
Comments Off on The Photographer’s Ephemeris app updated with support for what3words system

Posted in Uncategorized


The Photographers Ephemeris (TPE) Versus PlanIt! for Photographers

22 Jun

Note: I have no affiliation with either program.

TPE is probably the best known ephemeris application used by photographers. There is, however, a new kid on the block, PlanIt! for photographers.

While TPE does a good job of being a basic ephemeris, it ends there.

Shortcomings or challenges with TPE

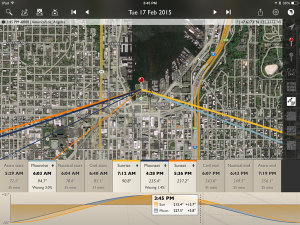
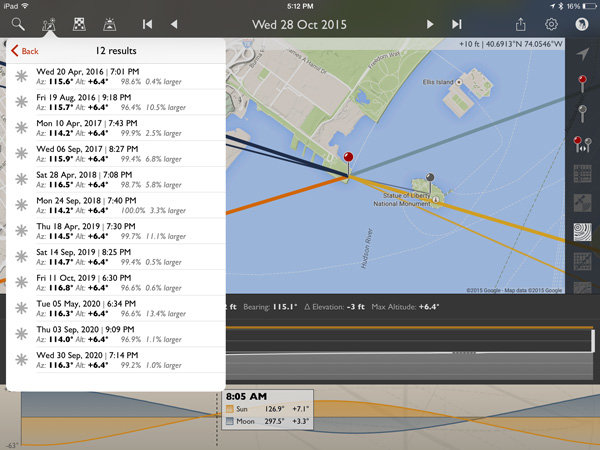
Like all good photographers, you’re planning a future shot of the moon rise. You consult TPE for the rise time at your selected location and, in due course, set off with plenty of time to prepare your gear. Comes the appointed time and the moon doesn’t show! TPE got the moon rise time over the horizon right, but didn’t note the hill in the way. TPE can, however, find the hill. It’s a fairly complex process that involves many steps and some calculation on your part, and the potential for getting it wrong is high.

How PlanIt! picks up the slack

PlanIt!, on the other hand, goes much further. Not only does it give you the rise and set times of moon, sun, Milky Way and many stars but it lets you know if there is an obstruction and when the desired celestial object will clear that obstruction. All you need to do is read the information off the screen.

Moon over Half Dome

There are three major menus in PlanIt!: Ephemeris Features, Tools, and Backgrounds. By combining the features of these menus there are more than 500 possible variations of the information available to you, the photographer. All the features in Planit! are location and time specific. You set them to your requirements.

With 12 separate Ephemeris Features, see below, PlanIt! pretty well has it all covered.

Ephemeris menu

With a few exceptions, the Ephemeris Features are self-explanatory.

Milky Way:

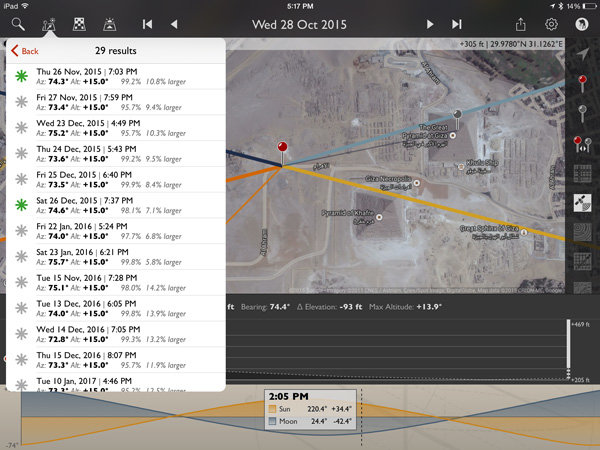
By zooming out on the map you will be able to use the Milky Way Center and Finder functions. In the Milky Way Center function you will see the times of visibility, the angle above the horizon and the bearing of the centre. If it is visible at the time and place entered, you will see an arc of red dots with a row of green dots representing the center of the Milky Way. The Finder function, on the other hand, will produce a list of times, between starting and ending dates, when the Milky Way will be visible at the selected location.

The screen shot below shows the Milky Way over the Half Dome. This screen shot is in Panorama mode with the background in Viewfinder (VR) and graphically shows the relative heights of the mountains in the background. The broken lines at the bottom of the picture tell you that with a focal length of 24mm, a resulting field of view of 40 degrees, and an overlap of five degrees you will need five shots, at the centres shown, to create this panorama.

Milkyway

Dark Sky:

This function uses the 1-9 Bortle Scale to indicate where you are most likely to get the best showing of stars. A one on the scale indicates a very dark sky, in other words no city lights and lots of stars, while nine means forget the star shots and photograph the brightly lit buildings instead.

Time-lapse:

Calculates the various parameters for a time-lapse film strip. You insert up to three of the four criteria, and PlanIt! calculates the rest. If you are doing star time-lapse, and the sun or moon will affect your plans, then PlanIt! will alert you to the fact and correct your timings.

Time lapse

The example above reads, from right to left, as: To make a 30 fps clip of 10 seconds duration, and you decide to take a shot every three seconds, it will take you 15 minutes in total and 300 photos will be taken.

Exposure:

Calculates the exposure triangle based on current light conditions as detected by your phone. Various Neutral Density filter values, and light measuring methods, are available via a drop-down menu.

Light and shadow:

Light and shadow gives you a graphical representation of where the light and the shadows will fall on a scene.

That covers the ephemeris part.

On my Samsung phone, pressing the bottom left key brings up, among other things, the Settings Menu. Scroll all the way down until you come to the Camera Settings. By entering your camera type, especially the sensor size, you enable the full strength of the scene planning features of PlanIt!.

These features are selected in the Tools Menu and, coupled with various ephemeris and background features, a whole new world of scene and equipment planning is yours.

Tools

Tools menu

Once again the menu items are mostly self-explanatory.

Location:

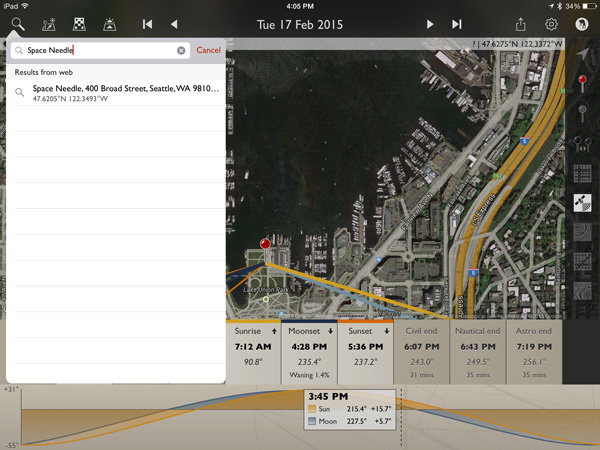
Allows you to enter a location by name or latitude – longitude. Provided you have internet coverage, and have enabled location services on your phone, PlanIt! will centre the map on your selection and, if necessary, automatically correct the time zone to the new location.

Distance:

Calculates the distance between the camera and scene icons. If the view is obstructed the green sight line will include a red section indicating where the obstruction is located. This feature gives you the opportunity to reframe your shot before going on location. The screen shot below shows the camera (the blue pin) just west of Yosemite Creek. The scene pin (red one) is off-screen but still located at the Half Dome. The shot cannot be made from this location because the ridge marked Yosemite Point rises higher than the sight line, hence the red section.

Distance  obstructed  view

The scene pin shown here with an exclamation mark indicates that the actual pin is off-screen. The camera pin will also be shown this way if it is off screen. Both pins can be left floating (will always be shown on-screen) or can be locked to their selected positions on the map, as is the case above.

Focal Length:

Part of planning your shot is knowing what lens to use. Here is where PlanIt! really shines.

In the screenshot below, the green shaded area represents your Field of View for a given focal length. By altering the width of that view, PlanIt! immediately calculates the focal length necessary to achieve the shot. Conversely, altering the focal length will change the Field of View. So, by using PlanIt! you will always have the correct lens in your kit for any shot. Coupled with focal length, you can also see Depth of Field, and hyperfocal distance.

Focal Length Horizontal

Depth of Field:

The aperture setting is ignored in every setup except Depth of Field. Here you are able to alter the aperture setting, and read off the Depth of Field limits as you do so.

Panorama:

As the name suggests, it calculates the number of shots, the focal length, the Field of View, and the overlap required to produce a cohesive set of shots with which to create your panorama.

Backgrounds

PlanIt! uses Google Maps as the basis for its various displays. This means the usual Google Map functions are available, plus a few others.

Backgrounds menu

The Map (Picture) background allows you to use a downloaded, or photographed map, e.g., a picture of a tourist map in a park. This requires correct orientation of the map to be of any real use.

The various Viewfinder backgrounds allow the scene to be depicted in a number of ways, each giving different details of the scene. The (Picture) option actually uses the phone viewfinder as the background. Obviously this requires you to be on location, and your phone to have compass and GPS capabilities.

It goes without saying, in such a comprehensive piece of software, that camera orientation, portrait or landscape, can be selected and this, in turn, affects the view presented. The change between horizontal and vertical focal length being a classic example.

Compare the almost bewildering array of possibilities in Planit! with the ephemeris features of TPE and I think there is a clear winner. Planit! for photographers is available for Android 4 and above in Google play store and has recently been ported to iOS. My thanks to David Qiao of Yingwen Technologies for the screenshots.


googletag.cmd.push(function() {
tablet_slots.push( googletag.defineSlot( “/1005424/_dPSv4_tab-all-article-bottom_(300×250)”, [300, 250], “pb-ad-78623” ).addService( googletag.pubads() ) ); } );

googletag.cmd.push(function() {
mobile_slots.push( googletag.defineSlot( “/1005424/_dPSv4_mob-all-article-bottom_(300×250)”, [300, 250], “pb-ad-78158” ).addService( googletag.pubads() ) ); } );

The post The Photographers Ephemeris (TPE) Versus PlanIt! for Photographers by John Sharples appeared first on Digital Photography School.


Digital Photography School

 
Comments Off on The Photographers Ephemeris (TPE) Versus PlanIt! for Photographers

Posted in Photography


Full Moon Photography Using The Photographer’s Ephemeris 3.0

16 Mar

IMG_0450
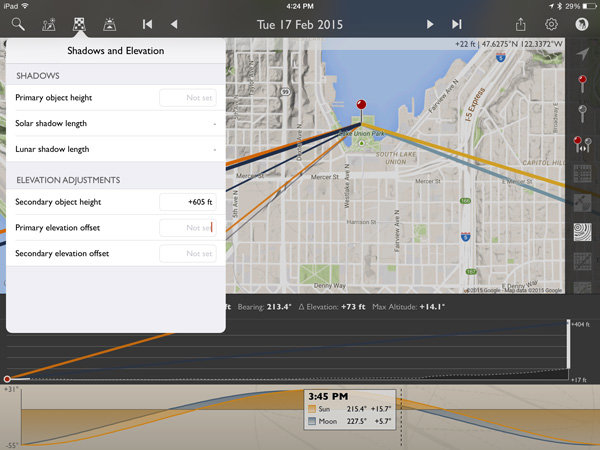
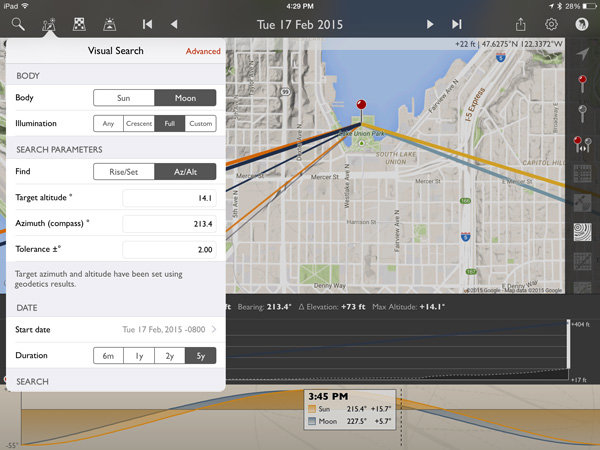
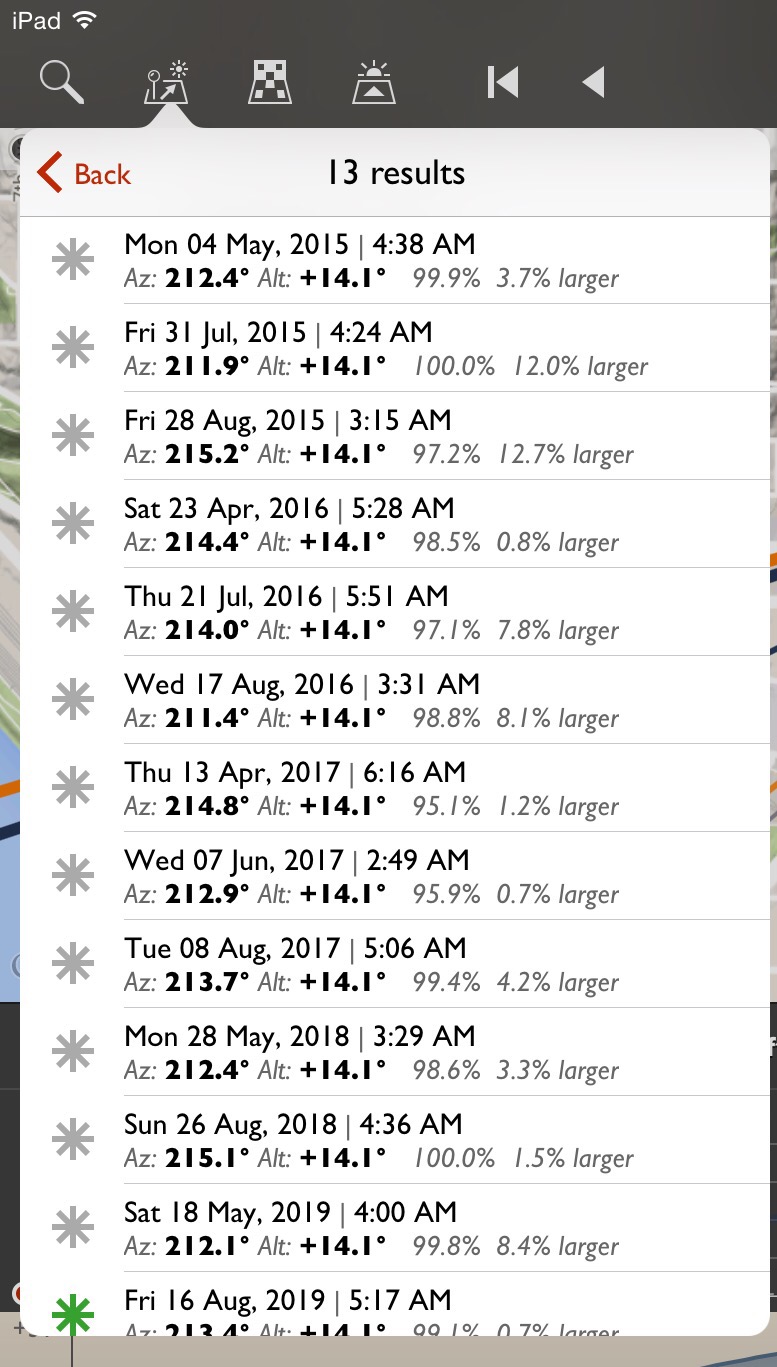
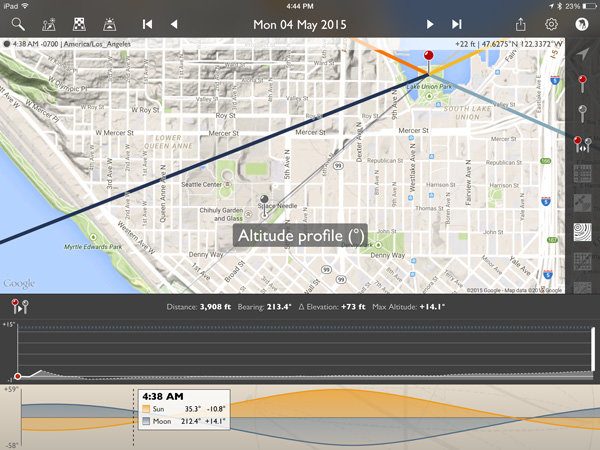
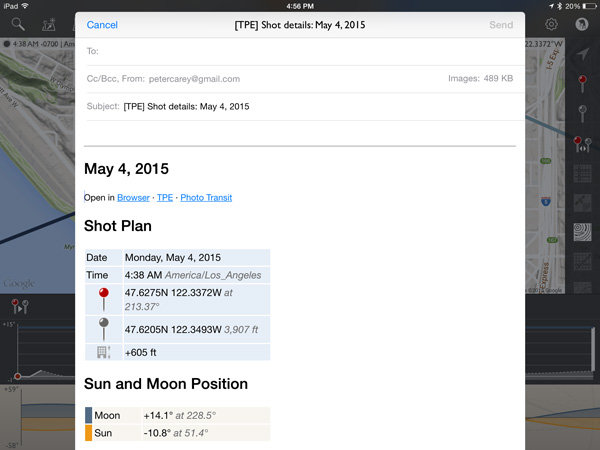
The latest release of The Photographer’s Ephemeris (TPE) releases even more tools to help us photographers get the shots we want. There is just too much for one article, so I am going to focus on a personal favorite subject – full moon photos.

Before handy apps like TPE, LightTrac and PhotoPills, figuring out where the moon might be on any given night took some educating. Pile on top of that the desire to know when the moon was behind, or next to, a specific feature, natural or man-made, and the calculations were beyond anyone lacking a degree in mathematics. But now, it’s all so much easier. Let me show you how I plan on getting a shot of the full moon behind Seattle’s Space Needle this May.

I’ll be using the iPad version of the app which allows for adding in a subject height. Nearly the same functionality is available with the Desktop and Android versions of the app, but the location of items may shift a little. With the desktop and Android version you will not be able to manually add in the subject height but can, using the Pythagorean theorem (and there are plenty apps for it), add in the angle you need.

Pre-planning

To get started, I have decided I want to get a shot of the full moon behind Seattle’s Space Needle. It’s a subject that lends itself well to moon photos. I had a shot in mind that I later confirmed possible after viewing Tim Durkan’s fine example from last year.

Laying out the steps before I open the app, my process will look like this:

  • Find a location where I can see the Space Needle, and one which faces mainly South or West (because of hills, I know shooting to the East is hard and the moon will not appear to the North of the Needle because of being in the Northern Hemisphere).
  • Plot out my location and the location of the Space Needle.
  • Account for elevation change and the height of the Needle.
  • Let the program do its magic.
  • Record my findings and make actual plans.

Finding your location

Loading the app brings up a fairly full featured screen.

IMG_0450

To center the map on your intended location, simply move the map around with your finger until the crosshairs are over your location. You can then tap on the inside of the crosshairs or tap the red observer pin that looks like this:(null)

I placed the location in a park near the shore of Lake Union, a place I know with good visibility of the Needle about 3/4 of a mile away. This will give me a good apparent size relationship of moon to Needle. Many locations can be scouted by using Google Street View.

Next, mark the location of the Space Needle. TPE has a decent search feature, you can use it to quickly find many natural and man-made features around the planet. Just click on the magnifying glass in the upper left and type Space Needle.

IMG_0453

Now click the Space Needle entry itself and you’ll see three options appear.

(null)

In order from left to right, these buttons allow you to: center the map on the location as your primary location, set this location as your secondary location (the item you wish to photograph), and the third is an option to save this item as a favorite, making future recall easy without searching. You will want to click on the gray map pin to set the Space Needle as the secondary location.

(null)Using geodetic information
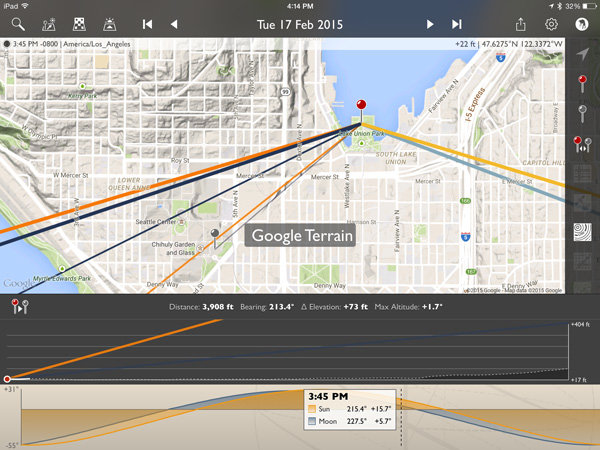
To make things easier to see, click on the Google Terrain map set – an option on the right side of the screen that looks like this (image right)

Now the map is a little cleaner and after zooming out you can see the red pin where I’ll stand and the gray pin at the location of the Space Needle. Those orange and blue lines simply show location of the sun (orange) and moon (blue) when they rise, set and current location.

IMG_0457

Notice that the lower display also changed? It now shows the elevation different between the two points, with distance (3,908 feet – can also be set to metric), bearing (213.4 degrees), elevation change (73 feet) and the angle at which you are looking, be it up or down (+1.7 degrees). There is also a nice plot between the points showing elevation differences.

This is great! But it only gives the elevation change at ground level. I need to add in the height of the Space Needle to position the moon properly. A quick wikipedia search tells me the Needle is 605 feet tall.

Click on the Shadow and Elevation tool at the top left of the screen, just to the right of the Search feature. Where it mentions “Secondary object height” put in 605 feet for the Space Needle.

IMG_0459

Now on the elevation plot at the bottom of the screen there is a big white bar, representing the height of the Space Needle, on the far right. Perfect!

Magic time

Now let’s have TPE do the heavy lifting and tell us when the moon will be perfectly behind the Space Needle, place the event on our calendar and go find other things to shoot!

Click on the Visual Search button, it is the one immediately to the right of the Search button on the top left. You will get a drop down that with all kinds of information. Click on the word “Moon” at the top and then “Full” and your screen will look like this:

IMG_0460

The app has filled in the target altitude (14.1 degrees), compass azimuth or bearing (213.4 degrees), and tolerance (2 degrees) for us!

For a first run, to get a full moon centered over the top of the Space Needle, click on the Duration you would like (I picked 5 years in this example) and then Perform Search. You will see a list of results that look like this:

(null)

Saving results

What does all that mumbo-jumbo mean? Quite simply, those are all the dates and times (and exact location of the full moon and how full it will be) that fall within a two degree margin of our requested position. You will notice the one at the bottom for August 16, 2019 has a green asterisk; this simply means the moon will be within .5 degrees of the request.

Clicking on the top item for May 4th, 2015 will make the map mimic the conditions at that exact time. Double tap the elevation profile at the bottom and it will show the Altitude Profile where you can see the full height of the Space Needle on the right (tall white bar) and the level of the moon in dotted blue.

IMG_0465

All lined up! We’re now ready to save this information on our calendar or send it to a friend if we like. Click the share button on the upper right and you will see the option for adding to calendar as well as messaging, emailing, etc.

IMG_0466

IMG_0467

Here’s the calendar add-item screen.

The location is set to the Primary Location in the app. You may want to adjust the time so you arrive early, as it defaults to the exact moment pictured in the app.

The email option includes all the pertinent information to share the details with a friend. It will attach a map and the recipient can open the information in the TPE (if they have it) or on the web browser version.

IMG_0468

Conclusion

I left a lot of information out of this article because TPE simply has too many options to describe here. At its most basic though, it is excellent for placing the moon over various subjects.

IMG_0469

How about a full moon over the Statue of Liberty?

IMG_0470

Or the Great Pyramid of Giza?

All it takes is a quick Wikipedia search for an object’s height and about two minutes in TPE to plan that moon shot you have been dreaming of!

For those wishing to explore further, TPE’s documentation is fairly complete and worth the read to unlock a wealth of photo planning power.

How can you use this tool in your photography?

googletag.cmd.push(function() {
tablet_slots.push( googletag.defineSlot( “/1005424/_dPSv4_tab-all-article-bottom_(300×250)”, [300, 250], “pb-ad-78623” ).addService( googletag.pubads() ) ); googletag.pubads().enableSingleRequest();
googletag.pubads().disableInitialLoad();
googletag.pubads().collapseEmptyDivs( true );
googletag.enableServices();
} );

googletag.cmd.push( function() { googletag.display( ‘pb-ad-78623’ ); } );

googletag.cmd.push(function() {
mobile_slots.push( googletag.defineSlot( “/1005424/_dPSv4_mob-all-article-bottom_(300×250)”, [300, 250], “pb-ad-78158” ).addService( googletag.pubads() ) ); googletag.pubads().enableSingleRequest();
googletag.pubads().disableInitialLoad();
googletag.pubads().collapseEmptyDivs( true );
googletag.enableServices();
} );

googletag.cmd.push( function() { googletag.display( ‘pb-ad-78158’ ); } );

The post Full Moon Photography Using The Photographer’s Ephemeris 3.0 by Peter West Carey appeared first on Digital Photography School.


Digital Photography School

 
Comments Off on Full Moon Photography Using The Photographer’s Ephemeris 3.0

Posted in Photography


The New Photographer’s Ephemeris Desktop Beta Version Announce

07 Aug

The Photographer’s Ephemeris for Desktop: All Change!

Some important news for users of The Photographer’s Ephemeris (TPE) for Desktop: on 2 September 2014, Google will switch off the Google Maps for Flash API. On that date TPE for Desktop will stop working.

When TPE for Desktop was first launched in 2009, we still lived in a pre-iPad world and Steve Jobs had yet to write his thoughts on Flash. Building on Adobe AIR provided a convenient cross-platform technology that allowed users on Windows, Mac and Linux to run the same application.

Since then, the popularity of Flash has declined significantly and Adobe AIR was repurposed towards mobile development. It has served TPE for Desktop well, but it’s time for a change.

A New Photographer’s Ephemeris Web App

01-new-tpewa-screenshot

The new web app is already live

Happily, this hasn’t come as a total surprise! We have a new TPE for Desktop ready to step into the breach. The new TPE web app is already live and available at app.photoephemeris.com. You can start using it right now. We’re keeping it in Beta until September 2nd, and will continue to refine it over the coming weeks as you send us your feedback.

The web app runs in a variety of modern browsers. It has been tested in the current versions of Safari, Chrome, Firefox, Internet Explorer (11) and Opera. As with the old TPE, it is designed for use on desktop computers or laptops equipped with a mouse or track pad.

One advantage of the web app: you no longer need to install additional software or to continually update to a new version of Adobe AIR. You get the latest version automatically each time you visit the site.

New Features

TPE has a loyal following and this is going to be a big change for some. The user interface may look different, but the new web app includes the same functionality as the old desktop version and comes with a number of enhancements.

Celestial events for the day are displayed in the events timeline below the map. At a glance, you can see the day’s information chronologically.

A chart of the sun, and moon’s, journey throughout the day is displayed at the bottom of the screen. Scrolling the time slider changes sun and moon information relative to your selected pin position and date.

02-600x373-tpewa-graphic

Same features as the old desktop version, but with some great additions.

New features include:

  • Sharing: look up locations; set date and time, then share the URL of the web page
  • Saved locations can be used to set the grey pin position as well as the red – great for planning both camera and subject placement
  • Six degree shadow circle: this new feature shows sun and moon shadows, and highlights, when the sun or moon sit between +0° and +6° above the horizon – times when there’s often good light (so-called “golden hour”) or when the moon can be photographed against features in the landscape
  • Use Google Street View directly from the map
  • Timeline and chart toggle on and off to increase map “real estate” – great for users with small screens
  • Support: you can submit feedback or a support request directly from the app

Look after your locations!

Locations stored in the old desktop version can be exported and saved as a KML file, and then imported into the new web app. We’d encourage you to do this now ahead of the September 2nd deadline.

Once imported, the web app saves locations in your browser’s local storage. In order to ensure you don’t inadvertently lose your locations, we advise exporting and saving the KML files as backups. Look after your saved locations the way you look after your photos.

It’s time to switch

03 old tpe desktop screenshot

Say goodbye to the old TPE desktop app, it’s time to switch (caption)

Just like the original TPE for Desktop, the new desktop web app remains free to use.

You can send feedback to TPE at any time using the support tab in the web app. TPE is used by so many professional and amateur photographers around the world, and this is a great opportunity for you to help shape this useful tool.

We’re adding updated tutorials to the TPE website in the weeks leading up to September 2nd. There is also a Quick Start Guide you can download directly from the web app page. It outlines the major functionality along with a list of useful keyboard shortcuts.

Go ahead and try it out today!

Get The Photographer’s Ephemeris available free of charge. Tutorials are available.

Here’s a few dPS articles that mention TPE so you can try it out:

  • It’s all about the light: The Photographer’s Ephemeris
  • Finding New Photography Locations Just Got Easier With ShotHotspot
  • 8 Simple Guidelines for Capturing Spectacular Sunrise and Sunset Images
  • 5 Hot Tips For Improving Your Summer Photography

The post The New Photographer’s Ephemeris Desktop Beta Version Announce by Stephen Trainor appeared first on Digital Photography School.


Digital Photography School

 
Comments Off on The New Photographer’s Ephemeris Desktop Beta Version Announce

Posted in Photography