RSS
 

Posts Tagged ‘Edited’

Clever “Sketches” video shows objects being edited in the real world

01 Dec

A newly published video called “Sketches” from Russian motion graphics designer Vladimir Tomin shows the world around him being edited using video editing tools. The experimental work presents a variety of scenes in which cursors appear to cut and paste birds, type text created from twisted crane pieces, and scrape the painted line off a road.

Clips from the video, which was published on Vimeo, can also be found on Tomin’s Instagram account alongside other videos of clever reality edits. Tomin also offers content on YouTube and through his personal website.

Articles: Digital Photography Review (dpreview.com)

 
Comments Off on Clever “Sketches” video shows objects being edited in the real world

Posted in Uncategorized


Reuters will no longer accept edited Raw files from freelance photographers

19 Nov

In an email to freelance photojournalists this week, Reuters has confirmed a change in its photo submission policy requesting that photographers submit JPEGs rather than edited Raw files to the news agency. The message also states that original JPEGs with ‘minimal processing’ are acceptable, for example, level corrections and cropping. Read more

Articles: Digital Photography Review (dpreview.com)

 
Comments Off on Reuters will no longer accept edited Raw files from freelance photographers

Posted in Uncategorized


How I shot and edited it: The Second Severn Crossing

24 Mar

Second Severn Crossing - how I shot and edited

The image above is a long exposure taken of the Second Severn Crossing, a motorway bridge that crosses the River Severn, just outside Bristol, England.  I have been asked a number of times how this image was processed, what software/plug-ins were used, so I thought it would be a useful exercise to explain it here.

Shooting the image

I had been thinking about this shot for a while and I knew that there were a couple of important elements that I needed to consider when trying to capture the image:

  • I was really keen to get low, relative to the bridge, and shoot a wide-aspect image across the river.   Fortunately, there is a footpath that runs along the river bank, under the bridge, that is easily accessible by car (Google maps link).
  • I wanted to capture a long exposure so I could contrast the movement of the clouds against the static structure of the bridge.  Therefore, there was no special planning in terms of weather or time of day, as I was happy with a cloudy sky in the middle of the day, as long as there was a strong wind – fortunately, over the 2012 Christmas period, the UK offered those conditions in abundance.
  • I wanted to fill the frame with silky-smooth water, so as the River Severn is a tidal river with one of the largest tidal ranges in the world, I ensured that I would arrive at the location around high tide.

The image, as captured straight out of the camera, is shown below:

How I shot and edited - second severn crossing - image 1

The image was taken at ISO100, 12 mm, f/10, with a 5 minute exposure (299 seconds to be precise).  I used a 2-stop graduated neutral density filter to evenly match the exposure of the sky with the river, and used a 10-stop neutral density filter to produce the long exposure.   As the highlights of the scene were easily contained, I over-exposed the image to ensure that I captured the maximum amount of movement in the clouds, knowing I would be able to correct the exposure/contrast during post processing.

Processing the image

The processing of this image was performed in Adobe Lightroom 4.

The first step was to convert the image to black and white using the B&W selector in the colour panel (on the development pane).

lightroom BandW selection

How I shot and edited - second severn crossing - image2

The initial image after a straight B&W conversion, lacking in contrast

Given the significant amount of foreground, I decided to crop the image at this point, using a 2:1 aspect ratio, to give the wide-aspect image I was after and to stop the foreground being a distraction during the rest of the processing.

How I shot and edited - second severn crossing - image3

Cropped to a 2:1 aspect ratio

I then needed to address the lack of contrast and over-exposure of the initial image.  Therefore, I set the white (+33) and black (-40) points and adjusted the contrast (+40) to set the overall exposure for the image.

How I shot and edited - second severn crossing - image3-1

Initial exposure adjustments made

I then applied a graduated filter to the sky (shown below) to adjust the exposure (-1.74), contrast (+100), clarity (+100) and highlights (+12).  I wouldn’t usually increase either the contrast or the clarity to +100, let alone both, but in this instance doing so acts to bring out a full range of tones within they sky and so emphasise the movement captured in the clouds (the increase in contrast/clarity is also a very good way of highlighting any dust spots present in an image!).

How I shot and edited - second severn crossing - image4

Showing the graduated filter being applied to give impact to the cloud movement in the sky

Next, I applied a graduated filter, from the bottom of the frame, to the water (shown below).  I used it to increase the exposure (+0.80) and reduce clarity (-100) in order to brighten the water and reduce the local contrast to give that bright, smooth water effect that can be key to an image such as this.

How I shot and edited - second severn crossing - image5

Showing the graduated filter being applied to the lower section of the image to smooth out the water

When applying the graduated filter to the sky, it also acted on the bridge in the top left corner of the frame, making it overly dark, losing detail.  Therefore, I used the adjustment brush to paint a mask over the affected portion of the bridge, using a low flow, in order to be able to build up the desired effect gradually.

How I shot and edited - second severn crossing - image6

The mask drawn with the adjustment brush is shown in red

To the adjustment mask, I applied an increase in the exposure (+1.08) and shadows (+18) to bring out some of the detail in the bridge that was lost after applying the graduated filter over the sky.

How I shot and edited - second severn crossing - image7

Nitce the extra detail now visible in the upper left portion of the bridge after application of the adjustment mask

I then applied a graduated filter to each corner on the right hand side of the image, shown below.  The top graduated filter was required to subtly blend a vignette caused by me stacking the 10-stop filter and the ND filter holder.  The bottom graduated filter was required to tone down the water at the edge of the frame.  The exposure was reduced in both instances.

How I shot and edited - second severn crossing - image8

The two final graduated filters shown merged into the same image here)

The final edit that needed to be made to the image was to remove all of the dust spots (you’ll be glad to know I’ve since had my sensor cleaned) and hot pixels (the bright white pixels that result from the extreme exposure time) to give the final image:

How I shot and edited - the second severn crossing - final image

The final image (click to enlarge)

So there you go, using a few relatively simple edits, it was possible to produce this high-contrast black and white long exposure without the need for any additional plug-ins or software packages outside of Lightroom 4.  The initial image may have lacked impact and that can often be the case with long exposure shots, however by shooting in raw, you can exploit the captured detail to create the image you had envisioned.

If you would like some tips to help you take long exposure images, such as the one above, please check out this earlier post.


Post originally from: Digital Photography Tips.

Check out our more Photography Tips at Photography Tips for Beginners, Portrait Photography Tips and Wedding Photography Tips.

How I shot and edited it: The Second Severn Crossing


Digital Photography School

 
Comments Off on How I shot and edited it: The Second Severn Crossing

Posted in Photography


How I Shot And Edited It – Mesa Arch At Sunrise

26 Jan

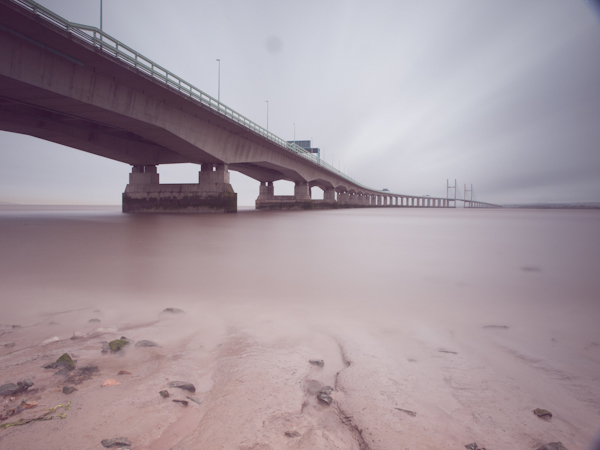
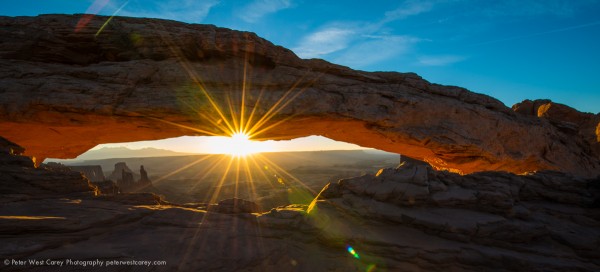
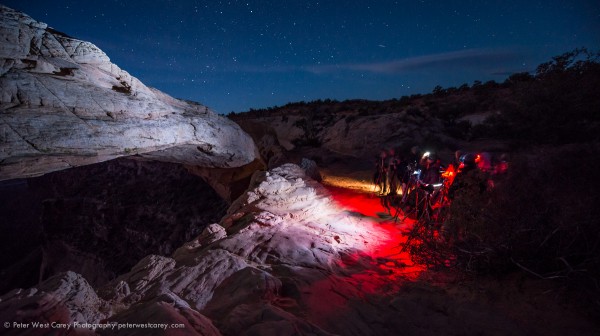
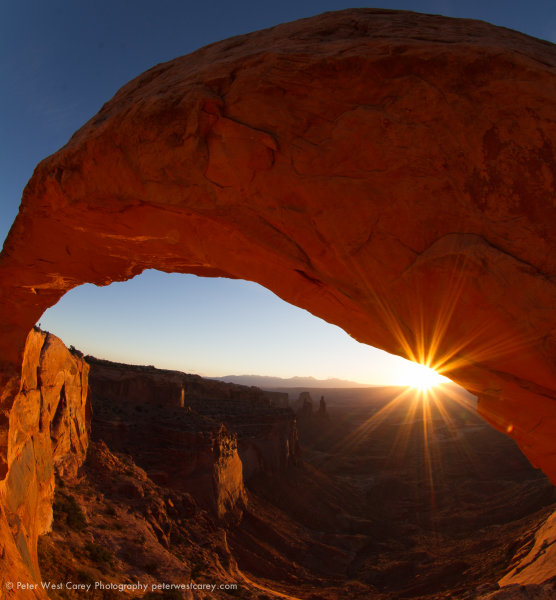
Of the images I brought back from a trip to Utah’s Canyonlands and Arches National Parks this past Fall, the one above recieved the most comments and requests for info. For starters, this is a shot of Mesa Arch in Canyonlands National Park, which is famous for the fact that the bottom of the arch glows from reflected sunlight just after sunrise on most mornings. Most shots look like this:

I had seen images of this arch before and was keen to shoot it with fellow Puget Sound photographer Michael Riffle when he suggested it. He made the suggestion and knew the location so I trusted in his judgement (while he noted it would be crowded) and I did little other prep.

Setup

Getting to the location is straight forward. But the catch: Michael tells me we need to leave early from Moab, the nearest town where we are staying. I think we left at 4:30am, but the details of the clock are fuzzy. There is a short walk from the parking lot and the whole setup is fairly accessible.

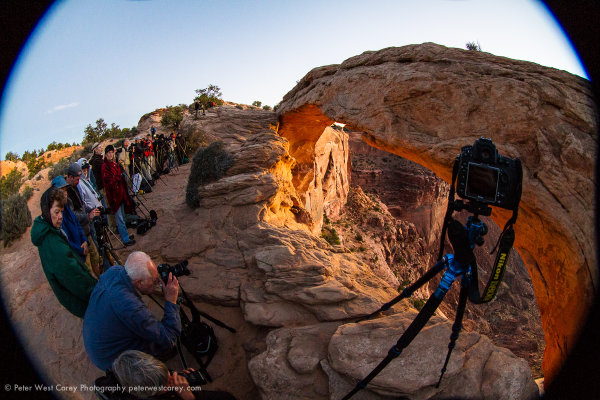
Why did we need to leave so early? Two reasons: 1) This location is popular and 2) it is small. I didn’t realize how small this arch was. I was thinking it was on the order of Landscape Arch in neighboring Arches National Park, which is at least a hundred meters long. Not so with Mesa Arch. To give you a frame of reference, here is what we were greeted with upon arrival.

For someone who loves shooting far-off places with not so many people, this scene astounded me. I can count a dozen cameras in this setup. This is at 6:30am and the sun is not due for another hour.

I decided to set my camera on the far side of the arch in this image and Michael strong armed (politely) his way into the middle of the crowd. By the time I was set up, another six photographers arrived. In the end, over two dozen would be shooting.

I was lucky this day as BorrowLenes.com had lent me a Nikon D800E and 14-24mm lens for this trip. As well as a Canon 8-15mm L fisheye. This meant I was able to setup the Nikon at the location you see above and wait for the sun. I was then able to use the 8-15mm on my Canon 7D and walk around for different composures. It is possible the setup kept me sane.

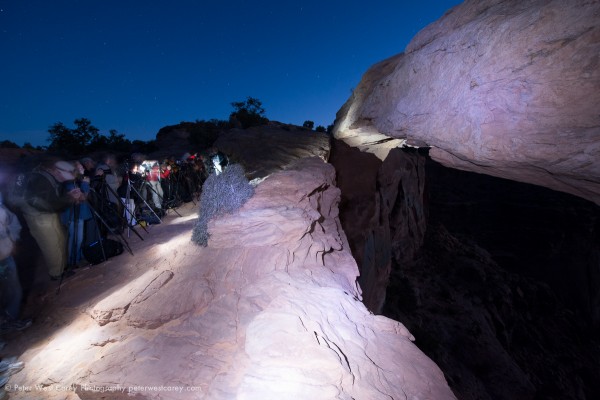
I tested some shot ideas with the 8-15mm L and liked one where I was right at the edge of the cliff and below and to the right of my tripod as in the picture above. Here’s a test shot before the sun came up.

Shooting

After fiddling with the location, the sun finally broke the horizon. You would think Tom Cruise was seen walking naked through LA with the sound of snapping shutters behind and to the side of me. The long, long wait for some was finally paying off. I wasn’t happy with the Nikon shots at the time so I kept experimenting with the fisheye.

It was then that a local Utahan noted he got great shots by hanging over the edge. I love rock climbing and am comfortable on cliffs so, making sure I wasn’t in anyone’s shot (amazingly enough, it was possible) I leaned to the edge and hung my arm down.

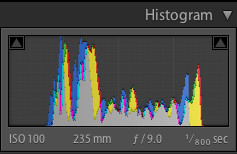
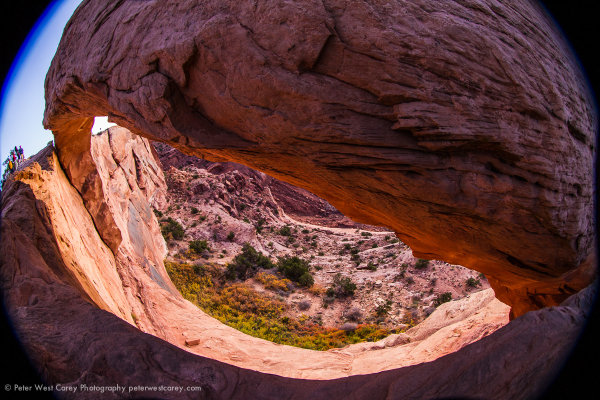
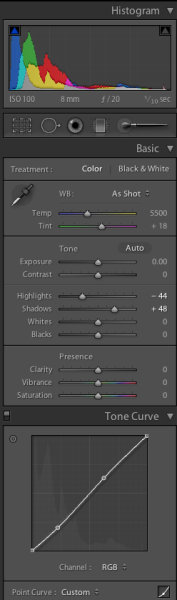
Taking a couple test shots, I switched to Manual Mode and chose ISO 100 for the best quality image now that the sun was up, 8mm for the widest wide angle I could get, f/20 because I wanted a nice star burst pattern to the sun and 1/10 of a second to balance things out.

It took a number of tries to get the shot I wanted and I would take a few, move the camera slightly, take a few more. It was really shooting in the dark as my torso was over the edge with my arm hanging down and wrist bent back, while trying to avoid getting my body in the shot (at 8mm, the field of view is 180 degrees).

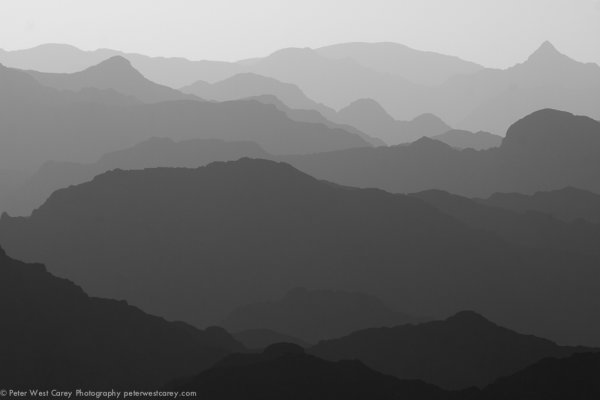
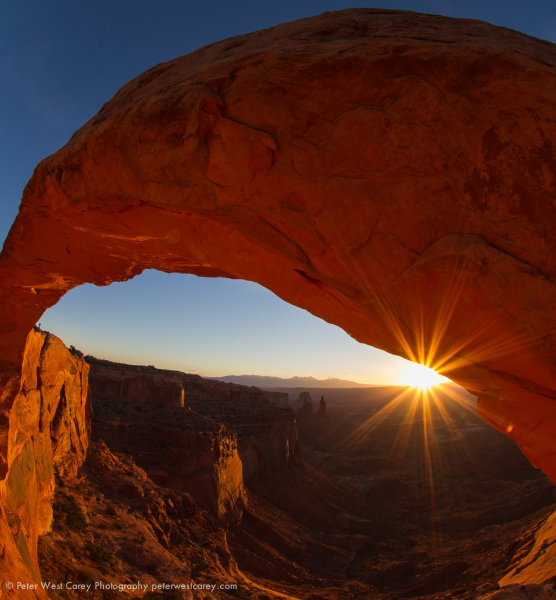
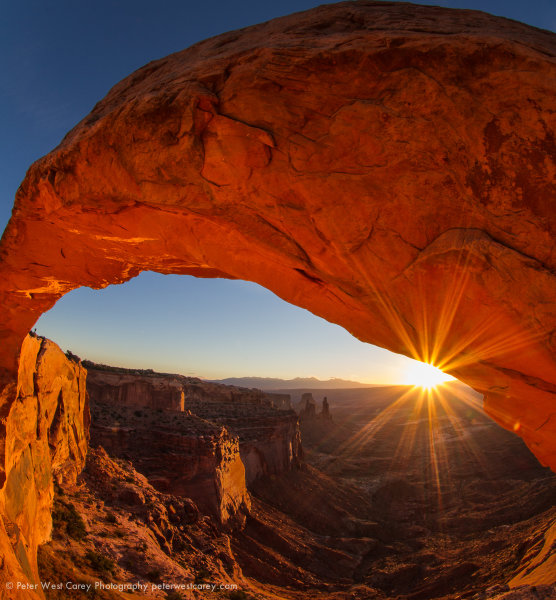
This is the resultant image, straight out of the camera:

Satisfied, we shot for a few minutes more and then headed back to town.

Editing

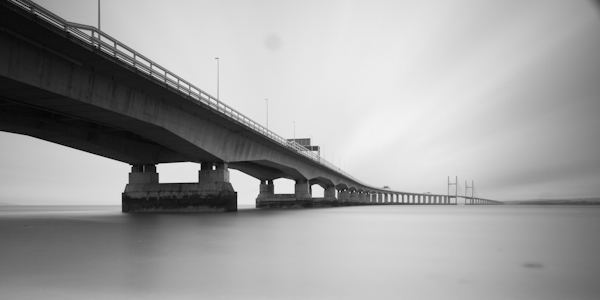
Upon arriving home it was time to play with the image. I knew what I wanted and I started by straightening and cropping the image to cut out the black areas. All the edits below are handled in Adobe Lightroom.

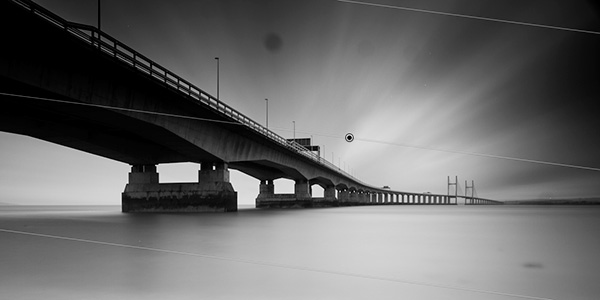
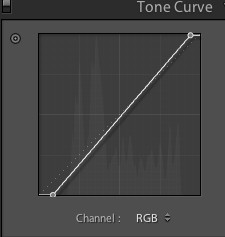
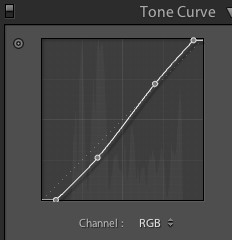
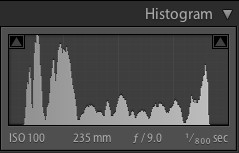
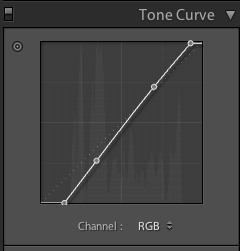
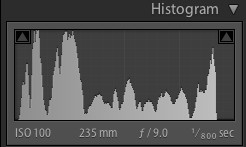
I then adjusted the Tone Curve to add some contrast, but I didn’t pull in the sides as the image was already pushing the edge of the Histogram. I cut Highlights by 44 and enhanced Shadow detail by +48.

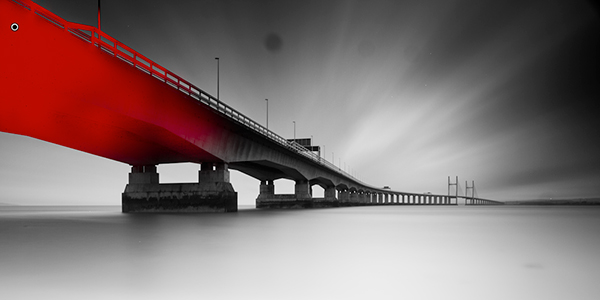
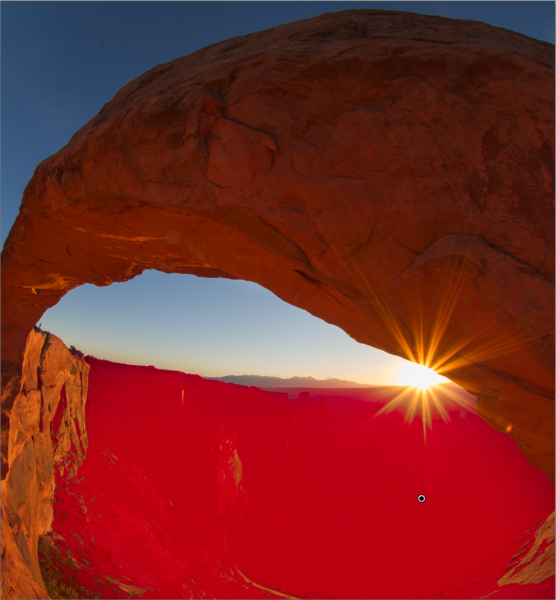
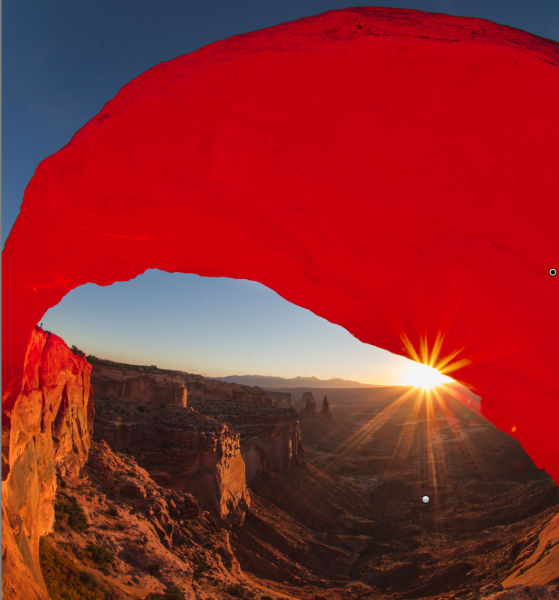
After that, it was time to liven up the valley floor. Using the Adjustment Brush, I painted over the valley floor and increased exposure by +.73 and Clarity by +48 to add some sharpness. I like to use the Clarity often on rock features to make them ‘harder’. The red in the image below represents the painted area for those settings.

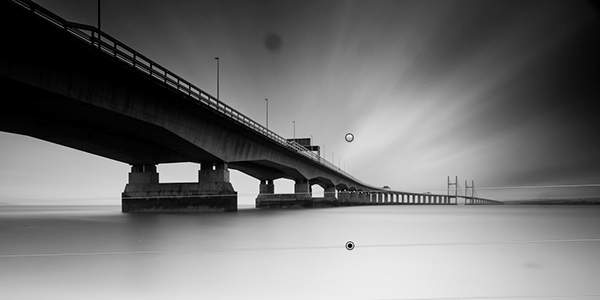
Now I want more life in the arch itself and I use a new brush to paint that. Exposure is +.73 and Clarity is +43.

After removing some dust spots (I’ll spare you the screen shots, but if you click through the images above you can probably spot them), I adjusted the crop angle slightly before the last set of adjustments.

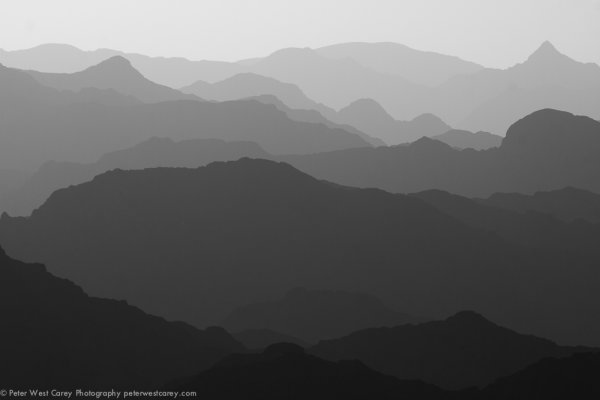
Both the face of the arch and the valley floor are brighter and more vivid. Wanting a little more ‘pop’, I increased the overall Vibrance by +31 (this brings more blue to the sky and orange to the rock and sun) as well as a Blue Saturation of +40 to help the sky.
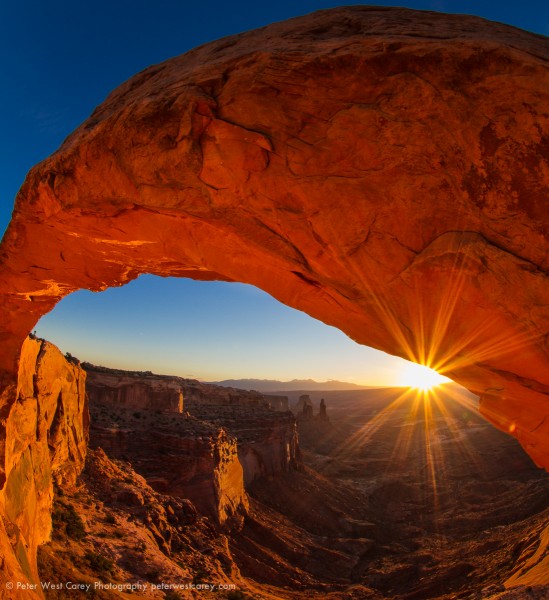
And that was it!

The keys for me for this shot were:

  1. Knowing the space I would be able to crop using the Canon 8-15mm L Fisheye on a cropped sensor camera.
  2. Stopping down my aperture to get the star burst effect.
  3. Placing the sun near the rock to gain the most from the burst (it works best when there is something for the sun rays to contrast with).
  4. Taking a chance and shooting blind from a unique angle.
  5. Listening to the advice of others.
  6. Being courteous to others wishing to get their own shot.
  7. Minor edits to bring the vision to fruition.
  8. Borrowing the right gear (thanks again to BorrowLenses.com)

If you have question, please ask. I will do my best to address them.


Post originally from: Digital Photography Tips.

Check out our more Photography Tips at Photography Tips for Beginners, Portrait Photography Tips and Wedding Photography Tips.

How I Shot And Edited It – Mesa Arch At Sunrise


Digital Photography School

 
Comments Off on How I Shot And Edited It – Mesa Arch At Sunrise

Posted in Photography


How I Shot & Edited – The White Infinity Setup

03 Jan

The Classic White Infinity Backdrop

In my last post about studio photography (the killer clamshell) I covered a simple two light setup for achieving a gorgeous soft beauty look.  This time I thought it might be fun to cover something a bit more general purpose and for this there cannot be anything better than the ever classic white infinity setup.

The All Can Do Lighting Setup

There is a reason why pretty much every major fashion or lifestyle magazine makes good use of a white backdrop and that reason is simplicity.  Not only is this lighting arrangement incredibly easy to achieve but it also delivers sharp, detailed portraits with a beautifully clean and uniform background and most importantly no visible seams or edges.  Aesthetics aside its also great for beginners to try as if done correctly provides a large and consistent zone in which to place your subject, allowing you to concentrate less on the position of your lights and more on placing and posing your model.

Families, pets, models, products the white infinity background is probably one of the most versatile setups going and to help you get started here is my approach to nailing this fantastic lighting arrangement:

Disclaimer

Ok, confession time.  The images and steps below are 100% genuine and therefore its going to be pretty obvious that I screwed up my exposure during this shoot.  Before you hit the big red ‘X’ at the top of your browser .. I can explain.  I basically had about 10 minutes to set everything up and 30 mins to take the shots before my studio rental was over.  Because I was in a rush I failed to spot that a large portion of the floor area was under exposed (by about a stop).  I promise I don’t do this all the time and if you don’t believe me check please feel free to check out the studio section of my portfolio site.  Hopefully by showing you my mistakes you will avoid them in the future.

Equipment

This lighting setup requires three lights and is best achieved using studio strobes as opposed to speed lights given the extra power needed to blow out the background.  As I have said before, hiring a studio is a cheap and very effective way to get access to this kind of equipment, making this shot all the easier to achieve.  If you do decide to do this at home however I would definitely recommend spending a little bit of money on a decent quality background paper, you can use a fabric backdrop but in my experience this will absorb much more light making the exposure more difficult than a non fabric setup.  Its also important that you have a background which is long enough to span both the back wall and floor of your shooting space.

For this setup you will need:

  • Two lights for the background, preferably with some form of diffuser to spread and soften the light.
  • A main light with as large a diffuser as you can possibly get, an octobox is ideal however any softbox or umbrella will also work.
  • If possible a light meter is also a great tool for this setup and will help speed up the setup although it isn’t essential.

The Lighting Setup

The important thing to achieve is a background that is both evenly exposed and completely blown out (i.e. solid white).  The ideal result is to have a background that is twice as bright as your subject, the trick here being the ratio of light as opposed to absolute values.

Typically I will set the exposure for my subject using an aperture of around f8.  Therefore if we want to achieve a background which is twice as bright we need to expose the background at an aperture which is one stop smaller than that used for the subject.

Just in case this doesn’t make complete sense, changing the aperture by one stop will either halve or double the available light.  Therefore if when we meter the background we use an aperture which is one stop smaller than the subject, when we open this back up again to take the final shots the background will now be twice as bright as the subject.

Here is how I go about getting this all set:

  1. Assuming a subject aperture of f8, set your camera to manual and dial in an aperture of f11 and a shutter speed of around 1/125 of a second with your lowest ISO.
  2. Aim the two background lights at the backdrop, positioning them to provide as even a spread of light as possible and either fire the stobes or take a test shot.  Take care to only expose the background, try to avoid any of the light spilling forward onto where the subject will be.
  3. If you have a light meter you can now use this to adjust the power of the background lights until you get an even exposure of f11 across the entire backing.  If you don’t have a light meter set the exposure by taking a test shot of the background, varying the power until the entire backdrop is solid white and evenly exposed.  If your camera has it you can use the highlight clipping warning combined with the histogram to double-check your results.   Remember to check the floor as well as the background, don’t make the same mistake as I did.
  4. Now its time to set the subject exposure, before doing so adjust your camera settings to f8 keeping everything else the same.
  5. Now turn off the background lights and place your subject in position.  Again if you have a light meter you can use this to confirm the right flash power to achieve an f8 exposure.  If you don’t have a light meter set your subject exposure by varying the flash power on your main light until you achieve an exposure that looks right.
  6. Now turn all your lights back on and you are all set.

Two background lights and a main subject light.

The Post Processing

Obviously you can post process your final images however you like but just in case you are looking for a few pointers here is a brief overview of my workflow and more importantly how I overcame my exposure malfunction.

Starting Point – Notice the horrible 'yellow' area of underexposed floor.

Step 1: White Balance & Crop – Basic adjustments to get the colour right and to straighten up the slight slant on the composition.


Step 2 – Minor exposure adjustment (slight exposure and fill light) to get the subject lighting right.

Step 3 – Contrast corrections using via a minor curves adjustment (slight 'S') and added detail via Clarity.

Step 4 – Now its time to fix the badly exposed floor. This was done using a gradient filter from the bottom up to increase the exposure on the area on the floor. Minor imperfections were cloned out using a spot healing brush.

Step 5 – All done, final image completed. Much better than the start as I am sure you will agree. All in all this took less than 2 minutes and would have been much less if I had got the exposure correct from the start.

Summary

The white infinity backdrop is a fantastically versatile and satisfying lighting setup and one which I would definitely recommend to anyone wanting to try something different to a single light arrangement.   Hopefully the tips here will help you to have a go at this classic lighting look, unfortunately though finding the super model is down to you!

Post originally from: Digital Photography Tips.

Check out our more Photography Tips at Photography Tips for Beginners, Portrait Photography Tips and Wedding Photography Tips.

How I Shot & Edited – The White Infinity Setup


Digital Photography School

 
Comments Off on How I Shot & Edited – The White Infinity Setup

Posted in Photography


How I Shot And Edited It – Layers, Oman

22 Oct

The image above was shot in Oman near sunset and I have received a number of requests to explain how it was shot and processed. I hope this post helps you understand the process I used so it may be of service to you.

Starting at the start, I got lucky. This image is not too far off what I captured while standing on the side of the road, sweating in 100F+ heat. My girlfriend and I were driving the mountainous regions of Oman on holiday with very few particular objectives so it was hapenstance that we came upon this scene about an hour before the sun set. This shot is facing East to North with the sun coming in slightly off to the side.

The shot was taken with a Canon 7D and Canon 28-3400mm L lens. The settings were: ISO 100, 235mm, f/9 and 1/800the of a second. No tripod was used.

I downloaded the image into Lightroom 4 and it was pretty decent from the start. (Click on any image for a larger version.)

I was happy with the range in the capture. Here is the histogram for it at the start.

After removing some spots that showed up with the f/9 setting, I adjusted the Tone Curve to bring in the white and black point.

This expanded the histogram a little.

So far, so good. A few more spots showed up and I removed them (I’m not showing that part so as to not completely bore you). I also adjusted the Luminance Smoothing by +12 because, even with ISO, I wanted things even smoother when it came to tone.

It was at this time I decided to use Seim Effects Silver Shadows 2 to change the image to black and white. Having played with this product for a while, I knew the Dynamic Silver effects would render a great result. There are over 100 presets and I’m not patient enough to go through them all, so I stick with a few tried and true favorites. In this case, it was specifically 3:01 Dynamic Silver I.

Then, I gave a slight curve to the Tone Curve to accentuate the contrast. I have had a problem as of late of going overboard with curves, so I kept this one subtle.

The curve looked like this and the result is after it.

It’s hard to tell the difference without flipping between the two images, I realize, but that is good in my book.

I found another spot (tip: clean your sensor before your next trip) and then decided on one last change. I brought the black and white points even more to stretch the tonal range as such:

Not every photo needs to have a ton of edits in post production. And thankfully this image was pretty nice to start with, fitting well within the sensors capabilities.

The problem with an edit like this is it’s impossible to please everyone. After I posted this image on my Facebook page, I received requests for the original color version with edits. To that end, I submit it here for your opinion.

Which do you like better, the B&W version or the color?


Post originally from: Digital Photography Tips.

Check out our more Photography Tips at Photography Tips for Beginners, Portrait Photography Tips and Wedding Photography Tips.

How I Shot And Edited It – Layers, Oman


Digital Photography School

 
Comments Off on How I Shot And Edited It – Layers, Oman

Posted in Photography


Windows Live Photo Gallery 2011 – Move Original Copies of Edited Photos to Recycle Bin after Awhile

30 Oct

If hard drive space is at a premium, place original copies of photos edited in Windows Live Photo Gallery 2011 into the Recycle Bin for later emptying.

It is always recommended to make backup copies of photos before editing them. To help automate this process, as you edit photos in Windows Live Photo Gallery 2011, the software makes its own backup copies of originals. This way you can later revert the changes if you do not find the edits to your liking.

If you edit many photos using Photo Gallery 2011 and hard drive space is at a premium, you may decide that once you edit a photo and leave it edited for awhile without reverting to the original, you mean for the edit to stick. Or, you may make backup copies of photos before importing them into Photo Gallery 2011 and not need the tool to make its own copies. Thus you can automatically move original photos to the Recycle Bin after a given period of time by doing the following:…

Read more at MalekTips.
New Computer and Technology Help and Tips – MalekTips.Com

 
Comments Off on Windows Live Photo Gallery 2011 – Move Original Copies of Edited Photos to Recycle Bin after Awhile

Posted in Technology