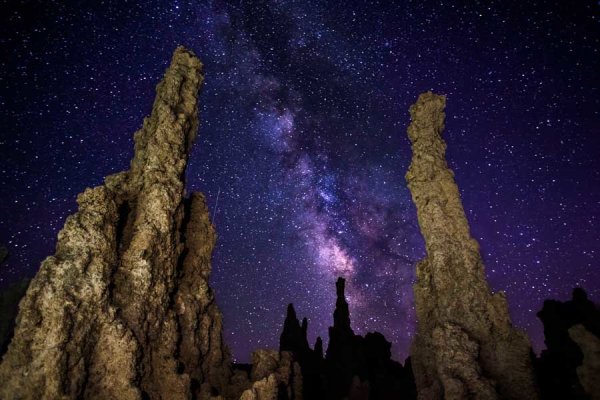
Milky Way Over Mono Lake | James Brandon
Seeing the Milky Way with your own eyes is a life-changing, mind-blowing experience. It will put your place within the universe in to perspective and remind you just how small and insignificant we all are. The sad part is that most people have never seen it. Over half of our planet’s population lives in cities where seeing the Milky Way is all but impossible.
Even when people get out of the city and have a good view of the stars, they usually don’t focus on them long enough to find the Milky Way. It’s something that you either stumble onto by accident, or something that you have to plan ahead of time. Here’s a few quick tips for getting the Milky Way in your viewfinder and exposing it properly – your guide to Milky Way photography.
Research, Research, Research
Benjamin Franklin said so brilliantly that, “By failing to prepare, you are preparing to fail”. And it was Antoine de Saint-Exupéry that said, “A goal without a plan is just a wish”. So it goes with Milky Way photography. Sure, you can make a point to go out at night and see what you can find, but chances are you will be wasting your time.
The Milky Way by Hemispheres
The Milky Way is only visible in your respective hemisphere during certain months of the year. If you’re in the northern hemisphere your best time to photograph the Milky Way is in the summer, with July being the peak month. Unfortunately, the summer months aren’t typically the best times for clear skies because of the heat and the clouds from all the storm systems. Summer nights are also short, therefore limiting access further to the night sky. Folks in the southern hemisphere have it better, with the winter months being the best time.
Don’t Forget the Moon!
The moon can make or break your Milky Way shots. This is why planning is so important! Don’t make the mistake of finding a perfect subject, waiting for the Milky Way to line up, and then discovering that the moon is right in the middle of the celestial center. Having the moon obstructing the view of the Milky Way will, quite simply, ruin your shot.
There are two ways the moon can help your shot. One is by its total (or nearly total) absence in the sky. The other is by having the moon behind you, with the Milky Way in front of you (thereby providing a light source for your foreground).
The Best Astro App EVER
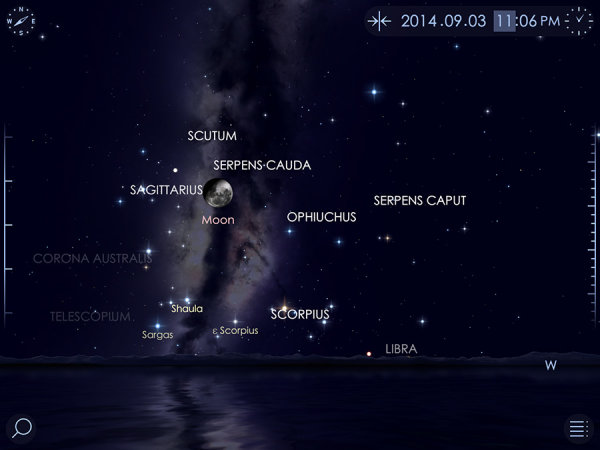
Oh no! The moon is in the way!
All you need to do to plan a perfect night of Milky Way photography is a beautifully designed app called StarWalk 2 (sorry Android users, you’re simply out of luck here. I have an Android phone and I absolutely hate that I don’t have access to this). Luckily I have an iPad and it works beautifully on there.
StarWalk lets you interactively view the night sky from either your position, or any other position on earth, at whatever time of day you choose. As you change the time of day, the entire sky will magically begin to revolve around your position, revealing or concealing the Milky Way, the constellations and the moon.
So let’s say you decide to photograph Delicate Arch in Arches National Park. You discover through research that from beneath the arch looking toward it you will be facing east. All you really need to do now is choose a location in that general area, make the app point east and then scroll through the hours in the day to find when the Milky Way will rise above the horizon.
One of the jaw-dropping cool features of this app is that you can actually use it in the field with an image overlay. You can hold your iPad or iPhone out and the app will turn the camera on and look at what you’re seeing. It will then overlay the night sky onto your image so you can see what that view will look like at a certain time of day or night! How cool is that!?
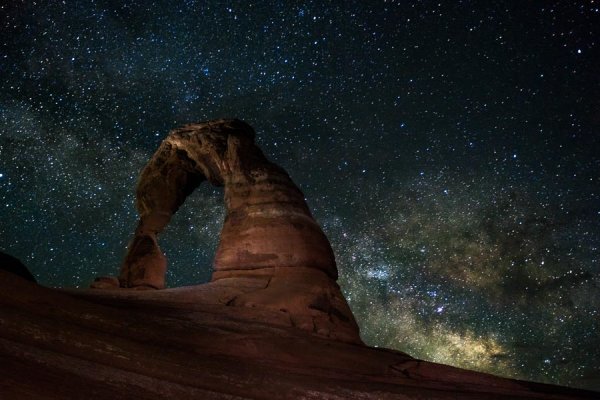
The Milky Way Over Delicate Arch | James Brandon
Having a Dark Sky is Crucial
While it’s not impossible to photograph the Milky Way in light polluted areas, it’s certainly not ideal. I live in the heard of the Dallas – Fort Worth metroplex and to really get a great view of the Milky Way I have to drive about three to four hours west. A great resource for locating extremely dark skies is the International Dark-Sky Association. They’ve got a list of locations that host some of the darkest skies in the world. Planning a trip to any of these places during the right time of the year will give you some of the clearest views of the Milky Way you will find anywhere. Trust me, you haven’t lived until you’ve stood beneath a Milky Way so bright that it lights the landscape in front of you. It’s truly a spiritual thing to witness.
Camera Settings
Photographing the Milky Way is quite different from any other subject you will attempt to capture. Like I said before, it really is a magical experience. Seeing the Milky Way with your own eyes is one thing, but wait until you see it appear on your camera’s LCD screen! You will quite possibly, literally jump for joy the first time you see it.
ISO is the first thing we’ll cover. In short, it needs to be set as high as possible while still maintaining a useable image quality. While this doesn’t mean that you need a pro level SLR, having one that performs exceedingly well in low light will certainly help. If your camera can produce quality images at ISO 1600 or even ISO 3200 you are going to be in great shape. If ISO 6400 or ISO 12800 is still workable, then you are going to knock it out of the park. Having your ISO set high means that your cameras sensor will be as sensitive as possible so that the maximum amount of light can be collected (which is very important at night).
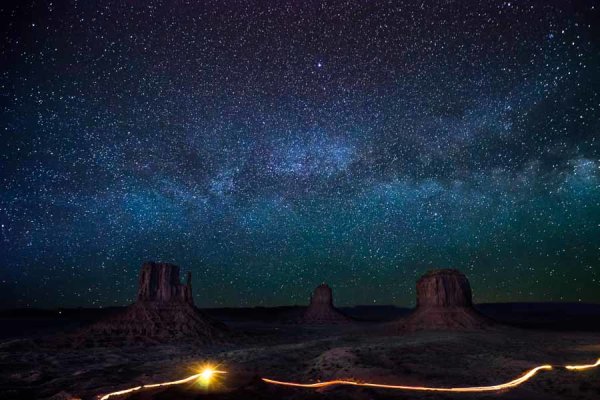
Milky Way Over Monument Valley | James Brandon
Next, select a shutter speed. Anywhere between 20-30 seconds is ideal. If you can get away with super high ISO levels, then go with 20 seconds. If you’re around ISO 1600-3200 then you may want to stick with 30 seconds. The only downside to 30 seconds is that you will have just the slightest hint of trails in your stars from the rotation of the earth. Not really a big deal though.
Finally, you need to set your aperture to be wide open, or very close to it. This is where having a lens that can open up to f/2.8, or larger, is really helpful.
All of these settings combined have one goal – to bring as much light as possible back to the cameras sensor.
Other Gear to Consider
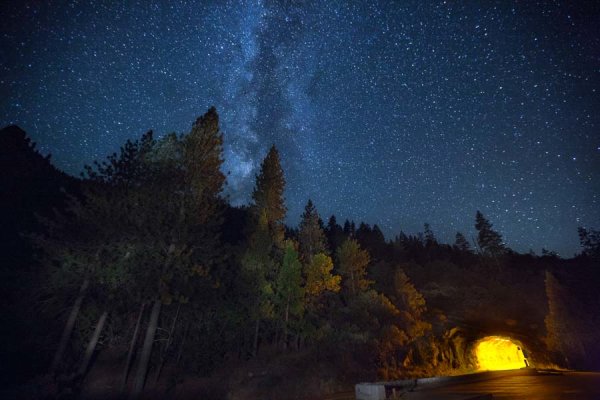
The Milky Way At Tunnel View In Yosemite
A good and sturdy tripod is worth its weight in gold. That is almost a literal statement if you go with something like a Really Right Stuff tripod, hehe. I got mine about a year ago (after saving up for quite a while) and will never consider another one. Having a good tripod means that your camera will be steady throughout the entire long exposure. If your tripod is cheap and made from plastic, or just a very flimsy aluminum or carbon fiber tripod, you will definitely have a hard time with long exposures. If your tripod has a hook underneath the center column, be sure to utilize it by hanging your camera bag there to weigh the whole thing down!
You’ll also want to set either a two second timer or use a cable release (remote trigger). Both of these methods get your hands off the camera for the entire duration of the exposure. If you try and press the shutter button down for a 30 second exposure, you will not be happy with the results.
Conclusion
The Milky Way is one of the most challenging and rewarding things you can get out and photograph. Doing it well requires planning and more planning. Don’t leave anything to chance. If you have more tips to add, questions or thoughts about the article, let me know in the comments below.
The post Down and Dirty Guide to Milky Way Photography by James Brandon appeared first on Digital Photography School.


You must be logged in to post a comment.