RSS
 

Posts Tagged ‘Detail’

CIPA’s 2019 numbers detail worst year of the decade for the camera industry

04 Feb

Camera & Imaging Products Association, more commonly referred to as CIPA, has released its December report, which not only provides the details for the final month of the year, but also gives us a complete picture of the camera industry in 2019.

For anyone paying attention, it shouldn’t come as a surprise that the news isn’t great. In fact, it’s downright terrible if we’re only looking at the numbers and not contextualizing the industry as a whole as it continues the transition from DSLR to mirrorless cameras. But, even then, it’s not a pretty sight.

According to CIPA’s data, digital still camera sales decreased by approximately 14 percent year-over-year. DSLR unit sales dropped almost 34 percent, while their value dropped roughly 28 percent. Meanwhile, mirrorless unit sales dropped by 10 percent, but the value of mirrorless camera sales increased by almost 6 percent, suggesting more advanced mirrorless cameras are increasing in popularity. Fixed-lens cameras saw a unit sale decline of 23 percent, while value dropped 12 percent.

As a whole, these numbers define what’s easily been the most dramatic year-over-year decline in the past decade; and most camera company’s don’t seem too confident the market will improve much next year if we’re to consider their financial projections as any indication.

However, as noted by CIPA’s mirrorless numbers, it does appear as though mid-to-high-end mirrorless cameras are providing more revenue year-over-year, and with both Canon and Nikon expected to ship more advanced mirrorless models in the coming year, that number will likely only go up, even as DSLR and fixed-lens sales continue to decline.

Articles: Digital Photography Review (dpreview.com)

 
Comments Off on CIPA’s 2019 numbers detail worst year of the decade for the camera industry

Posted in Uncategorized


High-resolution telescope images show Sun’s surface in ‘unprecedented detail’

01 Feb
‘This image covers an area 8,200 x 8,200 km (5,000 x 5,000 miles, 11 x 11 arcseconds).’ — Credit: NSO/AURA/NSF

The Daniel K. Inouye Solar Telescope has produced high-resolution images that show the Sun in ‘unprecedented detail,’ according to an announcement from the National Science Foundation (NSF). The telescope is located close to the summit of Maui’s Haleakala volcano. Each of the ‘cell-like structures’ visible in the images and video are approximately as large as Texas, according to NSF.

Understanding the Sun is an important step toward improving space weather forecasts, which will help humanity anticipate potentially disruptive events. The Inouye Solar Telescope is a key tool that will shed light on a number of the Sun’s mysteries. According to the NSF, having hours of advanced notice about potential space weather events will give officials time to put satellites and important infrastructure like power grids into safe mode.

The Inouye Solar Telescope features a massive 4m (13ft) mirror and more than 11km (7 miles) of piping as part of the cooling system that protects the telescope and its optics. The NSF explains that Inouye feature’s adaptive optics designed with an off-axis mirror placement that compensates for the blur that would otherwise result from the Earth’s atmosphere.

Astrophysicist and cosmologist Katie Mack chimed in on the above video, sharing a fun little anecdote about how the forces at work on the sun can be seen here on Earth in everyday life:

Ultimately, the Inouye Solar Telescope has the largest aperture of any solar telescope in the world, according to director Thomas Rimmele. The first half-decade of the telescope’s operation is expected to produce more solar data than humanity has generated in the past few hundred years.

Articles: Digital Photography Review (dpreview.com)

 
Comments Off on High-resolution telescope images show Sun’s surface in ‘unprecedented detail’

Posted in Uncategorized


Google explains its Night Sight astrophotography mode in detail

27 Nov

Ever since Google launched its Night Sight feature on the Pixel 3 series the low light photography feature has been very popular with users. On the new Pixel 4 Google has updated Night Sight with a specific mode for astrophotography. The team behind it has now authored a blog post to explained the function in more detail.

In order to capture as much light as possible without using shutter speeds that would require a tripod and/or lead to blur on any moving subject, Night Sight splits the exposure across multiple frames that are aligned to compensate for camera shake and in-scene motion. In a second step the frames are averaged to reduce noise and increase image detail.

The astrophotography feature uses the same approach in principle but uses longer exposure times for individual frames and therefore relies on tripod use or some other kind of support.

Image with hot pixels (left) and the corrected version (right)

The team decided exposure times of individual frames should not be longer than 16 seconds to make the stars look like points of light rather than streaks. The team also found that most users were not patient enough to wait longer than four minutes for a full exposure. So the feature uses a maximum of 15 frames with up to 16 seconds exposure time per frame.

At such long exposure times hot pixel can become a problem. The system identifies them by comparing neighboring pixels within the same frame as well as across a sequence of frames recorded for a Night Sight image. If an outlier is detected its value is replaced by an average.

In addition the feature uses AI to identify the sky in night images and selectively darken it for image results that are closer to the real scene than what you would achieve with a conventional long exposure.

This image was captured under the lighting of a full moon. The left half shows the version without any sky processing applied. On the right the sky has been slightly darkened for a more realistic result, without affecting the landscape elements in the frame.

Night Sight is not only about capture, though, it also includes a special viewfinder that is optimized for shooting in ultra-low light. When the shutter is pressed each individual long-exposure frame is displayed as it is captured, showing much more detail than the standard preview image. The composition can then be corrected and a new Night Sight shot triggered.

Some of the results we have seen have been impressive. For more more technical detail head over to the original post on the Google blog. A n album of full-size sample images can be found here. The team has also put together a helpful guide for using the feature in pdf format.

Articles: Digital Photography Review (dpreview.com)

 
Comments Off on Google explains its Night Sight astrophotography mode in detail

Posted in Uncategorized


Don’t Create Detail, Just Reveal It – How to Reveal the Hidden Details in Your Photos

24 May

The post Don’t Create Detail, Just Reveal It – How to Reveal the Hidden Details in Your Photos appeared first on Digital Photography School. It was authored by Herb Paynter.

Just as cleaning the lenses of your eyeglasses clarifies what you see, cleansing your pictures of dull lighting will put the sparkle in your photos.

Have you noticed how many individual tools are available in your favorite editing software for changing the values of pixels? The array is dazzling, and most of this editing involves “localized” procedures (dodging, burning, painting, cloning, masking, etc.) affecting specific areas.

But here’s something to consider.

Unless the image you are working on is either damaged (either completely blown-out highlights, plugged-up shadows) or just contains too much unwanted clutter, you rarely need to create specific detail with these tools. The detail is usually right there just below the surface waiting for discovery. You need only make global adjustments to the tones within the darker and lighter ends of the range to achieve pretty amazing results.

When I took this shot of my wife Barbara fifteen years ago, I put it in the reject file because it was so dark. But carefully adjusting and lightening the shadow and middle tones in the picture separated the deep shadow tones from the middle tones. Now both she and the picture are definite keepers. No local editing was necessary, and there is no tell-tale evidence of a touchup. The image contained all the necessary lighter tones – they simply had to be uncovered.

Push tones instead of pixels

Post-processing digital images is usually a process of subtraction; removing the visual obstacles that are covering the underlying detail in a photographic image. This detail will reveal itself if you merely nudge the tonal ranges instead of the pixels.

The fact is…all the detail in every subject has been duly captured and is hiding in either the shadows or the highlights, waiting to be discovered.

The digital camera’s image sensor sees and records the entire range of tones from black to white within every image it captures. What is hiding within this massive range of tones is the detail. Unfortunately, the camera sensor has no way of knowing the detail that may be under (or over) exposed within that range. It simply captures everything it sees inside the bookends of dark and light.

Camera image sensors can capture a range of tones up to 16,000 levels between solid color and no color. This doesn’t mean that all 16,000-pixel values are actually present in the picture; it just means that the darkest to the lightest tones are stretched out over the significant detail that is hiding in the middle.

Adjustments made to the image in Alien Skin’s Exposure X4.5 revealed detail in the sunlit walkway and darkened archway that appeared lost in the original capture. No painting or cloning tools were necessary.

The purpose of this article is not to get geeky about the science, but to assure you that there is an amazing amount of detail that you can recover from seemingly poor images.

A basic JPEG image can display more than 250 tones in each color. While that doesn’t sound like much, you should know that the human eye can only perceive a little over 100 distinct levels of each color. No kidding! Technically, 256 tones are too many.

The balancing act

Here’s a sobering truth. Your camera can capture more detail than your eye can detect and more tones than your monitor can display. As a matter of fact, it can capture up to 16,000 levels of tones and colors. That’s more than any publishing resource (computer monitor, inkjet printer, Internet, or even any printed publication) can reveal. Each of these other outlets is limited to reproducing just 8-bits (256 levels) of each color. The camera’s light-capture range is even beyond the scope of human vision. The range (light to dark) of your camera is immense compared to any reproduction process. What this means is that the editing part of the photography process needs MUCH more attention than the image capture process.

This introduces a complex but interesting phenomenon. Your post-production challenge is to emphasize the most important details recorded inside the tones captured by your camera and then distinguish them sufficiently for the printer, your monitor, or the Internet to reveal.

Your camera captures an incredible amount of detail in each scene that isn’t initially visible. However, with the right software, this detail can be uncovered just as an electron microscope can reveal detail buried deep inside things that the naked eye cannot perceive.

Image editing is all about discovering and revealing what is hiding in plain sight.

Image clarity

Bringing a picture to life doesn’t always require additional touchup procedures. Sometimes, just massaging the existing detail does the trick. The Highlights, Shadows, and Clarity sliders were all that were required to transpose this shot from average to special.

Clarity is the process of accentuating detail. The dictionary defines clarity as “the quality of being easy to see or hear; sharpness of image or sound.” When we clarify something, we clear it up. We understand it better. We view an issue from a different perspective.

Many image editing software packages have a slider called “clarity.” The function of this slider is to accentuate minor distinctions between lighter and darker areas within the image. Each of the other tone sliders (Exposure, Contrast, Highlights, Shadows, Whites, Blacks, Clarity, and Dehaze) all perform a clarifying process on specific tone ranges.

The real beauty of shooting with a 12/14-bit camera is the level of access you receive to the detail captured in each image. If you want to think “deep,” you can start with the editing process of your digital images. You’ll be amazed at what you will find when you learn to peel away the microlayers of distracting information in well-exposed photos.

Just as cleaning the lenses of your eyeglasses clarifies what you see, cleansing your pictures of dull lighting will put the sparkle in your photos.

Adobe Camera Raw controls reveal significant detail in the darker portions of the image by simply adjusting the Basic slider controls.

Learning to expose images correctly

The information you learn from excellent teaching resources like Digital Photography School teach you how to correctly set your equipment to capture a variety of subjects and scenes. Study the articles in this amazing collection and learn to shoot pictures understanding the basic tenets of good exposure. Poorly-captured images will hinder your discovery of detail. However, correctly exposed images will reward you with, not only beautiful color but, access to an amazing amount of detail.

Learn to harness the power of light correctly for the challenge that each scene presents by balancing the camera controls of ISO, Aperture, and Shutter Speed. The more balanced your original exposure, the less post-processing will be necessary.

Conclusion

Every scene presents a unique lighting situation and requires a solid understanding of your camera’s light-control processes to capture all possible detail. Any camera can capture events and document happenings, but it takes a serious student of photography to faithfully capture each scene in a way that allows all that information to be skillfully sculpted into a detailed image.


The post Don’t Create Detail, Just Reveal It – How to Reveal the Hidden Details in Your Photos appeared first on Digital Photography School. It was authored by Herb Paynter.


Digital Photography School

 
Comments Off on Don’t Create Detail, Just Reveal It – How to Reveal the Hidden Details in Your Photos

Posted in Photography


Xiaomi details DeepExposure, an AI that automatically fixes image exposure and detail

06 Dec

Chinese company Xiaomi’s AI Lab has published a new paper detailing an AI network called “DeepExposure” that improves low-quality images through machine learning. “Comparing with other methods,” the researchers explained in their paper, “our algorithm can restore most of the details and styles in original images while enhancing brightness and colors.”

DeepExposure utilizes generative adversarial networks and asynchronous adversarial learning to split low-quality images into segments called sub-images. The system computes both local and global exposures for these sub-images, then evaluates their quality before blending them with the original image.

The end result is an image with improved exposure and detail, opening the door for future solutions that may automatically enhance low-quality photos. It’s possible that Xiaomi may one day offer this technology on its smartphones, which already offer other AI capabilities.

The researchers point out in their paper, “Due to the requirement of expertise of photography, photo quality enhancement is beyond the capability of non-professional users, thus leading to the new trend of automatic techniques of image retouching.”

The study indicates that DeepExposure could also be adjusted in the future to improve image tone and contrast.

Xiaomi isn’t the only company using artificial intelligence to automatically improve images. Earlier this year, researchers with Intel and the University of Illinois Urbana-Champaign detailed a deep neural network able to brighten low-light images without reducing their quality. Similarly, a technology called Deep Image Prior was unveiled last year with the ability to recreate damaged parts of an image based on the image’s existing elements.

Articles: Digital Photography Review (dpreview.com)

 
Comments Off on Xiaomi details DeepExposure, an AI that automatically fixes image exposure and detail

Posted in Uncategorized


More detail on Samsung Galaxy S10 triple camera setup revealed

14 Aug

Last week, Samsung revealed its latest high-end smartphone, the Galaxy Note 9. The Note 9’s camera hardware is identical to last year’s Galaxy S9 Plus dual-camera, but we’ve already seen rumors of the 2019 Galaxy S10 Plus featuring a triple-camera.

Next year’s flagship is likely to be the first smartphone to combine a super-wide-angle and a tele-lens with the primary camera. The super-wide-angle is expected to come with a 123-degree angle of view, and the tele lens with a 3x magnification, offering a wider zoom range than any other smartphone.

Today a report from South Korean publication ET News has provided more detail on the Galaxy S10 camera specifications and if the sources can be trusted all three cameras will come with a different sensor resolution. The main camera will offer a 16MP pixel count, the telephoto camera captures 13MP images and the wide angle is expected to feature a 12MP sensor.

…it’s likely that the output image size will be the same, no matter the zoom setting

Samsung is likely going to merge image data from all three sensors to leverage the combined sensor surface for improved light gathering, and provide a stepless zoom experience. Therefore, it’s likely that the output image size will be the same, no matter the zoom setting. That said, as usual we can’t know for sure at this point.

The ET News report contains another interesting piece of information: While Samsung initially planned to implement the triple camera only in one model of the Galaxy S10 series, the company’s plans changed and there will now be two triple-camera models. Hopefully this should increase the chances of a triple-camera model becoming available at a (halfway) affordable price point.

Articles: Digital Photography Review (dpreview.com)

 
Comments Off on More detail on Samsung Galaxy S10 triple camera setup revealed

Posted in Uncategorized


Google AI adds detail to low-resolution images

09 Feb

It seems intelligent enhancement of image detail is currently high on the agenda at Google. Recently the company brought its RAISR smart image upsampling to Android devices. Now, the Google Brain team has developed a system that uses neural networking to enhance detail in low-resolution images.

The system uses a two-step approach, with a conditioning network first attempting to map 8×8 source images against similar images with a higher resolution and creating an approximation of what the enhanced image might look like. In a second step, the prior network adds realistic detail to the final output image. It does so by learning what each pixel in a low-resolution image generally corresponds to in higher-res files.

As you can see, the system already works pretty well. In the series of samples above, the images on the left show the 64 pixel source images, while the ones in the middle show the output image that the Google Brain algorithm has produced from them. The images on the right show higher-resolution versions of the low-res source images for comparison. While the results are not perfect yet, they are certainly close enough to provide value in a variety of scenarios. Eventually we might even be able to extract high-resolution images from low-quality security-cam footage a la CSI.

Articles: Digital Photography Review (dpreview.com)

 
Comments Off on Google AI adds detail to low-resolution images

Posted in Uncategorized


Lighting 102: Shape and Detail

03 Aug

"One light for shape, another for detail."

This simple concept, which I learned from photographer Jim Richardson about 25 years ago, forever changed the way that I thought about lighting. It's like a switch was turned on inside of my brain. Read more »
Strobist

 
Comments Off on Lighting 102: Shape and Detail

Posted in Photography


Tips for HDR Night Photography to Retain Maximum Image Detail

07 Jul

Night photography is very popular, and if you go out to take photos on on any given night here in my hometown of Melbourne, you will find other photographers doing the same thing. Night photography can create magical images and you are able to see things with the camera, that you can not see with your eyes alone. Your camera can do a better job at taking in the lights than you can.

leannecole-night-photography-nightHDR-start

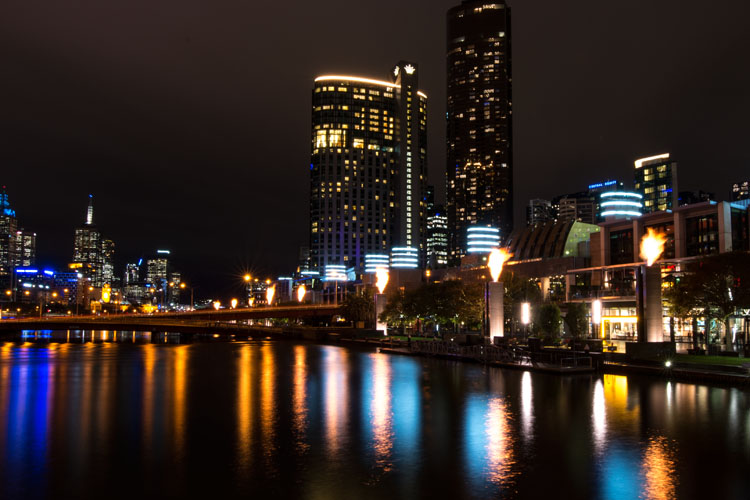
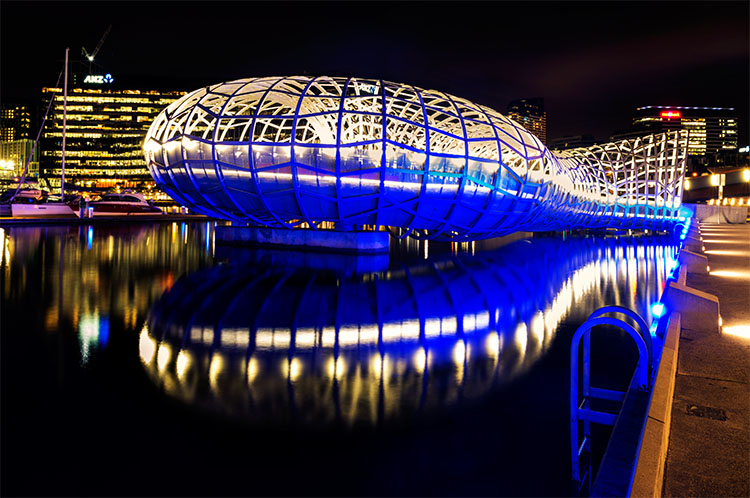
HDR image of Docklands, Melbourne.

Taking photos with your phone, or on a compact camera, is never going to give you those amazing results you see of night photos. You really need to do long exposures; set your camera up on a tripod and do exposures from a couple of seconds, to several minutes.

One major problem with taking photos at night is the sharp contrast between the highlights and shadows. If you try and get detail in the shadows, you will often blow out your highlights. If you do expose for the bright parts, then you won’t get any detail in the rest. Most people don’t mind this. However, if you want your night images to really sing, you should start looking at what you can do to make them stand out.

Comparing shots with different exposures

Here is a side by side comparison of images all taken at the same time, but with different methods. The first was taken with a phone, the second is a single exposure, the one the camera says is correct. Lastly, the third image is an HDR using four out of five bracketed shots.

leannecole-nightphotography-comparison

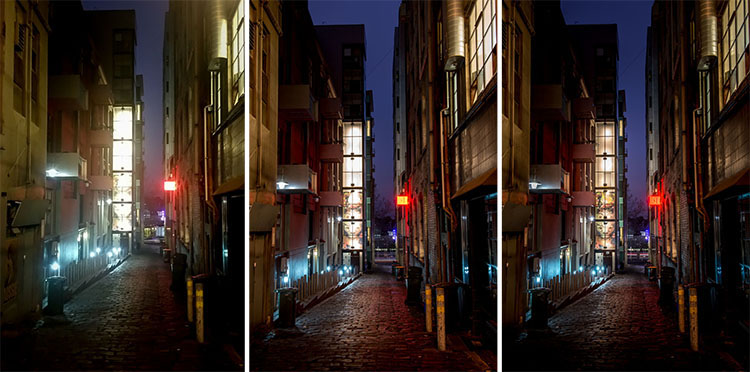
Three images of the same scene, (left) phone, (middle) camera correct exposure, and (right) HDR.

Hopefully you can recognize the difference and appreciate just how unique each approach is.

Photos with your phone

You see a lot of people in the city taking photos with their phones. If it is all you have, then you have to be content with what you get. However, you are never going to get amazing night photos simply with a phone or most compact cameras. Often the photos are too grainy, you will only get a few of the highlights, and none of the depth that a longer exposure will give you.

To get great night photos you need to have a camera on which you can control the ISO, aperture and shutter speed.

The first image (below) was taken with the Samsung Galaxy Note 4. It is not a bad image for a phone, but it is noisy and not as sharp.

leannecole-night-photography-phone

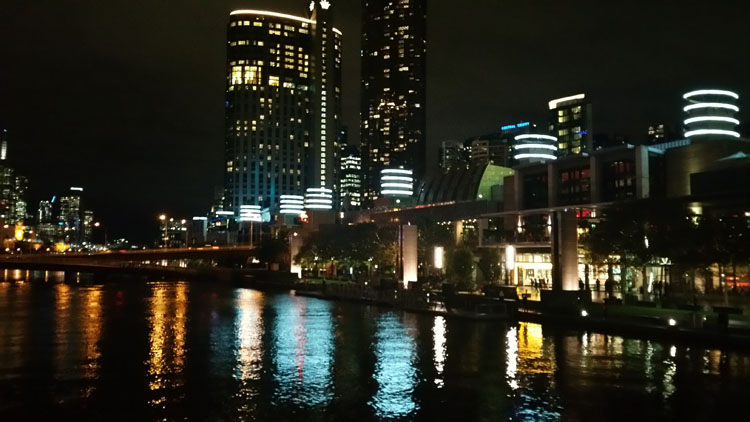
Image taken with phone of Melbourne at the Casino.

Using a DSLR or Mirrorless Camera

When you can control what your camera is doing, then you can use a low ISO, the aperture you want, and get a shutter speed of a couple of seconds to several minutes. You will get a lot more detail doing this, however, you do need more equipment.

A tripod or somewhere solid to set your camera is important to prevent camera shake. If you want to do exposures longer than 30 seconds you will need a remote shutter release, that will allow you to lock your shutter open for however long you choose to expose. Both are pieces of equipment that you will use a lot so they are worth getting.

This image was taken with a DSLR at the correct exposure, according to the camera.

leannecole-night-photography-3

Single image of Melbourne at the Casino.

Bracketing

Bracketing your photos is thought to be a process that people only do for HDR. However, photographers have been using this technique for a very long time. In the days of film, you would have had to work it out for yourself, but most digital cameras have the ability to take bracketed exposures, and do the calculating for you.

The process involves taking a series of photos, usually three or five. When you do this, you are taking one image that is the correct exposure, and additional images that are under and overexposed. The amount of time for each image changes, while aperture and ISO remain the same, and the shutter speed is altered by the camera.

There are good reasons for bracketing, one being that it gives you more options. Sometimes the exposure the camera says is the right one, is in fact not. The overexposed image or the one that is under can be the better choice.

leannecole-nightphotography-bracketed

Five bracketed photos ready to use.

There are, of course, disadvantages to bracketing. You end up with many more images, especially if you are doing five each time. If you are shooting in RAW you may encounter storage problems. However, I find that the positives far outweigh the negatives.

High Dynamic Range (HDR)

HDR has been popular for a few years and we have all seen those hyper real images that some people create. They have given the process a bad name, but if it is used in the situations it is meant for, it can be very effective.

High Dynamic Range is used to correct the problem of having very bright and overly dark areas. Cameras do not work the same way as our eyes, and they cannot make the necessary adjustments that your brain and eyes do. Your camera will either expose for the highlights and make the shadows too dark, or it will do the opposite.

HDR software takes the well exposed highlights and shadows, and puts them together in one finished image so that nothing is lost in either area. You can do it manually (using luminosity masking or layer blending), but there is good software out there which can do it for you.

Here is an HDR image of the same scene above, using four of five bracketed shots. Notice how much more detail is retained in the highlights.

leannecole-night-photography-hdr-example

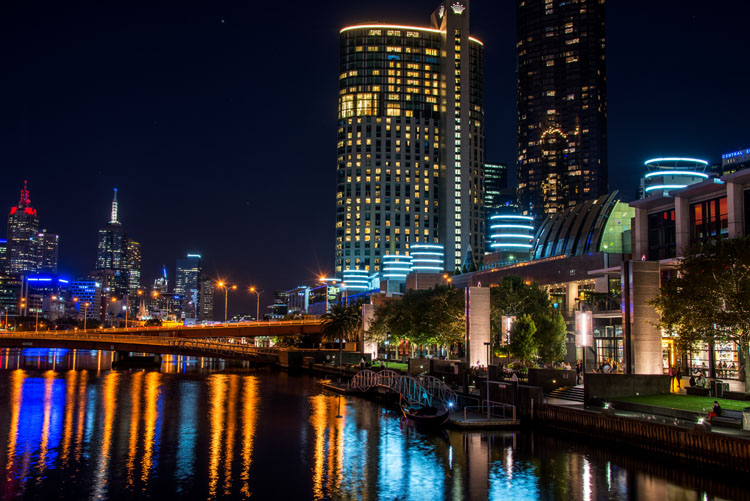
HDR night image of Melbourne at the Casino.

HDR Software

There are many different types of software that can process your HDR images for you. The most popular has been Photomatix Pro, though Lightroom and Photoshop can also be used, and they have improved significantly over the years.

Lightroom does a fairly decent HDR image and I often use it. However, you do have to be careful that the image is processed properly. Sometimes it misses spots, but most of the time it is effective.

Lightroom HDR

It is easy to use Lightroom’s Merge to HDR. Select the images you want to process and highlight them. Go to Photo > Photo Merge > and click on HDR (you can also find it by right clicking with the images selected).

leannecole-night-photography-101

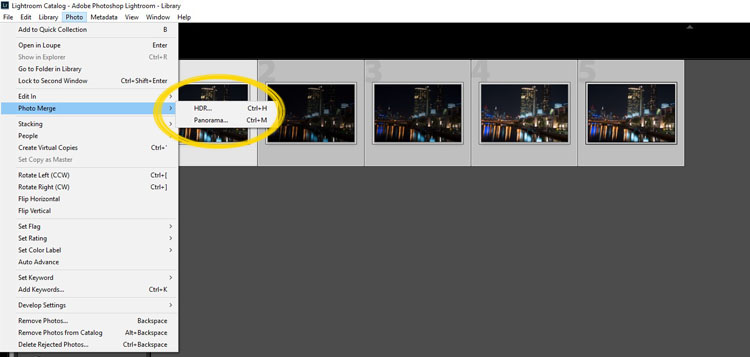
Selecting photos and merging for a HDR in Lightroom.

A separate window will come up. You can select whether you need deghosting or not (use it if something has moved between shots like trees or people). If you have used a tripod to take the image then you shouldn’t need deghosting, although it doesn’t hurt to use it regardless.

leannecole-night-photography-102

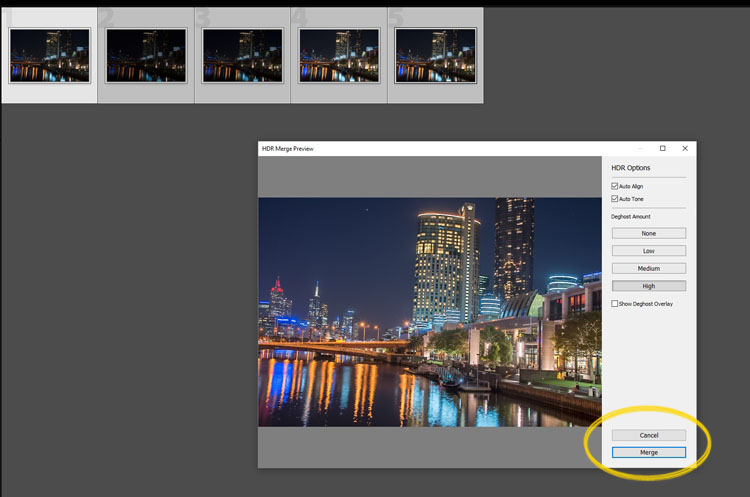
Lightroom loading the photos ready for you to click Merge

Watch for the Merge icon to come up and then press it.

Often the image will appear at the end of the folder, sometimes just after the images. You may have to search for it (sort by file name and it should appear next to your originals).

Once it is done you will see that it does not look great.

leannecole-night-photography-103

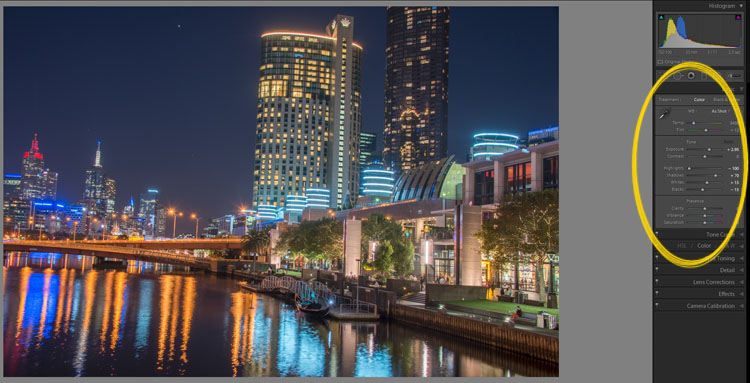
What the image looks like when Lightroom has processed it using Auto Tone.

Lightroom shows you the adjustments that it has made using Auto Tone, but there is no reason why you can not change them.

I have found that it will often have the exposure up too far, but you are able to turn that down slightly. You can turn the shadows down a little, and you usually need to add more black to the image. Compare the image above and below and you can see what changes have been made.

leannecole-night-photography-104

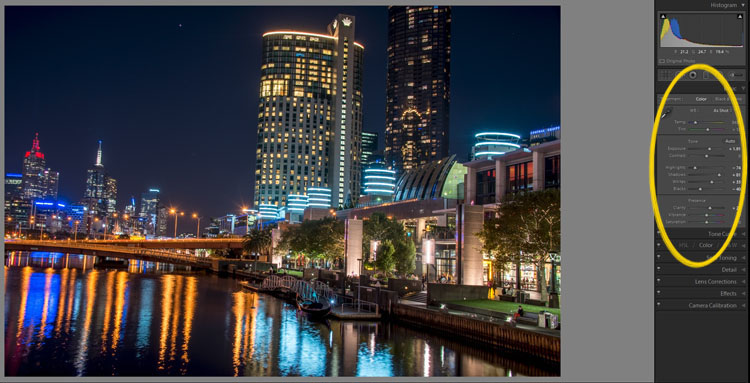
What it looks like after you have made changes to the adjustments.

Once you have the image as you want it, you can do further adjustments in Lightroom or press Ctrl+E and continue editing it in Photoshop.

Long Exposure Night Photography

There is nothing wrong with doing long exposures as well. You do not need filters, but you can do images that are more than 30 seconds. Using a tripod and a remote shutter release, you can put your shutter speed on Bulb, and try taking some exposures for a minute or longer.

leannecole-night-photography-longexposure

A one minute exposure of Melbourne at the Casino.

You do have to be careful that you don’t blow out the highlights too much. Try different times and see what you can get.

Examples

Night photos taken with any of these techniques can give you great results. You should try them all and see which ones you like, and what works best for your style.

Following are some more night shots with descriptions of how they were done.  Good luck and be safe out there.

leannecole-night-photography-example3

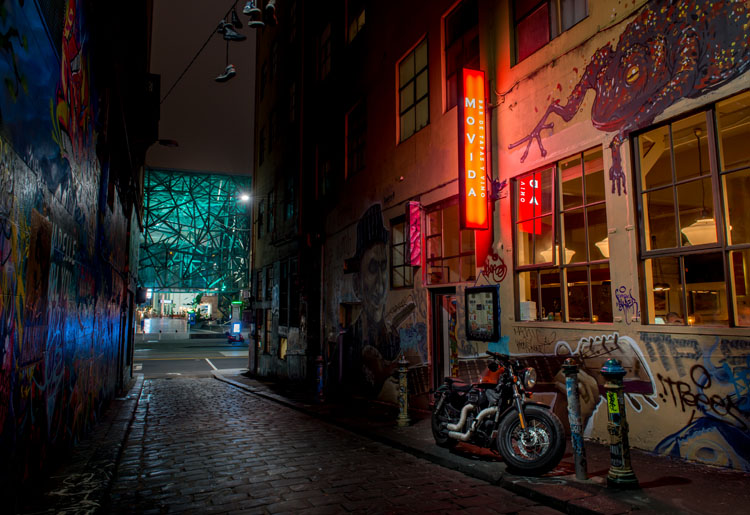
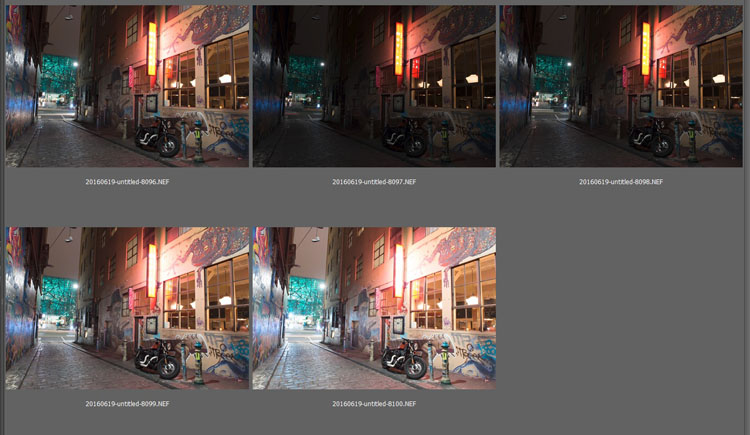
Hosier Lane in Melbourne, HDR image with 4 images.

leannecole-night-photography-hdr-example2

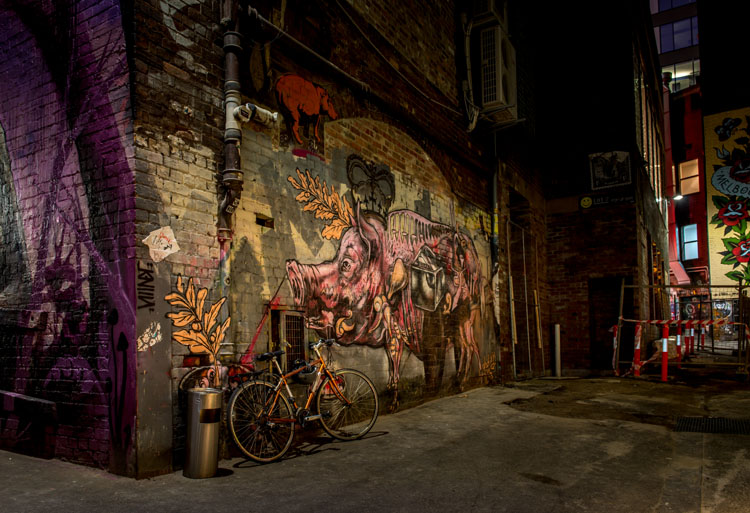
HDR image of laneway in Melbourne.

leannecole-night-photography-example4

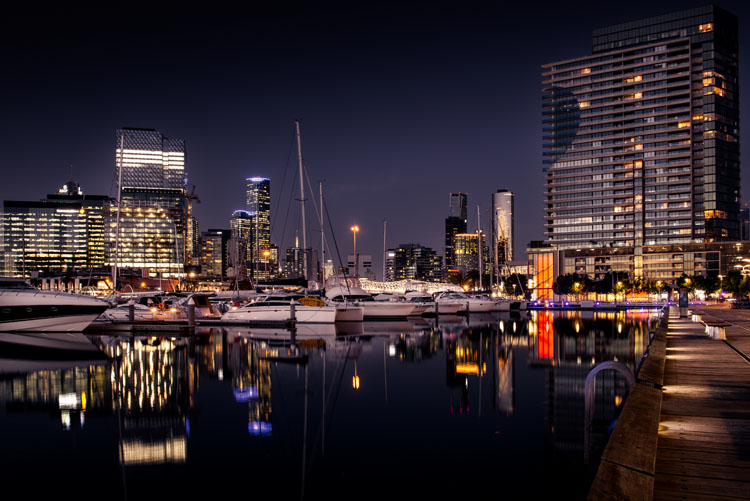
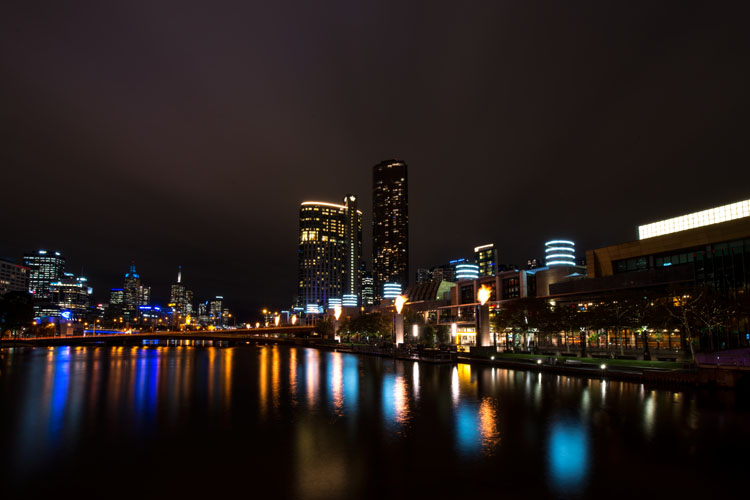
Single image at docklands with a one minute exposure.

googletag.cmd.push(function() {
tablet_slots.push( googletag.defineSlot( “/1005424/_dPSv4_tab-all-article-bottom_(300×250)”, [300, 250], “pb-ad-78623” ).addService( googletag.pubads() ) ); } );

googletag.cmd.push(function() {
mobile_slots.push( googletag.defineSlot( “/1005424/_dPSv4_mob-all-article-bottom_(300×250)”, [300, 250], “pb-ad-78158” ).addService( googletag.pubads() ) ); } );

The post Tips for HDR Night Photography to Retain Maximum Image Detail by Leanne Cole appeared first on Digital Photography School.


Digital Photography School

 
Comments Off on Tips for HDR Night Photography to Retain Maximum Image Detail

Posted in Photography


In Fine Detail: Canon EOS 5DS / 5DS R In-Depth Review

18 Dec

Preview based on pre-production Canon EOS 5D S & SR

Canon has added to its EOS 5D range with the launch of two 50MP cameras, the 5DS and the 5DS R. Both cameras are high resolution full frame models, primarily aimed at stills photographers. The only difference between the models is that the ‘S’ has an optical low-pass filter, while the ‘S R’ has a self-cancelling filter (the same relationship as Nikon’s D800 and D800E models shared).

The two cameras will exist alongside the EOD 5D Mark III, acting as dedicated high resolution cameras primarily intended for studio, landscape and wedding shoots, rather than the all-round capability offered by the existing model. The Mark III still trumps the S and S R in terms of maximum ISO and continuous shooting speed.

Canon EOS 5DS / 5DS R key features

  • 50MP CMOS sensor
  • 5 fps continuous shooting
  • ISO 100-6400 (Extends to 12,800)
  • 61-point AF module with input from 150k pixel metering sensor
  • Dual Digic 6 processors
  • 3.0″ 1.04M-dot LCD
  • CF & SD slots (UHS-I compatible)
  • 1080/30p video
  • M-Raw and S-Raw downsampled formats
  • 30MP APS-H crop and 19.6MP APS-C crop modes
  • USB 3.0 interface

Most of the big new features on the high-res 5Ds are about ensuring you’re able to get the best of the cameras’ extra resolution. Our experiences with the Nikon D8X0 series cameras has shown us that simply having a high resolution sensor isn’t enough: to take full advantage of it you need to really obsess about stability.

To this end, Canon has reinforced the tripod socket and surrounding area to allow stable engagement with a tripod. It has also used a more controllable, motorized mirror mechanism, like the one in the EOS 7D II, that allows a deceleration step before the mirror hits its upper position – reducing mirror slap.

The third change is a revised mirror lock-up mode that allows you to specify an automatic delay between the mirror being raised and the shutter opening to start the exposure. It allows the user to choose the shortest possible delay that has allowed mirror vibration to subside: maximizing sharpness while minimizing the loss of responsiveness.

Although the S and the SR can both shoot movies with the same choice of frame rates and compression as the 5D III, they don’t offer clean HDMI output or headphone sockets. The message is pretty clear – if video is a major concern, these aren’t the cameras for you.

 
Canon EOS 5DS
Canon EOS 5DS R
Canon EOS 5D
Mark III
Pixel count 50.2MP 50.2MP 22.1MP
Processor Digic 6 Digic 6 Digic 5+
Maximum ISO ISO 6400
(12,800 ext)
ISO 6400
(12,800 ext)
ISO 25,600
(102,400 ext)
Maximum ISO ISO 6400
(12,800 ext)
ISO 6400
(12,800 ext)
ISO 25,600
(102,400 ext)
Maximum frame rate 5 fps 5 fps 6 fps
Autofocus 61 point, of which 41 are cross type and 5 are double-cross type 61 point, of which 41 are cross type and 5 are double-cross type 61 point, of which 41 are cross type and 5 are double-cross type
Metering sensor 150k pixels (RGB+IR) 150k pixels (RGB+IR) 63-segment (RG/GB)
Optical low-pass (anti-aliasing) filter? Yes Self-cancelling Yes
Uncompressed HDMI output No No Yes
Headphone jack? No No Yes
USB connection USB 3.0 USB 3.0 USB 2.0

A series of features in the EOS 5DS and S R are ones we first saw in the EOS 7D Mark II. This includes the flicker detection function that warns you of lighting flicker and can synchronize the camera’s continuous shooting so that it only fires at the brightest moments to ensure consistent exposure (rather than the constant variation you can otherwise get in such situations).

Two other 7D II features to make an appearance in a 5D camera for the first time are the built-in intervalometer function that can be used to shoot time lapse sequences. And, as a first for Canon, these can then be combined in-camera to create a 1080/24p time-lapse movie.

Canon EOS 5DS / SR overview video

If you're new to digital photography you may wish to read the Digital Photography Glossary before diving into this article (it may help you understand some of the terms used).

Conclusion / Recommendation / Ratings are based on the opinion of the reviewer, you should read the ENTIRE review before coming to your own conclusions.

We recommend to make the most of this review you should be able to see the difference (at least) between X, Y, and Z and ideally A, B, and C.

This article is Copyright 1998 – 2015 and may NOT in part or in whole be reproduced in any electronic or printed medium without prior permission from the author.

Articles: Digital Photography Review (dpreview.com)

 
Comments Off on In Fine Detail: Canon EOS 5DS / 5DS R In-Depth Review

Posted in Uncategorized