RSS
 

Posts Tagged ‘Destination’

How to Photograph Destination Weddings Successfully

18 Feb

The post How to Photograph Destination Weddings Successfully appeared first on Digital Photography School. It was authored by Jackie Lamas.

So you’ve booked your first destination wedding, now what? Don’t worry, photographing a destination wedding is not much different from photographing a local wedding. Check out how to photograph destination weddings and make sure that everything runs as smoothly as possible.

1. Logistics and planning

It’s incredibly exciting getting the chance to travel to photograph a couple’s wedding. With that, however, comes the logistics and effective planning, so you aren’t scrambling or getting delayed by a flight.

First things first, make all the flight purchases and itineraries yourself. You should arrive at the destination at least one full day before the event.

For example, if the wedding is on a Friday, you need to arrive early Thursday morning at the latest. The best would be to arrive on Wednesday anytime. This way, if a flight gets delayed or canceled, you have time to figure out your next move. Never plan to arrive on the same day as the event.

If you are not extending your stay, make sure to leave the destination the next day or next night. The reason for this is because, after a full day of photographing a wedding, you won’t want to worry about packing, airport shuttles, and all that goes into traveling back home.

Get your rest, eat a good breakfast and then be on your way. Make sure to say goodbye to your clients before leaving if they are still on the property.

It is entirely up to you if you wish to extend the stay and turn the opportunity into a vacation. However, make sure that you separate the costs of work and vacation so that your clients aren’t paying for your vacation and you can relax knowing that you can enjoy your vacation.

Having said that, it is acceptable to extend the stay and travel a bit on your own. Destination weddings are perfect for this type of traveling, however, always be careful of your equipment when traveling.

2. Research the location of the wedding

Since you’ll most likely be traveling to a new place, you won’t be familiar with the location. Research online as much as possible so that you can find possible shoot locations and get an idea of what you’ll be working with.

Googling the location and adding “weddings” can also bring up other photographer websites who have photographed there. It can give you ideas of where to photograph or how the light looks.

Reach out to the planner or coordinator of the wedding and touch base with them before you arrive. It’s also nice to introduce yourself to them via email before arriving. Ask them in-depth questions about things such as the weather, the location, travel, and access.

All of these logistical and location questions are important so that you know whether to rent a car or if it’s easily accessible to the nearest town.

Getting all of this information can help you make an itinerary with the couple and they will be impressed that you went the extra mile to find out all of the details not only the wedding, but of the actual location.

3. Make the most of your time before the event

It can seem pretty enticing to take a dip in the pool after traveling to the destination of the wedding, however, it’s best to make the most of your time before the event.

Take the time to walk the grounds and get the lay of the land. This can help you get an idea of possible locations that aren’t too far from any of the important events of the wedding day. Ask the coordinator or planner to give you a quick tour of where the ceremony and the reception are taking place.

This is also a great time to check out the town if the couple has opted for photos there. Go and take a look and take the time to make a list of possible locations for portraits, family portraits, creative bridal party locations, etc.

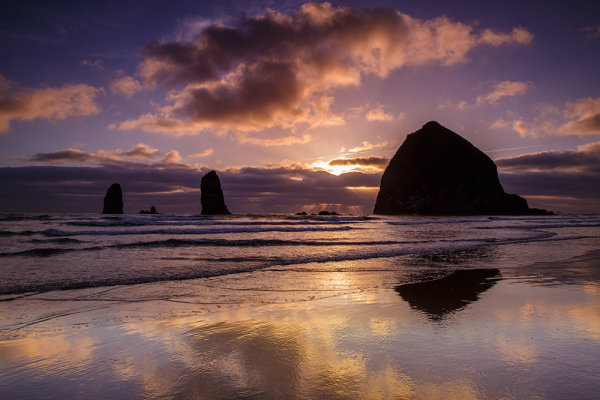
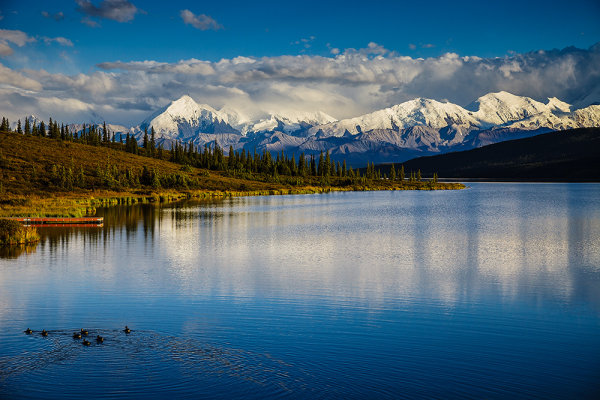
In order to capture this shot, we had to wake up for sunrise at 6:30. Doing research on the location will help you determine the best time for photos.

Also, take a short break to say hi to the couple. Reassure them that you have arrived and have been checking out the location for the best possible photo spots.

Upon arriving, also check your gear. Check that everything is in working order after traveling and that your batteries are charged. If you find you need something, it’s best to find it during this time rather than finding out you needed extra double aa batteries during the ceremony.

Preparing yourself, the photo locations, and your gear allows you to fully relax knowing that you have everything ready to go for the event. Then you can take that dip in the pool without any worries.

4. Gear

Flying with gear can be stressful. Never check-in your gear. Whenever possible, put it in a carry-on case so that it is with you at all times – at least the most important gear. Light stands and tripods are not as crucial as a flash and your favorite portrait lens.

Keeping your lens within arm’s length always ensures nothing gets thrown or broken in the course of the trip. Also, you’ll be able to take photos as you travel on the plane, in the airport, and anywhere.

Before traveling, make sure to speak to an insurance agent about getting your gear insured while you travel. Some insurance agencies only cover your gear in the country you live in. Be sure to call around and have your gear covered as you travel.

Also, ask if your gear is covered in transit. That means that while you’re on your way to where your event is taking place. Transit means in the car on the way to the airport, to the resort, or on the plane.

Having your gear insured while you are traveling makes you feel more at ease in the event something were to happen. Something like a broken lens, a faulty flash, having your camera fall in the water or having your gear stolen.

No one would want this to happen, however, being insured against these things helps keep repair and replacing costs lower than if you didn’t have your gear insured.

Now that you’re insured make sure you bring a backup camera and lens that helps you to cover the wedding in case your main camera stops working for any reason. This is pretty basic for any wedding event – local or destination. However, overseas or far from your local camera shop, it’s unlikely you’ll be able to rent anything if something does go wrong.

5. Tell a story

Most destination weddings take place in places that tell part of the couples’ story or is meaningful to them in some way. Take a photo of the dress where the resort is shown off. For example, a couple from Washington has their wedding in Puerto Vallarta, Mexico. An excellent photo to showcase the beach would be to take a photo of the wedding dress outside where you see the reflection of the ocean in the sliding door windows.

You can also strategically place the details of the wedding day, such as the shoes, bouquet, or the family formals so that some part of the location tells the story. Including these details in the photos makes for a beautiful wedding album and tells the story of the entire day. It has more meaning than a photo of the bride’s shoes in a location that could have been local.

Destination weddings tend to have a smaller guest list, and therefore, most of the guests are very close to the couple. This means that toasts and first dances may be emotionally driven.

Photograph from a more journalistic point of view during these emotional moments, that way, you can capture the mother with tears of joy during the ceremony, or a meaningful hug from a best friend after the first kiss. All of these moments are important during destination weddings.

The bride’s father is the officiant and her sister is behind them.

Take lots of portraits of the bride and groom with their guests, either candid or posed. As the guest list is small, every person is essential, and you should photograph each of them. If the wedding is tiny, say less than 20 people, take a group photo of everyone who attended.

Capture all moments. This man was telling the bride that she was the most beautiful bride he had ever seen during the bride and groom portraits. A funny and sweet moment to remember!

It’s sure to be a favorite among all the guests, and the bride and groom will appreciate you took the time to get a group photo of everyone who made their day special.

6. Get vendor information

Destination weddings are perfect for publications and lots of blogs. You’ll want to get the full list of vendors so that you can also share the images with them and across social media sites.

Tagging a vendor in your photos always creates more buzz and can help you to book more destination weddings in the future. This is especially helpful if you would like to keep photographing weddings at that particular destination.

Send the coordinator/planner a thank you email along with the link to selected photos of the event so that they too can share the images and tag you. Include any hashtags that you’d like for them to use on social media.

Doing this can create a positive rapport with the vendors and give you another opportunity to photograph more weddings at the same location. It also helps your future clients if they need referrals to vendors that you have personally worked with before.

In conclusion

There is not much difference between a local wedding and a destination wedding. With these tips, you’ll be more than prepared to photograph your destination wedding. With the right planning, you’ll do the very best for your clients, and you might even get to enjoy a vacation while you’re at it.

Have you photographed destination weddings? We’d love to hear your experiences in the comments below.

The post How to Photograph Destination Weddings Successfully appeared first on Digital Photography School. It was authored by Jackie Lamas.


Digital Photography School

 
Comments Off on How to Photograph Destination Weddings Successfully

Posted in Photography


How to Choose Your Next Travel Photography Destination

19 Jul

If you’re anything like me, your love for photography is matched only by your love for travel. Your days consist of dreaming of epic landscapes, amazing cities, and unlimited air miles. Unfortunately, my friend, you have the travel photography bug, and I’m sorry to tell you that it’s incurable.

beach with chairs and umbrella - how to choose your next travel photography destination

It’s easy to get down about your inability to see and photograph everything right now. There just aren’t enough hours in the day, and for most of us, not enough money in the bank. The thing that keeps me from getting down is planning my next trip.

Planning is the easy part, the hard part is choosing where to go. You might get overwhelmed by the options, so here are a few things to consider which may help you choose your next travel photography destination.

Look in Your Own Backyard

First up, your next trip doesn’t need to be an epic destination across oceans to places like Iceland or Patagonia. I’m always trying to find ways to get to big bucket-list locations that I know I would love, but sometimes looking closer to home may be a better option.

Unless you live on an island in the middle of the ocean, there’s likely somewhere nearby that you’ll be able to get to sooner to satisfy your wanderlust.

Is there anywhere within driving distance that you’ve always wanted to visit or a place that people have been saying you should check out? Somewhere in your own backyard that others spend thousands of dollars and countless hours traveling to see? It may be somewhere you’ve been before but could revisit to try to photograph better. The benefits of looking in your own backyard are many.

lake with rocks and mountains - how to choose your next travel photography destination

Make a Bucket List

You likely already have an idea of some of the places that you would like to visit and photograph. If you ask me, I can rattle off a long list of dream destinations. If you haven’t already done so, make a list and write it down. You could even make more than one list – local and international.

My bucket list has nested sub-locations within each item because I keep seeing new locations within a given country that I want to see.

I also encourage you to try and get past the big-name travel destinations. Add them for sure, I certainly have, but there’s more to the world than Iceland, New Zealand, and Yosemite. These places are insanely popular, which makes them expensive to get to and you’ll often be competing with huge crowds.

Instagram is a great place to find inspiration, but again, try to look for more than the uber-popular locations. Also, try asking people who love to travel for their recommendations. I’m always happy to make suggestions if you’re stuck for ideas.

egypt - how to choose your next travel photography destination

Talk to Your Travel Buddy

Who will you be traveling with? Do you have a buddy that you go everywhere with? Share ideas with them and come up with a shared list. Do you usually travel alone? Great, that gives you some freedom to do whatever and go wherever you want. It might be worth considering a travel buddy for a change. There are many benefits to traveling with somebody else or even a group.

If your travels usually come in the form of family vacations, then your plans will need to work for them too. Maybe try asking your kids where they would like to go for your next family trip? They might suggest something you have not considered. Is there somewhere your partner has always wanted to go but never mentioned?

Multi-Task

Is there a way that you can kill two birds with one stone? Sometimes there are ways to justify travel that you may not have considered. Do you have family somewhere that you could visit? Maybe an old friend that you haven’t seen for years?

Not everyone has the ability to travel for work, but if you do – is there a way you could tack on some personal travel to the end of a work trip? If you’re crafty you might be able to get your boss to pay for you to go to a conference somewhere. If you don’t ask the answer is always “No”.

cathedral how to choose your next travel photography destination

It’s worth considering photography workshops also. Although it will still be all about the photography, you’ll be investing in your craft. They can be expensive, but if you find one close to home you can keep the travel costs down. Your photography will benefit from a workshop far more than it would just by taking a trip.

Budget

The biggest barrier for most of us is cost. If money were no object, I’m sure many photographers would spend more time traveling than they do at home. Unfortunately, travel costs a lot so it needs to come into consideration.

Depending on where you live, you can use seasonal fluctuations to help you choose your next destination. Virtually everywhere in the world will have a high and a low season. These seasons affect travel costs significantly, so it’s worth doing some research into where’s the best place to visit at a given time of year. Either side of high season (shoulder season) is often cheaper, while the weather is still okay.

It’s also worth considering exchange rates as they can fluctuate a lot. If your home currency is performing well against another country’s currency, it could be worth considering traveling there while you’re able to get more for your money. I’ve planned travel at short notice a few times due to an unusually good exchange rate, and it’s saved me hundreds of dollars.

Expand Your Portfolio

It’s worth taking a look at your travel photos and asking yourself if there’s a subject or medium that you really want to add. Maybe you have loads of images of beaches and the ocean and could diversify by getting into the mountains?

Do you primarily photograph nature and could stretch yourself by spending a weekend photographing cityscapes? Always wanted to try out some astrophotography? Go spend a few moonless nights as far away from light pollution as possible.

I’ve always wanted to take my camera underwater, so next month I’m spending a few weeks in Queensland, Australia exploring the Great Barrier Reef.

cityscape how to choose your next travel photography destination

As photographers, we naturally seek out subjects that we’re drawn to and are comfortable with, but it’s worth trying something different from time to time. Choosing your next destination based on the subject or medium you want to photograph is a great way to learn something new and maybe go somewhere you wouldn’t usually choose.

Available Time

I’m a big advocate of slow travel. You can see and experience a place in a completely different way when you spend a few months there rather than a couple of days or weeks. That said, not everyone wants to or can quit their job and go live somewhere new for a few months.

It’s worth considering how much time you have available for your next trip. If you only have a weekend, you’re not going to want to spend 20 hours flying in each direction. If you have a month, you probably don’t want to spend the whole time in a small town down the road. Use your time wisely.

spices how to choose your next travel photography destination

There are places that I want to visit that I wouldn’t really enjoy if I rushed it. So I’m leaving them for when I can explore it at my own pace. There are also many places that would happily spend a couple of nights and be satisfied.

Make it a Road Trip

It’s pretty hard to beat a good road trip. You have the freedom to go where you want when you want. You’re not dependent on public transport or an itinerary.

You can even sleep in your vehicle if you like and get to obscure locations away from the crowds. Drive as far as time allows.

mountains how to choose your next travel photography destination

A road trip opens up many possibilities for travel photography destinations. It can turn one location into many. I always wanted to visit Yosemite National Park in California, so I did an epic road trip on the entire west coast of the USA.

Next, I wanted to see the Canadian Rockies, so I drove all the way from Vancouver through British Columbia, into Alberta and the Rockies, then down through northern Washington. I saw so much more on those road trips than I ever would have flying or busing between locations. Maybe a road trip should be next on your list?

Where to Next?

You probably can’t pack your bags and get on the road tomorrow, but choosing and planning your next travel photography destination can give you something to look forward to and prepare for. I hope this has helped you to consider new possibilities and narrow down your options.

If it’s helped your next trip come around sooner, even better. What’s on your travel photography bucket list? I would love to hear what you’re thinking or planning, please share in the comments area below.

The post How to Choose Your Next Travel Photography Destination appeared first on Digital Photography School.


Digital Photography School

 
Comments Off on How to Choose Your Next Travel Photography Destination

Posted in Photography


Destination Design: 12 Forward-Thinking Modern Hotels

08 Apr

[ By Steph in Destinations & Sights & Travel. ]

Hotel Architecture Main
Whether by totally transforming a city’s skyline, subverting old standards of hotel architecture or creatively reclaiming historic structures, these 12 unusual modern hotel designs have become destinations in and of themselves. These aren’t just cool-looking concepts that may or may not ever become reality – they’ve actually been built and are open for business.

Bella Sky Hotel by 3XN

Hotel Architecture Bella Sky 1
Hotel Architecture Bella Sky 2

Two wedge-shaped towers connected by a small skybridge taper down to the ground at 3XN’s Bella Sky Hotel, a new landmark in Copenhagen. Not only does this unusual design transform the city skyline, it also has the benefit of giving all 814 guest rooms view of the surrounding landscape.

Hotel Marques de Riscal, Spain by Frank Gehry

Hotel Architecture Riscal Gehry

Whether they’re world-class museums or relatively small hotels in the Spanish countryside, architect Frank Gehry’s designs are anything but ordinary. The City of Wine complex for the Marques de Riscal Winery in Elciego, northern Spain features a wavy metallic exterior meant to reflect the colors of the winery’s signature bottles with their silver foil and gold mesh covering. The building houses a five-star, 43-room hotel as well as a restaurant, a spa offering ‘wine therapy,’ a wine shop and a viticulture museum.

ParkRoyal Hotel by WOHA

Hotel Architecture Park WOHA 1
Hotel Architecture Park WOHA 2

Terrace after terrace of vivid greenery characterizes WOHA’s Parkroyal Hotel in central Singapore. A series of towers is elevated above a wavy, sculptural ground-level platform characterized by breezy courtyards that blur the boundaries between indoor and outdoor spaces.

Fogo Island Inn by Saunders Architecture

Hotel Architecture Fogo Island

A cantilevered dining hall reaches out over the rocky coastline of Fogo Island, Newfoundland in Canada. The Fogo Island Inn, by Saunders Architecture and the Shorefast Foundation, is a contemporary 29-room hotel merging traditional craftsmanship with modern aesthetics for a dramatic look that pays proper tribute to the landscape.

Next Page – Click Below to Read More:
Destination Design 12 Forward Thinking Modern Hotels

Share on Facebook


[ By Steph in Destinations & Sights & Travel. ]

[ WebUrbanist | Archives | Galleries | Privacy | TOS ]


WebUrbanist

 
Comments Off on Destination Design: 12 Forward-Thinking Modern Hotels

Posted in Creativity


The Definitive Guide to Destination Wedding Photography

05 Feb

Destination wedding photography is hard work but certainly has its rewards. If you can adapt quickly, can thrive on the new and different challenges, and are naturally resourceful this niche may be for you. There are some additional considerations if you are thinking about becoming a destination wedding photographer. It typically requires more planning and expertise. Because the location is Continue Reading

The post The Definitive Guide to Destination Wedding Photography appeared first on Photodoto.


Photodoto

 
Comments Off on The Definitive Guide to Destination Wedding Photography

Posted in Photography


Destination: Oregon

17 Jun
Haystack Rock dominates the landscape at Cannon Beach. The wet sand, dramatic skies, and great light combined for some great images. Canon EOS 5D Mark III, EF 24-70 f/2.8L II at 24mm.  1/40 second at f/16, ISO 200.  I used a 4 stop graduated neutral density filter on the sky.

Haystack Rock dominates the landscape at Cannon Beach. The wet sand, dramatic skies, and great light combined for some great images. Canon EOS 5D Mark III, EF 24-70 f/2.8L II at 24mm. 1/40 second at f/16, ISO 200. I used a 4 stop graduated neutral density filter on the sky.

Every year I try to dedicate at least one week of vacation to photographing a destination that’s on my lifetime list of places to see- some might call it their bucket list for photography.  The past few years those trips included Yosemite, Acadia, and Denali.  I have wanted to photograph the Oregon coast since I first began photographing landscapes, and decided that this year was the year for that.

I had seen photographs of the beaches in Oregon and knew they were beautiful, but nothing prepared me just how beautiful they really were. And nothing prepared me for the diversity of the landscape. From wide sandy beaches, to towering sea stacks, rocky headlands, and temperate rainforest, the coast of Oregon offers a little of everything to photographers seeking dramatic landscape images. I was in heaven.  For this trip, I took along the following: EOS 5D Mark III, EF 16-35mm f/2.8L II, EF 24-70 f/2.8L II, EF 70-300 f/4-5.6L IS, EF 100mm f/2.8L IS macro, and EF 14mm f/2.8L II. I had my lightweight travel tripod (a Gitzo 1541T), and my set of 4×5 inch graduated ND filters and ND filters, as well as a polarizer.

Indian Beach features a rocky area along with a wide expanse of sand.  On this day, gray clouds had been hanging around all day, keeping the light pretty flat and boring. Just as the sun began to set, the layers of clouds separated and began reflecting this unbelievable color. To capture it, I used both a 3 stop hard edged graduated neutral density filter, stacked on top of a hard edged 4 stop graduated ND. That brought out the color nicely and allowed me to maintain good detail in the foreground. 1/15, f/16, ISO 400. EOS 5D Mark III, EF 24-70 f/2.8L II at 50mm.

Indian Beach features a rocky area along with a wide expanse of sand. On this day, gray clouds had been hanging around all day, keeping the light pretty flat and boring. Just as the sun began to set, the layers of clouds separated and began reflecting this unbelievable color. To capture it, I used both a 3 stop hard edged graduated neutral density filter, stacked on top of a hard edged 4 stop graduated ND. That brought out the color nicely and allowed me to maintain good detail in the foreground. 1/15, f/16, ISO 400. EOS 5D Mark III, EF 24-70 f/2.8L II at 50mm.

I stayed in Cannon Beach, and was immediately drawn to the dominant feature of the landscape, Haystack Rock.   At 235 feet tall, Haystack Rock towers above everything else in the area.  Cannon Beach, like much of the coastline, features sand pounded flat by the tides, so you can see for miles down the beach. When the sand is wet, it becomes highly reflective, and since the beach is so flat, the water just keeps running over the sand.  This presents fantastic opportunities for reflections. In addition, the water and wind will carve the sand, creating patterns that just beg you place it in the foreground using a wide angle lens. Finding interesting compositions of the monolithic Haystack Rock can keep any photographer going for days.

The temperate rain forest features a plethora of flora. This is wood sorrel blanketing the forest floor. EOS 5D Mark III, EF 14mm f/2.8L II. 1/25, f/8, ISO 400.

The temperate rain forest features a plethora of flora. This is wood sorrel blanketing the forest floor. EOS 5D Mark III, EF 14mm f/2.8L II. 1/25, f/8, ISO 400.

Low tide is a macro photographer’s dream. You can walk all the way out to Haystack Rock, where tide pools form around smaller rocks.  These tide pools feature a plethora of marine life, including crabs, star fish, limpets, ochre sea stars, and sea anemone, among others.  One can spend hours amongst the tidal pools, alternating between landscapes and macro work, and still not exhaust all of the opportunities presented.

Just north of Cannon Beach is Ecola State Park. Ecola State Park is a mix of rocky headlands, temperate rain forest, and sandy beach.  I spent half a day photographing in the rain forest. Trees covered in moss, ferns and wood sorrel blanketing the forest floor, and winding trails lead to tons of photographic opportunities.

Thor's Well, at Cape Perpetua, is breathtaking in showcasing the ocean's power. EOS 5D Mark III, EF 24-70, f/2.8L II, at 31mm. 1/5, f/16, ISO 100.   Due to the spray I was unable to use a graduated neutral density filter, so in the raw processing I pulled the exposure for the sky back using a digital graduated filter in Adobe Camera RAW.

Thor’s Well, at Cape Perpetua, is breathtaking in showcasing the ocean’s power. EOS 5D Mark III, EF 24-70, f/2.8L II, at 31mm. 1/5, f/16, ISO 100. Due to the spray I was unable to use a graduated neutral density filter, so in the raw processing I pulled the exposure for the sky back using a digital graduated filter in Adobe Camera RAW.

South of Canon Beach is a stretch of beaches and state parks such as Arcadia Beach, Oswald West State Park, Hug Point State Park (which features a beautiful waterfall), and more.   A few hours further south is Cape Perpetua, which features some of the most dramatic coastline I’ve ever seen.  Specifically, the area around Devil’s Churn, which features waves crashing on the rocks like thunder, water being forced out of blow holes, and a cauldron-like feature called “Thor’s Well”.  This area is best photographed at high tide, where the waves create massive splashes, and Thor’s Well literally boils over.  While I was there, the wind was blowing spray all over the camera, making it a nightmare trying to keep the camera dry.

From Ecola State Park, you can view the vast expanse of Cannon Beach below.  EOS 5D Mark III, EF 70-300 f/4-5.6L IS, with a 5-stop and 6-stop ND filter stacked together to create the long exposure. 30 seconds, f/25, ISO 160.

From Ecola State Park, you can view the vast expanse of Cannon Beach below. EOS 5D Mark III, EF 70-300 f/4-5.6L IS, with a 5-stop and 6-stop ND filter stacked together to create the long exposure. 30 seconds, f/25, ISO 160.

I could not believe how many good photo ops there were waiting for me in Oregon, and I didn’t even get a chance to explore the Columbia River Gorge or the southern coast. I definitely plan to go back and explore more, so it stays on my list.  And I must go back for a marionberry scone from the Lazy Susan Cafe in Cannon Beach!

Wind and Water carved up the sand on the beach, creating a great foreground to use for this shot. EOS 5D Mark III, EF 16-35 f/2.8L II. Exposure was 4 seconds, f/16, ISO 100.  I used a 3 stop, soft edged graduated ND filter to help darken the sky, and a 6 stop ND filter to slow down my exposure.

Wind and Water carved up the sand on the beach, creating a great foreground to use for this shot. EOS 5D Mark III, EF 16-35 f/2.8L II. Exposure was 4 seconds, f/16, ISO 100. I used a 3 stop, soft edged graduated ND filter to help darken the sky, and a 6 stop ND filter to slow down my exposure.

The Needles are the tall, thinner sea stacks to the south of Haystack Rock. I photographed this with the EOS 5D Mark III and EF 70-300 f/4-5.6L IS. 1/10, f/16, ISO 200.

The Needles are the tall, thinner sea stacks to the south of Haystack Rock. I photographed this with the EOS 5D Mark III and EF 70-300 f/4-5.6L IS. 1/10, f/16, ISO 200.

Post originally from: Digital Photography Tips.

Check out our more Photography Tips at Photography Tips for Beginners, Portrait Photography Tips and Wedding Photography Tips.

Destination: Oregon


Digital Photography School

 
Comments Off on Destination: Oregon

Posted in Photography


Destination: Alaska

13 Mar
Wonder Lake is the furthest point in Denali National Park that the park bus system will reach.  It offers a spectacular view of the Alaska Range, when the weather is clear.

Wonder Lake is the furthest point in Denali National Park that the park bus system will reach. It offers a spectacular view of the Alaska Range, when the weather is clear.

Over the years, as I grew as a photographer, I wanted to expand my horizons and photograph exotic and epic places. Tops on my list was Alaska.  I wanted to photograph the grandeur of the Alaska Range, of Denali, and the beauty of the nature and wildlife.  I found Alaska to be full of beauty and opportunity, but at the same time, a difficult place to photograph.

The first challenge in photographing in Denali is the weather.  It is said that 80% of visitors to Denali National Park never see the mountain (known as Mount McKinley or Denali).  Denali (the mountain) generates its own weather pattern.  This was illustrated on my second visit there, when I camped at Wonder Lake for 4 days. I saw the mountain as I traveled in to the campsite on my first day, and saw it as I left the park on my way out on the 4th day.  The days in between, it was never seen again.

This view, captured from the Eilson Visitor's Center, is one of the iconic views as you approach Mount McKinley. The clouds surrounding the mountain illustrate the weather patterns around the mountain.  The dynamic range of the scene was huge- without using graduated neutral density filters, this image would not have been possible in one exposure. I used a 3-stop soft-edged ND grad. EOS 5D Mark II, EF 24-105f/4L IS.  1/500, f/8, ISO 200.

This view, captured from the Eilson Visitor’s Center, is one of the iconic views as you approach Mount McKinley. The clouds surrounding the mountain illustrate the weather patterns around the mountain. The dynamic range of the scene was huge- without using graduated neutral density filters, this image would not have been possible in one exposure. I used a 3-stop soft-edged ND grad. EOS 5D Mark II, EF 24-105f/4L IS. 1/500, f/8, ISO 200.

The next challenge I found in Denali National Park is the range of contrast in the landscape. Even late in the day, The range from the bright sky to the foreground was huge. I found graduated neutral density filters to be essential in helping to control the dynamic range of an image. Generally the mountains would be in bright light, while the foreground would be several stops darker.  A 3 stop or 4 stop ND grad was perfect for bringing the two closer together.

After spending all that money to get to this remote part of Alaska, I wasn’t about to let bad weather get in the way of my photography. As I mentioned, 80% of visitors to Denali don’t get to see the mountain.  The tallest peak in North America is obviously a major focal point when trying to photograph in Denali. When that’s taken away, it just means you have to work a little harder to find the shots. But Alaska is chock full of natural beauty, and there is no shortage of photos to be taken.

After two days of rain, we ventured onto the McKinley Bar Trail to hike to the McKinley River. The mountain was obscured by clouds, so I looked for other shots I could take.  This creek on the McKinly Bar Trail offered a nice opportunity. I composed the shot to eliminate as much sky as possible, due to the flat cloudiness of it.  EOS 5D Mark II, EF 17-40 f/4L @ 23mm.  1/250 at f/11, ISO 400.

After two days of rain, we ventured onto the McKinley Bar Trail to hike to the McKinley River. The mountain was obscured by clouds, so I looked for other shots I could take. This creek on the McKinly Bar Trail offered a nice opportunity. I composed the shot to eliminate as much sky as possible, due to the flat cloudiness of it. EOS 5D Mark II, EF 17-40 f/4L @ 23mm. 1/250 at f/11, ISO 400.

One of the best things I did in Alaska was get a different point of view.  Flightseeing tours are offered within the park.  I took one with Talkeetna Air Taxi, which is based at Kantishna Air Field, at the very end of the park road.  It was a 1 hour flight, bringing me as close to the mountains as I’d ever get.  You’re forced to shoot through the plane’s windows, but the reflections are pretty well controlled. I used a 5D Mark II and EF 24-105 f/4L lens for the entire flight. That gave me enough range to not have to change lenses during the flight. The cloud cover was already moving in on this day, but we got some dramatic shots of peaks poking through the clouds, glaciers making their way through mountain passes, and kettle ponds on the tundra reflecting blue skies.

This shot, taken from a plane at 10,000 feet, shows the kind of image possible on a flightseeing tour. 5D Mark II with 24-105 f/4L at 45mm. 1/1000, f/8, ISO 400.

This shot, taken from a plane at 10,000 feet, shows the kind of image possible on a flightseeing tour. 5D Mark II with 24-105 f/4L at 45mm. 1/1000, f/8, ISO 400.

The McKinley River flows through the tundra of Denali.  The silt deposited by the river changes its direction and creates these little strands. This shot was taken at 11,000 feet up. 5D Mark II, Ef 24-105 f/4L IS at 105mm. 1/500 at f/8, ISO 400.

The McKinley River flows through the tundra of Denali. The silt deposited by the river changes its direction and creates these little strands. This shot was taken at 11,000 feet up. 5D Mark II, Ef 24-105 f/4L IS at 105mm. 1/500 at f/8, ISO 400.

Wildlife is abundant in Denali, though you do have to get a bit lucky to see it.  The big five is moose, eagles, Dall sheep, bears, and caribou.  A long lens is a must.  To save weight in my bag, I used a 70-200mm f/2.8L IS II, with a 2x extender to give me an effective focal length of 400mm.  While we weren’t able to get close enough to any bears, we did get close to a wolf, Dall sheep, and a golden eagle that buzzed the bus we were on heading to our campsite. You’ll need to be ready as the wildlife doesn’t stay still for very long.  The bus drivers will stop whenever you ask as long as it’s safe, and you can hop off one bus and onto another if you decide to hike around some.

To view more of my Alaska images, visit my website at www.rickberk.com.

This Dall Sheep was lounging just above Polychrome Pass. Using a 70-200 with a 2x extender, I was able to get in close and get a nice portrait. 5D Mark II, EF 70-200 f/2.8L IS II w/2x extender. 1/1000 at f/4, ISO 200.

This Dall Sheep was lounging just above Polychrome Pass. Using a 70-200 with a 2x extender, I was able to get in close and get a nice portrait. 5D Mark II, EF 70-200 f/2.8L IS II w/2x extender. 1/1000 at f/4, ISO 200.

Post originally from: Digital Photography Tips.

Check out our more Photography Tips at Photography Tips for Beginners, Portrait Photography Tips and Wedding Photography Tips.

Destination: Alaska


Digital Photography School

 
Comments Off on Destination: Alaska

Posted in Photography


Final Destination full colour HD 3D (Anaglyph Conversion)

17 Aug

This clip is a full colour conversion of Final Destination 3D, from Anaglyph source. Left/right colour, brightness & contrast match is almost perfect. There is some light ghosting, but that is unavoidable with anaglyph conversions.
Video Rating: 0 / 5

 
3 Comments

Posted in 3D Videos


The Final Destination Trailer in Anaglyph 3D (World Premiere!!!)

03 Jul

This is the official trailer of The Final Destination, encoded in anaglyph 3D!!! grab a pair of 3D glasses (Red-Cyan) and enjoy!!!
Video Rating: 4 / 5

 
9 Comments

Posted in 3D Videos