RSS
 

Posts Tagged ‘Convert’

How to Convert a Photo to a Drawing in Photoshop

12 Apr

The post How to Convert a Photo to a Drawing in Photoshop appeared first on Digital Photography School. It was authored by Mark C Hughes.

How to Convert a Photo to a Drawing in Photoshop

If you are anything like me, your artistic skills with a pencil are not great. I can, however, take pretty good photographs. So, this technique will show you how to convert a photo to a drawing in Photoshop.

The steps aren’t complicated, but we will use smart objects, filters and blend modes. If you are not familiar with these, check out the related links to learn more about them.

You will need to use Adobe Photoshop for this particular technique and I will be using the current 2020 CC version of Photoshop. Different versions of Photoshop may require slightly different approaches, particularly as it applies to smart objects.

Start with a portrait

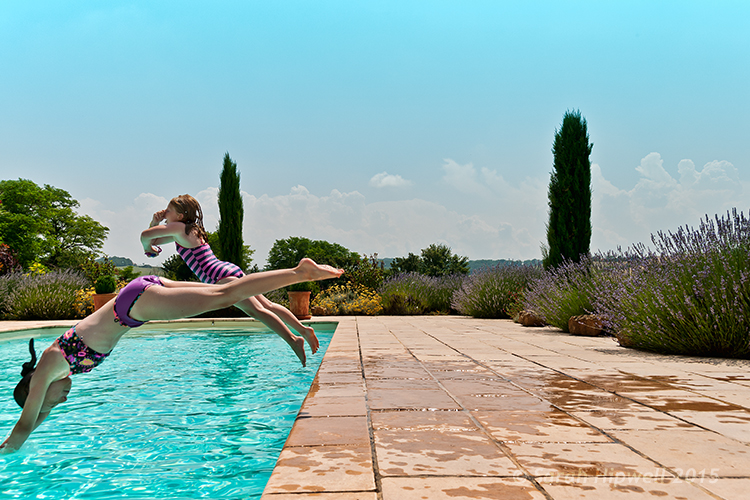
To convert a photo to a drawing in Photoshop, I will start with a portrait of a writer I know, Jane Marshall. I photographed this during a recent portrait session. My version of Photoshop is windows-based, but the commands apply to Mac too.

Make sure you are working with an 8-bit image, or some of the filters will not be visible within Photoshop.

Converting a photo into a pencil sketch
Start with the image you want to convert into a pencil sketch

We will be converting the layers into Smart Objects. Converting them into a smart object will allow you to make modifications to each layer.

Before you do this, use the Quick Select tool on the left side. With that highlighted, you can look across the top of the bar (on Adobe Photoshop CC) and use the Select Subject.

How to Convert a Photo to a Drawing in Photoshop

This uses Adobe’s Sensei AI technology and selects the subject for you. It generally does a pretty good job.

Mask out the subject

How to Convert a Photo to a Drawing in Photoshop
Create a layer mask so you are only working on the portrait

Create a layer mask so that you are only working on the portrait.

To do this, with your selection still made, go to Layer > Layer Mask > Reveal Selection. Alternatively, select the little layer mask icon in the Layer palette.

Clean up the mask by either using a black brush on the layer mask or use the Select and Mask tool. The Select and Mask tool is similar to the prior versions Refine Mask function, but works much better now. Fundamentally, the mask doesn’t need to be perfect, just smooth.

Remember when working on the mask, white reveals and black conceals.

How to Convert a Photo to a Drawing in Photoshop
Refine the mask

Once you are happy with the mask, we need to invert the selection, so press Ctrl I or Command I (Windows/Mac) and select the background.

Press Delete and the background will disappear. We will proceed to convert the layer into a Smart Object by clicking on the layer. You can also do this from the Edit menu.

Convert the base image into a Smart Object

How to convert a photo into a pencil sketch
You can convert the image into a Smart Object by right-clicking on the layer or going to the edit menu

Duplicate the layers and rename the new layers.

Because the layer was already a smart image, all the duplicates will also be smart images and will be tied to the original layer (more about that later).

There will be four layers above the original layer.

The original layer should be called Original (it will change from “Background” when you convert it into a Smart Object). We will leave that one alone and only work on the layers above it.

Title the layer above the original “Base.” We can call the layer above Base, “Pencil Outline.” The layer above that, call “Shading” and the Layer above that, call “Lines” or “Edges.”

Naming layers makes adjustments easier to keep track of. Smart objects will make the files larger, but will make all the changes non-destructive and editable.

Create multiple Smart Object layers

How to convert a photo into a pencil sketch
Once you create the first Smart Object layer, you can create all the additional layers we will need. Turn off all the layers above the one you are working on at the time.

Create the Pencil Outline layer

Turn off all the layers bar the layer you are working on using the Eye icon next to the name of each layer in the Layers palette. In this case, we will start on the Pencil Outline layer. To start the conversion, press Ctrl I or Command I to invert the layer.

How to convert a photo into a pencil sketch
Only the layer we are working on should be visible and we need to invert it to create the initial colored pencil effect

Once you have inverted the image, we are going to use the blend mode, “Color Dodge” to create the initial colored pencil outline effect.

How to convert a photo into a pencil sketch
The blend mode has created the initial effect, but it is not strong enough

Add a Gaussian Blur

The next thing we need to do to convert a photo to a drawing in Photoshop is to add a Gaussian Blur. We will do this to improve the appearance of the initial colored pencil effect.

Select Gaussian Blur from the Menu bar, by going to Filter > Blur > Gaussian Blur. The amount of blur you add will affect how much of the underlying image appears.

How to convert a photo into a pencil sketch
Adding the Gaussian Blur creates the amount of the image that will be visible

Adjust the amount of Gaussian Blur you want, and a color version of the pencil sketch will start to appear.

However, we can improve the image by creating shading and emphasizing some lines.

Adjust the amount of Gaussian Blur to an amount you like, but you want to clearly see your subject.

How to convert a photo into a pencil sketch
With an appropriate amount of blur (the amount will vary depending upon your image and image size), the base becomes visible

Make the image black and white

While on the Pencil Outline layer, add a new Black and White Adjustment Layer from the Adjustments Panel. This will add a layer above the Pencil Outline layer.

If you cannot find your Adjustments Panel, go to the menu bar and select Window > Adjustments. You will then see the panel open. The Black and White Adjustment icon is a box with a positive and negative rectangle inside.

Remember that if you have the layers above the one you are working on turned on, you will not see any changes. So make sure only the layer you are working on and the ones below are turned on.

You don’t need to change anything from the default settings for the black and white adjustment layer for the purposes of this exercise.

How to convert a photo into a pencil sketch
A black and white adjustment layer creates the pencil image effect

Working on the shading

When you are converting a photo to a drawing in Photoshop, you want some shading to give depth. However, pencils are usually shaded with texture and blending.

You can create this appearance in Photoshop.

Select your Shading layer.

To improve the effect, we are going to change your brush color from pure black to a dark grey and leave the white as white. You want the foreground color to be the dark grey and the background to be white.

How to convert a photo into a pencil sketch
As this will be a pencil effect, we are looking for the pencil color to not be 100% black

With the shading layer selected, go to the Filter Gallery (Menu > Filter > Filter Gallery) and choose the Charcoal Filter under the Sketch Group. Set the Charcoal thickness to 1, Detail to 5 and Light/Dark balance to 50.

How to convert a photo into a pencil sketch
At 100% this become the new layer. But we want a pencil effect, not a charcoal effect.

On the Shading Layer, change the blend mode to “Multiply.” This allows the underlying layer to merge with the shading layer, creating some detail and some shading.

How to convert a photo into a pencil sketch
The multiply blend mode combines the two main layers

Change the Opacity

Change the Opacity of the Shading layer to a pleasing amount. This will add texture to the image and make it look a lot more like a pencil drawing with shading. For this example, I used 62% opacity for the shading layer. This allows the underlying layer to start showing through. Choose an amount that works for your image

How to convert a photo into a pencil sketch
Balance the shading and the pencil outlines

Improve the outer edges

Most pencil drawings have stronger edges emphasized. Because we are converting a photo to a drawing in Photoshop, the photograph has lots of details but the edges aren’t pronounced. To do this, we are going to work off the Lines layer (this is the top layer we created earlier).

How to convert a photo into a pencil sketch
Work on the Top Layer

Invert the image by pressing Ctrl I or Command I.

How to convert a photo into a pencil sketch
To get stronger edges we need to invert the image again

Once the image has been inverted, we need to go to Menu > Filter > Filter Gallery and chose “Glowing Edges.”

How to convert a photo into a pencil sketch
Use the Filter Gallery to Access the Glowing Edges Filter

With Glowing Edges chosen under the Stylize Folder, use this to create the lines. Don’t worry that they are color – we are just looking for stronger edges like an artist would draw.

How to convert a photo into a pencil sketch
Glowing Edges makes the image strong

Change the blending mode to “Multiply.”

How to convert a photo into a pencil sketch
Use the blend mode to enhance the edges

Convert it to black and white

This time, instead of adding another layer, we can convert this layer to black and white. Do this by going to Menu > Image > Adjustments > Black and White.

How to convert a photo into a pencil sketch
Convert this last layer to Black and White for finished effect

Any filter effects below other filter effects will not show up live until you move to a different layer (no live preview as you change).

How to convert a photo into a pencil sketch
The finished effect can be tweaked because each smart object can be re-edited

Because each layer is a Smart Object, you can go back and adjust each layer’s filter settings to your liking. Essentially, everything is non-destructive. You can even replace the original image and apply the same settings (but that is a more advanced topic).
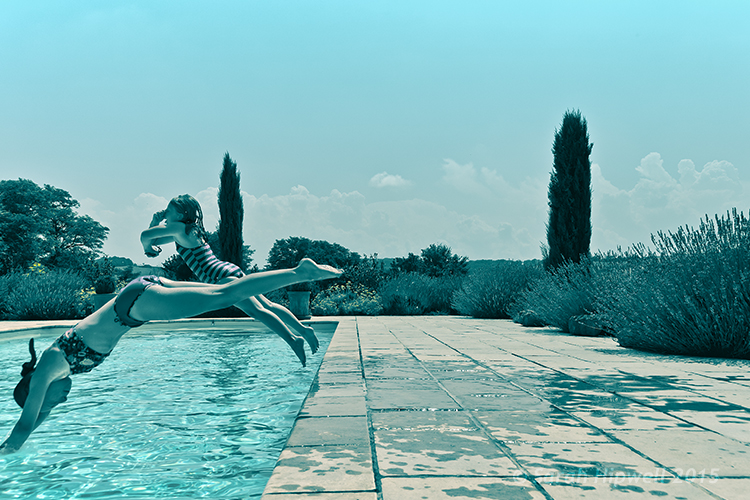
The finished look

How to convert a photo into a pencil sketch
The Final Portrait

In conclusion, by following all these steps you get a lovely pencil drawing image with shading and definition all starting from a color portrait photo.

There are other ways to accomplish converting a photo to a drawing in Photoshop, but I like how this technique adds subtle shading. This is how a sketch artist would convert a photo into a pencil drawing sketch.

Try converting a photo to a drawing in Photoshop yourself at home, and share your results in the comments section!

The post How to Convert a Photo to a Drawing in Photoshop appeared first on Digital Photography School. It was authored by Mark C Hughes.


Digital Photography School

 
Comments Off on How to Convert a Photo to a Drawing in Photoshop

Posted in Photography


Kandao uses AI to convert 30fps 360-degree video into super-slow-motion footage

19 Apr

Kandao, the makers of professional-grade 360-degree cameras and the Kandao Raw+ image stacking tool for Raw files has launched another potentially very useful software feature. AI Slow-motion is designed to convert 360-degree video footage that has been recorded at a regular 30 frames per second into 300 fps super-slow-motion clips.

The software uses artificial intelligence and machine learning methods to predict and generate intermediate frames for a smooth and detailed slow-motion output from existing 360/VR footage.

The company says that compared to optical flow or interpolation methods that are used in other applications, the AI-generated footage offers more accurate frame interpolation as well as fewer jagged edges and other artifacts. The software also requires less powerful hardware than comparable systems.

The feature will first be implemented into the Kandao QooCam Studio and Kandao Studio applications, allowing for an up to 10x slow-motion effect. For example, 360-degree video originally captured at 8k 30fps can be converted into 8K 240fps slow-motion or 4k 60fps video into 4K 480fps footage, by selecting a factor of eight during the 360 stitching workflow in the software software.

The bad news is that, although the algorithm behind the feature can work with any existing videos, in a first step the technology will only work with video from Kandao cameras. However, the company says it will make AI slow motion available for other cameras in the future, which is good news for 360-degree videographers who would like to work with super-slow-motion without splashing out on ultra-powerful hardware.

Kandao camera users can now download Qoocam Studio with AI slow motion free of charge on the Kandao website. Kandao Studio V3.0 with AI slow-motion will available on 23rd April.

Articles: Digital Photography Review (dpreview.com)

 
Comments Off on Kandao uses AI to convert 30fps 360-degree video into super-slow-motion footage

Posted in Uncategorized


Apple Final Cut Pro X 10.4.6 update brings detect and convert feature for older media files

26 Mar

Apple has pushed out Final Cut Pro X update (version 10.4.6), that adds the ability to automatically detect and convert any legacy media files that will not be compatible with future versions of macOS, as well as numerous bug fixes and improved features.

Last year, Apple began warning its users that older video formats and codecs relying on QuickTime 7 would no longer be supported by future macOS releases due to the 64-bit transition. Though legacy media files remain compatible with macOS Mojave, updating a Mac system beyond Mojave in the future could prove problematic for filmmakers who have content in older formats.

In a note about this potential issue on its website, Apple warns users to convert their incompatible media files before upgrading to the next major macOS version after Mojave. The newly released Final Cut Pro X 10.4.6 simplifies this requirement by detecting and converting these files into a format that will remain compatible with macOS in the future.

In version 10.4.6, Final Cut Pro users who open a library or import content will see a window listing any incompatible media files the software found. Users can immediately convert these files by clicking ‘Convert’ in the window. Copies of the converted content are created in Apple ProRes format and stored in the library’s media storage location. Existing clips in the library are then relinked to the converted files.

There’s an exception for Motion projects, however, with Apple warning that Final Cut Pro won’t detect incompatible media files in these projects. Instead, users will need to open the project in Motion, after which point a message will appear warning if any incompatible media is present. In that case, the user would need to convert it using QuickTime Player or Compressor.

Media conversion aside, Final Cut Pro X version 10.4.6 brings several relatively minor bug fixes and improved reliability when sharing videos directly to YouTube.

Articles: Digital Photography Review (dpreview.com)

 
Comments Off on Apple Final Cut Pro X 10.4.6 update brings detect and convert feature for older media files

Posted in Uncategorized


Why I’ve Become a Light Meter Convert

05 Sep

Light meters

sekonic light meter - Why I've Become a Light Meter Convert

Light meters can be an invaluable tool for photographers; especially those who use off-camera flash.

Mention a light meter in photography circles and you’re certain to get some fierce responses. Sure, some photographers will be indifferent and fewer will be in favor, but most will be adamant that you don’t need one. I used to be somewhere in the middle.

I could definitely see their utility, but I just never thought I needed one. Before a few months ago, I had picked up a light meter once in 14 years. It turns out that I was just making excuses to not spend the money on something that may be one of the most powerful tools you can buy if you use off-camera flash lighting.

Excuses

There are a lot of motives and reasons that you might avoid using a light meter in the digital era. For example:

  • You can just chimp the LCD screen.
  • It’s easy to fix it in raw processing.
  • They’re too expensive for what they do.
  • The histogram is enough for testing exposure.

I get it. All of these sentiments came out of my mouth over and over again.

Chimping and the Histogram

photographer checking settings - Why I've Become a Light Meter Convert

While you can chimp your exposures to get them right, this can take both time and guesswork. A light meter takes away both of those things.

Sure, you can look at the back of your camera after each test shot (chimping) while you’re setting up your lights. This works fine for one or two lights, but what happens when you need to create a precise lighting ratio?

How do you ensure that your fill light is exactly three stops below your key light? How do you ensure the rim lights are an even exposure with your fill? It’s possible, but all of that takes time and guesswork.

I remember doing a basic four light setup a few years back and it took the better part of an hour to get the ratios exactly how I had planned them.

Since starting to use a light meter, I set up an even more complicated five light setups, mixing really hard light with very soft light. It took me only 10 minutes to get right. I don’t know about you, but I could do with a lot more instances of saving nearly an hour of shooting time.

b/w portraits of a man in a suit - Why I've Become a Light Meter Convert

These images use five lights at a very precise contrast ratio. Using a light meter meant that the setup time was only 10 minutes.

Fix it in Raw Processing

raw processing in Lightroom - Why I've Become a Light Meter Convert

Fixing your exposures at the raw stage is a viable option, but it can take some time that might be better spent elsewhere.

Yes, you can fix the image later in raw processing. As long as your highlights and shadows aren’t clipped, raw processing is a viable tool here. However, wouldn’t it be much nicer to get it right in camera?

Think about it this way: with a light meter, you press the test button on your strobe, check the reading and dial it into your camera. The whole process takes about 20 seconds. Unless you move the light or your subject moves, every subsequent photo is now properly exposed.

Presume it takes about two minutes of fiddling to adjust the exposure of an image in Lightroom or ACR. If you’re working on 20 photos from a set, you’ve just lost 40 minutes of time to a task that could have been negated in twenty seconds.

Too Expensive

I get it, I really do. This was the main reason I avoided getting a light meter for so long. A couple hundred dollars for a decent light meter is a hard pill to swallow when there are so many things that you can buy for your photography at a much lower price. Why spend that kind of money on something you use so briefly when you can spend that money on lights, modifiers, trips, studio time, props, etc, etc.

It’s all a matter of how much you value your time and convenience. A light meter will save you time and it will make a good chunk of the set-up process easier. In the end, I’ve found that the price tag has been worth it.

Changing My Mind

model using a light meter - Why I've Become a Light Meter Convert

I had a shoot where I only had 10 minutes to set up. I borrowed a light meter from another photographer just to make my life easier. That one time completely changed how I felt about using light meters. In minutes, all of the potential benefits and values of having a light meter in my bag became apparent.

Time

As you may have guessed from my previous points, it comes down mostly to time. Faster set-ups mean you get more time actually shooting, which makes it more likely that you’ll get the shot that you’re after. Less time processing means you have more time to work on other things, like planning and arranging your next shoot.

Also, in terms of portraits, a light meter will help you minimize the time that your subjects are waiting on you between sets. Nobody, absolutely nobody (especially paying clients), wants to wait around for huge chunks of time while their photographer is messing with the lights.

Complexity

model with long hair - Why I've Become a Light Meter Convert

In this image, I wanted to experiment with a gridded stripbox as the key light and a giant octabox as fill. Using a light meter made getting the exact ratio between the key and fill lights that I wanted a breeze.

On top of time, the multiple light techniques that a light meter opens up makes it more than worth the value. With a light meter, you can dream up any number of lighting configurations, plan them down to the exact contrast ratio and set it up with no fuss.

You want a hard light source as a key at f/8, with two giant modifiers providing exactly two stops of fill at f/4 and two background lights at f/22? That’s a set-up that popped into my head one night shortly after buying my light meter. I went into the studio the next day and set it up.

I wouldn’t have bothered before, as trying to get the ratios right between those light sources would have been a major headache.

metering the light - Why I've Become a Light Meter Convert

Metering for each light individually and adjusting their exposure took about a minute or two. This only has to be done once.

behind the scenes lighting setup - Why I've Become a Light Meter Convert

If the exposure from the octabox was off, it would have destroyed the effect of the lighting from the much smaller striplight.


lighting diagram - Why I've Become a Light Meter Convert

Imagine that you’ve just had a week where you’ve saved several hours at both setting up and post-processing. If you used just a bit of that time to start drawing out and planning new light set-ups, how many do you think you could come up with?

Getting it right in-camera

Why I've Become a Light Meter Convert

When dealing with difficult subjects, like white shirts on dark backgrounds, a light meter can be an absolute blessing in terms of getting it right in the camera.

As I already mentioned, the ability to get your exposure perfect every single time is a huge benefit. In fact, when working with flash, I would posit that using a light meter might be the single most valuable step you can take to ensure perfect exposures and making your workload that much easier.

I’m a Total Convert

sekonic light meter - Why I've Become a Light Meter Convert

Over the time I’ve had it, my light meter has become indispensable. As it fits in my pocket, it now comes everywhere with me.

In the end, I regret that I put off and continually excused myself from buying a light meter for as long as I did. In the few months since I bought it, I have saved a ton of time in the studio not messing about with lights while people were waiting on me. My post-processing workload has lightened quite a bit as fixing contrast ratios in post-production is all too time to consume.

Both of these factors together mean that I now have more time for planning shoots and lighting set-ups than I had before. Those set-ups are also getting more and more complex as time goes on and most of them would have been next to impossible for me to put into use without a light meter to ensure the precise exposure ratios.

If you’re like me, and you’ve convinced yourself that a light meter is a superfluous bit of kit, I can only encourage you to challenge your own assertions. Could a light meter save you time as it has for me? Could it open new possibilities?

It’s possible that the answer is no. I can’t presume to know or understand your situation. All I can suggest is to at least ask yourself the question. It may very well be that light meter could be as valuable a tool to your photography as it is becoming to mine.

The post Why I’ve Become a Light Meter Convert appeared first on Digital Photography School.


Digital Photography School

 
Comments Off on Why I’ve Become a Light Meter Convert

Posted in Photography


Image style AI can convert paintings to photographs

04 Apr

Apps that convert your photos into paintings, with styles ranging from Monet to Lichtenstein, have been all the rage recently, with Prisma being one of the most popular offerings. A research team at UC Berkeley has now developed an artificial intelligence algorithm that can do the reverse – and much more. 

Using ‘image style transfer’ their AI can convert Monet’s impressionist paintings into a much more realistic image that comes close to photo quality, giving you a good idea of the scene that the French painter was looking at when he put down his easel and started to paint. In addition, the system is capable of changing winter to summer in an image of a Yosemite scene, turn apples into oranges and horses into zebras. Of course it’s also possible to transform regular photos into Monets, Van Goghs or Cezannes.

The research project uses so-called ‘unpaired data’ which, in the words of the project team means that ‘we have knowledge of the set of Monet paintings and of the set of landscape photographs. We can reason about the stylistic differences between those two sets, and thereby imagine what a scene might look like if we were to translate it from one set into another.’

To achieve that the relationships between similar styles had to be coded in a way that can be understood by a computer and then the AI had to be trained using large number of photos from Flickr and other sources. In a final step the quality of the results was checked by both humans and machines before fine-tuning of the algorithms. 

On some occasions the results are still far from perfect but overall the AI is impressively good at transferring styles from one image to another. More information is available on the project’s GitHub page.

Articles: Digital Photography Review (dpreview.com)

 
Comments Off on Image style AI can convert paintings to photographs

Posted in Uncategorized


How to Convert a Camera to Infrared for Black and White Landscape Photography

13 Dec

Get Andrew’s The Black and White Landscape eBook bundle at 30% off now over at Snapndeals, only until December 20th (AUS time).

Do you have an old digital camera that you don’t use much anymore? If you do, one way to make it useful again is to convert it to infrared for black and white landscape photography.

How to Convert a Camera to Infrared for Black and White Landscape Photography

Why would you want to do this? For me, the main reason is that it gives me a new way of working in black and white. Yes, infrared converted cameras can give you color images as well as black and white ones, but for me, the strange colors are more of a gimmick than a useful tool. With black and white, it’s different. In infrared photography, the tonality of the photo changes, giving you new and interesting ways to capture the landscape.

What is infrared photography?

The simple (non-technical) explanation is that infrared light is a kind of invisible light, formed of electro-magnetic waves that are undetectable to the human eye.

Human skin reflects a lot of infrared light, so does vegetation. These these things appear very bright in black and white infrared photos. Inanimate objects, such as roads, stones, and buildings, don’t reflect as much infrared light and can look remarkably similar to regular black and white photos when photographed in infrared.

How to Convert a Camera to Infrared for Black and White Landscape Photography

What is an infrared conversion?

Digital camera sensors are sensitive to ultraviolet (UV) light and infrared light as well as the visible wavelengths of light. Because of this, digital cameras have filters to block both ultraviolet and infrared light. The infrared filters on most cameras do let some infrared light through, but not enough to affect the image.

During an infrared conversion the technician removes the infrared filter so that the sensor can now see infrared light, and replaces it with a filter that blocks visible light, so the sensor can only see and record infrared. The process isn’t complex, and because of that isn’t particularly expensive. If you are technically minded you could even try it yourself. There are videos on YouTube that explain how. You just need the right tools and parts.

The usual caveats apply. If your camera is still under warranty that will be voided, and bear in mind that you can damage your camera if you don’t know how to do it properly. You should only attempt it if you know what you are doing!How to Convert a Camera to Infrared for Black and White Landscape Photography

The infrared conversion on my camera was done by Protech Photographic in the UK (they also handle orders from mainland Europe). LifePixel and Kolarivision are US based companies that also do infrared conversions. If you know of any other reliable companies, please let us know in the comments section below.

Types of infrared conversion

There are several types of infrared conversion. These are some of the most common.

Full spectrum conversion

The UV and infrared filters are removed. Your camera’s sensor can now see UV and infrared light as well as visible light. You control the effect by using filters (on the lens) to block different amounts of visible and/or infrared light. This may be interesting if you like to experiment, but the disadvantage is that you need to buy filters, adding to the cost. Filters also block light, so you need to use slower shutter speeds or higher ISOs to compensate.

infrared-camera-conversions-6

720nm conversion

The technician places a filterin front of the sensor that blocks all wavelengths under 720nm (nm = nano-meter and is a unit of measurement equivalent to 1/1,000,000,000 meter used for measuring wavelengths of light). In other words, it only lets infrared light through. It’s the type of conversion best suited for landscape photography, giving you a color image that’s easy to convert to black and white. This is probably the most common type of infrared conversion and the one you should go for unless you have a specific need for one of the other types.

830nm conversion

The sensor is fitted with a filter that blocks all wavelengths under 830nm. This gives a more intense type of infrared effect, with very little color. It’s ideal for dramatic black and white landscape photography.

Some companies offer different types of conversion in addition to these, so check their websites for details.

How to Convert a Camera to Infrared for Black and White Landscape Photography

Camera types and infrared conversions

When it comes to converting digital SLRs to infrared there is something you need to bear in mind. Infrared light focuses at a different point to regular light. Your camera is calibrated to focus visible light, which means that if you try to focus on something using a wide aperture (which gives less depth of field) then your focus may not be accurate. It is possible to calibrate a lens to focus accurately with infrared, so check with the company that is going to handle your infrared conversion for details.

But for landscape photography, where most photographers use wide-angle lenses and stop down the aperture for sharp focus, it is not so important. If your camera offers some sort of contrast detect autofocus in Live View (where the camera focuses by taking a reading from the sensor rather than using the camera’s phase detection autofocus system) then you will have accurate focusing in Live View (just not when using the viewfinder).

infrared-camera-conversions-5

Mirrorless advantage

Mirrorless cameras have an advantage over digital SLRs for infrared because they are able to focus from the camera’s sensor. That means that if you plan to hand-hold the camera and look through the viewfinder to take photos (rather than put the camera on tripod and use Live View) then a mirrorless camera is an excellent choice as you won’t get any focusing errors.

Another advantage of cameras with electronic viewfinders is that when you set the camera to its black and white mode the camera displays the scene in black and white in the viewfinder. This makes it easy to visualize how the photo will come out in black and white with the infrared effect applied.

infrared-camera-conversions-7

Lenses and infrared photography

Another consideration is that not all camera lenses are suitable for infrared photography. Older lenses in particular tend to show a hot spot at the center of the frame, especially at wide aperture settings. Before converting your camera you should check and see if there are any reported problems with the lenses you intend to use with it. Kolarivison have a comprehensive list of infrared compatible lenses.

Infrared filters

Another option, if you don’t want to convert a camera to infrared, is to buy an infrared filter that blocks out visible light and just lets infrared light reach the camera’s sensor. The Hoya R72 filter is a great option and not very expensive, especially if you have smaller lenses. It blocks wavelengths below 720nm, just like a 720nm infrared conversion.

Note: shop for the Hoya R72 Filter on Amazon.com or on B&H Photo’s site. 

infrared-camera-conversions-8

You may remember that digital cameras have a filter that blocks most infrared light. An infrared filter is opaque, so the result is that not much light reaches the sensor. In effect, an infrared filter is a strong neutral density filter as well as an infrared filter.

The strength varies according to the camera used, but don’t be surprised if you lose 16 stops of light. A tripod is essential. Luckily, this is not necessarily a bad thing for landscape photographers. If you are prepared to work within this limitation then an infrared filter could be for you.

infrared-camera-conversions-11

Test first

The infrared filter on some cameras is so strong that no light reaches the sensor at all. This makes using an infrared filter impossible. There’s a simple way to check to see if your camera’s sensor can detect infrared light. Do this test first before buying an infrared filter.

Set your camera to Live View and focus on the end of a television remote control while pushing down one of the buttons. If you can see a light (the infrared communication in action) then it is sensitive enough to infrared light to use with a filter. It’s probably easiest if you ask somebody to hold the remote control for you.

Black & white infrared landscape photograph

This photo (below) was taken with a Hoya 72 filter. It required a shutter speed of 180 seconds, even though the cliffs were lit by the light from the setting sun.

Black & white infrared landscape photograph

All the other photos in the article were taken with a Fujifilm X-Pro 1 converted to infrared.

Conclusion

That concludes our overview of converting cameras to infrared for black and white landscape photography. Have you tried this yourself? What camera did you have converted and how did it work out? Please let us know in the comments.

Get Andrew’s The Black & White Landscape eBook bundle at 30% off now over at Snapndeals, only until December 20th (AUS time).

googletag.cmd.push(function() {
tablet_slots.push( googletag.defineSlot( “/1005424/_dPSv4_tab-all-article-bottom_(300×250)”, [300, 250], “pb-ad-78623” ).addService( googletag.pubads() ) ); } );

googletag.cmd.push(function() {
mobile_slots.push( googletag.defineSlot( “/1005424/_dPSv4_mob-all-article-bottom_(300×250)”, [300, 250], “pb-ad-78158” ).addService( googletag.pubads() ) ); } );

The post How to Convert a Camera to Infrared for Black and White Landscape Photography by Andrew S. Gibson appeared first on Digital Photography School.


Digital Photography School

 
Comments Off on How to Convert a Camera to Infrared for Black and White Landscape Photography

Posted in Photography


How to Convert Images to Black and White and Add a Color Tint in Photoshop

17 Aug
Split-tone-ACR

Landscape scene in south of France using split-tone effect in ACR

So why would you bother with black and white imagery when we live in a world full of color? There are many reasons why, but a simple answer is that a black and white image can be quite powerful.

A close up of a man’s or woman’s face, heavily lined from age, photographed in black and white may elicit a stronger emotion than the same image in color. The viewer focuses in on the texture and contrast of the image.

A heavy fog or mist over a landscape is much spookier in monochrome than in color. That’s why those old black and white movies are so good.

Converting to Black and White in Photoshop

Converting a color to black and white in Photoshop is a relatively easy task. Open the image that you want to convert to black and white. Choose from the Image Menu>Mode>Grayscale. A dialog box appears, asking you if you want to, “Discard color information?”. Click Discard, but I would not recommend this method. All the color information has now been lost.

Snail-grayscale

A simple way to converting a colour image to black and white in Photoshop, but not the recommended way.

Channel Mixer

Instead, I’m going to show you a more effective way for converting your images to black and white in Photoshop. I like to use the Channel Mixer method. In Photoshop, choose the Channel Mixer icon from the adjustments palette or you can choose Layer>New Adjustments>Channel Mixer and click OK.

There is a check box next to the word Monochrome, on the lower left side in the Channel Mixer box. When you click on that, your image will turn to grayscale. The default settings are Red 40%, Green 40% and Blue 20%. See screenshot below. However, this is where I like to make my own changes.

Channel-mixer-default-settings

Using the Channel Mixer to convert a color image to black and white. The default settings when you click on the Monochrome box are Red 40%, Green 40% and Blue 20%.

The Red channel holds the most detail. The blue channel holds the most noise. The look that you’re after will depend on your choice. For this image, I moved the red slider to +80%, the green slider to +43% and the blue to -23%. The general rule of thumb is that the percentages should total to 100% (80+43-23=100).

Channel-mixer-custom-settings

The ability to adjust each of the Red, Green and Blue sliders gives you more control over how you want your grayscale image to look. Try and keep the percentage totals equal to 100%.

Adding a Color Tint

Next, let’s add some color to a black and white image, or rather a tint. Let’s start with a sepia tone, which is a reddish-brown color that gives those old vintage photos that classical look.

Sepia

Using the same image that you have just converted to black and white using the Channel Mixer – add another new adjustment layer, Color Balance. Similar to the Channel Mixer, choose Layer>New Adjustments>Color Balance

Name this layer, Shadows. In the properties panel, click to the right where it says Tone, it defaults to Midtones but you have the option of two others, choose Shadows, as you only want the color to effect the shadows. Move the red slider over to 55%, then move the yellow slider to the left -40% to give the image that classic reddish brown look. See the animated gif below.

Black-and-white sepia-tone

Antique

Now if you want the color to affect only the highlights. First, turn off the layer visibility on the Shadows layer. Add another Color Balance layer, choose Layer>New Adjustments>Color Balance and name this one Highlights. Same as above, click to the right of Tone where it says Midtones and choose Highlights. Move the yellow slider to the left -55%. This gives the image an Antique look. See image below left.

Antique tone split-tone

Split toning

Turn the visibility for the Shadows layer back on and you now have a split-tone look, as you have just added two different hues to the highlights and shadows. See image above right.

Split toning in ACR

To achieve this same effect in Adobe Camera Raw (ACR) it’s even easier. With your image open in ACR, having done the basic edits. Click the HSL/Grayscale tab, then check on the Convert to Grayscale box. Similar to the Channel Mixer adjustment layer in Photoshop the color sliders can be adjusted to make your own custom changes.

Click the Split Toning tab. Move the Highlights Hue to yellow and the Saturation over to the middle to start. Move the Shadows Hue to a red tone, and the Saturation to the middle as well. Then adjust the Saturation for the Shadows (I used 61) and the Highlights (I used 57).

Split-tone-ACR

Editing an image using the Split Toning tab in ACR

Gradient Map

As with most techniques in Photoshop, there are many ways of achieving the same results. It comes down to preference, and most importantly, time. So here’s a really quick, and very effective way, to convert your color photo to black and white and add a sepia tone, or even a duotone.

Normally, I don’t bother or rave about the presets that come bundled with Photoshop. But in the Gradient Editor, I beg to differ. There is a set called Photographic Toning, which consists of 38 presets in total, and I think these do an amazing job! Here’s how I applied this duotone effect to this image.

Go to Layer>New Adjustment Layer>Gradient Map or you can click on the last icon in the bottom row of the Adjustments panel. Ensure your Foreground and Background colors are set to Black and White. This will apply the default gradient, which is foreground to background and turn your image to black and white.

Layer-new-adjustment-layer-gradient-map

How to add a Gradient Map as an adjustment layer in Photoshop

Click on the gradient and the Gradient Editor menu appears. Click on the gear icon at the top right corner of the Presets section, and another pop-up menu appears. Photographic Toning is down near the bottom of the list. When you click on it, a dialog box appears asking you to replace the current default gradients with the ones that you are loading. Just click Ok.

Gradient-editor-photographic-toning

How to find the Photographic Toning presets in the Gradient Editor in Photoshop

I chose Blue2 (the sixteenth one) to give it this greenish, turquoise color. As with any adjustment layer, you can lower the opacity or change the blend mode, but in this case, I did a slight Blend-if on both layers. By right-clicking on the layer, this brings up the Layer Style pop-up menu with the different blending options.

Layer-with-blending-options

Blending-options-Blend-if

Go down to the Blend-if section. You will see ‘This Layer’ and the ‘Underlying Layer’ . Both of these options have a white slider. Hold down the Alt key, which splits it into halves, and slide the left portion to the left (as shown above). This brings back some of the highlights to give the image a more cross-processed look. See image below.

There is a great range of Sepia presets to choose from which are worth trying out too.

Original-before-duotone

Color image before I applied a duotone effect from one of the presets in the Gradient Editor in Photoshop

Duotone

‘Blue2′ one of the presets in the Gradient Editor in Photoshop to give that ‘Duotone’ effect

Have you converted your color photos to black and white? What techniques did you use? If so please share in the comments below.

Editor’s Note: This is one of a series of articles this week featuring black and white photography tips. Look for earlier ones below and more daily over the next few days.

  • 5 Simple Ways to Create Expressive Photos in Black and White
  • Tips for Black and White Wildlife Photography
  • 7 Tips for Black and White Portrait Photography
  • 28 Images with Strong Black and White Compositions
  • Weekly Photography Challenge – Black and White Techniques
  • Tips for Black and White Wildlife Photography

googletag.cmd.push(function() {
tablet_slots.push( googletag.defineSlot( “/1005424/_dPSv4_tab-all-article-bottom_(300×250)”, [300, 250], “pb-ad-78623” ).addService( googletag.pubads() ) ); } );

googletag.cmd.push(function() {
mobile_slots.push( googletag.defineSlot( “/1005424/_dPSv4_mob-all-article-bottom_(300×250)”, [300, 250], “pb-ad-78158” ).addService( googletag.pubads() ) ); } );

The post How to Convert Images to Black and White and Add a Color Tint in Photoshop by Sarah Hipwell appeared first on Digital Photography School.


Digital Photography School

 
Comments Off on How to Convert Images to Black and White and Add a Color Tint in Photoshop

Posted in Photography


Space-Saving Sleepers: Sofas Convert to Bunk Beds in Seconds

03 Oct

[ By WebUrbanist in Design & Furniture & Decor. ]

transforming fast quick sofa

Convertible couch beds are great if you are having a couple over to stay and have the space to fold out into, but these double-decker solutions is a great alternative for smaller apartments or multiple-but-single overnight guests. Here are three designs from different companies that show off the potential of this strategy (and give you a few color, size and style options to choose from, too).

couch sofa bunk beds

First, the Coupe deploys as fast as a regular transforming sofa, but expands vertically rather than horizontally to create a pair of beds stacked on top of one another. Based out of Greece, Proteas is a 50-year-old furniture company specializing in high-end designs. The Coupe comes in blue, red, green, brown or beige.

doc convertible sofa design

An alternative option that transforms slightly less quickly but unfolds along similar lines (and may be more robust due to its use of side supports) is the DOC.

doc red orange purplse

Designed by BonBon, a UK company, it likewise lifts up to reveal a ladder and second-level sleeping area for guests, starting as a sofa. The DOC comes in in red, purple or orange.

palazzo bunk bed couch

palazzo double decker sofa

palazzo convertible furniture design

Finally, from Resource Furniture, “the Palazzo bunk bed system, an innovative design that transforms from a sofa to a bunk bed, provides multiple functions while maximizing space. The beds are available with low or high armrests and come equipped with wood-slatted bed springs and removable mattresses. The bunk bed system includes exceptional safety features, including a locking mechanism and a complete barrier around the top bunk.”

Share on Facebook


[ By WebUrbanist in Design & Furniture & Decor. ]

[ WebUrbanist | Archives | Galleries | Privacy | TOS ]


WebUrbanist

 
Comments Off on Space-Saving Sleepers: Sofas Convert to Bunk Beds in Seconds

Posted in Creativity


Flip for Fun: 4 Clever Pool Tables that Convert & Transform

08 Jul

[ By Delana in Design & Furniture & Decor. ]

rollover pool dining table

Pool is one of those great American hobbies that never seems to get old. As much as we might want to play every day, not everyone has the space to fit an entire pool table into their home. These three brilliant solutions (plus a bonus pool table that wouldn’t save any space, but would definitely be a conversation piece) might finally be enough to convince you to save your quarters and play at home instead.

Disappearing Pool Table

There’s honestly no better solution for hiding something than having it pop out of the floor only when you need it. The Disappearing Pool Table from Stage Engineering does just that: when it’s hidden away, the only clue that it’s there is a huge rectangular cutout in the floor. When you activate some sort of mechanism, the cutout floor drops down and slides away, exposing a full-size pool table that then rises up on a platform to floor level. There isn’t much information available other than this video, but the video is enough to convince us: we want one.

Dining Table Conversion Kit

fusion pool dining table

elegant fusion pool table converts to dining table

Pool table covers are nothing new – you unfold a foam mat or plop a piece of wood down onto the pool table and it becomes a place for dining or playing ping-pong. But the Fusion collection of tables offers a slightly more high-class approach to the idea. The high-quality pool tables come with wooden leaves that slide on securely to stay put for the purposes of eating at the table. The resulting dining table is quite elegant and not at all what you might expect of covered-over pool table.

Rotating Table

dolphin flip over pool dining table

rotating dining pool table

The Bentley Dolphin Rollover Pool Dining Table might be a mouthful, but it’s a fun piece of furniture that leads a double life. On one side it’s a standard-size pool, snooker, or billiards table. Undo the security latches and spin the tabletop upside-down in the frame and it becomes a dining table with a solid wood top or a beautiful inlaid pattern top. The makers suggest that the flat top can also be used as a conference table, but we suspect there wouldn’t be much business going on when there are clearly games of pool to be played.

Converted VW Bus

volkswagen pool table

vw bus pool table conversion

The VW Bus pool table is different from the others here because its transformation was one-way and permanent, but it did once serve a very different purpose so deserves a mention. It is made from the real chassis of an old Volkswagen that was then fitted with a wood and felt top. It’s probably not regulation size and it definitely won’t be level, but those are small details. What really matters is that someone took the time and care to craft this seriously awesome one-of-a-kind Volkswagen/pool table mashup, which is an undeniably beautiful thing.

Share on Facebook


[ By Delana in Design & Furniture & Decor. ]

[ WebUrbanist | Archives | Galleries | Privacy | TOS ]


WebUrbanist

 
Comments Off on Flip for Fun: 4 Clever Pool Tables that Convert & Transform

Posted in Creativity


How to Convert Photos to Black and White in Lightroom

18 Jun

Andrew’s book Mastering Lightroom III is on sale now at Snapndeals for 40% off. This is a limited time offer, grab it while it’s available.

Black and white conversions in Lightroom

Today I’m going to show you just how easy to use, and effective Lightroom is, for converting colour photos to powerful black and white images.

The key to getting the best out of it is to use the Raw format rather than JPEG. The extra bit depth means they contain far more information for Lightroom to use. The end result is that you have more options and get smoother conversions.

This article concentrates on global adjustments – those that affect the entire image (I’ll leave local adjustments to another article).

There are two ways to convert an image to black and white in Lightroom:

  1. Set Treatment to Black & White in the Basic panel
  2. Go the B&W tab in the Color/HSL/B&W panel

Let’s take a look at each of these in turn.

Set Treatment to B&W in Basic panel

A good way to start is with a colour image that has already been processed. Before you start, set Saturation and Vibrance to zero, and adjust the White Balance sliders to give a neutral colour balance (the Auto setting works well most of the time).

Black and white conversions in Lightroom

This preps the image for the conversion. Here’s my starting image.

Black and white conversions in Lightroom

And this is what it looks like with Treatment set to Black & White.

Black and white conversions in Lightroom

The next step is to refine the conversion using the Tone sliders. These are the most useful ones, working in order from top to bottom:

Exposure – sets the overall brightness of the image. Adjust this first. If you started with a processed colour image, you may not have to.

Contrast – sets the overall contrast. Most black and white images benefit from higher contrast than you would use for colour processing. Set Contrast second.

Shadows – adjusts the darkest tones in the photo independently of the others. Use this to make the shadows lighter or darker.

Highlights – adjusts the lightest tones independently of the others. Use it to make the highlights lighter or darker.

With my photo I increased Contrast, moved the Highlights slider left to make the model’s skin darker, revealing texture, and the Shadows slider left to darken the shadows and add drama. Here’s what it looks like so far.

Black and white conversions in Lightroom

There are three other sliders you may find useful:

Clarity – increases mid-tone contrast, emphasizing sharpness and texture. A side effect is that the image often becomes a little darker when you increase Clarity, so you may need to return to the Exposure or Shadows sliders to lighten the photo.

My article Four Ways to Improve Your Photos With the Clarity Slider in Lightroom goes into the topic in more depth.

White Balance – after you have used the other sliders, you can go to the Temp or Tint sliders and move them to see the effect they have on your conversion. These sliders change the colour balance in the original photo, which in turn alters the tones in the image. Experiment with these to see if they improve the tones in your image.

These three images show the difference it can make. Moving the Temp slider altered the skin tones (see second image), and moving the Tint slider mostly affected the green background (see third image). The differences are subtle, you may have to look closely to see them.

Black and white conversions in Lightroom

Activate the B&W tab in the Color/HSL/B&W panel

The second option for converting photos to black and white in Lightroom is to go straight to the B&W tab in the HSL/Color/B&W panel.

Black and white conversions in Lightroom

Again, it is a good idea to start with a processed colour photo with a neutral colour balance and Vibrance and Saturation zeroed.

Black and white conversions in Lightroom

The eight sliders under this tab let you make the tones corresponding to the colours in the original photo lighter or darker.

For example, if you move the Blue slider left Lightroom makes any grey tones converted from blue darker. Move it right and it makes them lighter. The most obvious use of this slider is for making blue skies go dark and dramatic in black and white.

Black and white conversions in Lightroom

The other coloured sliders work the same way. Alternatively you can use the Targeted Adjustment Tool. To do so, click on the Targeted Adjustment Tool icon (see below red arrow on the left) and move the mouse over the grey tone you wish to adjust in the image. The Targeted Adjustment Tool icon and a cross-hair appear (see below, arrow on the right). Hold the left mouse button down and pull the mouse down to make the tones underneath the cross-hair darker, or up to make them lighter. Lightroom analyses the colours under the cross-hair and moves the appropriate colour sliders accordingly.

Black and white conversions in Lightroom

Be careful not to move the colour sliders too far or you will introduce unwanted artefacts and haloes into the image. The point at which this happens depends very much on the content of your photo. The best approach is to get in the habit of zooming to 100% and checking to make sure that there are no haloes around edges, and that the transitions are smooth in the affected colours.

This screenshot shows what happens when you push the sliders too far (in this case the Blue slider to -58). The edge of the sculpture is marked by a thin halo that isn’t present in the original photo:

Black and white conversions in Lightroom

Note that the initial position of the colour sliders in the B&W tab depends upon a setting in the Presets tab in Preferences. If the Apply auto mix when first converting to black and white box is unticked, the sliders will be in their zeroed positions.

If it is ticked, then Lightroom sets them according to what it calculates will make a good conversion. My preference is to have the colour sliders zeroed, and it’s what I advise you to do. If you’d like to see Lightroom’s conversion, you can press the Auto button at the bottom of the B&W tab at any time.

Black and white conversions in Lightroom

After you have finished in the B&W tab you can go to the Basic panel and make further adjustments with the sliders as explained above. Of course, if you elected to go to the Basic panel first, you can then go to the B&W tab to make changes there. In reality you may find yourself switching between the two panels as you refine the image.

How do you know which panel to go to first? That depends on the image. If it’s a photo with strong colour, then the B&W tab will probably be the most useful. But if the colours are not so strong, then the Basic panel may be better. It’s a judgement call that becomes easier with experience.

I’ve only touched on the topic of black and white conversion in this article. Now you have learnt how to make global adjustments. In my next article I will show you how to make local adjustments to really bring your black and white images to life.

Andrew’s book Mastering Lightroom III is on sale now at Snapndeals for 40% off. This is a limited time offer, grab it while it’s available.


Mastering Lightroom: Book Three – Black & White

Masterlng Lightroom: Book Three – Black & White by Andrew S Gibson
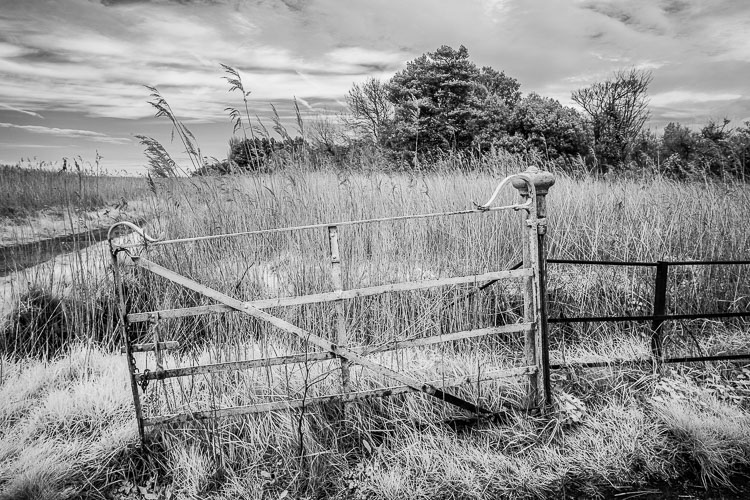
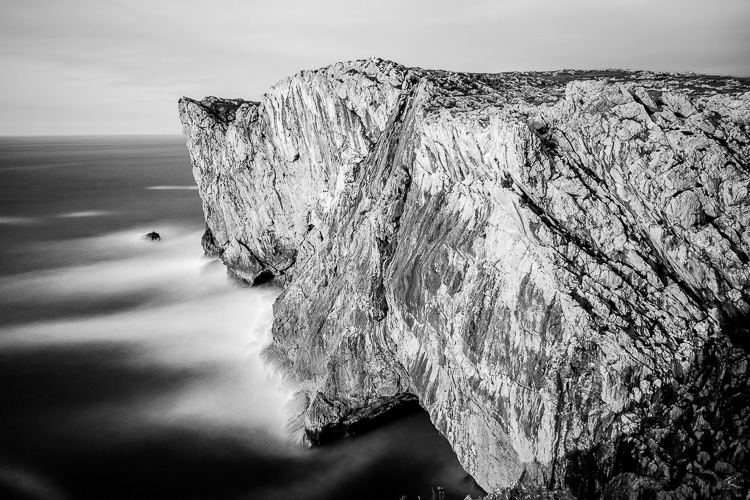
My ebook Mastering Lightroom: Book Three – Black & White goes into the topic of black and white in depth. It explains everything you need to know to make dramatic and beautiful monochrome conversions in Lightroom, including how to use the most popular black and white plug-ins. Click the link to visit my website and learn more.

The post How to Convert Photos to Black and White in Lightroom by Andrew S. Gibson appeared first on Digital Photography School.


Digital Photography School

 
Comments Off on How to Convert Photos to Black and White in Lightroom

Posted in Photography