RSS
 

Posts Tagged ‘Cloud’

Step by Step How to do Cloud Stacking

31 May

The effect of the clouds streaking across the sky is a very popular look now, but not everyone has ND filters and can get those photos. However, there are other ways of getting similar results. Cloud stacking can give a similar look. The process is much like what you do for stacking car light trails. You have to be more careful with how you take the original images, but you can get some wonderful results if you follow these steps.

LeanneCole-cloud-stack-original

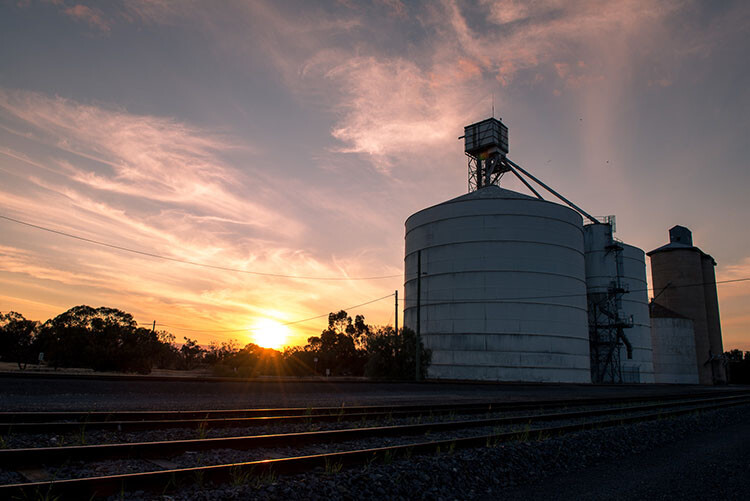
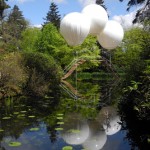
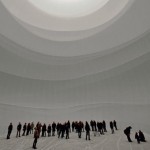
One of the original images.

You need a lot of photos for cloud stacking, and the best way to get them is by doing time lapse photography. Take a series of images over time, then try stacking them to see if they will work. Unfortunately, you don’t always get enough movement in the sky to get a good cloud stacking image, but others will be fantastic.

How to do Time Lapse Photography to get the images for stacking

Time lapse is about taking a series of images, one after another with a break in between, to capture the movement of a scene. Normally, once they are taken, you would put them on your computer and make a video from them to show that movement, however for cloud stacking you will be doing something else.

There are several ways of capturing your photos for a time lapse sequence. Many Nikon cameras come with a feature that allows you to do some, called Time Lapse Interval. You can set it up so that it will take the images at certain intervals, how many shots to take each time, and the final number of images you want. Basically, you can tell your camera to take a photo every 5 seconds, and to stop when you have 300 images.

LeanneCole-cloud-stacking-camerasetting

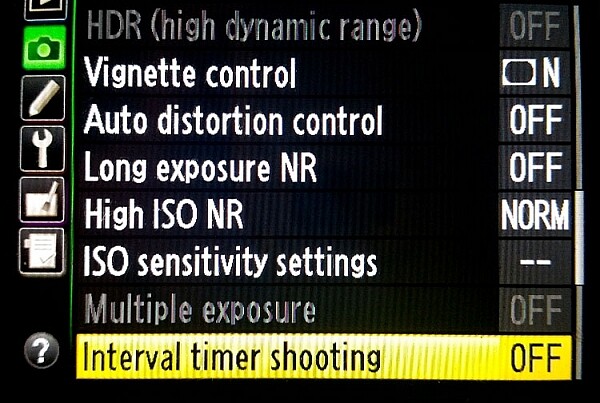
The Interval Timer Shooting on a Nikon Camera

If you have an intervalometer it will do the same sort of thing. Set what the interval will be, and how many shots to take. If you have neither of those options you can still do them, but it will mean you will have to keep an eye on the time and remember to press the shutter button at the intervals.

LeanneCole-cloud-stacking-intervalometer

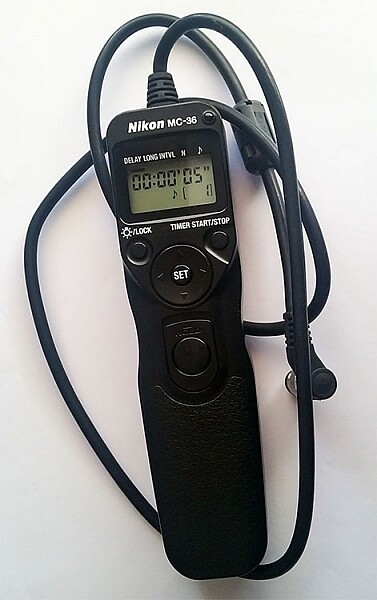
The Nikon Intervalometer, but you can also purchase other ones as well, get the one that works with your camera.

Usually what you do first is determine what the interval (time between shots) needs to be. Look at the sky and see how fast the clouds are moving. If they are moving fast, then the interval in between shots might need to be shorter. If the clouds are slower moving, then longer times will be needed. It does take experience, and the more you do it the better you get at figuring out the time between the shots you need.

The images for this tutorial were done at sunset, and the clouds were moving moderately fast. The camera was set to take an image every 10 seconds. A total of 122 photos were taken, but only 54 frames were used for the final image.

Direction of the Clouds

Cloud stacking seems to work best if the clouds are moving towards or away from you. Look for the clouds that appear to flow in a V shape. The base of the V is on the horizon and the arms come out over the top.

Using the photos

Once you have the photos on your computer, you need to work out which ones to use. The photos do need to be loaded into Adobe Photoshop as layers, the first consideration has to be the size of the images. If they are raw files they are likely to be too large to do this, so they will need to made smaller.

You can process the images in Lightroom first. Do a basic edit, and then sync, so that all the images have been treated the same. Resize the images when you export them from Lightroom, saving as smaller jpegs. (As this was going to be a tutorial for dPS the images were resized so the long side was 1500 pixels – if you want to print your image make sure you size appropriately, but do a test smaller first.)

Loading the images

For this tutorial I used Adobe Bridge, but you can also do it in Lightroom.

LeanneCole-cloud-stack-1

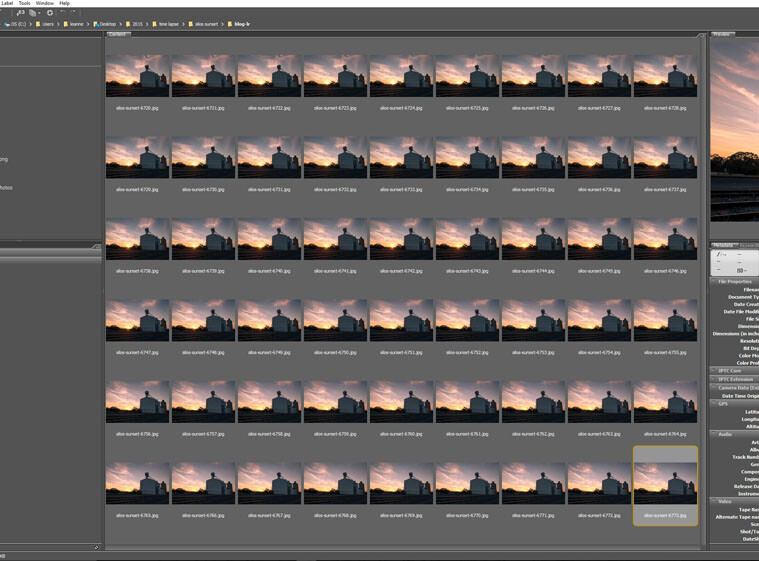
All the images to be used for the cloud stacking.

Select all the images you want to stack, using either Ctrl+A, or click on the first one, press the Shift key and hold, and click on the final image. Load all the images into Photoshop as layers. Select Tools > Photoshop > Load Files into Photoshop Layers (in Lightroom right click and select Edit in > Open as layers in Photoshop).

LeanneCole-cloud-stack-2

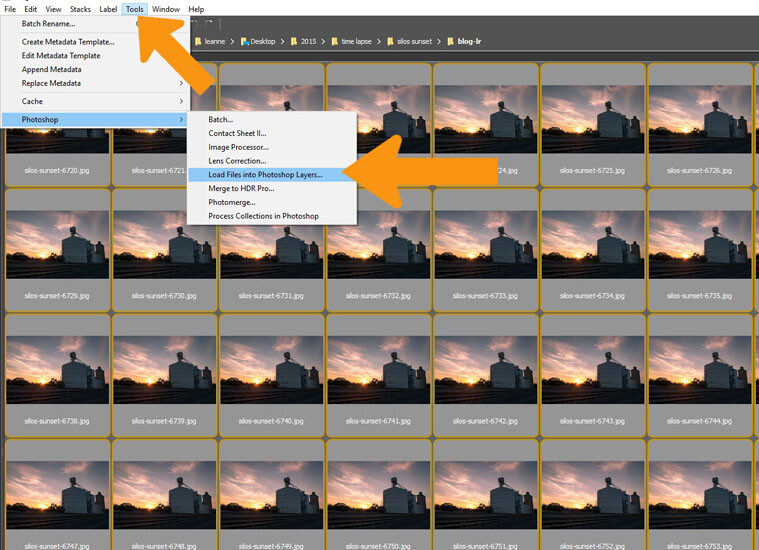
Select all the images and open them as layers in Photoshop.

This can take a while, depending on how many images you are using, and how large the files are. Once they are loaded select all again. Click on the top layer, hold the shift key down, then click on the bottom layer and it should select them all.

LeanneCole-cloud-stack-3

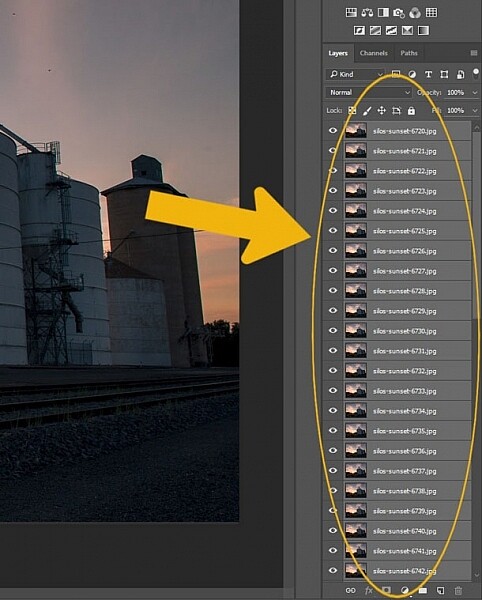
In Photoshop select all the layers.

Stacking the clouds

Go to the layer blending options, at the top of the layers panel and select Lighten.

LeanneCole-cloud-stack-4

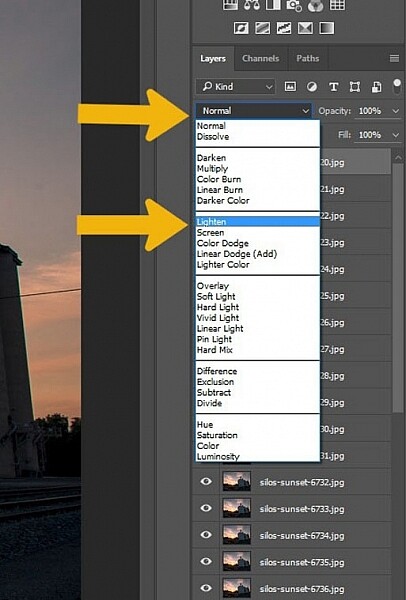
Go to the Blending options and select Lighten.

You should notice a difference straight away.

LeanneCole-cloudstack-first stack

The image after the stacking process.

You could leave the image there and be happy with your stack, but for this tutorial I’ve added some extra ideas on processing . They are relevant to this image, but you can try some ,or all of these ideas for your own image.

Some Additional Processing Tips

There are no hard and fast rules with what you can do when processing an image, it is up to you how you want to go. Here are some ideas to get you started.

Select all the layers, except for the bottom one, and put them into a group. This will make it easier to process the images. In this image it was windy, and the trees moved around, so in the final image they look blurry. By adding a mask to the groups you can carefully use the brush tool, painting with black, to go over the trees so only one is seen and they appear sharper.

LeanneCole-cloud-stack-6

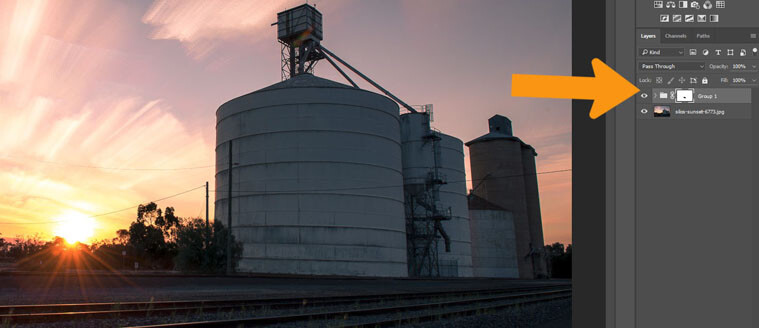
Add a mask to the Group layer and remove anything unwanted, like the trees in this image so only layer one is seen.

The silos appear a bit too dark, and lightening them up a bit would make them stand out a little more as well.

Select the Lasso Tool, and draw a line just inside the silos. Press Shift F6 to get the feather tool. For this image a small amount of feathering was chosen as it is a small image, but on larger sized ones you may prefer to use a feathering of around 200 pixels.

LeanneCole-cloud-stack-7

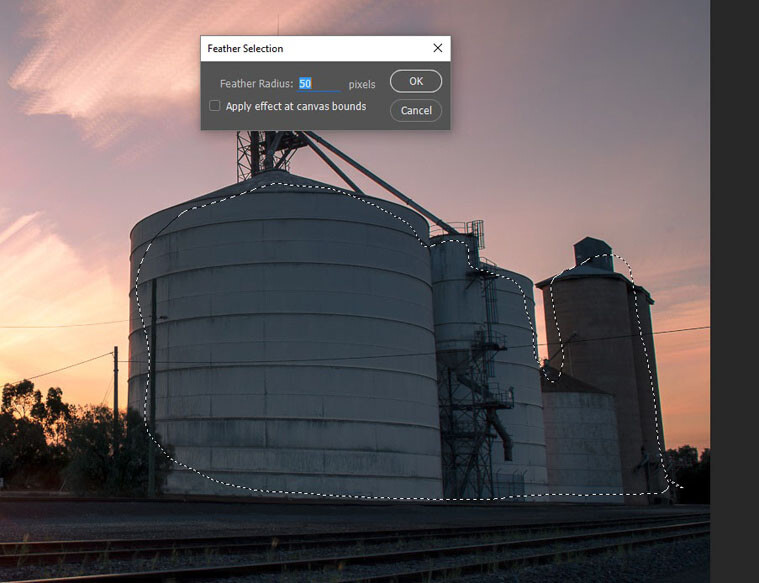
Use lasso tool to draw a selection, and then feather it.

Go to the Adjustments above the layers panel and click on Curves. Try to always use these ones as they do the adjustment as a layer, and if you decide you don’t like it later you can simply edit it, lower the opacity of the layer, or delete the layer (this is non-destructive editing).

Add some light or dark depending on what the image needs. For this one the silos were made brighter.

LeanneCole-cloud-stack-8

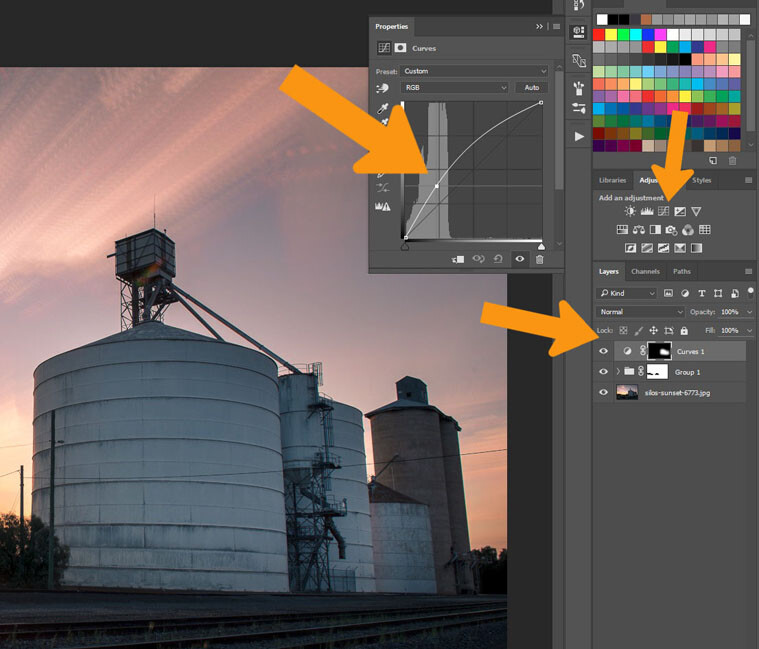
For this selection curves was used to lighten up the silos.

The final bit of processing will be to add a little vignetting or gradient. Add a blank layer to the image, click on the symbol at the bottom of the layers panel, it is the one next to the rubbish bin. Make sure it is selected, then select the gradient tool from the toolbar.

LeanneCole-cloud-stack-11

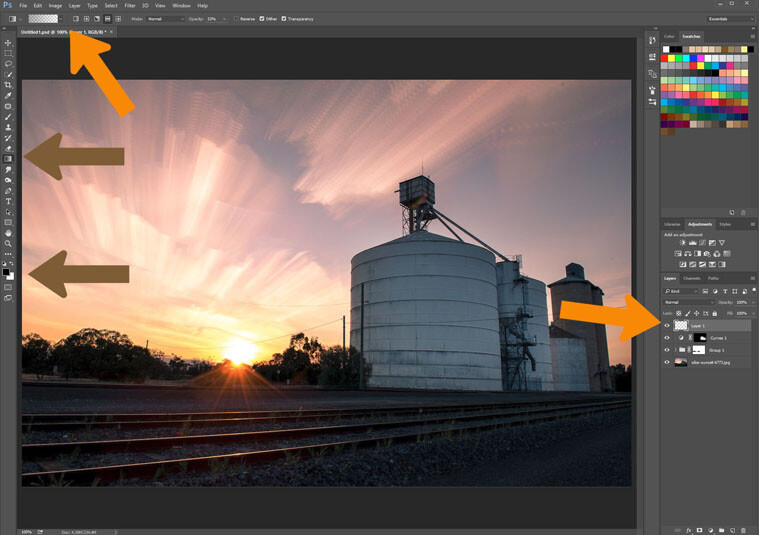
Use the gradient tool to add some darkness to the sky.

At the top under the menu bar you will see the options for the gradient tool. Make sure the tool selected is the Foreground to Transparent is the one you are using (make sure the foreground color is set to black).

LeanneCole-cloud-stack-12

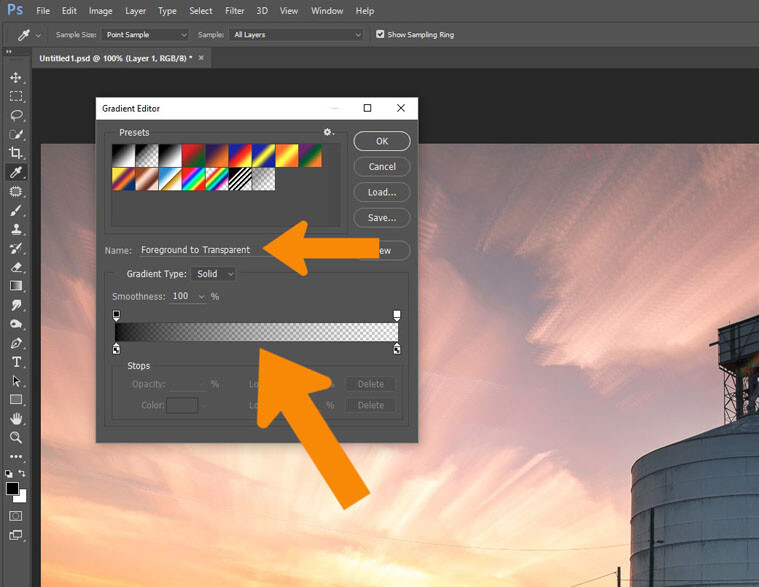
Make sure you have the right tool option for what you want to do.

You don’t want this to be 100%, it’s best to use it at around 50%. You can build it up, but start with that. You can change that by going to the tool options and changing the 100 to 50.

LeanneCole-cloud-stack-13

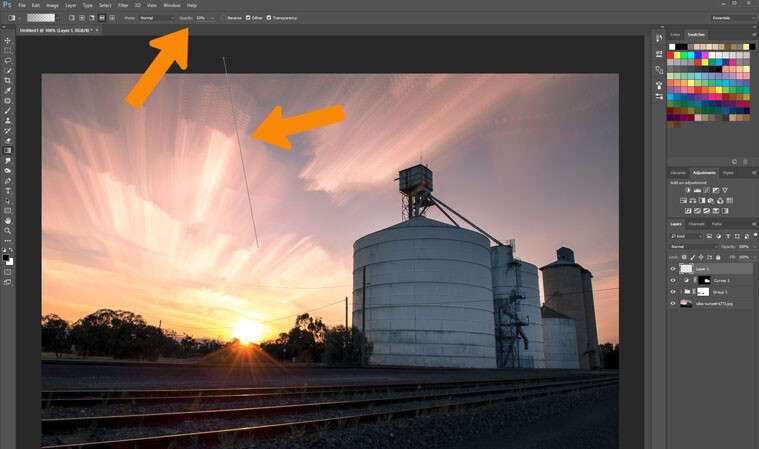
Add some gradient to the sky to darken it slightly.

To use the tool, click and hold outside the image then move inside the image and release. It will do a gradual lightening of the colour, so the darkest area is where you did the first click.

If you want it darker you can repeat until you get the desired effect. The image here it was done twice.
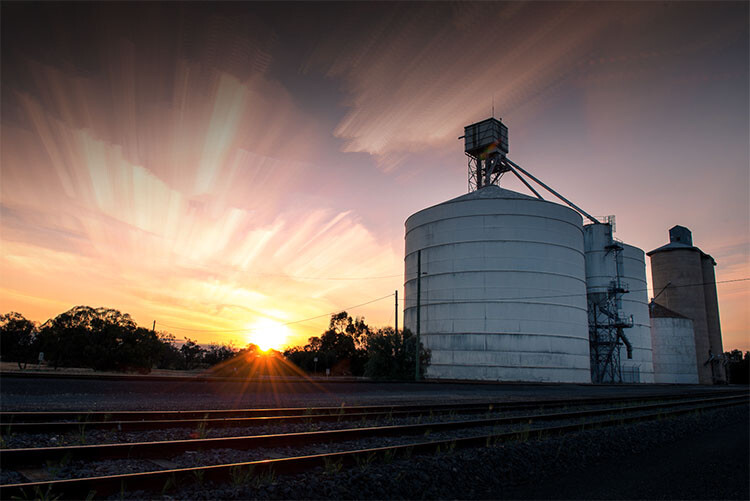
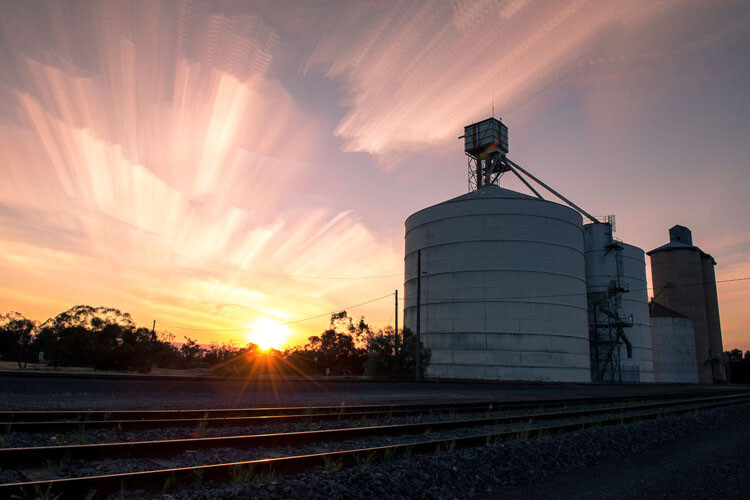
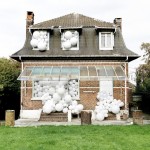
LeanneCole-cloud-stack-final

The final image

That is a very basic edit on this image, but is enough for now. The image is fine as it is, but, as with all images, the only thing stopping what you can do, is your imagination.


googletag.cmd.push(function() {
tablet_slots.push( googletag.defineSlot( “/1005424/_dPSv4_tab-all-article-bottom_(300×250)”, [300, 250], “pb-ad-78623” ).addService( googletag.pubads() ) ); } );

googletag.cmd.push(function() {
mobile_slots.push( googletag.defineSlot( “/1005424/_dPSv4_mob-all-article-bottom_(300×250)”, [300, 250], “pb-ad-78158” ).addService( googletag.pubads() ) ); } );

The post Step by Step How to do Cloud Stacking by Leanne Cole appeared first on Digital Photography School.


Digital Photography School

 
Comments Off on Step by Step How to do Cloud Stacking

Posted in Photography


Adobe announces updates to Creative Cloud video-oriented applications

14 Apr
With Adobe’s upcoming version of Premiere Pro CC, users can start editing video files immediately, even while still importing, and can switch between native and proxy formats as well.

Ahead of next week’s NAB Show in Las Vegas, Adobe has announced new features to its Creative Cloud software applications for video editing, motion graphics, and audio, including Premiere Pro, After Effects, Audition and Media Encoder.

Of particular interest to video editors, Premiere Pro users will now be able to start editing video files immediately, even while ingesting clips. Additionally, editors can now work natively with high resolution video formats up to 8K. New proxy workflows facilitate quick switching between native video and proxy formats while editing, which should be helpful to those working on older machines or laptops.

Premiere Pro also introduces virtual reality (VR) editing capabilities, making it possible to work with imported stitched video, including the ability to show field-of-view so it’s possible to see what the viewer will be seeing in any direction, and tagging of VR files so that VR-capable video players, such as YouTube, will automatically recognize VR footage.

Other noteworthy features enhanced Lumetri Color tools, improved captioning and titling options, and initial support for Apple Metal for improved performance on Apple devices.

The updated applications should be available in ‘early summer.’


Press release:

Adobe Unveils Breakthroughs in Video and Film Production

Virtual Reality, Character Animation, Sound Innovation Comes To Creative Cloud

SAN JOSE, Calif. — April 13, 2016 — The way consumers access and view content has undergone sweeping changes. Media and entertainment companies, along with creative professionals, are under increasing pressure to find new ways to create, deliver and monetize content. They must also adapt to rapidly evolving technology advancements, including high resolution capture, new delivery formats and virtual reality to name a few.  Also, enterprises are dealing with an explosion of content demands from constituencies and need to integrate high-impact content types, like video, into their communications strategies. 

Ahead of the National Association of Broadcasters (NAB) Show next week, Adobe (Nasdaq:ADBE) has revealed new features across its Creative Cloud tools for video editing, motion graphics, audio and collaboration. Media and entertainment companies are combining these advanced content creation capabilities with Adobe Primetime to help deliver TV and video content across screens. With Adobe’s digital marketing tools TV networks and pay-TV providers can drive viewer acquisition, engagement and monetization as audiences embrace “over the top” (OTT) content via connected devices such as Apple TV, Sony PlayStation, Roku and Microsoft Xbox. At NAB, Adobe will demonstrate the updated tools and new workflows at booth #SL3910, South Hall (lower) in the Las Vegas Convention Center and at over 120 partner booths from April 18-21.

Adobe Creative Cloud video tools are becoming the go-to source for film editors of both award-winning Hollywood and indie films. The most recent example is Deadpool, the 20th Century FOX blockbuster which shattered box office records. The post-production team from Deadpool will discuss their state-of-the-art workflows and why they chose Adobe Premiere Pro CC in a Creative Master Series panel at NAB on April 19 from 4:15–5 p.m. PT. 

Upcoming productions using Premiere Pro CC include Mindhunter, David Fincher’s new series for Netflix, and 6 Below directed by Scott Waugh and starring Josh Hartnett, which is currently shooting in 6K RED and will be edited natively in Premiere Pro.

Creative Cloud video tools are also powering a new generation of content delivered via social channels like YouTube, Facebook and Instagram.

“The videos we make at RocketJump are pure entertainment,” said Freddie Wong, Founder of RocketJump, the hybrid studio/production company behind the popular RocketJump YouTube channel with nearly 8 million subscribers and 1.3 billion views. “We’ve been users of Adobe’s Creative Cloud for years and love the new features coming soon. In addition to editing native footage in Premiere Pro and creating awesome visual effects in After Effects, we use Photoshop for graphics, Audition to sweeten audio, Media Encoder to export content, and now Creative Cloud Libraries to share assets.” 

Immerse Yourself In Creativity 

Adobe continues to deliver technology that opens unimagined creative opportunities for video and film production, and now, immersive experiences. In the next release of Creative Cloud –- available in early summer — Premiere Pro CC will add new virtual reality capabilities, including “field of view” mode for spherical stitched media.  In addition, thanks to Adobe Stock integration into CC apps, customers are already experiencing productivity increases of 10 times, when adding stock content into creative projects, including video*. In the upcoming release, Adobe Stock will have enhanced connections with CC apps and new workflows will enable Adobe Bridge and Lightroom users to contribute to the Adobe Stock marketplace directly from within the application.

Other feature highlights coming soon to Creative Cloud include:

  • Edit immediately during ingest allows Premiere Pro CC users to get straight to work, while importing their video and audio files in the background.
  • Powerful proxy workflows in Premiere Pro CC and Adobe Media Encoder CC enable users to easily work with heavy 8K, HDR and HFR media, so editors can switch between native and proxy formats freely – even on lightweight machines. 
  • Enhanced Lumetri™ Color tools within Premiere Pro CC adds HSL Secondaries to expand the editor’s toolkit for making color correction and adjustment easier for all filmmakers. 
  • New video and audio preview engine in After Effects CC delivers superior playback of cached frames for a smooth experience. 
  • Easier and more efficient Character Animator includes a simplified puppet creation process that enables users to easily tag puppet layers easily and record multiple takes of a character’s movement. Users can animate puppets to respond to motion and trigger animation accordingly. 
  • New Essential Sound panel in Audition CC enables anyone to mix audio content with professional results. 
  • Quickly find Adobe Stock assets with new filtered search in Creative Cloud Libraries. Licensed assets in your library are now badged for easy identification, videos are displayed with duration and format information, and saved videos are linked to video previews on the Adobe Stock site. 

“There’s rapid change happening in the digital landscape with video now the fastest growing media type across social media platforms and OTT shaking up broadcast and film,” said Bryan Lamkin, executive vice president and general manager, Digital Media at Adobe. “Adobe is transforming the industry with Creative Cloud and Primetime by helping customers create beautiful content to engage viewers and technologies that monetize content that audiences care about.”

Pricing and Availability

At NAB, Adobe is previewing the next major updates to Creative Cloud. These updates are expected to ship in the coming months. The company is offering Adobe Creative Cloud for US $ 49.99 a month. For more information, visit http://www.adobe.com/go/video.

Articles: Digital Photography Review (dpreview.com)

 
Comments Off on Adobe announces updates to Creative Cloud video-oriented applications

Posted in Uncategorized


Western Digital upgrades its My Cloud NAS system with multi-tasking processor

20 Feb

Storage manufacturer Western Digital Corporation has added a new 1.3 GHz dual core processor and 1GB of DDR3 memory to its latest network attached storage system and increased its maximum capacity to 12TB. The My Cloud EX2 Ultra is a twin-bay data storage device that the company aims at creative users, and which it is says is especially suited to those working with still and moving images. The new faster processor and built-in memory will allow users to multi-task ‘with ease’ and to stream high resolution content from the device to other connected PCs, smartphones and TVs.

The EX2 Ultra comes empty or fitted with Western Digital’s Red hard drives in total capacities of 4TB, 8TB or 12TB. The drives can be managed in RAID 0, RAID 1; JBOD and spanning modes, and they can be hot swapped while the unit is still running. Temporary expansion can also be achieved by connecting additional USB 3.0 external hard drives via the EX2’s USB ports.

The Western Digital My Cloud EX2 Ultra is compatible with Windows and Mac operating systems, and is priced from £135 with no disks, to £245 for 4TB, £390 for 8TB and £519.99 for 12TB.

For more information visit the Western Digital website.

Press release:

New Western Digital Prosumer NAS Storage Gives Creative Pros The Power To Multi-task And Easily Share Files

New My Cloud® EX2 Ultra Delivers High Performance with Up to 12 TB Capacity

IRVINE, Calif. – Feb. 17, 2016 –Western Digital Corporation (NASDAQ: WDC), a world leader in connected storage solutions, today updated its prosumer solutions with My Cloud EX2 Ultra, a high-performance, two-bay network attached storage (NAS) system. The My Cloud EX2 Ultra NAS is designed from the ground up for creative professionals and prosumers that need to automatically sync content across computers, easily share files and folders and enjoy multiple backup options so they can create their own personalized digital library with ease.

“We know our My Cloud users, especially creative professionals, need comprehensive solutions as digital storage needs continue to soar as well as the need for ongoing streaming capability,” said Jim Welsh, executive vice president, WD Branded Products. “With the My Cloud EX2 Ultra, creative professionals are able to combine high performance with multi-tasking optimization and data protection to create a NAS system that simplifies their workflow and provides peace-of-mind.”

My Cloud EX2 Ultra has been upgraded with a powerful 1.3 GHz dual-core processor enabling users to get ultra-fast transfer rates for high performance and smooth video streaming. Users also have access to 1 GB of DDR3 memory, allowing them to multitask with ease and leverage applications for HD media streaming, surveillance and much more. Several data management and security features allow users to select a preferred method for managing and protecting their movies, photos, music and digital files. Drive management options include RAID 0, RAID 1; JBOD and spanning modes, while data protection options include NAS to NAS, USB, cloud or LAN/WAN backup. The My Cloud EX2 Ultra  NAS comes preconfigured in RAID 1 mode to help protect data right from the start and is easily configurable into other data protection modes.

High Capacity and Ultimate Reliability
From unpopulated to 12 TB capacities1, the My Cloud EX2 Ultra provides several capacity options for customers to choose from. Additionally, customers can attach compatible USB 3.0 hard drives to the USB expansion ports on the My Cloud EX2 Ultra to instantly expand their storage capacity. The populated My Cloud EX2 Ultra features the award-winning WD Red® hard drives, specifically built for NAS systems to provide non-stop performance within 24×7 environments. WD Red drives are powered by NASware™ 3.0 technology, improving drive reliability and minimizing data corruption in the event of a power loss or disruption.

Easy Sharing with Anywhere Access
With simplified file and folder sharing, users can send customized, private links that allow recipients read/write access to particular files on the user’s My Cloud EX2 Ultra. Whether on a photo shoot, or editing at home, saving creations at full fidelity and sharing with your entire network is a breeze. The My Cloud EX2 Ultra features an intuitive dashboard, so user accounts can be created, features customized and storage can be monitored with ease. With MyCloud.com web access, or the My Cloud mobile app, users can access their media and manage users from any internet connected device. With WD Sync™, users can automatically synchronize their media and files across their computers and their My Cloud device with the confidence that their computer content is up to date and accessible from all devices.

Advanced Features
My Cloud EX2 Ultra includes advanced data serving options including an integrated FTP and WebDAV server, backup server, P2P download server and Microsoft Active Directory support. Additionally, users can download and run a host of third party apps, including, Plex®, Milestone Arcus™ surveillance, aMule, Icecast, Joomla!®, Anti-Virus Essentials, WordPress®, SqueezeCenter, and more. Users can also stream videos and photos to connected TVs, media players, gaming consoles and other DLNA®/UPnP® devices with  the included Twonky 7.2 DLNA-certified 1.5 media server, and built-in iTunes® support.

Price and Availability
My Cloud EX2 Ultra is currently available at select U.S. retailers and online at the wdstore.com. MSRP is $ 159.99 USD for the diskless My Cloud EX2 Ultra, $ 349.99 USD for 4 TB, $ 449.99 USD for 8 TB and $ 599.99 USD for 12 TB. The WD My Cloud mobile app currently is available for download for free from the Apple App StoreSM and Google PlayTM. My Cloud EX2 Ultra comes with a two-year limited warranty on the diskless device and a three-year limited warranty on the pre-configured devices.

Compatibility
My Cloud EX2 Ultra is compatible with Windows® 10, Windows 8, Windows Vista®, OS X® El Capitan™, Yosemite™, Mavericks™, Mountain Lion™ as well as DLNA®/UPnP® enabled devices.

Forward Looking Statements
This news release contains forward-looking statements, including statements relating to the approximate price and estimated availability of the My Cloud EX2 Ultra, the growth of digital storage needs, as well as the demand for ongoing streaming capability. These forward-looking statements are subject to risks and uncertainties that could cause actual results to differ materially from those expressed in the forward-looking statements, including but not limited to, the risks detailed from time-to-time in our Securities and Exchange Commission filings and reports, including, but not limited to, our most recent annual report on Form 10-K to which your attention is directed. Readers are cautioned not to place undue reliance on these forward-looking statements, which speak as of the date hereof, and WD undertakes no obligation to update these forward-looking statements to reflect subsequent events or circumstances.

About Western Digital
Founded in 1970, Western Digital Corp. (NASDAQ: WDC), Irvine, Calif., is an industry-leading developer and manufacturer of storage solutions that enable people to create, manage, experience and preserve digital content. It is a long-time innovator in the storage industry. Western Digital Corporation is responding to changing market needs by providing a full portfolio of compelling, high-quality storage products with effective technology deployment, high efficiency, flexibility and speed. Its products are marketed under the HGST and WD brands to OEMs, distributors, resellers, cloud infrastructure providers and consumers. Financial and investor information is available on the company’s Investor Relations website at investor.wdc.com.
1System is shipped in RAID 1 configuration, which leaves half of the system capacity available for data storage. System is configurable to RAID 0; JBOD or spanned, which leaves all system capacity available for data storage. Up to 0.1TB may be reserved for non-user accessible storage.

Articles: Digital Photography Review (dpreview.com)

 
Comments Off on Western Digital upgrades its My Cloud NAS system with multi-tasking processor

Posted in Uncategorized


Adobe issues fix for Creative Cloud Mac update that could delete files

16 Feb

Last week, Adobe rolled out a Creative Cloud update with a harmful bug that, for some Mac users, deleted files from the system root directory. Once the bug was discovered with the help of backup platform Backblaze, Creative Cloud version 3.5.0.206 was pulled from release and was replaced Sunday with an update that promises to fix the issue.

The bug appears to have deleted the first file in the root directory for users who downloaded the update, whatever that file might have been. Backblaze users noticed problems because alphabetically, the service’s .bzvol folder sits at the top of their root directory. When Creative Cloud deleted the folder, Backblaze alerted the user that something was wrong.

In a blog post on Friday, Adobe acknowledged the issue, saying that ‘the updater may incorrectly remove some files from the system root directory with user writeable permissions.’ Version 3.5.1.209 was released Sunday with a fix for the problem.

Adobe directs users who experienced problems with the Creative Cloud update to contact customer service. The latest update is available now for Mac and Windows.

Articles: Digital Photography Review (dpreview.com)

 
Comments Off on Adobe issues fix for Creative Cloud Mac update that could delete files

Posted in Uncategorized


Review : WD MyCloud Mirror Personal Cloud Storage

14 Feb

Some would argue that, these days, it’s just as important to backup our mobile (camera) devices for the very reason we backup our regular digital photographs. Here’s my take on doing just that with my review of the My Cloud Mirror.

wdfMyCloud_Mirror (1)

MyCloud Mirror Personal Cloud Storage on Amazon

Even though I have my camera with me most of the time, I still have my iPhone (or your Android or Windows thing or heck, even your Blackberry) with me about 99.8% of the time. That’s maybe more than most people as my 9 to 5 is social media and photography, so I tend to have the phone near, and as a result, I take a lot of photographs with the thing.

It’s the iPhone 6 Plus, it has a half decent camera and as a result I take a lot of photos, videos, time lapse sequences, slow motion videos, etc. The bottom line is, I use it to create a LOT of content, and I know a lot of you guys do too. The theme with my other storage and backup related articles here on dPS has been “don’t lose stuff when you don’t need to!” and really, the same goes for your phone. You use it to create memories, even if you can’t print those memories out at A1 size (23.4 x 33.1″), they are still moments that you might like to remember. (Or they’re just photographs of every coffee you’ve ever had and really, you should just stop that!*)

wdfMyCloud_Mirror

As ever, without slapping down a whole page of technical jargon that you really don’t understand, I shall explain the WD MyCloud Mirror in the easiest way I can. You unbox it, plug it into power and to your network, (Cat5 cable between your MyCloud and your internet modem / router) follow the configuration instructions, and within minutes (unless you really are very very bad at things with buttons and knobs) you will have a storage drive that is both connected to your computer on your home network / wireless, and you will have a storage “cloud” that is available to you on your phone (apps available in Google Play and iTunes app store) and via any internet connected browser.

Maybe the skeptic in you is saying, “but I still have to remember to actually backup my phone!” Actually, and you knew I’d say that, it does it automatically (make sure your app settings are right) so you can shoot on your phone, and have your photos automatically transferred to your MyCloud Mirror (you control if it does it all the time or only when you’re connected via Wifi to avoid crazy mobile data bills).

Simon_Pollock_WD_MyCloud_Review

My ultimate test of the WD MyCloud Mirror was on a recent trip to Fiji for a photography workshop. I was using a Fijian sim card in my iPhone and had wifi at random hours of the day. I set the MyCloud app to upload my iPhone content when on Wifi, and that’s exactly what it did – seamlessly! My wife could navigate to a website back in Melbourne and see what I’d photographed on my phone, and show my boys where I was – it was great. Now, you can do that using a camera, card reader, and a laptop with wifi (or a hundred other ways) but for those moments that I simply whipped out my phone and snapped a memory, they were preserved and immediately available for others to see (or to not see, depending on your security settings, obviously).

Some specs for you to wrap your head around

  • Keep your content in one, double-safe place
  • Get abundant, dual-drive storage with access from anywhere
  • Save everything with twice the protection using Mirror Mode (RAID 1-default)
  • Easily transfer to and from Dropbox™ and other cloud accounts

You can use the MyCloud Mirror with the following

  • Windows® 8.1 or earlier, Windows 7, Windows Vista® or Windows XP (32 bit) SP 3 operating systems
  • Mac® OS® X Mavericks, Mountain Lion™, Lion™ or Snow Leopard® operating systems
  • DLNA®/UPnP® devices for streaming
  • Router with Internet connection

Supported browsers:

  • Internet Explorer® 8 or higher
  • Safari® 6 or higher
  • Firefox® 21 or higher
  • Google Chrome™ 27 or later on supported Windows and Mac OS platforms

What’s that about a mirror?

You may also have picked up on the word mirror in the name of the MyCloud, it does indeed have two disks in it and it mirrors your data. While you’re backing it up from your phone, you’re also making a redundant copy of it onto the second drive, so if disk number #1 should fail, disk #2 will still have all of your duck-faced selfies (be honest, who doesn’t love a duck-faced selfie). Here’s a picture of that happening, just perchance I’ve confused you with my techno-babble.

wdfMyCloud_Mirror (3)

In summary, I totally love the WD MyCloud Mirror (I have the 4/2 (mirrored) TB version). I can’t recommend it enough for those of you that are half serious about your phone photography, or even just half serious about storage and content access while you’re anywhere with an internet connection.

The WD MyCloud Mirror has been online for three months to test its reliability. It’s been online, and available all of that time, without a hiccup. I was sent the unit for test and review purposes, and will always give an unbiased opinion of a product. I award the MyCloud Mirror Five stars for simplicity in setup and usage, as well as (three months) constant reliability.

*there’s a good chance that sentence was about, and directed at me :) 

googletag.cmd.push(function() {
tablet_slots.push( googletag.defineSlot( “/1005424/_dPSv4_tab-all-article-bottom_(300×250)”, [300, 250], “pb-ad-78623” ).addService( googletag.pubads() ) ); } );

googletag.cmd.push(function() {
mobile_slots.push( googletag.defineSlot( “/1005424/_dPSv4_mob-all-article-bottom_(300×250)”, [300, 250], “pb-ad-78158” ).addService( googletag.pubads() ) ); } );

The post Review : WD MyCloud Mirror Personal Cloud Storage by Sime appeared first on Digital Photography School.


Digital Photography School

 
Comments Off on Review : WD MyCloud Mirror Personal Cloud Storage

Posted in Photography


Adobe Portfolio brings customizable personal websites to Creative Cloud

27 Jan

Adobe has introduced Adobe Portfolio, a website creation platform similar to Squarespace. Part of Creative Cloud, Adobe Portfolio is offered under three subscription tiers and aims to provide creatives and professionals with a simple way to showcase their work online.

The Adobe Portfolio service offers pre-made layouts, as well as customization options for website elements like the header, logo, navigation, background and footer. The designs are responsive, able to scale for various screen sizes and there’s an option for a personalized website URL. Features include galleries for showcasing content, password-protected pages and website analytics. Subscribers can also integrate a Behance account with Portfolio for seamless content syncing.

Adobe Portfolio is available to individuals under three Creative Cloud pricing tiers: $ 9.99 USD/month with included access to Photoshop CC and Lightroom CC, $ 19.99 USD/month with access to 20GB of cloud storage and one desktop app and $ 49.99 USD/month with access to all Adobe creative apps.

Via: Adobe Blog

Articles: Digital Photography Review (dpreview.com)

 
Comments Off on Adobe Portfolio brings customizable personal websites to Creative Cloud

Posted in Uncategorized


Backing Up Your Digital Photos: Is Cloud Storage Right for You?

04 Oct

In today’s digital era, it’s so simple to copy your photos onto your laptop hard drive and forget about them, thinking they’ll be there whenever you need them. But if your laptop crashes or gets stolen, and you haven’t backed up your photos in another place, then they’re gone forever. Most forms of digital storage are unreliable in the long term. Hard drives crash, computers die, and CDs and DVDs get scratched up and become unusable.

If you want to preserve your digital photographs then it is important to develop a strategy to back them up. Many people have started looking to the cloud as a place to store their photos. Could cloud storage be right for you?

2015 08 24 providence 8

Here are a few questions you should ask yourself if you’re considering cloud storage:

  • Do you want to use a free storage service, such as Google Photos or Apple Photos? Or are you willing to pay for a service with more features? If so, how much are you willing to pay?
  • Do you want to use cloud storage as a backup solution for all of your photos or just some key ones? How much data do you have? How often will you need to access your photos?
  • What types of files do you have? Camera raw files? Tiff files? JPEGs? All of the above?
  • How fast is your internet connection? Uploading files to the cloud can be very slow.

There are a few free applications, such as Google Photos and Flickr. These services could be a good option to back up your digital photo library if you don’t want to spend any money. The problem with a lot of them is that they either compress your photos, which means a loss in resolution and quality, or dditionally they don’t support RAW or TIFF files. So if you’re a raw shooter then this isn’t a great solution for archiving your photo library.

Luckily there are a number of services which will store your digital photographs for a small fee. There are many different companies that provide cloud storage, so I’ve decided to focus on only a few in the rest of this article. Be sure to do your research and find a service that fits your backup needs.

A Few Options for Cloud Storage

Google Drive

Google Drive is a relatively cheap and reliable cloud storage service. All Google accounts are given 15GB of free storage. From there you can pay as little as $ 1.99/month for 100GB, $ 9.99/month for 1TB, and up to $ 299.99/month for 30TB. Google Drive allows you to organize your own folders and supports all photo file types.

Amazon Cloud Drive

Amazon Cloud Drive touts an impressive unlimited photo storage plus 5GB for video and other file types for only $ 11.99/year. Additionally, if you have an Amazon Prime account, then this service is already included as part of your subscription. The one catch is that file uploads are limited to 2GB per individual file, so if you have files that are larger than that then you may not be able to upload them.

Microsoft One Drive

Microsoft One Drive has plans that offer 15GB for free, 100GB for $ 1.99/month, and 200GB for $ 3.99/month. Additionally, Microsoft is currently running a deal where you can get the Office 365 application package and 1TB of storage for $ 6.99/month. A big disadvantage to this service is that you cannot store more than 200GB without purchasing additional apps from Microsoft. But if you have less than 200GB, then One Drive is a really cheap option for back up.

Dropbox

The Basic plan gives you 2GB of storage for free. Upgrading to a Pro account will give you 1TB of storage for $ 9.99/month. The highest level plan is a Business account which will give you unlimited storage for $ 15/month per user. Dropbox doesn’t offer the most competitive prices among cloud providers but it’s a popular option that you may find reliable. However, if you have more than a terabyte of data, and files that break the size limits of some of the other unlimited providers, then Dropbox may be the best option for you.

Mediafire

Mediafire is one of the cheapest cloud storage options among the major players in the market. They offer 10GB of storage for free and up to a terabyte for only $ 2.49/month. Most impressively, their Business accounts offer up to 100 terabytes of storage for $ 24.99/month. If you’re looking to get into cloud storage for relatively cheap, then Mediafire is definitely a good bet.

2015 07 01 chestnut hill reservoir 19

Alternatives to Cloud Storage

Cloud services are not the only option you should investigate as a place to store your digital photos. Like any other digital backup, cloud storage isn’t full-proof. A quick internet search will show you numerous horror stories of peoples’ data being lost in cloud storage glitches and failures. This section of the article will explore a few other possibilities for saving your digital photos.

External Hard Drives

External hard drives are a good option if you need a lot of readily accessible storage for an affordable price. I use one terabyte Toshiba drives that only cost about $ 60. There are many other brands that offer similarly priced drives. One advantage external hard drives have over cloud storage is speed of access. You can store these files and keep them in your home or office, meaning they are readily accessible. Trying to download files you have stored on the cloud can be extremely time consuming.

Another advantage is cost; hard drives are relatively cheap when compared to continuously paying for monthly fees for cloud storage over the longterm. The drawback of hard drives is that they will eventually fail. Many are only reliable for 2-5 years, so it is important to back up your files to multiple places. But if you can’t afford a RAID hard drive system and you have a lot of data to backup, external hard drives are a good place to start.

2015 08 27 tufts obsoletemedia 5

Flash Drives

USB flash drives are another option for backing up data in your home or office. Prices are continually dropping on flash drive storage. Flash drives don’t have a lot of storage capacity, but 16GB flash drives are as cheap as $ 6. This makes them one of the most inexpensive options to back up your most prized images. I use them to back up my portfolio and store the memory sticks at a relative’s house. It’s not a solution for all of my data, but it gives me an added layer of backup that could save some of my best photos in the event of a disaster.

CDs/DVDs

You can also back up your data on CDs or DVDs, but at this point I wouldn’t recommend it. This kind of media is quickly becoming obsolete, and while it’s cheap, CDs and DVDs are easily damaged or corrupted. Additionally, you can’t store that much data on discs. Most CDs have a capacity of 700MB and DVDs cap out at less than 5GB. On top of this, many computer manufacturers, such as Apple, aren’t including disc drives in a number of their products. This means you’ll have to purchase an external drive just to read your discs in the future. You’re better off storing files on a hard drive or flash drive with a USB connection.

2015 06 03 alaskaday05 matanuskaglacier 22

Conclusion

Ultimately, there is no holy grail, one-size-fits-all solution for backing up your digital photos. The main theme is that you should not rely on a single source of backup because it can easily become a point of failure. If you haven’t stored your photos in more than one place and that one backup fails, you’re likely going to be out of luck.

Backing up your photos doesn’t need to be expensive; it just requires that you be strategic. I believe that cloud storage is best utilized as part of an overall storage strategy for your digital photographs, rather than the only point of backup.

Is cloud storage right for your backup needs? That is for you to decide. I hope this article gives you a starting point to get you on the path to reliably backing up your digital photos.

googletag.cmd.push(function() {
tablet_slots.push( googletag.defineSlot( “/1005424/_dPSv4_tab-all-article-bottom_(300×250)”, [300, 250], “pb-ad-78623” ).addService( googletag.pubads() ) ); } );

googletag.cmd.push(function() {
mobile_slots.push( googletag.defineSlot( “/1005424/_dPSv4_mob-all-article-bottom_(300×250)”, [300, 250], “pb-ad-78158” ).addService( googletag.pubads() ) ); } );

The post Backing Up Your Digital Photos: Is Cloud Storage Right for You? by Dan Bullman appeared first on Digital Photography School.


Digital Photography School

 
Comments Off on Backing Up Your Digital Photos: Is Cloud Storage Right for You?

Posted in Photography


Fragile Cloud: 100,000 Illuminated Balloons Fill Indoor Market

02 Sep

[ By WebUrbanist in Art & Installation & Sound. ]

cloud installation art project

Pulsing with light and life, this incredible art installation provides Covent Garden, a glass-topped marketplace, with a kind of artificial interior skyscape. Created for the London Design Festival, you can watch a time-lapse video of its construction below.

cloud art architecture detail

The ‘Invasions’ of Charles Pétillon are well known for popping up in cramped spaces, photographed, then removed, but this project is scaled far larger than his conventional pieces, is much more public and is also his first work outside of France.

cloud art white balloons

cloud art light night

Over 100 feet long, this amorphous cloud organically weaves its way through a realm of historical brick and metal detail, a shockingly light, bright and fragile intrusion into a sharp-cornered combination of architecture and engineering.

cloud art from above

cloud art amorphous project

cloud art viewers

“The balloon invasions I create are metaphors”, explains Charles Pétillon. “their goal is to change the way in which we see the things we live alongside each day without really noticing them. with ‘heartbeat’ I want to represent the market building as the beating heart of this area – connecting its past with the present day to allow visitors to re-examine its role at the heart of london’s life.”

Share on Facebook


[ By WebUrbanist in Art & Installation & Sound. ]

[ WebUrbanist | Archives | Galleries | Privacy | TOS ]


WebUrbanist

 
Comments Off on Fragile Cloud: 100,000 Illuminated Balloons Fill Indoor Market

Posted in Creativity


Adobe Creative Cloud trials reset to offer preview of 2015 features

25 Jun

Adobe recently updated its Creative Cloud suite of software, and to give users a chance to test the new features it has reset its product trials. This includes trial versions of Illustrator CC, InDesign CC, and Photoshop CC. Users, even those who have previously taken advantage of Adobe’s 30-day free trial, can start a new trial by opening the software application and clicking ‘Update’. Read more

Articles: Digital Photography Review (dpreview.com)

 
Comments Off on Adobe Creative Cloud trials reset to offer preview of 2015 features

Posted in Uncategorized


Adobe Updates Photoshop and Lightroom with Creative Cloud 2015 and Launches Adobe Branded Stock Photography Library

16 Jun

Lightroom Dehaze UI

Today Adobe is announcing updates for their Creative Cloud 2015 Photography package as well as the launch of their new stock photography offering Adobe Stock.

I saw a demo last week of the new Creative Cloud enhancements. The enhancement that I liked the most was a new slider in Lightroom for haze and dehaze. With the haze slider you can now reduce unwanted haze in photos or add haze back in if you want more of an ethereal foggy type mood. I think that this tool will be especially dramatic when working with long exposure photography where you have clouds or low fog and want to get the mix of fog to subject just perfect.

Photoshop is also adding in an additive noise function where you can produce more camera like realistic bokeh and blur noise when desired, making the transition in blur more natural. The Photoshop healing brush also now heals in real time and is faster than previous versions.

These feature enhancements and updates will not be available to the current desktop versions of Lightroom and Photoshop, they will only be available for Adobe Creative Cloud subscribers. This is in line with Adobe’s previous stated goal of providing fast and rapid real time updates and upgrades to their subscription customers. I’m assuming that eventually these new enhancements will make their way to desktop upgrades/updates, but at present Adobe seems to be focused on providing the best and most current features available to their subscription customers.

There are also additional features being launched for the mobile versions of Adobe products including better tone and vignette adjustment for Lightroom mobile and an Android version of Photoshop Mix.

Adobe’s Creative Cloud photography package costs $ 9.99/month and you can subscribe to it here. They also offer a 30 day trial for you to try out Creative Cloud to see if it is right for you.

Adobe Stock

In addition to the improvements in Lightroom CC and Photoshop CC, Adobe is also announcing the launch of their new stock photography service simply called Adobe Stock.

Because Adobe is so widely used by creatives in general, leveraging their software products to sell an Adobe labeled stock photography library seems to make a lot of sense. Adobe’s stock photography service will be featured as a menu item in Photoshop and will allow stock buyers to use watermarked versions of stock photos to create mockups and test design/layout ideas. Once a stock buyer is ready to license an image they can license it directly from Photoshop and download the unwatermarked version of the image.

Images will cost $ 9.99 each to license or Creative Cloud subscribers can purchase one of two different subscription plans. The first plan costs $ 29.99/month and allows a subscriber to license up to 10 images a month and a second plan will cost $ 199.99 per month and will allow a subscriber up to 750 images per month.

Adobe will pay out 33% of their sales proceeds to photographers — photographers interested in applying can apply here.

Because so many stock photography buyers are connected into Adobe’s ecosystem, I think this stock photography offering will end up being very successful and represents formidable competition to the current stock photography giant Getty Images. Earlier this year Adobe purchased the stock photography agency Fotolia, but this new stock offering appears to be a different offering marketed directly under the Adobe brand and available through Adobe’s flagship Photoshop product.

More: MacRumors, The Verge, Engadget, Techmeme.


Thomas Hawk Digital Connection

 
Comments Off on Adobe Updates Photoshop and Lightroom with Creative Cloud 2015 and Launches Adobe Branded Stock Photography Library

Posted in Photography