RSS
 

Posts Tagged ‘Clone’

12 Tips to Master the Clone Stamp Tool in Photoshop

09 Jul

The post 12 Tips to Master the Clone Stamp Tool in Photoshop appeared first on Digital Photography School. It was authored by Jim Hamel.

12 tips to master the Clone Stamp tool in Photoshop

The Clone Stamp tool is one of Photoshop’s most useful editing options. After all, it can get rid of all sorts of unwanted objects! Yet for beginners – and even more experienced photo editors – it can be intimidating, frustrating, and discouraging.

That’s why, in this article, I’m going to share everything you need to know about the Clone Stamp tool, including how it works, how to use it to remove unwanted items from your photos, and the simple tips and tricks that will make you a Clone Stamp master.

Let’s dive right in.

When should you use the Clone Stamp tool in Photoshop?

Photoshop offers several tools for making minor adjustments to your photos (e.g., the Healing Brush tool and the Spot Healing Brush tool). But while such tools are great for minor edits – such as removing spots and power lines – when it comes time for serious, intensive surgery on your photos, the Clone Stamp tool is the way to go.

You can use the Clone Stamp tool to:

  • Remove people standing in the background of a portrait
  • Remove people walking through your travel shots
  • Remove cars that are positioned in awkward places
  • Remove distracting street signs
  • Remove distracting shadows
  • Remove distracting reflections

And those are just a few of the many applications of the Clone Stamp tool.

Clone Stamp Tool example on the Palais Garnier interior
You will not often find the stairs of the Palais Garnier in Paris free of people, so you will need to put the Clone Stamp tool to work if you want a clean picture. This applies at many other tourist destinations, as well.

How to use the Clone Stamp tool: the basics

Getting started with the Clone Stamp tool is simple. You just tell Photoshop two things:

  1. The area you want to target for removal (i.e., the target area).
  2. The area Photoshop should use to supply replacement pixels (i.e., the source area).

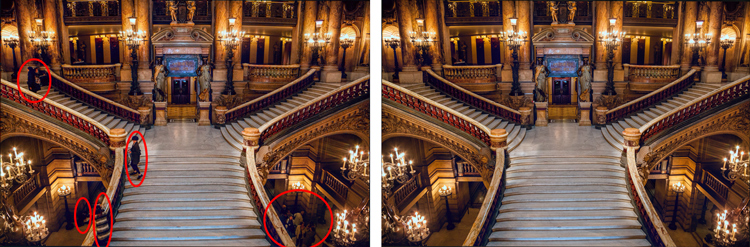
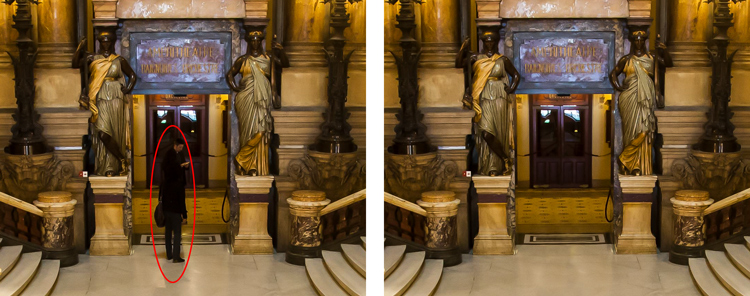
So if you were removing a person from a staircase (as I did in the example above), you would set the source area as some nearby stairs, and you would set the target area as the person you wanted to remove.

Here’s the step-by-step process for using the tool:

Step 1: Select the Clone Stamp tool from the Tools panel

You’ll find the Tools panel on the left-hand side of your screen (the Clone Stamp tool looks like a rubber stamp):

selecting the Clone Stamp tool

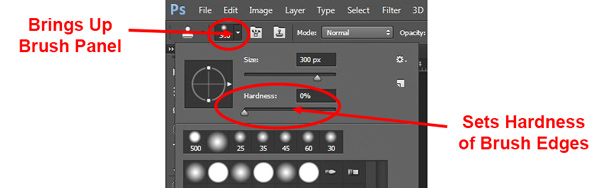
Once you have the tool selected, click on the Brush menu dropdown:

opening the Brush settings

And set both the Size and the Hardness.

adjusting brush size and hardness

Step 2: Select the source area

Remember, the source area refers to the portion of the image you will use to source replacement pixels.

So hover your cursor over the source area, hold the Alt/Option key (your cursor will now become a target), and do a single click.

Step 3: Paint over the target area

Release the Alt key and move your mouse over to the area you’d like to remove. Hold down the mouse button and carefully paint in the new pixels.

And that’s it. You’re done! But while the process sounds simple, there’s a lot to understand, especially if you want to become a Clone Stamp expert.

So let’s take a look at some tips and tricks to help you conquer this important Photoshop tool, starting with:

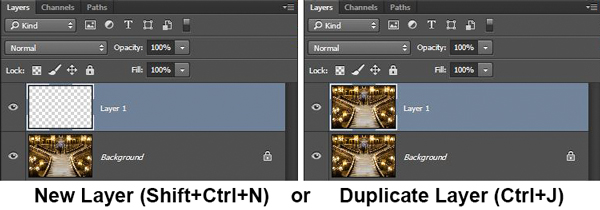
1. Work on a new layer

Before making changes with the Clone Stamp tool, always create a new layer. Then make sure your adjustments all happen on the layer (you can flatten the image when you’re done).

Why should you do this?

There are many reasons. First of all, Photoshop layers are nondestructive – so changes to the layer won’t change the underlying pixels of your image. In addition, if you don’t like where the changes are going, you can always delete the layer and start over.

And if you later decide there are portions of the Clone Stamp changes you don’t want, you can always use a layer mask to selectively delete those changes. Plus, you can apply adjustments specifically to cloned areas if they are on a new layer (as will be explored in more depth below).

Now, creating a new layer is easy. Simply press Ctrl/Cmd+J to create a duplicate of your current image layer, or press Shift+Ctrl/Cmd+N to create a new blank layer.

Working on a new layer with the Clone Stamp tool

Note: If you do create a new blank layer, make sure you have All Layers selected as your source in the Clone Stamp tool settings.

selecting All Layers for the Clone Stamp tool

I personally prefer working on a new layer (as opposed to a duplicate layer), but either way will work.

2. Zoom in (way in)

When working with the Clone Stamp tool, you should always zoom in – in fact, I recommend you zoom way in (potentially to 100% and beyond).

zoomed in image with Clone Stamp tool on the side
I tend to do my Clone Stamp work zoomed in to 100% or more.

Zooming in will help isolate the area you are working on, and it will allow you to work with far more detail and precision than would otherwise be possible. Make your changes look as good as you can with this higher level of detail, then when you zoom back out, the changes will blend in perfectly.

A shortcut for zooming quickly is to hold the Alt/Option key with your left hand while using the scroll wheel on your mouse to zoom in and out. You can also use Ctrl/Cmd and the + or key on the keyboard. That way, you can zoom in and out with speed.

3. Set your brush size using shortcuts

When working with the Clone Stamp tool, you’ll need to change your brush size often.

Why? You should always make sure your brush size fits the changes you’re making. Big changes require a big brush, whereas small changes require a fine brush for detail work.

Unfortunately, changing the size through the Brush panel is cumbersome, but there are some easy keyboard shortcuts:

  • The left bracket key [ makes the brush smaller
  • The right bracket key ] makes the brush larger

Thanks to these shortcuts, you’ll be able to rapidly tailor the tool to your specific circumstances.

4. Set the proper brush hardness

The Clone Stamp tool can be set to whatever hardness you desire. Simply open the Brush panel, then adjust the Hardness slider:

Setting the hardness of the brush

Now, hardness determines the extent to which your cloning will blend in with the surrounding pixels. If you set the hardness toward 100%, the cloned edges will be hard and definite:

hard-edged Clone Stamp brush example

If you set the hardness toward 0%, the edges will blend in with the surroundings:

soft-edged Clone Stamp brush example

In general, keep the hardness at 0%. It will help you seamlessly blend in your effect. There will be times, however, where you are working near a defined edge, in which case you should increase the hardness. Even then, around 50% will usually do. Setting the hardness any higher creates harsh transitions, and these often look unnatural (they’ll also make it very clear you’ve used the Clone Stamp tool).

5. Clone before making other adjustments

Here’s a quick Clone Stamp tool tip:

Do your cloning before making adjustments (via adjustment layers) to contrast, color, etc. If you apply the Clone Stamp tool after creating those adjustment layers, you’ll bake the changes permanently into your picture when you clone – which can be a problem if you later decide you want to remove some of your earlier adjustments.

However, in some cases, you’ll need to clone, yet you will have already made changes on an adjustment layer. So what do you do? Photoshop actually lets you decide whether to include adjustment layer changes in your cloning, and I generally recommend you don’t include these changes.

Simply select the circle with a line through it in the Clone Stamp tool Options bar:

preventing the Clone Stamp tool from being affected by adjustment layers

And Photoshop will ignore adjustment layers when you clone.

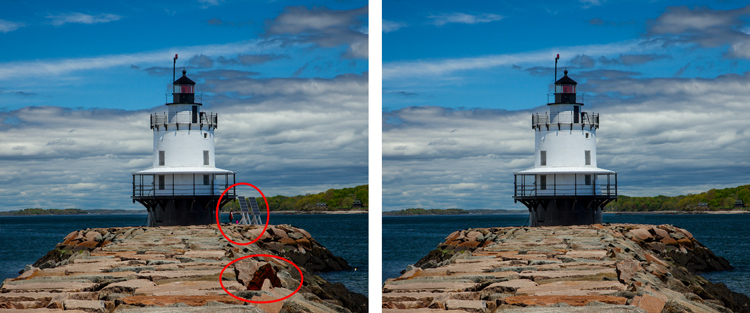
6. Grab the low-hanging fruit

Most of the time, your pictures will have some easy items to clone out – along with some harder items.

Clone out the easy items first, such as small blemishes on a portrait subject, dirt in a landscape, trash in a street scene, etc.

For one, this will give you confidence in your Clone Stamp tool abilities (always a good thing!). Plus, removing unnecessary items will help when the time comes to make hard changes.

How will it help? When using the Clone Stamp tool, the cleaner the space you have from which you can draw pixels, the better. So by making the easy changes first, you’re cleaning up the areas that may feature in your more difficult clone jobs later.

Make sense?

7. Watch for patterns

Sometimes, it’s a good idea to include patterns in your cloning; for instance, if you’re removing a person from in front of a building, you’ll want to use a similar building as your cloning source.

However, there are often times when you don’t want discernible patterns in your cloned areas. For instance, if you get rid of a bird in the sky, you don’t want to replace it with an obvious set of repetitive clouds – that would look super unnatural and would immediately indicate to viewers that you used the Clone Stamp tool.

There is an easy way to avoid patterns: as you clone, frequently choose a new source point. Sample from one area and clone one part of your image, then sample from another area and clone another part, and so on. Keep it up until you’ve finished all the necessary cloning, and you’ll end up with an image featuring zero repetition and an invisible clone job.

removing distractions from a lighthouse photo without creating a pattern
The right side of this image was filled with distractions, and the Clone Stamp tool eliminated them. But I had to be careful not to create patterns in the rocks or in the trees/water!

8. Follow the lines

A key to the successful use of the Clone Stamp tool is making all the lines in your picture match. Even slight deviations from the correct lines will look fake and destroy the effect you are trying to achieve.

For example, if you’re cloning parts of a landscape, make sure the edges of the tree branches match up. In an urban context, follow lines on buildings such as roof edges, doorways, and brickwork.

When you’re using the Clone Stamp tool, I recommend you start with – and stay focused on! – the lines. Let the rest of the pixels fall where they may. Afterward, if you need to go back over other areas, you can do so.

removing a person from an interior shot
Here, I’ve zoomed in on a portion of an architectural shot. As you can see, I’ve used the patterns on the floor and door to recreate the space behind the distracting person.

9. Avoid selecting from adjacent areas

As previously mentioned, a dead giveaway of the Clone Stamp tool is repetition.

Of course, in a sense, the Clone Stamp tool is all about repetition – you’re repeating a part of your image to cover up a part you don’t like – but you need to do it in such a way that the viewer doesn’t notice. If you draw pixels from an immediately adjacent area, you risk the viewer noticing the repetition. So take the pixels from somewhere else in the image instead.

Inadvertently creating a pattern is an easy trap to fall into when using adjacent areas, but at the same time, using non-adjacent areas can be tricky. The immediately adjacent areas are usually the closest in color and tone to the area you want to replace, and as you move farther away, tones and colors change so the pixels get harder to match.

So work hard. Find a way to use pixels from somewhere else in your photo, especially when the adjacent pixels contain obvious patterns. It might take extra time, but it’ll be worth it in the end.

10. Muddle through (and accept the messiness)

Once you’ve made the “easy” changes to your photo, it’s time to tackle a bigger problem – a crowd of people, for instance, or a car that takes up a large portion of the scene. And I get it: it’s the scary part of using the Clone Stamp tool.

The key is to just dive in. Don’t try to figure it all out beforehand (you never will). You can use a couple of different approaches:

  1. Go big first. Set your brush a little larger than is strictly necessary and just replace the entire area in one fell swoop. You should then go back and clean up with a smaller brush.
  2. Go small and steady. Stick with the smaller brush and paint over the problem area gradually. Here, the key is to keep going. Remember that you can go over the area again if necessary. Whatever you do on your first pass, while probably not perfect, will undoubtedly look better than what you started with.

You’ve just got to do it. There is a tendency to freeze up and to try to map out the entire clone job, step by step, before actually doing anything. But this just causes you to stare at the computer screen for long periods of time and isn’t especially helpful.

Remember, you can always undo what you’ve done! In addition, because you hopefully followed the first tip in this article and are working on a new layer, you can always mask out certain areas or even delete them if you don’t get the result you want.

11. Mirror your source pixels

The Clone Source panel contains lots of adjustments you can make to your brush when cloning.

To access the panel, go to Window, then click on Clone Source:

opening the Clone Source window

Once in the panel, you can change the angle of the replacement pixels, you can give the tool an offset, and more.

One of the most useful features in the Clone Source panel is the Flip Horizontal option:

using the Flip Horizontal setting in the Clone Source panel

Click on this, and the pixels will be replaced in the opposite horizontal direction to the source.

Confused? Don’t be. You’re basically just mirroring source pixels. For example, in the crop below, I selected the road line on the right as my source, then cloned it off to the left. You can see how the pixels are flipped horizontally:

example of Flip Horizontal in action

While this may seem like a pointless trick, it can actually be very useful. Imagine you’re dealing with a symmetrical object; instead of sourcing pixels from above or below the clone target, you can simply use pixels from its opposite (reflective) side.

Here’s a typical example: A person is covering one side of a doorway, and you want to get rid of them. By clicking on Flip Horizontal, you can use the other side of the doorway as your source, and you don’t have to scramble for pixels all around the frame.

12. Change the cloned areas with adjustment layers

Sometimes, your cloned areas just won’t look exactly like the surroundings. Perhaps the source areas you used were too bright or too dark, or perhaps the colors were just a bit off.

But don’t worry; you can fix this without affecting the surrounding pixels. You just need the power of adjustment layers.

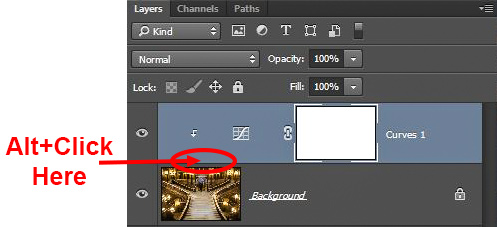
Simply create a new adjustment layer (e.g., Levels, Curves, or Hue/Saturation):

creating a new adjustment layer

Make sure it’s positioned above your cloning layer. Then hold down the Alt/Option key and click on the spot between the two layers:

clipping an adjustment layer to the cloning layer below it

This will clip the adjustment layer to your cloning layer. Now any adjustments you apply will only change the layer below it, and you’re free to brighten, darken, add contrast, adjust colors, etc.

Mastering the Clone Stamp tool: final words

Remember: Using the Clone Stamp tool can be a messy process. So don’t worry if you find yourself having to redo changes or make things up as you go along. There is no magical “clean” method – instead, the Clone Stamp tool involves a lot of experimentation, a lot of problem-solving, and a dose of determination.

Take your time and just keep moving. You can always undo your changes (or, if you are working on a new layer, you can delete the changes without losing the rest of your work).

And have fun!

Now over to you:

Do you have any tips or tricks for using the Clone Stamp tool? Share your thoughts in the comments below!

The post 12 Tips to Master the Clone Stamp Tool in Photoshop appeared first on Digital Photography School. It was authored by Jim Hamel.


Digital Photography School

 
Comments Off on 12 Tips to Master the Clone Stamp Tool in Photoshop

Posted in Photography


Capture One releases Nikon-specific version, also adds improved clone and healing brushes

18 May

Earlier this month, Capture One teased a variety of new features in an upcoming free update to Capture One 20. Today, this free update has been released to all existing Capture One 20 users. Further, Capture One has released a new dedicated version of their software specifically for Nikon users, Capture One for Nikon.

The new Nikon version of Capture One follows the same pattern as existing Fujifilm and Sony versions, meaning that the software will only work with files from Nikon cameras. Profiles for each supported Nikon camera have been specifically built for Capture One by the software team in Denmark using an exhaustive lab-based process. Further, the Vivid, Neutral, Standard, Landscape and Monochrome profiles in Nikon’s cameras are supported, allowing Capture One for Nikon to match the colors you see on your camera.

The list of supported Nikon cameras is exhaustive and includes the company’s DSLR and mirrorless Z cameras. Many cameras also support tethered capture. You can view the full list of supported cameras and features by clicking here.

Returning to the newly-released update for all versions of Capture One 20, we were previously shown the new heal and clone brushes plus an improved before/after viewer. The revised healing and clone brushes now create dedicated healing and clone layers, respectively, and utilize more intelligent source point technology. You can also now utilize as many source points per layer as you desire with no discernible impact on performance.

With respect to the before/after view, users can now click a button in the toolbar to select from new before/after view modes. This is a much simpler and more streamlined process than in prior versions of Capture One and can be used across multiple images at varying zoom levels.

Capture One has released additional videos showing off these new features, which you can view below:

Another new feature that was not shown off during Capture One’s livestream in early May is an improved Lightroom Catalog Import tool. The tool now allows for importing files located on disconnected drives. Capture One will automatically import the files once the drive has been connected. Further, when importing a Lightroom catalog, some basic image adjustments and catalog structure can be imported into Capture One 20. To see how this works, refer to a new video tutorial from Capture One below.

The update to Capture One 20 is available now at no cost for all existing users. If you don’t own Capture One 20 and would like to try it, there is a free trial available on Capture One’s website.

Capture One 20 is available both as a subscription and as a lifetime license. An annual subscription is $ 180 USD and a lifetime license for new users is $ 299 USD. For a full pricing breakdown and to view additional bundles, click here. Further, there is an ongoing promotion for new purchasers, allowing for 12-month access to SmugMug Portfolio or Power plans, depending on their selected product.

Capture One for Nikon can be purchased for $ 9.99 USD per month, $ 99 per year or as a perpetual license for $ 129.

Articles: Digital Photography Review (dpreview.com)

 
Comments Off on Capture One releases Nikon-specific version, also adds improved clone and healing brushes

Posted in Uncategorized


Capture One teases upcoming Capture One 20 update, including new heal and clone brushes

06 May

Earlier today, Capture One showed off a trio of major new features coming via a free update to Capture One 20 later this month. The announcement came in a live stream, which you can watch the replay of below, hosted by Product Manager Alexander Flemming and Business Development Manager David Grover.

In the live demo below, the first major new feature coming to Capture One 20 later this month is a revised healing brush for retouching images and removing unwanted spots. In the current version of Capture One 20, the healing workflow comprises creating a new heal layer, select your brush and pick a source point. Further, you can only select a single source point per layer.

In the upcoming update, the software will be able to quickly and intelligently select a source point for each instance of using the heal brush on a single ‘Heal Layer’. Per Flemming, there will be no limit to how many different heal points you can have on a single layer nor has the team found any performance issues when utilizing many heal points.

In the livestream, Flemming and Grover shared a few interesting tidbits about how the new healing brush operates. The first time you use the brush on an image, the software caches the entire image, so that all subsequent uses of the heal brush are much faster. Further, the new healing technology is adept at adjusting the luminosity of your source point to match the area you wish to heal or touch up. For example, if an area in the image with the best match for texture is brighter or darker than the area you are trying to heal, the software can match the source area by brightening or darkening it.

In addition to the new healing brush, there’s also a new clone brush. The clone brush works similarly to the new heal brush, but it creates a ‘Clone Layer’ rather than a ‘Heal Layer’. The clone brush creates a pixel-for-pixel clone, rather than replacing a healing area via a source selection. Basically, the clone brush allows you to copy a selected set of pixels from one area of your image to another area.

In this screenshot from Capture One’s presentation, the new clone brush is being used. Image credit: Capture One

Another addition is the new before and after button, which can be found on the toolbar. In prior versions, seeing a before and after comparison was done via a convoluted process whereby you reset the image and then undid the reset. Now you will be able to simply press the before/after button, which creates a sliding before/after split view, showing before on the left and after on the right. This works at all zoom levels and can be used across multiple images. Users will even be able to edit in this view if they so desire. There’s also a secondary before/after mode where you can view the entire image in its before and after state, rather than using a slider.

The upcoming free update to Capture One 20 includes a new before/after view. You can use this view across multiple images at once as well, as can be seen here. Image credit: Capture One

As mentioned, the update is scheduled to arrive by the end of the month. The update will be free for all existing Capture One 20 users, including those who use Capture One Fujifilm and Capture One (for Sony). For more information on Capture One 20, including pricing information for both subscriptions and perpetual licenses, click here.

Articles: Digital Photography Review (dpreview.com)

 
Comments Off on Capture One teases upcoming Capture One 20 update, including new heal and clone brushes

Posted in Uncategorized


FeiyuTech’s new 4K Feiyu Pocket camera is a more affordable clone of the DJI Osmo Pocket

02 Apr

FeiyuTech has unveiled the Feiyu Pocket, a small 4K gimbal camera that bears a very striking resemblance to DJI’s Osmo Pocket.

Externally, the Feiyu Pocket appears to be a carbon copy of the Osmo Pocket with the only noticeable differences being a lack of an expansion port (Feiyu opted for a single integrated USB-C port on the side) and a slightly larger screen compared to the Osmo Pocket (1.3in compared to 1in, respectively). Aside from the branding and those differences, the two units are essentially identical in both shape and size, complete with a 360-degree rotating head and two buttons on user-facing side for controlling the camera.

Moving onto the internals and detailed specifications, things do start to differ a bit more. Rather than the F2 lens with an 80-degree field of view on the Osmo Pocket, the Feiyu Pocket features a slightly slower F2.8 120-degree ultrawide lens. The Feiyu Pocket also uses a 1/2.5” CMOS sensor instead of the 2/3” sensor inside of the Osmo Pocket, but both cameras output 4K (3840 x 2160 pixel) video at up to 60 frames per second. The Feiyu Pocket outputs only 8.5MP stills though, compared to the 12MP stills possible with the Osmo Mobile.

As for stabilization, the Feiyu Pocket uses a similar three-axis gimbal to the Osmo Pocket, but also throws in what FeiyuTech is calling six-axis ‘hybrid image stabilization’ that appears to combine the three-axis optical stabilization as well as another three-axis digital compensation.

FeiyuTech says the batter is rated for up to 3.5 hours of runtime when capturing 4K video at 30 fps and up to 4.5 hours when shooting 1080p video at 60 fps. the internal battery is charged using the integrated USB-C port and FeiyuTech says a 10W charger will recharge the device from empty in 80 minutes. As for storage, an integrated MicroSD card slot can support cards with up to 512GB of storage.

The Feiyu Pocket offers multiple shooting modes, including a 360-degree POV all-follow mode, a motion timelapse (hyperlapse) mode, multiple auto-panorama modes, a dedicated beauty mode for selfies and an intelligent sync motion mode that will sync the gimbal with your hand movements. The Feiyu Pocket syncs with FeiyuTech’s Android and iOS app to offer liveview and controls for changing the various settings of the camera.

Despite being very similar in shape, size and specs, the Feiyu Pocket comes in at $ 249 (Adorama, B&H), a whipping $ 120 cheaper than the DJI Osmo Pocket. Y

Articles: Digital Photography Review (dpreview.com)

 
Comments Off on FeiyuTech’s new 4K Feiyu Pocket camera is a more affordable clone of the DJI Osmo Pocket

Posted in Uncategorized


Photopea online image editor is a free Photoshop clone with advanced tools

09 Nov

Programmer Ivan Kutskir of the Czech Republic has created an online-based Photoshop clone called Photopea. The web app was created solely by Kutskir in his free time during college, according to a Reddit AMA the developer held on Wednesday. Photopea features a Photoshop-like interface and is supported by advertisements.

The Photoshop clone offers a wide variety of image editing tools, including advanced features like spot healing, a clone stamp healing brush, and a patch tool. The software supports layers, masks, smart objects, layer styles, filters, vector shapes and masks, and more. A full rundown of Photopea’s tools is available on the app’s website, as well as tutorials for select basic activities.

Photopea took more than 7,000 hours of work, according to Kutskir’s Reddit post. The web app had 1.5 million visitors in October and offers a premium subscription for customers who want to support the product. Free usage includes PSD importing and exporting, as well as access to the editing tools. The premium version includes those features, eliminates the advertisements, and helps support the developer.

A single-user premium subscription is $ 9/month or $ 20 for 90 days. The developer also offers team and distributor options. Photopea joins other free photo editing programs, including the web app Pixlr Editor and desktop application GIMP.

Articles: Digital Photography Review (dpreview.com)

 
Comments Off on Photopea online image editor is a free Photoshop clone with advanced tools

Posted in Uncategorized


Yongnuo unveils YN50mm F1.8 II: Version 2 of its ‘Nifty Fifty’ clone

15 May

$ (document).ready(function() { SampleGalleryV2({“containerId”:”embeddedSampleGallery_6039414031″,”galleryId”:”6039414031″,”isEmbeddedWidget”:true,”selectedImageIndex”:0,”isMobile”:false}) });

Hong Kong camera gear maker Yongnuo has released version II of its ‘nifty fifty’ Canon clone: the YN 50mm F1.8 II. The original YN 50mm F1.8 was one of the first lenses the budget brand ever released, undercutting Canon’s already ultra-affordable EF 50mm F1.8 II. Version II continues this trend, with a price tag of just $ 75, while the original will cost you just $ 51.

Optically, the lens seems to be unchanged—you still get 6 lens elements in 5 groups which produce a 46° angle of view, and a 7-blade aperture that runs from F1.8 to F22. The updated lens does drop the minimum focusing distance from 45cm to 35cm (to match Canon’s 50mm F1.8 STM), and adds support for USB-free firmware updates that are delivered directly through the camera.

Other notable improvements, according to Yongnuo, come in the form of improved “mechanical structure and coating technology,” which apparently translate into improved “focus accuracy, auto-focus speed and light transmittance.” You’re also getting a metal mount, and focus distance markings have been added to the lens build.

Here’s the full spec sheet, in case you’re curious:

The lens is already live on eBay, where it’s going for $ 75 (compared to Canon’s 50mm F1.8 STM, which will run you $ 125). Expect the Yongnuo lens to join the rest of the YN lineup on Amazon shortly.

To learn more about this lens, head over to the Yongnuo website.

Press Release

Small Lens with Super Bokeh Effect – YONGNUO YN50mm F1.8 II

Supports USB-free Firmware Upgrade

Firmware of the lens can be upgraded through camera instead of using USB port, which not only meets the requirements of firmware upgrade and appearance design, but also avoids the incompatibility problems caused by different computer operating systems.?Note: this function needs to be supported by camera?

F1.8 Bright Aperture

Maximum aperture F1.8,bokeh effect is easily achieved ,which brings you more fun during photographing.

New Mechanical Structure, New Coating Technology

YN50mm F1.8 II has all the product advantages of the last generation. By improving the mechanical structure and coating technology, its focus accuracy, auto-focus speed and light transmittance are increased. Furthermore, it can control backlight ghost and glare.

Durable Metal Mount

YN50mm F1.8 II adopts chrome-plated and high-accuracy metal mount. It’s wearable, corrosion-resistant, and highly consistent with the body of the camera.

0.35m Closest Focusing Distance

Compared with the first generation, the closet focusing distance of YN50mm F1.8 II is shortened to 0.35m.You can get closer to the object for photography and enlarge the object.

Focus Modes: Auto Focus (AF) and Manual Focus (MF)

YN50mm F1.8 II supports auto focus and manual focus. The focus mode can be selected according to practical requirement.

Focus Distance Indicator is convenient for you to estimate the distance and the depth of field.

YN50mm F1.8 II has 7pcs of aperture blades, which helps to take picture of circular defocused spots or helps to stop down and take picture of 14-star effect.

Articles: Digital Photography Review (dpreview.com)

 
Comments Off on Yongnuo unveils YN50mm F1.8 II: Version 2 of its ‘Nifty Fifty’ clone

Posted in Uncategorized


How to Clone Yourself – Step by Step Tutorial

09 Dec

You have probably seen photos on the internet where the same person appears in multiple spots in a single photo. At first sight, you might not have believed it, and later you must have gone berserk looking for ways that effect can be achieved. Well, who does not want that superhero feeling where you can appear in 2-3 different places doing 2-3 different things as well in a single photo.

Let me tell you, it is not at all complicated or difficult to clone yourself multiple times in a single frame. You can achieve this effect by going through two simple stages, the execution stage (shooting) and the post-processing stage. By the end of this tutorial, I am sure you will be able to create pretty awesome clone photos, feel free to share them in the comments section.

How to Clone Yourself - Step by Step Tutorial

Part One – How to Clone Yourself – Execution

In the execution stage all you need is a:

  • A digital camera
  • A tripod
  • Shutter release remote or use the built-in self-timer

Step 1:

Mount your digital camera on a tripod. As you will be taking multiple photos you need to make sure that the frame in each photo remains the same and the camera doesn’t move.

Step 2:

Make sure that Manual Mode is selected as you do not want any aperture, shutter speed, or white balance variations in your multiple photos. This is to make sure that all your photos are consistent in exposure, depth of field and color temperature.

How to Clone Yourself - Step by Step Tutorial

Step 3:

Now focus on the point where you will be standing or sitting and switch the focusing mode to Manual as well. This is again to ensure that each photo is consistent in terms of depth of field and sharpness. An important suggestion is to use an aperture which is not too wide, something around f/5.6 – f/8 would be ideal to get good depth of field.

Step 4:

Switch on the 10-second timer on your digital camera so that you have enough time to position yourself in the frame and get ready for the photo. If you have one, you can also use a wired/wireless shutter release remote to click photos once you are ready and in position.

That’s it, now you are ready to take as many photos you as want to by positioning yourself at different spots in the frame.

How to Clone Yourself - Step by Step Tutorial

Here you can see the four shots I took. It’s important to take one of just the scene without you in it as well as you’ll need it for the next stage.

Note: It’s important to take one of just the scene without you in it as well as you’ll need it for the next stage!

Part Two – How to Clone Yourself – Post-Processing

Now comes the interesting part of this tutorial where you get to learn how you can clone yourself multiple times in a photo using software such as Adobe Photoshop. Let me take you through a step-by-step explanation of how I achieved this photo.

Note: you need an image editing software that works with layers to do this. Lightroom cannot do this.

Step 1:

Import all the photos into Adobe Photoshop and get them to a single workspace by going to individual photos, pressing CTRL/CMD + A (select all) and again pressing CTRL/CMD + C (copy). Now go to the photo where you want all other photos to be brought together and press CTRL/CMD + V (paste). Do this for all the other photos until you have all the photos in one workspace as layers.

Make sure the image without you is the bottom layer. If it is not, drag it there now.

Note: Alternatively you can open Adobe Bridge and find your images. Select all the ones you want to use (CMD+click on each to select more than one) and go to Tools > Photoshop > Load files into Photoshop layers. This will achieve the same thing as copy and pasting each image. If you work in Lightroom you can select them all, right-click and select Open as Layers in PS as well. 

How to Clone Yourself - Step by Step Tutorial

Step 2:

Now add a black layer mask (press and hold ALT and then click on Add vector mask icon as shown in the photo below) in order to start the editing process. Select the Paintbrush tool and make sure that black is selected as the foreground color, and then click once on the mask of the layer you want to work on first.

Note: Make sure the mask is selected not the layer. See the white bracket corners on the mask? That means it is selected. 

How to Clone Yourself - Step by Step Tutorial

Step 3:

Layer by layer, start painting (at 100% brush opacity)_ over the area where you are located in that frame to make yourself visible in the photo. Do this with all the layers in order to make yourself appear in the photo at multiple spots as shown in the image below.

How to Clone Yourself - Step by Step Tutorial

While bringing back one of yourself in the frame, if by mistake you erase your previous photo (your clone) you can bring it back by selecting the foreground color as white and painting back over it on the mask. So basically, painting with black lets you make the elements of the current layer visible, and the white color erases the elements of that current layer if you by mistake overdo it.

Black reveals – white conceals

How to Clone Yourself - Step by Step Tutorial

Finish up

Once you are done cloning all your photos proof check the final photo carefully, there is a chance that you might have erased a part of one of your clones by accident. Make sure you aren’t missing any toes or limbs.

So once you are satisfied with the final result, export it and start flaunting it on your social media channels and please share in the comments below.

The post How to Clone Yourself – Step by Step Tutorial by Kunal Malhotra appeared first on Digital Photography School.


Digital Photography School

 
Comments Off on How to Clone Yourself – Step by Step Tutorial

Posted in Photography


Clone Wars: How Star Architect Frank Lloyd Wright Inspired the Design of Naboo

26 Jan

[ By WebUrbanist in Architecture & Public & Institutional. ]

naboo-architecture

Much of the magic of the Star Wars films derives from the fantastic landscapes and exotic built environments that serve as backdrops for its intergalactic tales of empires and rebellions. But when world-makers like George Lucas create these places, they often draw on real architects and architecture for inspiration, including the last and largest work of starchitect Frank Lloyd Wright.

democratic-design-star-wars

Located north of San Francisco, the Marin County Civic Center consists of a massive rotunda housing a public library, offset by a strong vertical spire and long Hall of Justice (a classic Wright move to emphasize and juxtapose both horizontals and verticals). These same features can be found in the heart of Naboo, a Mid Rim world (near the Outer Rim Territories) featured across a series of Star Wars films.

marin-count-city-civic

royal-palace

As with their cinematic counterparts, Wright’s structures for Marin were designed to relate to the landscape – curved blue roofs pick up on the tones of the sky above while beige/pink walls tie into the earthen surroundings. Arched supports and the voids they create at different scales are also immediately recognizable as similar between the original Terrestrial architecture and its echos in Star Wars scenes.

civic-center-design

views-of-naboo

For Wright as well as Lucas, there is an underlying idea at work in the design: a combining of grandeur worthy of civic architecture but also an aspiration toward something democratic, beautiful but accessible. The settings are also similar: complex and lush landscapes, fitting a similar vision found in both the architect’s and filmmaker’s works: a focus on working architecture into natural settings rather than envisioning dense cities. Lucas has directly acknowledged a debt to Wright for inspiring the architecture found in the Star Wars franchise, but has yet to announce whether he will be working on a sequel story: some of us are still waiting on Starchitecture Wars.

Share on Facebook


[ By WebUrbanist in Architecture & Public & Institutional. ]

[ WebUrbanist | Archives | Galleries | Privacy | TOS ]


WebUrbanist

 
Comments Off on Clone Wars: How Star Architect Frank Lloyd Wright Inspired the Design of Naboo

Posted in Creativity


How to Use the Clone Stamp Tool in Photoshop to Make Clear Skin

06 Apr

We’re all beautiful. Sometimes however, we have imperfections that can be a distraction (most often they are magnified in our minds and really not as bad as we think). In this tutorial, I am going to show you how you can use a basic Photoshop tool, the Clone Stamp, to create clear, natural looking skin in your photos.

Image 1

It’s always a good idea to work on a separate layer when editing or retouching images in Photoshop. Once you have your image open, you should create either a new layer or a duplicate layer which you will edit on. You can create a new layer by clicking the new layer button in your Layers Panel, or by selecting Shift+Ctrl+N on a PC (or Shift+Command+N on a Mac). If you prefer to create a copy layer like I have, you can right click on the image in the Layers Panel and select the Duplicate Layer option provided. If you prefer to use keyboard shortcuts, you can simply press Ctrl+J if you’re using a Windows PC, or Command+J if you’re using a Mac.

Image 2

Select the Clone Stamp tool from the tools panel, it conveniently looks like a miniature office stamp. In the options bar at the top of your screen, ensure that your brush softness is set to zero, the mode is normal, and it is set to sample Current & Below. You can keep your opacity anywhere between 10 and 30% depending on the subject. To get a natural looking result, it’s best to gradually work your way up to the final complexion or shade you are trying to attain.

Image 3

Image 4

Zoom in on the area you would like to retouch by pressing Ctrl (or Command) and the plus (+) symbol on your keyboard. In this image, I’m going to focus on the shoulders mainly. You don’t need to zoom all the way in to the area, but ensure that it’s zoomed enough for you to clearly see the area you are trying to adjust.

Image 5

The Clone Stamp tool works by allowing you to duplicate a selected area, over to another section of your image. It’s really great for removing unwanted elements from your photos. Hold down the Alt key on your keyboard and click on an area of skin close to the spot you are trying to remove. If your spot is lighter than the overall skin tone, select an area that is darker than the spot; if the spot is darker than the surrounding skin, you will make your selection from an area that is slightly lighter than it.

Play around with your Clone Stamp brush size and the opacity, until you find a combination that gives your best results. You will more than likely end up using a variety of brush sizes and opacities for the image (change the sample area frequently as well so you don’t get a repetition of patterns). The clone stamp method is very effective at clearing skin but requires patience on your part. A few other minor adjustments resulted in the final image below.

Image 6

With practice and patience you can clone your way to clear skin with the Clone Stamp tool. Have fun!

Please share any questions and comments you have about using the Clone Stamp tool to make clear skin.

googletag.cmd.push(function() {
tablet_slots.push( googletag.defineSlot( “/1005424/_dPSv4_tab-all-article-bottom_(300×250)”, [300, 250], “pb-ad-78623” ).addService( googletag.pubads() ) ); } );

googletag.cmd.push(function() {
mobile_slots.push( googletag.defineSlot( “/1005424/_dPSv4_mob-all-article-bottom_(300×250)”, [300, 250], “pb-ad-78158” ).addService( googletag.pubads() ) ); } );

The post How to Use the Clone Stamp Tool in Photoshop to Make Clear Skin by Tricia Bent appeared first on Digital Photography School.


Digital Photography School

 
Comments Off on How to Use the Clone Stamp Tool in Photoshop to Make Clear Skin

Posted in Photography


12 Tips for Mastering the Clone Stamp Tool in Photoshop

29 Apr
Clone Stamp Tool - Opera Garnier shot

You will not often find the stairs of Opera Garnier in Paris free of people, so you will need to put the Clone Stamp tool to work to remove the people if you want a clean picture. This applies at many other tourist destinations as well.

There are a lot of good post-processing tools available for making minor edits to your photos. Within Photoshop, there are the Healing Brush and the Spot Healing Brush tools. Lightroom now has its own healing brush. Those are great for minor edits to your photos like removing spots or power lines. When it comes time for serious, intensive surgery on your photos, however, there is no substitute for the Clone Stamp tool. You will only find this in Photoshop and Photoshop Elements, there is no Lightroom substitute.

Getting started with the Clone Stamp tool is simple. You just have to tell Photoshop two things: (1) where you want to replace the pixels (target area), and (2) from where Photoshop should take the pixels to use as replacements (s0urce area). To use the Clone Stamp tool, just follow these steps:

  1. Select the Clone Stamp tool from the tool bar on the left side of your screen (you can also use the keyboard shortcut S). Once selected, set the brush size and hardness.
  2. Put your cursor in the area where you want to change the pixels.
  3. Select the source area: Press the Alt key (your cursor will now become a target) and move your cursor to the location where you want to take pixels from (source area). Click your mouse in that location.
  4. Paint in the target area: Release the Alt key and move your mouse back to the original location. Hold down the mouse button and paint in the pixels from the location you chose.

That is a simple process, but if you have used the Clone Stamp tool you realize that there is a lot more involved if you want to master it. This article will provide you with some tips to move you along the road towards conquering this important tool in Photoshop.

#1 – Work on a New Layer

First, always create a new layer before making changes with the Clone Stamp tool. Any changes you make should be made on the new layer. You can flatten the image when you’re done.

Why should you do this? There are many reasons. First of all, it is non-destructive – meaning you are not changing the underlying pixels of your image. In addition, when you use a layer, you can delete it if you don’t like where the changes are going. You can also create a mask if there are portions of the changes that you decide later you do not want. Finally, you can target adjustments to just the cloned areas if they are on a new layer (as will be shown below).

Creating a new layer is easy; simply press Ctrl+J (Cmd+J on Mac) to create a duplicate. You can also press Shift+Ctrl+N (Shift+Cmd+N on Mac) to create a new blank layer, but if you do so, make sure that you have “All Layers” selected as your source in the Clone Stamp Tool settings.

Clone Stamp Tool - Work on a New Layer

I prefer working on a new layer (as opposed to a duplicate layer) but either way will work.

#2 – Zoom in (way in)

When working with the Clone Stamp tool, zoom in on the area you are working on. In fact, zoom way in (to 100% even). That will help isolate the area you are working on, and importantly, it will also allow you to work at a much greater level of detail than you otherwise would. Make your changes look as good as you can at this higher level of detail, then when you zoom back out, the changes will be indistinguishable (which is what you want).

A shortcut for zooming quickly is to hold the Alt key with your left hand while using the scroll wheel on your mouse to zoom in and out (or use Cntrl/Cmd and the + or – key on the keyboard). That will allow you to move in and out quickly.

#3 – Set Your Brush Size Quickly

You will change your brush size often when working with the Clone Stamp tool. You should do this often to make sure that your brush size is tailored to the change you are making. Changing the size through the Brushes panel is cumbersome. Instead, use the keyboard shortcuts for changing brush size:

  • Left bracket [ makes brush smaller
  • Right bracket ] makes brush larger

Using these keys will allow you to rapidly tailor your brush to the specific circumstance.

#4 – Set the Proper Brush Hardness

The Clone Stamp brush’s edges can be set to whatever hardness you desire. Hardness determines the level to which the cloning will blend in with the surrounding pixels. If you set the hardness level more toward 100%, the edges will be hard and definite. If you set the hardness more toward 0%, the edge will blend in with the surroundings.

Clone Stamp Tool - Setting Hardness of Brush

In general, keep the hardness level at 0%. That will help you seamlessly blend in the effect. There will be times, however, where you are working near a defined edge, in which case you should increase the hardness. Even then around 50% will usually do. Setting the hardness any higher creates harsh transitions that are dead giveaways to your use of the Clone Stamp tool.

#5 – Clone Without Adjustments

Do your cloning before making other adjustments to contrast, color and other changes often made via adjustment layers in Photoshop. If you use the Clone Stamp tool after creating those layers, you are baking the changes permanently into your picture when you clone.

Clone Stamp Tool - Adjustments

However, in some cases you will have already made changes on an adjustment layer, and you need to decide whether your cloning should include those adjustments. Photoshop lets you decide whether to include those changes in your cloning. After you have selected the Clone Stamp tool, the top row of your screen will include a circle with a line through it (see graphic above). Photoshop defaults to applying the changes of any adjustment layers, but if you click on this icon, Photoshop will ignore any adjustment layers when cloning.

#6 – Grab the Low Hanging Fruit

Most of the time your pictures will have some easy items to clone out, as well as some harder things. Clone out the easy ones first. In addition to giving you confidence in the tool, this will also help you when the time comes to make the hard changes.

How will that help you? Remember that you need clear space from which to draw pixels when using the Clone Stamp tool. By making the easy changes first, you are doing just that so you can draw replacement pixels and will make your job easier when it comes time for the harder, more in-depth changes.

#7 – Watch for Patterns

Sometimes you want to include patterns in your cloning. In that case, when selecting pixels from which to draw, try to find patterns in your picture that match the area you are replacing. For example, if the background is a building, look for a similar building. Then make them match (which will be the subject of the next tip).

Clone Stamp Tool - removing distractions without creating a pattern

Here is a different example to show the Clone Stamp tool in another context. The right side of this image was filled with distractions, but the Clone Stamp tool eliminates them. Be careful that you do not create patterns by using pixels immediately adjacent, or it will give away your use of the Clone Stamp tool

But many times you will not want there to be any discernible patterns in your cloning. Usually a pattern is a dead giveaway to your having cloned something out. In that case, the way to ensure that there will be no patterns is to keep resetting your source point. Sample from one area and clone one part, then sample from another area – repeat frequently. Keep doing that to blend everything together without repeating a pattern.

#8 – Follow the Lines

A key to successful use of the Clone Stamp tool is making all the lines in your picture match. Even slight deviations look fake and destroy the effect you are trying to achieve. For example, in a landscape setting make the edges of tree branches match up. In an urban context, follow lines in buildings such as roof lines, doorways, and patterns on the ground.

When you are using the Clone Stamp tool, start with the lines and then let the rest of the pixels fall where they may. After that, if you need to go back over other areas, you can do so.

Here I've zoomed in on a portion of another shot of the Opera Garnier. Use the patterns on the floor and door to recreate the space where you clone over the people.

Here I’ve zoomed in on a portion of another shot of the Opera Garnier. Use the patterns on the floor and door to recreate the space where you clone over the people.

#9 – Avoid Selecting from Adjacent Areas

As previously mentioned, a dead giveaway of Clone Stamp tool usage is repetition. The Clone Stamp tool is all about repetition – you just need to do it in such a way that the viewer doesn’t notice it. If you draw pixels from an immediately adjacent area, you are risking the viewer noticing the repetition. Take the pixels from somewhere else in the picture instead.

Inadvertently creating a pattern is an easy trap to fall into because the immediately adjacent areas usually are the closest in color and tone to the area you want to replace. As you move further away, tones and colors change so that the pixels get harder to match. Working hard to find a way to use pixels from somewhere else in your picture will pay dividends because the viewer won’t see the repetition.

#10 – Muddle Through (accept the messiness)

By now you have fixed all the easy areas in your picture and you’re ready to tackle a bigger problem. It might be a crowd of people or a car that entered your frame, but it is a large area of your picture. This is the scary part of using the Clone Stamp tool.

The key is to just dive in. Don’t try to figure it all out beforehand (you never will). You can do this in a couple of different ways:

  1. Go big first: Set your brush a little larger than you might otherwise use and just replace the entire area in one fell swoop (and then clean up with a smaller brush), or
  2. Go small and steady: Stick with the smaller brush and paint in gradually, but the key is to keep going. Remember that you can go over it again. Whatever you are doing, while it is probably not perfect, will undoubtedly look better than what you started with.

The key thing is just to do it. There is a tendency to freeze up and plot the entire change before doing anything, which causes you to stare at the computer screen for long periods of time.

Remember, you can always undo what you’ve done (Ctrl/Cmd+Z). In addition, because you followed tip #1 above and are working on a new layer, you can always mask this area off or delete it if it isn’t heading in the direction you want.

#11 – Use the Mirror Function

You can affect a lot of settings involving the Clone Stamp tool in the Clone Source panel (to see it, go to Window and then click on Clone Source). For instance, you can change the shape of the brush or the angle of the replacement pixels.

One of the most useful features in the Cone Source panel is the flip-horizontal option in the middle of the panel. If you click on it, the pixels will be replaced in the opposite horizontal direction as the source. This can be extremely useful in many instances since often you will be dealing with a symmetrical subject where you can now draw from the other side.

Clone Stamp Tool - Flip Horizontal setting

A typical example where you might want to use the flip horizontal option is where something covers one side of a doorway or window that you want to remove. By clicking on flip-horizontal, you can use the other side of the doorway or window as your source. Take another look at the Opera Garnier examples above and you will see how the flip horizontal tool would be used quite frequently whenever your picture contains any symmetry (I used this feature in those pictures quite a bit).

#12 – Change the Cloned Areas with Adjustment Layers

Sometimes your cloned areas just won’t look exactly like the surrounding areas. Perhaps it is too bright or too dark, or perhaps the colors are just off a little bit. You can fix it without affecting the surrounding pixels.

Clone Stamp Tool - tying adjustment layers

One of the great benefits of working on layers is that you can create adjustment layers that affect only the areas you just cloned. Simply create a new adjustment layer (levels, curves, or hue/saturation), which will appear above your cloning layer. Then hold down the Alt key and click at the bottom of the adjustment layer (you will see your cursor change). Doing so will apply the changes of the adjustment layer only to the layer below it.

Conclusion

Remember that using the Clone Stamp tool can be a messy process. Don’t worry if you find yourself having to redo changes or make things up as you go. There is no magical “clean” process. One of the fun parts about the cloning process is the problem-solving that goes into it. Take your time and just keep moving. You can always redo your changes or, if you are working in layers, get rid of them without losing the rest of your work.

The Clone Stamp tool will save more pictures than almost any other tool in your post-processing. If you master it, you can remove almost anything in your pictures that you do not want.

googletag.cmd.push(function() {
tablet_slots.push( googletag.defineSlot( “/1005424/_dPSv4_tab-all-article-bottom_(300×250)”, [300, 250], “pb-ad-78623” ).addService( googletag.pubads() ) ); } );

googletag.cmd.push(function() {
mobile_slots.push( googletag.defineSlot( “/1005424/_dPSv4_mob-all-article-bottom_(300×250)”, [300, 250], “pb-ad-78158” ).addService( googletag.pubads() ) ); } );

The post 12 Tips for Mastering the Clone Stamp Tool in Photoshop by Jim Hamel appeared first on Digital Photography School.


Digital Photography School

 
Comments Off on 12 Tips for Mastering the Clone Stamp Tool in Photoshop

Posted in Photography