RSS
 

Posts Tagged ‘Camera’

OmniVision offers 8MP BSI CMOS and inexpensive 5MP camera modules

31 Oct

OV5645_media_image.png

Connect: Sensor maker Omnivision has announced two smartphone-targeted CMOS camera modules. The OV5645 is built on an affordable 1/4″-type 5MP sensor built around a standardized MIPI interface, allowing processing functions to be passed to the host processor, rather than having to include JPEG compression in the device. The OV8835 uses a higher-end, 1/3.2″-type 8MP second-generation BSI CMOS sensor with claimed ‘best-in-class pixel performance.’ 

News: Digital Photography Review (dpreview.com)

 
Comments Off on OmniVision offers 8MP BSI CMOS and inexpensive 5MP camera modules

Posted in Uncategorized


Making Basic panel adjustments in Camera Raw | lynda.com tutorial

31 Oct

This Camera Raw tutorial discusses how to make image adjustments using the Basic panel and the Crop tool. Watch more at www.lynda.com This specific tutorial is just a single movie from chapter ten of the Photoshop CS5: Athletic Retouching Projects course presented by lynda.com author Chris Orwig. The complete Photoshop CS5: Athletic Retouching Projects course has a total duration of 6 hours and 9 minutes, and covers removing blemishes from the subject and the background, adding motion blur, enhancing muscle tone, making adjustments to photos shot in an outdoor setting, and more. Photoshop CS5: Athletic Retouching Projects table of contents: Introduction 1. Outdoor Portrait 2. Simplicity 3. Strength 4. Speed 5. Gym Workout 6. Energy 7. Pushup 8. Indoor Track Sprint 9. Enhancing Strength 10. Surfer Portrait 11. Underwater Portrait 12. Jump 13. Father and Son Portrait Conclusion

Check out Bas Rutten’s Liver Shot on MMA Surge: bit.ly In this video, Mahalo expert Justin Z. briefly explains how the Sharpen tool works in Photoshop. Sharpen Tool ——————————————————————— The Sharpen tool is a neat feature that allows you to make pixels look slightly more jagged. On photographs, it will help create a sharpened effect that will make the selection look clearer. 1. To access this tool, click and hold the “teardrop” icon in the tool bar. Drag down to the tool that looks like a “triangle” that says Sharpen Tool.2. Click and drag on a portion of your canvas to see the effect. This tool can prove useful for both enhancing and hiding blur created by photographs. You can use it for all kinds of effects.3. The top Options panel has a few choices: * Brush Size and Stroke * Strength (which determines how much blur will be created with each stroke) * All Layers (which allows you to use the Sharpen tool on all layers at once) Read more by visiting our page at: www.mahalo.com
Video Rating: 5 / 5

 
Comments Off on Making Basic panel adjustments in Camera Raw | lynda.com tutorial

Posted in Retouching in Photoshop


How To Deal With A Dirty Camera Sensor

30 Oct

yachts-sensor-cleaning

Have you ever noticed little black specks appearing in brighter parts of your photos? These are dust specks that have found their way on to the sensor of your DSLR. Although not a serious problem, I think they’re amongst the most infuriating things photographers encounter! So I’m going to provide an easy, step-by-step process for removing them.

Firstly, I’ll just mention that one very simple means of preventing dust from landing on your sensor in the first place is to angle your camera body downwards when changing lenses. Similarly, when a really good shot appears to have been blighted by the presence of these pesky blobs, just use the clone-stamp tool in Photoshop or Lightroom to eliminate them.

yachts-sensor-cleaning-1

Cleaning Your Sensor, Step-By-Step:

  1. First things first. Get an idea of what you’re dealing with by taking a test shot. The idea here is to create an image that shows any senor dirt at its absolute worst.You’ve probably noticed that sensor dirt is only visible against bright parts of an image, like the sky. It’s also exaggerated when the aperture is at a wide setting. So, find a plain white subject, like a wall or a featureless overcast sky, focus on infinity and select the maximum aperture. Take the shot.
  2. Now it’s time to inspect the image. So upload it to your computer and open it on whatever processing software you use. Increase the contrast a touch to make things even clearer, before zooming in to 100%.This should give you a really clear idea of what needs to be done, and in what position some of the worst offending specks are.
    sensor-preview-dirty
  3. In your camera’s menus find the ‘mirror lock-up’ option and turn it on. Sometimes this is called ‘sensor cleaning mode’ or similar. This causes the reflex mirror inside the camera body to swing up and remain open, exposing the image sensor.
  4. The first tool you’ll need is a ‘bulb-blower’, which is a rugby ball shaped rubber air pocket with a thin plastic tube attached. Squeezing it causes air to be propelled at reasonably high pressure, and quite accurately, from the end of the tube.Remove the lens from your DSLR and hold the camera at a downward angle (this is important as it allows the dust to fall out of the camera). It’s not a bad idea to secure the camera in position on a tripod. Now carefully move the tube of the bulb blower towards the sensor, being careful not to make contact with any internal parts. Pump air for about 30 seconds to disperse any loose dust particles. Return the air blower to its pouch and re-attach the lens to your camera.
  5. Now take another test shot, exactly as in steps 1 and 2. Has the air blower been successful? If there are no longer any visible dust specks, job done. If there seem to be a few very faint ones, you can decide whether it’s worth having another go with the blower (remember, your test shots show the dust particles at their very worst).Sometimes you’ll find that there are some truly stubborn marks which haven’t even moved position in the slightest. Often these appear with a slight ring around them and have been become attached to the sensor with more than just static. If you see some of these, it’s time for step 6.
  6. To get rid of more stubborn marks, a sensor cleaning brush can be an effective tool. Select mirror lock-up (step 3) and position the camera at a downward angle, using a tripod if you wish to have maximum control. Take a sensor cleaning brush and carefully swipe it across the face of the sensor once.Don’t be tempted to go back and swipe it across the sensor again, for obvious reasons. The whole idea is to transfer the dust from the senor to the fine bristles of the brush. So once you’ve picked them up, remove the brush from the camera and blast air through the bristles with the air blower to clean them. Now you can return to the sensor and swipe the brush across it another time. When finished, return the brush to its storage box so that it doesn’t pick up any dust.
  7. Now for another test shot (as per step 1). Inspect the image and decide whether further cleaning is needed (as per steps 2 and 5). You may well find that those really stubborn marks have still stayed put, in which case it’s time for step 8.
  8. The last tool for cleaning sensors is a sensor swab, which comes with a special solution. Set everything up as before, with mirror lock-up on and lens removed. For this, it’s best to work sitting down with the camera body facing upwards for easy access.Apply a small amount of cleaning solution to both sides of a swab. It doesn’t want to be dripping or almost dry, but wet enough to budge stubborn particles. Swipe both sides of the swab across the sensor once. Use downward pressure (remember, you’ve already failed to get rid of these specks with an air blower and brush), but do treat it like the extremely expensive object that it is. Discard the swab and repeat with a new one.
  9. Re-attach the lens and take another test-shot (as in step 1). You should find that even those dust specks that seemed to have put down roots have now been blasted away! Zoomed in at 100%, you should have a satisfyingly pristine sensor.
    snesor-preview-clean
  10. If it turns out that there are still little specks of dirt, you have a couple of options: a) Have another go with the swabs, this time applying a touch more downward pressure and using a bit more solution, or b) send your camera off for a professional clean.

There’s no need to be afraid of cleaning your camera’s sensor yourself. As long as you use the right equipment and are not heavy handed, you should rarely need to spend money on a professional clean. Personally, I tend to find that the air blower does the trick 90% of the time. Don’t forget the clone stamp tool either, which is an invaluable asset for rescuing dust-affected images.

Josh Austin is a photographer based in the UK, with a particular interest in landscape, travel and street photography. When not out shooting he shares tips on digital photography through his blog Photography Art Cafe.

dslrBlog

 
Comments Off on How To Deal With A Dirty Camera Sensor

Posted in Photography


LowePro S&F Camera Exchange AW Bag 100 [REVIEW]

29 Oct

I see a lot of bags and packs that look like gimmicks trying to be passed off as something the average consumer can’t live without. Often they are toured as such. Few of them live up to the concept of making photography easier.

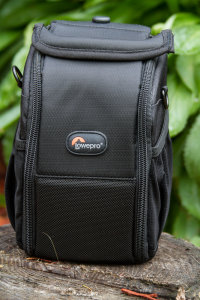
And that is why I eyed the LowePro S&F Lens Exchange 100 AW with a skeptical eye. “Look!” I imagined the PR rep shouting from on high, “You can change lenses more easily!!” I’m not a fan of individual lens cases and I usually only carry one extra lens not on my camera when I travel. But with my recent need to test a Tamron 90mm Macro, I decided to see if the small bag could deliver when I used it in conjunction with a Canon EF 10-24mm.

Specifications

  • Internal Dimensions: 11 x 11 x 17 cm (4.33 x 4.33 x 6.69 in)
  • External Dimensions: 14 x 14 x 19.5 cm (5.51 x 5.51 x 7.68 in)
  • Weight: 0.4 kg (0.88 lbs)

In The Real World

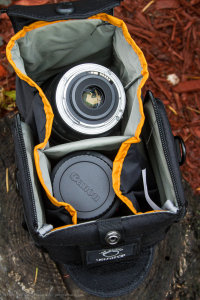
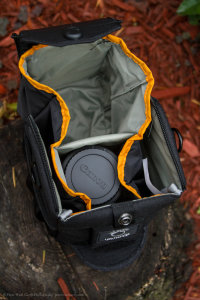
The concept is simple: When opened, this bag has holders for two lenses. It can’t hold them both when closed, but the idea is you open the bag, expand it out, drop one lens into the empty holder, swap end caps and put the first lens on your camera. It’s meant to make things easier for one handed operation when you don’t have a place to set your second lens during a swap.

And it works! I’ve been using the under-the-arm technique for a while and it frankly frightens me. I’m not the steadiest of hands at times and dropping a $ 1500 lens is a bad idea. This bag actually cures that problem.

What’s more, this bag doesn’t try to be everything to everyone and I really like that. It holds a smaller lens (like a 16-35mm, 50mm or even 90mm) well and has space for another. I didn’t try it with a 16-35mm and the wide lens hood, but it should fit as well. It can’t handle a 70-200mm but for that it has a big brother, the 200 model.

There are a couple of elastic pouches on the sides to hold lens or end caps. Beyond that, the bag isn’t larger than it needs to be to accommodate extra stuff. No pockets for keys or extra cards or cell phone. Just a lens bag.

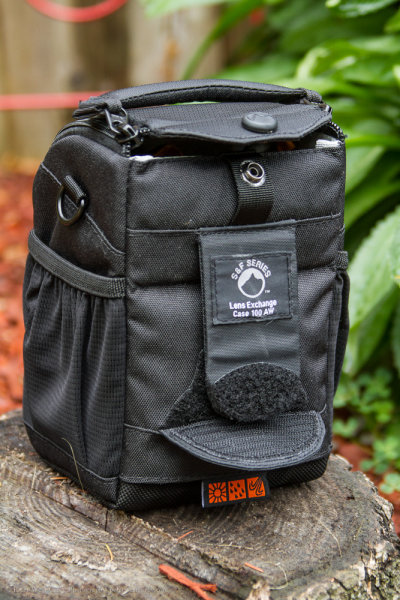
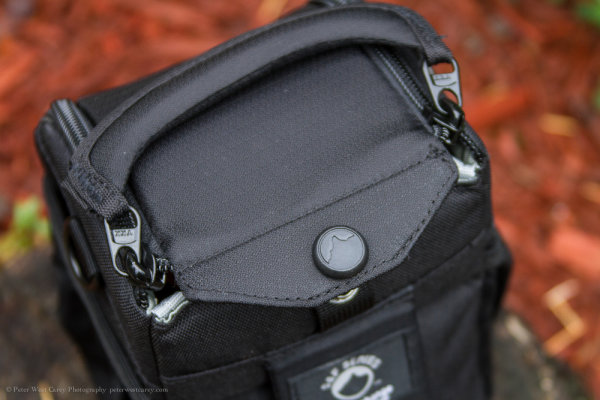
There is a nice belt loop velcro attachment on the back built in the normal, rugged LowePro fashion. The zipper pulls on the top are smooth, as I’ve also come to expect from LowePro and the use of a single handle is astonishingly easy. I’ve tried binding it up and it keeps on working properly. Very well designed for being so dang simple. There’s also a snap on the back (when both of your hands are free) to help secure the bag.

A shoulder strap is supplied and there is a rain cover. The rain cover seems a bit silly to me especially since it has holes form the shoulder strap. There is no way to get into the bag with the shoulder strap attached and the rain cover on. I have to remove the shoulder strap then take the cover off, which obviously requires more than two hands and a place to set the bag, most likely. 
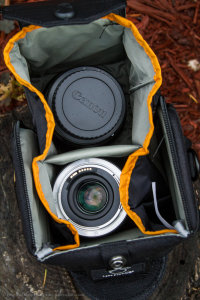
If the rain cover were not attached to the bag (a long time gripe of mine about LowePro rain covers in general) I could flip the rain cover the opposite way and still work the system with one hand.

Conclusion

The LowePro S&F Lens Exchange 100 AW works and despite me not wanting to like it (or lens pouches in general) I will be using it with my other bags when I want a slimmed down kit. I can attach it to the hip belt of a f-stop bag or the outer loops on a smaller camera/lens bag. I can also just loop my belt through it and forget about the bags altogether.

It also works better for me than the standard LowePro lens cases. With this bag, the case opens wise (I find those single lens bags have a lid that likes to flop closed when I don’t want it to) and the opening with a handle is just easier.

Get a price on the LowePro S&F Camera Exchange AW Bag 100 at Amazon.

Post originally from: Digital Photography Tips.

Check out our more Photography Tips at Photography Tips for Beginners, Portrait Photography Tips and Wedding Photography Tips.

LowePro S&F Camera Exchange AW Bag 100 [REVIEW]


Digital Photography School

 
Comments Off on LowePro S&F Camera Exchange AW Bag 100 [REVIEW]

Posted in Photography


New Camera Setup Tips – Super Secret Project

29 Oct

froknowsphoto.com It is really exciting when you get a new camera whether it is a new Nikon D3100 or D7000 or Canon T2i or 60D. But as soon as you take it out of the box what are the 7 things I suggest you set first in the menu? 1. Set the Camera to RAW and never take it out (or RAW + JPEG if you are new to RAW) 2. Set the card Lock – make sure that the camera will not fire without a memory card in it. 3. Set your date and time – make sure you do not let it write the date and time on the picture. 4. Set your White Balance to Auto – You are shooting RAW and will tweak it if needed later. 5. Turn off AUTO ISO if it is on – You will make better selections than the camera 6. Picture Review Off – This will keep you from looking at every single picture you take 7. Image Rotation On – This will orient the vertical shots properly when you bring the files into LightRoom There are a lot more settings in the camera I could talk about but I find these 7 will help you get off to a great start. To follow the super secret project please go here froknowsphoto.com
Video Rating: 4 / 5

 
Comments Off on New Camera Setup Tips – Super Secret Project

Posted in Nikon Videos


Digital Photography 1 on 1: Episode 47: Understanding Camera Settings: Adorama Photography TV

28 Oct

Adorama Photography TV presents: Pre-set modes like “Sports” and “Night Portrait” make it easy for us to just point and shoot. If you’re new to photography, two of the most important things to learn are aperture and shutter speed settings as these will give you a lot of creative control. If you’re not sure what settings to use Mark has an easy to follow spreadsheet to help you determine the right settings. Go here to download the spreadsheet and for related videos: www.adorama.com Visit www.adorama.com for more photography videos! Send your questions to: AskMark@Adorama.com

 
Comments Off on Digital Photography 1 on 1: Episode 47: Understanding Camera Settings: Adorama Photography TV

Posted in Photography Videos


Man With a Camera – Turntable

28 Oct

International superstar and iconic tough guy Charles Bronson stars in this gritty, action-packed TV series. Bronson portrays Mike Kovac, a New York City freelance photographer who specializes in getting difficult shots other lensmen cannot. Assisting law enforcement and insurance agencies, he invariable winds up acting as a private eye and gets himself into plenty of trouble!

 
Comments Off on Man With a Camera – Turntable

Posted in Photography Videos


55% of dPS Readers Will Have a New Camera in the next Year

28 Oct

Last month we asked our readers whether they were planning on buying a new camera? Just over 28,000 readers responded and the results are now in!

New camera poll

Looks like 55% of our readers will have a new camera in their camera bag in the next 12 months!

If you are one of them – which one will it be?

Post originally from: Digital Photography Tips.

Check out our more Photography Tips at Photography Tips for Beginners, Portrait Photography Tips and Wedding Photography Tips.

55% of dPS Readers Will Have a New Camera in the next Year


Digital Photography School

 
Comments Off on 55% of dPS Readers Will Have a New Camera in the next Year

Posted in Photography


The Sony alpha 35 Digital SLT camera

27 Oct

Paul Genge from Sony introduces the new Sony alpha 35 digital SLT camera. This new digital camera is packed with great features, yet maintains Sony’s easy to use focus, and enables both the amateur and professional photographer to capture unprecedented pictures, or even high resolution digital movies.
Video Rating: 4 / 5

In this 6th instalment of Pro Tog, Cheap Camera, commercial photographer Jennifer Chau gets a cheap camera with a difference. Find out how she copes with using this “cheap” camera. Jennifer Chau is a veteran photographer that specialises in still life and has worked for such big names as Sotheby’s. Find out more about her here: www.chaustudio.com
Video Rating: 4 / 5

 
Comments Off on The Sony alpha 35 Digital SLT camera

Posted in Photography Videos


CANON 60D better than any VIDEO CAMERA

27 Oct

quick test of the movie mode on the 60d

My review of Flycam nano. Using Canon 60d, Tokina 11-16 2.8 with Manfrotto quick release model 323 RC2 To learn how to balance the flycam go to Em’s blog: www.vimeo.com

 
Comments Off on CANON 60D better than any VIDEO CAMERA

Posted in Nikon Videos