RSS
 

Posts Tagged ‘Camera’

Lights, camera, action: Manfrotto Digital Director quick review

29 Oct

Manfrotto’s Digital Director, introduced in April, is a departure from its usual array of tripods and tripod heads. It’s a device designed to hold an iPad Air tethered to a DSLR, providing a large live view screen, access to camera controls and wireless sharing options. Shooting with a large screen can be a revelation compared to using a 3″ LCD, but the Digital Director is pretty pricey. Is it worth the cost? Read more

Articles: Digital Photography Review (dpreview.com)

 
Comments Off on Lights, camera, action: Manfrotto Digital Director quick review

Posted in Uncategorized


Leica introduces SL system with Typ 601 full-frame mirrorless camera and lenses

22 Oct

Leica has introduced the full-frame SL system, including the SL Typ 601 ILC and three compatible SL lenses. The SL uses a 24MP CMOS sensor adapted from the Leica Q, and true to form its weather-sealed body is cut from a single block of milled aluminum. Read more

Articles: Digital Photography Review (dpreview.com)

 
Comments Off on Leica introduces SL system with Typ 601 full-frame mirrorless camera and lenses

Posted in Uncategorized


Top 10 Things to do When Your New Camera Arrives

20 Oct

TripodAtGoldenGate

I recently found myself in the position of having to buy a new camera. It is an exciting time, but the new camera will take some getting used to.

Once you have put the battery in, the lens on, and inserted the memory card, it’s time to make your camera your own. Here are some steps to do so:

#1 Set your diopter

If your camera has a viewfinder, there will be a tiny dial near the eye piece. This is called the diopter and it affects how you see through the lens. Be sure to set it for your eyes, or things might not appear sharp when you look through the viewfinder.

Diopter

Actually, if you’ve been shooting for a while and have never set your diopter, go ahead and do it now. You might be amazed at how much clearer things appear.

#2 Set your Modes

You already know to set your mode dial (get it out of Automatic), but there are some other modes to worry about.

First, set the Drive Mode to what you want. I suggest Continuous because it will allow you to bracket your photos, or just shoot rapidly. If you do it now, you won’t be in the field wondering why your camera is only taking one photo at a time.

Next, you will need to set your Metering Mode. This is the way the camera determines the proper exposure level. The camera can either use a large portion of the scene to measure the brightness level, or just one specific point. The choices you have are:

  • Automatic Mode: which is called Evaluative by Canon, Matrix by Nikon, and Multi-Segment by Sony
  • Partial Metering: where the camera uses the center portion of the scene to measure light
  • Spot Metering: where the camera meters using only one specific point (small area)

Any one of these modes is fine, just be sure to set the one you like best (Spot metering is more advanced so use with caution until you are up to speed with it).

Finally, set your Autofocus Mode, and by that I mean setting the focus points. You can either have the camera automatically select the focus points, or you can do it. If you do it yourself, set it so that the camera uses the center point to focus, it is the fastest and most accurate.

#3 Add your externals

Most of the time you will be adding a few things to your camera. Obvious items are the strap and the battery grip, if you have one. But another item you should add right away is the quick release plate for your tripod. That way, you won’t forget it, and you will also be able to put the camera on the tripod quickly when you are in the field.

Tripod-Plate

While we are on the subject of external items, this is probably a good time to make sure you have an intervalometer, or remote shutter release, that is compatible with your new camera. These things are very cheap these days, so go ahead and get one.

#4 Arrange Image Review

All cameras will show your picture on the LCD after you take it. The camera will not necessarily do it the way you want though. Here are the settings to check to make sure it is set up according to your preferences:

  • Length of time: In the camera’s menu, there will be an option to set the length of time your image appears. You might as well set this on its longest setting, as you can always click it away.
  • Orientation: If you shoot with your camera turned to a vertical orientation, sometimes the camera will turn the image on your LCD so it fits horizontally on the screen. The result is a tiny image, so you may want to turn this off (Note: this may be called “Auto Rotate” in some cameras).
  • Show Histogram: Definitely set your review so that it shows the histogram with the image review. That is the best way to make sure you have a proper exposure.
  • LCD brightness: Set your LCD brightness level to the highest level. Otherwise, when you are out in the sun you will have a very difficult time seeing the LCD at all.

While I am on the subject of the LCD, I want to mention one tricky little item for Canon shooters. On many Canon cameras, to use the Live View function, you have to go into the menu and enable it. I recently rented a Canon camera and actually thought it was broken because the Live View didn’t work. Turns out, I just needed to enable it!

#5 Set the Image Quality

The next setting to check is image quality. This is where you tell the camera what type of file to create.

Do I have to tell you that this setting should be Raw? No? Good. You might as well have the camera also create a JPEG while you are at it though. It won’t cost you anything but a small amount of memory.

#6 Create a Custom Menu

There are certain things you will only want to access sometimes, but you will want to get to them fast. Mirror Lock-up and Auto Bracketing come to mind for me. Fortunately, most cameras allow you to create a custom menu. That way you can add the features and settings you use the most, to one menu screen. That will save you a lot of time digging around in your camera’s menu.

Custom-Menu

My custom menu settings

#7 Set up Back Button Focus

Normally your camera will focus when you press the shutter button halfway down. That works okay, but the better way is to set your camera to instead focus when you press a button on the back of the camera. This way the focus will not automatically reset with each picture. The setting will be in your camera’s menu.

#8 Protect your gear

I suggest using a label maker to put a label with your name and phone number on each camera, lens, or other piece of equipment you own. We are all careful with our gear, but sometimes things move fast, and I know people that have inadvertently left lenses or other items behind. What are the odds that someone who finds something you left behind will actually call the number on the label to return the item? I don’t know. Maybe they are not high. But I do know that the odds of someone returning something with no ability to identify where it came from to be precisely zero percent.

You can also add some protection for your gear by registering it with Lenstag. It is a free service where you register your camera and/or lenses with them, then if your item is stolen they put the word out to help you recover it. Does it actually work? Mercifully I’ve never had anything stolen, so I don’t know. But it is free so you might as well try it.

#9 Set up the Wifi

Almost all new cameras have a Wifi feature these days. To take advantage of it, you will have to download an app to your phone and go through a set-up process. It’s best to sit down and do that right away so that when you are out and about you are ready to take advantage of the Wifi feature.

Wifi

Set up the connection between your camera and your phone to enable remote shooting and camera image viewing.

#10 Read the Manual

You knew this was coming, didn’t you? Yes, you need to read your camera manual. Yes, it can be tedious, but you’ll be glad you did.

Do you have any other tips to add for new camera owners? Please share in the comments below.

googletag.cmd.push(function() {
tablet_slots.push( googletag.defineSlot( “/1005424/_dPSv4_tab-all-article-bottom_(300×250)”, [300, 250], “pb-ad-78623” ).addService( googletag.pubads() ) ); } );

googletag.cmd.push(function() {
mobile_slots.push( googletag.defineSlot( “/1005424/_dPSv4_mob-all-article-bottom_(300×250)”, [300, 250], “pb-ad-78158” ).addService( googletag.pubads() ) ); } );

The post Top 10 Things to do When Your New Camera Arrives by Jim Hamel appeared first on Digital Photography School.


Digital Photography School

 
Comments Off on Top 10 Things to do When Your New Camera Arrives

Posted in Photography


DJI introduces stabilized Osmo Gimbal handle with 4K 12MP camera

16 Oct

DJI, the maker of Phantom drones, has introduced a stabilized handheld 4K video system that uses a gimbal head to produce smooth video footage. The DJI Osmo is a handle-mount with a 3-axis head that senses movement and cancels out sudden jerks and bumps to ensure the camera moves slowly and the footage looks professional. Read more

Articles: Digital Photography Review (dpreview.com)

 
Comments Off on DJI introduces stabilized Osmo Gimbal handle with 4K 12MP camera

Posted in Uncategorized


How to Get the Most Out of Your Camera Bag

14 Oct

Boulder-Beach-Maine, landscape photography, camera bags, backpack, travel, photography, bags, gear

One of my biggest quests as a photographer who travels is not the search for the perfect shot, but for the perfect camera bag. No doubt you have come across this problem as well. With every bag or backpack I’ve ever owned, the dividers that come with the bags never seem to fit the gear perfectly. They leave compartments that are either too small to hold the lenses I need them to, or so large that the lens I am keeping in that compartment has too much room to move. The result tends to be a lot of wasted space in the bag, and gut-wrenching decisions over which lens to leave behind.

The gear I’m trying to fit includes all of the following: Nikon D810, a flash, 14-24mm lens, 16-35mm lens, 24-120mm lens, 80-400mm lens, 105mm macro lens, and a 24mm f/1.4 lens along with my set of 4×5 glass filters, just to give you an idea. Yes I know there are redundancies, but I have my reasons. So what’s the solution?

ThinkTank Airport Takeoff, backpack, roller bag, camera bag, photography, travel,

I started working with this. You can see that there’s plenty of wasted space and two compartments that I can’t fit a lens in. My 80-400 doesn’t even fit!

For me, the solution was to get rid of the dividers. I’m using a LowePro ProTactic 450AW and a ThinkTank Airport Takeoff. Which bag I use depends on the type of trip I’m taking. Obviously, you still need to pad your equipment. Bags get swung around, put down, picked up, and banged into. The gear moves inside it and without that padding, one way or another it will eventually suffer damage. One option to pad your precious cameras and lenses is to use wraps. There are several brands that make wraps, and they come in varying sizes, to fit different pieces of equipment.  The thing I didn’t like about this option is that when you go to re-wrap the lenses or camera, it takes some time (at least for me) and I didn’t really like the wraps I tried.

Completely removing the dividers from the ThinkTank Airport takeoff allowed me to fit everything I wanted, with plenty of room to spare.

Completely removing the dividers from the ThinkTank Airport takeoff allowed me to fit everything I wanted, with plenty of room to spare.

I went back to dividers after the fiasco with wraps, and gave up on the idea for a few years. But recently, I’ve gone on a few trips where I had to choose something to leave behind, because I just couldn’t get the dividers configured properly. Usually, it meant leaving behind a lens I doubted I’d have a need for, but I always end up wishing I’d brought later.

So I revisited the idea when I was in a camera store and found myself staring at neoprene lens pouches. Neoprene pouches provide padding, and come in various sizes that fit each lens in my kit, without being too snug, or being overly large. The pouches allow me to position lenses and cameras in the bag against each other, without having to worry about how the dividers fit. The neoprene is generally 4-5mm thick, so two pouches side by side have about as much thickness as the velcro dividers do.

camera bag, getting the most from your bag, travel, photography, lenspouch, lowepro protactic 450 aw

This is the LowePro ProTactic 450 AW. I used two dividers to support the lenses and keep them from shifting in transit, but eliminating the middle dividers allow me to fit gear more snugly.

After ripping all of the velcro dividers out of my backpack, I found I could fit everything I listed above pretty nicely. However, I did notice that after wearing the backpack while hiking, the items had a tendency to settle to the bottom, which made it difficult to find things when I opened it. I finally settled on a hybrid solution that has been working extremely well.

I have two full-width dividers running across the LowePro ProTactic backpack. At the bottom of the backpack I placed my 80-400mm lens, with no pouch. It is the only item in this compartment. In the next compartment is room for three lenses, in neoprene pouches.  Next, I used one of the velcro dividers to house my camera, on the side. What I’m then left with is a space that can take one or two more lenses in pouches, or my filters, or one lens and my filters, with some smaller accessories like lens cloths or a flashlight tucked in the middle.

So here’s how to do it:

  1. Measure each lens you plan to store in a pouch.  The interior dimensions should be about a half-inch larger than the lens. I used the LensCoat Lens Pouches.  The beauty of using the pouches is that if I decide to remove a lens from the bag, it is still protected from bumps and drops.
  2. Depending on how you arrange things, you may want a neoprene camera pouch as well. I’m using the LensCoat Body Bag pouches. Choose the one that best fits your camera.
  3. I purchased a Sharpie silver marker, and some stencils from a craft store, to label the outside of each pouch, for easy identification.

I find that if needed, I can fit more into the camera bag, because I’m not limited to what the dividers will allow me to do. It’s still not the ever-elusive “perfect camera bag” that every photographer I know is searching for, but for me it is just a bit closer. What is your ideal camera bag?

lenspouch, pouch, sharpie, stencil, lens, padding, travel

Using a silver Sharpie and a stencil, I marked each pouch to identify which lens was inside.

IMG_0892

Lens pouches marked for easy identification

Have you come up with any other invention solutions to this issue? Do share in the comments below.

googletag.cmd.push(function() {
tablet_slots.push( googletag.defineSlot( “/1005424/_dPSv4_tab-all-article-bottom_(300×250)”, [300, 250], “pb-ad-78623” ).addService( googletag.pubads() ) ); } );

googletag.cmd.push(function() {
mobile_slots.push( googletag.defineSlot( “/1005424/_dPSv4_mob-all-article-bottom_(300×250)”, [300, 250], “pb-ad-78158” ).addService( googletag.pubads() ) ); } );

The post How to Get the Most Out of Your Camera Bag by Rick Berk appeared first on Digital Photography School.


Digital Photography School

 
Comments Off on How to Get the Most Out of Your Camera Bag

Posted in Photography


Lomography launches Lomo’instant Wide camera

14 Oct

Lomography has introduced the Lomo’instant Wide camera. Using Fujifilm Instax Wide film, the camera offers a 35mm equivalent lens and Auto, Bulb, and 1/30sec Fixed Shutter Speed modes. Features cater to those who want to take a little more control over their instant prints, including a multi-exposure button and a lens cap that functions as a shutter remote control. Read more

Articles: Digital Photography Review (dpreview.com)

 
Comments Off on Lomography launches Lomo’instant Wide camera

Posted in Uncategorized


Snazzy Camera Straps For Every Occasion

12 Oct
Straps Gif

Kick that boring black strap to the curb and load up on straps for cameras of all types and events of all sorts.

Check out our hottest, and favorite, straps from the shop!

(…)
Read the rest of Snazzy Camera Straps For Every Occasion (0 words)


© Erin for Photojojo, 2015. |
Permalink |
No comment |
Add to
del.icio.us

Post tags:


Photojojo

 
Comments Off on Snazzy Camera Straps For Every Occasion

Posted in Equipment


Adobe Camera Raw 9.2 adds local dehaze

07 Oct

Adobe has released Camera Raw 9.2, introducing a local version of its new dehaze adjustment. ACR 9.2 also adds support for the DxO ONE, though not for the camera’s SuperRAW files. Other cameras supported by the update are the Olympus OM-D E-M10 II, Sony Alpha 7S II and Leica S (Typ 007). Read more

Articles: Digital Photography Review (dpreview.com)

 
Comments Off on Adobe Camera Raw 9.2 adds local dehaze

Posted in Uncategorized


A Beginner’s Guide to Buying a Camera

05 Oct
iPhone camera

Sadly, you may one day grow out of your cell phone camera.

So you’ve decided it’s time to buy a real camera? Maybe the cell phone camera just isn’t cutting it anymore, or you read an inspiring travel blog bragging about how they quit their day job, and now roam the planet selling snapshots they take along the way.

Either way, the decision has been made, and now it’s time to take the next step and figure out what gear you’re going to need to support this new endeavour.

The photographic gear market isn’t lacking in options, and it’s all talk about megapixel this and shutter speed that, but without a bunch of technical experience, how do you know where to start? There really isn’t a one-camera-fits-all option or we would all be using it.

Let’s take a look at some of the considerations you are going to want to keep in mind as you attempt to navigate the consumer minefield of cameras and photographic equipment when selecting and buying a camera. We will look at the major features shared among most cameras, and how they may influence your decision.

Price

Expensive camera equipment

Brace yourself: High-quality photography equipment often requires a significant investment.

That’s right, cameras all cost money, and sometimes lots of it. This is a logical place to start, unless, of course, money is of no consequence, in which case order a couple of Leica M Series cameras – one for you and one for me.

The easiest approach to budget is to come up with as narrow a budget window as possible. If you think you want to spend under $ 1,000, you will likely be overwhelmed with choices, while if you decide to look at the $ 800-$ 1,000 range, your options will be much more manageable to compare.

While you’re mulling over your photography budget, note what other accessories you may need or want. Don’t blow your entire budget on a camera body with no lens to mount on it. Do you want to acquire a tripod, external flash or even extra batteries and memory cards?

Types of Cameras

Generally speaking, there are point-and-shoot style cameras, mirrorless cameras and DSLRs (digital single lens reflex), but keep in mind that the lines can be pretty blurry between these.

Nikolaj F. Rasmussen

By Nikolaj F. Rasmussen

Point-and-shoot cameras are mostly compact and convenient. The constant with them is that the lenses are built-in and non-interchangeable, but usually cover a wide zoom range. Quality-wise they run the gamut from cheap with uninspiring quality, to pretty sweet ones like the Canon G1.

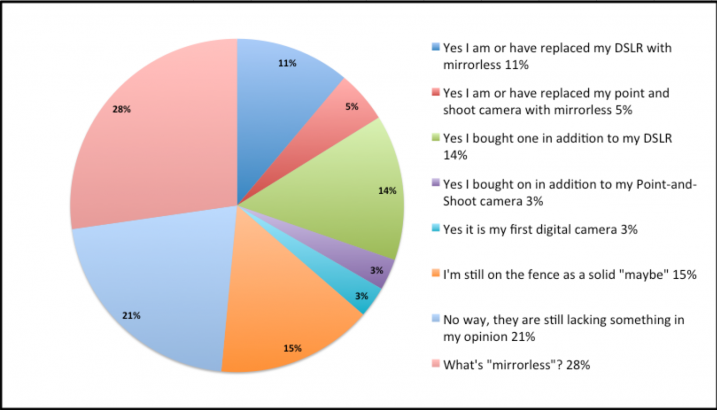
Mirrorless systems are all the rage and most of them have interchangeable lenses like the big DSLRs, at a smaller size. They are a great compromise of quality and versatility. Some are super classy like the Olympus OM-D and others deliver high resolution like the Sony A7S.

DSLRs are the classic, fancy-looking cameras, with all the buttons and big lenses (sometimes). Lower-end ones offer good quality, and give users a ton of control. There is a mind-boggling assortment of lenses and flashes available, as well as a myriad of other gadgets to achieve all sorts of creative effects.

Sensor

This is the part of the camera that replaced the film. The reason we care about these is because they range in size, resolution (megapixels) and sensitivity to light.

ZEISS Microscopy

By ZEISS Microscopy

As you’ve probably already deduced, big sensors with high resolution that are more sensitive to light are pricey. The biggest sensors in the camera types we are talking about are called full frame, and are the size of a 35mm negative (film). The majority of cameras on the market use a variety of smaller versions that we usually call cropped frame (DX for Nikon and APS-C for Canon). There are other size but these two make up the lion’s share of the market.

Right now camera companies are in a death match to out-resolution one another. While the average camera might boast 16-20 megapixels, some models are double that.

What do all those megapixels get you? You can think of it as the same as film grain, or the resolution of your TV. If you have a 36-megapixel camera, you can crop out 2/3 of the photo taken with that camera and still have a 12-megapixel photo. Higher resolution=finer grain.

Sounds like the more the merrier, but not necessarily. Lower-megapixel cameras are often more sensitive to light and work better in dark conditions. Also, resolution is directly correlated to file size so you will fill up your memory cards, and computer hard drive much quicker. Often times lenses for full-frame cameras are more expensive as well.

Memory cards

High-megapixel cameras come at a price as they eat up storage on your memory cards and hard drives.

ISO

This may sound familiar because when you had a film camera (if you are old enough) you probably used 400 ISO film. This is a measurement of the sensor’s sensitivity to light (short meaning, the long one is very technical).

If you want good results shooting in low-light conditions without a flash, you want to look at cameras that not only shoot at high ISO (1600 or greater), but can do so while producing decent shots. The Fujifilm X-T1, Nikon D800, Canon 5D Mark 3 and Sony RX100 get high marks in this category, but be warned, it’ll cost you.

Lenses

A sensor is only as good as the lens that you put in front of it. I just made that up but it’s true. Everything has to pass through the lens to get to the sensor.

If you’re going to go with a point-and-shoot camera, compare the zoom range (a number in millimeters) between several cameras. There are some that cover ridiculous ranges like the Nikon Coolpix P610 which zooms from 24-1,440mm. However, don’t be fooled by big numbers as you may never need that kind of range and another camera may have other features that are more useful to you.


The Fujifilm X100T's lens

Some cameras are equipped with a permanent fixed-focal-length lens like the Fujifilm X100T. Some photographers prefer simplicity.

Be aware that there are two types of zoom: optical and digital. Optical zoom is what the actual lens is capable of, while the latter digitally crops the photo and image quality is degraded significantly.

Some cameras like the Fujifilm X100T and the Sony RX1 are quality cameras which have permanently attached 35mm lenses. No changing lenses, no zoom. Some people love them, some people think it’s a stupid idea. In the end, it depends on your shooting style and your personal preference.

With DSLRs, the options for lenses are nearly endless. Original manufacturers make plenty, third party brands abound, and you can even get adapters to attach almost anything to almost anything else. Many DSLRs are offered as kits that come with the camera body and lens. Usually the lenses are of lower quality but can certainly produce good results.

canon-current-EF-lineup-2012

Image courtesy of Canon

Some lenses are big and expensive because they let in a lot of light and work better in low-light conditions, produce very sharp undistorted images, have long focal lengths allowing you to take pictures of far away subjects, and are built to more exacting and durable standards or any combination of these features.

The lens department is where mirrorless cameras fall a little short. For most casual photographers, there are enough good choices to fulfill your needs, but fewer choices for professionals, or those wanting to focus on niche genres like macro or sports.

The Other Stuff

I know you wish the things mentioned thus far were the only things to consider, but there is plenty more. With so much competition out there, even simple cameras keep getting more complex. On that note, if you find a camera you’re interested in, find out how long that model has been on the market as the manufacturer might be about release a new version.

Raymond Bryson

By Raymond Bryson

Other features to look for in a camera:
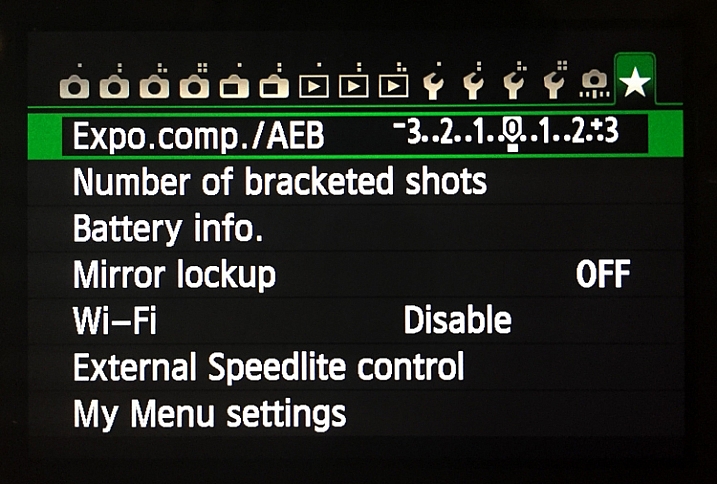
  • WiFi connectivity
  • Built-in flash
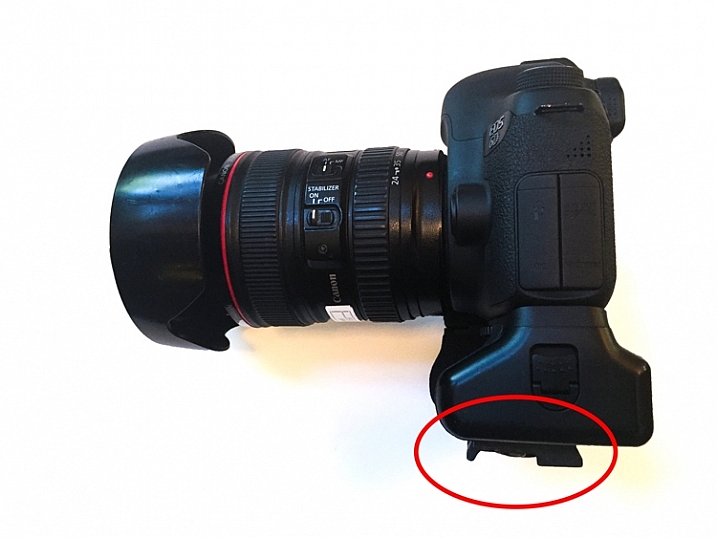
  • Hot shoe (for an external flash)
  • Touch screen
  • Articulating screen
  • Dual memory card slots
  • Image stabilization (in-camera or in-lens)
  • RAW file support (gives you more control in post-processing)
  • Video capabilities (HD, 4K, etc.)
  • External microphone support
  • Shooting speed (frames per second)
  • Minimum focus distance or macro mode
  • Shooting modes (for creative effects)
  • Weather sealing
  • Battery life
  • Weight

Conclusion

Of course this is not an exhaustive list, but it’s a good place to start. These days there are cameras as varied as the photographers using them so it will really pay off to do your research.

googletag.cmd.push(function() {
tablet_slots.push( googletag.defineSlot( “/1005424/_dPSv4_tab-all-article-bottom_(300×250)”, [300, 250], “pb-ad-78623” ).addService( googletag.pubads() ) ); } );

googletag.cmd.push(function() {
mobile_slots.push( googletag.defineSlot( “/1005424/_dPSv4_mob-all-article-bottom_(300×250)”, [300, 250], “pb-ad-78158” ).addService( googletag.pubads() ) ); } );

The post A Beginner’s Guide to Buying a Camera by Jeremie Schatz appeared first on Digital Photography School.


Digital Photography School

 
Comments Off on A Beginner’s Guide to Buying a Camera

Posted in Photography


Poll: Have you bought a mirrorless camera yet?

04 Oct

I asked this same question regarding mirrorless cameras about 18 months ago, and thought it would be an interesting comparison to see what the split is now. Here are the stats from last time (March 2014)

Screen Shot 2015-09-28 at 2.01.23 PM

Mirrorless poll 2015

So let’s run the exact same questions again and see how the answers compare. I’m interested to see how they change.  GO!


Note: There is a poll embedded within this post, please visit the site to participate in this post’s poll.

googletag.cmd.push(function() {
tablet_slots.push( googletag.defineSlot( “/1005424/_dPSv4_tab-all-article-bottom_(300×250)”, [300, 250], “pb-ad-78623” ).addService( googletag.pubads() ) ); } );

googletag.cmd.push(function() {
mobile_slots.push( googletag.defineSlot( “/1005424/_dPSv4_mob-all-article-bottom_(300×250)”, [300, 250], “pb-ad-78158” ).addService( googletag.pubads() ) ); } );

The post Poll: Have you bought a mirrorless camera yet? by Darlene Hildebrandt appeared first on Digital Photography School.


Digital Photography School

 
Comments Off on Poll: Have you bought a mirrorless camera yet?

Posted in Photography