RSS
 

Posts Tagged ‘Buying’

The Ultimate Guide to Buying a Tripod

03 Mar

You need a tripod for long exposures

Picture the scene – Bangkok airport and I’m settling into seat 16H on my short Thai Airways flight to Siem Reap, Cambodia. The lovely hostess hands me a hot, scented towel as I shout ”Bollocks” while slapping myself firmly on the forehead.

She gives me a justified look of disdain while I apologize for my outburst and then start begging her to contact Lost & Found as soon as possible. You see, I’d stupidly left my gorgeous carbon fibre, ball head tripod, in one of those plastic trays into which all airports now force you to empty your worldly goods before being forced through the X-Ray machine.

I’d somehow managed to wander through Bangkok airport, grab a snack, check my email and then board the plane without even realizing I’d lost one of my most essential pieces of equipment. I blame it on the terror filled drive through downtown Bangkok the night before while trying to find our hotel, it was a late night.

I realize I will never see that beloved tripod again.

Night Photography requires a sturdy tripod

So I touch down in Siem Reap, Cambodia and the first thing I do is go shopping for a tripod. Siem Reap has seen some major development over the years but it’s still a galactic black hole when it comes to tripod shopping.

The best I could find was a $ 45 Yunteng tripod with a plastic video panning tripod head that has one of those long handles that poke you in the eye every time you try to look through the viewfinder.

It was like going back in time to the very first tripod I’d ever bought. The next four days of shooting were an exercise in rage management as it took me five times longer to set up my shots. If it hadn’t been for my ever present tuk-tuk driver and his calming influence, I would have bent that tripod over my knee and tossed it under the wheels of a bus for good measure.

No wonder so many beginner photographers quit at the tripod using stage.

A good tripod makes ALL the difference

When buying a tripod, if you go for an El Cheapo one, two things will happen:

  1. You’ll spend so much time messing around getting your camera in position that by the time you’re ready to take the shot, you’ve already lost the will to live.
  2. You’ll realize that the $ 45 you spent could have gone towards a proper tripod that you now know you’ll have to buy anyway.

I realize that for total beginners, spending around $ 400 on a tripod seems like a major financial commitment but I’ve seen so many of my workshop students struggle in frustration with shoddy tripods that it breaks my heart. When I lend them one of mine, it’s like a ray of sunshine for them. At that point they realize their cheap tripod is now junk.

Long exposure - Why You Need a Good Tripod

Speed is important

You might think that if you’re using a tripod to hold your camera in place, that means you’ve got plenty of time to frame your shot. Sometimes that’s true but more often than not, the scene changes quickly, especially when you’re dealing with nature. Weather and wildlife won’t wait for you to get your tripod set up.

Things to consider when buying a tripod and tripod head

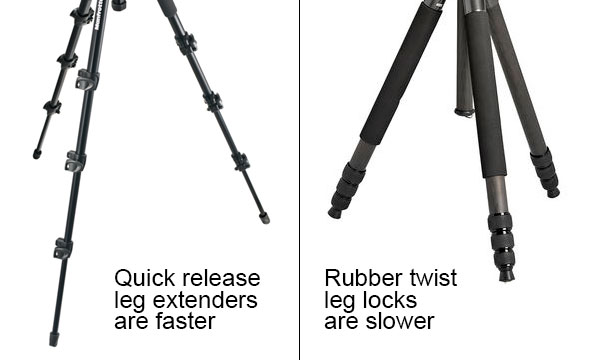
1 – How fast do the legs telescope?

I can’t stand those rubber twist leg locks that you have to loosen and then tighten. I much prefer quick release grips that flick open and quickly drop those tripod legs. Securing the extended legs requires a quick push of the thumb and you’re done. If your tripod has four telescopic extenders with threaded grips you’ll still be setting up your shot while I’m at the next shooting location.

Tripod Comparison

2 – How fast does the ball head adjust?

Once your tripod is in place and secure, it’s time to position your camera. For me, the best ball heads are those that only require one lever to loosen and tighten. That means that with just two turns of the lever I can position my camera in exactly the right position.

It’s also important to get a ball head that allows you to quickly switch between landscape and portrait aspect. A lot of cheapo tripods have those flippable mounts that you have to loosen first then tighten once in place. These are usually abysmal as you struggle to get just the right position and then the flimsy flippable part wobbles from the impact of just your breathing.

Ball Head Tripod

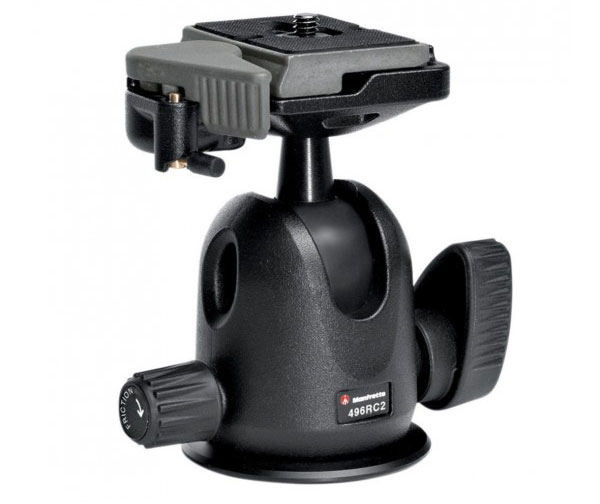
Manfrotto 496RC2 ball head


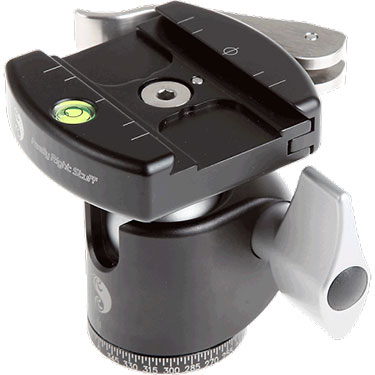
3 – Easy quick release

The thing that infuriated me the most with my temporary $ 45 Yunteng tripod was the quick release clip which mounts the camera on to the tripod head. I longed for my well oiled Manfrotto head with its trusty quick release clip.

Mounting the camera on the tripod head should be quick and easy. When shopping for a tripod, get the store clerk to demonstrate and then try it out yourself multiple times until you feel if it’s right for you. Some of the smoothest looking quick release plates I’ve seen are made by Really Right Stuff.

Really Right Stuff Quick Release Plates

4 – How heavy should my tripod be?

This is a personal choice based on your exact needs, and how much you can carry. There’s always a trade-off between portability and sturdiness. Heavier tripods will laugh in the face of a strong wind, while super lightweight carbon fibre tripods will vibrate. You can always attach a rock filled bag to the central stem of your tripod to give it more stability in high winds.

5 – How big should my tripod be?

Again, this depends on your travel plans. Since my recent loss at Bangkok airport, I’m now considering buying a smaller tripod that will actually fit into my camera bag. A smaller tripod won’t be anywhere near as sturdy, but for the Siem Reap shoot it’s not as if I had to face high winds and extreme weather, so smaller would have been okay.

Very tall photographers will most likely have to shop for tripods that cater to their height. Sure, you can always extend your tripod’s central column, but that’s always a last resort as you’ll find it induces major wobble from just your hand contact with the camera.

6 – How much should I spend?

Here’s another important thing to consider. If like me, you’re a bit of a Gormclops, don’t buy the best that you can afford. I abuse my tripods by shooting in the ocean, rivers, deserts and mountains. If I’m lucky, I’ll get two years out of a tripod (assuming I don’t leave it in the airport) so it just doesn’t make sense for me to spend big money when I can get a very capable tripod for under $ 400, that already comes with a good ball head.

7 – Do I need a bubble level?Camera Bubble Level

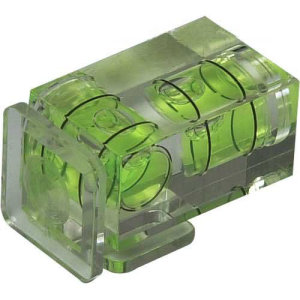
Although not essential, it’s nice to have an accurate bubble level on the tripod stand itself, and one on the tripod head. If you’re lucky enough to have a digital level inside your camera (like my Sony A7R) you probably won’t use a bubble level much. If you have neither, you can always attach a bubble level to your cameras hot shoe attachment as pictured here (see photo right).

Why do I even need a tripod?

If you want tack sharp images (see my article on how to get super sharp landscape images) with the best possible image quality, accept that a tripod will become a part of your anatomy. For long exposures, a tripod is essential. If you shoot weddings, portraits, action and events, a tripod may just get in your way.

Which brands should I buy?

I’m not going to recommend one brand over another. I advise that you try out as many tripods and heads as you can. It’s fine to read reviews but you need to get hands on to decide which tripod and head combination works best for your needs. A specialist camera store should have a much wider choice of consumer and pro level tripods to choose from.

Enough Yunteng Bashing

Cheap Yunteng TripodTo be fair to Yunteng, I got the sturdiest tripod I believe it’s possible to find for a measly $ 45. It didn’t fall apart, was light, and in all honesty the tripod head was made for video, not stills. I got exactly what I paid for. I’ll keep it in my studio as a demonstration tool for showing people the difference between a $ 45 tripod and a $ 400 tripod.

What features do you look for in a tripod? Do you have any horror stories or recommendations for our readers?

googletag.cmd.push(function() {
tablet_slots.push( googletag.defineSlot( “/1005424/_dPSv4_tab-all-article-bottom_(300×250)”, [300, 250], “pb-ad-78623” ).addService( googletag.pubads() ) ); } );

googletag.cmd.push(function() {
mobile_slots.push( googletag.defineSlot( “/1005424/_dPSv4_mob-all-article-bottom_(300×250)”, [300, 250], “pb-ad-78158” ).addService( googletag.pubads() ) ); } );

The post The Ultimate Guide to Buying a Tripod by Gavin Hardcastle appeared first on Digital Photography School.


Digital Photography School

 
Comments Off on The Ultimate Guide to Buying a Tripod

Posted in Photography


Gear Envy: Five Things to Consider Before Buying Your First Camera

07 Jan

GearEnvy 1

1. The Ol’ Gear versus Photographer Chestnut

What’s the best camera and lens you can buy when you’re starting out?

  • Anything by Nikon
  • Anything by Canon
  • Nikon and Canon are overrated; Pentax is what all the cool kids are using
  • Do the best you can with what you can afford right now

A photographer went to a socialite party in New York. As he entered the front door, the host said “I love your pictures – they’re wonderful; you must have a fantastic camera.” He said nothing until dinner was finished, then: “That was a wonderful dinner; you must have a terrific stove.” – Sam Haskins

Believing a great camera will make you a great photographer is like thinking Roger Federer’s tennis racquet will make you a world champion tennis player. Um, it won’t – I’ve tried. I’ve also worn the same jeans as Gisele Bundchen and they didn’t make me a supermodel. Cooking with Wolfgang Puck’s saucepans didn’t make me a master chef either.

Great gear won’t make you a great photographer. Great lenses, however, can improve the sharpness of your images, and great lights and accessories can improve their quality. But all of that can be undone with poorly executed or sloppily composed images.

Just because something’s technically perfect doesn’t necessarily make it great or even good. A good photo should inspire an emotional reaction, and no camera or lens available today can achieve that for you.

I’m blown away daily by evocative photos on Instagram, 500px, and Flickr. Eighty percent or more of these images are taken with smart phones or entry-level cameras with kit lenses. When I share my images online, I get just as big a response from images taken with my iPhone as I do from images taken with pro gear. Because of the Internet, there’s never been a greater time in history to have your work seen and loved, or to inspire a reaction.

The best first camera you can buy is the one you can afford right now.

2. What are you shooting?

GearEnvy 2

Next, you should ask yourself what your your gear is for? Where will you use it and how often?

  1. I only take my camera to church on Sundays.
  2. I’m going to document my trek to the summit of Mount Everest, rodeo rides and my next Tough Mudder event.
  3. I photograph sixty weddings a year.
  4. I’m still learning, but I love to take photographs every opportunity I get.

Are you planning on taking your camera to rugged subzero locations? Will you be shooting thousands of images a day or only taking photos on special occasions? This is the first question to consider before purchasing any new gear – what will you use it for?

If your answer is #2 or similar, you may want to consider a heavy duty pro body that’s built to take rough and tumble handling and extreme weather conditions; a cheaper lightweight camera may not withstand the wear and tear or hold up to the elements.

If you plan on taking thousands of frames daily or weekly, it may be more cost effective to invest in a mid-range camera that’s built to shoot more frames. The shutter on a cheap camera usually rolls over and dies after about 100,000 frames, so spending a few hundred extra may give you more longevity.

The subject matter you’ll be shooting will also influence your choice of lens. For example, if you’re planning on shooting a lot of portraits and head shots, many fashion and portrait photographers use long fixed focal lenses or zoom lenses. If you’ll be doing a lot of weddings, professionals stock their kits with wide and long lenses and lenses that are somewhere in-between. If you’ll be shooting a lot of scenery, landscape photographers get more use out of wider lenses. And lastly, if you plan on shooting a lot of food or products, you may want to consider adding a macro lens to your kit.

3. Brand loyalty. Which brand should you buy and why?

With cameras there’s no definitive answer to this question. Nikon appears to have a slight edge over all the other SLR brands, but there are advantages and disadvantages to each.

I spent the first 15 years of my career shooting with Nikon because both my brother and my first mentor used them. I loved my Nikon and never dreamt of swapping over. I initially invested in secondhand bodies and prime lenses and after I had saved enough coin to buy new, I stayed loyal to Nikon. Later when I switched over to digital, I continued my Nikon love affair.

The decision to convert to Canon was made for me by the lack of decent Nikon upgrades on the market in 2004-2005 and by the fact that Canon’s 1DS MKII blew anything Nikon made that year out of the water. I switched to Canon and invested in two new camera bodies, new lenses, speedlights and accessories.

Fast forward 10 years and you could argue that Nikon now makes better bodies than Canon, and that Canon makes slightly better lenses. For better or worse, I’ve made a commitment to Canon, and I’m sticking to that – for now. I still suffer the occasional bout of gear envy, but hey, I’m only human.

My advice is to test out each camera on offer in your price range. You’ll find that some cameras are more comfortable to use than others. Also factor in the warranty, general after-sales service, and how easy it is to have the brand you’re looking at serviced or repaired in your area. Another good indication of quality is the camera’s resale value. If your potential camera is flooding the low-end of the secondhand market, it may be a good indication you’re about to buy a lemon. Finally, check out camera reviews and look up discussions about the model you want to buy on forums. The photography community is incredibly thorough and generous with information.

4. Holy crop! Does size matter?

GearEnvy 3

I bought my first digital Nikon 13 years ago and paid $ 17,000 AUD (approx. $ 14,000 USD) just for the body. It took 256 MB memory cards and produced raw image files that were around 6 MB. I used that camera to shoot hundreds of covers, poster shots, magazine spreads and advertising campaigns, and nobody ever questioned the file size.

Today my iPhone takes 8 MB photos. So, does that mean my iPhone camera is better? Umm – no. It’s not the quantity of the megapixels that count; it’s the quality of the megapixels and the size of the sensor. Cramming lots of megapixels onto a tiny sensor decreases image quality, making grainier looking files.

So how big are the sensors in the various cameras on the market today? A camera phone sensor is the size of a tic tac, a compact camera sensor is the size of an M&M, an entry-level SLR sensor is the size of postage stamp, and a pro level camera sensor is the size of a 35mm film frame.

So how many megapixels are enough and what’s the best size sensor for you? Well again, the answer comes down to what the output is going to be.

If you plan on shooting images that are going to end up on billboards or really large wall prints, then a full frame sensor that produces raw image files that are larger than 20 MB is ideal. An entry-level camera can produce large enough files to create billboard size images; they just won’t look anywhere near as good.

If you plan on printing midsize images — A4 (8.5×11″) or smaller — then an entry-level to mid-range camera will achieve really good results.

Finally, if you’re mostly going to share your images online, you can get away with a smart phone or compact camera, but any of the above will do the job, as well.

5. Physical size and weight

GearEnvy 4

Does this camera make my bum look big?

This factor is often overlooked until you get home and pull your new camera out of the box and use it a few times. You may think you want the biggest, heaviest camera and the longest lens, but four hours into an eight-hour mountain hike, you may change your mind.

I currently use two different bodies: the 1DS MKIII and the 5D MKIII. My 1DSIII weighs twice as much as my 5D and produces better quality images, but I’m prepared to take a hit in quality when I’m travelling because I know I’ll shoot more if I’m carrying a lighter camera. Having to schlepp a heavy camera around makes me think twice about bringing it out in the first place.

A good camera should feel comfortable and be like a natural extension of your body. Test out how easy it is to change settings with one hand; believe me, this will get frustrating if it’s a difficult process.

Have I missed anything you feel is worth considering? Do you have anything to add to the discussion or have any questions? I’d love to hear from you.

googletag.cmd.push(function() {
tablet_slots.push( googletag.defineSlot( “/1005424/_dPSv4_tab-all-article-bottom_(300×250)”, [300, 250], “pb-ad-78623” ).addService( googletag.pubads() ) ); } );

googletag.cmd.push(function() {
mobile_slots.push( googletag.defineSlot( “/1005424/_dPSv4_mob-all-article-bottom_(300×250)”, [300, 250], “pb-ad-78158” ).addService( googletag.pubads() ) ); } );

The post Gear Envy: Five Things to Consider Before Buying Your First Camera by Gina Milicia appeared first on Digital Photography School.


Digital Photography School

 
Comments Off on Gear Envy: Five Things to Consider Before Buying Your First Camera

Posted in Photography


Guide to Buying Your First DSLR

04 Dec

Your First DSLR

For whatever the reason, you’re ready to buy your first DSLR. It could be that your point-and-shoot isn’t cutting it anymore in regards to features, speed, or image quality, or it could be that you’d like to turn photography into more than a rarely-touched hobby.

Romain Ballez

By Romain Ballez

DSLR (Digital Single Lens Reflex) cameras are what the vast majority of professional photographers use to get the job done. Unlike point-and-shoot camera models, which record light (and therefore an image) onto an electronic sensor directly, a DSLR uses a mirror to bounce the light from a scene through an internal system and into a viewfinder or an electronic sensor, in the case of an open shutter.

These cameras also allow for interchangeable lenses, giving you a wide array of options in regards to focal lengths and quality. There are, of course, advantages and disadvantages to DSLR systems, but at the end of the day, these cameras offer the features and quality required by advanced hobbyists and professionals.

What You’re Looking For

There’s no denying it, this is a big purchase for you. No, you’re not looking for a top-of-the-line, full-featured beast this go round; you need the best possible piece of equipment for a reasonable price. You need bang for your buck.

Whether photography is a passionate hobby or a hopeful profession of the future, you are in a learning phase, and need a camera that will compliment that objective well. While current-generation point-and-shoots can be great products, DSLR’s do have a few advantages.

Larger Sensors

As a rule, DSLRs have a larger photo-sensitive digital sensor, which usually translates to better image quality. Please note that this has nothing to do with megapixels or resolution, neither of which are, by themselves, indicators of image quality.

Interchangeable Lenses

While there are some point-and-shoot systems beginning to offer interchangeable lenses, by and large, DSLR’s have the market dominated in this area. Not only do the big camera companies have their own lenses, third-party companies such as Sigma and Tamron offer great selections as well. There is a lens out there for virtually every application you can imagine.

János Csongor Kerekes

By János Csongor Kerekes

A Viewfinder

Instead of the usual LCD screen present in point-and-shoot cameras, DSLR’s collect light from the lens, direct it to the mirror, and through the viewfinder, giving you an almost exact representation of what is being captured on the sensor.

Advanced Features and Controls

Namely, manual controls. While point-and-shoots usually feature the ability to modify settings, DSLR’s are built from the ground up with manual control in mind. ISO ranges are higher with reflex cameras, and larger sensors combined with precise aperture controls allow for controlled depth of field in your photos.

Speed

DSLR’s are known for their faster shutter and system speeds, and in the world of photography, speed is usually a good thing.

There are countless brands of equipment, but as far as DSLR’s go, there are the big three – Canon, Nikon, and Sony.

Recently, Pentax has been gaining ground again, and there are more expensive offerings available from companies like Leica and Hasselblad. For our purposes, we’ll stick to the big three, as they are all known for offering outstanding entry-level cameras within their product lines, and can be relatively inexpensive.

Elias Ruiz Monserrat

By Elias Ruiz Monserrat

What to look for when buying that all-important first SLR camera?

Image Quality

Image quality is usually the most important requirement of a new camera for photographers, and it’s also one of the most subjective. The quality of the photos a camera produces is dependent on several factors, including sensor size, lens quality, and the optics of the camera itself.

Feature Set

While almost all DSLR’s have a common set of features (such as the ability to shoot manually), some brands and models have automated some features, while others have not, or do not have those features at all. Different cameras have varying usable ISO ranges, autofocus points, and resolution (in megapixels).

Design

Although usually not the first thing you think of with an entry-level camera, buying a model with a solid design is still important. Some less expensive cameras have all plastic housing, whereas others may use more heavy-duty materials such as metal; others still may be weatherproof to a certain degree.

Even at the price points we’re discussing, it’s a good idea to research that aspect of the prospective camera as well, and buy as solid a model as possible.

Jung-nam Nam

By Jung-nam Nam

Cost

We’re talking entry-level, for the scope of this article, so cost will be a factor. Obviously, the more money you’re able to spend, the more advanced system you can get. Keep in mind however, that often with entry-level models, differences between the cameras can come down to feature sets, with image quality staying more or less the same.

Remember that the quality of the lens you’ll be attaching to the camera is more of a determining factor in the quality of the photo.

Where to Buy

Luckily, you have several options in this area. Gone are the days where you could only buy a camera at your local Wolf Camera (and unfortunately, gone are the Wolf Camera stores, as well). Now there are virtually limitless retail outlets and sellers online, carrying every system and component a photographer could need. You can order your camera from your living room and have it delivered to your house a few short days later, without ever leaving home.

Amazon, B&H Photo, and Adorama are all large, respectable retailers you can shop with, and are among the most popular today.

The Contenders

Canon EOS Rebel T5i

The Canon Rebel series has a long-standing tradition on solid, quality cameras at a reasonable price. While I won’t start a brand war here, it’s well-known that most photographers end up settling on either Canon, or Nikon.

The Rebel series has come a long way from the days of the XS, and the latest generation of Rebel cameras are much closer to Canon’s midrange line than before, with better sensors, more features, and hardier construction.

t5i_586x186

Canon Rebel T5i

The T5i is an 18MP (megapixel) camera, with an ISO range of 100 – 12800 (expandable to 25600). It also features a 3 inch Vari-angle Touchscreen LCD, 9 AF (autofocus) cross points, 5 fps (frames per second) continuous shooting speed, and shutter speeds up to 1/4000 second.

As with most entry level systems, if you opt for the full kit, you’ll get the standard 18-55mm IS (image stabilization) zoom lens. While very good for learning novices, you’ll want to upgrade to a cheap prime such as the excellent Canon EF-S 50mm f/1.8 or something similar, as the cheaper build and documented chromatic aberration issues with the kit lens could leave you wanting a bit more. Note that this applies to all kit lenses on the entry-level cameras we’re discussing here.

Nowadays, as systems get more advanced, HD video recording is becoming more of a requirement, and the T5i delivers this as well. As of this writing, the T5i kit is selling for $ 649.99.

Nikon D3300

D3300

Image courtesy Nikon

Nikon upped their game with the D3300, equipping the camera with a generous 24 megapixels of resolution in a solid, compact, carbon fiber enhanced body. This model gives you, the budding photographer, an ISO range up to 12,800 (expandable up to 25,600), 11 autofocus points, and 5 frames per second of continuous shooting, along with a 3″ LCD screen that matches the Canon model.

Just as with the Canon T3i, the D3300 supports shutter speeds up to 1/4000th of a second and allows for 1080p HD video recording.  Retailing around the $ 500 mark, the body and lens bundle includes the Nikkor 18-55mm 5.6 VR II lens, a relative equivalent to Canon’s 18-55mm kit lens.

Sony A58

Usually considered the third wheel of the big three, Sony is known more for their other forays into the electronics world than their digital cameras, but don’t let this fool you; they know how to make a good DSLR, and the SLT-A58 is a wonderful example of that.

sony-a58

Image courtesy Sony

Dipping even lower in price and the lowest of all three at $ 450, the A58 gives you quite a bit for that price point. This 20.1 megapixel camera offers a respectable ISO range up to 16,000, and is expandable up to 25,600. Leading the pack, this model offers 15 autofocus points, but forces you to give up a little bit with the smallish 2.7″ LCD screen.

Battery life has been improved fairly drastically on the A58 in comparison to previous entries in the series, and for such a budget-friendly camera, it features a surprisingly big and bright viewfinder.

Conclusion

So which one is right for you? Any of these – or none of these. The answer lies in what you’re looking for, and what concessions you’re willing to make for the budget you have. All of these are excellent cameras, and were chosen because of what they offer for the price, but that doesn’t mean there aren’t other cameras that would serve the purpose just as well or even better.

The prices we’ve discussed all include a kit lens to get you started, but be aware, these are usually the lowest-end optics available, and you’ll want to upgrade as soon as possible to another piece of glass. Also, in most cases you have the option of buying the camera body only, and picking out your lenses separately, which reduces your upfront cost of the DSLR itself. There are literally hundreds of lenses to choose from; just ensure they will fit your camera’s mount before purchasing.

At the end of the day, you want a camera that will facilitate the learning process you’re going through, so choose a camera that assists in that purpose, without breaking the bank.

Bought Your First DSLR? Here’s How to Learn How to Use it!

Check out our Ultimate Guide to Learning How to Use Your First DSLR.

Also check out our Photography Tips for Beginners page for lots of great photography tutorials suitable for first time DSLR buyers.

googletag.cmd.push(function() {
mobile_slots.push( googletag.defineSlot( “/1005424/_dPSv4_mob-all-article-bottom_(300×250)”, [300, 250], “pb-ad-78158” ).addService( googletag.pubads() ) );
} );

The post Guide to Buying Your First DSLR by Tim Gilbreath appeared first on Digital Photography School.


Digital Photography School

 
Comments Off on Guide to Buying Your First DSLR

Posted in Photography


DSLR Camera Buying Guide 2014 for Newbies and Pros

03 Oct

When it comes to buying a new digital camera, most beginners find it difficult to choose the best DSLR camera for photography. This article highlights some of the best professional cameras of 2014. It provides a round-up of the best digital cameras with DSLR technology that caters to the requirements of beginners as well as professional photographers. Let’s look at Continue Reading

The post DSLR Camera Buying Guide 2014 for Newbies and Pros appeared first on Photodoto.


Photodoto

 
Comments Off on DSLR Camera Buying Guide 2014 for Newbies and Pros

Posted in Photography


5 Ways to Create Better Images Without Buying More Gear

17 Jul

You are a photographer. You love getting out there and doing your best to create great images. Photographers also love something else. Camera equipment. Sometimes you may find that you spend more time searching for a new lens, filter or accessory than actually photographing with it. When you meet other photographers you will hear them talking about the latest piece of equipment that has just launched.

Why is this? Why are some photographers obsessed with equipment. My personal opinion is that we fall into the marketing trap. Sometimes we really do think that a new lens, or new camera body, will improve our images simply because it is a better piece of equipment. That might be true, but it’s only half true. A new lens might make your images a little sharper or have better bokeh, but the best way to get better images is to improve your ability as a photographer. Here are some thoughts that may help you create better images.

The key ingredient in any image is light

The key ingredient in any image is light

1. Become a light snob

Light is the key to every image you make. If you want a good image, shoot in good light, if you want a dramatic image, shoot in dramatic light. There really is no such thing as bad light, there is simply better light for creating images.

Light is the all important component of great photography. You may feel that shooting in the middle of the day is best because it is bright, and all the light you need is in that shot. Yes, there may be lots of light, but there is also a lot of contrast (bright highlights and dark shadows). The resulting shot may be unappealing because the light is flat or uninteresting.

How do you overcome this tendency to photograph at any time? Become a light snob. What does that mean? I mean in a good way, try this next time you go out with your camera. Make a point of shooting in the golden hours. Think about the light you are shooting in, go out in the early morning or early evening. Choose your subject carefully, compose your scene purposefully and shoot it with intention. Don’t shoot the same scene twice, work with the light, make sure you think about the exposure, try your best to get the shot and walk away from the scene. Make sure you expose for the light the results will speak for themselves.

2. Become more flexible – in more ways than one

POV2

How often do you photograph from your standing height and mostly in landscape orientation? I know I do, it is natural to do that, we shoot they way we feel comfortable. Change this up a little. Look for unusual angles and vantage points. We have all seen the photographs of children looking up at the camera. Change that, kneel down or even lie down in front of a child you are photographing. Turn your camera to portrait orientation, that changes the scene immediately. If you are photographing a street scene, maybe get to a higher vantage point on a balcony. If you are in a city, shoot straight up! The key thing here is, change your viewing angle and you will change the view of your image. You will give your viewers a unique perspective on a familiar topic and that can make for some very dramatic images.

A unique point of view can make for dramatic images

A unique point of view can make for dramatic images

3. Time it right

You have probably heard this about many things, particularly sports:  “its all about the timing”. This is true in certain genres of photography too. In street photography, timing can be crucial to making or breaking the image. The famed street photographer Henri Cartier-Bresson spoke about “The Decisive Moment”. What he was saying was this, if you take the shot a moment too soon, the scene has not yet unfolded, if you are a moment too late, the scene has passed, you have to release the shutter at the precise moment.

This is not easy to get right. It requires lots of practice and the ability to sense or anticipate what will happen next. With practice you will get better and better, and in time, you will find that you will “time” the shot better. When is the right moment? It is different for every photographer and every photograph. It might be the moment before a smile, or the moment the first tear appears, the moment of surprise or elation. Each moment is different and each photographer will shoot it differently. You will know when you get that moment captured because the image will be memorable. The moment will come, but you have to be ready and you may have to be patient.

Photographing fireworks is often about timing.

Photographing fireworks is often about timing.

4. Get your exposure right

We all know this one, it’s an old one, but exposure is all important. How do you affect exposure? You take control of your aperture and your shutter speed. This alone is a topic for another article, but what is important is that you, as the photographer, need to take control of your image exposure and not let the camera do that. If you still shoot on Auto and hope for the best, now might be a good time to start venturing into the world of shooting on manual or even aperture priority. Learning how the aperture and shutter speed affect your images will help you make stronger images in just about any light. This is what makes the difference between a good image and a spectacular image, the exposure.

Mastering exposure will make a big difference in your images

Mastering exposure will make a big difference in your images

5. Use what you have

You have a great camera, seriously, you do! If your camera is less than five years old, it is perfect for taking astounding images. A new camera body will take pictures with more megapixels or better noise reduction, but I am pretty sure, in fact I am CERTAIN, that you can get some amazing images on your current camera. One key element in getting great images is choosing the right lens for the scene. The lens is the eye to the camera. If you are going to invest in any equipment, save up and buy good lenses. Buy some prime lenses and see the results.

First though, use the current lenses you have, make sure you know how each lens affects a scene. A wide angle lens has the effect of making everything in the scene seem far away and spread out, a telephoto lens (say a 200mm) has the effect of compressing everything in the scene (bringing the elements closer together). If you were to photograph a mountain scene with a wide angle lens and switch to a long (or telephoto) lens and shoot the same scene, the elements in that scene would look really different. The perspective and viewing angle changes on each lens, so make sure that you use your lenses and understand the effect that they have on your scene.

Exposure2

Putting it all together

By using these techniques with light, composition, timing, exposure and current equipment, your images will improve. You need to practice, constantly. Keep pushing the boundaries, do the weekly challenges that dPS puts out, try different techniques. Only buy new equipment if your current setup is limiting your photography. The best way to create better images is by practicing and spending hours and hours behind the camera.

I heard a story that a professional golfer who was one of the top three golfers in the world used a very unique way of practicing. Before playing a golf course in an upcoming tournament, he would book the whole course for a week. He would then take 300 golf balls and set up on the first tee. He would tee off from there, hitting each ball from that tee. He would then play each ball from where it landed. He did this on every hole of the golf course. By the end of the week he knew every inch of that course and he knew exactly which clubs he could use from where on the course. Try this in photography. Shoot 100 shots on aperture priority or shoot 100 shots with your 50mm only. Don’t change lenses until you have 100 shots with that lens. Then move to your next lens and do the same. Try each lens with different subject, use a 500mm and shoot some sports, landscapes and macro photos. Mix it up, but learn how that lens works and learn how your camera works and pretty soon, you will be making great images with all your equipment and that shiny new camera will not seem so tempting!

Look for the light, work with the scene and practice, practice, practice.

Look for the light, work with the scene and practice, practice, practice.

I will end off with a quote from the actor Will Smith, which sums it up in a good way:  “The separation of talent and skill is one of the greatest misunderstood concepts for people who are trying to excel, who have dreams, who want to do things. Talent you have naturally. Skill is only developed by hours and hours and hours of beating on your craft.” – True enough!

Have you put in the hours? Do you have any other additional tips? Please share in the comments section below.

The post 5 Ways to Create Better Images Without Buying More Gear by Barry J Brady appeared first on Digital Photography School.


Digital Photography School

 
Comments Off on 5 Ways to Create Better Images Without Buying More Gear

Posted in Photography


[MODIFIED] Buying a Digital Camera – Hidden Costs with Higher Megapixel Cameras

18 Apr

Higher-megapixel digital cameras may have hidden costs besides just the cost of the camera.

High megapixel modern digital cameras generally allow one to take photos with much greater clarity than with cameras made in years past. Mistakes can be cropped out, larger photos can be printed, and more details can be made clearly visible, allowing one to take photos that more accurately represent a treasured memory. Modern cameras also may let you shoot HD video, offering even more enjoyment from your investment.

However, before you plunk down money on a new high megapixel digital camera, recognize there may be some ‘hidden’ costs to use this technology to its fullest:…

Read more at MalekTips.
New Computer and Technology Help and Tips – MalekTips.Com

 
Comments Off on [MODIFIED] Buying a Digital Camera – Hidden Costs with Higher Megapixel Cameras

Posted in Technology


Sony RX10 added to enthusiast compact buying guide

02 Apr

RX10.jpg

We just added Sony’s RX10 to our enthusiast compact camera buying guide and also updated our aperture comparison chart with Canon’s PowerShot G1 X Mark II. While image quality in this class won’t compete with a good mirrorless camera paired with a good lens, they pack enough features that should satisfy serious photo enthusiasts. Many cameras in this range make an excellent choice as a more portable second camera, or as a single do-it-all option. See how the RX10 ranks

News: Digital Photography Review (dpreview.com)

 
Comments Off on Sony RX10 added to enthusiast compact buying guide

Posted in Uncategorized


Compact cameras buying guide (Autumn 2013)

10 Oct

enthusiast.jpg

If you’re looking for a compact digital camera, you have a lot of choices. Although the past couple of years has seen a serious erosion of the entry-level, sub-$ 100 class thanks to the emergence of powerful smartphones, improvements in technology have meant that if you’ve got a couple of hundred dollars or more to spend, you can get yourself a very capable camera. In this guide, we examine the major classes of compact cameras, and discuss their relative strengths in order to help you make an informed buying decision. Click through for a link. 

News: Digital Photography Review (dpreview.com)

 
Comments Off on Compact cameras buying guide (Autumn 2013)

Posted in Uncategorized


Eric Kim: What to consider when buying a camera for street photography

24 Jul

Istanbul-11-660x437.jpg

Eric Kim is one of the most prolific street photographers around, but he’s also a keen blogger. In this article, originally posted on his site back in spring, he offers some advice on how to buy a new camera for street photography. Rather than a simple buyers’ guide, though, Kim delves into the psychology of purchase decisions, citing research by psychologist Barry Schwartz which divides us into two categories – ‘maximizers’ and ‘satisficers’. Click through for a link to the full article. 

News: Digital Photography Review (dpreview.com)

 
Comments Off on Eric Kim: What to consider when buying a camera for street photography

Posted in Uncategorized


An Introduction to Buying Used Lenses

23 Jun

A Guest Post by Jeff Guyer.

DSC 0726

Let’s face it– photography is an expensive hobby and an even more expensive profession. Camera bodies, speedlights, reflectors, memory cards, lighting equipment, backdrops, batteries, stands, hard drives, tripods, back-ups, gear bags, hard cases, the latest gizmo or gadget-that-you-seriously-cannot-possibly-live-without…and don’t forget the glass. Next to the camera itself, quality lenses make up the most expensive part of just about any gear closet.

In an ideal world money would be no object and pesky things like gear budgets would be non-existent, paving the way for me to purchase all of the shiny, brand-new lenses I could possibly want (“Hi, Nikon? I’ll take one of everything!”). The reality, though, is that I have to balance my lust for gear against how many meals my rapidly growing 12-year-old son gets to eat each week. The truth is, the buying and selling of used lenses has almost become an industry unto itself. There are a lot of high-quality second-hand lenses out there, which means you can satisfy your “need” and still save a good bit of money if you’re smart.

Where to begin? Well, there’s nothing for you to buy if you don’t hook up with…

DSC 0710

The Right Kind of Seller

Even though it should go without saying, I’m going to say it. Do your homework! It’s not enough to know everything about WHAT you want. You may have read all about the sweet spot on the Nikkor 24-70 f/2.8, or the minimum focus distance of the Canon 70-200 f/2.8 L-Series, but when you’re getting ready to drop a significant chunk of your hard-earned money on a lens, you need to find out everything you can about the person selling it.

If you’re contemplating a face-to-face transaction, ask around. Get references or referrals if you can. In this day and age of Facebook, Twitter, and Google+, chances are good that buyer and seller each know someone in common. If you’re buying on ebay, carefully check the seller’s feedback and ratings, particularly the comments. Also take a few minutes to compare the price against other auction sites and even that of a new lens.

Although I have purchased lenses on ebay with excellent results, it is generally not my first choice. After all, the first time you are going to have the lens in your hands is after you’ve already paid for it. Unless the seller has blatantly lied about the condition, you’re stuck with it (and sometimes even if they have). It’s entirely possible that what has been advertised as “minor wear” is actually a much larger scratch than you’re willing to overlook. I tend to be kind of nitpicky in that department, which just one of the reasons why I recommend buying used lenses in person whenever possible.

Try buying locally if you can. First, if you and your seller travel in the same circles, you exponentially increase your odds of an honest, above-board transaction. Nobody is going to risk their reputation over a used lens. Another important benefit to purchasing locally is the fact that you can have an actual visual and physical examination of the lens before you buy it. Being able to check it out and– more importantly– put it on a camera and test it are going to be the two most important factors in your decision to actually buy the lens. Never, ever underestimate these advantages.

DSC 0713

The Physical Exam — What to Look For

For starters, a quality lens is just going to feel good in your hands. Take a minute or two to look for anything obvious– dings, scratches, or any places where the finish may have rubbed off from excessive or careless use. Are the rubber grips on the zoom and focus rings snug and intact? Do the rings turn smoothly? How are the filter threads? Are switches intact and functioning properly? Only you can decide for yourself how much is too much, but remember that what you see on the outside is usually indicative of the care with which the original owner treated the lens. Also keep in mind that the finish on a quality lens should not rub off, regardless of age and proper use.

Next check the front element, preferably in bright light. Hold the lens against the light at different angles, checking the glass and coating for any scratches or other imperfections. Some of these imperfections MIGHT not necessarily affect image quality, but they should absolutely be a factor in negotiating the price. If the lens has an aperture ring, open it all the way and try looking straight through it like a telescope. Do you see any dust, mold, or anything else that shouldn’t be inside your potential investment?

Now turn it around and check the mount. Is it clean? Are there any scratches? Is it bent or seemingly out of alignment in any way? Are the contacts clean and in good condition? Remember that this point of connection is the only thing that lets the camera communicate with the lens. This is where it can all go wrong if you’re not careful. Any of the imperfections discussed so far might not necessarily be deal-breakers, but any problems whatsoever with the mount should be. Just walk away.

The Fungus Among Us

If you’ve read enough ebay auctions or classified ads for used lenses, you’ve been assured that the object of your lust and desire is free of not only dust and other particles, but fungus and mold as well. That’s great, but how would you know? The fungus/mold issue comes up most often in the case of older lenses in particularly humid climates. Early stages will resemble those dried water spots on your bathroom mirror, while more advanced stages can look like spider webs. If you see this, do not even think about attaching this lens to your camera. Fungus and mold are living organisms and can spread, both to your camera and other lenses that are subsequently mounted to it.

DSC 0689

Test It!

If you’ve purchased used lenses before, chances are you either didn’t test it at all, or if you did test it, you probably took a few random shots in the parking lot where you met the seller to make sure the auto-focus was working and that something actually showed up on your camera’s LCD. Don’t sell this part of the process short. Take a methodical approach.

You’ve changed lenses enough times to know how it should feel. Does the lens turn smoothly or does it feel like you’re forcing it? Is it too tight? Too loose?

Now shoot. I’m not talking about two or three shots. I’m talking about 100 shots. To really put this potential purchase through its paces you need to take close, mid-range and far focus images at multiple apertures, and in small increments along the entire zoom range of the lens. Was that spot there at f/16 or only at f/2.8? A problem that shows up at 200mm might not manifest itself at 70mm. Try manual focus. Listen for strange noises. Shoot something dark. Shoot something light. Does the auto-focus sound right? Do you hear anything rattling around inside the lens?

Check The Images

Even people who are careful about testing used lenses before they buy them hardly ever think to bring a laptop with them so they can get a good look at the test shots. We all know that the LCD is an unreliable indicator of image quality when we are photographing for our clients, so why should you automatically trust it when you’re about to hand over your cash to a stranger? If the seller really is on the up-and-up they won’t mind sticking around for a few extra minutes while you check the image quality against the only standard that really matters– your own two eyes.

A Special Note to Vintage/Film Camera Collectors

When lenses sit unused for an extended period of time, the special oil used to ensure that aperture blades move smoothly can leave shiny spots on the blades and cause them to stick. It will usually be visible on the blades as you adjust the ring, but if the lens has a depth-of-field preview switch, adjust to the smallest aperture and press the DOF preview button. Properly functioning aperture blades will snap smoothly into place without sticking.

DSC 0732

The Bottom Line

I know we all love the excitement of opening new boxes from B&H and Adorama. It would be a mistake, however, to avoid well-cared-for lenses just because they’re previously owned. Nikon, Canon, Tamron, Sigma and the others spend a great deal of time and money researching and producing lenses which are made to last. If you take a smart, methodical approach there is no reason why one of these previously used lenses can’t find a valuable, productive spot in your camera bag.

Jeff Guyer is a photographer based in Atlanta, GA. In addition to shooting portraits, architecture, sports, weddings, and just about anything else that pauses in front of his lens, he also teaches a Digital Photo Challenges class for kids. Follow him on Facebook at http://www.facebook.com/guyerphotography or on Twitter @guyerphoto

Post originally from: Digital Photography Tips.

Check out our more Photography Tips at Photography Tips for Beginners, Portrait Photography Tips and Wedding Photography Tips.

An Introduction to Buying Used Lenses


Digital Photography School

 
Comments Off on An Introduction to Buying Used Lenses

Posted in Photography