RSS
 

Posts Tagged ‘Brush’

Corel releases ParticleShop brush plugin for Photoshop

13 Aug

Corel has released a new brush plugin for PhotoShop called ParticleShop. It uses Corel’s Painter Particle brush technology to create photo-realistic effects like smoke, dust, fabric, fire, hair, lighting and fur. These effects are added to photos using brush strokes. Read more

Articles: Digital Photography Review (dpreview.com)

 
Comments Off on Corel releases ParticleShop brush plugin for Photoshop

Posted in Uncategorized


Adobe Creative Cloud update introduces de-haze feature and speedier healing brush

16 Jun

Adobe has announced a number of updates to its Creative Cloud suite, including some feature enhancements and additions to Photoshop CC and Lightroom CC. A previously demonstrated de-haze tool has been added to CC versions of Photoshop and Lightroom, and the effects of Photoshop’s popular healing brush will now be displayed in real time as the tool is used. Read more

Articles: Digital Photography Review (dpreview.com)

 
Comments Off on Adobe Creative Cloud update introduces de-haze feature and speedier healing brush

Posted in Uncategorized


Using the Adjustment Brush in Adobe Camera Raw

17 Mar
Adjustment-Brush-title2

A before and after using the Adjustment Brush on the buildings.

What is the Adjustment Brush?

The Adjustment Brush is an editing tool in Adobe Camera Raw (known simply as ACR). This tool is possibly the equivalent of the Dodge and Burn tools in Photoshop. So what is dodging and burning? To dodge is to lighten and to burn is to darken a specific area.

What does it do?

When you make your initial global adjustments of a RAW file in ACR, more than likely, you will need to make local adjustments too. This is where the Adjustment Brush is useful for making adjustments to specific areas of your photo.

Recently, I have found I am using this tool more and more. If I am out and about just shooting for my own library, I tend to take photos slightly underexposed. This way, I can recover a lot of detail in the post editing stage. This is useful if you don’t have time for metering the shot perfectly, especially in the case where skies are involved.

How does it work?

The Adjustment Brush isolates a specific area by masking it, similar to using layer masks in Photoshop. When you click on the Adjustment Brush icon, the right panel changes to the Adjustment Brush tab. The bottom sliders modify the size of the brush and you can also determine how much feather and density (flow) you wish to apply.

When you use the Adjustment Brush on a particular part of your image, a pin icon appears to determine where your adjustment has just been made.

Adjustment-brush-zoomed-up

The Adjustment Brush is located at the top left of the dialog box.

Adjustment-Brush-and-Pin-icon

How the Adjustment Brush looks when in use and the Pin icon which determines where on the image the adjustment has been made.

Adjustment-Brush-slider

These sliders adjust the size, feather and flow of the Adjustment Brush.

I do find using the Adjustment Brush a bit cumbersome. But this tool definitely has its merits. Like most of the editing tools in ACR, Photoshop, Lightroom, etc., there is simply no one-click button that magically does it all.

You may find with a bit of practice using the Adjustment Brush that it could speed up your editing workflow. Take for example this image that I shot of some blue containers on a pier. I made the basic adjustments in ACR. I then used the Adjustment Brush in several areas: to lighten the sky; to keep the highlights on the small white boat on the left from being blown out completely. I also used the Adjustment Brush on the wood section to give it more warmth.

blue-drums

Several areas where the Adjustment Brush has been used as shown by the Pin icon.

The Graduated Filter in conjunction with the Adjustment Brush is a great combination. It behaves in a similar way to a Graduated Neutral Density filter. I use this filter on skies, then use the Adjustment Brush to mask areas that I don’t want the Graduated Filter to effect.

Pros

  • Broad local adjustments lightened or darkened.
  • Speed up your editing workflow as you may not need further adjustments in Photoshop or Lightroom.
  • Works really well in conjunction with the Graduated Filter tool.

Cons

  • Cumbersome and sometimes awkward to use.
  • More refined detail is better done in Photoshop using layer masks where you have more control.

Tip:

A fantastic feature in Photoshop CC is that Camera Raw is now a filter. However, if you are using previous versions such as CS5/6, a substitute workaround is before you open your image from within ACR to Photoshop, make sure you open it as a Smart Object. You can do this by holding the Shift key and the Open Image button changes to Open Object. Or you can have this option ticked in Workflow Options. This is a pop-up dialog box located by clicking on the link at the bottom of the ACR screen. That way you can go back into ACR by double clicking on the layer.

Harbour

By using the Adjustment Brush on just the buildings, I was able to recover a lot of detail.

googletag.cmd.push(function() {
tablet_slots.push( googletag.defineSlot( “/1005424/_dPSv4_tab-all-article-bottom_(300×250)”, [300, 250], “pb-ad-78623” ).addService( googletag.pubads() ) ); googletag.pubads().enableSingleRequest();
googletag.pubads().disableInitialLoad();
googletag.pubads().collapseEmptyDivs( true );
googletag.enableServices();
} );

googletag.cmd.push( function() { googletag.display( ‘pb-ad-78623’ ); } );

googletag.cmd.push(function() {
mobile_slots.push( googletag.defineSlot( “/1005424/_dPSv4_mob-all-article-bottom_(300×250)”, [300, 250], “pb-ad-78158” ).addService( googletag.pubads() ) ); googletag.pubads().enableSingleRequest();
googletag.pubads().disableInitialLoad();
googletag.pubads().collapseEmptyDivs( true );
googletag.enableServices();
} );

googletag.cmd.push( function() { googletag.display( ‘pb-ad-78158’ ); } );

The post Using the Adjustment Brush in Adobe Camera Raw by Sarah Hipwell appeared first on Digital Photography School.


Digital Photography School

 
Comments Off on Using the Adjustment Brush in Adobe Camera Raw

Posted in Photography


How to Retouch a Portrait with the Adjustment Brush in Lightroom

04 Mar

Portrait retouching Lightroom

You have probably seen several portrait retouching programs advertised in magazines or online, and wondered if they were worth buying. The answer is no. I have tried out quite a few, and the truth is that the Soften Skin preset in Lightroom does just as good a job as any of them. For most photographers Lightroom’s retouching tools all are you will ever need. For high end retouching purposes you can go to Photoshop.

It’s worthwhile taking some time to think about your personal approach to portrait retouching. Some photographers seem to like the airbrushed, almost plastic look of heavy processing. It’s a style you see used a lot in commercial photography or movie posters.

Others will go for a more natural effect, and use the retouching tools with a light touch. That’s definitely my approach, and it fits with my preference for natural light and for creating portraits that capture character.

Either way,the Adjustment Brush in Lightroom can accommodate your needs.

Retouching portraits of women

When retouching portraits of women it is conventional to use a skin smoothing technique to make the portrait look more flattering. There are exceptions of course, sometimes skin smoothing is not necessary, especially if your model has good skin and you shoot in soft light, or use a wide aperture to throw some of the face out of focus.

Portrait retouching Lightroom
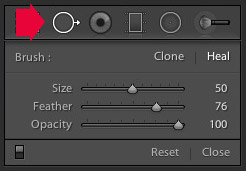
The first step in portrait retouching is to remove any blemishes with the Spot Removal tool. To do so, click on the Spot Removal tool icon to activate it, adjust the size of the  brush with the square bracket keys on the keyboard, and click on the spot you want to remove.

Lightroom automatically selects another area of the portrait to sample from, healing the blemish. Sometimes Lightroom won’t select the most appropriate area – in this case you can click on the circle representing the sample and move it to a more suitable location.

Portrait retouching Lightroom

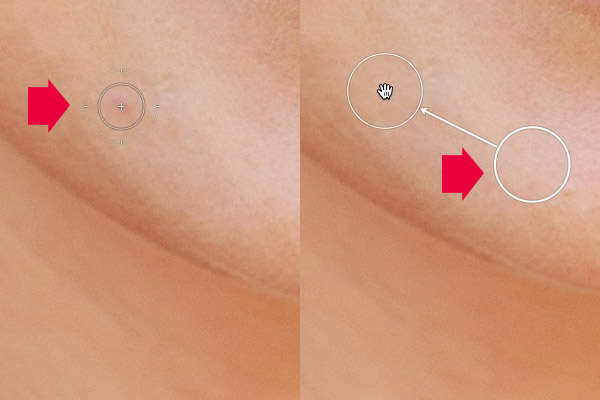
Click on a blemish with the Spot Removal tool (left). In this case Lightroom’s healing algorithm worked perfectly, but if it doesn’t then click on the circle representing the sampled area and move it to a location where the skin matches the tone and texture of the area to be healed (right).

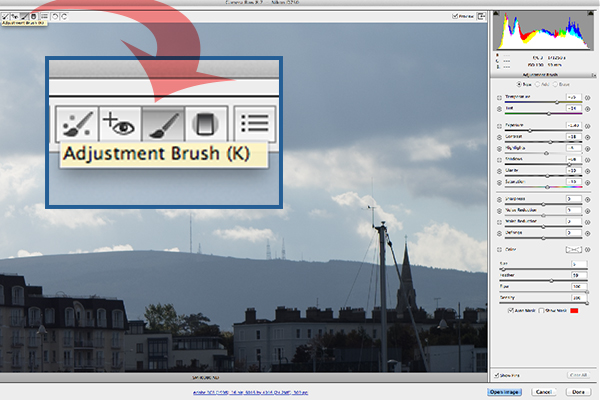
Adjustment Brush adjustments

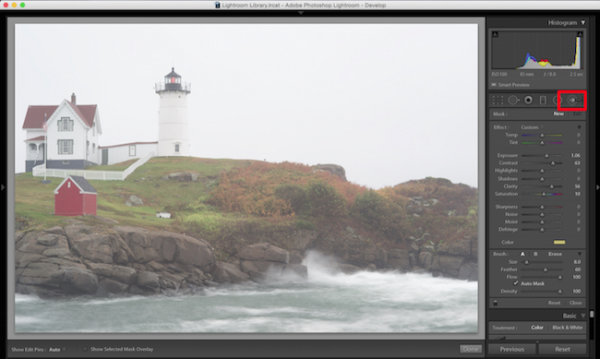
Now it’s time to look closely at the portrait and decide what other retouching is required. It’s important that you have already made the required adjustments to tone and contrast in the Basic panel before you get to this stage. Increasing Contrast and Clarity, for example, will emphasize skin texture, wrinkles and blemishes. On the other hand, you can move the Exposure or Highlights sliders right to brighten the skin, making wrinkles and skin texture less obvious. Retouching with the Adjustment Brush should be left until last, so you know what you’re working with.

I like to start with the area underneath the model’s eyes. The skin here is thinner than the rest of the face which is why people get dark patches there. There may also be wrinkles, and some people have a strong crease along the lower eyelid.

The idea is not to eliminate these completely (unless you’re going for the heavily retouched, airbrushed look) but to minimize them. They’re a natural part of the skin’s texture and it will look unnatural if they are not there.

Portrait retouching Lightroom
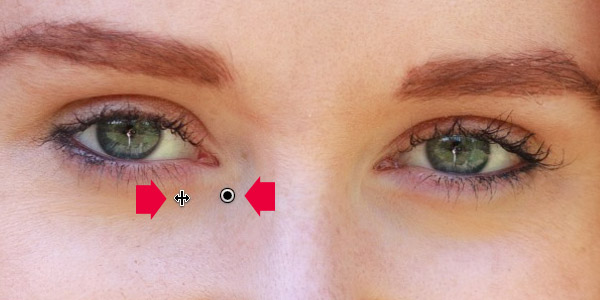
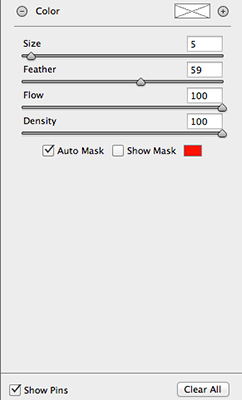
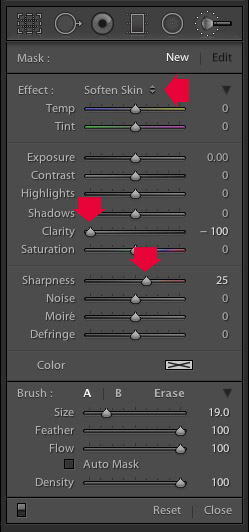
Click on the Adjustment Brush icon to activate it. Select the Soften Skin preset from the Effect menu. Lightroom sets Clarity to -100 and Sharpness to +25. Make sure Feather, Flow and Density are set to 100, use the square bracket keys on the keyboard to adjust the size of the brush and paint over the areas under the eyes. The Soften Skin preset blurs the area that you paint in with the brush.

If the effect is too strong, hover the mouse over the Adjustment Brush pin (a grey circle with a black dot in the middle) until a double arrow icon appears (below). Hold the left mouse button down and move the mouse left. Lightroom reduces the value of the Clarity and Sharpness sliders, effectively lessening the strength of the Soften Skin preset. Stop when it looks about right. You can also reduce shadows by moving the Shadows slider (in the Adjustment Brush sliders) to the right. Every portrait is different so you have to adjust the effect by eye.

Portrait retouching Lightroom

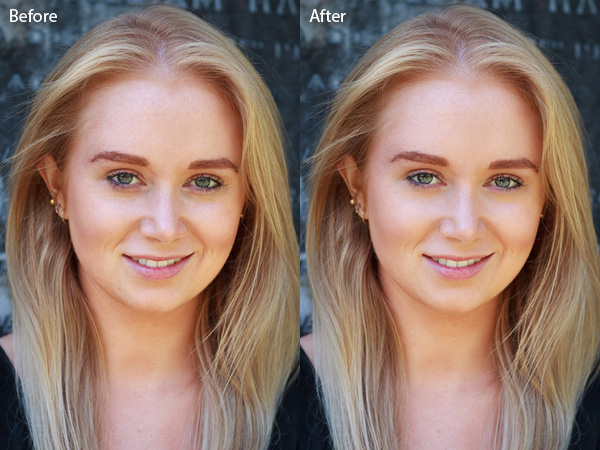
These are the results.

Portrait retouching Lightroom

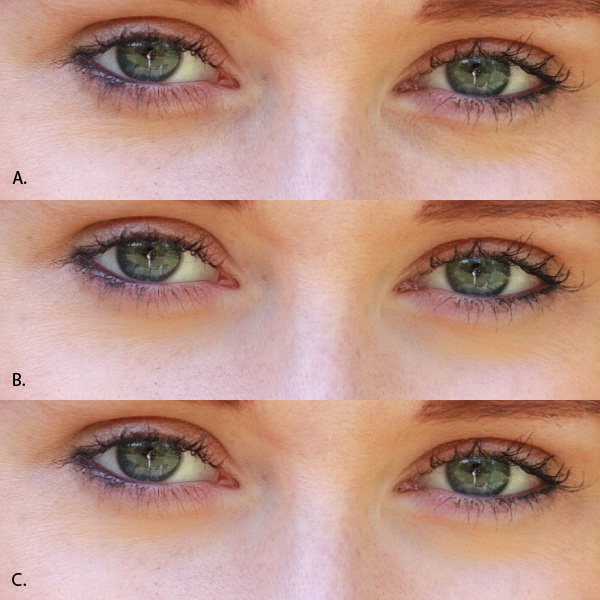
A. Original, unretouched portrait.
B. Retouched, with Soften Skin preset at full strength.
C. Retouched, with strength of Soften Skin preset reduced and Shadows slider moved to the right (subtle difference only).

Enhancing eyes

You can also use the Adjustment Brush tool to enhance your model’s eyes. This is useful if the eyes are dark due to the lighting. Be careful of overdoing this effect as it may not look natural.

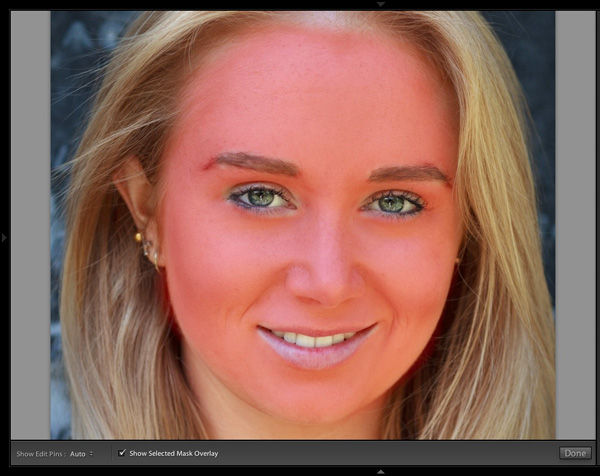
Click New at the top of the Adjustment Brush panel to create a new Adjustment Brush. Set Feather to around 50 and paint in the pupils of the model’s eyes. If you need to, press O (the letter) on the keyboard to see the masked area (it is displayed in red shown below).

Portrait retouching Lightroom

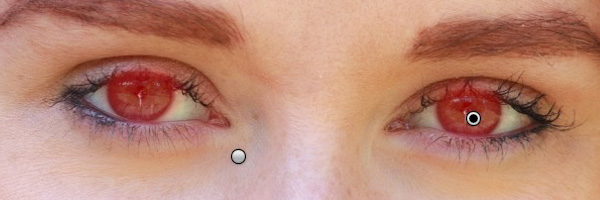
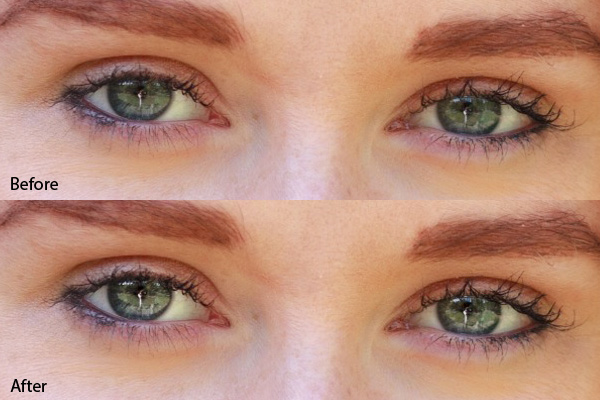
Now set Exposure to around 0.50 and Clarity to 30. The effect will vary depending on the colour of your model’s pupils and the amount of light on them. It’s a good idea to zoom out and look at the entire portrait to see if the effect is too strong. You can see this adjustment on the model’s eyes below, which I think is about right.

Portrait retouching Lightroom

You can make the effect stronger or weaker on your photo using the technique described above. Hover over the Adjustment Brush pin until the double arrow icon appears, move the mouse left to make the effect weaker, and right to make it stronger (you can also just drag the sliders one by one to change the settings)

The final step is to apply gentle skin softening to the rest of the face. Create another Adjustment Brush, set Feather to 100 and paint the entire face (use the O keyboard shortcut to display the red overlay). Then select Erase in the Adjustment brush panel, set Feather to 50 and erase the eyebrows, mouth and eyes. The idea is that you only want to soften the skin, not these parts of the face. It should look something like the mask below.

Portrait retouching Lightroom

Go to the Effect menu and select the Soften Skin preset. Press O to hide the mask overlay and you will see something like the screenshot below. Remember, this is the Soften Skin preset at maximum strength so it has a strong effect on the photo.

Portrait retouching Lightroom

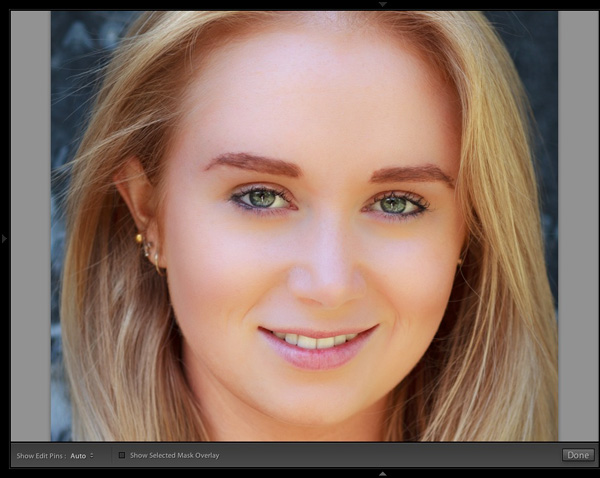
Use the technique we learned earlier to reduce the strength of the effect. How far you go is up to you. I like to apply the Soften Skin preset subtly to retain as much skin texture as possible. Here’s the result with Clarity reduced to -20 and Sharpness to +5.

Portrait retouching Lightroom

This video shows how I retouched another portrait, using the Adjustment Brush tool to enhance the model’s eyes and facial hair.

I’ve only touched on the number of ways you can use Adjustment Brushes in Lightroom for portrait retouching. What techniques do you use? Please let us know in the comments.


The Mastering Lightroom Collection

Mastering Lightroom ebooksMy Mastering Lightroom ebooks will help you get the most out of Lightroom 4 and Lightroom 5. They cover every aspect of the software from the Library module through to creating beautiful images in the Develop module. Click the link to learn more or buy.

googletag.cmd.push(function() {
tablet_slots.push( googletag.defineSlot( “/1005424/_dPSv4_tab-all-article-bottom_(300×250)”, [300, 250], “pb-ad-78623” ).addService( googletag.pubads() ) ); } );

googletag.cmd.push(function() {
mobile_slots.push( googletag.defineSlot( “/1005424/_dPSv4_mob-all-article-bottom_(300×250)”, [300, 250], “pb-ad-78158” ).addService( googletag.pubads() ) ); } );

The post How to Retouch a Portrait with the Adjustment Brush in Lightroom by Andrew S. Gibson appeared first on Digital Photography School.


Digital Photography School

 
Comments Off on How to Retouch a Portrait with the Adjustment Brush in Lightroom

Posted in Photography


Using the Lightroom Adjustment Brush to add Dimension to a Landscape Photo

25 Feb

Adding layers of dimension with the Lightroom brush

Lightroom has the power to completely transform your landscape photograph into something far more powerful, something that hits home with viewers, and something that pops off the screen.

By default digital cameras create flatter image files than what you see with your eye. Your eye has the ability to see dimensions like no camera can really capture. Although many try.

What is Dimension?

The definition of dimension is: an aspect or feature of a situation, problem, or thing. When utilizing the word dimension in your photograph, think of the features of specific locations and objects within the frame. As an example, in the photo you will see here, there are multiple layers of dimension to play with. There’s the sky, the water, the rocks, the buildings, the grass, and the shed. Each has its own uniqueness to it, and can and should be treated as such.

The Adjustment Brush Tool

Like the other local adjustment tools in Lightroom, the adjustment brush tool has the ability to fine tune specific parts of a photograph. Using the tool can create new dimensions you would never have otherwise seen from a camera rendition. Your eye, however, most likely did see the dimensions.

Lightroom Brush Tool

Where to find the Lightroom brush tool

You can see in the first photo that it’s a really cool lighthouse scene, but there is something drastically gone wrong. The photo is super flat. That is because it was a very rainy day with tons of fog everywhere, and mist from the water constantly hitting the camera.

To use the Lightroom Adjustment Brush, open a photo in the Develop module, then select the brush icon at the top right, just under the Histogram (the keyboard shortcut is K).

Once selected, a variety of local adjustments will appear. From there you have a wide range of options that you can make on a very specific section of your photo. For example, sharpness, exposure, or even brushing on a new color.

The first thing you should know before starting with the Adjustment Brush is that Lightroom keeps your last settings whenever adding a new brush. To zero out the settings simply double click on the word Effect.

Also, the Auto Mask feature is very smart. Think of it like a content aware brush. Simply put, it looks at the cross hairs inside of your brush and will try to stay “within the lines” and not brush on what doesn’t match up. This is fantastic for edges. However, the Auto Mask feature uses more Lightroom performance, so you may notice a slow down. My workflow is to fill in big spaces and then turn on Auto Mask when I need it.

As you are brushing in areas, hit the O key on your keyword to see a red mask of where you have brushed (hit Shift+O to cycle through the available mask colors).

Lightroom masking

Hit the O key to view the current mask in a red overlay

I started brushing the middle section of the photo with more contrast, and reduced highlights and shadows. This broke through the haze and enhanced the greens enough to where I like it.

I then made another brush by clicking on New in the brush panel. This one was to bring down the extreme highlights of the house and lighthouse. I brought it down just enough so it’s still white, but doesn’t blend in with the sky, which is also very white.

Then came a third brush, which was for the rocks. I wanted to make sure they popped out more than anything else. I didn’t want them to just have contrast, so I also used the clarity slider. Clarity will enhance a lot of edge detail, which is awesome on rocks.

Lightroom brush clarity

Add clarity to select objects using the Adjustment Brush

Now that the grass, the structures and the rocks all have different dimensions of contrast, clarity and light, it is time to play with the color dimension. So I created another brush with a hint of transparent blue to the water. This adds more life to the boring gray tone it had previously.

I then did the same with the sky, but with less transparency due to the whiteness of the sky already. Adding a hint of color the white sky helps separate the house and lighthouse from the background even more.

The last brush I added to the photo was on the roof of the house. The intention there was to recover the red color subtly, so it doesn’t take away from the rest of the photo. So I increased the contrast, dropped the exposure slightly and added a hit more red to the roof.

Lightroom brush color

Add color to specific areas using the Lightroom brush

At the end of the day, the photo has multiple layers of dimension. It’s no longer flat, and notone section has the same feel as the rest. Using the brush feature in Lightroom I was able to not only recover color and contrast, but add even more texture and life to the scene.

Think of the Adjustment Brush tool like layers in Photoshop or onOne Software. There are no actual layers but rather brush points which can be adjusted individually.

Below is a video showing what I’ve done with this photograph.

There is a lot more that can be done, like sharpness, noise reduction and even changing color temperature and tinting for specific areas in a photo. But what I have shared here is a handful of what you are capable of doing within your favorite photography workflow software, Lightroom.

I’d love to see some photos you have processed using Lightroom Adjustment Brush tool. Please comment to share with the dPS community.

googletag.cmd.push(function() {
tablet_slots.push( googletag.defineSlot( “/1005424/_dPSv4_tab-all-article-bottom_(300×250)”, [300, 250], “pb-ad-78623” ).addService( googletag.pubads() ) ); } );

googletag.cmd.push(function() {
mobile_slots.push( googletag.defineSlot( “/1005424/_dPSv4_mob-all-article-bottom_(300×250)”, [300, 250], “pb-ad-78158” ).addService( googletag.pubads() ) ); } );

The post Using the Lightroom Adjustment Brush to add Dimension to a Landscape Photo by Scott Wyden Kivowitz appeared first on Digital Photography School.


Digital Photography School

 
Comments Off on Using the Lightroom Adjustment Brush to add Dimension to a Landscape Photo

Posted in Photography


How to Make a Signature Brush in Photoshop

27 Feb

photossop-signature-brush-dps-001

The decision of whether to watermark images posted online is a frequent topic of debate. Proponents say it’s an added measure of security–a notice to would-be image thieves that the photographer takes his or her copyright seriously and will defend it like a mama lion protecting her cubs. Others point out that watermarks are distracting, clients don’t like them, and unscrupulous people with decent editing software can make that watermark disappear in the blink of an eye, so what’s the point? Regardless of where you come down on this issue, sometimes you just find yourself wanting to make sure the world knows that you took the photo.

There are a lot of ways you can do this, but I find most of them to be rather cumbersome. You can create a watermark and save it in various file formats, but that means opening  the file and dragging it onto your image each time you want to use it. Chances are that you’ll have to resize it and/or adjust the opacity for every image. I also tried it as a custom shape tool for a while, but that too was an inefficient way of accomplishing what should have been a pretty basic task. I eventually figured out how to create a signature brush in Photoshop, finally finding my perfect solution. I should point out, that I’m one of those people who has pretty much thrown in the towel when it comes to online watermarking. If someone really wants to steal my image, they are going to find a way to do it–with or without a watermark. I do, however, like adding my signature to some of my fine art images.

While I’ve outlined the steps for creating a brush of your signature, the same steps will work for making  a brush of your logo.

Step 1 – Sign Your Name

Use a plain white sheet of paper and a fine point Sharpie. The Photoshop part of the process will go much easier with the heavier lines of the marker, but you should also scribble out your signature a bit larger than you ordinarily would. Once your signature looks right, scan it at a high resolution and save the JPEG to your computer. You can try taking a photo if you don’t have a scanner, but fill the frame and make sure that your lens is as parallel to the paper as possible.

photossop-signature-brush-dps-002

Thicker, bolder lines from a marker will make creating the brush easier, yet still give the signature a normal appearance when applied to an image.

Step 2 – Open, Zoom, and Select

Once you open your signature in Photoshop, zoom in nice and tight. Using the magic wand tool (keyboard shortcut W), click on the signature to select it. You should immediately see the “marching ants” flashing across the outline of your signature. If the tool fails to select the entire signature, press and hold the Shift key while you click on parts of the signature that were missed the first time. Since my signature has a break in it, I had to add the second segment with an extra click of the selection tool. You can also right-click and select “Similar” from the context menu, but I find that the shift-click is quicker and more accurate.

photoshop-signature-brush-dps-003

The Magic Wand tool shares its spot in the tools palette with the Quick Selection Tool. Make sure you select the correct one.

Step 3 – Save It and Name It

Once the complete signature is selected, click on the drop-down Edit menu at the top of the window. Clicking on Define Brush Preset will open a dialog box showing a thumbnail of your new brush. Give the brush a name and click “OK.” This will save the brush at its current dimensions in your current brushes set. You can check it by selecting the brush tool (keyboard shortcut B) and opening the preset picker (second drop-down menu from the left at the top of the window). Your new brush will appear at the bottom of the brush set.

photoshop-signature-brush-dps-004

The Define Brush Preset command appears in the drop-down Edit menu.

Finding your signature in the brushes palette will be pretty simple, but give it an easy-to-remember name, just in case.

Finding your signature in the brushes palette will be pretty simple, but give it an easy-to-remember name, just in case.

Step 4 – Customize It

Due to the over-sized signature that we used to create the brush, our new brush is way too big for tastefully marking a photo.  You can adjust the size within the brush panel, but there is a faster, easier way of doing it right from the keyboard. The right and left bracket keys — [     ] — can be used to adjust the size of the brush. The right key makes it bigger, and the left makes it smaller. You can either create a second preset at a more manageable size, or simply use the bracket keys to make quick size adjustments for each photo as necessary. The preset picker contains a small square icon on the right side. Clicking it will open a dialog box that will allow you to save the new preset at its new size. It’s also worth noting that–just like any other brush in Photoshop–you can change the color and opacity, as well as the hardness or softness of the edges.

You can further customize the brush by saving another preset with variations of size, color, and opacity.

You can further customize the brush by saving another preset with variations of size, color, and opacity.

I find that the best use of this brush is small and subtle, with enough contrast for it to be noticeable, but not too distracting. I usually select a color or shade from within the image to help the signature appear more organic and less out of place. You should also experiment with adjusting the opacity of the brush until you find a combination that suits you.

The post How to Make a Signature Brush in Photoshop by Jeff Guyer appeared first on Digital Photography School.


Digital Photography School

 
Comments Off on How to Make a Signature Brush in Photoshop

Posted in Photography


How to Use the Adjustment Brush in Lightroom

08 Jul

In this video tutorial Trevor Dayley gives a few quick and helpful tips on using the Adjustment brush in Lightroom. If you’re new to Lightroom this is a great place to start to get a little more creative control. Enjoy!

Post originally from: Digital Photography Tips.

Check out our more Photography Tips at Photography Tips for Beginners, Portrait Photography Tips and Wedding Photography Tips.

How to Use the Adjustment Brush in Lightroom


Digital Photography School

 
Comments Off on How to Use the Adjustment Brush in Lightroom

Posted in Photography


Adjustment Brush in Lightroom 3

04 Nov

Kerry Garrison shows the local adjustment brush in Adobe Photoshop Lightroom 3. This video is from the Learning Resource Center at cameradojo.com
Video Rating: 4 / 5

Additional videos for this title: j.mp Lightroom 4 202: Nature and Landscapes by Martin Perhiniak Video 23 of 32 for Lightroom 4 202: Nature and Landscapes Mother Nature doesnt always cooperate when you take photos outdoors! Thats why weve asked Adobe Lightroom expert and acclaimed educator Martin Perhiniak to show you how to enhance and optimize even the most challenging Nature and Landscape photos. Martin starts off by underscoring the usefulness of the Camera Raw format as well as the importance of keeping your catalogs well-organized. He then covers a wide variety of techniques for enhancing your Landscape photos. Youll learn how to both visually recreate the original mood of a photo as well as how to create alternate artistic interpretations. Specifically, youll learn techniques for dealing with everything from tricky elements like water and clouds, as well as sunset and night conditions. Youll even have fun learning how to work with photos taken from airplanes! Then, Martin takes his photos over to Lightrooms sister product, Photoshop, to develop them further. He shows you how easy and smooth it is to move back and forth between the two Adobe family members. See how to convert and combine your photos to create realistic Panoramas and stunning HDR (High Dynamic Range) images! Upon finishing this course, youll have the the Lightroom skills to take your photos to the next level and beyond! Watch all of the advanced and specialized courses in our Lightroom 4 and

 
Comments Off on Adjustment Brush in Lightroom 3

Posted in Retouching in Photoshop


Photoshop: Improving skin with the Healing Brush | lynda.com tutorial

31 Oct

This Photoshop tutorial discusses how to reduce and simplify skin variations using the Healing Brush tool. Watch more at www.lynda.com This specific tutorial is just a single movie from chapter four of the Photoshop CS5: Fashion Retouching Projects course presented by lynda.com author Chris…

FREE Download Photoshop CS 6 here: www.creativestation.ru Adobe Photoshop CS6 Image restoration from Black and white to color Picer www.creativestation.ru
Video Rating: 0 / 5

 
Comments Off on Photoshop: Improving skin with the Healing Brush | lynda.com tutorial

Posted in Retouching in Photoshop


“PhotoTips” Episode 113 – How to make a Lightroom eye brush

31 Oct

www.PhotoTips.biz – In this episode we make 2 Lightroom brushes for quickly enhancing eyes. You can use these custom brushes over and over again. – Comments are locked on YouTube. All comments, concerns and questions, should be directed to the website. http
Video Rating: 4 / 5

dombowerphoto.blogspot.com here i show you how to add some motion blur with a photo editing software called gimp which is a free software that has many of the same features as photoshop. In this video i show you 2 ways to apply motion blur to an image of a stationary car to make it looks like it is moving. This tutorial uses the free software called GIMP which has many of the same controls as adobe photoshop and also with its easy use of layermasks makes it more simple than adobe photoshop elements. This is not a case of cheating photography but enhancing your images post produciton. I will also show you how to make the car stand out even more after applying motion blur. Hope this helps kind regards dom Ifyou enjoy my photography related videos please post them on your facebook page and let others know about this channel, To keep up to date Please join the facebook fan page www.facebook.com twitter page twitter.com flickr account www.flickr.com www.dombower.com all the tips in this can be done on photoshop as well
Video Rating: 4 / 5

 
Comments Off on “PhotoTips” Episode 113 – How to make a Lightroom eye brush

Posted in Retouching in Photoshop