RSS
 

Posts Tagged ‘brief’

lighting essentials advanced workshop – a brief review

06 Jun

For those not familiar, Lighting Essentials are a series of workshops put on by Don Giannatti (you may know him as “Wizwow” on flickr).   I am a big fan of Don, not only is he an excellent photographer, with years of commercial experience under his belt, but he is also a fantastic teacher – which is just as difficult a skill unto itself.  He’s also a really down to earth guy with a low tolerance for BS and fools, which I find refreshing, particularly in the online photo community which can often turn into a bit of a hive-mind circle-jerk at times (you know what I’m talking about)…

Anyway, I got to go to his workshop in Philly in ’08 and it was awesome – definitely kicked my work up a couple of notches.   At the time I was already somewhat experienced with lighting, so I wasn’t sure what to expect, but I was blown away; it was amazing to watch Don demonstrate things that I already “knew” lighting wise, and still be able to pick up something new – a new way of thinking about it, new ways of analyzing and constructing and deconstructing light.

A few weeks back, I had the opportunity to attend the advanced lighting essentials ‘shop down in Baltimore.  Different than the standard workshop, this one assumed a baseline familiarity with lighting to begin with – getting a baseline exposure, balatncing flash/ambient, ratios etc… This was fantastic, as we were able to jump right into working with little “catch up” required.  The format was well done. Don split us up into groups, with various assignments/challenges – in the morning we worked “in studio” talking about and working on precision lighting techniques for still life/objects.  I gained a whole new respect for product photographers – it’s a lot more difficult than you’d think.  One light, and lots of carefully placed white/black cards/diffusers etc…  I particularly appreciated this as it  really made you focus on analyzing and constructing light carefully rather than the “throw some strobes on it till it looks good” approach which many lighting novices seem to take.

In the afternoons we worked with models,  but instead of the standard “how to light/balance” we focused more on creating a mood or complex lighting schemes – sometimes using 4, 5 or more lights – little accents and subtleties to construct a meaningful lighting scheme.   Now I tend to be more minimalist in terms of my own lighting (I tend to favor zero, one or two lights – rarely more) but even so it was valuable to concentrate on the subtleties of the lighting scheme as a whole.

One of the things I like the best about Don’s workshops is that it’s all hands-on.  There’s no “sit around and listen to the instructor talk about how great he is” for 6 hours, as is the case with many “workshops” – Don has everyone jumping right in and shooting right off the bat.  It’s simply “talk about technique -> apply technique”.   Good stuff.   We also spent quite a bit of time talking business.  Don has been a full time photographer as well as designer and creative director for many years, so he has a fantastic amount of the experience in the industry and shares freely.  There are few things more valuable for a new photographer than the lessons of experience from someone who has “been there and done that”.   It’s like going through the school of hard knocks without having to take the knocks.

To sum up, aka the TL;DR version:  if you get a chance to attend one of Don’s workshops, go for it – it’s worth every penny.  What boggles my mind is that folks who will drop thousands on a new camera body or lens, are so hesitant to spend money on education or workshops.  I can say without reservation that the couple of hundred bucks for the LE workshops improved my work far more than any gear purchase I have made (and yeah, I’m also guilty of chasing the latest and greatest toys when it comes to gear).

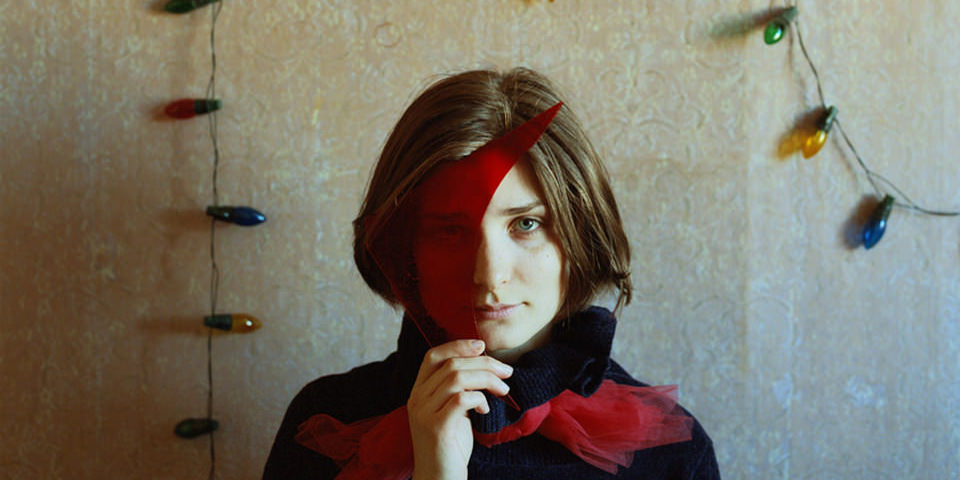
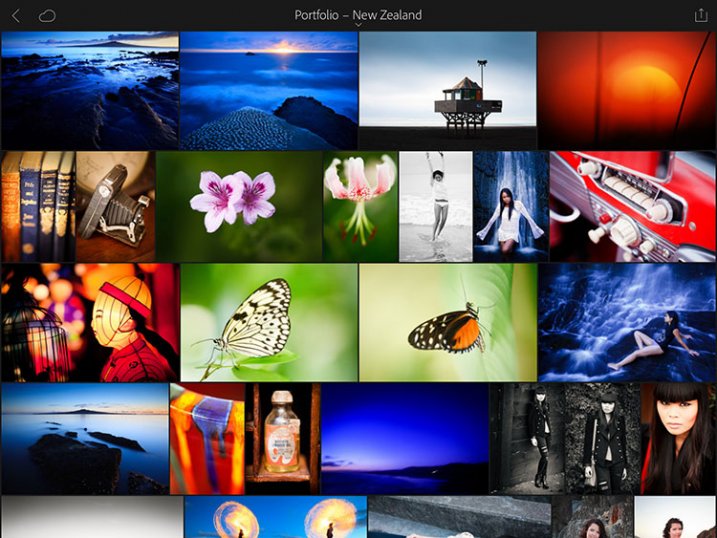
finally some shots from the ‘shop:

Tweet This Post Stumble This Post


F/1.0

 
Comments Off on lighting essentials advanced workshop – a brief review

Posted in Photography


Nikon confirms first D6 units will ship out by end of May, after a brief delay

08 May

At the time of its announcement on February 12 this year, Nikon said its flagship D6 DSLR was expected to ship in April 2020, with pre-orders starting the day of its announcement. However, due to component supply issues caused by the COVID-19 pandemic, Nikon was forced to issue a ‘notice of delay’ on March 9 stating the first units wouldn’t be shipping until May.

$ (document).ready(function() { SampleGalleryV2({“containerId”:”embeddedSampleGallery_9625198425″,”galleryId”:”9625198425″,”isEmbeddedWidget”:true,”selectedImageIndex”:0,”isMobile”:false}) });

Nikon has held true on that promise, confirming in a press release today that the first D6 units will start shipping to customers on May 21. In addition to the new shipping date, Nikon also shared a few images captured with the new DSLR as a teaser of sorts to tide over customers (and pixel-peepers alike):

$ (document).ready(function() { SampleGalleryV2({“containerId”:”embeddedSampleGallery_7067042395″,”galleryId”:”7067042395″,”isEmbeddedWidget”:true,”selectedImageIndex”:0,”isMobile”:false}) });

You can read more about the Nikon D6 in our initial coverage linked above, as well as in our hands-on coverage from our time with it at WPPI. Pre-orders are still live at retailers acros the globe, with the D6 DSLR body-only going for $ 6,500 (Adorama, B&H).

Press release:

Nikon Inc. Announces Retail Availability of the Flagship Nikon D6 DSLR

MELVILLE, NY (May 7, 2020) Today, Nikon Inc. announced the retail availability of the new Nikon D6 DSLR, which was unveiled in February of this year. The D6 will be available in the U.S. starting on Thursday, May 21 for the suggested retail price (SRP) of $ 6,499.95* for the body-only configuration.

Whether on an assignment or in the studio, Nikon’s flagship D6 DSLR always delivers. The D6 incorporates Nikon’s most powerful AF to date, featuring a high-density system with 105 selectable cross-type AF points to help capture pivotal moments again and again, even in the most challenging conditions and environments. Since every second counts, the uncompromising D6 incorporates important upgrades to enhance photographers’ workflow and accelerate file transfer capabilities, offering time-saving and customizable options during and after capture. Additionally, the D6 offers robust reliability, unrivaled low-light capability, amazing versatility, 4K UHD multimedia capabilities and a mechanical shutter frame rate that can capture at a blazing fast 14 frames-per-second (fps).

Articles: Digital Photography Review (dpreview.com)

 
Comments Off on Nikon confirms first D6 units will ship out by end of May, after a brief delay

Posted in Uncategorized


A Brief introduction to GIMP Software

19 Jul

The post A Brief introduction to GIMP Software appeared first on Digital Photography School. It was authored by Ana Mireles.

Whether you are looking for a free program to start learning photo editing or you want a lighter alternative to Photoshop, GIMP may be the software for you. You can create graphics, text, and manipulate photos, but first, you need to understand how it works. Keep reading for a brief introduction to GIMP software and how to use it.

Introduction to GIMP

What is GIMP?

GIMP is a completely free image editor. You can even use it for commercial purposes without having to pay. It is also open-source, which means that a lot of third-party developers have created free plug-ins for use with GIMP. Furthermore, if you know how to code, you can also modify it as you see fit. Finally, it is also available for many different operating systems. You can download GIMP from its site, and it will suggest the one for you.

Introduction to GIMP Software Download

It’s even possible to take it with you for other devices. You can find an instruction manual in the article How to Install GIMP on a Portable Device. In any case, on the main page of GIMP’s website, you’ll see a very enticing description, beautifully illustrated and promising high-quality image manipulation, original artwork creation, and graphic design elements.

Introduction to GIMP. What can you do with it

It all sounds fantastic, right? But when you open the program, you may not know where to start. Well, let’s break it down for you to easily understand.

Multiple windows or just one?

Most programs open in one window that you can enlarge or squeeze, minimize or close, all in one go. Instead, GIMP, by default, opens in three windows. This is a bit puzzling, and I found it very off-putting the first time I used it.

Introduction to GIMP. Multiple Windows View

The good news is that from version 2.8 of GIMP, you can change into a one-window view. I’ll tell you how to switch in just a moment.

First, I want to tell you what makes the multiple window choice worth trying. As each image opens as a new window, you can work with two or more images side by side. Even better, the same image can open in two windows so you can work on it as a side-by-side comparison.

Introduction to GIMP. Side by side comparison using multiple windows.

Another perk of having separate windows is that you can gain more image space on your screen. You can individually minimize any window containing tools or labels that you’re not using. Now, if you’re not convinced with it, you can switch to the single-window mode by going to Menu -> Window -> Single-Window Mode. Whichever choice you make, it saves as a default for the next time you open GIMP.

Introduction to GIMP. How to change to single window view.

What’s What?

Now that you have set up your workspace, it’s time to learn what each window contains. In the center, you’ll have the image window. Here you can see the image or canvas you’re working on. If you are on multiple windows, each image opens separately (as shown before), and if you are on the single-window mode, they open as tabs.

Introduction to GIMP. Open images as tabs

On the left side, you’ll have a window that holds your toolbox. In there, you can have a shortcut button for the tools you use most often. It comes with a default setup that you can personalize. To do it, go to GIMP -> Preferences -> Toolbox and choose the tools you want to add or delete from there.

Introduction to GIMP. Set toolbox preferences

Underneath you have the options available for each tool. Therefore, it’s not static content; it changes every time you select a different tool. You can drag and drop this dock to a different position if you prefer, however, I keep it on the right.

Introduction to GIMP. Toolbox option panel

On the right side, you have a window that holds a series of tabs like History or Layers. This window behaves like a dock. If you want to open a tab that is not showing, you have to go to the menu Windows -> Dockable Dialogs, and chose it from the drop-down menu. It will automatically dock the tab. Then click on the arrow button on the right to open the settings and manage it from there.

Introduction to GIMP. Manage the dockable panels

If you are working with multiple-windows mode, you can still reach these tabs on the menu Windows -> Dockable Dialogs. In this case, you’ll find that some open as tabs and some open as separate windows that you can drag, minimize, or close individually.

Save or export?

Whether you did a small modification or an original artwork, you need to save it. If you go to the menu File -> Save as you would normally do, you can only use the GIMP extension .xcf.

Introduction to GIMP. Save files

If you want to use a universal format like .jpg or .tiff or even change it into Photoshop’s .psd, you have to go to the menu File -> Export. From there, you have a huge variety of file formats to choose from. If you aren’t sure about which one is best, check this article for Understanding all the Different Image File Formats.

Introduction to GIMP. Export to save in different formats

I hope you found this article helpful overview to understand GIMP software and give it a try. If you are still not convinced with it, there are other free programs out there. For more information check out this article with Tips on choosing a Free Photo Editor for Post-Processing.

Have you used GIMP software? What are your thoughts? What are some other free post-processing software applications that you use? Please share with us in the comments section.


gimp-software

The post A Brief introduction to GIMP Software appeared first on Digital Photography School. It was authored by Ana Mireles.


Digital Photography School

 
Comments Off on A Brief introduction to GIMP Software

Posted in Photography


Brief aus der ruhigen Stadt

03 Nov

© Kate Smuraga

Ein Beitrag von: Kate Smuraga

Hallo, mein lieber unbekannter Freund! Oh, es ist schwer, ehrlich zu sich selbst zu sein. Um meine Geschichte zu erzählen, muss ich ganz vorn beginnen.
kwerfeldein – Fotografie Magazin | Fotocommunity

 
Comments Off on Brief aus der ruhigen Stadt

Posted in Equipment


A Brief Introduction to Lightroom

25 Sep
A Brief Introduction to Lightroom

Lightroom’s Book module lets you create photo books to publish using Blurb’s print on demand printing service.

Since the first version was released over eight years ago, Lightroom has become the go-to software for many photographers, both hobbyist and professional. But if you’re new to Lightroom you may be wondering exactly what it does, what you would use it for, and how it differs from other well known programs like Photoshop.

What is Lightroom?

Lightroom is part Raw converter, part photo processor (yes, you can edit JPEG and TIFF files in Lightroom too), and part photo organizer. The latter task is often referred to as digital asset management (or DAM for short).

The key thing to understand about Lightroom is that it is a workflow application. It is designed to take care of your photos from the moment you copy them from your camera’s memory card, to your computer’s hard drive. Once in Lightroom you can process photos, add them to a map to show where they were taken, create a photo book or slide show, print them or export them to other programs for further processing.

This is why Lightroom is so useful, and so popular. It becomes the centre of your workflow, and while it is powerful enough to be used independently, it also integrates seamlessly with programs like Photoshop. You can use Lightroom by itself, or in partnership with other programs.

A Brief Introduction to Lightroom

The Lightroom Develop module. This is where you process your JPEG, TIFF or Raw files.

The Lightroom Catalog

At the heart of Lightroom is the Catalog – a database that contains a preview of every photo that you have imported into the program, a record of each photo’s metadata (including processing) plus the location where it is stored on your hard drive.

It is important to note that the Catalog doesn’t contain the photos themselves, just information about them. Your photo files are always saved on a hard drive, even if you use Lightroom CC (Creative Cloud).

A Brief Introduction to Lightroom

The Lightroom Library module. This is where you view, organize, and search photos. It is the heart of Lightroom and arguably its most important module.

The database advantage

Because Lightroom is a database, it gives you several advantages over programs like Photoshop.

1. It saves you hard drive space

Lots of it. When you process a Raw file in Lightroom, the edits you make are saved in the Lightroom Catalog as a series of text commands which take up very little space.

When you process a Raw file in Photoshop, you have to convert it to a 16 bit TIFF or PSD file first (yes, you can use JPEG instead but the other formats give better image quality). TIFF and PSD (and even JPEG) files take up much more space than the text commands in the Lightroom Catalog do.

The end result is that, over time, you save hundreds of gigabytes of storage space, making it much easier to manage your growing photo collection.

Note that this benefit is diminished if you are in the habit of exporting photos to Photoshop or plug-ins for processing. That shouldn’t stop you from using those applications (although it is good practice to see if you can do something in Lightroom first) nor should it put you off using Lightroom.

2. Lightroom lets you see all your photos in one place

Provided you import all your photos into a single Catalog (it is possible to have multiple Catalogs in Lightroom but this is for advanced users only) you can view any of your photos using Lightroom’s Library module.

3. Lightroom lets you search your photos

Lightroom is a database, which is designed to collect, organize and search information.

Would you like to find all your photos taken with a particular camera or lens? That’s easy in Lightroom. How about all portraits taken with the aperture set to f/2.8? That takes a little more work as it relies on accurate keywording, but it’s entirely possible. Or what about all photos of a specific person taken in 2012? Easy with the face detection tool in Lightroom 6 and Lightroom CC.

A brief introduction to Lightroom

In this example I used Lightroom’s Library module to find all photos taken in 2015 with my Fujinon 35mm lens at an aperture of f/2.8 or greater.

4. Lightroom lets your organize your photos how you want

The problem with storing images in folders is that you can only save a photo in one location. Let’s say you took some photos of a friend called Sarah, in London, in July 2015 (maybe you were at Wimbledon). When you copy those files to your hard drive, you can only save them in one folder (which may be called Sarah, or London, or something entirely different).

Lightroom Collections

One of Lightroom’s key features is Collections. A Collection is like a virtual folder. You can call a Collection whatever you want, add as many photos as you like, and add photos to as many Collections as you need.

Using the above example, once you have imported your photos of Sarah into the Lightroom Catalog, you can add them to multiple Collections. For example, you may have one Collection that contains all your photos of Sarah, another with all your photos of London, and another with all the photos taken in July 2015.

It’s a simplified example, but the advantages of Collections become more apparent the more you use them. In short, they give you the flexibility to organize your images in a way that suits you.

A brief introduction to Lightroom

This is how I organize my photos using Collections. There is a separate Collection Set for each year. Each of those contains Collection Sets and Collections organizing photos by topic.

Lightroom versus Photoshop

Does that mean you should use Lightroom exclusively and forget about programs like Photoshop? Not at all. There are plenty of things that you can do in Photoshop (not to mention all the other plug-ins and editing programs that you can buy) that you can’t in Lightroom.

Many photographers use the two in conjunction. This is encouraged by Adobe with its Creative Photography Plan, which includes both Photoshop and Lightroom, along with Lightroom mobile and Lightroom web.

If you are new to Lightroom your first task is to import some photos into it so you can work on them. I’ll show you how to do that in my next article.

If you were unsure about what Lightroom is and what photographers use it for, then I hope this article has helped. Do you have any questions? Please ask in the comments and I’ll do my best to help.


The Mastering Lightroom CollectionMastering Lightroom ebooks

My Mastering Lightroom ebooks will help you get the most out of Lightroom. They cover every aspect of the software from the Library module through to creating beautiful images in the Develop module. Click the link to learn more or buy.

googletag.cmd.push(function() {
tablet_slots.push( googletag.defineSlot( “/1005424/_dPSv4_tab-all-article-bottom_(300×250)”, [300, 250], “pb-ad-78623” ).addService( googletag.pubads() ) ); } );

googletag.cmd.push(function() {
mobile_slots.push( googletag.defineSlot( “/1005424/_dPSv4_mob-all-article-bottom_(300×250)”, [300, 250], “pb-ad-78158” ).addService( googletag.pubads() ) ); } );

The post A Brief Introduction to Lightroom by Andrew S. Gibson appeared first on Digital Photography School.


Digital Photography School

 
Comments Off on A Brief Introduction to Lightroom

Posted in Photography


A Brief Guide to Lightroom Mobile and Lightroom Web

09 Jul

Lightroom mobile and Lightroom web

As you are aware, there are two ways to buy Lightroom.

The first is to buy a perpetual license, which means that you pay a set one-off fee to use the software for as long as you want. The second way is to subscribe to Adobe’s Creative Cloud Photography plan. With this, you pay a monthly fee that allows you to use Lightroom CC, Photoshop CC, Lightroom mobile and Lightroom web for as long as you keep up the subscription.

The subscription plan is somewhat controversial, and I know from comments on previous articles that some of you don’t like it. However, as it gives you access to Lightroom mobile and Lightroom web (as well as Photoshop CC) it’s worthwhile exploring the benefits of this licensing model.

Photoshop needs no introduction, but Lightroom mobile and Lightroom web are less well known. So let’s take a look at what they do, and how you can use them in your workflow.

Note: Lightroom mobile is now available for most Android and iOS smart phones and tablets. Up to date operating systems may be required.

Lightroom mobile helps you synchronize photos on your mobile device

In Lightroom CC you can synchronize any Collection with Lightroom mobile.

Lightroom mobile and Lightroom web

The lightning bolt icons on the left indicate these Collections are synchronized with Lightroom mobile.

Synchronized Collections appear on your mobile device (internet connection required) and you can download them for offline viewing.

Lightroom mobile and Lightroom web

Synchronized Collections created in Lightroom CC are immediately available for viewing in Lightroom mobile.

One practical application of this is that you can create a Collection containing your best photos to show people interested in viewing your portfolio. You can add or remove photos in Lightroom CC, and the updates are automatically pushed to Lightroom mobile. Very little work is required on your part, as most of the process is automated.

Lightroom mobile and Lightroom web

Lightroom mobile doesn’t require much storage space on your mobile device

Unless you have a device with a lot of storage space you probably don’t have room to store hundreds of full-size JPEG or Raw files in addition to what’s already on there.

Lightroom mobile works around that by using Smart Previews; a compressed preview of your photo that measures 2540 pixels along the longest edge. Crucially, Smart Previews are only a fraction of the size of a JPEG or Raw file (around 2%).

When you synchronize a Collection with Lightroom mobile, Lightroom CC generates Smart Previews of the photos it contains (if they don’t exist already) and uploads them to Adobe Cloud.

In turn, Lightroom mobile accesses Adobe Cloud and downloads the Smart Previews when they are required. They are cached and can be deleted when you need to free up memory. This system ensures you can use Lightroom mobile on devices without much spare storage space.

Lightroom mobile and Lightroom web

This Collection contains 37 photos yet only takes up 54.6Mb of my device’s storage space.

You can also download Smart Previews to your device and store them to enable off-line viewing and editing. This requires more storage space (although not a lot), but doing so both speeds up Lightroom mobile, and lets you view and edit photos without an internet connection. If you have a device with 64GB or 128GB storage, you have space for tens of thousands of Smart Previews.

Note: Lightroom mobile can be set to use a wi-fi connection only, so it doesn’t consume mobile bandwidth.

Lightroom mobile lets you Flag and rate images

If you use the Lightroom Library module to view images you will be aware that even on fast systems it’s not always as fast as you would like. Viewing images in Lightroom mobile is much faster. There’s virtually no delay in previewing images as long as you have enabled offline editing.

This means you can view photos and assign Flags or Ratings very quickly, greatly speeding up the amount of time it takes to view images from a shoot, and decide which ones to process.

Any changes you make to metadata, including Flags and Ratings, are automatically updated in Lightroom CC (internet connection required).

Lightroom mobile and Lightroom web

Lightroom mobile lets you process photos

Yes, you can process your photos in Lightroom mobile as well. All edits are synchronized with Lightroom CC. However, you don’t have the full functionality of Lightroom’s Develop module. But you can carry out the following:

  • All the adjustments available in the Basic panel
  • Cropping images
  • Apply one of 42 built-in presets
  • Add a vignette
  • Adjust Tone Curves
  • Use the Color/B&W adjustment tool

Note: Most mobile devices are not colour calibrated, so critical processing work should be carried out on a computer with a calibrated monitor.

Lightroom mobile and Lightroom web

Lightroom mobile synchronizes photos taken with your mobile device, with Lightroom CC

You can create a Lightroom mobile Collection that automatically populates with photos taken with, or added to your mobile device. Lightroom mobile uploads them to Adobe Cloud when you go online, and when you open Lightroom CC it downloads them and saves them on your computer. This works with JPEG, PNG and video files but not Raw files.

Lightroom web lets you make photos available for online viewing

When you synchronize a Collection with Lightroom mobile you can also make it available for public viewing. Lightroom generates a unique link for you to share with people so they can view the Collection in a web browser. Viewer’s logged in with an Adobe ID can comment on photos and mark favourites.

Lightroom mobile and Lightroom web

Lightroom web lets you access your photos from a web browser

Log in to the Adobe Lightroom website using your Adobe ID to access all your synchronized Collections. You can assign flags and ratings, make comments, mark images as favourites, and view essential metadata such as exposure settings. However, you can’t carry out any processing. You can also download a large JPEG file (generated from the Smart Preview).

Lightroom mobile and Lightroom web

Lightroom mobile as a backup

You may be wondering if you can use Lightroom mobile to edit or view photos taken in the field. The answer is you can, but with restrictions. The major one is that you can’t import Raw files into Lightroom mobile, even if they have been downloaded from your camera to your mobile device.

But you can import JPEG files. This is the workflow. It’s not as straightforward as it could be, but it works.

  • Shoot Raw+JPEG in-camera
  • Download all the photos to your mobile device
  • Import the JPEG files into Lightroom mobile
  • Assign Flags and Ratings, or process images in Lightroom mobile
  • When you get home, import the Raw files into Lightroom CC without changing the name. Meanwhile the JPEGS are synchronized via the Adobe Cloud
  • Use John Beardsworth’s Syncomatic plug-in to synchronize the changes you made to the JPEG files with their Raw equivalents

Your turn

Do you use Lightroom mobile or Lightroom web? What do you use them for? I’d love to know – please tell us in the comments.


The Mastering Lightroom CollectionMastering Lightroom ebooks

My Mastering Lightroom ebooks will help you get the most out of Lightroom. They cover every aspect of the software from the Library module through to creating beautiful images in the Develop module. Click the link to learn more or buy.

googletag.cmd.push(function() {
tablet_slots.push( googletag.defineSlot( “/1005424/_dPSv4_tab-all-article-bottom_(300×250)”, [300, 250], “pb-ad-78623” ).addService( googletag.pubads() ) ); } );

googletag.cmd.push(function() {
mobile_slots.push( googletag.defineSlot( “/1005424/_dPSv4_mob-all-article-bottom_(300×250)”, [300, 250], “pb-ad-78158” ).addService( googletag.pubads() ) ); } );

The post A Brief Guide to Lightroom Mobile and Lightroom Web by Andrew S. Gibson appeared first on Digital Photography School.


Digital Photography School

 
Comments Off on A Brief Guide to Lightroom Mobile and Lightroom Web

Posted in Photography


2 November, 2014 – Five Brief Audio Interviews from PhotoPlus

02 Nov

The PhotoPlus 2014 show in New York in late October saw a few new products being announced, for the first time in North America at least. I had been at Photokina in Germany the month before, and frankly, with only a few exceptions, found the industry to be a bit in the doldrums, as well as in a transition state.  PhotoPlus, because it is a consumer show, was much more lively and the crowds seemed to looking at everything with enthusiasm.

Because I was at the show for only one day, I was traveling light, and so instead of the more extensive video interviews which Kevin and I did at Photokina in September, I did mostly audio interviews at PhotoPlus. I also focused my attention on some of the smaller companies exhibiting for the first time, but also with Epson who is just now announcing the SureColor P600 photo printer in North America, though it was shown at Photokina earlier.


The Luminous Landscape – What’s New

 
Comments Off on 2 November, 2014 – Five Brief Audio Interviews from PhotoPlus

Posted in News


Gregory Crewdson: Brief Encounters is Now Available on DVD, and Netflix Streaming

23 May

©Gregory Crewdson

Netflix have acquired the rights to stream Ben Shapiro’s excellent 77-minute documentary, Gregory Crewdson: Brief Encounters. You can also buy it outright on DVD for $ 24.

Sadly, the Netflix access this is US-only (maybe Canada? nope!) and only for Netflix streaming subscribers. But this is still far and away the biggest audience to have had access to the film.

There’s no telling how long it will be up to stream. Netflix is notorious for having, then not having, the rights to a movie. So just in case, don’t wait too long. You can stream it here.

(Many thanks to reader Tim Kamppinen for the heads-up!)

-30-


Strobist

 
Comments Off on Gregory Crewdson: Brief Encounters is Now Available on DVD, and Netflix Streaming

Posted in Photography


Don’t Miss: Gregory Crewdson: Brief Encounters

20 Dec

I posted about filmmaker Ben Shapiro's documentary, Brief Encounters, when it was first released. I have finally gotten a chance to see it and wanted to make sure as many of you as possible did, too.

For those of you not familiar with photographer Gregory Crewdson's work, he meticulously creates his photographs on an epic scale. For instance, that photo above is completely staged—and lit. As in, they lit the whole freakin' street scene.

Below, the film's trailer, an extended clip, and how to catch this worthwhile documentary in its cross-country, limited-release tour. Read more »
Strobist

 
Comments Off on Don’t Miss: Gregory Crewdson: Brief Encounters

Posted in Photography


DJ Wich & Nironic – Be Brief feat. C Monts (VIDEO)

24 Oct

Camera, edit, postpro by: DJ Wich Nomad 2 – The Long Way Home – 31.5.2011 www.facebook.com www.facebook.com www.facebook.com www.twitter.com www.twitter.com www.twitter.com
Video Rating: 4 / 5

 
Comments Off on DJ Wich & Nironic – Be Brief feat. C Monts (VIDEO)

Posted in Nikon Videos