RSS
 

Posts Tagged ‘Blur’

How To Create Photographic Illusion With Motion Blur Photography

20 Feb

Motion blur photography gives an illusion of speed and motion. Apart from taking pictures of objects in motion like in the case of capturing sports related events, or movements of animals like a running deer, motion blur photography also helps add dramatization to stand still photos. It helps focus on aspects and highlights the importance of certain movements. It is Continue Reading

The post How To Create Photographic Illusion With Motion Blur Photography appeared first on Photodoto.


Photodoto

 
Comments Off on How To Create Photographic Illusion With Motion Blur Photography

Posted in Photography


How to Add Blur to Your Images for the Right Reasons

16 Oct

Bycicle Blur

Blurring is a Tool, Not a Gimmick

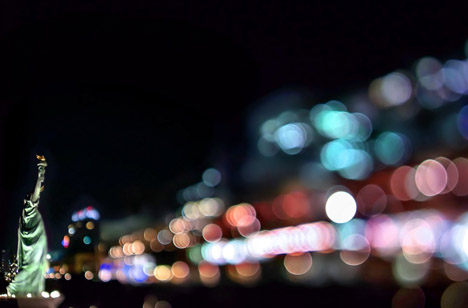
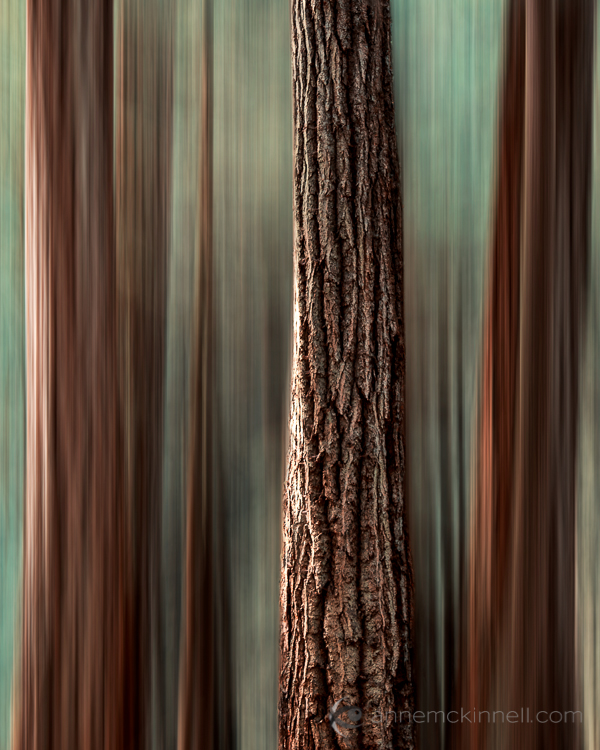
Adding blur or movement to a photo just for the sake of it is the same as a magic trick; razzle-dazzle but without purpose. Using a blur effect makes sense when you actually wants to say something specific with the photo. Sometimes it’s to create a sense of speed, and sometimes it’s to add an ethereal, soft kind of ambiance to the shot, but it’s not something to use just because.

Monks  before lunch

Know What You Want to Convey

Although it’s true that sometimes a random or accidental shot yields good fruit, more often than not, there is a better chance of taking a great photo if you think about the setup beforehand. Adding blur is a great option but should be used sparingly and always planned for. Take a look at your scenario and think about what you want from it; motion, speed, a little ethereal mystery? Achieving each of these in a photo takes a different attack, so plan ahead before taking the shot.

Hard versus Soft, Blurry versus Sharp

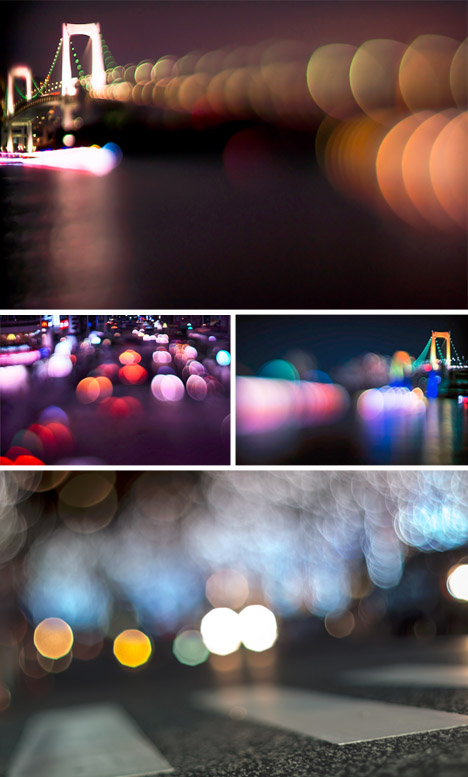
Taking good photographs means understanding contrast; light versus dark, soft versus sharp edge, focusing on the foreground or the background, etc. As for blurring, it always comes out best if the blur tool is only used on part of the photo. That way, the clearer, sharper part of the image is in contrast to the blur, and it’s this contrast that conveys the sense of speed.

Bycicle Blur 2

It’s All Right to Make Mistakes!

Iteration is fine. Much like athletes and sketch artists need to warm up, taking several test shots, playing around with speed and f-stops is a great way to prepare for your final photo. Use these shots to find your direction, see what each exposure brings. As stated before, a good blurry picture requires some planning – so take the time to plan. The digital age of photography and instant viewing has given us a great boon in terms of being able to experiment in a trial-and-error sort of way, so you can calmly view and sort out what exactly you intend to do.

Floating Monk

Choose the Best Speed

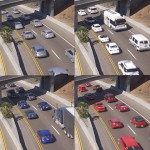
The main photographic technique for blurring is to use a slow shutter speed. Depending on the speed of the object or subject, as well as its relative direction or angle to you and your camera, you will need to play with your shutter speed. If someone is walking in a straight line, facing you, the speed needed in order to create the idea movement will be slower, perhaps 1/8 of a second. If the same person is walking form left to right perpendicular to you, you will need a faster speed, perhaps a 1/20th.

Taking still shots of subjects that are sitting, standing, etc, your speed can be as low as ¼ of a second.

Even if you are shooting at this speed, a still shot might not show the motion at all, if the subject doesn’t move. Usually for standard walking shots on the street the speed will be between 1/8 and 1/15.

Again, the mantra to remember is that different scenarios call for different things. Devotees bathing at Varanasi, someone taking their time walking through a gallery, or a cyclist in mid-race will all need vastly different shutter speeds. As well, you have to determine the degree of movement you want to portray.

In the case of the devotees in Varanasi, I did not want to reflect speed, so much as mystery, a very slight sense of motion, as if it were a dream.

Early Morning Bath

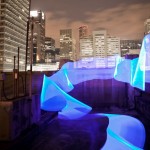
For producing a sense of mass motion, and by this I mean, small crowds strolling around galleries for example, you will sometimes need to use open exposure. This means letting people blur the image by moving, because it will create a contrast with anything that remains still.

Take Care With F-Stops and ISO

Remember that speed is only one of the three factors involved in correct exposure. The other two factors are aperture (f-stops) and ISO. My advice is to set the camera on shutter priority, (possibly “S” for your camera) and let it adjust the f-stop. See if the latter suits you, and adjust the ISO accordingly.

Monks before lunch 2

Don’t Leave Everything to Luck

Certainly, if there’s one time when you need a little bit of luck, it’s when capturing something in motion.

You should always plan and set yourself up if you want the best chance to get a lucky shot, especially when you want to work with something so unpredictable as motion-based shots. Normally, I get myself situated in my chosen venue and take picture after picture at all different speeds. It’s not unusual for me to glance at my watch and realize I’ve been in the same spot for over half an hour. But with one eye on the camera and the other on the scene in front of me, I’ve got a good view for when luck happens my way, as long as I have the patience and dedication to wait for it.

Tuc Tuc Blur

The post How to Add Blur to Your Images for the Right Reasons by Harry Fisch appeared first on Digital Photography School.


Digital Photography School

 
Comments Off on How to Add Blur to Your Images for the Right Reasons

Posted in Photography


4 April, 2014 – It’s All a Blur

04 Apr

This new article is about creating impressionistic images of subjects in motion. But before proceeding, a word of caution. These images were taken at a bull fight in Mexico. I am not a big fan of bull fighting, indeed I find them mostly unpleasant to watch. But, I accept that in some countries they are an established part of the culture and history. All of the images on this page are done in an impressionistic manner and deliberately none are gory. I have mainly focused on the horsemanship in this collection. If you are offended by the very thought of bull flighting, please do not go to this page, and also, whatever you do, don’t write to me with your complaints about it. 


The Luminous Landscape – What’s New

 
Comments Off on 4 April, 2014 – It’s All a Blur

Posted in News


Focus on Blur: Bokeh Cityscapes Celebrate Color & Light

06 Jan

[ By WebUrbanist in Art & Photography & Video. ]

bokeh urban color light

Stretching and reversing conventions for balancing foreground and background, one urban photographer in Tokyo is taking the Japanese concept of Bokeh to dazzling extremes.

bokeh vertical landscape city

Bokeh (which translates as ‘blur’) plays with a lens’s circle of confusion in which points of light become glowing discs, but instead of making the background fuzzy, Takashi Kitajima unexpectedly lets the foreground become the backdrop.

bokeh blurred city street

The result seems to highlight the chaos and movement of what is closest to the viewer’s perspective in a surreal but suggestive way that indirectly resonates with our actual experience of cities.

bokeh city angled view

bokeh statue monument focus

In turn, more distant monuments, buildings and bridges on the horizon or off to one side emerge as stable anchors, contrasted with a sea of light.

bokeh zoom foreground background

The net effect is something between a photograph and a watercolor or pastel painting, a fusion of concrete realism and playful abstraction.

Share on Facebook


[ By WebUrbanist in Art & Photography & Video. ]

[ WebUrbanist | Archives | Galleries | Privacy | TOS ]


WebUrbanist

 
Comments Off on Focus on Blur: Bokeh Cityscapes Celebrate Color & Light

Posted in Creativity


Artist Rolf Sachs’ photo series inspired by train travel, embraces blur

21 Aug

sachs_3.jpg

Anyone who’s traveled by train has seen the landscape outside of their car moving by in a blur. While most of us turn our attention back to our reading material and mobile devices, artist Rolf Sachs’ finds inspiration. His photo series, called ‘Camera in Motion,’ aims to capture the effect of the blurred landscapes outside of his train traveling between Switzerland and Italy. The resulting images walk a line between landscape photography and surrealist art. Click through to see some of his work.

News: Digital Photography Review (dpreview.com)

 
Comments Off on Artist Rolf Sachs’ photo series inspired by train travel, embraces blur

Posted in Uncategorized


Next Version of Adobe Photoshop to Be Branded Photoshop CC, Includes Awesome New Motion Blur Sharpening Tool

07 May

Today Adobe announced a new branding of their flagship Photoshop product to be released later this year, Photoshop CC. The new version will only be available via a monthly subscription to Adobe’s Creative Cloud and will not be sold as a traditional boxed application that consumers can purchase.

Probably the most anticipated new feature in the next iteration of Photoshop is a revolutionary new image sharpening tool that focuses on fixing camera shake issues.

The new tool analyzes images that are out of focus due to the slight movement or motion that takes place while a shutter is open. There are lots of reasons why photographers may find camera shake in their images. Many images shot slower than about 125th of a second are susceptible to camera shake unless you’re on a tripod or have a very steady hand. Telephoto shots, especially can be problematic.

With the new version of Photoshop CC, Adobe uses an algorithm to try and detect which direction the camera was moving that produced the shake. They then try to account for the movement back into the direction of a steady image without camera shake. This new sharpening tool won’t help you with other types of focal blur issues, like lens position, but it does address a fairly common issue dealt with by photographers.

Adobe had previously offered a sneak peak of this new technology in a video that they posted to Youtube. Watch the video and you’ll be impressed.

What makes this interesting to me is that there are a lot of old images that I’ve taken in the past that now will suddenly become salvageable.

This new technology advancement should be yet another reminder to photographers why they should save ALL of their images, even the bad ones that they don’t think they can use. With technology advancements in image processing, I’m finding more and more images that I’d previously dismissed due to problems. Whether previous Adobe noise reduction tech or newer tech like this new sharpening tool, it pays to save all of your images no matter what. Storage is cheap and you never know when you may need that image that you never knew you needed at the time. Even years after you are dead, those images may be important to someone, somewhere for some reason.

While the camera shake feature is the sizzle of the new Photoshop upgrade, there are several other enhancements they have made to the program as well including, smart Sharpen (new technology promising more realistic sharpening without halos or noise) and new upsampling tech (this helps make your photos look better when you make them larger than you processed them).

The biggest news though is Adobe’s moving Photoshop 100% into the Cloud and 100% by subscription. You’ll still be able to purchase Photoshop CS for the time being, but it won’t have the new features available in CC.

Pricing varies by type of customer but starts at $ 49.99 a month per person for individuals. Existing Creative Suite customers, students, and teachers will get a discount to $ 29.99 a month. Creative Cloud has a lot more applications than just Photoshop and also includes Lightroom and a whole suite of other Adobe Creative applications. It also includes integration with Behance, a portfolio site for creatives that Adobe recently purchased.


Thomas Hawk Digital Connection

 
Comments Off on Next Version of Adobe Photoshop to Be Branded Photoshop CC, Includes Awesome New Motion Blur Sharpening Tool

Posted in Photography


How To Create a Motion Blur Effect in Photoshop

06 Jan

Motion Blur Original

The original image before the motion blur is applied

Motion Blur Filter

For the first technique I am going to start with this rather boring and cluttered image I made in a forest on Vancouver Island, British Columbia, Canada.

Maybe it wouldn’t be so boring if there was anything to show the scale of these enormous trees but it’s pretty hard to get away from cluttered in the dense forest there.

I decided to mimic the effect of in-camera panning by using the motion blur filter in photoshop to blur the image in the same direction as the strong lines of the trees.

Try this technique on your own forest scene or another scene with strong lines by following these steps. I am using Photoshop Elements but you can also do it in Gimp and some other photo editors.

1. Select Filter > Blur > Motion Blur

Photoshop Motion Blur Filter

2. Set the direction of the blur to match your image and amount of the blur to your taste. For my image I made the blur vertical and the amount maximum.

If you have a photo editor that supports layers, make a copy of the background layer and apply the filter to the new layer. This will allow you do have some fun in step #4 below.

Photoshop Motion Blur Filter Options

Motion Blur Applied

Image after motion blur is applied


3. Crop the tell-tale edges out of the image.

I find that you can always tell when the blur is done in photoshop, as opposed to in-camera, because the edges of the image don’t blur evenly. Why they don’t blur evenly I don’t know! But they don’t so I always crop the edges out.

See the 100% zoom of a portion of my image below where you will see how the edges of the image don’t look right.

Motion Blur Artifacts

4. To add a little something extra try revealing a part of the original image without the blur.

If you applied the blur to a copy of the background layer as I mentioned in step #2 above you can try this. Either using a layer mask or simply using the eraser tool, remove the blur effect from a portion of the image.

This is the final version:

Motion Blur Revealed

Here is a video I made that shows all the steps I took to make the final image using Photoshop Elements.

Zoom Blur Original

Original image before zoom blur is applied

Zoom Blur Filter

This technique is very similar to the motion blur effect but with a little bit of a twist.

As you can see the original image has a few problems. The trees are mottled with light and shadow and there are blown out highlights in the sky for a start. But I like the composition of the trees the way the wide-angle lens made them appear to lean in towards the centre of the frame.

I decided to try a zoom blur effect to emphasize the composition and even out some of the colours.

Try this technique on your own image by following these steps:

1. Duplicate the background layer (Layer > Duplicate Layer)

Duplicate Background Layer

2. Rename the layer to “blur” or something else that makes sense to you

3. In photoshop, select Filter > Blur > Radial Blur

Photoshop Radial Blur Filter

4. Change the option from “spin” to “zoom” and, in the section of the window named “blur center”, drag the centre of the zoom from the middle to the top of the frame to match the composition of the original image

Photoshop Zoom Blur Filter Options

5. Crop out the blown out highlights in the resulting image

Zoom Blur Final

Here is a video I made that shows all the steps I took to make the final image using Photoshop Elements.

Post originally from: Digital Photography Tips.

Check out our more Photography Tips at Photography Tips for Beginners, Portrait Photography Tips and Wedding Photography Tips.

How To Create a Motion Blur Effect in Photoshop


Digital Photography School

 
Comments Off on How To Create a Motion Blur Effect in Photoshop

Posted in Photography


The days blur into one.

05 Nov

I am actually really happy with how this video turned out, all clips of Alfie. He is going great, he has such a great attitude and just takes everything in his stride. Clips range from 6-8ish ride, first canter, first jump etc. I upload a lot of normal riding videos to this channel so go check them out 🙂 – www.youtube.com Alfie – 16.1/2 3YO Selle Francais X Irish Sport Horse gelding. Breed lines here – www.sporthorse-data.com Twitter – twitter.com Camera – Nikon D3100 – Kit Lens, Nikkor 55-200 & Tamron 70-300 Song – Radical Face – Welcome home
Video Rating: 4 / 5

 
Comments Off on The days blur into one.

Posted in Nikon Videos


Photoshop tutorial: Adding Motion Blur to a photo | lynda.com

02 Nov

This Photoshop tutorial shows how to add speed and motion to photographs using the Motion Blur effect and other filters. Watch more at www.lynda.com This specific tutorial is just a single movie from chapter five of the Photoshop for Photographers: Creative Effects course presented by lynda.com author Chris Orwig. The complete Photoshop for Photographers: Creative Effects course has a total duration of 4 hours and 57 minutes, provides a practical guide to enhancing photos, and shows how to modify color and light to add vibrance, drama, and emphasis. Photoshop for Photographers: Creative Effects table of contents: Introduction 1. Creating Vibrant, Saturated, and Rich Colors 2. Creating Subdued, Artistic, and Unique Colors 3. Adding Light and Shadows 4. Increasing Visual Interest with the Blur Gallery 5. Adding Motion 6. Creating Lens Flare Effects 7. Making HDR Toning Effects 8. Creating Digital Infrared Looks 9. Adding Film Grain 10. Creating Vintage Effects 11. Adding Border and Edge Effects 12. Blending Layers Together 13. Working with Custom Brushes 14. Working with Photoshop Plug-Ins Conclusion
Video Rating: 5 / 5

 
Comments Off on Photoshop tutorial: Adding Motion Blur to a photo | lynda.com

Posted in Retouching in Photoshop


Digital Photography Tutorial – Outdoor Portraits – How to Blur the background – Beginner lesson

30 Aug

razzi.me www.facebook.com www.PhotographersOnUTube.com A video on Outdoor portrait photography. Please watch my Aperture video first if you already haven’t seen it by clicking on my channel. These are the 4 easy steps to blur your background in outdoor portrait photography. 1. Use lower aperture value 2. Stay close to your subject 3. Zoom in to your subject 4. Keep a good distance between your subject and the background. If you feel this video has helped you, please THUMBS UP If you have any question, please ask me on facebook. SUBSCRIBE for future videos. It’s free! Until next time, keep clicking. Visit www.PhotographersonUTube.com if you want to do photography on a budget.

www.photographercourses.com The Complete SLR Digital Photography Course – Why buy our Photography Courses Well first of all if you are reading this then you have an SLR you have probably paid in excess of 00 dollars once you have all the lenses and accessories, unfortunately most people do not ever take their camera off the auto settings which is a complete waste, our course is .99 and will be the best photography equipment purchase you will make and also the cheapest Do you offer Support with the Photography Courses We offer full email support for free.. Is there any Guarentee with the Photography Courses? We offer full money back if you do not improve 100% at least… Where can i find reviews of your Photography Courses We are the number one selling course on Ebay, take a look at our feedback, we have helped 10 year olds to 80 year olds, across all makes of cameras, SLR’s Compact and point and shoots. We have literally sold thousands of courses and have not received one return, we have 100% Feedback Live Ebay Reviews please click here We are the only course to have a 5 star rating on both Amazon in America and Amazon in the Uk 5 star rating on Amazon.co.uk click to see reviews 5 Star rating on Amazon.com click to see reviews So What will I learn in your Photography Courses? The complete SLR Digital Photography course has everything you need to start shooting quality professional photos in a little under 2 hours. It’s complete with professional settings; find out
Video Rating: 4 / 5