RSS
 

Posts Tagged ‘Best’

Nocturnal Field Trips: 7 World Wonders Best Explored at Night

01 May

[ By WebUrbanist in 7 Wonders Series & Travel. ]

night light art

When planning out world travel, one typically dwells on destinations more than times, but some of the best sights can only been seen at a particular point in the day or, in the case of these marvels, at night.

fieldtrip

WebUrbanist is pleased to announce a new partnership with Google Field Trip, bringing some of our best and brightest travel articles to their mobile platform, allowing you to find hidden wonders of the world wherever (and whenever) you may be. In this article, we have teamed up to highlight seven amazing places to visit by night, each offering special surprises to the nocturnally inclined.

World’s Largest Urban Bat Colony in Austin, Texas

bridge bat experience austin

At dusk, people flock to watch the emergence of 1.5 million bats from beneath the Congress Avenue Bridge, designed and built in 1980 in a way that inadvertantly turned out to provide an ideal roost for a particular breed of flying nocturnal predators.

bridge bat sign

Often under-appreciated or even feared, these night flyers consume between 10,000 and 20,000 pounds of food each evening, helping them earn their keep. Today, there is even a dedicated Statesman Bat Observation Center from which visitors are encouraged to experience the spectacle.

World’s Largest Ice & Snow Festival in Harbin, China

snow festival by day

snow festival at night

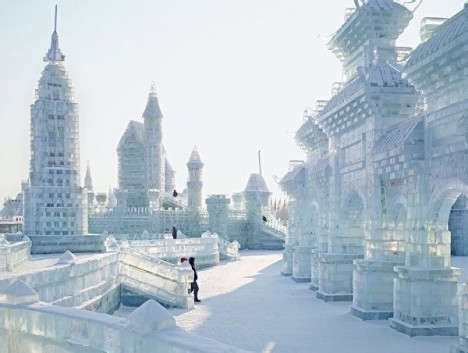
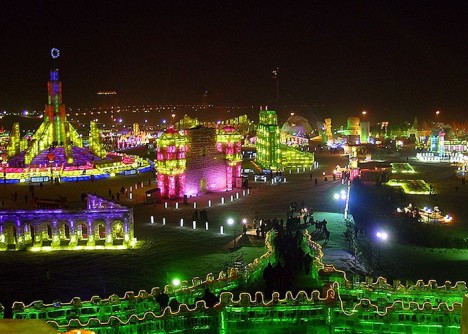
By far the biggest such event in the world, the Harbin International Ice & Snow Sculpture Festival consists of huge works of art and architecture that truly come into their own once the sun sets and glowing lights behind and within bricks of ice come to life.

harbin snow festival building

snow ice festival staircase

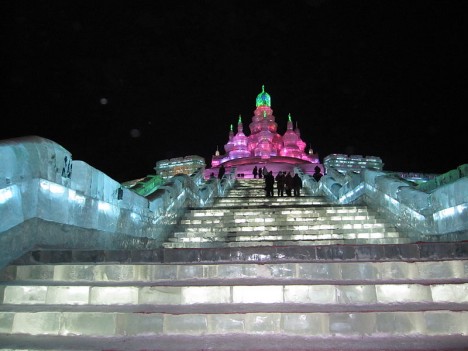
Using swing saws to cut ice directly from an adjacent river, artists then turn the frozen building blocks into human, animal and mythical figures as well as huge staircases and structures. Among other honors and awards, a snow sculpture featured at the festival holds the world’s record for size at 750 feet by 28 feet (13,000 cubic meters of snow). Other similarly-impressive global ice festivals can be found in Japan, Canada and Norway as well.

Synchronous Firefly Swarms near Knoxville, Tennessee

night lightning bug sync

lightning bug flying art

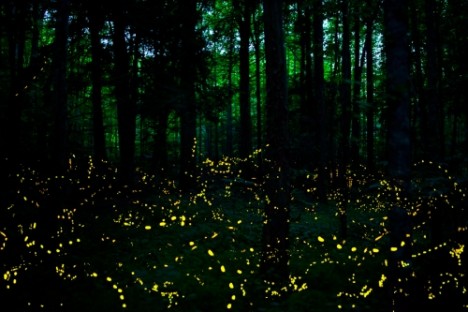
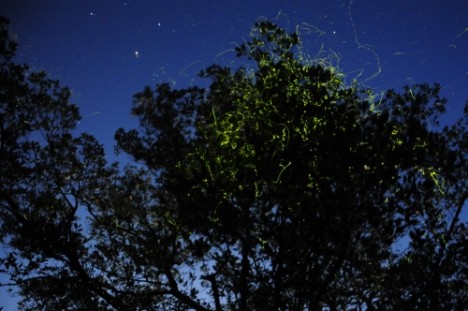
Fireflies can be a wonderful sight regardless of the species, but one rare type in particular (Photinus Carolinus), is even more special than its cousins: the so-called Synchronous Firefly swarms light up in unison, pulsing every few seconds at the exact same time.

synchronous firefly swarms

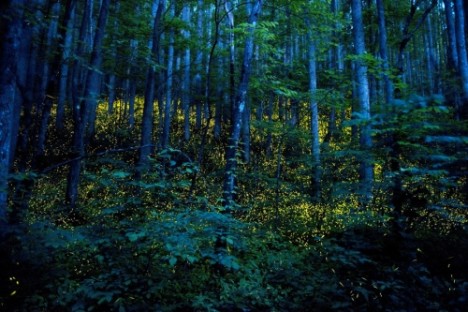
At Great Smoky Mountains National Park, viewers can buy tickets in advance and be taken by shuttle to special viewing areas from which to observe these lightning bugs. Within the park, 18 other species of firefly can also be found, but only one whose constituents almost all flash simultaneously.

Ghost Ship Water Hologram in Amsterdam, Holland

amsterdam light festival ship

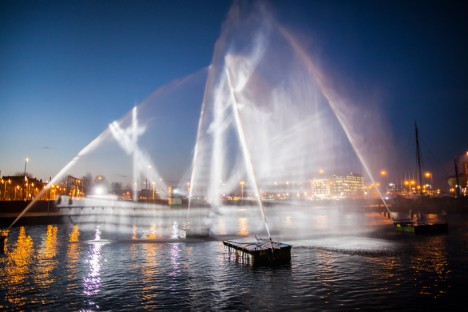
A maritime marvel in more ways than one, this 3D optical illusion involves two intersecting planar projections beamed onto perpendicular planes of vertical water.

amsterdam maritime ghost boat

amsterdam light vessel

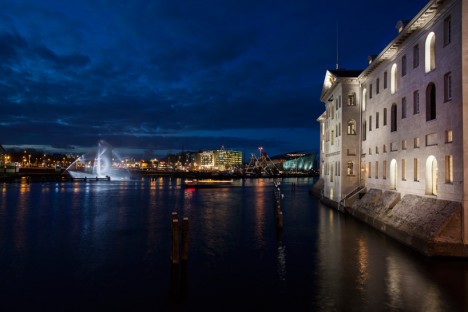
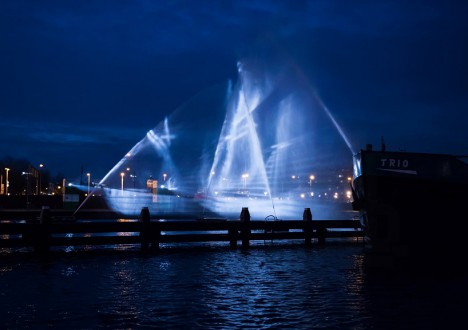
Created for the Amsterdam Light Festival by VisualSkin, the resulting real-life rendering looks like a 17th-century seafaring vessel seemingly held in stasis and composed of water and light. The effect, naturally, works best at night, turning a fountain by day into a marvelously surprising evening display.

Next Page – Click Below to Read More:
Nocturnal Field Trips 7 World Wonders Best Explored At Night

Share on Facebook


[ By WebUrbanist in 7 Wonders Series & Travel. ]

[ WebUrbanist | Archives | Galleries | Privacy | TOS ]


WebUrbanist

 
Comments Off on Nocturnal Field Trips: 7 World Wonders Best Explored at Night

Posted in Creativity


DPReview recommends: Best smartphone cameras

30 Mar

In many users’ pockets consumer-level digital compact cameras have been replaced by smartphones. The cameras of the latter don’t usually have zoom lenses or xenon flashes but image sensor technology has been rapidly improving, making smartphones important photographic tools for many. We’ve made a list in no particular order our current favorite smartphone cameras for those who are looking to buy their first smartphone or upgrade their current device. Read more

Articles: Digital Photography Review (dpreview.com)

 
Comments Off on DPReview recommends: Best smartphone cameras

Posted in Uncategorized


Finding the Best Quality of Light During the Day

27 Mar

Light is the main ingredient in any photograph. Without light, you cannot make an image. Photography is all about drawing or painting with light. One book I read on the subject said that light IS the subject in photography, in many ways, this is true. Light is a difficult phenomenon to quantify. Most of the time, we don’t really think about light in our day to day lives.

Shoot for the light...

Shoot for the light…

As a photographer however, light is your currency. Without it, you cannot create an image. If you were in a lightproof room, with no light entering the room at all, it would be nearly impossible to make a photograph. However, if you were to light one candle in that lightproof room, suddenly you could make many images. Light is the key to every photograph ever made.

As a result of light being so ethereal, the photography world has tried to make sense of it. Photographers speak about the attributes of light, namely: quality, direction, color and intensity. In this article, I want to look at the first of those definitions, known as quality of light.

What is quality of light?

Light quality is determined by the source of the light. Small light sources that are far from the subject, will create harsh lighting conditions, while a large light source will create soft lighting conditions. Another way to think of it is to look at the shadows what are created by your light source. If the shadows are clear and defined, then your light source is small relative to your subject, and the light is harsh and high contrast. If the shadows are blurry or nondescript, then the light source is large compared to your subject, and the light is soft and low contrast.

A small light source could be something like the popup flash on your camera. This is a small, sharp source of light that will blast bright light into your scene. It creates hard shadows and will create a high contrast scene. A large light source could be the light on an overcast day. The sun’s light is scattered, or diffused, by the cloud cover so the light becomes larger, soft, and less defined.

Warm sunset colours over the Vancouver runway

Warm sunset colours over the Vancouver runway

Time of day is key

You will be shooting either in daylight or nighttime conditions and often in the soft light between day and night. Each situation comes with its own challenges. If you are serious about taking your photography to the next level, you need to be shooting more often during the golden hour of the day. The golden hour occurs from about half an hour before, until about an hour after sunrise in the morning, and then an hour before sunset, to about 20 to 30 minutes after the sun has gone down in the evening. If you are going to shoot in this soft light, you will need a tripod, the rewards will be well worth the effort. It is not always possible to shoot at these times of day, so below are some guidelines about shooting throughout the day. Another good time to photograph is during the blue Hour which is the hour after the sun has set (more on this later).

1. Shooting in the middle of the day

Many of us were taught to shoot under bright sunlight, in the middle of the day, with the sun behind us. Sure, that can work, but you won’t get dramatic results every time, in many cases, your images will look very average. This is because light is harsh at this time of day.

Generally, when the sun is high in the sky, it is a small light source compared to the subject. This means that your subject will have very bright highlights and very dark shadows. This is high contrast scene. Also, the shadows will be very well defined and the light will be very directional. In other words, you will be able to see clearly where the sun is because the shadows will be very well outlined.

If you are photographing a wedding at midday in the summer (this is often the case) and the bride is in the full sunlight, you will have have some harsh shadows under her eyes to deal with. That’s not to say that you should never photograph in the midday sun, you can, but you need to know how to deal with the contrast situation. That might mean you need to use a reflector to put some of the light back into the bride’s face, or use some fill flash to lighten the shadows under her eyes. Remember, the brighter and smaller the light source, the harsher the quality of light.

Panoramic image taken at midday in full sun. The image works because the image is properly exposed for the bright sun.

Panoramic image taken at midday in full sun. The image works because the image is properly exposed for the bright sun.

2. Shooting during the golden hours

Shooting in the early morning, before the sun has risen, or shooting at sunset as the sun goes down, gives you a great opportunity to capture images, in dramatic light. Many of the scenes that people love to see in photography, are very often low light or golden hour ones. The reasons why these times are so good to shoot at area:

  • The light is golden in colour and changes colour from yellow, to orange to magenta.
  • The light is soft, i.e. no major contrast such as hard shadows and very bright highlights.
  • Colors are more exaggerated, the color of the light is far more emphasized, much more oranges, reds and magentas are visible in the scene.

It is for these reasons that photographers choose to shoot in the early morning or early evening, these times produce the most dramatic images.

Golden hour shot of the city with a warm glow in the sky.

Golden hour shot of the city with a warm glow in the sky.

3. Shooting during the blue hour

Blue hour conditions don’t always occur, but when they do, the results are spectacular. For the best possible blue hour conditions, you will want a sunset with very little, to no clouds in the sky. Summertime is normally good for this, but any time of year can work. If there is 80% cloud cover, you will probably not see the blue light in the sky, so a clear sky is important to make this work. Blue Hour is the time after the sun has dropped below the horizon and the sky goes a radiant blue for a while. The blue lasts anywhere from 40 minutes to an hour, and that’s the time you want to be photographing.

To make sure you get it right, be in position and set up 20 minutes before sunset. That way, when the light starts getting good, you are able to hit the shutter release and make some great images. Cityscapes work really well for blue hour images. The reason is that the sky will go blue, but the city will be reflecting the yellowy, orange light of the sunset. This means that you will have the sun setting behind you.

The beauty of blue hour images is that that the blue and yellow colours work well together, they are complementary colours on the visual colour wheel, so the scene is visually appealing. If you are not sure about when blue hour will be, you can visit this site and simply enter your city name and it will tell you what time it will be occurring in your city, on a given evening and morning. There is even an iPhone app you can download to work this out in the field, pretty amazing!

Blue Hour panoramic, the blues and the yellows work well in this image

Blue hour panoramic, the blues and the yellows work well in this image

What do I need to use to get the best images

A tripod is always a good idea. You will be able to make sure that your camera is perfectly still as you make longer and longer exposures. As the light starts fading, your exposures may be a few seconds long, this is impossible to handhold without getting blurred images. Use the best quality lenses you have and a cable release or remote shutter release to avoid any camera shake. You will want to set your camera up in manual mode and have your aperture settings at f/8 or f/11. Set your shutter time accordingly, make sure your ISO setting is at 100 and you are ready to go. When the light show starts happening, click away and enjoy the results!

googletag.cmd.push(function() {
tablet_slots.push( googletag.defineSlot( “/1005424/_dPSv4_tab-all-article-bottom_(300×250)”, [300, 250], “pb-ad-78623” ).addService( googletag.pubads() ) ); } );

googletag.cmd.push(function() {
mobile_slots.push( googletag.defineSlot( “/1005424/_dPSv4_mob-all-article-bottom_(300×250)”, [300, 250], “pb-ad-78158” ).addService( googletag.pubads() ) ); } );

The post Finding the Best Quality of Light During the Day by Barry J Brady appeared first on Digital Photography School.


Digital Photography School

 
Comments Off on Finding the Best Quality of Light During the Day

Posted in Photography


Priime, The Best iPhone Photo Editor I’ve Ever Used

20 Mar

Priime is Liive -- Get It While It's Hot

Disclosure, I am an advisor to Priime and have styles included in their style marketplace.

Boom. Just a few hours ago Priime went live in the Apple iTunes App Store and already on launch day Apple is featuring it in their best new apps section.

What is Priime?

Priime is the best mobile phone editor I’ve ever used. I’ve been using it behind the scenes for the past few months and am blown away by how much better it is than anything else out for mobile editing today. The free app features a powerful suite of editing tools allowing you to enhance a lot of the basics around your photos: brightness, structure, contrast, warmth, tint, saturation, sharpness, highlights/shadows, vignette and fade. The app can also save photos up to 50 megapixel in size! I don’t know of any other app that can let you output such high res photos.

In addition to these tools, Priime has currated some of the best mobile photo styles available. These are styles developed by photographers for photographers. I have two styles for sale in the Priime marketplace — Americana and Neon. Neon can be a particularly tricky thing to shoot sometimes. I’ve taken over 10,000 photos of neon signs and this is my best attempt at an overlay that works especially well for signs.

The app gives you some great free starter styles. It will also make suggestions for what styles may work best with your photo after analyzing it.

In addition to my styles, Priime features styles developed by 30 other insanely talented photographers, each with their own unique way of processing the world through their iPhone.

Daniel Krieger, who shoots for the NY Times, is probably the best working food photographer in the world right now. If you are going to take photos of food, you are definitely going to want to get his filter. Vivienne Gucwa just put out a fantastic book of New York City photographs and has some amazing styles as well.

There is no Android version yet (it is on the roadmap), but the app is compatible with iPhone, iPad, and iPod touch.

One of the things that I think makes Priime different from other photo editing apps is that it was actually developed by photographers. I have known Art Chang for several years. We went and shot Death Valley with a bunch of Google+ photographers 4 years ago. He’s an amazing photographer and has especially done cool things with mobile. His Instagram stream is here. Art has a love for photography that I think gives the app a unique photographer driven perspective and street cred. Art’s co-founders are also all photographers — Loren Baxter, Andrew Ng and Joe Pestro.

Priime is sharing the revenue for their styles with the photographers who have developed them. I think that is a really cool thing. I can’t wait to see what other photographers are added as time goes on.

Anyways, check out Priime in the iPhone App Store. Here is a direct link to the app here. I’d love to hear what you think of it. Remember it’s Priime with two ii’s. :)

My Styles in the New Release iPhone App Priime

Priime Featured in the Best New Apps Section of the iPhone App Store


Thomas Hawk Digital Connection

 
Comments Off on Priime, The Best iPhone Photo Editor I’ve Ever Used

Posted in Photography


The Best Way to Delete Photos From Your Memory Card

01 Mar

When it comes to photography, we spend most of our time thinking about taking photos – lighting, composition, exposure, and posing. Then, once the photo is taken, we may start to think about post-processing, gently nudging the photo along until it becomes exactly what we’ve pictured in our mind’s eye. Once that’s accomplished, we do it all over again.

MeredithClark6.jpg

Back in high school and college, I shot film. I can vividly remember running out of film, and sometimes having to wait weeks until I was able to buy more. Our public high school relied heavily on donations of film, and sometimes when there wasn’t any left, our teacher would have us walk around campus with our pointer fingers and thumbs shaped into a rectangle, pretending to take photographs. Now that digital cameras are on the scene and we’re using memory cards in lieu of film, with the capability to erase images and write over them again, the number of photographs that we can take in any given week or month is nearly endless.

You may have noticed that I said, “nearly” endless, and that’s because memory cards do have a lifespan, and will not last indefinitely. That said, there are a few things that we can do to maximize the lifespan of our memory cards, including making sure that we are deleting our photos off the memory card in the most efficient manner possible. This isn’t something that’s talked about all that often, but when it comes down to it, it is really simple:

Less Desirable Ways to Delete

Deleting each photo individually through the camera by using the “Delete” or Trashcan Button

Del3

Deleting all photos through the camera by using the “Delete All” option

Del2

Plugging the camera into the computer, and dragging photos into the computer’s recycle bin and/or allowing your import software to delete the files from the card once they’re uploaded.

Del1

Most Desirable Way to Delete

Using your camera’s Format function

Del4

In the end, all of the  above methods work toward the same end, in that they remove the images from your card. However, the first three ways to delete are actually more taxing to the memory card than using the card’s Format function. I’ve heard it explained like this:

Let’s pretend for a moment that your memory card has a shelf-life of 1,000 uses. Let’s say that you go out and take 500 photos, that’s 500 uses on your memory card. You then upload the photos to your computer, and then individually delete each photo using the delete button on your camera. Deleting each photo individually counts as another 500 uses on your card. So in all, you’ve just spent 1,000 uses of your memory card, leaving you with no uses left on that card.

Now, let’s pretend that you’ve uploaded your 500 photos, but instead of deleting them with your delete button, you use your camera’s Format function. Formatting works in a different way than deleting, and only deletes the directory files rather than the images themselves. This then allows the images to be overwritten the next time you take a picture. Because of this, formatting only counts as ONE use of your memory card, regardless of how many photos you’re deleting. So, in the scenario above, you’d have used only 501 of your memory card’s uses, as opposed to 1,000 with deleting manually. Certainly,  memory cards available today will be able to handle far more than 1,000 uses, but the illustration still rings true – formatting your card causes less wear and tear on your memory card than other ways of deleting images.

Additionally, because formatting only deletes the directory file instead of the images themselves, images on a card that has been formatted are typically much easier to recover (if needed) than those that are deleted manually, assuming that you did not overwrite them by taking more photos. Not a bad trick to have up your sleeve in case of emergencies, am I right?

I’d also like to add that I have personally seen a difference in both buffering time of the card, and also a decrease in the amount of corrupted images/cards that I’ve come across since I’ve been formatting cards rather than deleting in some other way. I’m not sure whether there’s an actual scientific basis there, but it definitely seems related in my book, and it is now pretty rare that I delete even a single image in any way other than formatting.

So, how often should you format? Some people like to wait until their card is totally full, and then format. Personally, I like to format my card before each new photo session. It just makes sense to me to start fresh each time, and be able to upload everything on the card to one location. This is really a matter of personal preference as far as I’m concerned. The one hard and fast suggestion that I do have when it comes to formatting cards is simply to be sure to format the card in whichever camera body you plan to use it in next.

How do you typically delete images, and why?

googletag.cmd.push(function() {
tablet_slots.push( googletag.defineSlot( “/1005424/_dPSv4_tab-all-article-bottom_(300×250)”, [300, 250], “pb-ad-78623” ).addService( googletag.pubads() ) ); } );

googletag.cmd.push(function() {
mobile_slots.push( googletag.defineSlot( “/1005424/_dPSv4_mob-all-article-bottom_(300×250)”, [300, 250], “pb-ad-78158” ).addService( googletag.pubads() ) ); } );

The post The Best Way to Delete Photos From Your Memory Card by Meredith Clark appeared first on Digital Photography School.


Digital Photography School

 
Comments Off on The Best Way to Delete Photos From Your Memory Card

Posted in Photography


Magic for Nothing: The Best Free Photo Editors 2015

25 Feb

If you are serious about photography, you’ll likely want to start editing your photos soon. Or maybe you’re already editing photos, perhaps on a work or school computer, and you’re ready to set up your own photo editing station at home. Either way, the most popular photo editing options, such as Photoshop and Lightroom, while fantastic programs, might be outside Continue Reading

The post Magic for Nothing: The Best Free Photo Editors 2015 appeared first on Photodoto.


Photodoto

 
Comments Off on Magic for Nothing: The Best Free Photo Editors 2015

Posted in Photography


2014 DPReview Readers’ Best Shots: People

26 Jan

Picking favorites is hard. Nevertheless, our readers were up to the task when we asked them to submit their best shots of 2014. We received over 1400 submissions, and it was no small job picking favorites. We didn’t need the reminder, but it underscored just how talented our readership is. Photos were divided into three categories and we settled on a small selection to feature in each.

Articles: Digital Photography Review (dpreview.com)

 
Comments Off on 2014 DPReview Readers’ Best Shots: People

Posted in Uncategorized


2014 DPReview Readers’ Best Shots: Places

26 Jan

Picking favorites is hard. Nevertheless, our readers were up to the task when we asked them to submit their best shots of 2014. We received over 1400 submissions, and it was no small job picking favorites. We didn’t need the reminder, but it underscored just how talented our readership is. Photos were divided into three categories and we settled on a small selection to feature in each.

Articles: Digital Photography Review (dpreview.com)

 
Comments Off on 2014 DPReview Readers’ Best Shots: Places

Posted in Uncategorized


2014 DPReview Readers’ Best Shots: Things

26 Jan

Picking favorites is hard. Nevertheless, our readers were up to the task when we asked them to submit their best shots of 2014. We received over 1400 submissions, and it was no small job picking favorites. We didn’t need the reminder, but it underscored just how talented our readership is. Photos were divided into three categories and we settled on a small selection to feature in each.

Articles: Digital Photography Review (dpreview.com)

 
Comments Off on 2014 DPReview Readers’ Best Shots: Things

Posted in Uncategorized


DPReview Readers’ best shots of 2014

26 Jan

As the calendar flipped to 2015, we asked DPReview readers to look back at their photographic year and send us their favorite shots from 2014 so we could feature some standouts on our homepage. The response was overwhelming. We’ve sorted through 1400+ submissions and made selections of our favorites in three categories – people, places and things. Take a look at some of our readers’ best work from the last year. See galleries

Articles: Digital Photography Review (dpreview.com)

 
Comments Off on DPReview Readers’ best shots of 2014

Posted in Uncategorized