The best entries so far for the 2021 Comedy Wildlife Awards
Now in its 7th year, the annual Comedy Wildlife Awards showcases some of the funniest wildlife moments caught on camera. Here are some of the best entries, out of thousands submitted from around the world, so far, that the judges and organizers felt the urge to share with the public.
‘A lot of wildlife shown in these images are facing threats to their populations and habitats that are heart-breaking. With this competition, we wanted to capture people’s attention and energy by giving them a giggle. In order to protect animals, we need people to fall in love with them. We think these wondrous shots show a side of wildlife that we don’t often get to see. They remind us of the beauty, and comedy, in our natural world that needs protecting,’ says Tom Sullam, the competition’s co-founder.
You still have six more weeks to enter the 2021 Comedy Wildlife Awards. Photographers are allowed to submit up to 10 images. The grand prize includes a safari to Maasai Mara in Kenya. 10% of the competition’s total net revenue will be donated to the Save Wild Orangutans charity.
Entry: ‘Bald Eagle Gets a Surprise’ by Arthur Trevino
Location: Hygiene, CO
Animal Description: Bald Eagle & Prairie Dog
Artist Description: When this Bald Eagle missed on its attempt to grab this prairie dog, the prairie dog jumped towards the eagle and startled it long enough to escape to a nearby burrow. A real David vs Goliath story!
Entry: ‘Monday Morning Mood’ by Andrew Mayes
Location: Rietvlei Nature Reserve, South Africa
Animal Description: Pied Starling
Arist Description: I took this shot while photographing a group of Pied starlings perched in a tree at the Rietvlei Nature Reserve in South Africa. It perfectly sums up my mood on most Monday mornings 🙂
Entry: ‘ROFL’ by Giovanni Querzani
Location: Serengeti National Park, Tanzania
Animal Description: Young Lion
Artist Description: A young lion in the Serengeti National Park, Tanzania, who apparently is laughing at my photography skills.
Entry: ‘Quarantine Life’ by Kevin Biskaborn
Location: South Western Ontario, Canada
Animal Description: Raccoon
Artist Description: Isolated inside with your family eager to get out and explore the world? These eastern raccoon kits are too. Just when you think there’s no more room in the tree hollow, mother raccoon appears and displays just how compact the space is. The babies clambered all over their mom and each another, struggling to take a look at the exact same time.
This photo was taken in Southwestern Ontario, Canada. After exploring a particular area with numerous tree hallows, I identified it as a hot spot for raccoon families. Since raccoons will move from den to den, often not spending more than one night at a time in a particular den, locating an area with numerous options is key to locating the animals.
I stumbled across this family and immediately worked on leveling the camera with the hole to prevent an upward angle. When the camera and tripod were ready, the baby raccoons were extremely curious (and cooperative), sticking their heads out for a closer look!
Entry: ‘Yoga Bittern’ by KT Wong
Location: Satay By The Bay, Singapore
Animal Description: Yellow Bittern
Artist Description: A Yellow Bittern was trying very hard to get into a comfortable hunting position. I got this shot when it was between 2 stalks of lotus flower.
Entry: ‘Missed!’ by Lea Scaddan
Location: Perth, Australia
Animal Description: Western Grey Kangaroo
Artist Description: Two Western Grey Kangaroos were fighting and one missed kicking him in the stomach.
Entry: ‘Yay – It’s Friday!’ by Lucy Beveridge
Location: Kgalagadi Transfrontier Park, South Africa
Animal Description: Springbok
Artist Description: A young springbok, all ears and spindly legs, caught in midair while pronking as the sun started to rise over the Kgalagadi Transfrontier Park. There’s not much information on why the Springbok pronk but some theories suggest it is a way of showing fitness and strength to ward off predators and attract mates. It has also been said that this small, dainty and largely unappreciated antelope also pronks out of excitement, jumping for joy!
Entry: ‘Sweet Lips Are For Kissing’ by Philipp Stahr
Location: Curaçao, Dutch Caribbean
Animal Description: Boxfish
Artist Description: This picture was taken at Curaçao, Dutch Caribbean. Usually box fishes are difficult to take pictures of, since they do not have a problem of a diver coming close, but if you show interest, they always turn the back and not the face to you. That’s why I tried to swim 0.5m above the fish and showing no interest at all to him.
The same time I had my camera not in front of me, but below at my chest pointing to the bottom. When the right moment had come, I turned the camera 90 degrees to the front and just point and shoot, hoping to have the fish in focus. Never expected to have its beautiful lips that close!
Entry: ‘Cranky Hippo’ by Rohin Bakshi
Location: Vwaza Game Reserve, Malawi
Animal Description: Hippo
Artist Description: The baby hippo wanted his mother’s attention, but it seems he wasn’t getting any.
Entry: ‘Happy’ by Tom Svensson
Location: Falklands
Animal Description: Penguin
Artist Description: These penguins was surfing on the waves on to land and looked so happy each time.
Entry: ‘Houston – We’ve Got a Problem!’ by Txema Garcia Laseca
Location: Pantanal (Brazil)
Animal: Amazon Kingfisher
Artist Description: This fish is astonished when has been trapped for a fisher bird.
The post The Best Camera for Street Photography in 2021 appeared first on Digital Photography School. It was authored by Simon Ringsmuth.
Choosing the best camera for street photography doesn’t have to be difficult, but it can take some time to weigh the options. Fortunately, with all the cameras available today, it’s tough to make a bad choice!
That said, there are some street photography cameras that stand out among their peers – thanks to a unique combination of features.
Fujifilm X100F | f/16 | 1/30s | ISO 200
While street photography can be done with almost any camera, from mobile phones to medium format, there are a few characteristics to look for when choosing your gear. A small size, easy-to-use manual controls, a quiet shutter, and a fast response time are all very much appreciated when capturing slices of life in public spaces.
Other features like a tilting screen, a built-in ND filter, a bright viewfinder, and weather sealing are nice, but not deal-breakers for most photographers. Ultimately, you’ll need to decide what’s important to you and choose accordingly, but if you’re not sure where to start, this list will hopefully be of use.
(Note: In terms of ranking, the top three picks are ranked in order; after that, every camera is about equally good, followed by four honorable mentions that don’t quite make the cut.)
1. Fujifilm X100V
Back in 2010, Fujifilm released the original X100, which featured a groundbreaking set of features including a hybrid optical/electronic viewfinder and an APS-C sensor. It quickly became a runaway hit.
The X100V is the fifth iteration of this camera, and over the years Fujifilm has steadily refined it for street photography. Aperture, shutter speed, ISO, and exposure compensation each have their own control dials, which makes them dead simple to adjust on the fly. The hybrid viewfinder lets you shoot with an old-school rangefinder or an ultra-modern mirrorless, and the flip-out touchscreen makes it easy to compose from low angles.
Other benefits for street photographers include a 23mm fixed lens mated to an APS-C sensor, which results in a 35mm equivalent field of view – perfect for street photography. The lens is sharp and bright with a maximum aperture of f/2, so you can take pictures with ease and never worry about missing a shot due to poor light. The built-in leaf shutter makes photography virtually silent, which is great if you value discretion.
The X100V is small but not exactly pocketable, and it has a full suite of customizable buttons and dials to suit your style. If you want a virtually no-compromises camera designed from the ground up for street shooters, the Fuji X100V is a fantastic option; it is, in my opinion, the best camera for street photography today.
Pros:
Stellar image quality
Easy-to-use controls
Hybrid optical/electronic rangefinder-style viewfinder (the only one of its kind among all the cameras on this list)
Beautiful JPEG files with a wide variety of available film simulations
Cons:
Weather sealing requires the purchase of an adapter ring for the front of the lens
Autofocus isn’t as fast as some of its peers
Expensive, especially for casual photographers
No image stabilization
2. Ricoh GR III
The Ricoh GR line of cameras has been a favorite of street photographers for years, and with good reason. The third iteration of this venerable camera series continues the tradition of being small in size but packing quite a punch, and it offers nearly everything a street photographer could want.
An 18mm lens mated to the APS-C sensor results in a 28mm field of view; this is a bit wider than the Fujifilm X100V, and more like what you might see on a mobile phone. Some people like the wider angle, but I find the 35mm field of view much more pleasing and versatile. Image quality is outstanding, and high-ISO shots look great. Lots of photographers swear by the Ricoh black and white JPEGs, so if you like to shoot in monochrome, this might be a good option.
The Ricoh GR III has plenty of buttons but not as many dedicated controls as the Fujifilm X100V and other cameras on this list. It’s not quite as easy to rapidly change settings, but many custom functions can be mapped to specific buttons to make things easier. The maximum f/2.8 aperture isn’t as bright as the Fuji X100V, but the camera compensates with built-in image stabilization; this makes low-light photography a bit more practical as long as you are shooting still subjects. A non-tilting touchscreen makes composing shots a cinch, but the lack of a dedicated viewfinder is certainly something to consider if you prefer composing your shots by bringing the camera up to your eye.
Pros:
Small size makes it easy to carry in a pocket or handbag
Much more affordable than the Fuji X100V and some other options on this list
Excellent image quality
Built-in image stabilization
Cons:
f/2.8 lens is not as bright as the Fujifilm X100V
The lack of a built-in viewfinder means photos must be composed using the rear LCD screen
Battery life isn’t great, so you might consider carrying a spare
3. Sony RX100 VII
The Sony RX100 line has been around for many years and has gone through myriad iterations to adapt to the demands of photographers. The most dramatic change in recent years is the lens, which used to have a much smaller focal range but now goes all the way from 24mm to 200mm (in equivalent 35mm measurements). This makes the RX100 VII an outstanding camera for many genres, including street photography.
While the lens isn’t nearly as bright as the Fuji X100V’s or Ricoh GR III’s, its maximum f/2.8 aperture on the wide end is great for daytime street photography. This quickly shrinks to a maximum f/4.5 aperture as you zoom in, but most street photographers typically shoot wide as opposed to telephoto.
The 1″ sensor in the Sony RX100 VII is what enables this camera to have such a versatile lens. And while it’s no match for its APS-C and full-frame siblings’ image quality and high-ISO performance, Sony makes up for it in terms of sheer technological prowess.
The RX100 VII camera is packed to the gills with features normally found on high-end mirrorless cameras costing thousands of dollars. Autofocus is snappy and reliable and includes subject tracking and eye AF, video recording is outstanding, and the pop-up viewfinder is a boon for street photographers. A rear touchscreen, a relatively robust set of manual controls, and several customizable buttons mean you can set the camera to shoot how you want to get the street photos you might otherwise miss. At the end of the day, the reason this camera earns a spot on my list is due to its unique combination of features and size; no other camera offers so much in so small a body.
Pros:
Very small size makes the camera extremely portable and pocketable
Incredible technology, from 4K video to fast, reliable autofocus
Versatile lens with a 200mm focal length at the long end
Optical stabilization helps you get clear shots of still subjects in low light
Cons:
f/2.8 aperture is only available at the widest end of the focal range
The small image sensor results in less depth of field and inferior high-ISO performance compared to other cameras
The pop-up viewfinder isn’t instantly accessible
4. Panasonic Lumix LX100 II
While the Panasonic Lumix LX100 II isn’t as feature-packed as other cameras on the list, it nonetheless acquits itself nicely in the world of street photography. It’s easy to use and packs fast autofocus and responsive controls, including dedicated dials for shutter speed and exposure compensation. The built-in 24-75mm (35mm equivalent) lens is great for wide-angle shots as well as tighter crops, and the bright f/1.7 aperture is perfect for low-light photography, though it does shrink to f/2.8 when zoomed to 75mm. Street photographers will love the small size of this camera, though the lens does stick out from the body enough to cause problems in a pocket or handbag.
Panasonic packs a lot of technology into its cameras, and the Lumix LX100 II has a range of high-tech features that make it well suited to street photographers. The autofocus points cover nearly the entire frame so you can focus almost anywhere, and built-in crop modes let you frame your shots in a variety of different aspect ratios.
The touchscreen makes focusing a breeze, which can be useful for on-the-spot candids, and the electronic viewfinder is great for thoughtfully composing your photos. Street photographers will also appreciate the aperture ring, which gives you full control over the aperture without requiring a trip to the camera menus.
Pros
Manual control dials for shutter speed and aperture
Built-in zoom lens covers a useful focal range for street photography
Small size
Cons
Image quality isn’t as good at higher ISO values
f/1.7 aperture is only available at the widest end of the focal length range
The viewfinder isn’t as sharp and crisp as others on this list, which makes composing some shots a little frustrating
5. Canon G1 X Mark III
The Canon G1 X Mark III combines the best of compact cameras and their larger-sensor DSLR/mirrorless brethren; the result is an imaging tool that is quite well suited to many types of street photography.
The G1 X Mark III’s overall appeal is a bit hampered by its size as well as some limitations of the built-in lens, but anyone after a street photography camera would be wise to consider it. The huge APS-C image sensor on the G1 X III makes for superb shots in a variety of lighting conditions, and a long list of impressive technical specifications makes this camera great for street shots.
Composing is simple with the rear LCD, and Canon goes one step further than most by offering a fully articulating touchscreen. Autofocus isn’t particularly noteworthy, especially when tracking moving subjects, but that’s usually not a primary concern for street photographers.
The 24-72mm (35mm equivalent) focal range of the zoom lens means you can get wide shots and street portraits, but the aperture range on the lens is definitely less than ideal. The f/2.8 maximum aperture (when zoomed out) is respectable, but the f/5.6 aperture when zoomed in severely limits this camera’s functionality in low light.
However, high-ISO shots look great, and street photographers will love the abundance of control dials and function buttons to access commonly used settings. The electronic viewfinder is crisp and sharp, and while not as nice as Canon’s high-end cameras, it’s certainly good enough for street photography.
Pros:
Excellent image quality, especially compared to some cameras on this list with much smaller sensors
Leaf shutter lets you use very fast internal flash sync speeds
Built-in neutral density filter lets you explore more creative possibilities
Cons:
Small maximum aperture limits the usefulness of the built-in lens, especially when zoomed in
Battery life is not great
The lens isn’t as sharp as others on this list
6. Nikon Z5
The inclusion of the Nikon Z5 on this list might seem a bit strange, but hear me out. The Nikon Z5 isn’t specifically designed for street photography like the Ricoh GR III or Fuji X100V, and it’s larger and heavier than the Canon G1 X Mark III. You also need to attach a lens because it doesn’t include one like the Panasonic LX100 II and others.
But it has one standout quality for street photography: it is currently the cheapest full-frame mirrorless camera on the market. So for street photographers who value image quality above all else, the Nikon Z5 is definitely worth a look.
In addition to a full-frame sensor, the Nikon Z5 has plenty of other features to make street photographers sit up and take notice. Its flip-out touchscreen lets you shoot from up high and down low, and it has more than enough manual controls and customizable settings. It features a bright viewfinder, fast autofocus, built-in image stabilization, and an (optional) fully electronic shutter for discreet shooting.
The Nikon Z5 can be paired with Nikon’s Z lenses, many of which are outstanding for street photography. Bear in mind that the Z5 is expensive, heavy, and downright cumbersome next to its nimble, pocketable counterparts. But for full-frame street shooters, it’s one of the best options available.
Pros:
Exquisite image quality and autofocus performance
Dual memory card slots
Built-in image stabilization helps you get great shots with slower shutter speeds
Cons:
Larger than almost every camera on this list; it will not fit in a pocket
Very few small Z-mount lenses available, which limits its appeal for street photography
7. Olympus PEN E-PL10
The Olympus PEN series has long been beloved by street photographers, and while not up to the standards of some of its peers, the PEN E-PL10 definitely holds its own in key areas. It sports a Micro Four Thirds sensor, which sits comfortably between the 1″ sensor of the RX100 series and the APS-C sensors offered by cameras such as the G1 X Mark III and Fuji X100V. It strikes a nice balance between size and capability, with features that appeal to many street photographers.
Like the Nikon Z5, the PEN E-PL10 requires a separate lens, but Micro Four Thirds lenses are much smaller than their Nikon/Canon/Sony counterparts. For example, the 14-42mm lens (28-84mm equivalent) shown in the photo above makes the E-PL10 about the same size as the Fuji X100V when the lens is zoomed out to 14mm. And there’s a huge variety of MFT lenses, many of which are great for casual street shooting.
The PEN E-PL10 isn’t as feature-rich as some of its more pro-oriented siblings like the OM-D E-M1 Mark III, but it has a full complement of manual controls so you can get precisely the shot you’re after. Some street photographers might lament the lack of a dedicated viewfinder, but the articulating rear touchscreen makes composing photos easy and enjoyable.
The E-PL10 also stands out thanks to built-in image stabilization and fast, reliable autofocus. And the PEN E-PL10 is much less expensive than other cameras on this list, which makes it a great option for people wanting to get started with street photography.
Pros:
One of the smallest interchangeable lens cameras on the market
Excellent manual controls and built-in image stabilization
Inexpensive, even when factoring in the cost of a lens
Cons:
A Micro Four Thirds sensor means high-ISO shots aren’t top-notch
No dedicated viewfinder
Serious street shooters might outgrow the feature set of the camera rather quickly
Honorable mentions
The cameras listed below are all well-suited to street photography, but I generally consider them outliers in this type of discussion. While they are all worth considering, each is limited by some important factors, and I would generally recommend one of the initial cameras on this list over one of the honorable mentions.
However, if money, size, or access to the latest technology are not your primary concerns, then by all means, look at the models listed below.
8. Leica Q2
The Leica Q2 is a no-compromise street photographer’s dream. Everything about this camera is ideally suited to street photography, from its full-frame sensor to its exquisitely sharp 28mm f/1.8 lens to the brilliant optical viewfinder, durable construction, and weather sealing.
While you could buy several Fujifilm X100Vs and a Ricoh GR III for the same price as a Leica Q2, you would be making some compromises and tradeoffs in the process that you simply don’t have to think about with the Leica. So if money is no object and you don’t mind a massive lens protruding from the camera body, the Leica Q2 is my top recommendation.
9. Sony RX1R II
If you’re searching for an ideal street photography camera but can’t afford the Leica Q2, then the Sony RX1R II should sit at the top of your list. It’s similar to the Leica in many ways, with specs that surpass almost every camera at the top of this list, even if it doesn’t quite reach the same soaring heights as its German-made counterpart.
If the Q2 sits at the top of the podium, the RX1R is a very close second place. It’s expensive, but not quite as much as the Q2. It has a 35mm f/2 lens that isn’t quite as wide or bright as the Q2. It has a viewfinder, but it pops out like a periscope instead of being elegantly embedded in the camera body. While the rear screen flips out for greater versatility, the camera sacrifices weather sealing as a result.
In short, the Sony RX1R II is an outstanding camera for good reasons, but generally not one I would recommend for most casual street shooters.
10. Sony a6100
The Sony a6100 isn’t designed for street photography, but don’t overlook it. It’s a small, well-rounded, highly capable camera that also happens to serve the needs of street photographers quite well.
The Sony a6100 is a full-featured APS-C camera that accepts all of Sony’s E-mount lenses, and it packs some impressive technology to help you capture the images you’re after. Everything you would expect in a proper camera is here: manual controls, a bright viewfinder, great autofocus, and a flip-out rear screen. It’s small enough to tote around but not as pocketable as the Ricoh GR III or Sony RX100 VII. I would recommend pairing it with the 20mm (30mm equivalent) f/2.8 pancake lens, which essentially transforms this camera into a Fujifilm X100V.
Strictly from a street photography perspective, I prefer the X100V – but some might appreciate the technology and the ability to change lenses offered by the a6100.
11. Fujifilm X-E4
It almost doesn’t seem fair to relegate the Fujifilm X-E4 to the bottom of the honorable mentions category. In many ways, it seems like one of the best cameras for street photography you can buy! But while this camera has an extensive list of features that appeal to street photographers, I can’t recommend it over the Fuji X100V.
The X-E4 and the Fujifilm X100V share many common elements, from sensor size to flip-out screen to manual controls and even an integrated viewfinder. But while the X-E4 is newer and less expensive, it doesn’t come with a lens, and by the time you add one that is suited to street photography, the price is almost the same as an X100V.
And the X100V has a wide-aperture lens, better manual controls, and a hybrid optical/electronic viewfinder that will appeal to a lot of street photographers. As a small, capable, interchangeable lens camera, the X-E4 is great. But for street photography, the X100V is the better choice.
Fuji X100F | f/2 | 1/600s | ISO 200
The best camera for street photography: final words
Street photography is all about capturing the candid everyday moments that make up the world around us. And almost every camera is capable of getting those shots – mobile phones, pocket cameras, and even DSLRs with big lenses.
There’s no rule that says the camera you already have isn’t going to be well suited to street photography. And your only inherent limitations are the ones you set for yourself. But if you’re looking for the best camera for street photography, I hope this list was helpful and gave you a few things to think about!
Street photography camera FAQs
Can I use my mobile phone for street photography?
Mobile phones are great for street photography, as long as you have plenty of light. When the lights go down, photo quality decreases dramatically, especially if you are shooting moving subjects. (Night Mode on mobile phones almost always requires your subjects to be very still.)
What focal range is best for street photography?
This one is largely a matter of personal taste, but anything between 25mm and 35mm is generally ideal for street photography. Much wider than 25mm and people start to look a bit distorted. Much narrower than 35mm, and you will have trouble fitting everything into the frame.
Can I use a DSLR for street photography?
While traditional DSLRs can certainly be used for street photography, I don’t recommend them when there are so many excellent mirrorless options available. DSLRs are large and conspicuous, and Live View shooting often uses contrast-detection autofocus (which is highly unreliable for dynamic street photography settings).
Do I need weather sealing on my camera?
Unless you are shooting in extreme weather conditions, you probably don’t need weather sealing. It’s nice to have for peace of mind and I wouldn’t recommend against it, but as long as you’re careful not to let your camera get soaked with rain or covered in dust, you’ll probably be fine.
Do I need to focus manually when shooting street photos?
Many street photographers enjoy shooting manually, which is very simple thanks to focus peaking on modern mirrorless cameras. However, autofocus works perfectly fine, and there is nothing wrong with using it for street photography.
The post The Best Camera for Street Photography in 2021 appeared first on Digital Photography School. It was authored by Simon Ringsmuth.
The post Affinity Photo vs Photoshop: Which Photo Editor Is Best in 2021? appeared first on Digital Photography School. It was authored by Simon Ringsmuth.
Which is the better photo editor, Affinity Photo vs Photoshop CC?
Adobe Photoshop was released in 1988 and has become the most widely used digital image editing tool in the world. The program is so popular that its name has become a verb – and Photoshop is now the de facto standard for industry-leading professionals and amateurs alike.
Photoshop has also spawned a host of competitors, including Affinity Photo, a worthy alternative for anyone who wants a full-featured image editor without the expense of Photoshop. But is Affinity Photo now the superior choice? Or are you better off sticking with Adobe’s classic program?
In this article, I’m going to compare Photoshop and Affinity Photo. I’m going to give you the benefits and drawbacks of each program – and you’ll leave knowing which program is right for you.
Affinity Photo vs. Photoshop: overview
When considering Affinity Photo and Photoshop, it’s important to remember that there is no one single correct program for everyone. Both are highly capable photo editors, and either one will serve the needs of most photographers. They each have advantages and drawbacks, as well as very different pricing models, and both work well for many photographers.
So try not to think of this as a binary choice or even a competition. It’s not about which program is better, but which program suits your needs.
Before getting into the weeds of how these programs are different, it’s a good idea to take a look at how they are alike. This helps establish a sense of common ground, or perhaps a starting point, that will make the differences stand out.
Both Affinity Photo and Photoshop offer a layer-based workflow, meaning all edits are non-destructive and can be combined with other edits. Both include RAW converters, which allow you to open and manipulate the lossless file formats used by amateur and professional photographers around the world.
Affinity Photo opens RAW files and lets you manipulate the same properties and parameters as Adobe Camera RAW, the RAW editor used by Photoshop.
Affinity Photo and Photoshop both feature a dizzying array of tools to let you edit images any way you want. You can create detailed selections, use complex layer masking, warp and transform parts of your images, use dozens of filters and adjustments, go back to earlier edits with a history panel, insert and manipulate text…the list goes on.
Comparing the two programs, then, becomes less about looking at a bulleted list of features and more about value. Affinity is significantly cheaper with a one-time price of $ 50 USD. Adobe Photoshop is much more expensive and is available only as part of a Creative Cloud subscription, the cheapest of which is about $ 120/year. And while you certainly get a lot for that yearly fee, Affinity Photo is no slouch.
Photoshop is available as part of the Adobe CC Photography plan or for a standalone subscription. You can also find it bundled with other, more expensive plans, as well.
Affinity Photo doesn’t have the sheer quantity of features that Photoshop offers, but many of the tools in Photoshop aren’t used by a lot of amateur and semi-professional photographers, so it might not matter to you. For instance, Photoshop has tools for manipulating 3D objects and video, but if you just want to edit static 2D images, that probably isn’t important. Photoshop is also updated more frequently and has some interesting AI-based tools to alter faces and other image elements, but for some people, these aren’t worth the yearly fee.
User interface
Both programs follow a similar design language: tools on the left, options for customizing the selected tool on top, editing panels on the right, and a huge space in the middle of the screen for working on an image. Their tools share many core functions, as well. Both have tools for cropping, brushing, making selections, fixing blemishes, working with text and objects, and more.
The editing interface in Photoshop (shown here) is similar to the interface in Affinity Photo. They’re not identical, but they’re similar enough that if you’re familiar with one program, you can probably use the other.
The interface is not altogether dissimilar from Lightroom, Luminar, and other photography software. If you are new to Affinity Photo or Adobe Photoshop, it won’t take you long to figure out how to edit and where to find the tools and adjustments you need.
Adobe has a key advantage in terms of user interface design because it has built up so many tools and options over the years. But this is also its Achilles’ Heel and can be seen as a disadvantage, as well. Photoshop’s ever-expanding repertoire has resulted in a program with a staggering learning curve, and even simple options like changing the white balance on an image or refining a selection can lead to inordinate amounts of head-scratching and online searching.
Photoshop contains visual tooltips to help new users acclimate themselves to the buttons and options.
This has put Adobe in a bit of a tough spot – one that makes Affinity Photo seem quite attractive by comparison. Adobe must walk a fine line between catering to its professional customers, many of whom have been using Photoshop for years, and catering to new customers who find the growing feature set to be complicated and frustrating. Welcome screens, popups, tooltips, and other helpful hints stem the tide of confusion – but while these do help, it can still be difficult to locate the options you need to get your work done.
By contrast, the simplified nature of Affinity Photo seems downright pedestrian but remains quite powerful. Tools on the left are bright and colorful, and the adjustment panels on the right are a bit more streamlined for common use-case scenarios.
For example, adjusting the white balance is as simple as clicking the White Balance option and adjusting some sliders. In Photoshop there isn’t a White Balance option; you have to apply a Curves adjustment layer or use a filter to achieve the same effect.
Affinity Photo includes familiar adjustments like White Balance that are more complicated to implement in Photoshop.
This theme is prevalent throughout any comparison of Affinity Photo vs. Adobe Photoshop. Affinity Photo has a fresh, modern take on the interface elements that Photoshop invented. If you prefer a cleaner, simpler layout, then Affinity Photo might be the best option for you, but if you crave raw power and a slew of options, you might be better off with Photoshop.
It is worth noting that Affinity Photo also has a few tricks up its sleeve that Photoshop can’t yet match. Namely, speed: Adobe Photoshop is built on decades-old legacy code that makes some simple operations confoundingly slow. Tools like Liquify and even simple transformations are much snappier in Affinity Photo, and while Photoshop has made some great strides in recent years, there’s no denying that aspects of the program still feel slow and outdated.
Workflow tools
While both Affinity Photo and Adobe Photoshop have a huge number of editing tools, each program is at its best when you learn to use those tools to accomplish your work with minimal effort. Photoshop has a bit of an edge here if you want to make complicated, in-depth edits, but Affinity Photo is no slouch either.
For example, most of the items in Photoshop’s toolbar have sub-options with different variations on the same tool. There are three selection tools: Marquee, Lasso, and the Magic Wand. And each of those has its own subset of tools.
The tools in Photoshop are more comprehensive and contain a greater number of options and customizations compared to Affinity Photo.
From a workflow perspective, this bevy of options can be invaluable. You can get in, make your selections, and get on with your editing. And in that regard, Photoshop gets the nod over Affinity Photo. Once you learn all the options at your disposal and get familiar with the myriad keyboard shortcuts, Photoshop can dramatically cut your editing time. But getting to that point can take a lot of learning and a lot of patience, so some might prefer the relative simplicity – and fewer options – of Affinity Photo.
Both programs have all the standard adjustments you would expect: Brightness/Contrast, Exposure, Invert, and many others. These are applied using layers, and the layers can be blended using virtually the same sets of blend modes, including Darken, Multiply, Color Burn, Difference, Exclusion, Subtract, and so on. Layers can be moved up and down and combined in both programs, and both give you access to dozens of effects that can be applied, as well.
The Layer Effects panel in Photoshop contains many options for enhancing and editing your images, and it lets you customize the blend modes, as well.
The Layer Effects panel in Affinity Photo is similar but lacks the depth that Photoshop offers. Still, it should suffice for most people.
If you are thinking of transitioning away from Photoshop, there is one important thing to note:
While Affinity Photo does replicate many of the common keystrokes and shortcuts used in Photoshop, they’re not 1:1. You might find yourself pressing familiar keys and using shortcut commands out of habit only to realize that nothing happens, or worse, something happens that you didn’t intend. It can make the transition a bit rocky but might be worth it if it saves you time or money in the long run.
Compatibility
When you work with image editors, compatibility can be an issue. Photoshop’s PSD file format is the gold standard – but not necessarily because it’s the best, and certainly not because it’s the most efficient in terms of file size. Rather, after more than 30 years in this business, Photoshop’s PSDs have simply become the most widely used. PSD files are nondestructive, meaning they contain all the layers, history steps, adjustments, effects, and other elements of an image as it’s being edited.
Affinity Photo has a similar non-destructive file format, AFPHOTO. But as you might expect, it is not well known; it’s simply too new compared to the PSD format. While Affinity Photo can open PSD files and also export its own files in PSD format, Adobe Photoshop can’t do anything with AFPHOTO files. This can end up becoming a time-consuming hassle if you use Affinity Photo but find yourself collaborating or sharing files with Adobe Photoshop users (or vice versa).
Affinity Photo can export images in AFPHOTO (as well as nearly a dozen other formats). But Photoshop won’t open Affinity Photo documents and likely never will. Adobe has almost no incentive to do so.
It’s currently Adobe’s playground, and we have to play by their rules for the time being. Adobe doesn’t need to spend time and money making Photoshop compatible with Affinity Photo files, but Affinity needs to work with PSD files if it is to be relevant in the image-editing space. The old saying, “If you can’t beat ’em, join ’em” comes to mind.
So if you go with Affinity Photo because you like the price or appreciate its tools and features, just know your documents won’t always play nice with Photoshop.
Support
Learning any new tool takes time and effort, and this is doubly true for image editors. There are so many options and features in both Affinity Photo and Photoshop; it’s enough to make you want to give up and go with the one-click simplicity of a program like Luminar. Especially if you’re new to digital photography.
Just imagine trying to explain these Photoshop brush options to someone who has never used the program before.
When considering Affinity Photo vs. Photoshop, it’s important to take this into account and make sure you have access to the knowledge and training you need to get your editing done. While Photoshop has too many features to count, it also has over three decades of support behind it. The internet is jam-packed with every kind of Photoshop tutorial you can imagine: websites, forums, social media groups, YouTube tutorials, podcasts, classes, lectures, and Adobe’s own help files and rich knowledge base.
What’s more, since so many people use Photoshop, it’s not hard to find someone who can help you. Most friends, coworkers, and even casual acquaintances who use Photoshop will be happy to show you a few tricks or help you learn how to use the program.
I knew Photoshop could do a simple border with rounded corners, but I didn’t know the exact steps. A quick video call with my cousin, who uses Photoshop professionally, got me all the information I needed.
This is hardly the case with Affinity Photo. Affinity has its own set of video tutorials, as well as sample images you can import and experiment with to learn the basics. But while these are a good place to start, they’re just not at the same level as what you’ll find in Photoshop.
Tutorials will improve as more people use Affinity. But until then, you might find yourself frustrated when you can’t figure out more advanced features and aren’t able to find the help you need.
Editing and the cloud
As photo editing moves away from the desktop and into the cloud, it’s important that your tools can keep up with your workflow (and that you can adapt them as needed). Many photographers today want to edit images on tablets or even phones and have their pictures available whenever and wherever they want.
Thankfully, both Affinity Photo and Adobe Photoshop are up to the task, but they approach it in different ways.
Affinity Photo has an iPad app, available for a very reasonable fee, that mimics most of the functionality of the desktop version. It can’t do things like batch export, but it reads AFPHOTO files, and edits on the iPad are also available on the desktop version.
However, Affinity does not have a cloud-based infrastructure to support file syncing and storage. This means you have to transfer your images manually or sync them to a service like iCloud – then you must make sure all your files are properly synced again after you edit, lest you lose some of your changes.
Photoshop handles this differently, and it’s all due to the subscription fee you pay to use the program. Since every Photoshop plan comes with some degree of cloud storage from Adobe, it’s possible to have a cloud-based workflow where everything is stored remotely. This means you can load all your PSD files and other assets into your Adobe Creative Cloud storage, edit your images on desktop or mobile, and everything is automatically synced in real time.
Adobe gives you the option of storing files in the cloud; this is part of your Photoshop subscription.
Neither one of these approaches is necessarily better, but it’s important to determine which you prefer. Affinity Photo’s one-time pricing structure means it can’t support the ongoing costs of cloud servers for its customers. But if you already pay for cloud storage through another platform, then you might prefer Affinity’s approach.
On the other hand, Photoshop’s method is great for a lot of people, especially those who want a cloud-based workflow.
Affinity vs Photoshop: Which editing program is right for you?
At some point, you have to stop reading and just make a decision. There are definitely some good reasons to go with Affinity Photo, and there are some advantages to Photoshop. Here’s my advice if you’re on the fence and not sure which one is right for you:
Get Affinity Photo if you want an inexpensive, full-featured photo-editing program. While it doesn’t have decades of history in the photography community, it has an extensive list of features and workflow tools to suit the needs of almost anyone. Certainly, it’ll handle everything a casual or hobbyist photographer requires, and if you aren’t actively earning money with your images, then a one-time fee of $ 50 makes Affinity the better choice.
You can create some amazing artwork in Affinity Photo. And if you need inspiration, you can download sample images like this one (which are designed to help you learn the program).
Subscribe to Photoshop if you want a mile-wide set of features developed over several decades, as well as an endless supply of websites, articles, videos, books, and entire courses to help you learn how to use them. There are also many plugins you can get to extend the functionality of the core application; that way, you can tailor Photoshop’s capabilities to your needs. In terms of sheer product ecosystem, Photoshop is the clear winner.
While some have accused Adobe of resting on their laurels now that they have a steady stream of subscription income, that’s not really a fair criticism when it comes to their flagship product, Photoshop. Photoshop continues to add new options for demanding professionals while making the onboarding process easier for beginners. Adobe has also been incorporating artificial intelligence tricks such as allowing you to age (or de-age) human faces, alter smiles, and even change the direction that people are looking.
Adobe’s AI-based Neural Filters let you apply all sorts of strange, interesting adjustments such as changing expressions, smoothing skin, and aging (or de-aging) people.
The heart of the Affinity vs. Photoshop debate comes down to a simple question: What do you want to do to your photos? By identifying your needs first and then looking for a solution, you can be sure that the program you choose will more closely align with your requirements. It might be Affinity, it might be Photoshop, or it could even be something else.
Both Affinity Photo and Adobe Photoshop have free trials, and I recommend going that route before spending any money or getting too invested in one particular application. Download both products, try them, and see what you think. Then you can decide the Affinity Photo vs. Photoshop question for yourself.
Now over to you:
Have youused Affinity Photo and Photoshop? Which program did you prefer? Share your thoughts in the comments below!
The post Affinity Photo vs Photoshop: Which Photo Editor Is Best in 2021? appeared first on Digital Photography School. It was authored by Simon Ringsmuth.
The post The 17 Best Photo-Editing Apps (in 2021) appeared first on Digital Photography School. It was authored by Ana Mireles.
Are you looking for the best photo-editing apps available in 2021? You’ve come to the right place.
In this article, I’m going to share my 17 favorite editing apps – including apps for general editing, apps for fun and filters, and apps for specialized editing.
So whether you’re a dedicated smartphone photographer or just looking to find some powerful ways to edit on the go, this list contains the perfect app for your needs.
Let’s get started.
The best photo-editing apps for general editing
In this section, you’ll discover the best photo-editing apps for general adjustments. With the apps on this list, you can adjust exposure, enhance colors, crop, sharpen, and more.
1. Snapseed
Cost: Free
Availability: iOS and Android
Snapseed is one of the most popular photo-editing apps on the market – and for good reason. It’s very intuitive and easy to use, which makes it great for beginners. At the same time, Snapseed offers a lot of control for more skilled users.
You don’t need to pay any fees for using Snapseed, nor are there in-app upgrades; it’s completely free. So if you’re after a beginner-friendly photo editor that can do pretty much anything, Snapseed is a great choice.
2. Lightroom
Cost: Limited version for free. Full version available with an Adobe subscription (from $ 9.99).
Availability: iOS and Android
The free version of Lightroom Mobile lets you do most basic editing tasks. You can also access and create presets.
However, if you decide to upgrade, you’ll gain access to a healing brush, selective adjustments, geometry tools, and RAW editing. You can also use the camera from the app to shoot RAW images.
If you want to use Lightroom Mobile to speed up your workflow, check out this article.
3. Photoshop Express
Cost: Free
Availability: iOS and Android
Adobe Photoshop is the industry standard for photo editing. Its mobile version is divided into three smaller and specialized apps; the basic editor is Photoshop Express.
Photoshop Express offers one-touch solutions such as an auto-fix option and filters. It also allows you to edit and retouch with total control. And it’s packed with many fun features such as stickers and collages.
You can crop to most platform’s formats and share directly from the app. While you don’t need an Adobe subscription to use Photoshop Express, you will need a free account.
4. Pixlr
Cost: Limited version for free
Availability: iOS and Android
Pixlr is a well-rounded editing app, offering all the post-processing essentials plus tons of presets and features to unleash your creativity.
There’s no need to create an account and you can download Pixlr for free, though you’ll be offered in-app purchases for overlays and stickers.
Pixlr also offers two great browser versions that you can use for free – or you can get a subscription for full access to both browser versions and other useful assets.
Best photo-editing apps for fun and filters
In this section, I’ll share the best photo-editing apps for filters and effects.
(In most cases, these apps also include a camera and some basic adjustments tools.)
5. VSCO
Cost: Free limited version. $ 19.99/year for the full version.
Availability: iOS and Android
VSCO works as a general photo editor, but it belongs in the fun and filter category thanks to its artsy, social-media-focused features.
To use VSCO, you will need to create a (free) account. After that, you can continue to use VSCO for free, but most of the filters are sold separately.
Alternatively, you can grab a yearly subscription for $ 19.99 that includes 200 filters (and you have a 7-day trial to make sure it’s worth it).
Your creations can then be shared with the community, which is like- and comments-free. In other words, the VSCO community is more about the quality of the work. You can also share VSCO creations directly from the app to other social networks such as Instagram or Snapchat.
6. Prisma Photo Editor
Cost: Free limited version or free 3-day trial. Full version is $ 29.99/year.
Availability: iOS and Android
Prisma is designed for art lovers. It’s more than just filters; Prisma uses artificial intelligence to turn your photos into artworks inspired by the greatest artists in history. And unlike other apps, Prisma adds new filters every day.
General editing is also possible (as it is with most filter apps). Though I do miss the rotation tool to correct the horizon if needed.
7. PicsArt Photo Editor
Cost: 7-day free trial, then $ 34.99/year.
Availability: iOS and Android
PicsArt Photo Editor is one of the most versatile editing apps on the market. You have a powerful in-app camera, plus tools and presets to no end. You can do anything with PicsArt, from professional applications like time-lapse photography to fun stickers and drawing.
PicsArt Photo Editor also has social media integration, as well as thematic contests that will spark your creativity.
8. A Color Story
Cost: Free
Availability: iOS and Android
A Color Story is the perfect app to manage your Instagram account. You can do some basic editing and apply filters to your images and videos.
New filter collections based on current trends are added often, although most do need to be purchased separately.
You can even plan your Instagram feed with the Grid feature. In fact, you can use this just to see how the feed looks after each picture you add, or you can connect it to your Instagram account for scheduling posts. That’s why A Color Story is great for maintaining a unified Instagram feed – whether you are a photographer, influencer, or community manager.
9. Afterlight Photo Editor
Cost: Free
Availability: iOS and Android
Afterlight boasts 59 filters, 66 textures, and 77 frames for you to transform your images in a single click. Some of these tools are offered for a small fee, but there is also a wide variety of free, high-quality effects to choose from.
Afterlight can also handle basic editing tasks; the app has 15 tools to make most of the adjustments you’ll need.
The Crop tool is also quite versatile; it allows you to straighten, flip, and crop freehand and to many standard ratios.
10. Photo Lab Picture Editor
Cost: 3-day free trial, then $ 9.99/year or $ 4.99/month.
Availability: iOS and Android
Photo Lab is full of filters and effects; you can have fun or do some professional-looking work. You can even turn your photos into cartoons, and you can swap faces and make collages.
Photo Lab is an app designed to give free rein to your creativity. It’s also a social app with a big community of followers that’ll help you stay inspired.
Best apps for specialized editing
If you’re looking for the best photo-editing apps with dedicated features, this is the list for you:
11. Foodie
Cost: Free
Availability: iOS and Android
Although it has all the standard photo-editing tools, Foodie is designed primarily for food photography.
You can use Foodie’s in-app camera to take pictures (and you’ll get a live view of your selected filter). There are plenty of food filter series, including Fresh, BBQ, Yum, and more.
Once you’ve chosen a filter, you can compose your image using the smart grid. For flat lays, you’ll get a yellow band across the edges of the screen when the camera is perfectly level.
Foodie is only missing one key editing feature, but it’s a big one: a crop tool. You’ll either need to compose well from the beginning or have another photo editor on hand to deal with any cropping.
12. Photoshop Fix
Cost: Free
Availability: iOS and Android
This mobile version of Photoshop boasts Photoshop CC’s most popular portrait retouching tools. You get the main tools for basic retouching such as exposure, contrast, etc. And Photoshop Fix also offers a separate Light tool, which allows you to selectively adjust highlights and shadows.
But the real power is in the Liquify tool. With it, you can smooth the skin and even adjust expressions to make your subjects smile.
Photoshop Fix is free, but you will need to create an Adobe account.
13. SKRWT
Cost: $ 1.99
Availability: iOS and Android
If you like photographing architecture, real estate, or urban scenes, then you’re going to love SKRWT.
It’s a dedicated distortion-correction app, plus it has a powerful auto-cropping feature to ensure you get the best results.
And it corrects lens distortion regardless of whether the image was taken with an interchangeable lens camera, a GoPro, or your smartphone.
14. TouchRetouch
Cost: $ 2
Availability: iOS and Android
Removing unwanted objects from a photo is something we all have to deal with, no matter the genre of photography.
With TouchRetouch, you can use brush and lasso tools to select an object for removal. And if you’re removing a line (e.g., telephone wires in the background), you just need to tap; it will automatically be selected and removed.
TouchRetouch also has a clone tool, plus a feature called Quick Fix to remove blemishes. Many apps offer some kind of healing brush, but as a specialized app, TouchRetouch will get you the best results.
15. Photoshop Mix
Cost: Free
Availability: iOS and Android
If you aren’t a fan of other mobile versions of Photoshop, then you should try out Photoshop Mix.
You can work with layers to create cut-outs and photo composites. You can also work with texture overlays thanks to Photoshop Mix’s different blending modes.
As with the other Adobe apps on this list, you’ll need to create a (free) account to use Photoshop Mix, but you don’t need a subscription.
16. Motionleap (formerly Pixaloop)
Cost: Free limited version, or one of three paid choices: $ 3.50/month, $ 18/year, or a one-time purchase of $ 55.
Availability: iOS and Android
Have you seen pictures where everything is motionless – except for the water running or the coffee steam coming out of a cup? Well, Motionleap lets you create that effect with just a few taps and swipes.
You can also add filters, do some basic adjustments, and apply overlays. Keep in mind that the free version won’t let you export your projects and you won’t have all the tools available, so it’s worth considering a paid subscription.
17. Canva
Cost: Free
Availability: iOS and Android
If you use your photography for marketing purposes, then Canva is the app for you. It offers enough graphic design templates to fit your every need.
From creating an eye-catching Facebook post to designing an entire menu, Canva is intuitive and easy to use.
Many templates are free, though others must be purchased separately. Canva also has a browser version so you can access your projects on your computer, too.
Best photo-editing apps: final words
Well, that’s it:
The best photo-editing apps available in 2021! So start downloading your favorites.
And remember that you don’t need to pick just one; you can use two apps, three apps, or more to improve your editing workflow.
Do you like any other photo-editingapps? Are there apps that should be added to this list? Share your thoughts in the comments below!
FAQ
Are paid photo-editing apps better than free photo-editing apps?
No, there are excellent free choices such as Snapseed and Photoshop Express.
Should I have more than one editing app?
That depends on your needs. In my experience, it is useful to have different apps for different tasks.
What if I like smartphone photography but prefer to edit on my computer?
If you don’t like editing on your phone, you need to use an app that allows you to easily transfer pictures between your phone and your computer. You can use Lightroom for this (with an Adobe subscription). Another choice is to use a cloud service such as Dropbox.
What is the best photo-editing app?
I don’t think there’s one app that tops all the others; I think it’s about which one is best for you. That will depend on your phone, your budget, and your editing needs – plus your personal preference.
The post The 17 Best Photo-Editing Apps (in 2021) appeared first on Digital Photography School. It was authored by Ana Mireles.
With technology rapidly changing and becoming better every year, many people are asking the age-old question “which camera is better?” You now have an array of options including DSLR Cameras, Mirrorless Cameras, Phone Cameras and Point and Shoot Cameras. Having so many options can become overwhelming and make you wonder, where should I invest my money? But the truth is Continue Reading Photodoto
Comments Off on DSLR vs Mirrorless vs Smartphone vs Point and Shoot: Best Camera?
The post The Best Online Photo Storage Platforms in 2021 Compared appeared first on Digital Photography School. It was authored by Simon Ringsmuth.
Of all the options for managing our digital images, which one offers the best online photo storage?
With dozens of services to explore, it can be difficult to find the right storage for your needs. Some prioritize features, while others compete based on price. Some services are basic but easy to use, and others are highly customizable but intimidating to set up.
The trick is to find the service that works right for you!
And that’s what this article is all about:
Exploring the current photo storage options to find one the one that best meets your needs.
Let’s get started.
Online photo storage: a brief overview
Not long ago, cloud-based storage was slow, expensive, and out of reach for most users. People kept their digital photos in folders on their computers, and images weren’t widely shared like they are today.
But now people take more photos than ever, and all those images can quickly fill up a phone, memory card, or hard drive.
Fortunately, online photo storage solves this problem – by giving people a way to store photos remotely and access them at any time from any device.
In 2013, Flickr rocked the photography world by offering one terabyte of free storage, and in 2015, Google fired back by offering unlimited photo storage.
Sadly, these deals didn’t last; in 2018 Flickr slashed the storage limit for free accounts to 1000 photos, and in June of 2021 Google will limit users to 15 GB of storage for their entire account: photos, movies, documents, and everything else.
Flickr’s redesign in 2013 gave every user one free terabyte of storage. It seemed too good to be true. Turns out it was!
While the halcyon days of near-infinite online photo storage might be over, that doesn’t mean there aren’t options.
In fact, you now have more storage solutions than ever, but they have a few caveats and tradeoffs that didn’t exist before. Pricing has finally caught up with demand, and most online photo storage sites now have a limited free tier along with paid options.
One immutable fact we have learned over the last two decades of digital photography is that the old adage rings true: There’s no such thing as a free lunch. Or in this case, free online photo storage. Some sites have free tiers, but all are limited in important ways.
So if you want the best online photo storage, you’re going to have to pay for it.
Not much, mind you – generally only a few dollars each month. Just know you can’t get something for nothing, especially when it comes to storing your photos in the cloud.
Will you use online photo storage for backup or sharing with others? The answer could affect your choices dramatically.
The best online photo storage in 2021: Flickr
Flickr has been in the online photo storage business longer than almost any other site. That doesn’t mean it automatically earns a place at the top of my list, since longevity does not equal quality when it comes to internet ventures.
But in the case of Flickr, it is a huge advantage, since the site carries a rich legacy that photographers have enjoyed for years. Its interface is specifically designed around sharing photos, which is a pleasant change from social media sites that seem to be more interested in advertising than photography.
Flickr’s main interface is the Photostream, or a scrollable list of the most recent pictures you have uploaded.
The Flickr Photostream is a public showcase for your most recent images.
You can create Albums and Galleries, and mark photos as viewable for the public as well as friends or family members. Pro members get detailed statistics on how often their photos are viewed, favorited, and commented on. The mobile app automatically uploads all recent photos and videos. Images can be categorized with keywords, added to groups, and licensed with several types of Creative Commons.
Flickr shows complete EXIF data for photos, which is an invaluable tool that helps photographers learn more about how a given image was taken. Images can be embedded or downloaded (if the photographer allows), and prints can be purchased directly on the site.
Flickr also has over two million groups – online communities organized around specific topics where users engage in discussions about photos and share information and advice.
Flickr Pro users have access to advanced statistics and data for their images.
While the 1000 photo limit for free users seems positively anemic in the age of smartphones (when average users could easily reach that in a month or two), it does strike a good balance between end-user practicality and long-term business sustainability.
Also, the mobile app for Flickr can automatically upload pictures from your phone (though its interface is a bit simplistic compared to some other options).
Free Version: 1000 photo limit, ad-supported, no statistics for photos.
Paid Version: $ 59.99/year, unlimited photo/video uploads, no ads, advanced statistics, desktop app for automatic photo backup.
Pros: Easy to use for casual photographers. Rich set of tools for power users. No ads or storage quotas for Pro members. Photos are uploaded at full resolution with no compression.
Cons: Some interface elements are very outdated. RAW files are not supported, which limits Flickr’s appeal for professional photographers.
2nd place: Google Photos
Born from the ashes of the Google+ social media site in 2015, Google Photos quickly became the most popular photo-sharing site in the world thanks to its free, unlimited photo storage.
For five years, Google Photos reigned supreme as the go-to place for over a billion users to upload their images. Unfortunately, starting in mid-2021, a 15 GB limit will be imposed on new files added to free accounts.
But just because Google will start charging users who exceed 15 GB of storage doesn’t mean it is no longer a great option for people looking for online photo storage.
Google Photos is a great option for mobile users who want easy, intuitive photo storage, organization, and sharing.
Unlike Flickr, Google Photos is built for mobile. The Google Photos app uploads your images automatically, where they are sorted, tagged, and automatically analyzed by Google’s AI-driven software. Some users find this to be a bit invasive, but Google has said that this data remains private and is not used for advertising. The app also contains a surprisingly in-depth photo editor that also uses AI to enhance your images and suggest edits.
Google Photos has powerful built-in sharing features that let you set up shared albums and galleries and allow multiple people to contribute to a single album. This works great for parties or events where everyone is taking photos; the files can be instantly shared among attendees.
Photo albums can be shared publicly, or they can be shared privately with anyone who has a Google account.
AI software also recognizes people and uses geotagging for places, and this can help with sorting through your images. These algorithms also find objects in your photos, so you can search for words like “pumpkin” or “fireworks” and the app will display relevant images, all without you doing any extra work to add tags.
For privacy hawks, this might be a little too intrusive, as there’s no telling exactly what Google is doing with all this information in your photos. And there’s no way to adjust or customize the AI scanning and analyzing of your images. However, you do get to control who sees your images, and all photos are private by default.
Instead of offering a quantity limit, Google Photos restricts the free option to 15 GB. That might seem like a lot, but the 15 GB is for your entire Google account, not just your photos. If you have large files or other data already taking up lots of space in your Google account, there won’t be much left for your photos.
Free Version: No limits on functionality, but storage is limited to 15 GB.
Paid Version: $ 19.99/year for 100 GB. $ 29.99/year for 200 GB. $ 99.99/year for 1 TB. Same features as the free version, but storage is increased.
Pros: Excellent mobile interface. AI algorithms help with tagging and organizing. Sharing albums is easy since most people have Google accounts.
Cons: Some privacy concerns related to how Google uses your data. Storage that you pay for includes all your documents and files, not just photos.
3rd place: Apple iCloud Photos
Apple iCloud Photos is the de facto standard for iPhone and Mac users and with good reason. It’s designed to be extremely easy to use and integrates deeply with the Apple software and hardware ecosystem.
All photos you take with your iPhone are automatically uploaded to your iCloud account, where they can be synced with other devices such as iPhones, iPads, and Macintosh computers. The iOS Photos app has a rich set of editing options, and all edits are automatically synced across devices, as well. Images can be edited with the Photos app on a Mac, and edits are synced instantly.
iCloud Photos is excellent for Apple users, though the free 5 GB of storage is very limiting.
Apple has steadily been improving iCloud Photos over the years with on-device machine learning, which ensures your photo information is not sent to the Cloud or mined for advertising or other purposes.
You can search for people, places, and objects without doing any extra work; on-device software analyzes your photos, organizes them into groups of related images (i.e., vacations, holidays, etc.), and even attempts to pick out favorite moments and memories. None of this information is done in the cloud, which makes iCloud Photos a little more attractive for people who value privacy at the expense of some functionality.
One of my favorite iCloud Photos features is its ability to back up all the images and videos on your mobile device and retrieve them instantly. This is great for people whose phones are constantly low on storage space. Small thumbnails of all your photos are left on the device, while the full-size originals are safely stored in the cloud. Tapping a photo will download the original file on the fly, so you can take thousands of pictures without using up all the space on your phone.
All your mobile phone pictures are automatically uploaded to iCloud Photos. They can be synced with other Apple devices or shared publicly.
Unfortunately, iCloud Photos stumbles with the social and sharing functions. Flickr and Google Photos have easy options for sharing images and albums with others, making some photos public, and letting people leave comments or even their own tags. Some of this is possible with iCloud Photos, but it’s not as easy or seamless as other platforms.
Also, while Google Photos and Flickr work on both iOS and Android devices, iCloud Photos is specifically designed to work with Apple hardware and software. This is a dealbreaker for anyone who prefers to use non-Apple products.
Free Version: No limits on functionality, but storage is limited to 5 GB.
Paid version: $ 12/year for 50 GB, $ 35/year for 200 GB, $ 120/year for 2 TB.
Pros: Incredible suite of editing tools in the Photos app. Integrates seamlessly with Apple devices. Private and secure, with no advertising or data mining.
Cons: Limited to Apple devices. Sharing and social elements like commenting are not as easy as other platforms.
Honorable mentions
Flickr, Google Photos, and iCloud Photos are great options for online cloud photo storage, but you might have other requirements or workflows that are better suited to other platforms.
Thankfully, there are a host of other companies to consider. So if none of the above options meet your needs, here are a few excellent alternatives:
SmugMug
SmugMug has a suite of features and tools that make it great for professionals, but even casual photographers will find a lot to like.
SmugMug is designed for professionals who need a way to showcase their images and create galleries for clients, but it has a good option for casual users, too.
The Basic plan has everything most non-professionals could want, including unlimited uploads, solid organizational tools, options for sharing, and even a front-facing website. The latter is somewhat unique among online photo storage tools and makes SmugMug one of the best options for people who want a web presence along with storage.
SmugMug’s features are about what you’d expect. You can upload images from your phone or computer, and people can follow you to see your public photos.
You do have some options for sharing photos with SmugMug, but not nearly the same as Flickr or Google Photos. There isn’t the same level of community and engagement as on other sites, but if you want a simple method for storing your photos, SmugMug might be worth a look.
SmugMug lets anyone create a website to showcase their best work.
If you’re a working professional who needs control over how your photos are presented, as well as methods for selling your images to clients, SmugMug is definitely worth considering.
Paid version: $ 55/year for unlimited uploads. $ 85/year, $ 200/year, and $ 360/year options for professionals, which include advanced organization options and client tools.
Pros: Unlimited photo uploads. Price includes a website for showcasing your best work, plus a high degree of control over organizing your images.
Cons: No free option with limited functionality (but you can get a 14-day trial).
500px
Like SmugMug, 500px is generally geared towards professionals and more serious artists, but it is worth considering for people who want a solid option for online cloud photo storage. It offers a limited, ad-supported free tier, but the basic paid plan is priced similar to other sites.
What separates 500px from other options on this list is its communal focus. It’s a great option if you want to get exposure and build engagement with a community.
500px is more geared towards building a photography community, and it gives users a chance to build a brand and grow their following.
In some ways, 500px is better compared with Instagram than Flickr or Google Photos. You can quickly gain a following and view statistics on which of your photos lead to the greatest audience engagement.
If you are tired of the endless advertising and data mining on social network sites, then 500px might be worth a look, but its walled-garden nature somewhat limits its appeal. That can be a good thing, as it leads to more considered, curated content – but ultimately, 500px doesn’t have the same level of broad appeal as other sites.
500px has Quests to help members grow their skills and educational resources offered for free or at a discount.
Free version: 7 uploads per week, ad-supported, with limited access to some of the more powerful features like statistics and liked photos.
Paid Version: $ 48/year for unlimited uploads, data on how your photos perform among the 500px community, and tools to organize, share, and promote your images. $ 72/year for professionals who want a powerful platform with tools for creating a website, gaining clients, and finding jobs.
Pros: Unlimited photo uploads and access to a vibrant community of artists sharing quality work. Tools to organize and share images with the community and others.
Cons: Free option is extremely limited.
Adobe Creative Cloud
If you pay for a $ 9.99/month Adobe Creative Cloud plan, you already have pretty awesome online photo storage built into your subscription. Whether you have the cloud-focused Lightroom plan or the desktop-centric Photography Plan, you can create online galleries and share them with specific people, or make them publicly viewable for anyone who has the link.
You can upload photo galleries to the cloud even if you just use Lightroom Classic. This is extremely useful for sharing images publicly, privately, or with clients. (Note: The uploads are not full-resolution originals.)
Best of all, if you use Lightroom Classic, these online galleries don’t even count against your storage quota. When you create a public gallery, Lightroom uploads Smart Previews of your images to the cloud. These aren’t full-size, high-resolution images, but they’re great for just sharing pictures with friends and family.
You can also use the Discover feature in Lightroom Mobile to join a community of photographers in order to showcase your work and engage with an audience.
Adobe has been building a photography community similar to Instagram and 500px through their Discover tool (which is built into Lightroom Mobile).
While Adobe Creative Cloud isn’t as full-featured as Flickr, Google Photos, or others on this list, it’s definitely worth investigating if you already have an Adobe subscription and don’t want to pay more for an online photo storage site.
Paid Version: $ 9.99/month for 1 TB cloud storage or 20 GB cloud storage. Creating online galleries to share does not count against your cloud storage.
Pros: Included as part of the Adobe Lightroom or Photography plans. Unlimited images with no storage quota. A decent level of control over how your images are shown in online galleries.
Cons: Images you upload to online galleries are smaller-size previews of your images. Not as full-featured as other photography sites. No built-in support for sharing videos or allowing your photos to be purchased.
Amazon Prime Photos
If you’re one of the millions of people who pay for Amazon Prime, you already have access to Amazon Photos at no additional charge. This service allows you to upload an unlimited number of images (including RAW files) from desktop or mobile. You can organize your photos with Albums, buy prints, and share images with other people in just a few clicks.
If you pay for Amazon Prime, you also have access to Amazon Photos, which allows for unlimited photo uploads to the cloud.
The Amazon Photos app lets you back up all the images on your phone to save space. However, accessing them afterward involves using the same Amazon Photos app instead of the native Photos app on your device. You can also use the desktop app to automatically upload all the pictures on your computer to your Amazon Photos account.
All these features make Amazon Photos great for online storage, but there are a few glaring issues that hold it back from being a true competitor to the others on this list. For one, there are no social networking features and viewers can’t leave comments on your images. The desktop app is kind of clunky, and all your uploaded images are organized solely by the folder they happen to be in on your computer.
The user interface for Amazon Prime Photos is pretty basic, but it gets the job done. You can create albums, share images, and order prints.
Amazon Photos also does auto-tagging by default, but you can turn this off if you prefer to keep Amazon’s artificial intelligence algorithms out of your images. This feature looks for easily-recognizable objects and also analyzes people using facial recognition algorithms, which is similar to a feature that Google offers. Some people find these extremely useful, but your mileage may vary.
If all you want is a simple way to back up your images, then Amazon Prime Photos is a great choice. If you are looking for robust organizing tools, options for sharing your images, and a full-featured image browsing experience, it’s best to look elsewhere.
Paid Version: Included with a $ 119/year Amazon Prime account. No limit for photo uploads; a 5 GB upload limit for videos.
Pros: Great for backing up your images. No extra charge for Amazon Prime members.
Cons: No social features. Web interface is unrefined and desktop uploading app is clunky with occasional bugs.
Dropbox
In the search for the best online photo storage platforms, Dropbox might not be the first option that comes to mind.
While it’s not exactly designed with photos in mind, if you want a solid option for storing, backing up, and even sharing your images, Dropbox is a great choice.
Now, there’s nothing in the way of social features and the web-based user interface is fairly utilitarian, so keep your expectations in check. But it’s one of the best services around for easily transferring and managing huge amounts of data, including images.
Dropbox is made for online file storage and not specifically geared toward photographers, but it’s definitely an option to consider if you have a vast library of photos that you want to keep safe and secure.
Designed first and foremost as a cloud-based storage platform, Dropbox works great, not just for storing photos, but also for syncing them across multiple devices. If you want to back up your photo library to the cloud and mirror it to another computer, Dropbox just might be the solution you are looking for.
DropBox’s free version is positively anemic with only 2 GB of storage, but the paid version is outstanding – if a little on the pricey side.
Photos can be shared publicly, and other Dropbox users can leave comments next to an image or by clicking directly on a specific portion of an image.
One of my favorite features of Dropbox is the ability to instantly share a file or folder with anyone via a public link. Navigate to a file or folder on your computer that is synced with Dropbox, right-click on it, and get a link you can copy and paste into an email, text message, or social media account. Anyone with the link can view the file or the contents of the folder, and of all the photo services on this list, Dropbox handles this simple task easier than the rest.
The mobile app can automatically upload your images to Dropbox and includes a host of other features for managing all your cloud-based files.
Free Version: 2 GB storage, limited to 3 synced devices.
Pros: Rock-solid cloud storage with outstanding backup and syncing features. Easy to share photos with a public link. Images can be easily downloaded from the public link.
Cons: Designed more for file storage and backup than sharing photos. No social networking features. 2 TB storage is generous, but the price is expensive.
Microsoft OneDrive
We’re a little off the beaten path here, since OneDrive isn’t exactly known as the world’s greatest online photo storage platform.
However, it’s a service many people already pay for in order to use Microsoft programs such as Word, Excel, and PowerPoint. And since 1 TB of storage is included in a personal or family OneDrive plan, it’s something to consider if you want a simple way to back up your photos.
Microsoft includes 1 TB of OneDrive storage with their cheapest paid plan, which also includes access to Office software such as Word, Excel, and PowerPoint.
OneDrive is similar to Dropbox in that it is designed around file storage and syncing, but it has some useful features for photographers, as well.
You can automatically upload your mobile device pictures directly to OneDrive and share individual images or folders with others. OneDrive syncs across devices, too – though over years of using both platforms, I have found Dropbox to be more reliable and less prone to head-scratching glitches.
Photos in OneDrive can be viewed online and shared with others.
OneDrive won’t blow you away with its photo-centric features, AI-based image organization, or a community of shutterbugs to connect with. But if you already pay for the service, then it’s worth checking out for the features it does offer.
Free Version: 5 GB storage only. No access to Office apps like Word/Excel/PowerPoint.
Paid Version: $ 2/month for 100 GB storage. $ 70/year for 1 TB storage as well as access to Office apps.
Pros: If you already pay for OneDrive, you can use your 1 TB storage for managing photos. Great for backing up your images and sharing with others.
Cons: Designed more for file storage and backup than sharing photos. No social networking features.
iDrive
For photographers who want a simple, robust, and fairly inexpensive solution to backup their photos, it’s hard to beat iDrive. iDrive has a long history of offering cloud-based storage and backup, and this reputation makes it easy to recommend them over other storage providers.
While iDrive is more specifically geared toward backing up your entire computer, that doesn’t mean it has nothing to offer photographers. Quite the opposite, in fact.
iDrive is built for file storage and backup. It’s a good choice if you have a huge photo library, but doesn’t have the same level of features as Dropbox in terms of sharing and commenting.
If you have a massive photo library and care more about making sure your work is safely backed up than sharing your pictures with the world, iDrive is a good option to consider. Their software will securely transfer all your data, or just the files and folders you choose, to their cloud servers. You can sync everything with another computer, access your photos via the web interface, and use the mobile app to automatically upload your camera photos.
Don’t expect image editing tools, a community of photographers, or other advanced features found on photography-centric platforms. But you can share images with others and use iDrive to transfer large batches of photos to clients.
Free Version: 5 GB Storage
Paid Version: $ 70/year for 5 TB storage. Back up one or more computers continuously. Clone an entire hard drive, which is useful for backing up a photo library.
Pros: Great reputation for cloud-based storage and backup. Price is very good for the amount of storage, which is important for photographers with large photo archives.
Cons: Not specifically created for photographers, and options for creating galleries and for sharing images are limited.
pCloud
Like Dropbox and OneDrive, pCloud isn’t known first and foremost for online photo storage. It was created for easy-to-use file storage and syncing, and has a free tier with 10 GB of storage for people who want to try it out without committing to a monthly fee.
What sets pCloud apart is its price: It’s the only cloud storage option on this list that has a one-time fee option instead of monthly or yearly charges. While the one-time fee is expensive, it is far cheaper in the long term if you plan on using the service for years.
pCloud is a great choice for photographers on a budget who don’t want to commit to expensive yearly fees but require solid online photo storage.
pCloud’s options for photographers won’t knock anyone’s socks off, but they do have some pleasing features. The mobile app can upload your images directly to pCloud, and the web-based interface lets you resize your photos to make them smaller. This is useful if you want to share photos while keeping an eye on file sizes and bandwidth usage.
Free Version: 10 GB storage. Includes all pCloud features in the commercial version.
Paid Version: $ 175 one-time fee for 500 GB storage. $ 350 one-time fee for 2 TB. Annual plans also available.
Pros: One-time fee. Uploading via the mobile app. Offers an easy way to resize photos.
Cons: Expensive up-front cost. Not designed for social networking or easy image-sharing.
Synology Photo Station
Synology Photo Station differs from the other options on this list because Synology isn’t really a cloud-based photo storage platform.
With Synology, you essentially build your own cloud storage server, called a NAS (network-attached storage). It’s a physical device you keep at home and can access from anywhere with advanced, highly-customizable software. This might make its inclusion on the list a little confusing, but hear me out.
Synology gives you your own personal cloud storage on a device you own. You can then access your photos and other files from anywhere.
Instead of an external hard drive that you plug into your computer, a NAS is a disk or array of disks that you access over a network. NAS devices are standard in many businesses, and are becoming more popular at home as people realize how flexible and powerful they can be.
In late 2020, Synology released a service called Photo Station. It’s designed for people who want to easily share images with others in online galleries, but need to control the physical media themselves. That way, you can buy a Synology NAS and use it to host photo galleries, share images, and manage all your digital images – without relying on a cloud server you can’t always control.
Introduced near the end of 2020, Synology’s Photo Station tool gives photographers a way to share images and create public albums. It’s a nice perk for those who have already invested in Synology hardware and don’t mind a bit of a learning curve.
Synology Photo Station lets viewers engage with your images by leaving comments and clicking on highlighted areas, so it’s great for sharing images with clients or even the general public. Storage space isn’t a problem, since you can just add more drives to your NAS or swap out the existing disk for a bigger one.
There is a learning curve to set it all up, and if something goes wrong you might find yourself spending more of your own time to fix it than you want. But it’s definitely worth a look for photographers who require the highest level of control over their photos.
Price: Around $ 200 for a basic enclosure, but drives need to be purchased separately.
Pros: Highly customizable, infinitely expandable. Easy to share photos with others and no long-term recurring fees.
Cons: Steep learning curve. Not true a cloud-storage service, so your photos aren’t backed up remotely.
How to choose
At the end of the day, you just want the right solution for you and your workflow.
With so many options available, how can you possibly pick the best online cloud storage option for your photos?
To answer that question, it’s helpful to reframe things just a little and realize that there is no one single solution that is ideal for everyone. Different people have different needs, and no single cloud platform is going to meet the needs of every individual.
Keeping that in mind, here are my picks for the best online photo storage options for three types of people:
The casual photographer: Flickr
Flickr occupies the ideal middle ground between storage, price, features, and community. Its yearly cost is right in line with what many other services offer, and it offers unlimited photo uploads so you never have to think about running out of space or upgrading your storage plan.
Flickr has existed since 2004 and has outlasted many competing services while still remaining relevant today. Its mobile app is perfectly usable, if not as feature-rich as some alternatives, and the 1000-photo free tier is enough for you to get plenty of use before paying to upgrade.
The lack of RAW uploads makes Flickr less appealing to professionals, and there’s no front-facing website for showcasing your best work to clients. Additionally, some elements of the Flickr web interface feel like they haven’t been updated since 2004, which can make using them a bit of a challenge.
Flickr has been around since 2004, which is also the last time some parts of its interface appear to have been updated. Nevertheless, it’s the best online storage option for many photographers.
You won’t find artificial intelligence sorting and organizing on Flickr, either. But if you’re a casual or even semi-professional photographer looking for an outstanding online photo storage platform – one that can meet your needs without requiring too much money – Flickr is the best option.
The professional photographer: SmugMug
SmugMug is the best storage option for professionals who require more feature-rich storage. The Basic plan is fine for casual photographers and shares many of the same features as Flickr, though it lacks the social elements and photography communities that have made Flickr so useful over the years.
SmugMug has tools for professionals to create a website and let clients order prints, and its SmugVault tool allows for uploading RAW, TIFF, and other high-quality image formats. Combine that with unlimited storage and the result is an online photo storage platform ideal for working professionals.
The archiver: Dropbox
If you’re a person with hundreds of thousands of photos and you just want to store them safely in the cloud, Dropbox is your best choice.
The price is a little higher than some of the other options, but you do get what you pay for. Dropbox handles tasks like uploading, downloading, syncing, versioning, and restoring deleted files and folders more smoothly than any other platform.
Dropbox has been refining its file syncing technologies since 2007. They only do one thing – online cloud storage and syncing – and they do it very, very well.
Dropbox syncs your files instantly across multiple devices and has a robust and full-featured mobile app for uploading photos and managing files. Plus, the one-click public sharing for pictures and entire folders is so useful that, once you have it, you won’t ever want to go back.
The cheapest paid tier offers a generous 2 TB of storage, and if you want to free up space on your computer, you can tell Dropbox to store originals in the cloud; you can then download them on an as-needed basis.
Dropbox doesn’t have productivity apps like OneDrive, and it’s more expensive than iDrive or pCloud, but it handles the straightforward task of cloud storage better than anything else on the market.
The best online photo storage: conclusion
I hope this guide was useful to you!
And now that you’ve finished, you should know the best online photo storage provider for your needs.
Now I’d like to ask you:
What do you think about online photo storage options? Do you have a site you like that didn’t make it on this list? Are there features of these tools that you use but I didn’t mention in my review? Leave your thoughts and questions in the comments section below!
The post The Best Online Photo Storage Platforms in 2021 Compared appeared first on Digital Photography School. It was authored by Simon Ringsmuth.
The post What’s the Best Aperture for Portraits? appeared first on Digital Photography School. It was authored by Simon Ringsmuth.
Choosing the best aperture for portraits doesn’t have to be complicated…
…but there are some guidelines to follow if you want your shots to look stunning.
And in this article, I’m going to break it down for you. I’ll share with you my favorite apertures for different types of portraits – so that you can confidently pick the perfect aperture whenever you’re out shooting!
Why is aperture important in portrait photography?
Aperture matters for several reasons:
First, aperture is one of the three components of exposure. If you don’t get your aperture right, you might end up with a too-dark or too-light image.
And, because of its effect on exposure, your aperture limits your shutter speed and ISO.
The right aperture also puts your viewer’s attention squarely on your subject and regulates your depth of field to get just the right amount of background blur.
Now, the best portrait lenses have wide apertures of f/2.8 to f/1.2. With these lenses, you can capture photos in virtually any lighting condition, plus you can create dreamy bokeh behind your subject.
As you consider what aperture to use when shooting portraits, you also need to pay attention to the focal length of your lenses, as well as how close you’ll get to your subjects.
A wide aperture on a 35mm lens won’t blur the background as much as a wide aperture on an 85mm lens. Also, longer focal lengths require fast shutter speeds to reduce vibration, unless the lens or camera has built-in stabilization. Wide apertures can help get those fast shutter speeds without requiring a high ISO (and a high ISO might result in unwanted noise or grain).
The best aperture for individual portraits is f/2 to f/2.8. If you’re shooting two people, use f/4. For more than two people, shoot at f/5.6.
These aren’t the only apertures you can use, and there are certainly other elements to consider. But if you want great results, you can’t go wrong with these rules of thumb.
They’ll help ensure your portraits are sharp and your subjects are all in focus.
Apertures in portrait photography: A detailed breakdown
Unfortunately, there is no single best aperture for portraits. There are myriad factors that affect the final photo, so you’ll need to adjust your aperture depending on your subject.
Let’s take a closer look at some different shooting scenarios and the apertures I recommend:
The best aperture for individual portraits
While I stand by my earlier recommendation for an f/2 to f/2.8 aperture, you should consider those apertures as starting points, or as an insurance policy of sorts. Depth of field is so thin at wider apertures that it’s best to start a bit smaller than your lens’s maximum aperture value, simply to make sure your bases are covered.
After all, shooting at f/1.2 can keep a person’s eyelashes in focus while their iris ends up blurry!
Note that, when using a wider focal length, you can shoot at larger apertures, because the depth of field won’t be as shallow.
For example, if you use a 35mm prime lens, you can go all the way to f/1.8 or wider and keep plenty of your subject in focus.
One caveat: Some lenses, especially less-expensive zooms and even some primes, lose sharpness at maximum apertures. For that reason, I recommend shooting conservatively and not always going as wide as you can.
Of course, each lens is different, so test out different apertures and see what you’re comfortable with.
I like to take a two-pronged approach when shooting portraits.
First, I always use Aperture Priority mode paired with Auto ISO. This lets me specify the aperture while my camera takes care of the shutter speed and ISO.
Since the aperture is my primary consideration, I need to get that right. As long as my camera doesn’t drop below a certain shutter speed or go beyond a specific ISO value, I know my photos will be fine.
Second, I always start by taking several shots with a smaller aperture. It’s how I cover my bases; that way, I know I have at least some shots where everything is in focus and the depth of field isn’t too shallow.
Then, like stepping on the gas pedal of a sports car, I spin my camera dial and widen the aperture. This lets me turn my portraits up to 11, and clients love the results – but I know that, if my depth of field does turn out too shallow and something isn’t in focus, I can always rely on the narrow-aperture shots I started with.
Nikon D750 | Nikon 85mm f/1.8G | 1/180s | f/1.8 | ISO 250. I took lots of shots at f/2.8 and then went all the way to f/1.8, knowing I had a fallback plan if the wide-aperture photos didn’t turn out sharp. Fortunately, the f/1.8 shots were great!
The best aperture for small group photos
Selecting the right aperture for small groups depends on a number of factors.
Though you can’t go wrong with f/4, there are variables to consider that will help you get the best shots possible.
(One reason f/4 works well is that it gives you depth of field wiggle room while still producing great results.)
When photographing a single subject, it’s essential to get the eyes in focus, or at least the one eye that is closest to the camera.
But when working with small groups, you ideally want everyone’s eyes in focus. So the depth of field should be wider, which requires a smaller aperture.
Fortunately, when shooting groups, you’ll be positioned farther back from your subjects, and this will deepen the depth of field.
An f/4 aperture strikes a great balance between blurring the background, sharpening your subjects, and giving your clients frame-worthy photos.
Note that apertures wider than f/4 can work, but people must be aligned perfectly with one another; otherwise, there’s a good chance someone will be out of focus.
So apertures such as f/3.5 and f/2.8 tempt fate, and you might not realize it until it’s too late.
In fact, if your subjects are too far out of alignment, even f/4 won’t do the trick. Look at the photo below; the mother is holding her son on her lap, and his eyes are sharp while her head is blurry. She is only a few inches behind her son, and f/4 resulted in her being out of focus:
Nikon D750 | Nikon 85mm f/1.8 | 1/250s | f/4 | ISO 800. The mother’s eyes are just a bit blurry, which could have been fixed by using a smaller aperture of f/5.6.
Even though f/4 is my go-to aperture for small group photos, it’s a good idea to get shots at smaller apertures, as well. Otherwise, things can get so chaotic that you might not have time to check all your shots, and only after you load your images in Lightroom will you realize that you didn’t get everyone in focus.
This has happened to me more than I care to admit! For that reason, I recommend taking some pictures at f/5.6 even if you’re pretty sure you nailed the shot at f/4.
And by all means, go wider, too. Just be aware that, as the number of people increases, you are far less likely to get everyone in focus.
Nikon D750 | Nikon 85mm f/1.8 | 1/250s | f/3.3 | ISO 500. I opened up the aperture after getting several great shots at f/4, and I ended up with some beautiful images.
The best aperture for large group photos
The larger the group, the smaller the aperture, right?
Unfortunately, it’s not that simple. Smaller apertures mean less light enters the lens, so you have to use slower shutter speeds and/or higher ISO values.
Plus, shrinking the aperture keeps the background sharp – so you won’t get the creamy background that many clients love.
Therefore, f/5.6 is a great place to start when dealing with large groups.
There are exceptions to this guideline. You can use a wider aperture if you’re able to get everyone positioned (somewhat) in alignment.
Of course, this isn’t always possible, especially when kids are involved, since they tend to be somewhat less predictable. But if you have the option, it’s worth trying larger apertures.
That is, as long as you’ve already captured some small-aperture photos to make sure your bases are covered!
When doing large group shots, you are usually standing much farther away, so depth of field isn’t as much of an issue compared to single-person portraits.
You still have to be careful when using wide apertures, but sometimes you simply need to let in a lot of light and a wide aperture is the best option.
When shooting the image below, I was losing daylight as a light drizzle came on. I lined everyone up on my homemade photo benches and shot this picture at f/4.
After getting a couple of shots at f/4 and f/5.6, I went all the way down to f/2.8. The result is okay, but the adults in the back row are just a bit out of focus. The image isn’t worthy of printing; let it serve as a cautionary tale about the importance of using smaller apertures like f/5.6 for large groups.
Doing extreme close-up portraits, whether with macro lenses or close-up filters, can be exceedingly tricky.
Why?
Because the depth of field is incredibly thin. Wider apertures further increase this issue, so it’s best to shoot in well-lit conditions and use a small aperture like f/5.6.
Nikon D750 | Nikon 50mm f/1.8 with a close-up filter | 1/90s | f/5.6 | ISO 6400
Wide apertures can work fine when doing macro photography with still subjects, but people (especially young children) move around so much that it helps to have some depth of field breathing room.
Nikon D750 | Nikon 50mm f/1.8 with a close-up filter | 1/180s | f/5.6 | ISO 6400
The best aperture for portraits: Final words
Choosing the best aperture for portraits isn’t difficult, but it does take a bit of experience and practice.
I recommend starting with the advice I’ve laid out here, but don’t be afraid to tweak it to suit your own style.
For example, you can’t go wrong shooting single-person portraits at f/2.8 – but over time, you may decide you prefer going much wider.
Or perhaps your clients like the look of smaller apertures with more depth of field. The choice is yours, and as long as you like the results, then there’s no bad option!
A: Certainly! Many lenses have a maximum aperture of f/2.8 and this is a great middle ground for letting in enough light while still keeping the depth of field under control.
Q: I only have a kit lens. Can I use it for portraits?
A: Kit lenses work just fine for portraits, though they typically don’t have apertures that go as wide as prime lenses. I recommend zooming in as far as your kit lens will go and using your maximum aperture, even though it might only be f/5.6. This will blur the background as much as possible.
Q: Can I shoot large group portraits with very wide apertures?
A: Yes, but make sure everyone is lined up so your depth of field is under control. I shot this group photo at f/2, and it only worked because everyone was in a straight line:
Q: I want to use a very wide aperture in bright sunlight, but my photos always turn out overexposed. How can I prevent this?
A: You’ll either need a very fast shutter speed or an ND filter.
Q: Do I need to get an expensive f/1.4 lens to shoot portraits?
A: Absolutely not! F/1.8 prime lenses are outstanding for portraits and won’t break the bank. Canon and Nikon make affordable 50mm f/1.8 lenses, and many other manufacturers have relatively inexpensive options, as well. Don’t ever fall into the trap of thinking you have to spend thousands of dollars to get great portraits!
Q: My camera has a Portrait mode. Should I use that for portrait photography?
A: You can, though I recommend using Aperture Priority mode; it lets you select the exact aperture you want to use. Portrait mode tries to make decisions based on available light and can give you apertures that are wider or narrower than what you might want.
The post What’s the Best Aperture for Portraits? appeared first on Digital Photography School. It was authored by Simon Ringsmuth.
For most photographers, the digital darkroom is based around payware or subscription software from the likes of Adobe, Capture One, DxO or one of their many rivals. But if you’re a Sony shooter, there’s an option which is available entirely free of charge along with your camera purchase: Sony Imaging Edge Desktop.*
Sony Imaging Edge Desktop version 3.0’s user interface.
In this article, we’ll take a look at how Imaging Edge Desktop compares with the 800-pound gorilla in the room, Adobe Camera Raw, whose algorithms also underpin the company’s popular Lightroom Classic application. As with previous articles in this series, I’m limiting myself only to still image editing in the interests of keeping things to a readable length, and won’t address features like image management, tethering or printing.
*Sony does include a version of Capture One, called ‘Express,’ with camera purchases, which we’ll investigate in a future article.
The ground rules
This comparison is based upon the most recent versions of each application at the time of writing. For Adobe, that’s Camera Raw 13.0 and Bridge 11.0. For Sony, it’s Imaging Edge Desktop 3.0. My computer is a 2018 Dell XPS 15 9570 laptop running Windows 10 version 1909.
To ensure neither Adobe nor Sony had any advantage out of the gate, I’ve aimed to reproduce, as closely as possible, the look of already-processed images from our galleries, without any prior knowledge as to the recipes behind them.
Adobe Camera Raw version 13.0’s user interface.
I’ve chosen images from the Sony A7 III (ILCE-7M3) for use in this comparison, as its been available for long enough for Adobe to fine-tune its rendering, while its price tag and resolution are broadly similar to those of the Canon EOS R and Nikon Z6 used in my previous manufacturer software comparisons.
Sharpness and noise reduction were left at their default settings to avoid overcomplicating things, while lens corrections were enabled for both applications. Images processed in ACR were saved at JPEG quality 11, just as used in our galleries. For Imaging Edge Desktop, which offers a choice of just four different compression levels, I used the maximum quality.
The main differences
Of course, the most immediately obvious differences between ACR and Sony’s Imaging Edge are their camera support and price tag. You already paid for Imaging Edge when you bought your Sony camera, so it’s effectively free. While it only supports Raws shot by the company’s own cameras, you can expect full Raw support for every Sony camera to be available pretty much immediately upon release.
Imaging Edge’s shadow and highlight sliders don’t give you as much latitude as the same sliders in Adobe Camera Raw, so shadows can only be lifted so far – even with D-Range Optimizer enabled. Download the full ACR image here; the full Imaging Edge image here.
By contrast, ACR requires a recurring subscription fee. It supports a vast range of cameras from many manufacturers – including every single interchangeable-lens or large-sensor Sony camera made to date – but that support can sometimes take a while to arrive after the release of new models. It’s also sometimes more limited than that in first-party software, especially for older models.
For example, while Adobe offers ‘camera matching’ profiles for most recent Sony cameras, it’s not yet available for the recently-launched A7C. Nor has it been provided for any Translucent Mirror model made before 2014, or any Sony DSLR model at all.
A clean, modern interface with good multi-monitor support
Imaging Edge Desktop offers a twist on a modal interface. The initial install is merely a launcher which in turn installs and then launches separate viewer, editor and tethering apps. These can run separately or simultaneously, and can span multiple monitors. The editor app can’t browse entire folders of images, but you can open individual shots directly from within and stay out of the viewer app entirely, should you choose. Web help is available through the menu system, but it’s quite abbreviated.
We’ve found that Imaging Edge uses a bit stronger noise reduction by default, though in some cases its finer-radius sharpening will tease out the finest details a bit better; but ACR has a ‘punchier’ look. Download the full ACR image here; the full Imaging Edge image here.
The user interface is really quite straightforward and very clean, although it does involve a lot of scrolling. Buttons in Imaging Edge and the individual apps launch the other apps, and the editor sports a single scrollable toolbar whose 14 sections can be rearranged or hidden. Thumbnails of currently-opened images line the bottom of the screen, but they’re tiny and not terribly useful even at Full HD resolution, and lots of space is wasted on the filenames. Nor can you move them to the side of the screen, unfortunately.
Unlike most rivals, Imaging Edge doesn’t treat your Raw files as sacrosanct
Sliders move smoothly, but some control names are a bit unintuitive like “overshoot” / “undershoot” for the sharpness control, or “magnification chromatic aberration correction”, neither of which are explained in help. There are also no automatic controls other than those for white balance, dynamic range and noise reduction.
A risky data strategy and not the best standards compliance
Sadly, while Imaging Edge plays nicely with pens and touch screens, it doesn’t support 4K monitors terribly well. Many user interface elements are too small for comfortable use, and Windows’ scaling setting is mostly ignored. Imaging Edge also doesn’t follow Windows keyboard conventions like tabbing between controls, and you can’t customize the keyboard shortcuts at all. And there are some occasional bugs; for example on canceling processing of a brief six-image batch, the program stopped functioning for multiple minutes and had to be force-closed.
Overall, I did find it easier to get more pleasant foliage and sky color out of Imaging Edge than Adobe Camera Raw. Download the full ACR image here; the full Imaging Edge image here.
That’s doubly worrisome because unlike most rivals, Imaging Edge doesn’t treat your Raw files as sacrosanct. Instead of using a database to store its edits, or putting them in sidecar files in the same folder, Sony instead saves them in the headers of the original raw file.
The company has already been bitten by this approach once in the past with a separate application, PlayMemories Home, and in 2018 had to release a tool to correct that app’s corruption of Raw files. To avoid this issue, I recommend using Imaging Edge solely with copies of backed-up images.
Curiously, batch processing is not available in Edit mode, even if you have multiple images open. It’s available only from the Viewer window, and provides fairly limited possibilities for renaming your output images. Imaging Edge also only has a choice of four compression levels, and there’s a huge gap in quality between the highest (~15MB/image) and second-highest (~5MB/image) levels.
Reasonable if pedestrian performance
Compared to ACR, Sony Imaging Edge’s performance is reasonable, but it’s not going to light any fires. Where ACR takes just 12 seconds to process six images, Imaging Edge takes around 21.5 seconds when saving highest-quality JPEGs. Admittedly, dropping the quality level one step reduces this to just a hair under 20 seconds, but it also slashes files sizes by two-thirds.
You can see here how much more highlight detail Adobe Camera Raw is able to save in the windows, though the softer overall tonality of the Imaging Edge version isn’t unpleasant. Download the full ACR image here; the full Imaging Edge image here.
While previews are two-pass, they update fairly quickly, usually within a second or two of releasing the control. This is still nowhere near as quick as Adobe’s near-real time previews, however. And they sometimes don’t update the whole screen at once, with a tile or two of the overall result occasionally needing a few additional seconds to finally fill in.
Very similar controls to ACR, but not all as effective
Sony Imaging Edge Desktop’s editing controls are broadly similar to those on offer in Adobe Camera Raw, including the highlight and shadow sliders that many other apps lack. It also allows display not just of clipped highlights and shadows, but out-of-gamut colors. It foregoes ACR’s texture and vibrance controls, but adds a D-Range Optimizer slider with auto mode.
In many cases, it’s just hard to balance dynamic range and contrast in Imaging Edge. Download the full ACR image here; the full Imaging Edge image here.
D-Range Optimizer does a pretty good job of lifting shadows, but the highlight and shadow sliders are nowhere near as effective as their Adobe equivalents, and the highlight slider in particular didn’t seem capable of recovering much detail at all from blown highlights, even when ACR could do so with ease. I found the best results with more difficult images tended to send me to the curves tool, whereas Adobe could get the results without needing to fiddle with curves.
Sony’s noise reduction is rather more heavy-handed
By default, Imaging Edge uses higher levels of noise reduction than Camera Raw, and Adobe produces crisper results out of the box. With that said, you likely won’t notice the difference unless you’re pixel peeping or making large prints, where Adobe’s NR has a finer-grained look.
Noise reduction levels in both apps can be dialed back from that default. Imaging Edge also offers an “off” setting, but Sony’s app still applies more noise reduction than Adobe’s, even when that’s used. Setting NR to off definitely applies less noise reduction than simply zeroing out the sliders in manual mode, though, especially when it comes to chroma noise.
I found ACR to do a better job with skin tones. Imaging Edge tended a bit towards the magenta, but in turn delivered more convincing skies and foliage than ACR. Of course, you can improve color in either app by fiddling with the sliders, but ACR has an auto mode to get you in the ballpark, whereas Imaging Edge requires you make corrections manually.
Another example where Adobe Camera Raw is able to take advantage of remaining highlight information better than Imaging Edge. Download the full ACR image here; the full Imaging Edge image here.
Final thoughts
Sony Imaging Edge Desktop looks and feels more modern than some of its rivals from other camera manufacturers, but I still found Adobe Camera Raw more pleasant to use. And Adobe also wins in terms of performance, although Sony certainly doesn’t trail in this respect as badly as some of its rivals.
In terms of image quality, things were rather closer, however. Imaging Edge is capable of delivering good results with most images, although Adobe clearly still has an edge when it comes to recovering blown highlights and blocked-up shadows. And Sony’s highlight slider, in particular, proved rather less effective than I’d hoped.
But if you’re trying to slash your budget to a minimum, Imaging Edge Desktop delivers pretty decent image quality for most shots, and does so with reasonable performance and versatility. There’s definitely money to be saved by switching away from a monthly subscription, especially if you tend to stick with just the basic tweaks and don’t often make major edits to your photos.
Sony Imaging Edge Desktop
Pros
Cons
Available free with a Sony camera
Excellent support for Sony’s cameras from launch day
Good foliage and sky color with minimal effort
Tames noise well
Good lens corrections
D-Range Optimizer makes it easy to lift shadows
Only supports Sony cameras
Doesn’t treat Raw files as sacrosanct
UI requires lots of scrolling
Doesn’t follow Windows standards
Doesn’t support 4K monitors well
Minimal help documentation available
Highlight / shadow sliders aren’t very effective
Skin tones tend towards magenta
Denoising robs some fine detail even if switched “off”
Adobe Camera Raw
Pros
Cons
Clean, clear and modern interface
Supports a vast range of cameras from many brands
Great performance
Allows fine-grained adjustments with accurate real-time preview
Great image quality
Extracts more fine detail than Imaging Edge with minimal fuss
Does a great job with highlights/shadows
Recurring subscription fee with no perpetual license option
Camera support can take a while to arrive for more obscure features or even fairly big ones like camera matching profiles
One-click auto control produces overly contrasty, saturated results
The post Sony Announces the a1, Its Best Mirrorless Camera to Date appeared first on Digital Photography School. It was authored by Jaymes Dempsey.
Sony has announced its latest full-frame mirrorless offering, the Alpha 1.
A groundbreaking camera that offers a shocking combination of speed, resolution, and video capabilities, the a1 somehow manages to speak to action photographers, wildlife photographers, and even all-around professional shooters without sacrificing on, well, anything.
For several years now, Sony has maintained the same four full-frame camera lineups:
The a9 lineup, geared toward professional sports and action photographers
The a7R lineup, geared toward landscape and commercial photographers
The a7 lineup, geared toward all-around professionals and advanced hobbyists
The a7s lineup, geared toward serious videographers (plus the occasional hybrid shooter)
(Sony also recently released the a7C, a compact full-frame model.)
Note the division of labor here, with one camera tailored toward action photographers, another tailored toward videographers, and yet another tailored toward landscape shooters.
But now, with the launch of the Sony a1, the division between action photography, landscape photography, and even video seems to have crumbled, leaving Sony users with a camera clearly more capable than the a7 III, and even offering a leg up over the a7S III, the a9 II, and more.
So what does the Sony a1 offer?
First, check out the sensor:
50 MP for intense cropping abilities, plus it gathers enough detail to satisfy professional landscape shooters.
Then there’s the autofocus, which packs “improved real-time Eye AF for humans and animals, and new real-time Eye AF for birds.” Sony is well-known for its top-tier autofocus algorithms, so don’t be surprised if the bird Eye AF makes the a1 a hot choice among serious bird photographers.
You also get in-body image stabilization (Sony claims up to 5.5 stops), as well as a lightning-fast continuous shooting speed (30 frames per second using the electronic shutter).
The a1 also boasts one of the most impressive electronic viewfinders on the market. With a whopping 9.44M-dots of resolution, you should have a clear view, even in low light, which is always a plus for event photographers, night street photographers, and wildlife photographers, to name just a few.
Finally, there’s the video capabilities. The a1 can record at 8K/30p, as well as 4K/120p; the former capability is what puts the camera above the Sony a7S, at least in terms of raw recording power. While 8K is likely overkill for casual videographers, I can highly recommend the a1 for serious videographers and true hybrid video/stills shooters.
Of course, you should also consider the price: $ 6499.99. In other words, the a1 costs more than the Nikon Z7 II, more than the Canon EOS R5, more than the Sony a9 II, and more than every other full-frame mirrorless camera on the market.
But the a1 really is one heck of a camera, and those who can afford it are bound to be impressed (to say the least!).
Now over to you:
What do you think about the Sony a1 announcement? Are you excited? Apprehensive? Frustrated? Share your thoughts in the comments below!
The post Sony Announces the a1, Its Best Mirrorless Camera to Date appeared first on Digital Photography School. It was authored by Jaymes Dempsey.
The post The Best Way to Delete Photos From Your Memory Card appeared first on Digital Photography School. It was authored by Meredith Clark.
When it comes to photography, we spend most of our time thinking about taking photos – lighting, composition, exposure, and posing. Then, once the photo is taken, we may start to think about post-processing, gently nudging the photo along until it becomes exactly what we’ve pictured in our mind’s eye. Once that’s accomplished, we do it all over again.
Back in high school and college, I shot film. I can vividly remember running out, and sometimes having to wait weeks until I was able to buy more. Our public high school relied heavily on film donations, and sometimes when there wasn’t any left, our teacher would have us walk around campus with our pointer fingers and thumbs shaped into a rectangle, pretending to take photographs. Now that digital cameras are on the scene and we’re using memory cards in place of film, the number of photographs that we can take in any given week or month is nearly endless.
You may have noticed that I said “nearly” endless, and that’s because memory cards do have a lifespan and will not last indefinitely. That said, there are a few things we can do to maximize the lifespan of our memory cards, including deleting our photos off the memory card in the most efficient manner possible. This isn’t something that’s talked about all that often, but when it comes down to it, it is really simple.
So if you’re looking for the best way to delete photos from your memory cards, read on!
Less desirable ways to delete photos
If your memory card is full, you may be tempted to use one of these methods to delete your photos.
However, I recommend you avoid them if at all possible.
So here are the ways you should not delete your photos:
Getting rid of each photo individually through the camera by using the Delete or Erase button
If you’re in the middle of a shoot and you take a bad photo, you may be tempted to delete it right then and there with the Delete button.
But this is far from ideal. First, it’s always a good idea to check your images on the computer screen before deleting them forever, because you never know; your image may have some redeeming quality, one that you missed on your tiny camera LCD.
Plus, it’s just not the best way to get rid of your images from a card-health perspective, as I’ll explain in a moment.
Deleting all photos in-camera with the Delete All option
Once you’ve transferred your photos over to your computer, you can always pop the memory card back into your camera and hit the Erase all images on card button.
But again, this isn’t the best way to keep your card healthy.
Deleting via your computer
Here’s a third way to delete photos from your memory card:
Plug the camera or memory card into the computer, then drag all the photos into the Recycle Bin.
Is this a convenient way to delete images?
Absolutely.
But it’s not the most desirable way to get it done.
Most desirable way to delete photos
If you’re looking to delete photos off your memory card in the quickest, most efficient, least harmful way, then here’s what I recommend:
Delete with your camera’s Format function
In other words:
Transfer your photos to your PC or an external hard drive.
Stick the card back in your camera and head into the menu.
Find the Format option.
And hit OK.
This is my suggested way of deleting photos off your memory card, and I recommend you use it every single time you need to delete photos, without fail.
(It’s what I do!)
Why are some methods better than others?
In the end, all of the above methods work toward the same end, in that they remove the images from your card.
However, the first three deletion methods are actually more taxing to the memory card than using the card’s Format function. I’ve heard it explained like this:
Imagine that your memory card has a shelf-life of 1,000 uses. Let’s say that you go out and take 500 photos; that’s 500 uses of your memory card. You then upload the photos to your computer, and then individually delete each photo using the Delete button on your camera. Deleting each photo individually counts as another 500 uses on your card. So in all, you’ve just spent 1,000 uses of your memory card, leaving you with no uses left on that card.
On the other hand, imagine that you’ve captured your 500 photos, but instead of deleting them with your Delete button, you use your camera’s Format function. Formatting works in a different way than deleting, because it only deletes the directory files rather than the images themselves. This allows the images to be overwritten the next time you take a picture. Therefore, formatting only counts as one use of your memory card, regardless of how many photos you’re deleting.
So in the scenario above, you’d have used only 501 of your memory card’s uses, as opposed to 1,000 when deleting manually. Certainly, memory cards available today will be able to handle far more than 1,000 uses, but the general logic still holds – formatting your card causes less wear and tear on your memory card than other ways of deleting images.
Additionally, because formatting only deletes the directory file instead of the images themselves, images on a card that has been formatted are typically much easier to recover (if needed) than images that are deleted manually, assuming you did not overwrite the formatted images by taking more photos.
Not a bad trick to have up your sleeve in case of emergencies, right?
I’d also like to add that I have personally seen a difference in the amount of corrupted images/cards that I’ve come across since I’ve been formatting cards.
These days, it’s pretty rare that I delete even a single image using any method other than formatting.
How often should you format?
Some people like to wait until their card is totally full and then do their formatting.
Personally, I like to format my card before each new photo session. It just makes sense to start fresh each time, because I can then upload everything on the card to one location and keep my files organized.
But this is really a matter of personal preference, at least as far as I’m concerned.
The one hard and fast suggestion I do have when it comes to formatting is simply to format the card in whichever camera you plan to use it in next. So if you’re going to be shooting with your Nikon body, make sure you’ve first formatted your card with that Nikon body. And if you’re going to be shooting with your Canon body, format with the Canon body before heading out.
Make sense?
How to delete photos from a memory card: Conclusion
Now that you’ve finished this article, you’re well-equipped to delete photos from your memory cards (the right way).
So make sure to always format in-camera.
Your photos and your memory cards will thank you for it!
Now over to you:
How do you typically delete images, and why? Share your thoughts in the comments below!
The post The Best Way to Delete Photos From Your Memory Card appeared first on Digital Photography School. It was authored by Meredith Clark.


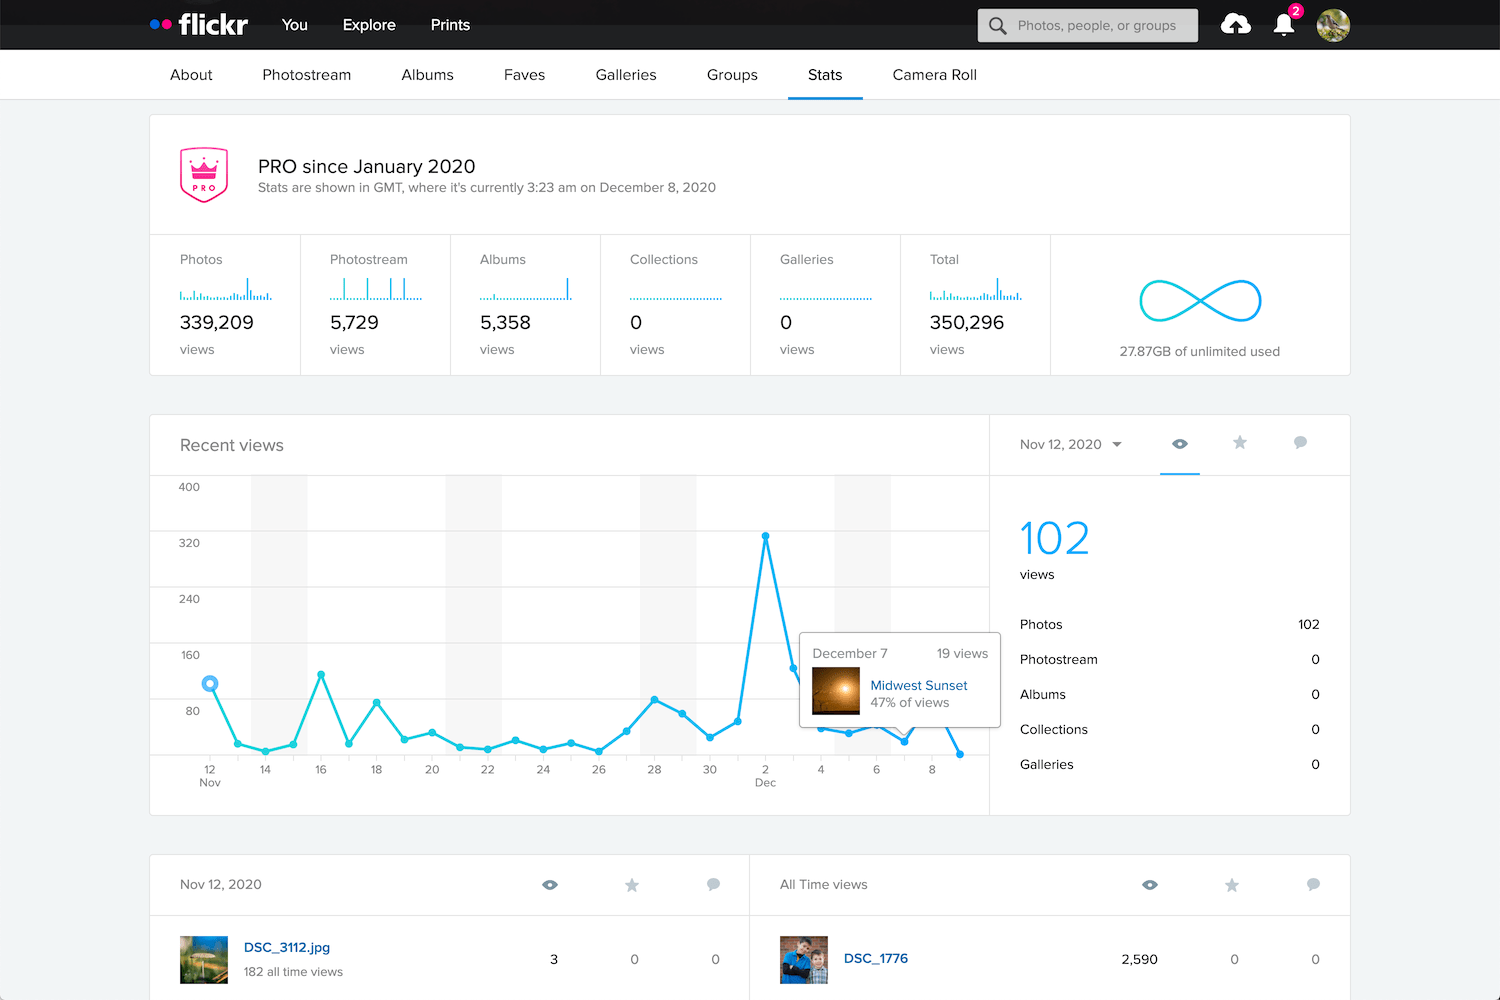


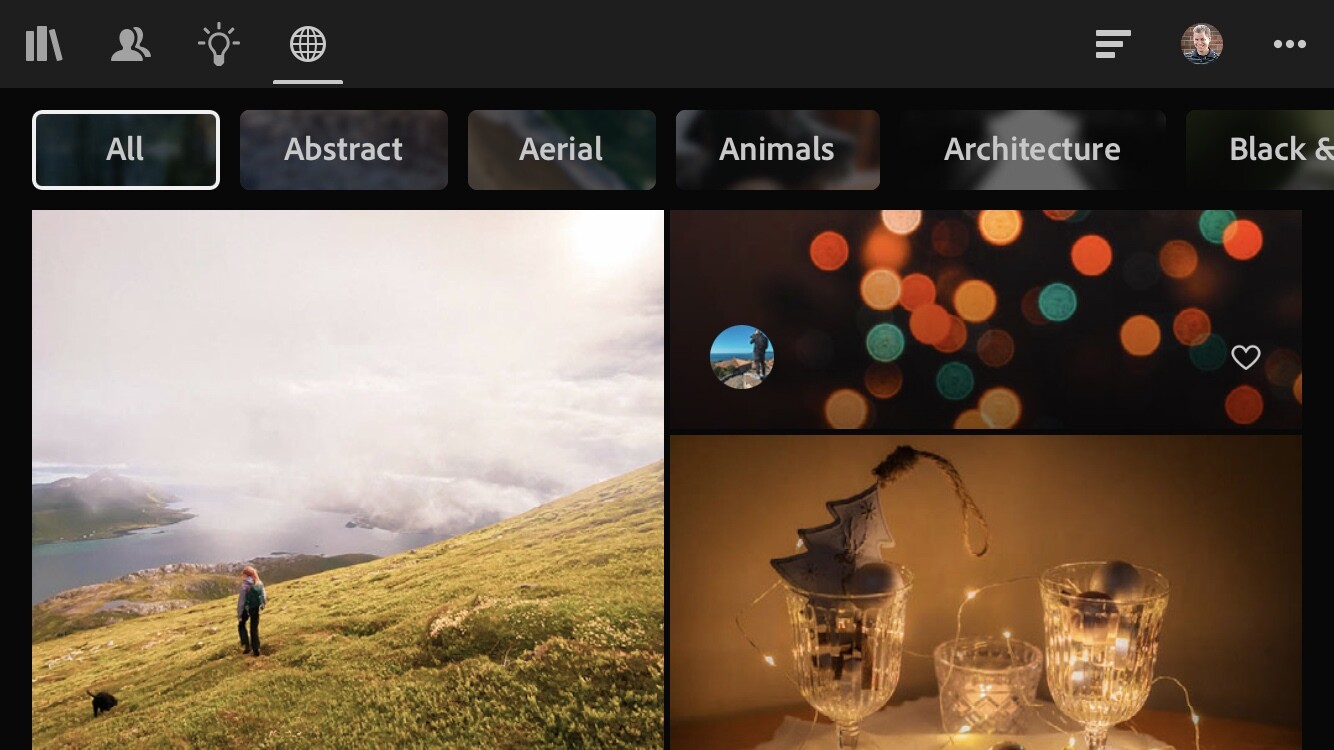


You must be logged in to post a comment.