RSS
 

Posts Tagged ‘Bench’

Roger Cicala: why I don’t use an MTF bench to test my own lenses

25 Oct
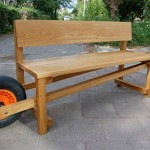
Roughly clockwise from left: 300mm collimator, laser transmission testing, lens test projector, Trioptics Imagemaster HR optical bench, spectrometry measurement. It might not look like much, but the total cost is similar to really nice house in a small city (or a decent house in big city).

I have a complete testing lab at my disposal: MTF benches, lens test projectors, spectrometers, lasers, an Imatest setup gathering dust in a back room; everything all the cool kids have. A lot of people assume I test the hell out of my own shiny new personal lenses after I buy them. (Yes, I buy my own stuff). I do test them, but not in the lab. I go out and take pictures with them.

It’s not because I’m such a great photographer that my practiced eye can tell more about the lens through photographs than any lab test could. I’m a mediocre photographer. Years ago I tried making a living as a photographer. I sold some prints once, made enough to pay for maybe half a lens, and after another six months without a sale I decided to explore other methods of supporting my extravagant lifestyle.

The lab is faster, gives tons of information, and makes cool graphs. But I still don’t use it to test my personal lenses

It’s not because the lab stuff doesn’t give useful information. The lab gives a LOT of useful information. Most people don’t have time to learn how to interpret it, or learn its value and limitations, but it’s useful information nonetheless. And the lab is fast; I can test a lens about 32 different ways in a couple of hours. My ‘test a lens with photography’ time is a half a day or more. So the lab is faster, gives tons of information, and makes cool graphs. But I still don’t use it to test my personal lenses.

Lab tests give a ton of precise information. Understanding and interpreting it is, I’ll admit, not completely intuitive.

That’s because all lab tests have some major limitations. The biggest one is this: real images are 3-dimensional, they are focused at a variety of distances, and almost always contain foregrounds and backgrounds. Optical tests are two-dimensional slices taken at a fixed focusing distance with no background or foreground. The focusing distance is infinity for an optical bench. It’s a single, close distance for Imatest / DxO / and other computer image analysis methods.

So, the lab tests tell me everything I want to know about the plane of exact best focus at one focusing distance. That’s really useful information, especially if you want to find out if a lens is optically maladjusted, want to know what kind of aberrations it has, or are interested in its maximum resolution. And it gives people numbers – the ammunition of choice in many a Forum War.

Even a three-dimensional standard comparison image, such as the kind that DPReview and other sites use, is basically limited to one focusing distance. That distance is different for different focal lengths but it’s always fairly close up. And, if it’s an indoor target, the depth of those targets is usually only a few feet at most; it’s not going to show you what the out of focus area 30 feet behind the image plane looks like.

What I actually do to test a new lens

Photographs give me far more information than the lab, even if it’s less exact. I don’t recommend brick wall or side-of-building photographs. Those are just 2-dimensional slices like the lab gives, but with more variables and less information. I want photographs of 3-dimensional subjects.

With the right background (I prefer a field or yard of grass) you can quickly compare resolution at a half-dozen focusing distances. Sure, some lenses are about the same at all distances, but many are not. No zoom lens is equally sharp at all focal lengths. My favorite grass field is a hill behind my office that slopes up away from me. I focus on the mower tracks and quickly get images at several focusing distances.

Simple grass slope image taken with a Canon 50mm F1.2 lens at F1.4.

Grass (or pebbles or concrete or all manner of things that make fairly uniform photographs filled with fine detail) are great for figuring out the zone of acceptable sharpness (for you) of a lens.

Repeating this set of images at several apertures lets me see at what aperture maximum center, middle, and edge sharpness occur (those are almost always different). It’s good to know things like there’s maximum center sharpness at F4 and the edges are at maximal sharpness at F6.3 or F8 or that they never get very sharp.

Grass is also great because it gives you a nice sharpness comparison as you leave the area of best focus. I also recommend looking at what you consider the depth of field at each aperture and focusing distance. Depth of field is not an area of maximal sharpness. It is an area of acceptable sharpness; there is greater and lesser sharpness within the depth of field. Your definitions of ‘acceptable sharpness’ in your images may be greater, or less, than the calculated depth of field.

You rarely see dramatic changes in a prime lens’ field curvature at different focusing distances, but you will usually see a dramatic change in a zoom’s field curvature at different focal lengths

More importantly, some lenses fall off of the sharpness cliff as they exit their area of maximal sharpness, others drift so slowly down the gentle sharpness slope that it really does seem as if the entire depth of field is maximally sharp. Also, that sharpness slope often changes at different apertures. Those are all good things to know.

The other thing I do is to take some of my grass images and run them through a Photoshop ‘Find Edges’ filter or equivalent. This will let you visualize the field curvature of your lens and see how it varies at different focal lengths or focusing distances. (Pro tip: you rarely see dramatic change in a prime lens’ field curvature at different focusing distances. You will, however, usually see a dramatic change in a zoom’s field curvature at different focal lengths.) That’s really useful information that few people know about their lenses. The find edges type filters are also a good way to look at depth of field at various apertures or with different lenses.

Same image as above (Canon 50mm F1.2) run through a find edges filter – the field curvature is obvious.
Field curvature of Canon 50mm F1.2 as measured on an optical bench. You get about the same information from the grass photo and find edges filter as you would from the $ 250,000 optical bench.

Grass shots also give you a superb way to see if your lens is softer in one area or if the field is tilted. The grass image above is very slightly tilted, an amount that’s about normal for a good prime lens. A more dramatic field curvature might look as though you’d rotated the dark area 15 or 20 degrees in Photoshop.

About half the people who take building or brick wall images and think their lens is ‘decentered’ actually have a lens with a field tilt; the lens is equally sharp on both sides, but not at the same distance as center focus. It’s actually very hard to detect a field tilt by shooting a chart and evaluating a two-dimensional image.

A large field tilt in a prime lens is unusual while a field tilt at some focal lengths of a zoom is pretty common. (I’ve seen 45 degree field tilts in zooms, but 10 degrees or so is routine.) If you return your zoom lens to the store for exchange, the replacement will probably have a different field tilt at another focal length.

People like to talk about a lens’ bokeh like it’s one thing, but bokeh often varies

If the lens is one for which I consider bokeh important, I use the a Bokelizer. Basically, this is a couple of strings of tiny Christmas lights hung in a three-dimensional pattern. I take some images at various focusing distances and evaluate the foreground and background in-focus highlights, as well as the in-focus lights. People like to talk about a lens’ bokeh like it’s one thing, but bokeh often varies in the foreground vs the background, at different focusing distances, and depending on how far off-center the object is for many lenses.

Why do I look at in-focus lights, since they have nothing to do with out-of-focus highlights? Because comparing pinpoint light sources is a superb way to see if the lens is optically maladjusted. ‘Optically maladjusted’ means a lens that has a decentered, tilted or poorly spaced element. On the forums, people often refer to all of these issues as ‘decentering’ but that’s less than correct.

Illustrations of the various types of optical maladjustments. In reality, a given lens usually has several small errors, rather than one single large one.

Each of those optical maladjustments causes different optical problems and often they’re apparent when looking at pinpoint light sources. Looking at pinpoint light sources also gives you an idea of the coma and other aberrations that the lens displays by design.

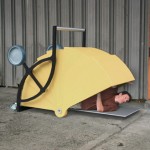
This image was created from equipment in the repair department that basically just projects pinhole lights. You can easily see the difference between a good lens (upper half) and one that is slightly decentered (bottom half).

Once I’m done with the stuff above, I go out and take the kinds of pictures that I bought the lens for. But the hour or two needed for the checks above gave me a lot of information about how to best use the lens’ strengths and weaknesses before I set off to shoot. It also shows me if the lens is optically maladjusted, and there’s no sense taking a bunch of photographs if I already know I’m going to return the lens.

Will taking pictures tell me if I got a copy that’s every bit as sharp as the copy Reviewer Guy got? Absolutely not. Does it let me spout numbers in ‘my lens is better than your lens’ Forum Wars? Again, no. But it certainly does tell me if the lens meets my expectations and will do the job I want it to do. Lab tests give me all manner of information, but they can’t tell me whether I’m going to like the images from the lens.

It doesn’t matter to me at all if I have the sharpest copy of a lens or not. I just want to know if it’s acceptable for the purposes I want to use it for

To be completely honest, if I think the lens isn’t as sharp as I expect, then I may actually take it to the lab and measure it on the bench. I’ve done that maybe twice in the last ten years out of a few dozen lenses I’ve purchased, and both times it turned out that the lens wasn’t up to spec. So, really, I knew the answer without using the bench.

Photographic testing won’t tell you if your lens is among the sharpest copies of that lens, or if it’s in the top half of the variation range or things like that. If you want to know that, then really you need to pay someone to test the lens on a test bench. Why don’t I do that? Because it doesn’t matter to me at all if I have the sharpest copy or not. I just want to know if it’s acceptable to me for my purposes.


Roger Cicala is the founder of Lensrentals.com. He started by writing about the history of photography a decade ago, but now mostly writes about the testing, construction and repair of lenses and cameras. He follows Josh Billings’ philosophy: “It’s better to know nothing than to know what ain’t so.”

Articles: Digital Photography Review (dpreview.com)

 
Comments Off on Roger Cicala: why I don’t use an MTF bench to test my own lenses

Posted in Uncategorized


How to Build a Bench Prop for Great Portrait Photos

23 May

The post How to Build a Bench Prop for Great Portrait Photos appeared first on Digital Photography School. It was authored by Simon Ringsmuth.

When I got started with family and child photography, I thought I had all my bases covered. Between my cameras, lenses, locations, and shot lists, I figured I was all set to create some amazing portraits that families would treasure for generations. Then I ran head-first into a practical problem for which I didn’t really have a good solution; where do people sit? All the camera gear in the world won’t help on location with no place for parents, kids, or high school seniors to sit and pose for their pictures. I finally made my own solution, which has performed flawlessly, and it’s something you can make in an afternoon with a few tools you might already have in your garage.

Before I built benches like this, I tried to use things I had around, such as bar stools, folding chairs, and even our living room coffee table. None of these really worked well or looked very professional. Once I realized I could construct my own bench props, my portraits improved almost immediately.

This tutorial is going to cover a sturdy single-person bench 16 inches high, 16 inches deep, and 18 inches wide. This design is easy to customize if you want something wider, deeper or shorter, but it’s a great place to start if you’re looking for a simple one-person option.

This boy is on a wider version of the bench you’ll build in this tutorial.

Materials needed

The wood and hardware you need to construct a photo bench are pretty minimal:

  • Two 2×4’s, 8-feet long
  • 3/4-inch thick wood, 8-feet long and 11-inches wide. I like to use low-grade utility shelving but any similar wood will work just fine.
  • 1.5-inch Deck Screws
  • A saw to cut the wood

The boards on the right, plus some screws, are all you need to build the bench on the left. It’s an easy afternoon project and your clients will appreciate having this highly practical prop. I spent about $ 40 on the four pieces of wood at a local lumber yard.

The following tools will help you with the construction process, but your own situation might be different. These are what I used, but feel free to adapt as necessary. For instance, you could use a circular saw instead of a miter saw. This is a fun project to do with someone else, so if you don’t have any of these tools, you could ask a friend for help.

  • Miter saw
  • Table saw
  • Drill
  • Sandpaper or electric sander
  • Kreg Jig*
  • Kreg Jig screws 2.5-inches in length with coarse threads*
  • If you don’t use a Kreg Jig, you will need additional deck screws 2.5-inches in length.
  • Wood glue (optional)

A table saw is really useful for ripping the utility shelving to a uniform width of 3 inches.

*A Kreg Jig is a staple of a lot of DIY projects, but if you don’t have one already you probably don’t need to buy one just for this photo bench. Traditional wood screws will suffice just fine.

A view of the bench from below. You could probably construct it out of thinner, lighter materials but it would be far less durable.

Phase 1: Cut the wood

For this photo bench you will need to cut the following pieces of wood in the lengths listed below.

A miter saw makes this project a lot easier, but other cutting tools would suffice just fine too.

  • 2×4 boards, 7.5-inches long – 5 pieces
  • 2×4 boards, 15-inches long – 4 pieces
  • 2×4 boards, 15.5-inches long – 4 pieces
  • 3/4-inch thick boards, 3-inches wide and 16-inches long – 8 pieces
  • 3/4-inch thick boards, 3-inches wide and 18-inches long – 12 pieces

It’s a lot easier to cut everything first and then assemble the bench all at once.

Phase 2: Build the frame

If you have a Kreg Jig, you can use it here to construct the frame of the bench. But if not, you can just use traditional screws. If you want to have an extra-secure hold, you could use wood glue at the joints as well, but it’s not necessary. I would recommend against using nails though, as they’re going to wiggle loose over time and you want this bench to be as sturdy as possible.

A Kreg Jig is really useful but not necessary.

If you’re going with this method you’ll need to use your Kreg Jig to drill two pocket holes in each end of the 15-inch, 2×4 boards.

15-inch boards with two pocket holes in each end.

When you’re done putting pocket holes in the 15-inch boards you’ll repeat the process with the 7-inch boards.

7-inch boards with two pocket holes in each end.

Once your pocket holes are ready you can start assembling the frame of the bench. Secure a 15.5-inch board to each end of one of the 15-inch boards to make a U-shape.

This shape will form one side of the bench.

Repeat the process with the other two 15.5-inch board and another 15-inch board. When you’re done you will have two identical U-shapes.

Both sides of the bench, not yet attached to each other.

If you don’t have a Kreg Jig, or don’t want to go to the trouble of using pocket holes, you can use regular screws to attach the 15.5-inch boards to the 15-inch board. As long as you end up with two U-shaped pieces as shown above, you’ll be just fine.

After you get the U-shapes constructed, attach the other 15-inch board on the open end, but rotate it 90-degrees as shown below.

Attach the second 15-inch board to the open side of each U-shape.

Repeat this step with the other U-shape, which will give you two of these square pieces as you can see in the following image.

These form the sides of the bench, and you’ll need to attach them by first securing all the 7-inch boards to one side.

I find it easiest to attach all five of the 7-inch boards to one side, and then attach that entire assembly to the other side.

Again, I like to use a Kreg Jig and pocket holes, but you can just as easily use regular deck screws to do this. Don’t worry too much about appearances either, as if you use deck screws you won’t really see them in the finished product. They will be covered up with the slats you will attach in Phase 3.

The finished frame, upside down on my table saw which doubles as a small workbench.

If you do end up using pocket holes, you might find yourself working in some really cramped conditions when you insert the screws. A right-angle attachment for your drill can be a huge lifesaver in this step! Once you’re all done, flip the contraption over, and you’re all set for attaching the slats to the sides.

The brace in the middle gives the bench an extra measure of support. Kids can jump on this thing all day long and it won’t be harmed.

It’s important to know that this bench is designed to be sturdy as well as aesthetically pleasing, as you can see in the photo above. You might be able to find something similar at a store but it probably won’t be built this solidly. Also, it won’t stand up to years of use and abuse.

Note also the extra 7-inch board on top, which you can see in the above photo. This helps give even more structural support to the bench so it won’t buckle under the weight of people using it over the years.

Phase 3: Attach the slats

Once you have the basic frame built, you can get a little creative in how you want to finish everything off. I like to attach the boards about 1/2-inch apart, but you can space yours closer or farther. I wouldn’t go too far though, especially on the top where people will be sitting.

Attaching the boards is pretty simple: just place them where you want them to go and attach with deck screws. Other types of screws would work too, but I like deck screws because they are self-tapping and hold very firmly. Nails might work for this step, but I prefer deck screws because of their firmer hold.

I like to use four slats on each side as well as the top and space them about a 1/2-inch apart. But, this is also up to you. You might use fewer boards and make them wider. Or you may use several thin boards, or one giant board covering the entire surface. It’s up to you, and don’t be afraid to get a little creative. In this example, the 18-inch boards get attached to the front, top, and rear while the 16-inch boards go on the sides.

Drilling pilot holes will extend the work time required for this step, but it helps ensure the wood doesn’t crack and split when you insert the screws. When finished, all the basic work is done.

In the background, you can see a bench with some holes I cut out to make it easier to carry.

I recommend sanding the entire bench to smooth out any rough edges. If you have a jig saw you can cut holes for carrying as you can see in the photo above.

Phase 4: Finishing

Now that you’ve constructed the basic bench, the sky is your only limit in terms of how you want the final product to look. I like to use tea-staining, which is inexpensive, non-toxic, and gives a lovely aged look to the wood. The results are inconsistent though, so you might prefer actual wood stain or even paint.

This is your chance to customize the look of your bench, so have fun and get creative!

Your clients will appreciate having a nice place to sit, stand, or otherwise pose when you are taking their pictures. And as a bonus, they’ll be doubly impressed when you tell them you made the bench all by yourself!

We’d love to see some pictures of your bench once you build it. Please share with us in the comments below.


The post How to Build a Bench Prop for Great Portrait Photos appeared first on Digital Photography School. It was authored by Simon Ringsmuth.


Digital Photography School

 
Comments Off on How to Build a Bench Prop for Great Portrait Photos

Posted in Photography


Anti-Object: A Public Bench Designed to be Everything-Proof

05 Oct

[ By WebUrbanist in Design & Furniture & Decor. ]

camden bench public design

While many individuals desire multi-functional and space-saving furniture, many cities want quite the opposite: an object that one can sit on but that foils attempts at anything from sleeping, littering and vandalism to street theft and drug-dealing.

camden uncomfortable urban bench

Designed by Factory Furniture and named after the city for which it was commissioned, the Camden Bench is largely (and fascinatingly) defined in the negative, its creators boasting what it cannot do rather than what it can do, made to “resist criminal and anti-social behaviour.” It all sounds well and good in theory, but in practice: does this approach constitute  a public service or an unnecessarily prohibitive way to design urban furniture?

camden bench in use

camden bench seating area

Made of cast concrete, the bench’s ridged top and sloped surfaces make it hard to lie down on and help keep skateboarders at bay, while its smooth finish is made to be graffiti-resistant. Its solid sides feature no slots or crevices in which dealers could hide drug stashes, while its slight recesses allow sitters to slide their bags safely behind their legs. Its smooth finish and lack of gaps also help keep it clean – dirt has nowhere to accumulate and water washes grime away.

camden bench design diagram

camden bench close up

As Frank Swain muses on Medium, “it a strange artifact, defined far more by what it is not than what it is. The Camden Bench is a concerted effort to create a non-object. [It] is strange kind of architectural null point. A piece of the city that by design will not interact with it in any way. It is a bench by the slimmest of margins – hardly comfortable, affording none of the qualities that would make it more than simply a place to sit. This is the bench’s sole concession to being part of the city, and it does it with the least conviction possible.”

Share on Facebook


[ By WebUrbanist in Design & Furniture & Decor. ]

[ WebUrbanist | Archives | Galleries | Privacy | TOS ]


WebUrbanist

 
Comments Off on Anti-Object: A Public Bench Designed to be Everything-Proof

Posted in Creativity


Bench to Bedroom: Urban Furniture Turned Homeless Shelters

25 Jul

[ By Steph in Design & Guerilla Ads & Marketing. ]

raincity housing project shelter

Whereas London and Montreal have installed spikes on the sidewalks to keep homeless people from getting too comfortable, Vancouver offers a kind welcome with benches that transform into mini-shelters. A nonprofit called RainCity Housing teamed up with Spring Advertising to create the modified public benches in order to provide a covered place to sleep while simultaneously raising awareness.

Bench Homeless Shelter 1

RainCity provides specialized housing and support services for the homeless in Vancouver. This two-part project highlights the importance of RainCity’s work without a hint of the exploitation that’s often seen in homeless awareness campaigns, avoiding stereotypical images of derelict people and focusing on a solution instead.

Bus Bench Homeless Shelter 3

Bus Bench Homeless Shelter 4

The first bench, which reads ‘FIND SHELTER HERE,’ has a built-in roof that can easily be folded up when needed. The second features the message ‘This is a bench’ during the day. At night, glow-in-the-dark ink highlights the text ‘This is a bedroom.’

bench bedroom homeless shelter

The Vancouver campaign is one of many thoughtful projects that meet at the intersection of activism and urban design. An open-source street store that’s easy to set up in any city offers free clothes for the homeless, and 14 thought-provoking ideas seek new ways to manage the issue of homelessness whether by meeting the immediate needs of people who live on the streets or providing more long-term transitional living spaces.

Share on Facebook


[ By Steph in Design & Guerilla Ads & Marketing. ]

[ WebUrbanist | Archives | Galleries | Privacy | TOS ]


WebUrbanist

 
Comments Off on Bench to Bedroom: Urban Furniture Turned Homeless Shelters

Posted in Creativity