RSS
 

Posts Tagged ‘Aperture’

How to Control Aperture and Create Images You Love

09 Feb

This article is sponsored by the New York Institute of Photography. NYIP offers high-quality online photography courses that are affordable, convenient, and accredited.

1 aperture

Controlling the aperture is one of the most powerful ways to improve your images. It’s also the topic that continues to perplex photography students everywhere. Rather than unnecessarily complicating matters, I prefer to demystify the subject. In this tutorial, I’ll reveal how both a wide and small aperture can be used to create consistent and beautiful results.

Consider the Background

2 butterfly

When I’m about to take a photo, the first question I ask myself is, “What kind of background would be best?” With wildlife, sports, portraits, and still-life objects, I often want the subject sharp, and the background to be a soft blur. As you’ll see in the example above, the blurred background allows the viewer to focus on the beautiful details of the butterfly, not on the leaves behind it. To do this, I chose a wide aperture by adjusting to a smaller f-number. At f/5.6 the opening in your lens is physically wide open, creating what’s known as shallow depth of field.

3 puffin

In the example above, I photographed an Atlantic Puffin at f/5.6. The bird is tack sharp while the foliage in the distance is very soft. The theme of the photo is clearly about its colorful beak, and there is little else in the photo to detract from it. For this reason, wildlife photographers typically use wide apertures for the majority of their work. To further emphasize the effect, try positioning yourself so there is distance between the subject and the background.

Freezing action

4 soccer

If you flip through the pages of Sports Illustrated, you’ll notice how most of the players are sharp while the fans are out of focus. The wide aperture chosen by the photographer not only creates that shallow depth of field, but it also lets a great deal of light into the camera. As such, it’s possible to use a fast shutter speed to freeze the action. If you are serious about sports photography, a lens that opens all the way to f/2.8 is worth the investment. You may even hear people refer to them as “fast lenses” which describes the speed in which the wide aperture lets light into the camera.

Focus on what’s important

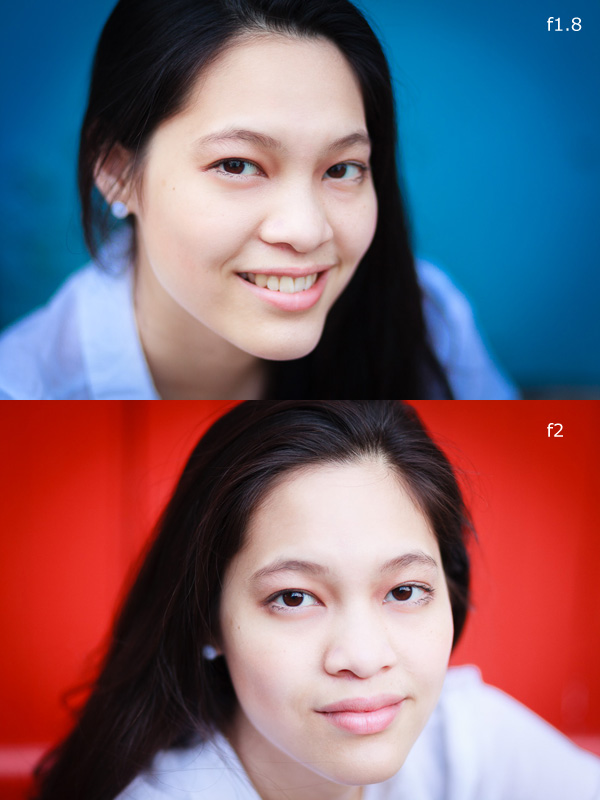
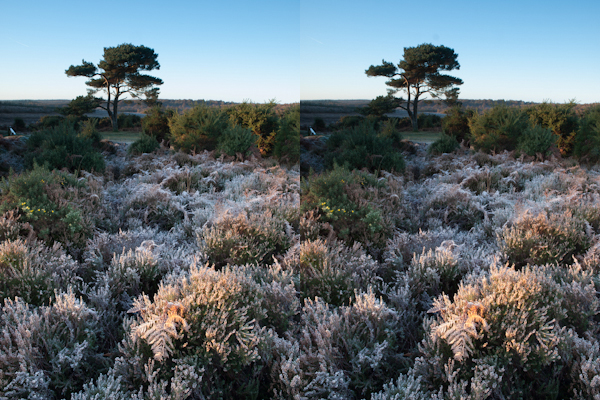
Before going any further, allow me to spend a moment on focus. When using a wide aperture, be sure to place your active focus points on the subject you want sharpest. These two vineyard photographs were both taken with the same wide aperture of f/1.8, but they look very different. This is due to my placement of the focus point indicated here by the arrows. For the image on top, I focused on the vines closest to me. As a result, everything behind it is soft. For the image on the bottom, I focused on the distant vines. The shallow depth of field then works to blur everything in front of the focus point.

5 focus example

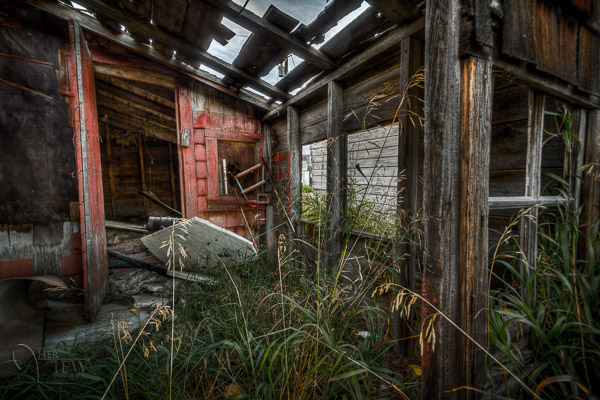
We can see how all of this comes together in the image of the male buck. I saw the large deer in October just after sunrise. With my active focus point on his face, I knew the deer would be sharp. A wide aperture of f/5.6 created a shallow depth of field. Not only was the background blurred, but the tall reeds in the foreground as well. The perspective makes it seem as if we’re spying on the creature through the tall grasses.

6 buck

As you can see, a wide aperture can help you create images that surpass routine snapshots. With this new knowledge, you’ll start to recognize the techniques other photographers have used in their photographs. Begin practicing with wide apertures and you’ll soon be changing settings like a pro. Now, let’s turn our attention to small apertures.

Small apertures

7 castle

There’s a common misconception amongst photography students who believe sharp photos are solely result of fast shutter speeds. While that is part of the equation, the other equally important consideration is the aperture. By achieving greater depth of field, it’s possible to keep the entire subject in focus. In this second portion of our aperture tutorial, I’m going to share the specific f-stops and techniques used to create tack sharp images.

8 aperture opening

Don’t let the terminology trick you. The term “small aperture” refers to the physical size of the lens opening. This may seem counterintuitive since the actual f-number is larger. Yet, f/22 is a smaller aperture than f/16 because the aperture blades inside the lens don’t open as wide. See the example above.

9 empire state

When you hear photographers say they are “stopping down”, it means they are using a narrower aperture opening, for example going from f/8 to f/11, or from f/11 to f/16. This renders everything sharp from near-to-far, hence the phrase “great depth of field”. I’ve created a phrase to help you remember this. “The greater the f-stop number, the greater the depth of field.”

10 brooklyn bridge

Great depth of field is also useful when you’re photographing flowers or close-up objects. If the aperture is too wide like f/2.8, only a handful of the petals will be sharp. The solution doesn’t necessarily have to be f/22 which is more suitable for a vast landscape; a better compromise would be f/8 which provides enough depth of field for most macro opportunities. Then, by simply focusing on the center of the flower, the entire subject remains reasonably sharp.

11 dahlia

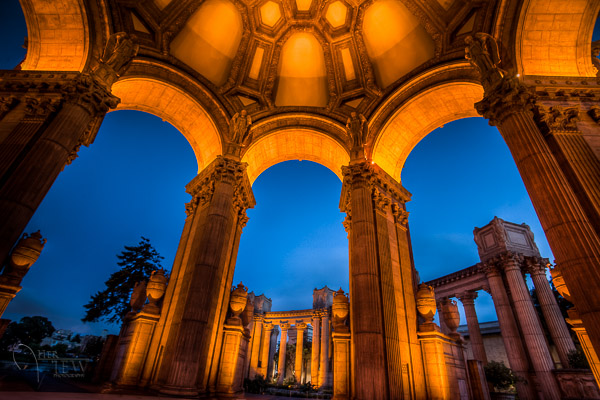
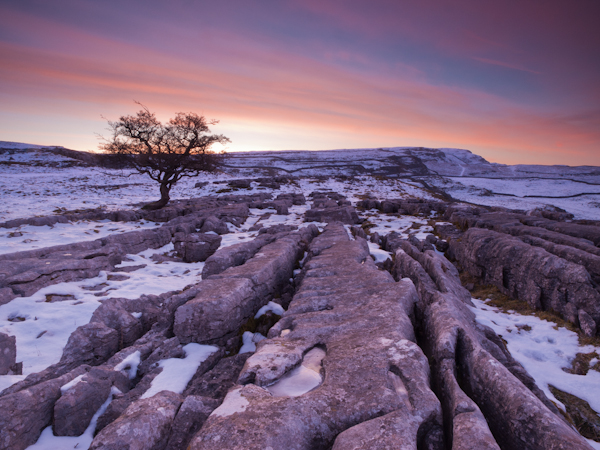
In a big sweeping landscape, it can be tricky to determine where to focus. For me, apps that calculate precisely where to focus are just not practical (or fun). To further emphasize the effect of the small aperture, I have found a simple solution that really works. Place your focus point on an object that’s 1/3rd of the way up from the bottom of the frame and use a small aperture like f/22. Not only will the object in the bottom third be sharp, but so will everything in front of, and behind it. As an example, I focused on the large boulder towards the bottom of the frame in this photo from Yosemite National Park.

12 yosemite

Where the tripod comes in

While f/22 may be an ideal setting for a landscape, it does present photographers with a challenge especially in low light situations. Since a small aperture doesn’t let much light into the narrow opening of the lens, a slower shutter speed and/or higher ISO become necessary to achieve a good exposure. These longer exposure times are the primary reason most landscape photographers use tripods.

13 central park

Bonus tip

If carrying a tripod is not possible, you can create a makeshift camera support by placing the camera on a bag, a wall, even the ground. Then, to avoid jostling the camera during the exposure, set the two second timer to automatically trip the shutter.

14 jefferson

This article is sponsored by the New York Institute of Photography. NYIP offers high-quality online photography courses that are affordable, convenient, and accredited.

googletag.cmd.push(function() {
tablet_slots.push( googletag.defineSlot( “/1005424/_dPSv4_tab-all-article-bottom_(300×250)”, [300, 250], “pb-ad-78623” ).addService( googletag.pubads() ) ); } );

googletag.cmd.push(function() {
mobile_slots.push( googletag.defineSlot( “/1005424/_dPSv4_mob-all-article-bottom_(300×250)”, [300, 250], “pb-ad-78158” ).addService( googletag.pubads() ) ); } );

The post How to Control Aperture and Create Images You Love by Chris Corradino appeared first on Digital Photography School.


Digital Photography School

 
Comments Off on How to Control Aperture and Create Images You Love

Posted in Photography


Why Aperture Priority Mode Isn’t Always the Best Choice

03 Jul

There are a lot of common mistakes to make in photography, but possibly the most frequent is to shoot in Aperture Priority mode when it’s not the best choice.

There are many situations where shooting in Aperture Priority is ideal, such as when you are using a tripod and your shutter speed does not matter, when you are in strong sunlight, when you are shooting a scene with a wide-angle lens and nothing is moving, or when you want a very shallow depth of field for aesthetic purposes.

However, in most other situations it is beneficial to shoot in Shutter Priority mode (or manual mode).

Lamborghini, SoHo

Lamborghini, SoHo – Shutter Speed priority can be much more effective for Street Photography, where spontaneous shots occur frequently, and freezing motion is very important.

I see this problem most often when people are traveling. They will stick their camera on Aperture Priority for the entire day, forgetting that the light sometimes will not be strong enough to yield a shutter speed fast enough to offset camera shake or to freeze moving subjects, particularly if their lens aperture does not go below f/4 or f/3.5.

The result is that they will come home and many of their images will be blurry, when they didn’t have to be.

Your shutter speed is the first line of defense for creating a sharp image. The rule of thumb is that the shutter speed should be at least one over the focal length of the lens to offset handheld camera shake. I like to add a little extra speed to that to be safe, so if you are shooting at 50mm on a full frame camera, I would keep the shutter speed at least at 1/80th. On a cropped sensor however, such as an APS-C camera, a 50mm might be the equivalent of an 80mm view, so I would shoot at least at 1/100th of a second.

You can see, especially if you are using a telephoto focal length, how quickly and easily your shutter speed can go below this threshold when on Aperture Priority and not in strong, direct light.

Plaza Hotel

The Birds and Plaza Hotel. A spontaneous shot on Shutter Priority at 1/500th and ISO 800.  On Aperture Priority there is a much stronger chance that I would have yielded too slow of a shutter speed, especially since it was overcast and late in the day.

When there are moving subjects in a scene such as people, 1/320th or 1/250th is often a good shutter speed to freeze their motion. So when traveling, I use 1/320th as my baseline shutter speed and will lower it for the situations where there is no motion or when the light is extremely low. This guarantees that no matter what I capture, it will be sharp, including the spontaneous moments. Often, because I shoot this way and prefer to also shoot with an aperture of f/8 or above, I will raise the ISO to 800, 1600, or even 3200 in areas with very low light. This will add more grain/noise to the image, but especially on the newer digital cameras you will quickly notice that the technical quality and sharpness of your images will actually be improved, despite this grain.

Now you might be saying that you are able to shoot in Aperture Priority mode (or Manual mode) all of the time and can pay attention to the corresponding shutter speeds so you never have a problem. That’s great, and in that case, please keep shooting in Aperture Priority. I do not want to stop you from shooting in a way that works well for you. If you know your camera settings well then you can effectively shoot in any situation with any of these modes.

However, I teach a good amount of students and I would guess that about 80 percent of them come in shooting in Aperture Priority. Then, when I look at their photos, for a good portion of these students, way too many of their photos turn out blurry, or have some sharpness issues. They will pay attention to their aperture but then zoom for a shot and not notice that the shutter speed is lower than their focal length, or not notice that is too low to freeze the motion of a subject. I find that switching them over to Shutter Priority for these situations puts the shutter speed in their mind first and then they can pay attention to the corresponding aperture to achieve the largest depth of field possible (if you are purposely looking to create a shot with a shallow depth of field, then Aperture Priority would be ideal.)

Particularly for travel photography in cities or in areas with people, often when I explain to students to try photographing around 1/320th of a second and a higher ISO, they quickly remark about how much sharper their photos become.

Give it a try and see if yours do too.

The post Why Aperture Priority Mode Isn’t Always the Best Choice by James Maher appeared first on Digital Photography School.


Digital Photography School

 
Comments Off on Why Aperture Priority Mode Isn’t Always the Best Choice

Posted in Photography


Apple to cease development of Aperture

28 Jun

Apple has announced that it is ceasing development of its Aperture photo editing application. The company will instead be focusing on the upcoming Photos for OS X software, which will be included in the next version of Mac OS X (Yosemite). Apple will ensure compatibility with the next version of OS X and will allow you to import your Aperture library into the new Photos app. This certainly bodes well for Adobe, since even more Aperture will be defecting to Lightroom.

related news: Digital Photography Review (dpreview.com)

 
Comments Off on Apple to cease development of Aperture

Posted in Uncategorized


Cosina updates Voigtländer Nokton 25mm F0.95 with clickless aperture

13 Feb

50-095-iia.png

Cosina has announced a slightly revised version of its ultra-fast normal prime for Micro Four Thirds cameras. The Voigtländer Nokton 25mm F0.95 Type II gains an aperture ring mechanism that is switchable between clicked and clickless operation, a desirable feature for movie makers (and previously seen in its 17.5mm F0.95 and 42.5mm F0.95 stablemates). The optics are unchanged, but the updated lens is slightly heavier and larger in diameter. It will be available in March. 

News: Digital Photography Review (dpreview.com)

 
Comments Off on Cosina updates Voigtländer Nokton 25mm F0.95 with clickless aperture

Posted in Uncategorized


Apple Aperture 3.5 adds iCloud Photo Sharing, SmugMug support

23 Oct

shared:Aperture.png

While not the major update that many users had been hoping for, Apple did sneak in an update to its Aperture software amongst yesterday’s iPad madness. New features include iCloud Photo Sharing, integration with SmugMug, and support for iOS 7 camera filters. In addition, Aperture 3.5 now uses Apple Maps for its ‘Places’ feature (we’re not sure if that’s a good thing), and numerous bugs were squashed. Follow the link for the full change log.

News: Digital Photography Review (dpreview.com)

 
Comments Off on Apple Aperture 3.5 adds iCloud Photo Sharing, SmugMug support

Posted in Uncategorized


Getting Creative with Aperture and Colour

19 Sep

Creative use of aperture and colour


Andrew S. Gibson is the author of Mastering Photography: A Beginner’s Guide to Using Digital Cameras, on offer now at Snapndeals for a limited time.

You are probably already familiar with the effect of aperture on your images. If not, here’s a quick recap: for any given focal length and camera-to-subject distance, use a wider aperture to get less of the image in focus. There’s a fair amount of science behind that statement (some of it subjective, such as the definitions of depth-of-field and sharpness) but the end result is that you can use wide apertures to limit depth-of-field and add a real creative edge to your images. Note that you’ll get the best results with a prime lens as they have wider maximum apertures.

I’m writing about using wide apertures in this article because they are exciting. You can use them to do wonderful things with composition, focus and colour. Today I’m going to concentrate on the relationship between aperture and colour, something that I hadn’t really thought about before until someone pointed it out in a comment on a previous article. It made me realise that a wide aperture alone isn’t enough to make a good image. Light (as always in photography) is important, and (unless you’re working in black and white) so is colour.

Creative use of aperture and colour

Here’s an example. I used an 85mm lens and an aperture of f2.0 to create a portrait with very little depth-of-field. Now, look at the model. She has fair skin and dark hair. She’s wearing a black top over another green top. There is very little colour. I emphasised that by placing her against a grey coloured background. I darkened the background in Lightroom and reduced the saturation. The end result is a portrait with a lot of neutral light and dark tones and very little colour. The colour has become a subtle and understated part of the composition.

Creative use of aperture and colour

Here are two more portraits. They were taken during the same shoot, just with different backgrounds. In both cases I moved the model away from the background so that it would go out of focus. The idea here was to have fun and play around with the colours. Unlike the previous example the colours are strong, rather than subtle.

The background in both portraits was a painted door. Perhaps it’s also another example of seeing – where many photographers would see a door I saw colour, because I understood that I could throw the doors out-of-focus by choosing the right lens and aperture.

Creative use of aperture and colour

This portrait has a different approach. We took the photos in a children’s playground, and I noticed that the model’s jumper was nearly exactly a match with the colour of one of the plastic climbing frames. I was able to position her so that the colour of the background (out of focus again) matched her jumper.

The key in all these photos is first in observing the colours (seeing what is actually happening in the scene) and then finding interesting ways to work with the colour palettes presented by the combination of clothes worn by the models and the environment we were in. None of these were pre-conceived concepts. I was simply reacting to the circumstances given to me.

It’s also part of learning about how lenses and aperture work. Once you understand that you can make the background go out of focus by moving your model away from it and using a short telephoto lens with a wide aperture, you can start seeing what the camera sees, rather than what you see when you use your own eyes.

Mastering Photography

Creative use of aperture and colour

Would you like to learn more about aperture and the other important settings on your digital camera? My latest ebook, Mastering Photography: A Beginner’s Guide to Using Digital Cameras introduces you to digital photography and helps you get the most out of your camera. It covers concepts such as lighting and composition as well as the camera settings you need to master to take photos like the ones in this article. It’s available now at Snapndeals for a special price for a limited period.

Post originally from: Digital Photography Tips.

Check out our more Photography Tips at Photography Tips for Beginners, Portrait Photography Tips and Wedding Photography Tips.

Getting Creative with Aperture and Colour


Digital Photography School

 
Comments Off on Getting Creative with Aperture and Colour

Posted in Photography


LockCircle releases Prime Circle XE lenses with wireless aperture control

06 Apr

primecircle.png

Accessory maker LockCircle has announced Prime Circle XE lenses in a Canon EF mount with a wireless controller that can can change aperture remotely at distances of up to 300 feet. Ranging between focal lengths of 15mm to 135mm, the lenses feature Carl Zeiss optics in a housing designed specifically for cinematographers with large focus scales and a common 95mm front mount across the range of lenses. There is currently no information about the XE series’ price and availability.

News: Digital Photography Review (dpreview.com)

 
Comments Off on LockCircle releases Prime Circle XE lenses with wireless aperture control

Posted in Uncategorized


LockCircle releases Prime Circle XE lesnes with wireless aperture control

06 Apr

primecircle.png

Accessory maker LockCircle has announced Prime Circle XE lenses in a Canon EF mount with a wireless controller that can can change aperture remotely at distances of up to 300 feet. Ranging between focal lengths of 15mm to 135mm, the lenses feature Carl Zeiss optics in a housing designed specifically for cinematographers with large focus scales and a common 95mm front mount across the range of lenses. There is currently no information about the XE series’ price and availability.

News: Digital Photography Review (dpreview.com)

 
Comments Off on LockCircle releases Prime Circle XE lesnes with wireless aperture control

Posted in Uncategorized


Getting off Auto – Manual, Aperture and Shutter Priority modes explained

04 Apr

Macro image of a digital camera's controls set on autoYou may have heard that once you get a DSLR you need to learn to shoot in manual and only ever use that mode. That if you are using the Aperture or Shutter Priority you’re cheating and if you want to be more like a pro you have to shoot in Manual only, all the time. To that I say “horse pucky”! (if you’re old enough to remember M.A.S.H. you’ll get that reference).

What you’ll learn from this article:

  • what each of the A (Av), S (Tv) and M modes are, a definition of each
  • what types of situations I would choose each of them and why
  • some advantages of A (Av) and S (Tv) over manual
  • some advantages of Manual and when it’s the only choice
  • some things to look out for

The three manual shooting modes what are they?

  1. Manual mode: this mode puts you in full control of the three settings on your camera that control the exposure (commonly known as the exposure triangle).  ISO, aperture and shutter speed. In manual you will be making all of those choices.
  2. Aperture priority:  (A on Nikon, Av on Canon) this mode has you in control of two of the three exposure controls:  ISO and aperture.  The camera will select an appropriate shutter speed to give you a correct exposure.
  3. Shutter priority: (S on Nikon, Tv on Canon) this mode once again puts you in control of two of the three exposure settings, this time it is ISO and shutter speed.  The camera will select the aperture for a correct exposure.

There are of course other factors involved that will affect the exposure such as what Metering Mode you’re using and Exposure Compensation. More on the latter later.

Shot in Aperture mode to control Depth of Field

Shot in Aperture mode to control Depth of Field

How do you decide which mode to use?

I actually use the Aperture and Shutter priority modes more often than I use Manual. How I decide which mode to use is based on my subject matter and what is my goal of the image as follows:

  • I choose Aperture Mode when I want to control depth of field (DoF) as my top priority.  Such as to create shallow DoF for a portrait, people photos, or any time I want a blurred background (choose a large aperture like f2.8 or f1.8). That also applies if I want a larger DoF as well such as for a landscape photo, group portraits, or shots where I want maximum detail and sharpness (choose a smaller aperture like f11 or smaller)
  • I choose Shutter Mode when my top priority is controlling motion, either freezing or blurry it. So freezing for subjects like sports or action and I will choose a faster shutter speed such as 1/500th or faster depending on the subject. Subjects like flowing water, waterfalls, or panning a moving subject I will select a slower shutter speed like 1/15th for panning and 2-5 seconds for flowing water. (for more on this topic read my article Using Shutter Speed to Freeze or Blur Motion)
  • I switch to Manual Mode in a few specific instances: doing a portrait where the subject is not moving; night photography; pretty much any time I’m using a tripod; doing HDR bracketed exposures (even though my camera does 7 on AEB I still use Manual when on tripod); when using studio lighting; certain times when using a speedlight (such as working in a dark room and I want to maintain some ambient light levels)

Here’s some example images taken with each of the modes as explained above.

Shot in Aperture mode to control Depth of Field

Shot in Aperture mode to control Depth of Field

Shot using Shutter Priority to use a panning technique and slow shutter speed

Shot using Shutter Priority to use a panning technique and slow shutter speed

Shot in manual mode for night photography challenges

Shot in manual mode for night photography challenges

Things to watch out for and keep in mind

ISO: remember that when you select either A or S mode you are still choosing the ISO
I usually select my ISO first, based on the lighting conditions I’m shooting in.  If it’s bright sunlight I go to 100 or 200.  If it’s subdued light, shade or overcast I might bump it up to 400. For indoors or dimly lit rooms I may go to 800 or higher up to 3200 if necessary (you need to test to know the upper limits of your ISO and where you’re comfortable shooting with your camera, mine will yield pretty decent results even at 6400 and beyond).How I know I’ve gone high enough with the ISO, is if I have a fast enough shutter speed to eliminate camera shake when hand holding.  If I’m on a tripod, I’m usually shooting a ISO 100 or 200 because I can use any shutter speed safely.

Check your shutter speed when in A mode
Just because the camera is picking the shutter speed does not mean it will give you a nice sharp image. Yes it will choose a shutter speed to give you the correct exposure, but if you set up your camera for ISO 100 at f16 in dark room you’ll wind up with a pretty slow shutter speed like 1/2 of a second perhaps, and without a tripod you’ll get blur from camera shake.So keep your eye on the shutter speed the camera is picking and if it is too slow (I suggest you follow the 1/focal length rule for minimum shutter speed – for more on getting sharp images read my article 5 tips for Getting Sharper Images) readjust the ISO, the aperture or both – picking a higher ISO will help, so will choosing a larger aperture like f4 as that will let the camera pick a faster corresponding shutter speed.

Multiple bracketed exposures using Manual for HDR processing

Multiple bracketed exposures using Manual for HDR processing taken during my Drumheller Workshop

Watch for exposure warning notices in A or S modes
Your camera is pretty smart but it can only work within its own limitations. So it will tell you if you’ve gone outside that boundaries of what it can adjust for you.  This will show up as a flashing warning in your viewfinder. I’ll give you an example for both Aperture and Shutter modes.

Scenario #1 in Aperture mode if you choose say ISO 800, F1.8 on a bright sunny day the camera will tell you there is simply too much light and give you a flashing shutter speed (your fastest) like 1/4000th of a second.  If you take the photo it will be overexposed which is what the camera is warning you above.  Choose a lower ISO or smaller aperture and try again until the warning is gone.

Scenario #2 in shutter mode in a darkened room with settings of ISO 400 and 1/1000th of a second you will likely get a flashing aperture shown in your viewfinder (the largest your lens goes to such as f3.5 or f5.6).  To correct this you need to choose a slower shutter speed and likely a larger ISO as well until that warning disappears.Side note: this is why kit lenses with a maximum aperture zoomed in of f5.6 become somewhat limiting. Grab yourself a simple 50mm f1.8 for low light conditions, it’s an inexpensive great lens to have in your bag

Painting with Light during night photography on my Drumheller workshop

Painting with Light during night photography on my Drumheller workshop

Exposure compensation in Manual
There is often confusion among students about using Exposure Compensation when in Manual mode.  This behaves differently depending in the camera you have, in Canons for example it just doesn’t apply, as it is has no affect. When using a Nikon if you shift the Exposure Compensation to say +2 what it does it adjusts the scale you see in your viewfinder to reflect that so if you then set the exposure to match the “0″ mark it will give you a +2 exposure. I’d personally find that even more confusing, so if you want +2 just set your exposure in Manual so that it shows +2 on the scale.

Summary

Steps I use are these:  

  1. choose ISO first
  2. decide whether motion or depth of field are most important and choose my shooting mode
  3. set my shutter speed or aperture for the results I want
  4. check for warnings and slow shutter speeds
  5. review image and correct as necessary

Tell me what you do and if you find this information helpful.

Post originally from: Digital Photography Tips.

Check out our more Photography Tips at Photography Tips for Beginners, Portrait Photography Tips and Wedding Photography Tips.

Getting off Auto – Manual, Aperture and Shutter Priority modes explained


Digital Photography School

 
Comments Off on Getting off Auto – Manual, Aperture and Shutter Priority modes explained

Posted in Photography


Getting Landscapes Sharp: Hyperfocal Distances and Aperture Selection

26 Feb

An important element of landscape photography is ensuring that all of the key elements within your composition are sharp.  This can often include foreground objects that are a matter of meters from your camera as well as background elements that can be kilometres away.  Therefore, to achieve this, you need to ensure your depth of field is large enough to render everything of interest, suitably sharp.

Sunrise over the limestone pavement

In this scene it was important to capture everything from the frozen puddle in the foreground, to the hills in the background, in sharp focus

When you focus on an individual point within your landscape, you are in fact creating a plane of focus that lies parallel to the sensor.  Everything in front of, and behind, that plane is technically not in focus, however there is a region within which objects will appear acceptably sharp – that is the depth of field.  For instance, in the scene below the camera has been focussed on a rock.  Therefore, the plane of focus lies parallel to the sensor across that rock and the limits of acceptable sharpness, that form the bounds of the depth of field, lie in front of, and behind, that plane.

Hyperfocal Distance Diagram 1

A theoretical example showing the depth of field for a given focal length, aperture and point of focus. The depth of field will always extend one third of the distance in front of the focal plane, and two thirds of the distance behind it.

In the diagram above, the depth of field is not sufficient to capture all of the trees within the range of acceptable sharpness, i.e. they will appear out of focus.  However, the depth of field can be easily manipulated to extend as far as you wish as it is controlled by a number of factors, namely: focal length, aperture and distance to the focal point. (I’m not going to include sensor size here as, after the purchase of your camera, it is not subject to user control; however it does not hurt to appreciate that the depth of field is inversely proportional to sensor size meaning that different cameras have different capabilities with respect to achievable depth of field).  The relationship that these factors have with depth of field is given below:

  • Focal length: Up first is focal length as, typically, your focal length will be determined by your composition.  Changing your focal length will alter your field of view and therefore your composition, meaning that you don’t often adjust your focal length to alter your depth of field but generally manipulate the other factors at your chosen focal length.  A short focal length, i.e. wide-angle, will give you a greater depth of field than a long focal length, i.e. telephoto.
  • Aperture: Probably the most obvious factor in depth of field control is aperture. A narrower aperture, i.e. larger f/ number, gives you a greater depth of field and vice-versa.  It is important to select the smallest, diffraction-limited aperture so to obtain the maximum depth of field without suffering from image degradation.
  • Distance to focal point: In combination with a given focal length and aperture, deciding where to place that plane of focus will impact the resulting depth of field.  The depth of field increases as the distance to the focal point from the camera increases.  Therefore, once a focal length has been chosen, it is generally the combination of the selected aperture and distance to the focal point that controls the depth of field.

Hyperfocal Distance

One way to ensure that the entire frame is in focus (well, ‘acceptably sharp’) is to ensure that the depth of field extends from the foreground to infinity.  To do this, you need to focus at the ‘hyperfocal distance’: for a given focal length and aperture, there will be a distance where setting your point of focus will result in the entire scene being within the depth of field.

Hyperfocal Distance Diagram 2

By focussing at the hyperfocal distance, the entire scene (and more beyond) will fall within the depth of field

So theoretically, by selecting the correct aperture and moving the point of focus to the hyperfocal distance (assuming the composition and therefore focal length remain unchanged) it would be possible to render the entire scene in focus.  A point worth noting is that when focussing at the hyperfocal distance, the near acceptable limit is always half of the hyperfocal distance.

The calculation to determine the hyperfocal distance isn’t trivial, so there are numerous sites or apps to help you when out in the field.  However by frequent application, it isn’t long until you gain an appreciation of where to set your point of focus, for a given aperture at your commonly used focal lengths.

Aperture Selection

For any focal plane, the depth of field extends 1/3rd in front and 2/3rd behind the point of focus.  Therefore, an easy, but potentially flawed, application of hyperfocal focussing is to select a very small aperture, e.g. f/22 or f/18, and to focus 1/3rd of the way into the scene from the bottom of the frame.  It’s not a bad assumption, as often you will achieve the desired depth of field, however in choosing such a small aperture, you may well be losing any benefits of infinite focus due to decreased image sharpness as a result of diffraction.

For example, the image below shows a comparison of the same scene, shot at f/8 (left) and f/16 (right).

Hyperfocal distance aperture selection 1

The frosty fern leaf in the centre of the frame at the bottom of the image, was an important part of the foreground interest here.  Even though both images look perfectly sharp, the 100% zoom for each image below shows the difference in sharpness for between using f/8 and f/16, even though both apertures result in a depth of field that extends from before the fern leaf to infinity:

Hyperfocal distance aperture selection 2

The sharpness of the fern leaf at f/8 (left) vs. f/16 (right). Even though the lens was stopped down from f/22 to f/16, the resulting image could still be captured with greater sharpness throughout, by using a wider aperture of f/8, and focussing at the hyperfocal distance

Diffraction becomes an issue all lenses as the aperture gets smaller, especially at the edges of the image, and will be more pronounced on inexpensive lenses.  Typically, the sweet spot, in terms of lens performance, will be somewhere between f/8 and f/11.  Therefore, use of the smallest  ‘diffraction limited’ aperture that can still achieve the required depth of field becomes important.

So, hopefully, you will see that it is worth being aware of the hyperfocal distance for your commonly used focal lengths, especially for the apertures that result in optimum lens performance.  With the tools available to us today, it isn’t difficult to work it out, even when out in the field, so why not give it a go the next time you are out photographing landscapes.

Post originally from: Digital Photography Tips.

Check out our more Photography Tips at Photography Tips for Beginners, Portrait Photography Tips and Wedding Photography Tips.

Getting Landscapes Sharp: Hyperfocal Distances and Aperture Selection


Digital Photography School

 
Comments Off on Getting Landscapes Sharp: Hyperfocal Distances and Aperture Selection

Posted in Photography