RSS
 

Posts Tagged ‘Anatomy’

Netter anatomy free download pdf

08 Sep

this produces a spiral netter anatomy free download pdf of urine and has the effect of cleaning the external urethral meatus. Vì dung l??ng và s? l??ng thông tin c? ngày càng nhi?u lên, 109 men showed an average length of 22. The length of a male’s urethra, which can lead to urethral strictures. In […]
BooksChantcdCom

 
Comments Off on Netter anatomy free download pdf

Posted in Equipment


Cellular Urbanism: Analyzing the Anatomy of Functional City Block Designs

30 Aug

[ By WebUrbanist in Architecture & Cities & Urbanism. ]

We all understand intuitively that different urban layouts lead to different kinds of cities, but a new book analyzes these on a block-to-block basis to illustrate how this civic anatomy works on a cellular level. In Urban Being: Anatomy & Identity of the City, Robin Renner uses anatomical-style classifications to look at urban landscapes through a kind of giant microscope.

Overlaying use patterns and transit networks, the reader begins to understand what types of urban “cells” make for functional built environments. Think of it like genome sequencing: through it, planners and architects can learn how to identify problems and, in some cases, address them or head them off in advance.

A combination of topography, transportation networks and design ambitions go a long way toward shaping cells in global cities, forming grids and networks familiar from satellite views of cities. All this in turn shapes the kinds of buildings and functions one finds within a given city.

At the most basic level there are “block cells” made up of arterial routes — these tend to be packed with activity, though specific functions vary on long and short sides of a block (shorter are often busier). These are often found in financial centers of major metropolitan areas.

There are also “linear cells” where two single-direction roads pass one another, which can form the basis of walkable commercial hubs.

Inside “central cells,” where traffic is pushed to the periphery, pedestrians can dominate, generating demand for things like stores and restaurants. Barcelona, for instance, has been implementing a plan to turn sets of blocks into single superblocks, leaving central zones free of cars.

In the process of analyzing all of these types and how they work together in neighborhoods, Renner has devised some rules of thumb, like: residential cells should be between 1200 and 2400 feet across. Industrial cells, which often grow up around transit routes (railroads, rivers and lakes) can grow too big and isolated unless located close to worker housing or connected via public transit. These kinds of decisions, says Renner, can help cities keep a healthy balance of livability and functionality.

“There is a long tradition of comparing cities with organisms as they have similarities in their anatomy, explains the author. “But since cities are brought into life by the presence of people, they are less living beings than urban beings with their own identity. This is based on the behaviors, needs and requirements of the residents. In other words, the anatomy of the city informs its identity.”

Share on Facebook


[ By WebUrbanist in Architecture & Cities & Urbanism. ]

[ WebUrbanist | Archives | Galleries | Privacy | TOS ]


WebUrbanist

 
Comments Off on Cellular Urbanism: Analyzing the Anatomy of Functional City Block Designs

Posted in Creativity


Anatomy of a Green Screen Shot: How to Use It Right

06 Apr

I have a family that I shoot several times a year, They’re “show people” , all outgoing and crazy and fun, and after at a certain point, the mom, Ginette, said to me, “You know, I love all of the perfect and beautiful shots that you get of us, but I think it’s time to show the world the kind Continue Reading

The post Anatomy of a Green Screen Shot: How to Use It Right appeared first on Photodoto.


Photodoto

 
Comments Off on Anatomy of a Green Screen Shot: How to Use It Right

Posted in Photography


28 December, 2014 – Fraser Island Australia – Anatomy Of A National Geographic Assignment

29 Dec


Growing up I had two magazines that I always looked forward to receiving in the mail and they were Life Magazine and National Geographic.  I always wanted to photograph for these magazines and travel the world.  Well, I have traveled the world but never had a chance to shoot for these magazines.  Today’s article is by Peter Essick and he has lived the dream.  He has done a number of assignments for National Geographic and shares one of those with us in his Fraser Island Australia – Anatomy Of A National Geographic Assignment story.  Peter shares what it is like to pitch an assignment and what it takes to shoot one.  Plus, he takes pretty darn nice images.


The Luminous Landscape – What’s New

 
Comments Off on 28 December, 2014 – Fraser Island Australia – Anatomy Of A National Geographic Assignment

Posted in News


Anatomy of a Concert Photography Shoot

24 Feb
Concert photography Slash

Slash from Guns N’ Roses

In my last article 6 tips for budding concert photographers I explained the basics (and camera settings) of how to start your career as a concert photographer. I would like to say a big thank you for your awesome feedback and your ongoing comments on that post. It really means a lot to me and shows how many talented and hard working concert photographers are out there.

This article is a follow up, and I will go into more details about the “anatomy of a concert photography shoot“. Especially when you are new to concert photography, it can be overwhelming to stand in the photo pit all alone with your camera. The venue lights go out, the band enters the stage and you have only three songs (average 10 minutes) to get your awesome shots. Honestly, in the beginning it was also scary for me, but trust me, after you have shot some concerts you’ll feel much more comfortable in front of the stage and you’ll learn to know your camera settings by heart.

One of the points that are often undervalued is the fact that a band consists of various individuals. It is tempting to only shoot the lead singer (the key person), but this would be just one out of the whole band. There’s also a guitarist, drummer, bass player and additional musicians that are worth taking a closer look. Hence, it is more difficult to photograph the other band members, but you definitely should try to catch everyone on stage.

Let´s break it up:

The Lead Singer (The celebrity of the band)

This guy is the one whose name is often linked to the bands name such as Iggy Pop, Morrissey, David Bowie, Neil Young or Leonard Cohen.

They are the celebrities and will be shown on every VIP party and on TV. So, to photograph this person is a must have. From a concert photographers perspective, this is the easiest member to photograph. They are always at the front of the stage and get the best lighting. I always focus on the lead singer first and once I’ve got some awesome shots, I will follow up on the other band members.

Concert photography Iggy Pop

Iggy Pop

The Guitarist and the Bass Player

Next I focus on the guitarist and bass player. Both of them are standing on one side of the stage, either behind the singer or on the same level. I’ve shot concerts where the bass player was standing in total darkness, so I won´t have a chance (even with a full frame sensor DSLR, f/1.4 lens, and ISO 6400) to get a decent picture. These are the hard times of a concert photographer and you just have to accept it sometimes. However guitarists and bass players provide great shots when you catch them e.g. posing when playing a solo or jumping around.

(See photo below of Flea from the Red Hot Chili Peppers and Slash from Guns N’ Roses top of the article)

Concert photography Flea bass player

The Drummer

The drummer is the “heart“ of the band and the pulse generator. A rock band without a drummer doesn’t work, but photographers tend to ignore them in their pictures. The drummer is also the one who gets you awesome action shots if you catch them in the right moment. However, these guys are almost always in the back of the stage and therefore you need a telephoto lens like the 70-200mm to capture his presence. On bigger stages (like festivals) it can happen that the drummer is so far away, that it is not always possible to reach him with your basic lens kit. But try your best, and your efforts will be rewarded.

Concert photography drummer

Chad Smith, Red Hot Chili Peppers

The Band

Also try to get a picture of the entire band. Your best bet is the use an ultra wide-angle lens such as a 14mm lens. This will allow you to get the whole stage in one picture. If you are allowed to shoot the complete show (you have to ask the band first), try to get other viewpoints such as from a balcony, from the back of the venue, or on stage.

Concert photography band

Fink

The Audience

In addition, you can also take pictures of the audience. Just turn around in the photo pit and you are facing the screaming fans squeezed into the first row. This is a tricky one, because there is lack of lighting there and you need a ultra wide angle lens to capture some good action shots. Try to catch them when they are ecstatic about the band.

Concert photography Audience

Some general notes for you as concert photographer:

  • I always try to get the musicians with their instruments. So when I shoot the lead singer, I take care to include the microphone. When shooting the guitarist, get the guitar in the shot and the drummer needs to show his drumsticks, otherwise it looks strange when someone sits behind a huge drum kit, but you can’t actually see him playing.
  • In general I try to frame my pictures in a way that I don´t chop off guitar necks, bass bodies or keyboards. For a close shot of the drummer you need to crop the drum kit. Thats fine, just try to get a clear framing.
  • Shooting famous bands like Metallica, Iron Maiden, Red Hot Chili Peppers, they always provide good lighting on stage. It gets more difficult in smaller clubs where you are confronted with poor lighting conditions.
  • Try to get some details shots too. Shoes, tattoos, fancy stage outfits such as lamps, visuals or flags. Some bands can be very creative.

Summary:

  • Get to know your gear by heart first (camera settings, lenses)
  • Even though the lead singer is the celebrity of the band, try to also get the other band members
  • For the drummer, you often have to use a telephoto lens
  • Show the context in your pictures e.g. The singer with a microphone, drummer with drumsticks, etc.
  • Frame your pictures to avoid cropping off the instruments
  • Get pictures of the band, audience and details on stage
  • The more famous the band, the better lighting on the stage (rule of thumb)


The post Anatomy of a Concert Photography Shoot by Matthias Hombauer appeared first on Digital Photography School.


Digital Photography School

 
Comments Off on Anatomy of a Concert Photography Shoot

Posted in Photography


Anatomy of a Subject

30 Aug

So much of what we do is defined by the elements that embody the concept.  The three elements of the exposure triangle help us understand “proper” exposure.  Every light source has three distinct qualities (color, quality, direction).  Even the physical tools at our disposal can be broken down to a simple trifecta– light, lens, and camera.  Being able to break something down into its components helps the beginner by giving them a road map– a series of steps that simplifies the process and makes it easier to understand.  With enough repetition, that same road map becomes a mental checklist for the more advanced photographer.  Over time, that checklist hopefully just becomes second nature.  That photographer might not actually be thinking “foreground, subject, background” each time they compose an image in the viewfinder, but the elements are present, both in the planning and execution of the shot.  Taking this concept of breaking down composition a step further, we can even break down the subjects in our images into distinct visual components.

SHAPE or OUTLINE

Perhaps one of the most fundamental of these components is shape.  Regardless of whether we are photographing people, buildings, landscapes, or any of the other endless possibilities, every subject has shape.  Definition.  It can be subtle or dramatic, but everything we photograph is defined to a certain extent by its outline.  The most graphic representation of shape comes from a back-lit silhouette or underexposure, either of which draws less attention to individual features and more to the overall shape of the subject.  While this photo of a boxer is very brightly lit from the side, the high contrast lighting and black background combine to engage the viewer with a strong emphasis on the shape and outline of the subject.  In a more classic silhouette, the sax player was lit completely from behind.  The soft, wraparound quality of the light does bring out a bit of detail in the instrument, but the visual emphasis rests primarily on the shape and outline of the musician, creating an entirely different overall feel to the image.

001-Shape

Obviously, high contrast and silhouette are not the only ways to illustrate the shape of a subject.  As noted, everything that comes in front of our camera has shape.  How and to what extent you choose to highlight it relies on how you choose to place it in your frame.  The photograph of the staircase was taken for an ABC project entirely because of its shape, while the radiator grill of the 1938 MG has multiple shapes and lines which draw the viewer’s eye into the photo from top to bottom.

002-Shape

COLOR & TONE

While color often grabs our attention first, sometimes we take the extra steps to actually plan for it.  Bright and bold.  Soft and muted.  Contrasting or Complementing.  In the portrait of the boy with the football helmet, the bright red obviously grabs your attention and draws you in.  In the low-key portrait on the right, however, it was the darker tones and color palette that caught my interest.

003-Color and Tone

FORM & TEXTURE

When we start introducing light and shading across a subject we produce various qualities of shape, shifting lines, and intensity of color.  While our silhouette primarily emphasizes a subject’s two-dimensional  shape, it is “form” that best describes the three-dimensional qualities of a subject.  Form gives substance, depth, and definition to the silhouette– bringing it out of the shadows and into the foreground.  Here is where the combination of light, color, and shadow combine to create texture in our images.  In each of the images below, the form and textures are created and accentuated not only by the composition, but also by the way the light falls across the subject.

004-Form and Texture

As is the case with things like the exposure triangle  or characteristics of light, the extent to which each of these is emphasized in any given photo is going to rely heavily on the photographer and how they express their personal vision and individual style, as well as the mood they are trying to convey and the story they are trying to tell.  In virtually every situation, however, one of these components plays a huge role in making a photographer stop in their tracks and say, “I need to photograph that.”

Post originally from: Digital Photography Tips.

Check out our more Photography Tips at Photography Tips for Beginners, Portrait Photography Tips and Wedding Photography Tips.

Anatomy of a Subject


Digital Photography School

 
Comments Off on Anatomy of a Subject

Posted in Photography


Anatomy of a Modeling Session

05 Feb

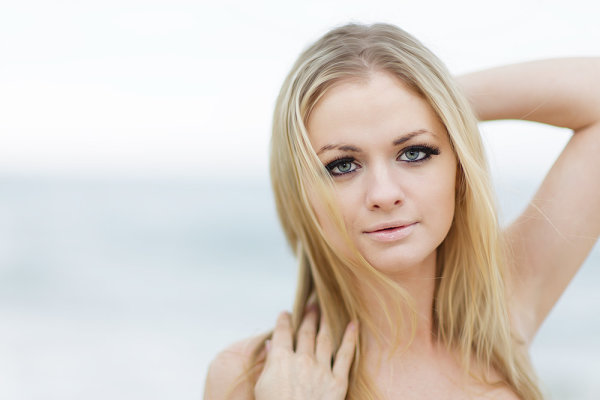
This was taken with the Canon EOS-1D X and EF 85mm f/1.2L II. I had a 600EX-RT speedlite on camera to provide just a touch of fill. Exposure was 1/250, f/1.2, ISO 100.

I am often contacted by people who are interested in modeling, either as a hobby, or to build a portfolio to try and model professionally. It’s one of the more fun things I get to do with a camera, as it allows me to be creative and really direct things a bit.  Models can be great to work with- both to build their portfolio as well as your own.  Aspiring models are often looking to diversify their portfolio, and are willing to trade time for images. I’ve developed working relationships with several models so that when I want to try something new, they are usually game.  In addition, they will call me when they have an idea they want to add to their portfolio.  This type of relationship can be liberating, since you are creating portraits for a client who is paying, and depending on your for an image.  Rather, it’s a joint collaborative effort that yield phenomenal results.

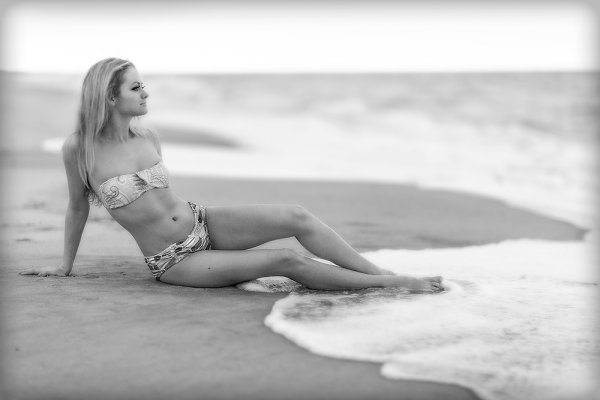
The headshot above was taken within the first few shots of the session. This one was the next sequence. I backed off to shoot her full length. Exposure 1/1250, f/1.2, ISO 100. Lens was the EF 85mm f/1.2.

I enjoy working on location with models because locations can offer a variety of settings. They also offer their own set of challenges.  When I begin planning a model session, I propose several locations, as well as an overall concept.  It’s important to agree on these things ahead of time so you are both on the same page for overall direction.

Once the shoot and location is agreed on, I always hold a discussion with my subject, discussing the goals of the shoot, as well as any ideas I had.  I would ask the model to let me know if he or she had any ideas or shots in particular as well. Once the general concept is down, we discuss outfits. Many times the model will send me photos of outfits they have or want to try, and this will lead to more discussion.  Generally, by the time this exchange happens, both myself and the model have a very good idea of what we want, and what the plan is, that when the day of the shoot comes, we’re ready to go with no questions.  By the way, this process works great for my portrait sessions as well.

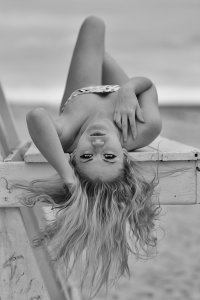
Locations present their own benefits. In this case, the lifeguard stand offered some nice options for posing. A reflector to the right of the model helped kick a bit more light into her face. EOS-1D X, EF 85mm f/1.2L II. Exposure is 1/640, f/2.8, ISO 100.

So we’ve discussed outfits, concepts, and location. Once I know what the model is looking for and what we want to do, I pack my bag.  Camera body, speedlites, spare batteries, lenses.  Which lenses? Depends on the shots I’m looking for, but  my go-to lenses for portraits and models are pretty much the EF 85mm f/1.2L II, the EF 100mm f/2.8L IS Macro, and the EF 70-200 f/2.8L IS II. Depending on what else I’m looking for, I’ll use a EF 24-70mm f/2.8L II for wider shots that become more of a landscape with a model in it than a portrait.  If I’m planning on using off camera speedlites, I’ll also bring however many I plan to use- usually two or three- as well as modifiers such as soft boxes. In addition, I ALWAYS have a reflector with me to use with both speedlites or natural light.  Right now, my camera of choice is the Canon EOS-1D X.

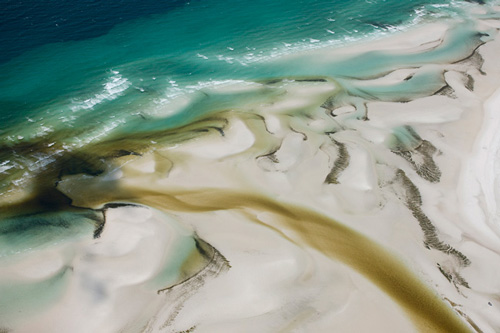
You’ll notice my go-to lenses are all f/2.8 or faster.  The ability to blur the background using a wide aperture is important to me, so anything distracting or unimportant can simply be blurred out.  I like to show a context without being literal about it.  So while you’ll see the sand and water in the background, it doesn’t have to be sharp. The furthest I’ll stop down, generally, is about f/5.6, but I normally will shoot at anywhere from f/1.2 to f/4.

When I do a model portfolio, or even a portrait shoot, I generally go in with an idea of the look I want to achieve. I try to maintain the same look for every file. When shooting on location, this assumes the light and the weather cooperate.  Invariably, there are times when the weather does not cooperate and you have to adjust.  The shoot that produced the accompanying photos are a case in point.  I planned a sunrise shoot.  I envisioned soft, warm, light on the model’s face, with orange glows on the sand and soft pink sunrise skies.  Instead I got fog and flat grey clouds.  Change of plans.

I pretty much decided when I arrived at the location that I was going to go for a monochromatic look.  The light was flat, the sky was grey, everything just “felt” black and white.  That’s not to say I didn’t do any color- but overall the look was for black and white.  Generally when I’m shooting a model my goal is variety.  If it’s for a portfolio, I want to be able to get several shots they can use for their book.  I’ll work wider for full body shots, then close in for tighter head shots.  I’ll generally let the model pose as he or she feels comfortable, tweaking the poses when I see something that needs to change- a tip or turn of the head, a repositioned hand, a stray hair.

I always have a reflector on hand. Even on a dull, cloudy day, a reflector can add enough punch to the light to create catch lights in the eyes, fill in the soft shadows around the eye sockets, and generally just make things pop better.  I use a two-sided reflector by Westcott, with one side silver and the other side uncoated muslin. On a day like the one the accompanying photos were taken on, I used the silver side of the reflector since it kicked more like back up than simply using the white side.

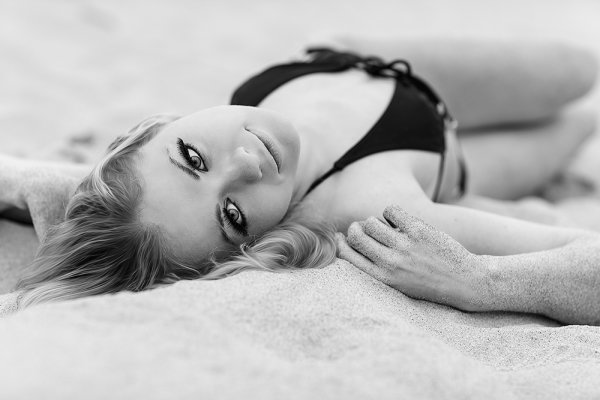
For this shot, I asked Yuliya to just pose in the sand. Rather than have her move, I moved around her 360°. She did her thing and we ended up with a few nice images. EOS-1D X, EF 85mm f/1.2L II. 1/250, f/2.8, ISO 100.

During the session, I try to mix full-length shots with tight closeups.  Once I think we’ve captured the essence of the current outfit, I’ll quickly ask the model if there was anything else he or she wanted from it that we didn’t do, and then suggest a change to next one. This avoids belaboring one outfit or using so much time on one outfit that you don’t get to the rest.

I will show the model what I’m getting periodically so they know what we’ve got.  The last thing I want to hear is that they wanted something we didn’t get, after the fact.  This feedback is valuable because if the model doesn’t feel they look right, it can be changed before it’s too late.  It also gives them an idea of what you’re capturing and allows them to modify their posing accordingly.

When it comes to processing the images, I try to make sure the look of all the files is fairly uniform.  I want each session to stand alone as its own body of work.  I do vary certain things, but generally I will use the same styles.   Once all images are downloaded, I go through and choose the keepers.  Then I process each, retouching the skin, the hair, and the eyes.  To me, portraits and model photography isn’t about reality.  It’s about flattery. You want to make your subject look good.

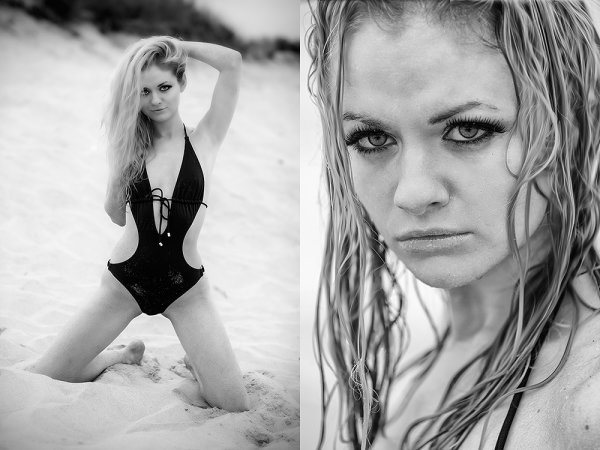
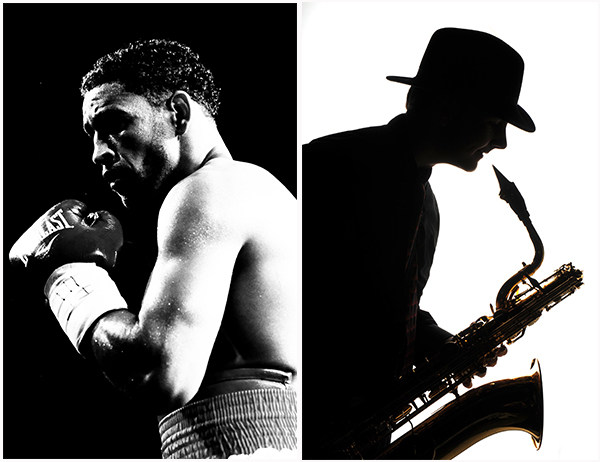
These two images were taken with the EF 70-200 f/2.8L IS II on the 1D X. It's one of my favorite lenses because it allows me to start off loose and then go in tight without being in the model's personal space.

Post originally from: Digital Photography Tips.

Check out our more Photography Tips at Photography Tips for Beginners, Portrait Photography Tips and Wedding Photography Tips.

Anatomy of a Modeling Session


Digital Photography School

 
Comments Off on Anatomy of a Modeling Session

Posted in Photography