RSS
 

Posts Tagged ‘Actions’

How to Create and Use Photoshop Actions to Speed up Your Workflow

26 Jun

Photoshop_CC_icon.pngWhat are Photoshop Actions?

Photoshop Actions are very useful time savers. Should you find yourself applying the same Photoshop commands or a series of commands repeatedly to images, wouldn’t it be nice to just push one key and apply that series of commands to your image, or even to a whole folder of images? It can be done, read on.

What kind of things can you do with Actions?

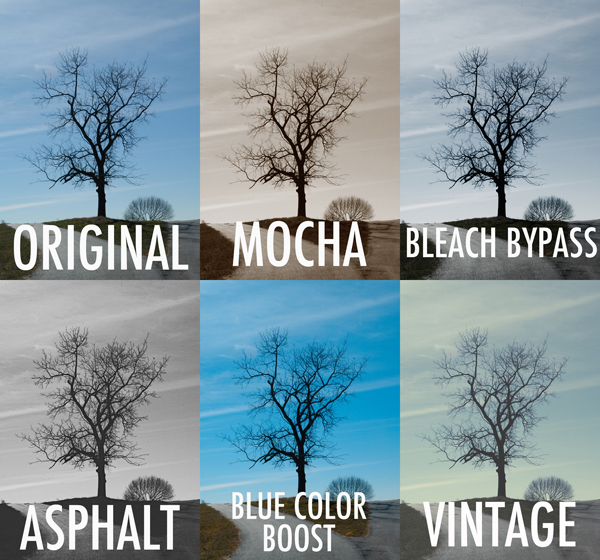
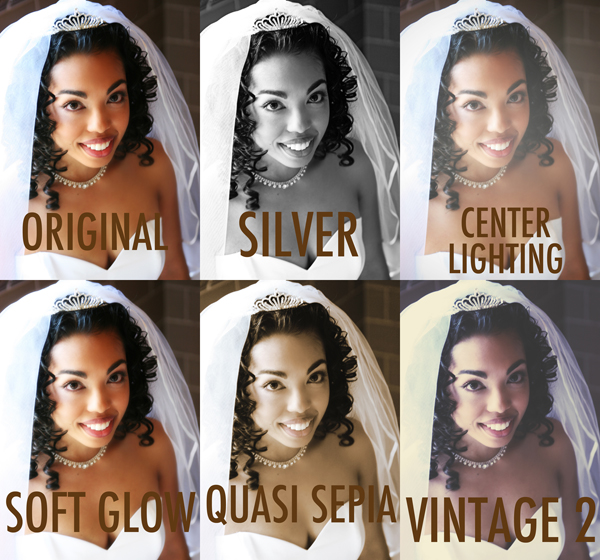
Inside Photoshop, just about everything you do to enhance images can be done with an Action, ranging from: applying creative styles, resizing, converting to Black and White, sharpening, watermarking, or even compositing star trails – all with one click of the mouse or a keyboard short-cut.

Why use Actions?

The use of Actions will streamline image processing by combining multiple commands into one key stroke, or batch, which will save you lots of computer time and give you more time for shooting. Every photographer wants more time for shooting.

Create a simple Action

Okay, so perhaps you want to resize an image for the web. This simple action will resize the image to 600 pixels wide, and also add copyright and contact information to the image.

action_palette-with-callouts

Steps-by-step how to create your own Action

  1. In Photoshop , open the photo file you want to work on.
  2. Open the “Action Palette” or panel (Alt+F9)
  3. Select “Create New Action” from menu or click on the “New Action” button.new action3
  4. Name your Action; use a name that will tell you what the Action will do. In this case we will name it “Save for dPS Blog”.
  5.  Assign a key board short-cut.
  6. Assign a color to Action button. (This is optional, but can be useful to organize your Actions when you set up multiples.)
  7. Assign a set in which your Action appears. This is useful if you want many Actions for many different types of work, for example “Sizing Actions”.
  8. Start recording – select record from the menu or click the  “Start Recording” button.
  9. Now, simply apply all the Photoshop commands to your open image that you want saved in that Action.
  10. Select image size (Alt+Ctrl+I) and set to 600 pixels wide.
  11. Select File Info (Alt+Shift+Ctrl+I) and enter your Copyright information.
  12. Select “Stop Recording” from menu or click the “Stop Recording” button.If any of your commands require variable settings that need to be changed on an image by image basis, click on the pause button for that Action. Now when you run your Action, it will stop at that command for your input. Otherwise, your action will run just as it was recorded with all input being applied the same.

How to use Actions

There are three ways Actions may be used:

  1. Applying it to a single open image
  2. Applying it to a batch of images
  3. By creating a Droplet of your Actions

Explanations of how each of these work follow.

Applying to open image

You can apply your Action to an open image by simply selecting the desired Action in the Action Palette and then selecting Play from the menu or by clicking the Play button.

Applying to a batch of images:

  1. Place all the  images into one folder
  2. Select the Action you want to run
  3. Under the File menu, select Automate and then Batch (because the Action you want to run is already selected, the action field will have already been preloaded with the right one)
  4. Under Source, select the desired folder from the menu.
  5. Click on the Choose button and select the folder that contains your images.
  6. Under Destination, select Folder.
  7. Click on the Choose button and select a folder where you want the final images to be saved.
  8. Select Override Action “save as commands”
  9. Click OK and Photoshop will automatically start opening all the files in the source folder one at a time and running the Action, then saving them to the destination folder. Cool, huh!?batch

Make a Droplet from an Action:

With this method you can create an executable file, which you can be place on your desktop. Then if you want to run an Action on a file, you can just drag it to your Action Droplet and the changes will be applied to your file and saved to a specified folder.

Creating a Droplet:

  1. Select the Action that you want to use to create your Droplet.
  2. Under File menu, select Automate and Create Droplet, the Create Droplet menu will open.
  3. Under Save Droplet In: click on Choose and select a destination for your droplet. Your computer desktop is a great destination and makes the Droplet easily accessible.
  4. Under Play, since we already selected the Action in step 1, this section already contains the correct command info.
  5. Under Destination select Folder.
  6. Under Destination click on Choose and select a folder where you want the finished images to be stored.
  7. Select Override Action “Save as Commands”.
  8. Click OK and Photoshop will automatically create your Droplet.
    Now simply drag your image to the Droplet and the Action will be applied to the image and saved to your specified folder.Droplet

Actions can be used for the simplest series of commands, but after you get the hang of it you can create some very complex applications. The purpose of this article is to show just how easily you can create your own Actions and thereby simplify and speed up your work flow.

If you have other tips for using Photoshop Actions please share in the comments below.

For more on Photoshop Actions try these articles:

  • Tips for Learning to Love Photoshop Actions
  • Get Creative with Photoshop Actions
  • Lightroom Presets vs. Photoshop Actions

The post How to Create and Use Photoshop Actions to Speed up Your Workflow by Bruce Wunderlich appeared first on Digital Photography School.


Digital Photography School

 
Comments Off on How to Create and Use Photoshop Actions to Speed up Your Workflow

Posted in Photography


ATNX Photoshop Actions Review

17 Dec
"Photoshop Actions" from ATNX Digital provides an affordable, user-friendly actions alternative for Photoshop users.

“Photoshop Actions” from ATNX Digital provides an affordable, user-friendly actions alternative for Photoshop users.

Let’s face it– Photoshop is a beast, and a tough one to tame. There are at least half a dozen “right” ways to do just about everything, and I think it’s safe to say that most of us don’t use it to anywhere near its full potential. I’ve lost track of how long ago I started using PS (version 4, maybe?), and I’ve yet to unlock all its secrets– which I think is a good thing. For me, the best Photoshop work is that which my clients never even notice. To that end, I strive to get it right in the camera, and to the extent that post-processing is necessary, I try to keep it to a minimum. Smooth a little skin. Bump some contrast. Open up the shadows. Darken the highlights. A few simple tweaks to help make sure that people notice the photo– not the editing.

Keeping the edits simple, though, is not always an option. Try as I might, I’m not always going to get it right in the camera. Keeping the sky nice and blue when properly exposing for the ground isn’t always easy. And don’t even get me started on the myriad of ways to run a black & white conversion. Learning how to tackle some of these editing challenges can be slow, meticulous work, and it can often feel like you’re re-inventing the wheel for every photo. Who wants to spend that kind of time in front of the computer? This is where Photoshop Actions come in handy.

“I’m Still New to Photoshop. What’s an Action?”

A Photoshop action is basically a recorded set of steps which allows you to reduce any series of long, complicated, time-consuming steps to a single click of the mouse. What might ordinarily take minutes or even hours to achieve by going step-by-step, becomes a much more convenient, time-saving, automated process. Some actions provide a simple, global adjustment to the photo, while others will apply several customizable adjustment layers, allowing the user to fine-tune the action and target specific areas of the image.

While anyone can record their own actions in Photoshop, companies like Kubota Image Tools, Totally Rad Actions, MCP Actions, and others, have been creating action packs for years, allowing photographers to achieve editing results they might not otherwise have the time or Photoshop expertise to achieve on their own. Contrast adjustments, black & white conversions, sun flares, vintage filters– even teeth whitening– are all just a click or two away. Most action packs come with more than you will ever need (or want) to use, but if you’re lucky enough to find even just a few that help your workflow, you’ll find them to be well worth the cost.

atnx-actions-collage1

Set One – In this first set, “Lonely Tree” gets a sampling of actions from each of the four sets in the pack.

Photoshop Actions from ATNX Digital is a new option, providing users with 90 actions in four sets– Primary, Mono, Color, and Special.  The Primary set consists of 20 actions, helping to automate tasks like boosting contrast, dodge & burn, noise reduction, and soft focus. Mono– as the name implies– consists of 26 different black & white conversion tools, while the Color set goes the other direction, using actions like Bleach Bypass, Color Boost, and Custom Toning to make color adjustments you could never achieve in-camera (see image above). Finally, the Special set brings effects like center lighting, selective focus, light leaks, and 17 different textures to your digital palette.  It’s a pretty extensive selection, with a variety of options for many post-processing tasks.

First Impressions

What I like about these actions is that most are customizable and can be adjusted to the specific needs of the image. This is achieved in a variety of ways, depending on the selected action. Since most actions are applied by adding various types of adjustment layers, the original image (the Background layer) is left untouched on the bottom of the stack. By adjusting the opacity of the new layers, selecting which of them are even visible, or tweaking the layer masks, you open up a world of adaptable possibilities.

All of that sounds great, but it’s important to keep something in mind. The quality of any action is only as good as the Photoshop skills and aesthetic of the person who programmed it in the first place. Most actions are good starting points, but since every image– and every photographer– is different, you are hardly ever going to simply apply an action and walk away. You may have to tweak it, finesse it, and sometimes even bend it to get the right look. Hopefully, the structure of the action makes it easy– perhaps a final step in a relatively streamlined process. That’s why it’s so important to find actions that fit well with your workflow. If applying an action is only the first step of a 30-minute editing process, you’ve completely missed the point. They only save time and effort if you are off doing something else.

I haven’t tried all 90 of the actions yet, but I’ve gone through a good sampling from each set to have a pretty good feel for them. Of the 40 or 50 that I’ve put to the test, I’ve probably found five or six that I can see incorporating into my workflow. While that might sound like a bad review, I assure you that it’s actually pretty high marks coming from me. Of the hundreds of actions installed on my computer, I probably use a grand total of anywhere from six to ten of them with any regularity. While that may sound like a waste of money, if they get me away from my computer so I can spend more time with my family, it’s worth the price.

Examples

For purposes of this review, anything labeled “Original” is straight off the camera, with no edits other than resizing.  Anything labeled with an action name has had the action applied, with no additional editing of the image or tweaking of the action. See Set One examples above.

Not all actions are universal. What might work well with landscapes can fail miserably with portraits. Experimenting with how different actions affect different photos can lead to interesting and creative results.

Set Two- not all actions are universal. What might work well with landscapes can fail miserably with portraits. Experimenting with how different actions affect different photos can lead to interesting and creative results.

Easy on the Budget

Speaking of cost, this is where ATNX actions really shine. While some companies charge hundreds of dollars for smaller action packs, the complete set of 90 ATNX actions comes in at a very budget-friendly $ 25.00 (USD). This is particularly helpful for photographers who may be new to Photoshop actions and still aren’t quite sure how they’ll fit with their workflow. While you might hesitate to spend anywhere from $ 80.00 to $ 200.00 on a maybe from another company, at $ 25.00 you can afford to take a chance. That’s not to take anything away from higher priced sets, but if you’re still learning your way through the post-processing labyrinth and want to give actions a try, ATNX might just be a good place to start.

Wrap up

Anything negative that I might have to say would be based only on my own personal aesthetic, through no fault of the product. If an action’s initial output requires too much tweaking to get the look I want, then it’s not for me. Objectively speaking, though, Photoshop Actions from ATNX Digital combine strong, user-friendly editing tools with an affordable price tag– not an easy combination to find.

ATNX Digital Photoshop Actions are available for digital download on their website.

The post ATNX Photoshop Actions Review by Jeff Guyer appeared first on Digital Photography School.


Digital Photography School

 
Comments Off on ATNX Photoshop Actions Review

Posted in Photography


Tips for Learning to Love Photoshop Actions

13 Dec

This is a guest contribution from Meghan Aileen Schirmer at The Shoppe Designs & Photoshop Actions. Their In Vogue Action Set is available on Snap N Deals now for just $ 29! (until December 24, 2013)

Learning to Love Photoshop Actions

Photoshop actions tips 04

When it comes to Photoshop Actions or presets photographers tend to love them or hate them. But, when done right they can really enhance a digital image in a way that a straight out of the camera digital image cannot achieve. If you use film, that is very different, and the variety in types of film and processing techniques allows for a greater variety of beautiful looks for your images. However digital photography, in general, is limited to that digital look we all know, especially when we are in the context of a commercial photography workflow. You can of course edit your images individually in Lightroom, ACR or Photoshop. But when you use Photoshop Actions and presets it is simply speeding up this process. When you have hundreds of images to edit, time savers are very valuable.

What can you use Photoshop Actions for?

Photoshop Actions can be used for workflow speed, such as simply adding a little contrast and saturation to all of your straight out of camera images. They can also be used to specially edit key images or to add a unique style or look to your images that makes you memorable amongst the sea of competition. Action sets at The Shoppe Designs & Actions usually each contain, several specialized Photoshop Actions that you can use at different opacities and different combinations for various style looks, as well as some utility Actions such as adding contrast or grain.

Action styles

Our In Vogue set was inspired by the pages of high end fashion magazines. In this set you will see the matte look and slight toning of modern fashion photography, as well as the clipped blacks of vintage black and white film. When shooting film is not an option, using Actions to mimic the look of film is a great alternative. Maybe you love the look but are not in a position to switch to shooting film.

Here you can see the plain digital image and then the sample using the In Vogue Action Set. Our Actions are set up to leave you with a folder on top of your background layer in Photoshop, so that you can easily adjust the strength of the action. We give them to you at 100% strength or a bit less, and then you can adjust them to say 20% for a more subtle look. Perfect when you don’t want the image to look like you edited it with Actions, but just want to get rid of that digital feel. See how in these samples the actions are used at a lower opacity to simply enhance the image and not heavily alter it.

Photoshop actions tips 01

Photoshop actions tips 02

Black and white Actions

Using Actions to make your images black and white is an excellent use of them. Especially if you like the black and white film look. Just reducing the saturation on an image in Photoshop is not going to get a gorgeous black and white image, it will be flat and digital looking. Our Actions create different tones, different depths of contrast, flat or deep blacks and some even add grain for that authentic film look.

Photoshop actions tips 03

Photoshop actions tips 04

Applying Photoshop Actions

When using Photoshop Actions, we recommend trying a variety of them on several different types of photos with different lighting conditions. Not all Photoshop Actions work the same on all images, it is just not possible. Some greatly enhance one image, but may not work at all on another. As you use them often you get to know which works best on the different types of images. Some will really bring out the color in one image, while diminishing the color in another. As I mentioned our Photoshop Actions leave a folder on top of your image in your layers palate in Photoshop. We recommend playing each one on an image, then turning the folder off and on to see the effects. Then adjust the opacity of the entire folder and see what looks best. Then you can play another to add different effects and keep adjusting the folder opacity until you love it. It is best to go back to the background layer before playing each one.

Photoshop actions tips 05

In general, I recommend doing basic image editing in a RAW editing program before starting to play with Actions, unless you are using the utility Actions such as ADD CONTRAST. Stylized Photoshop Actions are simply meant to enhance while utility Actions like adding contrast, boosting saturation and sharpness can be used on original camera images.

If you want to use a utility type Action on a bunch of images at once, or a stylized action on a set of similar images, you can do that as well. In Adobe Bridge, go to TOOLS > PHOTOSHOP > BATCH and then choose the folder of images, the action to use, and the destination for them. I recommend saving them in a different folder and not saving over your originals in case you want to edit them differently later.

However you decide to use them, Photoshop Actions can be very versatile and very useful. It is a matter of fitting them into your workflow and discovering how Photoshop Actions in general as well as which Photoshop Actions in particular work best for you and the way you work.

The Shoppe Designs & Photoshop Actions has many well respected action sets to choose from, and the In Vogue Action Set from is available on Snap N Deals now for just $ 29! (until December 24, 2013)


Designer and Photographer Meghan Aileen Schirmer is the owner of The Shoppe Designs, Inc. Meghan has designed and photographed for some of the most well-known companies in the world over the past 15 years. From Sony to Nickelodeon, as well as Grammy winning artists and musicians. She lives in Nashville, TN with her family.

  • Try a FREE sample set of Actions by liking The Shoppe Designs Facebook Page
  • See more available Actions on their website  The Shoppe Actions
  • See the In Vogue Actions set, regular price.

The post Tips for Learning to Love Photoshop Actions by Guest Contributor appeared first on Digital Photography School.


Digital Photography School

 
Comments Off on Tips for Learning to Love Photoshop Actions

Posted in Photography


Actions: Efficient Editing or Cheating?

22 Oct

Learning to use Photoshop can be overwhelming to some people. There are so many functions and so many tools that it can seem like you will never really understand how to use it. You search online for videos and tutorials, but even then, depending on your version of Photoshop you still may feel lost.

When photographers discover actions for Photoshop it’s sometimes like hitting the photography jackpot. They speed up your workflow. You can get more done. You can achieve different effects with them, but sometimes other photographers will tell you that it’s basically cheating in Photoshop.

Are you cheating yourself or your client when you use actions?

Most actions require a bit of tweaking when you use them to get the effect that you want. It’s very rare that once actions are played that they are perfect. This way a photographer can adjust them to get the look they desire for their images. When photographers use actions that require the tweaking of their images, they are learning more than just using the slider, they are learning how parts of Photoshop works. They are learning about blending modes, adjustments, curves, etc.

Photography is about finding your art and doing it your own way. Using an action does not compromise the vision of your art. You still make the decisions about how the end product looks. There are some people who will disagree and say that actions are cheating because you don’t have to learn to manually adjust everything by hand. You can get clean dishes by using a dishwasher or washing them by hand, is one way cheating? You still achieve clean dishes. Isn’t that the goal?

Some photographers use different actions combined with hand editing. They have learned Photoshop over time and figured out what works for their editing needs. You can even make your own actions by combining the actions you use the most and your own hand editing. It takes a little practice to get the technique down, but once you do you will speed up your own workflow go even faster. I have incorporated actions and hand editing and now when I do a photo shoot I typically know what type of look I am going to want for the final images. Whether I achieve those looks by hand editing or by actions or a combination doesn’t matter to my client. They just want beautiful images. You can even use actions multiple times or use different actions in a combination to achieve your desired look.

For this vintage type look I used Blue Ginger from Florabella Classic Workflow twice.  The second time I only used it at 10%.

For this vintage type look I used Blue Ginger from Florabella Classic Workflow twice. The second time I only used it at 10%.

So, you decide that you want to look into actions, but then you Google them and are overwhelmed by the options that are out there. What’s next? How to choose? Well, this depends on the look you want for your images. Look at the images that are posted using the actions and see if they reflect your style and your images. There are some free actions out there, but most you have to purchase. Some are relatively inexpensive and there are some that are very expensive. For some people it’s very hard to commit to buying expensive actions without testing some first. There are some action developers that post some free sample actions for you to use so that you get an idea of how their actions work.

For this complete vintage look I used Pioneer Woman's free set. I used Vintage and changed the edge burn to 74%, vintage blur to 84%, midtone bump to 85%, and turned grain off. Then I used the Old West action and just decreased the overall action to 37%

For this complete vintage look I used Pioneer Woman’s free set. I used Vintage and changed the edge burn to 74%, vintage blur to 84%, midtone bump to 85%, and turned grain off. Then I used the Old West action and just decreased the overall action to 37%

Whether your purchase your actions or use free actions the only thing you need to be sure of is that they are working with your overall images and that they are reflecting your style. As you learn Photoshop you may start creating your own actions that help your workflow and truly reflects your style and your artistic vision, or you may stick with what is working. Only you can decide what works best for your business, your images, and your clients.

A few recommended places to download free actions:

  • Colorvale Actions
  • Pioneer Woman
  • My Four Hens (Look for the freebie tab on their Facebook)

You can also purchased actions from:

  • Colorvale
  • My Four Hens
  • Wish Photography
  • Florabella

Post originally from: Digital Photography Tips.

Check out our more Photography Tips at Photography Tips for Beginners, Portrait Photography Tips and Wedding Photography Tips.

Actions: Efficient Editing or Cheating?

The post Actions: Efficient Editing or Cheating? by Guest Contributor appeared first on Digital Photography School.


Digital Photography School

 
Comments Off on Actions: Efficient Editing or Cheating?

Posted in Photography


Easy Blog Collages With MCP Action’s Lightroom Presets

12 Feb

Are you a fan of Lightroom presets?  There are so many Lighroom preset brands out there, but some of them stand above the rest.  MCP Actions is one of them, and recently they’ve released a fantastic set of presets with the purpose of giving photographers an simple way to create blog collages.

As you can see, without leaving Lightroom you’re able to organize and generate amazing blog collages using the new MCP Actions Lightroom presets.

Here is an example:

blog-collages-lightroom-presets

What do you think? Will you be picking up a copy?

Thanks for reading,
Scott

dslrBlog

 
Comments Off on Easy Blog Collages With MCP Action’s Lightroom Presets

Posted in Photography


JHP Photoshop Actions – Photography to the Next Level!

24 Oct

Just a short intro video into the JHP Actions and LR Preset world. This video is not so much a tutorial as it is preview of the processing power of the JHP Actions. This video shows the installing, changing to Button Mode and using the JHP4 – The Essentials Action set. This is my first screen capture video so expect future videos to be more entertaining as soon as I learn how to use my video software. 🙂 Check out www.jhpactions.com today – Create AMAZING images, INCREASE your workflow and give your photos LIFE with just ONE CLICK! The JHP Actions give you the flexibility and ease of enhancing, color-correcting, sharpening, Retouch, texturizing and adding that extra boost to all your images with One Click! JHP Actions are Non-Destructive meaning they keep your original image intact and allow you to mask, control opacity, stack actions and adjust blend modes to create a limitless number of awesome effects! Take your photography to the next level and Satisfy Your Creative Mind! Credits – Used WebCam Max for Capture and Muvee to add sound and style. Music: Nighthawk22_Corrosion
Video Rating: 5 / 5

 
Comments Off on JHP Photoshop Actions – Photography to the Next Level!

Posted in Retouching in Photoshop


PSE Actions Tutorial by Paint the Moon – Picture Perfect Mega Set

07 Dec

paintthemoon.net Photoshop Elements Actions by Paint the Moon … a tutorial using the brand new Picture Perfect Portrait Mega Set Available for Elements 6-9 and Photoshop CS2 through CS5. Shows how to utilize the actions, plus tips and tricks along the way.
Video Rating: 4 / 5

Master Guitar Solos app! mhlo.co What Can You Do with Photoshop? ——————————————————————— Photoshop can be used in photography, illustration and web design. Gene and Justin will guide you through this course and show you the many facets of the program. Overview ——————————————————————— Photoshop is more than just a tool for photographers. It allows users to use tools and blend effects to achieve results that can be described as a mix between digital painting and photography. Here is a quick run down that briefly explains some of the things that Photoshop can achieve. Photo retouching and image enhancement: the image on the left has been retouched and enhanced to create the image on the right.Image manipulation: the people near the water have been removed and the colors have been brightened slightly.Color correction: the home video image on the left is tinted yellow, so Photoshop was used to give a more proper skin tone to the subject and to alter the background.Image restoration: the photographs on the left sides have been restored and color corrected to become the images on the right sides.Digital matte painting: a combination of painting and photography, mixing photographic elements and paint. This technique is typically used in movies to enhance backgrounds. Design ——————————————————————— Logos, web pages and even fashion can be


Photoshop Actions How To Tutorial Paint the Moon

20 May

paintthemoon.net An editing session in Photoshop using Paint the Moon actions – see how they work and examples of how to “tweak” your actions.
Video Rating: 5 / 5

 
Comments Off on Photoshop Actions How To Tutorial Paint the Moon

Posted in Retouching in Photoshop


Photoshop Actions!

08 Nov

Happy with our training? Donate! tinyurl.com For more tutorials, head to www.tutcast.com Creating actions in Photoshop! Music: Kevin MacLeod
Video Rating: 4 / 5

Save 10% on your GoDaddy.com purchases using coupon code: TUT1 For more tutorials, head to: www.tutcast.com Music: Kevin MacLeod
Video Rating: 4 / 5


The Life. Camera. Workflow. from Life. Camera. Actions.

08 Apr

Getting great results from Photoshop actions starts with balanced photographs. The Life. Camera. Workflow. has everything you need get the most out of your photographs and acts as a great primer for more detailed effects.
Video Rating: 0 / 5