2018 Sony World Photography Award Winners Announced
After first revealing the shortlist and later the Open category and National Award winners, the World Photo Organization has finally unveiled the overall winners of the 2018 Sony World Photography Awards. This includes the coveted Photographer of the Year, Open Photographer of the Year, Youth Photographer of the Year, and Student photographer of the year awards, as well as the 10 winners of the Professional categories.
This year’s winners vary greatly in both style and substance: from stark portraiture, to dreamy landscapes, to an ecologically-minded photo project that sheds light on the problem plastic pollution.
The overall winner and 2018 Photographer of the Year accolade goes to British photographer Alys Tomlinson, whose project Ex-Voto:
The winning work encompasses formal portraiture, large format landscape and small, detailed still life images of the ‘ex- votos’ (offerings of religious devotion) found at pilgrimage sites of Lourdes (France), Ballyvourney (Ireland) and Grabarka (Poland).
Tomlinson’s project was selected as the best from the 10 Professional category winners, where she also took home top prize in the Discovery category. The title comes with $ 25,000 worth of prize money.
Open Photographer of the Year was awarded to IT specialist and self-taught photographer Vaselin Atanasov for his photograph Early Autumn; Youth Photographer of the Year was earned by 16-year-old Megan Johnson for her image Still; and Student Photographer of the Year went to Canadian student Samuel Bolduc for his series The Burden, shot on behalf of College de Matane, Quebec.
Scroll through the slideshow to see the Overall, Open, Youth, Student, and all 9 remaining Professional category winners, then head over to the World Photo Organization website to see all of the 2018 winners and runners-up.
Press Release
Overall winners revealed for 2018 Sony World Photography Awards
- British artist Alys Tomlinson named Photographer of the Year
- 10 Professional category winners and finalists revealed
- Overall Open, Youth and Student winners announced
London, April 19, 2018 – The World Photography Organisation today names the overall winners of the prestigious 2018 Sony World Photography Awards at a London ceremony.
The coveted Photographer of the Year title was presented to British artist Alys Tomlinson for her series Ex-Voto, winning the photographer $ 25,000 (USD). The work was praised by the jury for its beautiful production, technical excellence and sensitive illustration of pilgrimage as a journey of discovery and sacrifice to a greater power.
Tomlinson was selected from the 10 category winners of the Professional competition who were announced today alongside those in 2nd and 3rd place in each Professional category. The overall winners of the Awards’ Open (best single image), Youth and Student Focus competitions were also revealed.
All winners were flown to the London awards ceremony and received Sony digital imaging equipment, publication in the winners’ book and their work will be shown as part of the 2018 Sony World Photography Awards Exhibition at Somerset House, London.
Outstanding Contribution to Photography recipient Candida Ho?fer was also at the ceremony to collect her prize.
Produced by the World Photography Organization, the Sony World Photography Awards is the world’s most diverse photography competition. The 11th edition saw a record breaking 320,000 submissions by photographers from more than 200 countries and territories, presenting some of the world’s finest contemporary photography captured over the past year.
The Awards’ annual London exhibition brings together the best established and emerging talent from around the world, providing winning and shortlisted photographers the opportunity to showcase their work on an international stage.
Photographer of the Year – Alys Tomlinson, British
Ex-Voto is a personal project by London-based photographer Tomlinson (age 43). The winning work encompasses formal portraiture, large format landscape and small, detailed still life images of the ‘ex- votos’ (offerings of religious devotion) found at pilgrimage sites of Lourdes (France), Ballyvourney (Ireland) and Grabarka (Poland).
The photographer mainly explores themes of environment, belonging and identity. She recently completed an MA (Distinction) in Anthropology of Travel, Tourism and Pilgrimage and has been recognized by a number of photography prizes.
Open Photographer of the Year – Vaselin Atanasov, Bulgaria
Selected from 10 category winners as the best single image in the world, Atanasov is recognized for his work Early Autumn and receives a $ 5,000 (USD) prize. An IT specialist, Atanasov is a self-taught photographer who began shooting in 2014. The winning photograph captures autumn in the Central Balkan National Park.
Professional Category Winners and Finalists
From insightful documentation of worldwide cultural and political events to showcasing the natural world, the photographers below were selected by judges as the best series of photographs in the world.
- Architecture: Gianmaria Gava, Italian with Buildings
2nd Edgar Martins, Portuguese / 3rd Corentin Fohlen, French
- Contemporary Issues: Fredrik Lerneryd, Swedish with Slum Ballet
2nd Margaret Mitchell, British / 3rd Alfio Tommasini, Swiss
- Current Affairs & News: Mohd Samsul Mohd Said, Malaysian with Life Inside the Refugee Camp
2nd Luis Henry Agudelo Cano, Colombian / 3rd Rasmus Flindt Pedersen, Danish
- Discovery: Alys Tomlinson, British with Ex-Voto
2nd Antonio Gibotta, Italian / 3rd Maria Petrenko, Ukranian
- Landscape: Luca Locatelli, Italian with White Gold
2nd Rohan Reilly, Irish / 3rd Tomasz Padlo, Polish
- Natural World & Wildlife: Roselena Ramistella, Italian with Deep Land
2nd Mitch Dobrowner, American / 3rd Andrew Quilty, Australian
- Sport: Balazs Gardi, Hungarian with Buzkashi
2nd Behnam Sahvi, Iranian / 3rd Matteo Armellini, Italian
- Still Life: Edgar Martins, Portuguese with Siloquies and Sililoquies on Death, Life and Other Interludes
2nd Tristan Spinski, American / 3rd Werner Anderson, Norwegian
Youth Photographer of the Year – Megan Johnson, American, Age 16
Open to photographers aged 12-19, Johnson was awarded for her image Still.. Shot on the cliffs near her house in Connecticut, the black and white image captures the complex and intricate solitude the photographer faces in everyday life.
Student Photographer of the Year – Samuel Bolduc, Canadian, Age 20
Bolduc was chosen by the judges from students worldwide for his photographic series The Burden. The work beautifully illustrates the physical burden of plastic waste in the environment to highlight the urgent need to half plastic pollution. Bolduc represented College de Matane, Quebec and has won 30,000 Euros worth of Sony photography equipment for the institution.
Outsanding Contribution to Photography – Candida Höfer
As one of the world’s foremost contemporary photographers, German artist Candida Höfer is renowned for her precise methodology and technique. Her powerful portraits of vast, empty interiors are held in collections around the world. The Awards recognize the artist for her contribution to the medium.
The news of the overall winners joins the March announcement of 2018’s 10 Open competition category winners and 63 National Awards winners, to complete the announcement of 2018’s awards. All winning, shortlisted and commended images can be seen at the 2018 Sony World Photography Awards Exhibition at Somerset House, London from April 20 – May 6th www.worldphoto.org/2018exhibition.
Sony World Photography Awards
The objective of the Sony World Photography Awards is to establish a platform for the continuous development of photographic culture. The Awards do this by recognizing great advancements in photography through the Outstanding Contribution to Photography prize as well as finding and promoting new talents of the future, whether this be in the Professional, Open, Youth or Student Focus competitions. Sony is committed to supporting global photography. This is demonstrated not only via the Awards, but also by its significant grant program which offers winners of the student competition $ 3,500 USD and professional competition $ 7,000 USD to develop personal projects.
The 2019 Sony World Photography Awards opens for entries 1 June, 2018. All entries are free at www.worldphoto.org.
Photographer of the Year and 1st Place, Discovery
Photo © Alys Tomlinson, United Kingdom, Photographer of the Year and Winner Professional Discovery category, 2018 Sony World Photography Awards
Image Description: Untitled from the series ‘Ex-Voto’
Series Description: A handwritten note neatly folded and hidden in the crevice of a rock, crosses etched onto stone, ribbon carefully wrapped around piles of twigs. These are all offerings of religious devotion, known as ‘Ex-Votos’ and found at Christian pilgrimage sites worldwide. Often placed anonymously and hidden from view, pilgrims leave ex-votos as expressions of hope and gratitude, creating a tangible narrative between faith, person and the landscape.
Taken at the pilgrimage sites of Lourdes (France), Ballyvourney (Ireland) and Grabarka (Poland), the project encompasses formal portraiture, large format landscape and small, detailed still-lifes of the objects and markers left behind.
Shot on 5×4, large format film, the images evoke a distinct stillness and reflect the mysterious, timeless quality present at these sites of great spiritual contemplation. People and landscape merge as place, memory and history entwine. NB all images untitled and taken in 2016/2017
Open Photographer of the Year
Photo © Veselin Atanasov, Open Photographer of the Year, Open, Landscape & Nature (2018 Open competition), 2018 Sony World Photography Awards
Image Description: The autumn has begun to decorate with its colors the woods of the Balkans. National Park – Central Balkan, Bulgaria.
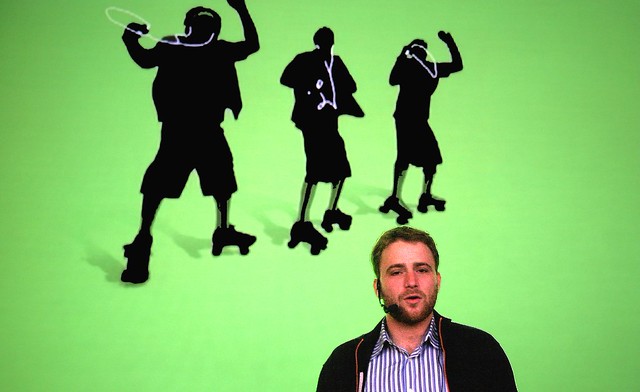
Youth Photographer of the Year
Photo © Megan Johnson, United States of America, Youth Photographer of the Year, Youth, Your Environment (2018 Youth competition), 2018 Sony World Photography Awards
Image Description: This image was shot on October 22, 2017 on the cliffs right near my house. It was taken on an iPhone 7 for the following: life, to me, has more detail in black and white.
The image represents my current state at home and school. Despite having a social group and a caring family, I often find myself alone, left to watch what goes on around me, all the while being caught up in the very center of it. This glimpse through the trees of the figure on the cliff represents the courage it takes to be one’s self in today’s society, and how even when you’re on the inside, you can be pushed out.
Student Photographer of the Year
Photo © Samuel Bolduc, Canada, Student Photographer of the Year, Student Focus, 2018 Sony World Photography Awards
Series Description: My photographic series for this second brief are staged poetic photographs illustrating people bearing the burden of plastic wastes in the environment. With these images, I want to show the actions we have to take regardless if pollution continues at this speed or not. Through commitment of my characters, I also want to evoke the hope of changes about the accumulation of plastic wastes in the environment. The vast winterly territories reveal the contrast between their magnitude and the small place humankind has.
My creative process was guided by the three guidelines of AIR strategy: Avoid by the awareness of what should be done to counter this pollution, Intercept by the involvement of human in a realistic and durable solution and Redesign by the characters’ collaboration in the production of the staged photographs.
These images were created in the Lower Saint-Lawrence region in Quebec, Canada, in February 2018. The characters represented in the photographs are friends, acquaintances and people from the recycling milieu who agreed to collaborate to this project. At each encounter, I explained the issues of the project and the impacts plastic wastes have on the environment.
1st Place, Architecture
Photo © Gianmaria Gava, Italy, 1st Place, Professional, Architecture (Professional competition), 2018 Sony World Photography Awards
Image Description: November 2017. Vienna, Austria. Because the building had the right criteria to be photographed for my project “Buildings”. Shot on tripod.
Series Description: The project Buildings is a research about the archetypical forms of architecture. When functional elements have been removed, the constructions appear as pure geometrical solid shapes. As such, they seem uninhabitable. Nevertheless, these buildings arise questions about the function and accessibility of architecture in both the public and private space.
1st Place, Contemporary Issues
Photo © Fredrik Lerneryd, Sweden, 1st Place, Professional, Contemporary Issues (Professional competition), 2018 Sony World Photography Awards
Image Description: Lavenda and Wendy are rushing into the classroom where the ballet is held after changing clothes around the corner of the house
Series Description: Every Wednesday at Spurgeons Academy, a school in the middle of the indecipherable maze of Kibera’s narrow streets and alleys, students take the chairs and benches out of a classroom and sweep the floor. The school uniforms are switched to bright-coloured clothes. When teacher Mike Wamaya enters the classroom, the students get into position and place one hand on the concrete wall as though it were a ballet bar. Classical music plays out of a small portable speaker, and the class begins.
The Ballet class is part of Annos Africa and One Fine Days charity activities in slum areas around Kenya. In Nairobi they work together with two schools in Kibera and one school in Mathare, another slum closer to the city centre. The dance is a way for the children to express themselves and it strengthens their confidence in life, and a belief that they can become something great.
Some of the children are now dancing several days a week in a studio called “Dance center Kenya” in a upper-class area of Nairobi and living in a boarding school, so thanks to their talent they have taken themselves away from the harsh conditions in the slum.
1st Place, Creative
Photo © Florian Ruiz, France, 1st Place, Professional, Creative (Professional competition), 2018 Sony World Photography Awards
Series Description: In the snowy landscapes of the heights of Fukushima, I have captured the invisible pain of radiation. Inspired by the drawings of Japanese engravings, I hoped to capture the fleeting moments, the ever-shifting perceptions of nature, where radiation accumulates the most.
The title is the measure of contamination of landscapes in becquerel (Bq), a unit that expresses atom disintegration and its mutation’s number per second. By a process of staggered superimpression, I intended to show the atom’s alteration in my pictures. The transparency effects, the broken perspectives give rise to a shape that is in motion, an impermanent world. Then, I created a vibration, a departure from the reality of the subject that reveals the presence of radiation in the image.
The process reinvents and twists the very landscape, leading to a sort of vertigo, a threatening danger hidden behind the purity of the white of the landscapes.
1st Place, Current Affairs & News
Photo © Mohd Samsul Mohd Said , Malaysia, 1st Place, Professional, Current Affairs & News (Professional competition), 2018 Sony World Photography Awards
Image Description: Bangladesh military control the situation, as Rohingya refugees wait to receive food aid at the distribution point in Balukhali refugee camp, Bangladesh on September 28, 2017.
Series Description: Ethnic Rohingya in Rakhine state has taken a turn for the worse, where on Aug 25, more than 400 houses were burnt, and within this two weeks, nearly 125,000 Rohingya refugees left Myanmar for Bangladesh.
International organizations have reported claims of human rights violations and summary executions allegedly carried out by the Myanmar army. Now Over 400,000 Rohingya Muslims have fled from Myanmar into Bangladesh since violence erupted in the Rakhine state. This pictures show their life inside the Balukhali camp in Cox’s Bazaar, Bangladesh
1st Place, Landscape
Photo © Luca Locatelli, Italy, 1st Place, Professional, Landscape (Professional competition), 2018 Sony World Photography Awards
Image Description: A view of Torano’s “marble valley” in the Apuan Alps, one of Italy’s most marble-rich area, where the abundance is surreal. What we admire as pristine white stone was born hundreds of millions of years ago in overwhelming darkness. Countless generations of tiny creatures lived, died and drifted slowly to the bottom of a primordial sea, where their bodies were slowly compressed by gravity, layer upon layer, until eventually they all congealed and petrified into the interlocking white crystals we know as marble.
Some eons later, tectonic jostling raised a great spine of mountains in southern Europe. Up went the ancient sea floor. In some places they rise more than 6,000 feet.
Series Description: Rarely has a material so inclined to stay put been wrenched so insistently out of place and carried so far from its source. In Italy’s most marble-rich area, known as the Apuan Alps, the abundance is surreal. Hundreds of quarries have operated there since the days of ancient Rome and Michelangelo sculptured most of his statues from this stone. Now the trade is booming due to the demand in Saudi Arabia and other gulf states.
The photographs of this area’s majestic quarries reveal their own isolated world: beautiful, bizarre and severe. It is a self-contained universe of white, simultaneously industrial and natural.
1st Place, Natural World & Wildlife
Photo © Roselena Ramistella, Italy, 1st Place, Professional, Natural World & Wildlife (2018 Professional competition), 2018 Sony World Photography Awards
Image Description: Luigi a young Sicilian. The economic crisis, high unemployment rate is re-directing young Sicilians from small rural communities back to their lands and working in agriculture. Luigi helps his father cultivate small fields and take care of their farm animals.
There isn’t a day in which he doesn’t dirty his hands to try to save some money to assist his young fiance’, a Romanian national that he met while working in the fields and can now pay for her trip back to Sicily and start a new life together.
Series Description: Deepland is a personal journey that started on May 2016. I traveled on the back of a mule the old Sicilian trails, starting at Nebrodi, passing through the Madonie, Peloritani and all the way to the Sicani Mountains. The mule track is a rural road similar to a trail, but also suitable for the circulation of pack animals. Prior to the development of the modern road network itself, it represented the link and trade route between the towns and the farmland.
Until about fifty years ago, mules had a prominent role in Sicilian country life providing employment and assistance to the local farmers. Due to the economic crisis, many people are moving back to the countryside, especially the young, who have chosen to react to this difficult historical moment by working the land, planting local crops and breeding livestock, creating a new rural economy.
The project is divided into two parts, research of local communities still living in remote areas and the track of a new map, a document of what remains of the old mule tracks, the last update comes back to the 50’s. Ongoing.
1st Place, Portraiture
Photo © Tom Oldham, United Kingdom, 1st Place, Professional, Portraiture (Professional competition), 2018 Sony World Photography Awards
Image Description: Colin Anthony, singer, in the back bar From the series ‘The Last of The Crooners’.
Series Description: The Last of The Crooners is a portrait of what was. Long before Gilbert and George made art in the East End of London, in a corner of every pub at weekends you’d find pub singers crooning their way through a set of jazz standards, entertaining audiences all over Hackney and Bethnal Green.
These sharply turned out ladies and gentlemen entertained the throngs—and kept them in the pub. The audience for this form of entertainment has obviously changed over the decades, with only one notable venue still continuing to honour this tradition, with the rigid commitment of consistently hosting guest singers, three times every single weekend for over forty years, The Palm Tree in Bow, E3.
Rich in warmth and familiarity, The Palm Tree is world famous for maintaining its original East End atmosphere despite the impact of gentrification, land value, council pressures and independent pubs generally feeling the pressure of the shifts in habits of its clientele. It is a rich culture, though now sadly remains as a unique and lone stalwart. These really are The Last of The Crooners.
After several years of asking, this family-run pub has finally allowed me access to document the many great characters who still perform here, in a bid to capture this slice of time while it hopefully remains as it always has been—a beautiful and celebrated discovery, cherished by every visitor.
1st Place, Sport
Photo © Balazs Gardi, Hungary, 1st Place, Professional, Sport (Professional competition), 2018 Sony World Photography Awards
Image Description: Horsemen fight for a headless calf carcass during a buzkashi match on the day of Nawroz, or Persian New Year, in Mazar-e Sharif, Afghanistan on March 21, 2017.
Series Description: In buzkashi, Afghanistan’s violent and ancient national pastime, riders battle for control of an animal corpse that they carry toward a goal. Sixteen years after the U.S.-led invasion that ousted the Taliban, the sport is dominated by rival warlords who will do anything to maintain power in a turbulent country that once again is up for grabs.
1st Place, Still Life
Photo © Edgar Martins, Portugal, 1st Place, Professional, Still Life (Professional competition), 2018 Sony World Photography Awards
Image Description: Letter of departure written on an academic notebook.
Series Description: Siloquies and Soliloquies was produced at the National Institute of Legal Medicine and Forensic Sciences (INMLCF), in Portugal. A significant number of the images produced at the INMLCF depict forensic evidence, such as suicide notes, letters and other objects used in suicides and crimes as well as inherent in the work of the pathologist. The images here included represent a variety of suicide letters written by individuals who took their own lives.
The work explores the tension between revelation and concealment questioning, amongst other things, the ethical implications of representing and divulging sensitive material of this nature. Edgar Martins’ decision to work in the National Institute of Legal Medicine stems from his interest in highlighting the historic and symbolic role of one of the places that, in the context of modernity, institutionalized—through scientific practice and judicial discourse—the representation, analysis and scrutiny of death and the dead body.
In this sense, the incursion of a photographic artist into a place so charged with scientific character (medical, judicial, ideological) necessarily calls on epistemological, psychological and semantic questioning: e.g. what distinguishes a documental image of a corpse or a crime scene from an image that reproduces the staged creation of a mental image of a corpse or a crime scene? What effect do these differences have in the viewer’s imagination? How do the retrospective and prospective horizons appear in the face of these different types of image?
The Suicide tool as Destinerrance proposes to scrutinize the tensions and contradictions inherent in the representation and imagination of death, in particular suicide, and, correlatively, the decisive but deeply paradoxical role that photography—with its epistemological, aesthetic and ethical implications—has played in its perception and intelligibility.
Articles: Digital Photography Review (dpreview.com)


You must be logged in to post a comment.