RSS
 

Posts Tagged ‘2018.5’

Tips for Portrait Processing with ON1 Photo RAW 2018.5

11 Sep

There are many genres within the framework of photography and one that is very popular is portraits. As such, many photographers are looking for great software that can help them make their portraits so much better. ON1 Photo RAW 2018.5 has some great tools and adjustments for portrait processing to give them a professional touch.

In ON1 Photo RAW 2018.5 you will find all the tools you need to retouch out blemishes or any imperfections that the person or model may have. You can give the skin the same hue all over to get rid of blotchiness. Finally, you can make the eyes whiter and the teeth brighter. Your subjects will love the results.

Tips for Portrait Processing with ON1 Photo RAW 2018 - portrait image

Portrait processing with ON1 Photo RAW

We are going to start with the basic skin retouching before heading to the Magic Eye Fixer and finally the Toothbrush.

Basic Retouching

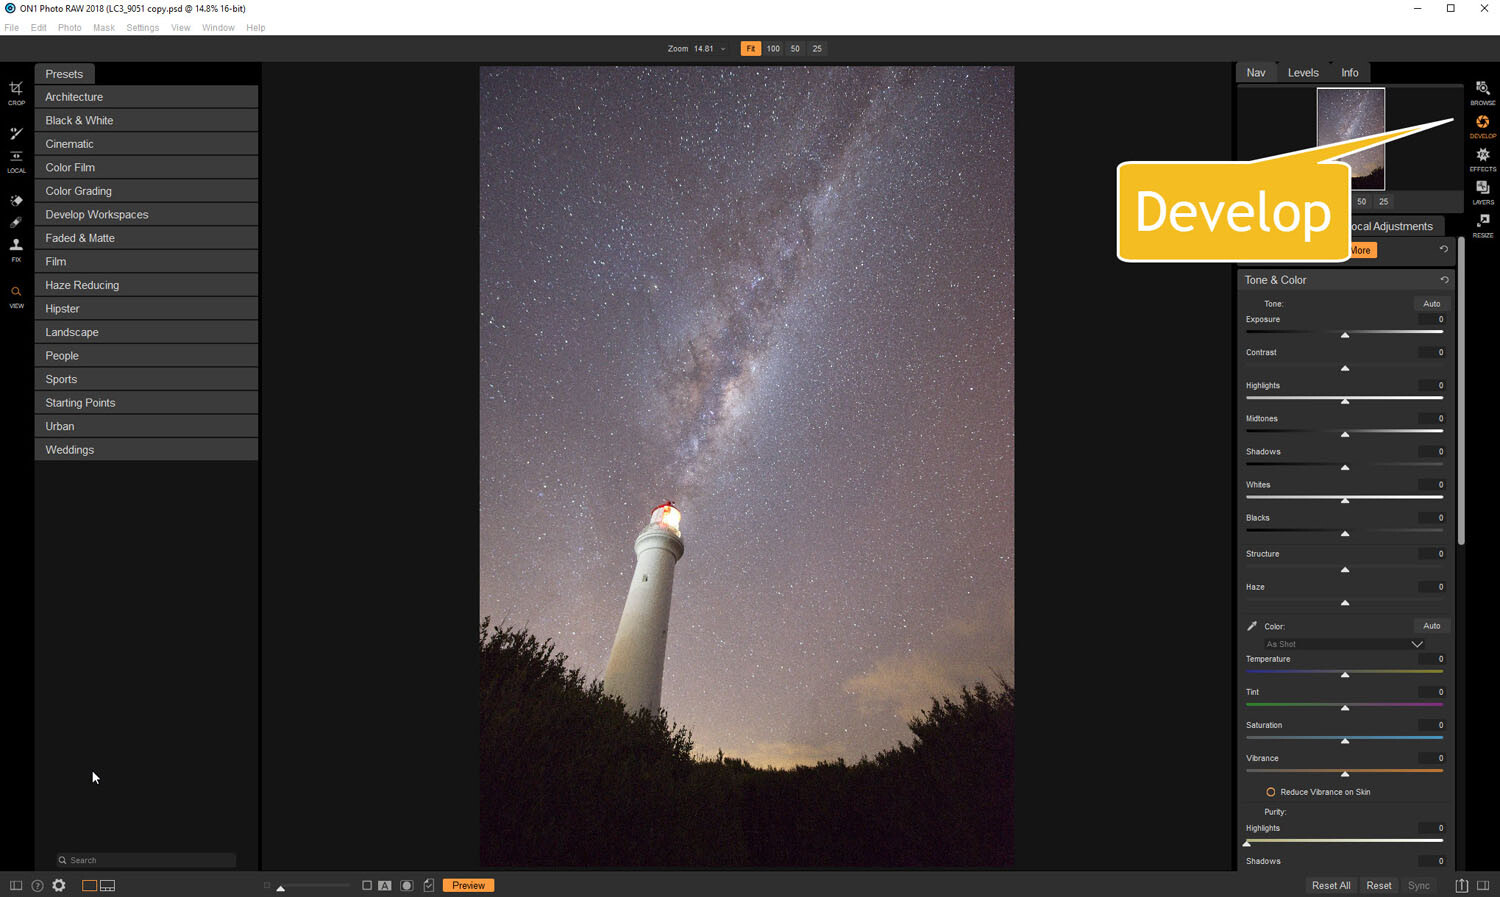
Open the image you want to work on in the Develop Module of ON1 Photo RAW 2018.5. Here you can make the basic adjustments like correcting the exposure or the white balance. Play around with the sliders to get what you want.

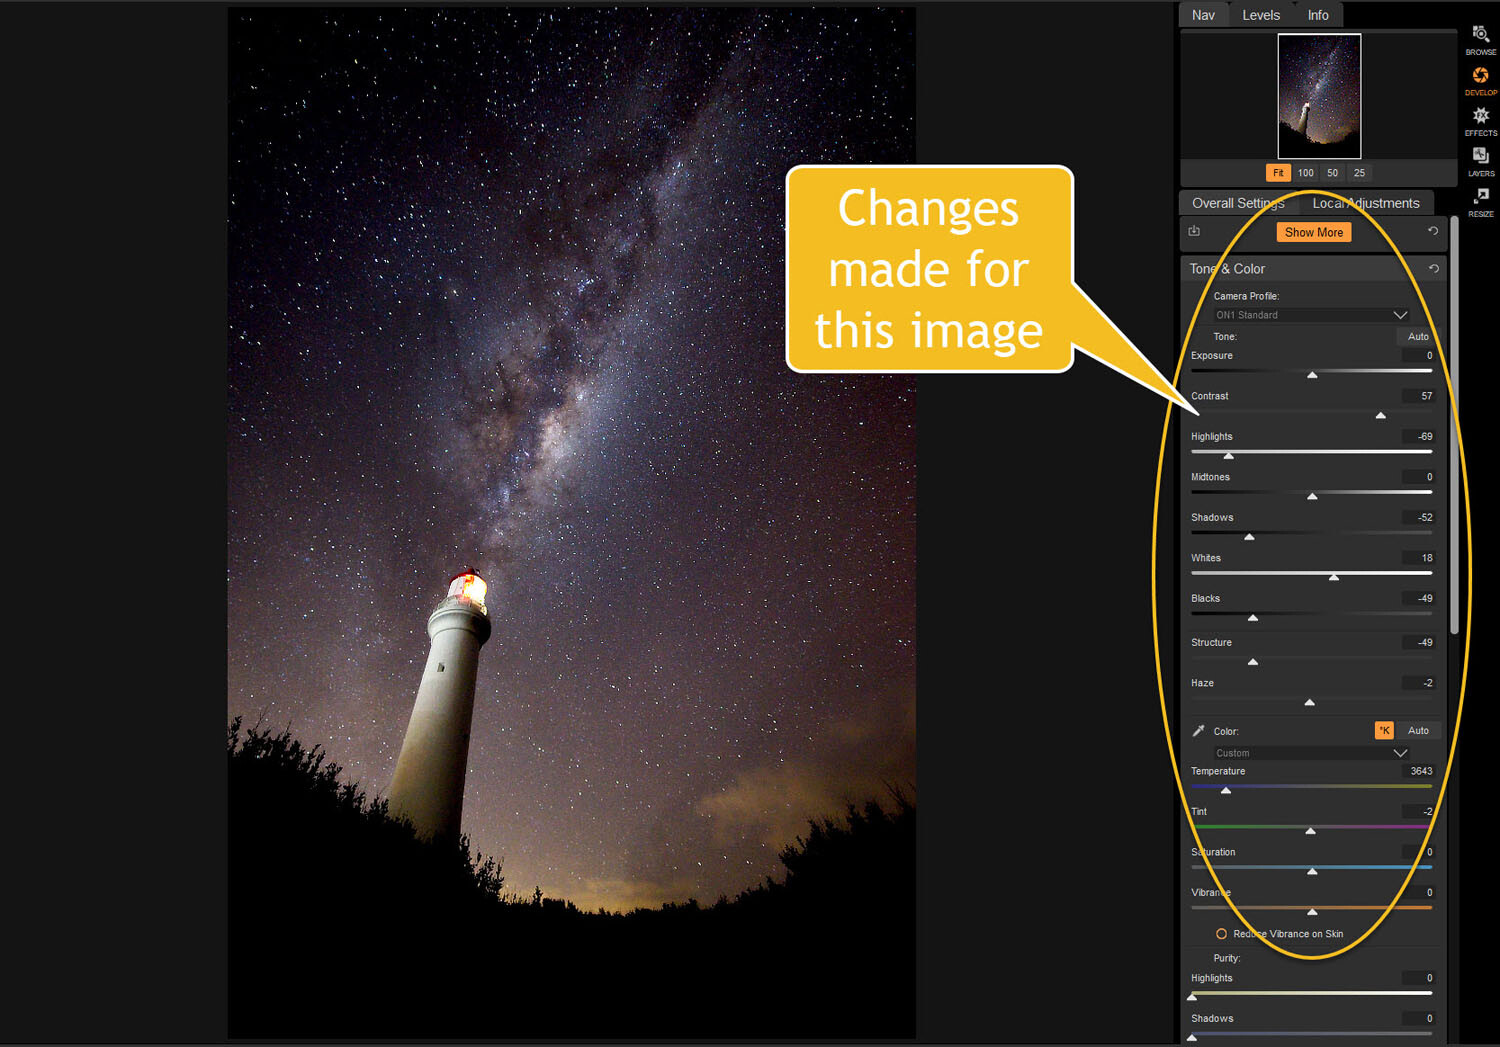
You can see what was done to this image below.

Tips for Portrait Processing with ON1 Photo RAW 2018 - basic adjustments

Basic adjustments.

No girl wants to be seen with acne on her face, so the next step is to get the Erase tool and remove as much of it as you can.

Tips for Portrait Processing with ON1 Photo RAW 2018 - blemishes

There are still blemishes on and around the chin, so now it is time to take it a step further with the skin retouching. ON1 Photo RAW 2018.5 has some great adjustments you can use to do just that.

If you are working on images of people that you know or clients, consult with them first about what they are happy with you removing from their skin. It might be good to remove scars, for example, however, if they are proud of those scars, it might upset them. Always ask.

Skin Retouching

You can do skin retouching in either the Develop or Effects modules. For this article, we will use the latter so click on Effects in the right-hand panel.

Once you are there click on Add Filter under the Overall settings.

Tips for Portrait Processing with ON1 Photo RAW 2018 - Effects Add Filter

Effects > Add Filter

When you click on that you will get a big list of options from which you can choose. For this tutorial, click on Skin Retouching.

Tips for Portrait Processing with ON1 Photo RAW 2018 - skin retouching filter

Skin Retouching filter.

You should see a new window open up that has all the adjustments for Skin Retouching. The first thing you want to do is select the eye dropper that is next to the square color patch. You will see a cross-hairs cursor so that you can make a selection on the skin.

Tips for Portrait Processing with ON1 Photo RAW 2018 - skin selection

Choose a part of the skin that is somewhere in between the darks and the lights. A mid-tone is the best option and a good place to find that is on the forehead.

Once you have your selection you are ready to retouch all the skin. You can now set the range of how much you want to do on the face. Use the Range slider at the bottom.

As you move it around you will see parts of the image that are covered in black while others are now. The black parts will not be affected, which as the lighter sections and places where it doesn’t cover it you can use the skin retouch. It doesn’t hurt to move it up a lot.

As you move the Range slider along you will see parts of the image covered in black while other areas are not. The black parts will not be affected by the retouching. However, the light sections, or the parts of the image that seems like they are not being affected, is where the skin retouching will apply to the image.

It doesn’t hurt to move the Range slider up a lot.

Tips for Portrait Processing with ON1 Photo RAW 2018 - range of skin retouching

Add a Mask

Next, you need to add a mask. You can do that at the top of the layer window, it is the white rectangle with the black circle inside.

You will see more options appear and along with the mask. The cursor will also change and the brush will come up automatically once you have done that.

Tips for Portrait Processing with ON1 Photo RAW 2018 - mask and brush options

Once you have the mask, go ahead and invert it. When you do this the mask will go black. When it is black it means that nothing from that layer is affecting your image. The brush is already chosen and now it is time to work out what parts of the image you want to add the skin retouch.

Make sure you brush is set to Paint In. You can change the brush options including feathering along the top above the image. You don’t need a lot, my brush was set at 31.

Now paint over the skin you want to affect. You should see parts of the mask going white where you are painting. Avoid the eyes and the mouth.

leannecole-skin-retouching-on1-portraits-6

Once you think you have done all the skin it is best to check and make sure.

Along the bottom of the window, you will see the button for a preview. Press it to see your original image. However, on the left, you will see a rectangle with a grey dot in it. If you click on it you will see the image go to solid black and white.

Tips for Portrait Processing with ON1 Photo RAW 2018 - mask

This shows you what your mask looks like. Pressing the letter O does the same thing if you like keyboard shortcuts. It can be hard when it is like this to really see what you have got painted and what you haven’t.

Go up the Main Menu > Masks > View Mode and finally choose Red Overlay.

Tips for Portrait Processing with ON1 Photo RAW 2018 - red mast overlay

The red overlay will show you where the black part of the mask is (the unaffected areas), so you can now refine your mask.

Tips for Portrait Processing with ON1 Photo RAW 2018 - red overlay mask

In the above image, you can see what has been selected. The areas with no red are where the skin retouching will be applied. If you have areas that should be red, change your brush to Paint Out and it will cover them.

Click the circle at the bottom to change back to the image, or press O to show it.

The skin retouching can seem very subtle, but if you toggle the layer on and off you should be able to see the changes.

Tips for Portrait Processing with ON1 Photo RAW 2018 - toggle layer

Final Adjustments

Now to do some final adjustments. At the bottom of the layer you can see Blemishes, Smoothing, Shine and Evenness. Move all the sliders to the left.

Tips for Portrait Processing with ON1 Photo RAW 2018 - sliders at the bottom

Slowly move each slider up and see how they change the image. Take them all the way to the right to see how bad would be if you go too far, then bring them back to where you want.

The one you have to be really careful about is the Smoothing slider. You can make the skin look like plastic very easily. You can see what was done for this image in the following example.

Tips for Portrait Processing with ON1 Photo RAW 2018 - sliders adjusted

The next step is to again turn the layer off and on to see the results and whether you think it has improved the image.

Tips for Portrait Processing with ON1 Photo RAW 2018 - skin retouching before and after

Magic Eye Fixer

The Magic Eye Fixer is great to help whiten the white parts of the eyes. It can make the subject’s eyes seem a lot brighter. However, this one needs to also come with a warning, it is very easy to take it too far and make the eyes look ridiculous.

To use this tool, go to the Local Adjustments tab and then select Add Layer.

Tips for Portrait Processing with ON1 Photo RAW 2018 - new layer

In the new layer window, you will see options like Lighten, Darken, Vibrance, and Detail across the top (just below the Opacity slider). Then there is a square with a down-arrow that says More underneath. Click on it and a drop down menu will appear.

Look down the list and you will see Magic Eye Fixer. Click on that.

Tips for Portrait Processing with ON1 Photo RAW 2018 - magic eye fixer

Once you have clicked on it you will see some of the adjustments change automatically. The brush tool will also be automatically selected. Paint over the eyes.

leannecole-eye-fixer-on1-portraits-3

Obviously with the automatic changes that ON1 Photo RAW makes for the adjustments are too much. You may also find it too hard to paint exactly over the eyes. Don’t forget you can change the brush to Paint Out to deselect the areas you don’t want if you mess up.

Enlarge the image view so you can get a better look at what you are doing; make sure you are only changing the parts you want to affect. You can also press O to check the mask as well.

Tips for Portrait Processing with ON1 Photo RAW 2018 - masked eyes

You can see that the adjustment is too much. Now you can change the exposure slider to make it look more natural. You can also use the Opacity slider at the top of the layers panel. That will also help you tone down how much the layer affects the image.

Tips for Portrait Processing with ON1 Photo RAW 2018 - eye settings

You can toggle the layer off and on to see if you like the effect or want to make further adjustments. Just remember not to go too far.

Healing the Skin

You could leave the image here, but there are other things you can do to make the skin look even better.

In the left-side panel, there is a brush called the Retouch Brush. This is a good one to use to help remove unwanted skin blemishes. It softens them, without removing them completely.

Tips for Portrait Processing with ON1 Photo RAW 2018 - retouch brush

Paint this Retouch Brush over the areas where you would like to remove imperfections. For this image, we will use it for the bags under the eyes, the scar on the forehead and the one over the right eye. It will also work well for the acne marks on the chin.

The brush is feathered and the opacity has been changed to around 50%.

Tips for Portrait Processing with ON1 Photo RAW 2018 - after retouch brush

After the Retouch Brush

It is a great tool, but as with all things, you can go too far. Sometimes it is good to leave the image for a day or two, then go back and take another look. It gives you a better perspective.

Whitening Teeth – Toothbrush

You will find that many people like to have their teeth appear whiter in photos. We aren’t all blessed with brilliant white teeth and now you can help them achieve that. ON1 has included an adjustment that will help you do the job very easily.

So still in the Effects Module, go to Add Layer. As you did for the Magic Eye Fixer, click More and select Toothbrush this time.

Tips for Portrait Processing with ON1 Photo RAW 2018 - toothbrush

You will see a new layer open up with many adjustments already made, so it is ready for you to go.

Tips for Portrait Processing with ON1 Photo RAW 2018 - preset adjusments

Do much the same as you did for the eyes. Click on the mask and then the brush will come up. Paint over the teeth. It may be easier to do them one at a time. If you go outside the teeth click on the brush to Paint Out and go over the areas you don’t want affected.

The teeth should be very white.

Tips for Portrait Processing with ON1 Photo RAW 2018 - overly white teeth

Obviously, it looks terrible like this so you will need to make further adjustments to get the right look.

You can change the opacity of the layer, or turn down the exposure slider so the effect isn’t so bright. For this image, I changed the exposure because there was something else I wanted to do.

These images are of my daughter, who has never thought looking after her teeth were worth worrying about. So, I wanted to get rid of the yellow staining. The best way to do that was to lower the saturation so the teeth appeared whiter. Move the Saturation slider to the left until you get the result you are happy with.

Tips for Portrait Processing with ON1 Photo RAW 2018 - teeth whitening

Now we can compare the final image by turning the layer on and off. You do that by clicking the Yellow dot in the top left corner of the layer panel you are working in.

Tips for Portrait Processing with ON1 Photo RAW 2018 - layer off

Layer off.

Tips for Portrait Processing with ON1 Photo RAW 2018 - resulting image

Layer on, final result.

The image could be left there, but I decided that her face and hair could do with some brightening overall. So I choose a new layer, and did a mask with her face, that included her hair. The exposure was brought up slightly and so was the White balance to make the image warmer.

Tips for Portrait Processing with ON1 Photo RAW 2018 - lighten the image

Looks much better now. She even likes it as well.

Finally

ON1 Photo RAW 2018.5 has everything you need to do the most amazing portrait processing. You can give people skin that is attractive or remove unwanted hues that the camera adds. Everyone wants to look beautiful in photos and now you can help them look the way they see themselves.

The people at ON1 have created an amazing community for all their users and there are many other videos to help go to the next level. Don’t forget to check all of them out and see what else you can do with your portraits.

Disclaimer: ON1 is a paid partner of dPS.

The post Tips for Portrait Processing with ON1 Photo RAW 2018.5 appeared first on Digital Photography School.


Digital Photography School

 
Comments Off on Tips for Portrait Processing with ON1 Photo RAW 2018.5

Posted in Photography


Tips for Processing Night Photography with ON1 Photo RAW 2018.5

07 Aug

For many students, as they start learning photography they want to know how to take photos at night. It is a mystery to them and they often think it is so complicated that they will never be able to do it. That is until they try it and discover just how easy it is. The next step is editing those images and ON1 Photo RAW 2018.5 has a lot of tools and adjustments that are perfect for processing night photography.

HDR architecture image - Tips for Processing Night Photography with ON1 Photo RAW 2018

An image created using the HDR option in On1 Photo RAW 2018.

Night photography options

First, we should take a look at the different types of night photography that you can do. There is the easiest option of setting your camera up on a tripod and photographing lights somewhere.

The city at night is very popular if you live in an urban area. Perhaps capturing town lights can also be good. You just need something that is making light. HDR has had a lot of bad press, but it really is good for some images, and night shots of cities are perfect for it. ON1 Photo RAW’s HDR processing is one of the best I’ve seen.

When the sun has gone down and there is a lot of traffic you can photograph light trails. Taking longer exposures with your camera on a tripod will make all those lights look like streaks. If you want to make it look like there were a lot, then you can stack the images together, so all the streaks will show in one final image.

One type of night shot that is hugely popular right now, especially in Australia, is astrophotography. Photographing the Milky Way. It is the season for it here and with the low population, you are spoilt for choice where to do them. If you have ever tried doing any astrophotography then you will also be aware that your images have to be processed or they can look at washed out. ON1 Photo RAW 2018.5 has you covered there as well.

Tips for Processing Night Photography with ON1 Photo RAW 2018 - astrophotography milky way image

An astrophotography image processed with ON1 Photo RAW 2018.5

Photographing the City

Night time in the city can be so magical and to be taking photos of it even more so. Processing your images taken at night is much the same as processing any of your images.

Open your image in ON1 Photo RAW and take it into the Develop module. Make the adjustments as you would for other images. Move the sliders around to see what you can get. Take them too far and then bring them back.

sliders in ON1 Photo RAW - Tips for Processing Night Photography with ON1 Photo RAW 2018

When learning it is good to take the sliders too far, see what happens.

If you want to make adjustments to particular areas, then look at local adjustments which is the best place to do that.

However, what if you want to do something to your image to really make it pop?

HDR photography, or High Dynamic Range, can be perfect for this. It is a process that has copped a lot of criticism over the years. People say it is too much, that the images can be ugly. But that really only happens when you don’t use it for the right images, or overdo it.

There are some scenes and images that are perfect for HDR and night photography is one of those times.

HDR Night Photography

When you are to decide which images would work best for HDR, look for ones that have a lot of dark areas, and a lot of bright parts as well. Usually, your camera will struggle with getting an even image of a high contrast scene. It will either make the image too bright or too dark. Night images have those problems. Once you get the lights exposed right, all the shadows become too dark or black.

The best way to do HDR is to take a series of images or bracketed shots. If your camera will allow you to bracket then it will sort out the exposures you need. The most common number of shots is 3 or 5. For this article, five images were taken.

Next, select all of your bracketed images inside the ON1 Photo RAW browse module. You can do that by clicking the first then pressing the shift key followed by clicking on the last image. If you have put the images into a subfolder you can then just use Ctrl/Cmd+A.

Tips for Processing Night Photography with ON1 Photo RAW 2018 - bracketed set of images

Work out which images you want to use.

Once they are selected you should be able to see the HDR button over on the right-hand side of your screen, underneath all the different modes.

select images and HDR button - Tips for Processing Night Photography with ON1 Photo RAW 2018

Select all your images.

ON1 Photo RAW will then merge all your images together. The first time you do it, a window will pop up asking you what look you would like. The options include Natural, Natural Auto, Surreal and Surreal Auto. You can make the changes once the image has been merged to HDR. There are lots of choices with ON1.

Let’s take a look around the HDR working window

Tips for Processing Night Photography with ON1 Photo RAW 2018 - HDR looks

Selecting your HDR look in ON1 Photo RAW.

There are several places where you can set the amount of de-ghosting (remove spots where something moved between brackets) you want the program to do. You can change the HDR look you wanted if you think you made a mistake. You can select which image you think should be the main one.

Go through and change the image to suit the look you are after. I know I say this a lot, but the best way to learn is to play around with the settings.

HDR options - Tips for Processing Night Photography with ON1 Photo RAW 2018

All the different things you can do to your image.

Like most images, you need to experiment to see what you like. Remember that ON1 is non-destructive so you won’t ruin anything. Try everything, it is the best way to learn. Take it all too far and then bring it back.

Lastly, choose where you want your image to go when you are done. You can have it open in Develop, Effects or go back to Browse. The last choice is Cancel. If you want to save it then click Save.

Tips for Processing Night Photography with ON1 Photo RAW 2018

Taking the image further.

Once the image is opened in the Develop module, you can then make more adjustments to as you would normally.

Develop module - Tips for Processing Night Photography with ON1 Photo RAW 2018

Where to go next.

ON1 Photo RAW is one of the best programs for doing HDR. You can make so many changes to it as it is happening and after it is done. Nothing is final.

final HDR - Tips for Processing Night Photography with ON1 Photo RAW 2018

The final HDR image.

Astrophotography

For anyone who has ever done astrophotography, you know that the images always need to be processed.

Here is an image that was taken a couple of years ago. This is the raw file and you can see that it needs a lot of work.

night image Milky Way and lighthouse - Tips for Processing Night Photography with ON1 Photo RAW 2018

Raw image from astrophotography shoot.

Open the image up in ON1 Photo RAW and go to the Develop module. Everything you need to make the best astrophotography images is all right there.

develop - Tips for Processing Night Photography with ON1 Photo RAW 2018

Open in the Develop module.

Noise reduction

The first thing you want to do is to work on the noise in the image. All astrophotography images have a great deal of noise. You have to increase your ISO quite high in order to get the Milky Way in your image. Usually, it is going to be somewhere between ISO 3200 up to 6400.

The image for this article was taken at f/2.8, for 30 seconds at ISO 6400. It was taken at 14mm using a 14-24mm lens.

In the Develop module go to Details. This is where you can help reduce the noise in your image. Click on the image to zoom in so you can see the noise better.

noise and details section of develop - Tips for Processing Night Photography with ON1 Photo RAW 2018

The first thing to do is to fix the noise in the image.

Under Noise Reduction, you will see a Luminance slider. Move that along until the noise almost disappears. Be careful not to go too far or you might lose all the stars (noise is just white specs so the stars can easily be misinterpreted as noise if you go too far).

This slider smooths out the image and you can lose a lot of detail if you go too far. Bring up the Detail slider to help maintain it. It is about experimenting and seeing what you like as well.

You can also bring up the Sharpening amount as well but be careful. Over sharpened images can look terrible. Go easy with this slider.

noise adjustments - Tips for Processing Night Photography with ON1 Photo RAW 2018

You can see how much was changed.

Tone & Color

It is time to go back to Tone & Color and make more adjustments.

tone and color - Tips for Processing Night Photography with ON1 Photo RAW 2018

Take the image back to Tone & Color to make basic changes.

The main things you want to add back into your image are the blacks and lots of contrast. The added contrast will help the stars stand out more from the dark sky. The blacks will allow the darker parts of the sky to appear as you saw them when you shot the image.

The highlights can be brought down to stop the lighthouse from blowing out too much. If you take the shadows down it helps make the darker parts of the sky richer as well. However, be aware that it can also make other parts of the image go black, like the foliage at the bottom of this image.

The whites were brought up a fraction, as this helped to lighten up the Milky Way and make it jump out more.

slider adjustments - Tips for Processing Night Photography with ON1 Photo RAW 2018

Some of the changes that were made in Tone and Color.

Color Adjustments

Most of the changes are made to the image now, but if you look closely there is quite a bit of blue in it. It shouldn’t be there and to remove it you need to go to Show More and then Color Adjustments.

color cast - Tips for Processing Night Photography with ON1 Photo RAW 2018

Taking out the blue cast color in the stars.

A new window for this will open up down below the other adjustment windows.

As it is the blue you want to change, click on that color square. Once it is selected you can move the saturation slider until the blue in the image disappears or is to your liking.

reducing blue saturation - Tips for Processing Night Photography with ON1 Photo RAW 2018

Changing the saturation of the blue.

You can try adding presets to your image as well, though most people with astrophotography just do the basics and leave it there.

You will need to play around with your photos to see what you can do and what is to your tastes. These are just suggestions as to what other photographers do. Experiment, take the sliders too far and then bring them back.

This is the final image.

final image of lighthouse - Tips for Processing Night Photography with ON1 Photo RAW 2018

The final image of the Milky Way over the top of the lighthouse.

Light Trails

In cities, or anywhere there is a lot of traffic, you will see photographers trying to capture the trails of the lights as the cars go past. For most places, the best time to capture this is during peak hour when a lot of vehicles are moving. However, it also needs to be dark.

Unfortunately, there are times of the year where it is impossible to get both at the same time. For instance, in Australia during the summer daylight saving means it doesn’t get dark until after 8 pm. Getting good light trails is reduced because there isn’t enough traffic at that hour.

However, there is a way to make it look like there was more traffic, that is to stack your images. You can also do this for star trails too.

Stacking light trails

Work out which image will be the first one. Take it the Develop module in ON1 Photo RAW and do what you want to process it normally first.

But do not straighten it or do any lens correction on the image. If you do then the other images won’t align up properly, you can do all that after.

original image for light trails - Tips for Processing Night Photography with ON1 Photo RAW 2018

The first image used for the light trails.

Once you have your image ready, go to the Layers module.

layers - Tips for Processing Night Photography with ON1 Photo RAW 2018

Take the image to the Layers mode.

Next, add all the other photos that will make up the final image. The best way to do this is to put all the images into a subfolder. Select the images you want to use, then right-click and go to Add Subfolder.

add subfolder - Tips for Processing Night Photography with ON1 Photo RAW 2018

Putting your images into a subfolder.

A window will pop up once you click Add Subfolder. You can name it as you want, or ON1 will name the folder the same as the filename for the first image. Make sure the box is ticked for Move Selected Items into Subfolder.

add subfolder - Tips for Processing Night Photography with ON1 Photo RAW 2018

Creating the subfolder.

Now you are ready to add all those images as layers to the original photo.

Get your image to the Layers module which is where you will add the images for your light trails. Go up to File in the main menu at the top. Select Add Layer(s) from File.

add images from file - Tips for Processing Night Photography with ON1 Photo RAW 2018

Now it is time to add the layers.

A window will pop up where you can go to the subfolder that you put the images into. Select all the images, Ctrl/Cmd+A, then press Open.

select images - Tips for Processing Night Photography with ON1 Photo RAW 2018

Selecting all the images you want to use.

ON1 Photo RAW will ask you if you want to open them all, say yes. Depending on how many images you are trying to do it can take some time for this to happen. The images used for this demonstration are quite large and took a few minutes.

images added as layers - Tips for Processing Night Photography with ON1 Photo RAW 2018

All the images are added.

Next, you need to blend each layer. You want the lights to shine through from each but not everything else. For each layer, go up to the blending pull-down and select Lighten.

blending options - Tips for Processing Night Photography with ON1 Photo RAW 2018

Blending all the layers with Lighten.

You can now save the image and then you can do more processing if you wish. If the image needs straightening, lens corrections, etc., you can do it in the Develop module.

light trails image - Tips for Processing Night Photography with ON1 Photo RAW 2018

The final image.

Star Trails

If you enjoy doing star trails then you will be able to use this same method for processing and stacking those images using ON1 Photo RAW. Just add them all as layers and use the Blending option Lighten.

Conclusion

There are many things you can do with your night photos in ON1 Photo RAW 2018.5. With things developing constantly you will be able to do more and more with time. The HDR feature is one of the best I’ve seen and I’m sure most of you will enjoy that.

With all software, experimenting is the key. Take what you learn and see what else you can do with it.

Disclaimer: ON1 is a dPS paid partner.

The post Tips for Processing Night Photography with ON1 Photo RAW 2018.5 appeared first on Digital Photography School.


Digital Photography School

 
Comments Off on Tips for Processing Night Photography with ON1 Photo RAW 2018.5

Posted in Photography


ON1 reveals Photo RAW 2018.5 with ‘massive performance boost’, LUTs and more

12 May

ON1 has released a major update to its ON1 Photo RAW photo editor. Version 2018.5 will be available in June and boasts, “a massive boost in overall performance” in addition to bug fixes and two major feature additions: a new LUTs filter in the effects panel, and the ability to select brand-specific in-camera profiles, including Fujifilm’s much-loved film simulations.

There are also some other new features like the ability to collapse RAW + JPEG frames into a single image to de-clutter your library, nested albums, background export, and more. But the big three additions are performance, LUTs, and Camera Profiles.

Performance Boost

ON1 says Photo RAW 2018.5 comes with a “massive overall performance boost,” which should be noticeable across Browse, Develop, and Effects. This is particularly obvious when you flip through photos in the filmstrip view, regardless of module. You should see practically no lag at all.

In addition to culling images, brushing performance, switching between modules, and exporting/sharing photos have all benefitted noticeably from this performance boost.

LUTs Filter in Effects

A much-requested feature, LUTs (or Look-Up Tables) are a popular way to add various color grading looks to your images. This feature is now available inside the Effects module in ON1 Photo RAW 2018.5, which will launch with “a ton” of LUTs, alongside packs you can purchase from professional photographers like Matt Kloskowski and Tamara Lackey. You can also import both the .3DL and .CUBE LUT formats into Photo RAW if you have LUTs of your own.

Applying a LUT will work like all of the current filters available in the Effects module, meaning you’ll be able to “stack them, mask them and control the blending options.”

Camera Profiles

The final feature update coming in 2018.5 is the ability to apply brand-specific camera profiles to your pictures. If you shoot Canon or Nikon, that means your Natural, Landscape, Portrait, etc. profiles will all be available. If you shoot Fuji, that means your film simulations.

Additionally, you’ll have some built-in ON1 profiles—in addition to ON1 Standard, you now have ON1 Faithful, ON1 Landscape, ON1 Portrait, and ON1 Vivid—that can be applied across brands, just like the recently-announced Adobe RAW profiles in Lightroom.

$ (document).ready(function() { SampleGalleryV2({“containerId”:”embeddedSampleGallery_8405143667″,”galleryId”:”8405143667″,”isEmbeddedWidget”:true,”selectedImageIndex”:0,”isMobile”:false}) });

ON1 Photo RAW 2018.5 is scheduled to arrive officially in June. It’ll be a free upgrade for owners of ON1 Photo RAW 2018, but if you’re not part of the ON1 ecosystem yet, there are some discounts to be had before launch.

Owners of previous versions of ON1 Photo RAW can upgrade for just $ 80 (usually $ 100) and new users can purchase ON1 Photo RAW 2018.1 for $ 100 (usually $ 120). Each license of ON1 Photo RAW includes both Windows and Mac installers, and can be activated on up to five devices.

To learn more about ON1 Photo RAW, visit the ON1 website. And if you want to learn more about 2018.5, the company has set up a landing page where they’ll be demoing new features every week before the official release goes live.

Press Release

ON1 Photo RAW 2018.5 – Coming this June

Portland, OR – May 10, 2018 – Today, ON1, Inc. announces the new ON1 Photo RAW 2018.5, a significant update to Photo RAW 2018. Version 2018.5 will include a massive boost in overall performance, fixes for user reported issues, and new key features such as LUTs and camera profiles.

“We’re incredibly excited to unveil the new features in ON1 Photo RAW 2018.5 over the next several weeks. We plan on showcasing the new features and improvements through weekly videos leading up to the June release,” says ON1 President, Craig Keudell.

Key Features and Improvements

  • Camera Profiles – Select the same looks you see on the back of your camera in ON1 Photo RAW. Select from Natural, Portrait, Landscape, etc. depending on what your camera offers. These are not presets as they don’t adjust any of the sliders, and are non-destructive. These will include popular cameras like Fujifilm®.
  • LUTs in Effects – LUTs or Look-Up Tables are a favorite way to add matte, vintage or cinematic color grading looks. These will be available inside Effects in version 2018.5. A ton of LUTs will be available in the release along with individual packs from Matt Kloskowski, Tamara Lackey, and Hudson Henry. The common .3DL and .CUBE formats found online can be imported into Photo RAW. LUTs will work like any of the current filters in Effects. You can stack them, mask them and control the blending options.
  • RAW+JPG – If you shoot RAW and JPG at the same time, you will be able to collapse and hide the JPG copy, so your library isn’t cluttered. Any metadata or file changes you make are mirrored to the JPG seamlessly.
  • Faster Film Strip for Culling – Using the Filmstrip in Develop and Effects will be just as fast as in Browse. You will be able to switch photos instantly! You can even perform your editing and culling tasks, like ratings, labels, rotate and delete, while you are adjusting your raw processing.
  • Transform Enhancements – The Transform pane in Develop will include new tools to correct perspective and rotation issues along with a new grid will make it easier to visualize results.
  • Nested Presets – Ability to better organize presets into a nested category structure will be added along with the ability to move, rename, delete, and nest presets and categories.
  • Nested Albums – Nest albums or photos inside of other albums. If you are migrating from Lightroom®, your nested collections are brought over by the Lightroom migration assistant.
  • Improved Brushing Performance – Brushing with the Masking Brush will be more fluid and responsive, especially on Windows computers with large or high-dpi displays.
  • Export Improvements – Exporting will be processed in the background so customers can continue to work on another job without having to wait for the export to finish. You can even stack multiple export jobs and continue working on your photos.
  • Performance Boost & Increased Stability – Significant under the hood speed and stability improvements are coming in 2018.5. These include speedier switching of modules between Browse, Develop, and Effects along with switching and culling photos using the film strip in Develop and Effects.
  • New Cameras & Lenses – Each update includes new cameras and lenses. The list is continuously updated, and we will share the final details when version 2018.5 is released.

ON1 Photo RAW 2018.5 Exposed

Each week ON1 will be adding videos showcasing the new features and improvements available in version 2018.5. Get a sneak peek of the new camera profiles, new LUTs, and overall performance improvements at www.on1.com/exposed.

Price and Availability

ON1 Photo RAW 2018.5 will be available this June. New customers can purchase version 2018.1 today and receive 2018.5 as a free update once it becomes available. ON1 is running an introductory price of $ 99.99 for new customers for a limited time (Reg: $ 119.99). Owners of previous versions of ON1 can also upgrade at an introductory price of $ 79.99 (Reg: $ 99.99). Version 2018.5 is a free update for all owners of ON1 Photo RAW 2018. A single purchase of ON1 Photo RAW will include both Mac and Windows installers and activation for up to five computers. It comes with a 30-day money-back guarantee, world-class customer support, hundreds of free video tutorials, and free ON1 Loyalty Rewards every month.

About ON1 Photo RAW

ON1 Photo RAW is the only photo editor designed by photographers for photographers. ON1’s unique community-driven development approach via The Photo RAW Project gives customers a voice in how it’s designed, allowing users to submit ideas and vote on new features. The majority of new features and updates in version 2018.5 have come as a result of the Photo RAW Project. With fast photo organizing, hundreds of customizable photo effects, powerful masking tools, LUTs, Camera Profiles, HDR, panos, layers, and other Lightroom and Photoshop®-like features, Photo RAW is the ultimate all-in-one photo editor and raw processor with no subscription.

ON1 Photo RAW 2018.5 isn’t just for raw files. It also supports JPEG, TIF, PSD, PSB, PNG, and DNG are supported and benefit from the speed, performance, and abundance of editing tools in the app. Photo RAW 2018.5 will continue to work seamlessly within current photography workflows. The app will integrate as a plug-in for Adobe® Lightroom Classic CC and Photoshop CC. Like the current version, Photo RAW 2018.5 will integrate with the major cloud services to allow for uploading, managing, and editing photos across multiple computers. This enables users to sync photos and their edits across multiple computers or in a studio setting.

Articles: Digital Photography Review (dpreview.com)

 
Comments Off on ON1 reveals Photo RAW 2018.5 with ‘massive performance boost’, LUTs and more

Posted in Uncategorized