RSS
 

Posts Tagged ‘2016’

2016 Roundup: Interchangeable Lens Cameras around $500

20 May

While they aren’t cameras that make headlines, one thing is for certain: entry-level interchangeable lens cameras sell by the truckload. The majority of them are stripped-down versions of their midrange siblings, with things like newer sensors, advanced autofocus systems, customizable controls and ‘premium’ build quality being left out. That doesn’t mean that these aren’t capable cameras – quite the contrary, actually.

All of these cameras – both mirrored and mirrorless – produce good image quality, offer respectable performance and can record Full HD video. The majority have Wi-Fi. Many of them are targeted toward beginners, with ‘help’ systems that point out the best settings to use for various shooting situations.

Those unfamiliar with DSLR and mirrorless cameras may be wondering what advantages and disadvantages each brings to the table. DSLRs are larger cameras, with a more ‘traditional’ shape and control layout, as well as an optical viewfinder. While they’re great for shooting stills, they’re not as well suited to video capture, and focusing using live view can be sluggish. Mirrorless cameras are typically smaller and are very capable video shooters, since live view focusing is much faster than most DSLRs. Two negatives about mirrorless cameras are that battery life isn’t nearly as good as a DSLR and – especially true in this class – they often lack a viewfinder.

Let’s take a look at several entry-level ILCs, with US MSRPs in the $ 500 region, kit lens included. 

  • Canon EOS M10
  • Canon EOS Rebel T6
  • Fujifilm X-A2
  • Nikon 1 J5
  • Nikon D3300
  • Olympus PEN E-PL7
  • Sony Alpha a5100

Articles: Digital Photography Review (dpreview.com)

 
Comments Off on 2016 Roundup: Interchangeable Lens Cameras around $500

Posted in Uncategorized


Software Review: Macphun Creative Kit 2016

17 May
Image edited in Macphun Intensify CK

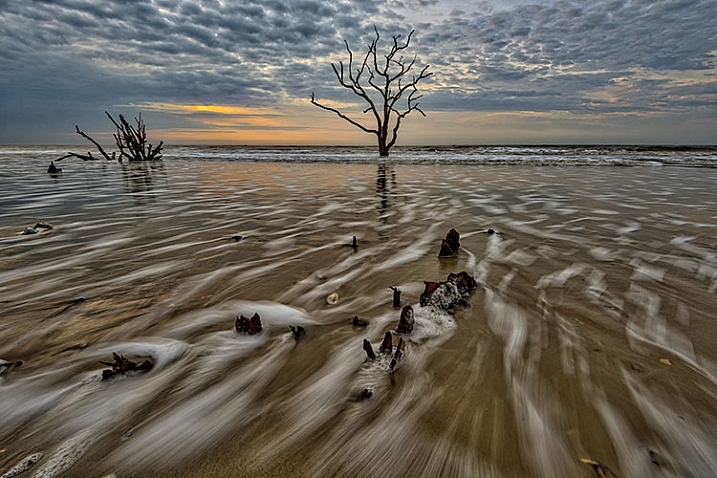
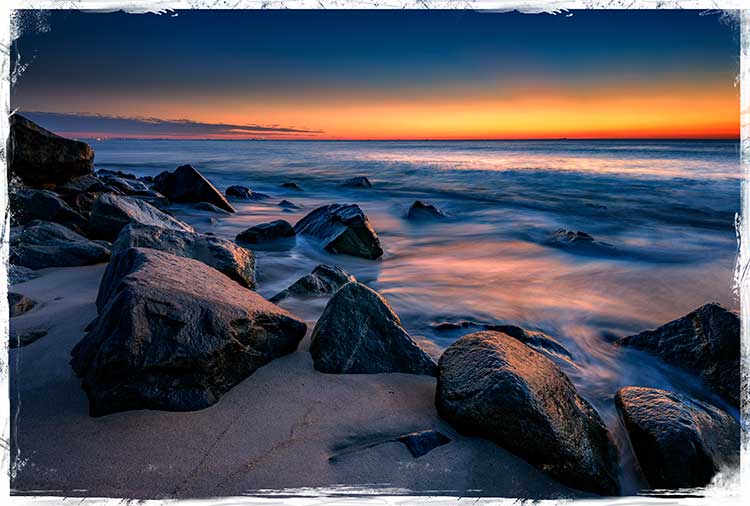
Boneyard Beach, Botany Bay Plantation, South Carolina. Edited in Macphun Intensify Creative Kit.

My philosophy on photography has always been that photography starts with the push of the shutter button, but it does not end there. Back when film was king, I spend a lot of time in the darkroom, learning and mastering darkroom techniques, and printing my work. With the advent of the digital age, those processes moved to the digital darkroom. Always one for working smarter, not harder, I have often employed plugins with Photoshop to make the work of editing my images a bit easier. I’m a big fan of plugin suites that offer a soup to nuts solution for editing images, so when Macphun released its Creative Kit 2016, I was excited to give it a try.

Note: all Macphun products are made for Mac only.

Macphun’s Creative Kit 2016 includes six plugins for Photoshop or Lightroom. This is a comprehensive collection that can handle all aspects of image editing, from color and contrast adjustments, to black and white conversion, to removing unwanted elements, sharpening, and noise reduction. The six modules are Intensify, Tonality, Snapheal, FX Photo Studio, Focus, and Noiseless. I’ll explain each one individually to give you an idea of the capabilities of each. Macphun Creative Kit, as the name implies, is only for Mac users, and is currently on sale at Macphun for $ 129 (USD)

Intensify CK

Macphun Intensify CK application window

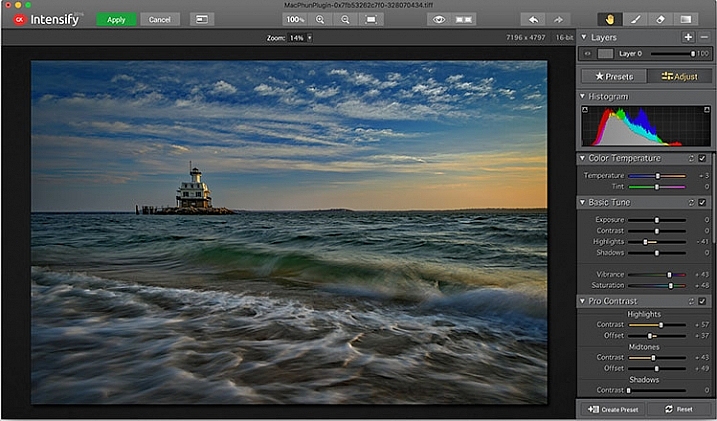
The Macphun Intensify CK application window.

Macphun Intensify is a plugin in the same vein as Topaz Adjust. You can adjust everything from color temperature and saturation, to contrast, structure, and details.  When you open Intensify, your image will be in the center of the screen with a tool bar on the right, which can alternate between presets and manual adjustments.

The list of presets is broken down into groups: Architecture, Black & White, Creative, Detail Enhancement, Image Tune, Landscape, and Soft. Within each group is a list of presets that pertain to the subject of the main group. For instance, within Landscape is Aerial Photo Enhance -2, Gloomy Day, Natural Enhance, Structured Scape, and Warm Day. When you select a preset, an amount slider appears underneath so you can adjust the amount applied to the image. You also have the option of manually adjusting all the sliders to tweak the preset to to your tastes.

Macphun Intensify CK Comparison Image

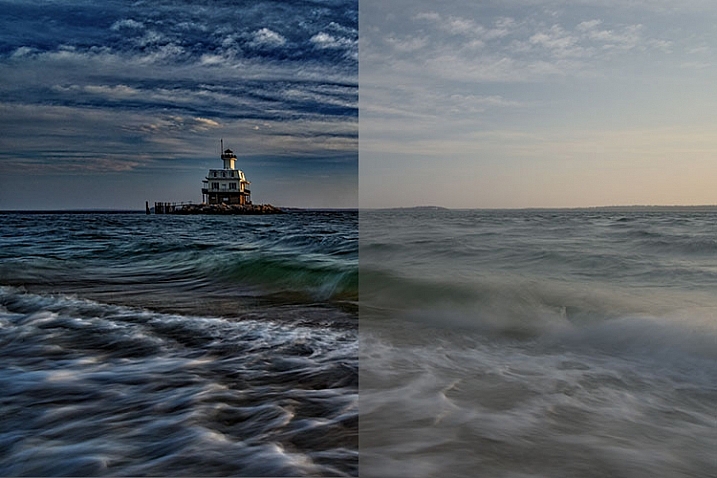
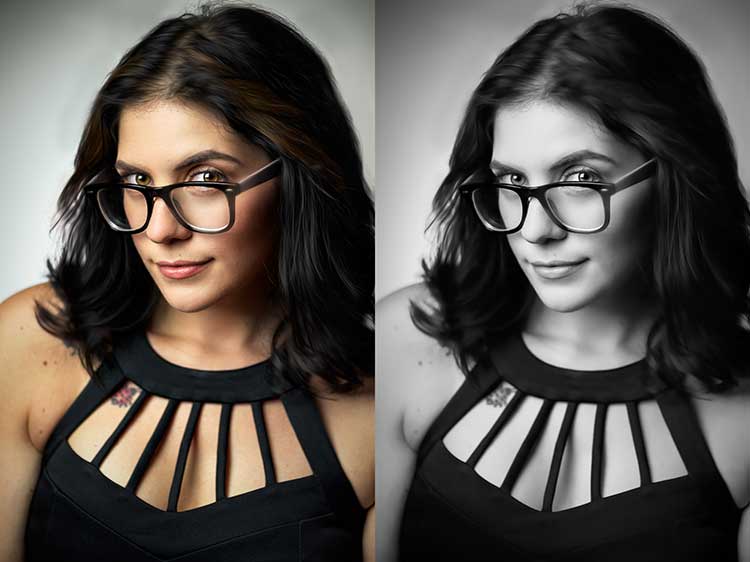
Comparison of an image edited in MacPhun Intensify, before (right) and after (left).

While I found many of the presets to be a bit heavy handed, manual adjustments are easy to make, and gave me a much more satisfying result than simply clicking a preset. For a more in-depth look at Intensify, read MacPhun Intensify Pro Software Review. While Macphun Intensify CK is a newer version, the controls and presets are largely the same and Andrew Gibson does an excellent job of breaking them down.

Intensify-Architecture

Before (left) and after (right) Intensify CK

Snapheal CK

Macphun Snapheal CK application window

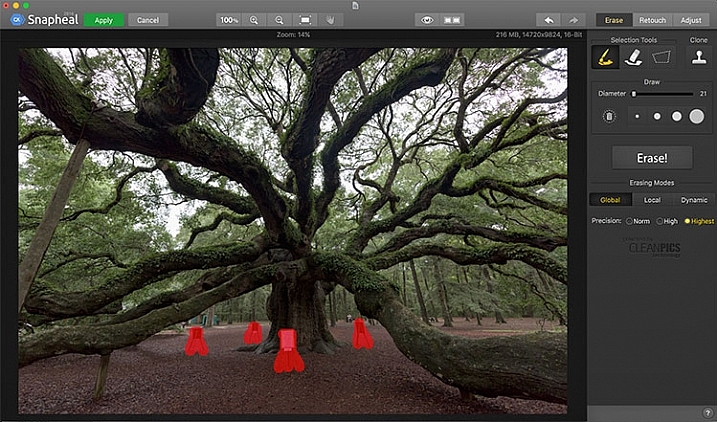
The Macphun Snapheal CK application window.

Snapheal CK may very well be the crown jewel of this collection. Think of the healing brush or clone stamp on steroids, and that’s what Snapheal CK is like. Snapheal CK is an amazingly simple way to remove unwanted objects from a scene. When you open Snapheal CK, You’ll notice a tool panel on the right, and a menu bar across the top. You’ll see zoom and move tools, an eyeball icon, which shows the object you’ve removed, a comparison button, arrows to step forward or backward, and finally – Erase, Retouch, or Adjust, which are the different modes you can work in. The selection tools at the top are a paintbrush, an eraser, and a marquee selection. There is also a cloning stamp tool.

Once you have your image in Snapheal CK, if you select Erase mode, you can either use the paint brush or the marquee tool to select the object you want removed from the scene. A red mask will appear over the object you’ve selected. The size of the paintbrush can be adjusted using the slider, or the bracket keys on the keyboard. If you paint in an area you don’t want removed, simply select the eraser tool and erase the painted area.

Image before Macphun Snapheal CK.

An image before using Macphun Snapheal CK. The signs in the scene were not allowed to be moved, so I was resigned to having to clone them out.

Underneath the selection tools, you’ll find the options for each tool, such as brush size, polygonal or free marquee, and for the clone stamp, diameter, softness, and opacity. Beneath the options, is a very large button clearly marked as Erase! Under the erase button are three erasing modes: Global, Local, and Dynamic, as well as three Precision options: Norm, High, Highest.

Once you’ve made your selection, you simply press the Erase button and Snapheal CK goes to work. While you wait, the status bar displays a variety of interesting facts to keep you entertained. It does take a few minutes to do its thing, even on my 2015 Macbook Pro with 16GB of RAM. After the process has finished, if the result is not to your tastes, try changing the erasing mode to one of the other modes. Each one behaves a bit differently and will produce a different result. The same goes for the Precision setting.

After Macphun Snapheal CK

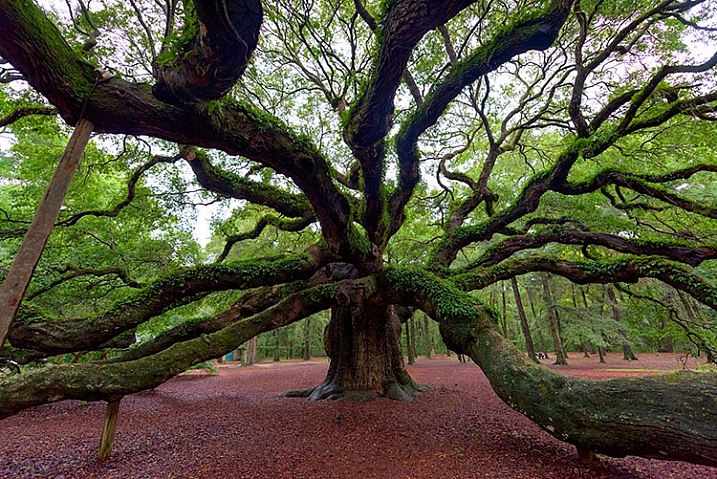
The same image after being edited in Macphun Snapheal CK. The signs and other unwanted objects have been removed.

Retouch mode works similar to erase mode, but instead of erasing, it allows you to adjust the selected area for color, contrast, and more. Adjust mode is similar but instead of working on a selected area, it makes global adjustments to the entire image.

Even without the Retouch and Adjust modes, the object removal mode of Snapheal CK makes it worth the price of admission in my book, saving me time every time I need to clone or remove an object from an image for whatever reason.

Note: if you are a Lightroom user and want a more powerful cloning and healing tool without having to purchase Photoshop, this may be a good option for you to look at.

Tonality CK

Macphun Tonality

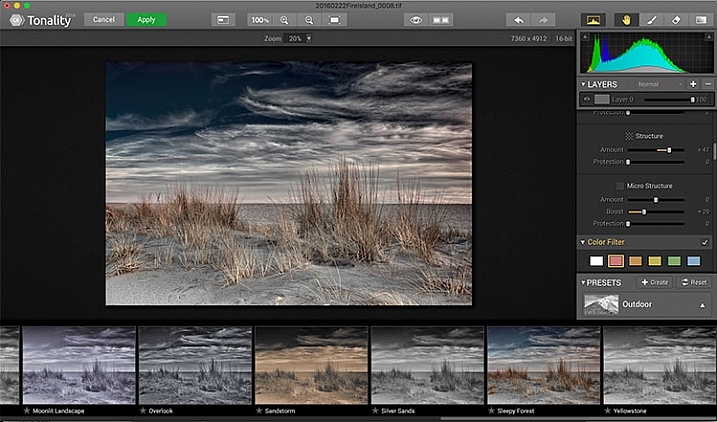
The Macphun Tonality CK application window.

Macphun bills Tonality CK as, “The world’s most advanced black & white photo editor.”  With hundreds of presets available to you, as well as the ability to work in layers and adjust virtually everything about the image, there’s a lot of truth in that statement.

As you open Tonality CK, you will be presented with your image in the main window, a menu bar across the top, tool palette on the right hand side, and preset preview bar across the bottom.  The palette on the right hand side features all of the settings, including; layers, a histogram preview, adjustment sliders for color temperature, tone, clarity and structure, color filter, tone curve, split toning, glow, lens blur, texture overlay, vignette, grain, photo frames, and layer properties. There are a lot of variables to adjust to get exactly the look you want. Beneath these adjustments is a drop-down menu to select various presets, from groups including Basic, Architecture, Portrait, Dramatic, Outdoor, Street, Vintage, Film Emulation, Toning, HDR, a Favorites group, and a group for user defined presets.

Macphun Tonality CK Comparison

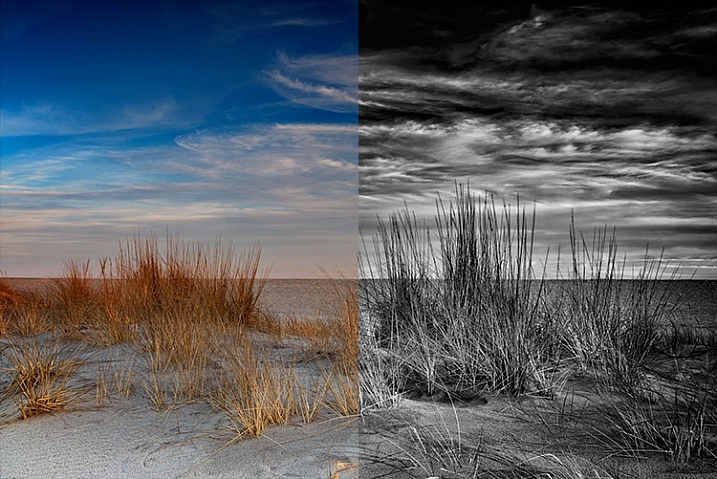
Before (left) and after Macphun Tonality CK (right)

With the use of layers and individual adjustments, there are literally endless combinations and looks that can be creative with Tonality CK. I really like the amount of freedom I have in the editing images, and the ability to create layers with different effects, and mask them off if desired, takes that freedom to a whole new level. For a more in depth review of Tonality, Product Review: Macphun Tonality Black and White Photo Editor goes in depth. As with Intensify CK, Tonality CK is an update to the version reviewed, but both are similar enough that I found the review helpful when I first began using Tonality CK.

Tonality CK applied on a portrait

Tonality CK applied on a portrait

Focus CK

Macphun Focus CK application window

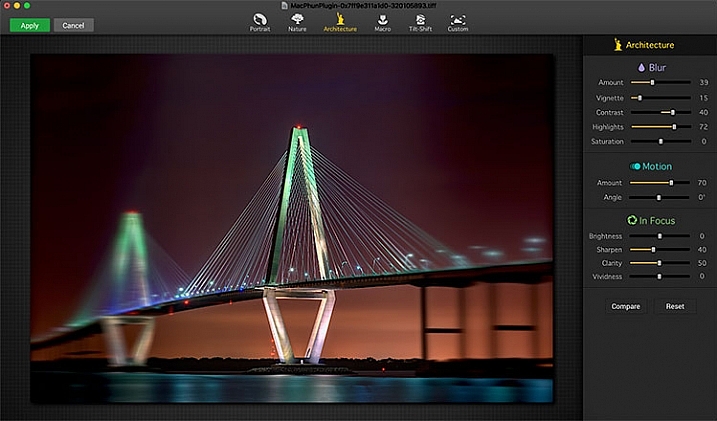
Macphun Focus CK application window.

Macphun Focus CK is a plugin that allows you to create lens focus effects easily and quickly. The interface when the plugin is opened is a minimalistic one, with only six presets across the top of the screen, and your image in the main window underneath. The presets are as follows: Portrait, Nature, Architecture, Macro, Tilt-Shift, and Custom. Truth be told, Nature, Architecture and Tilt-Shift are all similar, in that the blur is similar to that created when using a tilt-shift lens. There are subtle differences in each preset, with the most notable being the angle of the blur. This is user-adjustable, however, as are several settings sliders, which are adjusted slightly differently according to the preset selected. The same can be said for the Portrait and Macro settings, except instead of a parallel blur field, they create a circular blur field.

When you select a preset, a series of sliders appear on the right side of the screen, in three groups. The first group is Blur. This set of sliders, as you may have deduced, adjusts the image in the blurred area. The settings include amount of blur, vignette, contrast, highlights, and saturation.  The next group of sliders is Motion, which allows you to add motion to the blur, rather than simply a normal blur. Here you can adjust the amount and the angle of the motion. The final group of sliders is for the In Focus area of the image, and allows you to adjust the brightness, sharpness, clarity, and vividness of this area of the image.  Beneath these sliders are a Compare button, to allow you see before and after the blur is applied, and a Reset button, to allow you to start over if you don’t like what you’ve done.

Before and after comparison of Macphun Focus CK

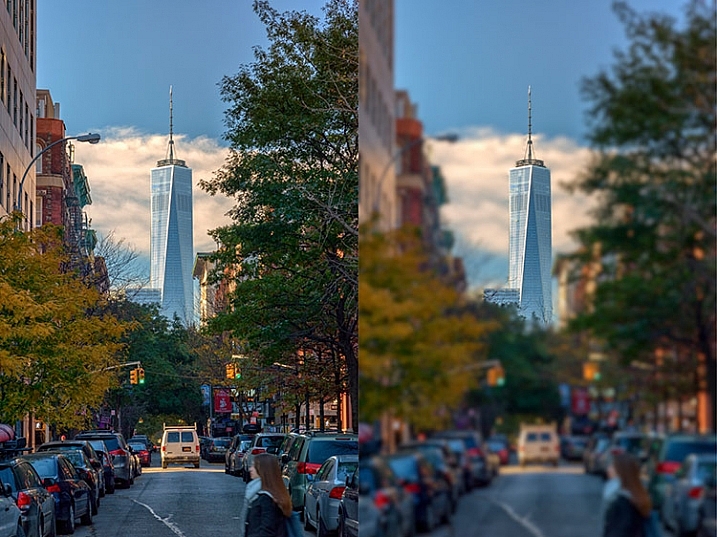
Before (right) and after (left) Macphun Focus CK.

The most fun part of Focus CK is the Custom setting. The custom setting allows you to mask off the areas of the image you wish to remain sharp, using the paint brush. As you paint, you’ll see the effect on the image. There is an eraser tool if you paint in an area you’d like to remain blurred. This custom setting allows you to really create different looks within your image. Have two objects at different depths, and want them both sharp and everything else blurry? No problem. Simply mask each object and adjust the blur of the out of focus areas to taste.

The biggest drawbacks in Focus CK is in this custom mode. There is no ability to zoom in on the area you are masking to do fine detail work, and the brush will not go smaller than 20 pixels, making it very difficult to mask off fine detail, such as the antenna on the building in the example above. If those two deficiencies could be rectified, I could see using Focus CK much more in my personal work.

Focus-CK-Portraiture

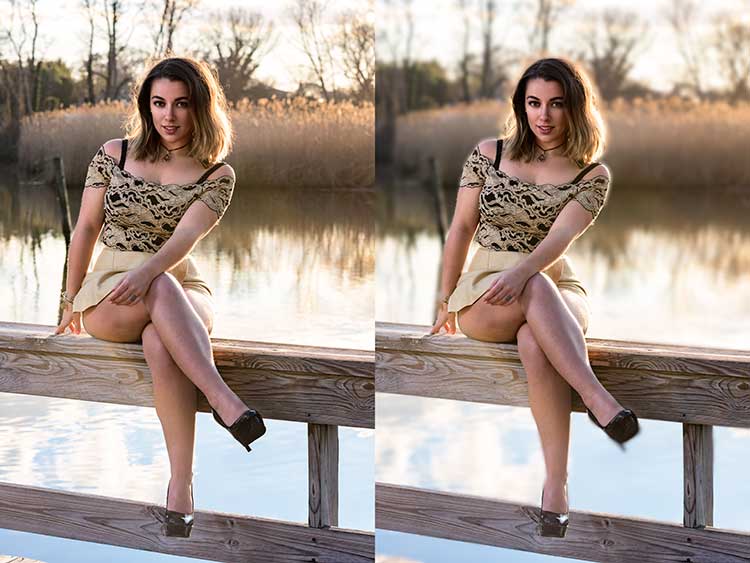
Focus CK applied to a portrait

Focus-CK-Macro

Focus CK applied to a macro image

Noiseless CK

Noiseless CK is Macphun’s entry into the digital noise removal arena. Like the other plugins in the Macphun Creative Kit, the interface features a large window for your image, a button bar across the top, and a palette of sliders on the right, that allows you to adjust a wide array of settings and customize the noise reduction to your preference.

Macphun Noiseless CK application Window

Macphun Noiseless CK application window.

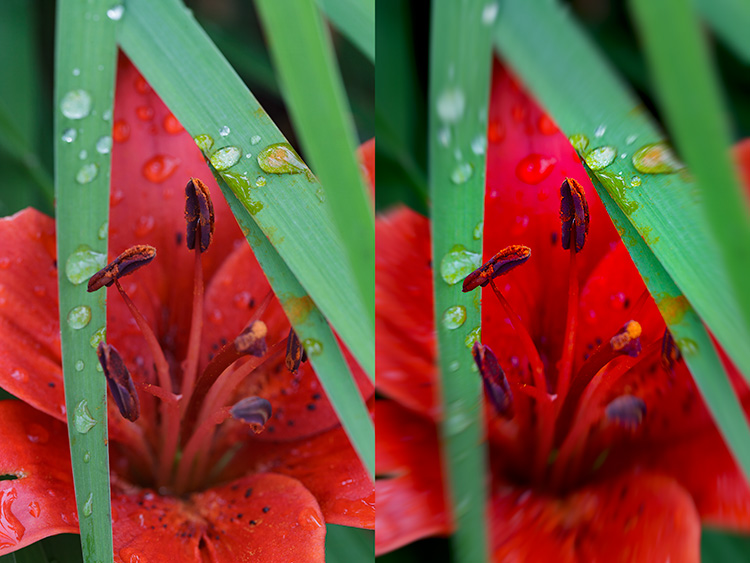
To test out Noiseless CK, I dug out an image I created several years ago that has the worst noise I’ve ever had in an image. It was a four minute exposure, and I had neglected to turn on long exposure noise reduction. I found Noiseless CK was able to subdue the noise pretty easily.

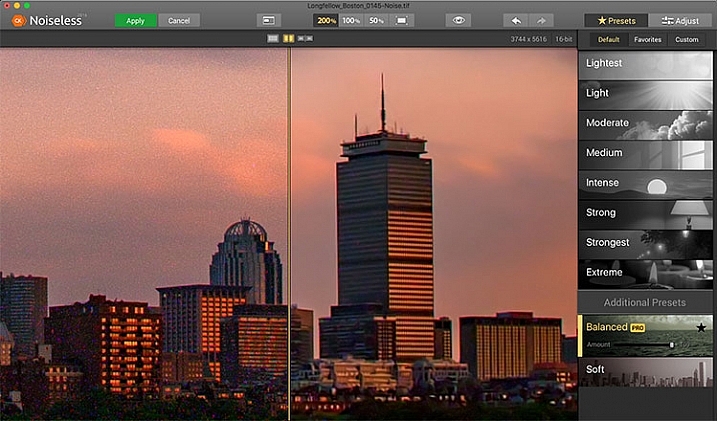
Noiseless is simple to use. Open your image in Photoshop or Lightroom and start the Noiseless Plugin. On this image, I started at the Lightest preset, just to see how that would do with the noise, knowing that most likely it wouldn’t come close to reducing it enough for my taste, due to the heavy noise within the image. As I worked my way down the list of presets, I found that once I hit the Strong preset, it really reduced detail in the image, which I wanted to try and avoid. In addition to the presets ranging from Lightest to Extreme, there are also two additional presets, called Balanced and Soft. The Balanced setting seemed to work the best on this image. There is also an Amount slider to adjust the application of noise reduction using that setting.  From there, I could also select the Adjust tab, and individually adjust the settings individually to get a look I was happy with. If I wanted to save those settings, I can create a custom preset of my own for future use.

Before and after editing in Macphun Noiseless CK

Before (right) and after (left) comparison of an image edited in Macphun Noiseless CK.

I found that using some of the presets resulted in a greater loss of detail than I was happy with, but once I went into the Adjust tab and started using the sliders, I was able to get some detail back, and get a look I was happy with. As I said, this was an extreme image I was using to test, and I have to say Noiseless CK did a great job with it. The ability to adjust the noise reduction using both the amount slider and individual settings sliders, gives me the confidence that Noiseless CK can handle almost anything I need it to.
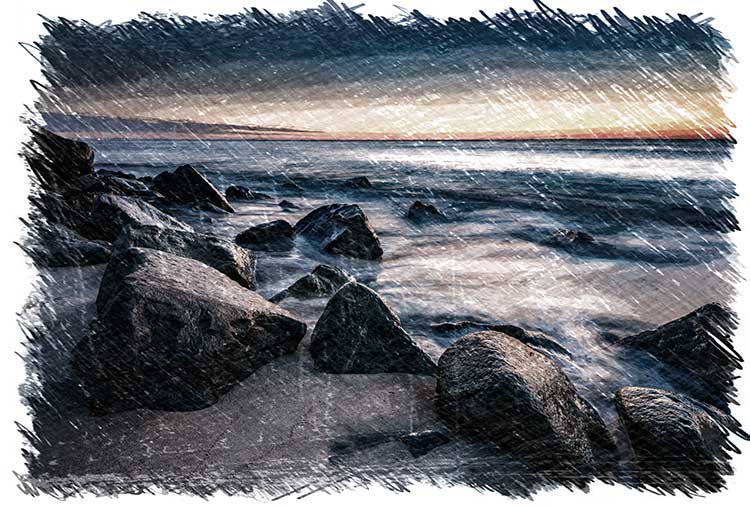
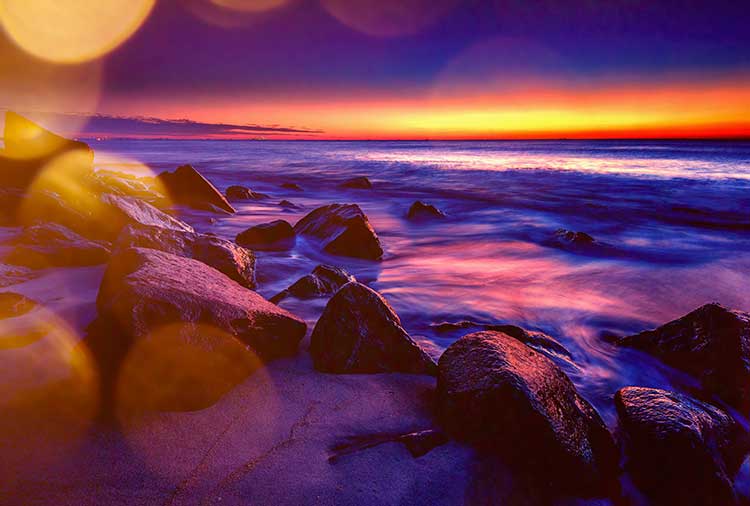
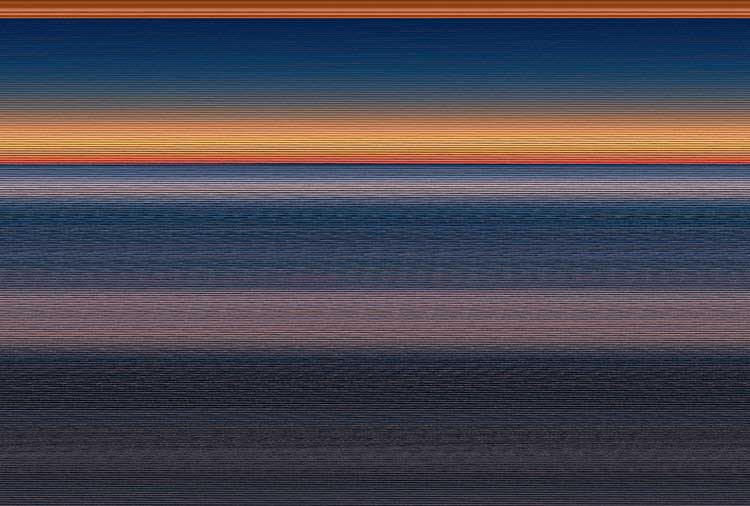
FX Photo Studio CK

Macphun FX Photo Studio CK

Macphun FX Photo Studio CK application window

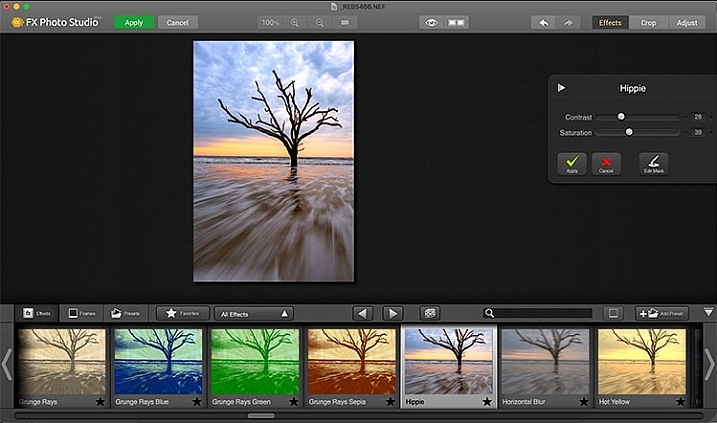
FX Photo Studio Ck is a special effects generator and photo editor that, at first glance, looks relatively simple and easy, but doesn’t offer many options. However, if you dig a little deeper, you’ll see there is more than meets the eye here. It offers over 200 different effects and frames, as well as the ability to create your own.

When you first open an image in FX Photo Studio CK, you’ll see your image in the main window, and underneath is a preview bar of presets. You will also notice the menu bar above, and on the right end of that, a mode selector, allowing you to select from Effects, Crop, and Adjust. The presets for Effects include Effects, Frames, and Presets, with Presets in this case meaning user-defined presets. The Effects tab also features a drop down menu with 20 groups of effects. These include Art, Black & White, Blur, Color Fantasy, Color Lenses, Color Strokes, Color Temperature, Cross Processed, Distortion, Glow, Groovy Lo-Fi, Grunge, Hollywood FX, Hue, Photo Styles, SFX, Sketch, Symmetry, Vignettes, and Vintage. When you select the Frames tab, you’ll be presented with a preview of frames below, and a drop-down menu to select different groups of frames appears, allowing you to select between Art, Classic, Grunge & Analog, and Photo Borders.

Before and after comparison of Macphun FX Photo Studio CK

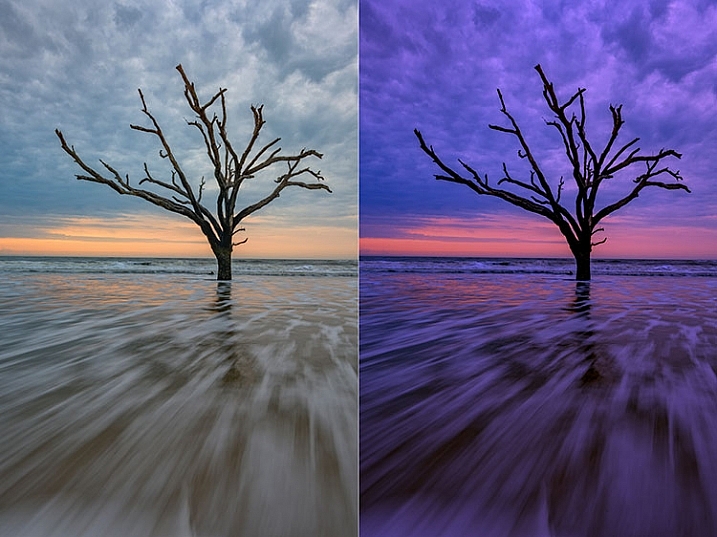
An image before editing in Macphun FX Photo Studio CK on the right, and after, on the left.

To be honest, most of the effects and frames do not appeal to me. But there is more to FX Photo Studio CK than just presets and frames. At the right of your image are adjustments for the various effects. These adjustments will vary depending on the effect chosen, and is usually a minimal control of one or two sliders to adjust the effect. You can combine effects, by selecting one, applying it, and then selecting another one to apply to that. FX Photo Studio CK lacks the layer capabilities of Tonality, which would really make it easier to combine multiple effects and adjust how they are applied together. As it stands now, you must commit to one effect before adding another. One great feature of FX Photo Studio CK is the ability to edit the mask on the image, so you can apply the effect only to areas of the image you want, and hide the effect in other areas.

FXPhotoStudio-Frame-Grunge

FXPhottoStudio-Color-Charcoal-Sketch

FXPhotoStudio-Groovy-Lo-Fi-Napa

If you wish to make further adjustments, you can select the Adjust tab, which opens a palette of sliders including Temperature, Saturation, Hue, Exposure, Brightness, Contrast, Shadows, Highlights, Sharpen, Red, Green, and Blue. There are fewer controls available than in Intensify CK, so I’m not sure I see the usefulness of FX Photo Studio CK for in-depth editing, but for someone looking to quickly add an effect or frame to their image, FX Photo Studio CK may be just what they need.

Error using frames

Error using frames

Note: I could not get FX Photo Studio to give me a clean image. Every frame I tried, every file I tried, gave me the same result when I tried to use the Art Frames and Classic Frames. I was able to use a Grunge Frame, and have shown examples above. Not sure if this is a greater bug with MacPhun’s software or a problem with my system specifically.

Conclusion

The Macphun Creative Kit is a full-featured, well thought out, suite of image editing tools that would be welcome in any photographer’s tool kit. While I would prefer more control in certain areas of the suite, Macphun has continued to develop the software for the past several years, and I have no doubt they will continue to make improvements as they move forward.

Overall rating: 3.5 out of 5. I really liked MacPhun Creative Kit and think it has a lot to offer, but I ran into a bug with the FX Photo Studio when trying to add a frame to an image, and I think Focus CK needs a zoom feature and a finer brush to allow for more precise masking. Fix the bug with the frames and add the zoom and finer brushes to Focus CK and I’d give another star.

googletag.cmd.push(function() {
tablet_slots.push( googletag.defineSlot( “/1005424/_dPSv4_tab-all-article-bottom_(300×250)”, [300, 250], “pb-ad-78623” ).addService( googletag.pubads() ) ); } );

googletag.cmd.push(function() {
mobile_slots.push( googletag.defineSlot( “/1005424/_dPSv4_mob-all-article-bottom_(300×250)”, [300, 250], “pb-ad-78158” ).addService( googletag.pubads() ) ); } );

The post Software Review: Macphun Creative Kit 2016 by Rick Berk appeared first on Digital Photography School.


Digital Photography School

 
Comments Off on Software Review: Macphun Creative Kit 2016

Posted in Photography


2016 Roundup: Interchangeable Lens Cameras $800-1200

16 May

These days, many (if not most) consumers are likely to shop based on price and capability, rather than according to whether a certain model contains a mirror, or not. We think this is a good thing; with all the increased competition, cameras are improving more and at a faster rate than ever before. From the gear perspective, it’s certainly an exciting time to be a photographer.

In this category, you’ll find both mirrorless and DSLR cameras that are highly capable under a variety of shooting situations, offer built-in high-spec viewfinders – either optical and electronic – and an extensive array of external controls. The biggest differences in performance tend to come down to autofocus sophistication and video capability, but neither of those is dictated by the presence or lack of mirror.

The contenders are:

  • Canon EOS 80D
  • Canon EOS Rebel T6s
  • Nikon D7200
  • Olympus OM-D E-M5 II
  • Panasonic Lumix DMC-GX8
  • Pentax K-3 II
  • Sony Alpha a77 II
  • Sony Alpha a6300

Most of the camera in this roundup are built around either Four Thirds or APS-C sensors. Sensor size plays a large part in determining the image quality a camera is ultimately capable of and, in general, the larger a camera’s sensor, the better the image quality and the more control you have over depth-of-field. APS-C sensors are larger than Four Thirds chips, but the differences are rarely huge. 

Of course, the sensor sizes and image quality of these cameras are not the only thing that varies; the feature sets and performance of each camera are also quite different across the board. Within this category you’ll find weather-sealed cameras, cameras that can capture 4K video, cameras that can shoot bursts at incredibly high speeds with autofocus, and cameras that are simply well-balanced all-rounders. Which one should you buy? Read on to find out…

Articles: Digital Photography Review (dpreview.com)

 
Comments Off on 2016 Roundup: Interchangeable Lens Cameras $800-1200

Posted in Uncategorized


2016 Roundup: Consumer Long Zoom Compacts

12 May

Bridge and travel zoom cameras are two of the very few categories of compact cameras to survive the smartphone. Whether it’s a travel zoom, which puts a 25X-30X zoom into your pocket, or a bridge camera which offers even more zoom, phones just can’t compete. 

While there are now enthusiast-level long zoom cameras with 1″-type sensors – such as Sony’s Cyber-shot RX10 series – there are still plenty of more budget-friendly models, though their smaller sensors don’t offer the image quality or depth-of-field control of the pricier models. The one product in the group that is a bit more competitive with the enthusiast cameras is the Olympus Stylus 1s, which has a 1/1.7″ sensor, rather than the smaller, and more common (in this class) 1/2.3″.

The following cameras are included in our roundup:

  • Canon PowerShot SX60 HS
  • Canon PowerShot SX710 HS
  • Nikon Coolpix P900
  • Olympus Stylus 1s
  • Panasonic Lumix DMC-FZ300
  • Panasonic Lumix DMC-ZS60
  • Sony Cyber-shot HX90V
  • Sony Cyber-shot HX400V

Of those eight cameras, three are pocket-sized and offer 30X zooms. The other five are bridge (SLR-style) cameras with focal lengths ranging from 600mm to an unbelievable 2000mm (35mm-equivalent).

And with that, let’s take a look at some consumer-level travel zoom cameras!

Articles: Digital Photography Review (dpreview.com)

 
Comments Off on 2016 Roundup: Consumer Long Zoom Compacts

Posted in Uncategorized


2016 Roundup: Interchangeable Lens Cameras $500-800

10 May

The $ 500-800 category (based on US MSRP) features quite a few strong offerings, some of which should satisfy first-time camera buyers with easy-to-use interfaces and point-and-shoot style functionality. Others are aimed more at seasoned-enthusiasts, offering direct manual controls and high-end features.

At this price point, all of the cameras use either Four Thirds or larger APS-C-sized sensors and all can shoot Raw. And while a larger sensor can mean the potential for better image quality and more control over depth-of-field, the difference in size between APS-C and Four Thirds is not enormous. As such, small differences notwithstanding, the vast majority of cameras in this roundup have what we would consider to be very good image quality.

All of the cameras in this selection are reasonably small in size (compared to pricier ILCs), but the number and arrangement of control points, grip size, build quality and weight all vary quite a bit. As do the inclusion of features like like 4K video capture and in-body image stabilization.

Let’s take a look at the currently available interchangeable lens cameras that fall into the $ 500-800 price range (give or take).

  • Canon EOS M3
  • Canon EOS Rebel SL1
  • Canon EOS Rebel T6i
  • Fujifilm X-T10
  • Nikon D3300
  • Nikon D5500
  • Olympus OM-D E-M10 II
  • Panasonic Lumix DMC-G7
  • Panasonic Lumix DMC-GX85
  • Pentax K-S2
  • Sony Alpha a6000

Articles: Digital Photography Review (dpreview.com)

 
Comments Off on 2016 Roundup: Interchangeable Lens Cameras $500-800

Posted in Uncategorized


2016 Roundup: Enthusiast Long Zoom Cameras

03 May

While most of new 1″ sensor enthusiast cameras have been on the shorter end of the focal length spectrum, there are now quite a few long zoom models, as well. Whether you want something pocketable or want to shoot for the moon (pun intended), you’ll find it in this group.

There are plenty of other long zoom compacts out there, some offering focal ranges reaching 2000mm though they almost always use much smaller 1/2.3″ sensors (the Olympus Stylus 1s is one exception). The cameras in this roundup eclipse those models, especially when it comes to image quality and control over depth-of-field.

The models we’re looking at in this article include:

  • Canon PowerShot G3 X
  • Panasonic Lumix DMC-FZ1000
  • Panasonic Lumix DMC-ZS100/TZ100
  • Sony Cyber-shot DSC-RX10
  • Sony Cyber-shot DSC-RX10 II
  • Sony Cyber-shot DSC-RX10 III (coming soon)

The cameras that have the shortest zoom are arguably the most robust, feature-wise: the Sony Cyber-shot RX10 twins. (The RX10 Mark III, which will cover soon, has a significantly longer lens.) The Panasonic Lumix DMC-ZS100/TZ100 is likely the best travel zoom ever, offering a good balance of size and zoom power, while the Canon PowerShot G3 X and Panasonic Lumix DMC-FZ1000 swing for the fences in terms of zoom power.

To further help you pick the right camera in this class, we’ve created the chart below, which breaks down the equivalent aperture for each camera, as you work your way through the zoom range. Our article here explains the concept of equivalence, but at a high level all you need to know is that the lower the line is on the graph below, the blurrier the backgrounds you’ll be able to get and typically, though not always, the better the overall low-light performance.

This graph plots equivalent focal length against equivalent aperture – with both axes taking sensor size into account so that they can be compared on a common basis. Equivalent focal lengths offer the same field-of-view and equivalent apertures give the same depth-of-field and similar total light capture. For more information, click here.

With its constant aperture (F2.8) lens, the Sony Cyber-shot RX10 I/II capture more total light and offers more control over depth-of-field compared to its peers, by 1 or 2 stops. The trade-off is that its focal length caps out at 200mm equiv. The Canon PowerShot G3 X has the longest lens, but it reaches its maximum aperture (F5.6) at around 200mm equiv., putting it 1 stop behind the Panasonic Lumix FZ1000, which tops out at F4.

And with that out of the way, let’s get right into exploring the enthusiast long zoom cameras!

Articles: Digital Photography Review (dpreview.com)

 
Comments Off on 2016 Roundup: Enthusiast Long Zoom Cameras

Posted in Uncategorized


2016 Roundup: Compact Enthusiast Zoom Cameras

29 Apr

The enthusiast compact market has exploded over the last couple of years, with almost every manufacturer offering a product with a 1″-type sensors. Most of those cameras are small (and sometimes pocketable) and feature fast (but short) lenses. They also vary in terms of design, control points, video specs and whether they have an EVF, so you’ll have some decisions to make. In this roundup, we’ll try to help.

Here are the cameras that we’ll be covering in this article:

  • Canon PowerShot G1 X Mark II
  • Canon PowerShot G5 X
  • Canon PowerShot G7 X
  • Canon PowerShot G9 X
  • Fujifilm X30
  • Fujifilm XQ2
  • Panasonic Lumix DMC-LX100
  • Panasonic Lumix DMC-ZS100/TZ100
  • Sony Cyber-shot RX100
  • Sony Cyber-shot RX100 II
  • Sony Cyber-shot RX100 III
  • Sony Cyber-shot RX100 IV

As mentioned above, the majority of offerings in this category utilize 1″-type sensor, however two cameras offer even larger sensors. The Canon PowerShot G1 X Mark II is built around the largest sensor of the bunch at 1.5″, while the Panasonic Lumix DMC-LX100 uses a slightly smaller Micro Four Thirds chip.

On the opposite end of the spectrum, the two Fujifilm options use significantly smaller 2/3″ sensors, which is important, because sensor size can be a major indicator of potential – particularly lowlight – image quality. Also, cameras with larger sensors will generally allow for much more control over depth of field.

To further help you pick the right camera in this class, we’ve also created the chart below, which breaks down the equivalent aperture for each camera, as you work your way through the zoom range. Our article here explains the concept of equivalence, but at a high level all you need to know is that the lower the line is on the graph below, the blurrier the backgrounds you’ll be able to get and typically, though not always, the better the overall low-light performance.

This graph plots equivalent focal length against equivalent aperture – with both axes taking sensor size into account so that they can be compared on a common basis. Equivalent focal lengths offer the same field-of-view and equivalent apertures give the same depth-of-field and similar total light capture. For more information, click here.

On the following pages, you’ll find what we liked and didn’t like about each camera, links to our test scenes for image quality comparisons, and real-world galleries to give you a sense of how each performs outside the lab.

Articles: Digital Photography Review (dpreview.com)

 
Comments Off on 2016 Roundup: Compact Enthusiast Zoom Cameras

Posted in Uncategorized


Highlight reel: top video trends from NAB 2016

26 Apr

NAB 2016

Last week Las Vegas once again hosted the annual National Association of Broadcasters Show. Although many of the products and technologies seen at NAB won’t be of direct interest our audience (think satellite trucks and news studios), the explosion of high quality, affordable tools aimed at filmmakers and videographers make it a good place to watch industry trends and new product categories. Perhaps more importantly, NAB can provide insight into what technologies we might expect to filter down to prosumer and consumer products in a few years time.

Take a look at a few trends and products from NAB 2016 that caught our eye and got us excited.

Virtual Reality (VR)

VR was everywhere at NAB, with multiple sessions focused on VR technology, storytelling and distribution that were packed to standing room only. A top destination was the VR Showcase sponsored by Kaleidoscope VR, a VR studio, and Jaunt, a maker of VR cinema cameras. With dozens of stations featuring headsets from Samsung, Oculus and HTC, visitors could experience cinematic VR experiences in person.

These weren’t just your standard ‘park-a-camera-in-an-iconic-spot-and-look-around’ videos, but actual films created with a VR audience in mind. Imagine watching a film about the 7/7 London Tube bombings, except you’re sitting on the train while the story plays out. It creates an immersive, visceral experience that simply wouldn’t work with conventional filmmaking.

We’re very excited about the creative possibilities that VR can provide to photographers and filmmakers, so we’re planning a follow-up report to tell you more about VR and our experiences at NAB.

Nokia OZO: Impressive VR for a price

The Nokia OZO includes eight cameras and eight microphones to create immersive VR footage. You can pick one up for a cool $ 60,000.

If you still equate the name Nokia with mobile phones, it’s time to change your thinking. The company has made a big push into VR, making a big splash at NAB with its $ 60,000 OZO 360-degree spherical VR camera. The OZO features 8 cameras, each with 195-degree field of view and global shutter, as well as the ability to capture stereo video for 3D effect. To add additional realism, the OZO also features 8 microphones in order to provide 360 sound, something that’s important for creating immersive VR experiences.

Although the quality of the footage from the OZO still isn’t up to the resolution and dynamic range standards we’re accustomed to seeing in digital still cameras, the VR experiences created by the OZO were impressive and compelling. The directional sound had a huge impact on the realism of footage shot with the camera, and it captured some of the best VR footage we’ve seen. Count us in for a test unit!

GoPro Omni

Not to be left out the the VR extravaganza, GoPro showed off its new Omni camera, a cube-shaped cage that holds six GoPro Hero 4 cameras. Although rigs holding multiple GoPro cameras aren’t new in the VR world, GoPro has embedded useful features to improve the experience of a multi-GoPro setup. Primarily, all cameras in the rig are synchronized and act as a single camera. 

This may not seem like a big deal, but if you’ve ever tried to set up, sync, and use multiple cameras at one time you’ll appreciate the convenience. Making a mistake on just one camera ruins your entire shoot. The Omni solves this problem and syncs everything, right down to the rolling shutter, between all the cameras at once. 

GoPro is selling the Omni for $ 1,499 (rig only) or $ 4,999 for the full kit.

4K? No thanks, I think I’ll take 8K instead.

Although many consumers are still learning about 4K video technology, the broadcast industry is already beginning to think about 8K video, with companies such as NHK, Canon, Panasonic, Ikegami and Planar showing off 8K cameras and displays.

Let’s get the obvious out of the way right up front: 8K IS AMAZING! (Yes, we meant to scream that.)

OK, let’s put 8K this into some context. None of these companies really expect 8K technology to come to your living room any time soon, though that’s likely to occur in some form by the 2020 Summer Olympics in Tokyo, which seems to be a common target in the industry.

The real interest in 8K technology right now is for content acquisition, and it’s the same reason producers of HD content like to shoot in 4K: additional post-processing options and better quality footage when downsized. Display manufacturers are also excited about 8K for applications where size really does matter, such as cinema screens, displays at amusement parks, and giant stadium screens.

Trust us, though. Once you’ve seen 8K displays you’ll never look at a 4K screen the same again…

8K Displays

It’s almost impossible to see the pixels on Canon’s prototype 8K reference display – even with a magnifying glass.

Speaking of 8K displays, one of the most impressive examples was Canon’s prototype 8K reference display. To fully appreciate just how sharp this display is, consider that each frame of 8K video is just over 35MP of resolution – the rough equivalent of a full resolution Nikon D810 image. Pack that into a relatively small screen and for all practical purposes it looks like a backlit fine art print.

Quite simply, this redefines what a video screen is. Once you remove any noticeable pixelation, it’s essentially indistinguishable from a nicely backlit, printed image. We could easily imagine these being used for museum exhibits, but we suspect content creators will come up with interesting ways to use them that we haven’t even envisioned yet.

Almost as a tease, Canon tethered a magnifying glass to the display so you could look at the pixels up close. While it’s possible to see them you have to look really hard – certainly much closer than you ever would in real world conditions – and even then you have to convince yourself that you’re really seeing them.

8K Prints

Prints in Canon’s 8K print gallery were stunning and looked as good as what we would expect from even the best still cameras.

This is why still photographers should care about 8K video.

Each frame of 8K video is a 35MP image, meaning that as long as you use settings to avoid motion blur it’s possible to make some spectacular prints.

Canon illustrated this potential with an 8K print gallery, exhibiting prints made from individual frames of 8K video. The results were spectacular, with vivid colors and sharp edges. Really, if they had told us the photos were shot by a Canon 5DS or a Nikon D810 we would have believed them. If this is the future, bring it on.

Atomos Shogun Flame and Ninja Flame

The new Atomos Shogun Flame (top) and the original Shogun (bottom). The new Flame includes an HDR screen and AtomHDR technology, which allows videographers to see a live approximation of what graded footage will look like when shooting in Log.

Atomos has become a favorite of video shooters thanks to its excellent off-camera displays and recorders. At NAB the company showcased its newest line of ‘Flame’ products, which add significant new features to its Shogun and Ninja recorders.

The biggest improvement most users will notice are the displays: the screens are now 10-bit HDR displays that are up to four times brighter than previous models, meaning they can even be used outdoors without a hood.

Atomos also introduced a technology called AtomHDR to help videographers who shoot in Log format. Log video typically looks very flat until it’s color graded; AtomHDR allows you to record in Log while displaying accurate contrast and colors on-screen, giving a good approximation of what graded footage will look like. We use the original Shogun here in our studio and we were really impressed the AtomHDR technology. In the photo above you can see a comparison of the new Shogun Flame using AtomHDR (top) and the old Shogun without AtomHDR, but to be honest the photo doesn’t fully capture how much better the Shogun Flame looks.

The Shogun Flame lists for $ 1,695, and the Ninja Flame (which lacks some features such as SDI and XLR inputs) lists for $ 1,295.

Blackmagic Video Assist 4K

Videographers also flocked to the Blackmagicdesign booth to try out the Blackmagic Video Assist 4K, an updated version of its Video Assist monitor and recorder. The Video Assist 4K is built around a 7-inch display and includes HDMI and SDI plugs, dual SD card slots for continuous UHD recording, LANC connection for remote control, and XLR microphone inputs. Footage can be recorded in 10-bit 4:2:2 video in either ProRes or DNxHD for easy downstream editing. The Video Assist 4K looks to be a great option for people who need off-camera recording, especially those shooting events that may require long, continuous recording.

The Video Assist 4K lists for $ 895.

Sennheiser Microphones

The Sennheiser MKE 440.

Cameras tend to get a lot of attention, but videographers know that sound can be just as important as a good picture when capturing video.

Last year Sennheiser introduced the ClipMic digital and MKE 2 digital, lavalier microphones that plug directly into the Lighting port of an iOS device to record high quality sound, turning iPhones into great off-camera recorders. This year, the company followed up with additional Lightning-compatible microphones: The HandMic digital, a handheld microphone designed for mobile journalism, and the MK 4 digital, a studio microphone. We’ve actually been using one of the MKE 2 digital mics with an iPhone to record a lot of interviews over the past year and it works great, so we’re really excited to see Sennheiser expanding this line of products.

Sennheiser also introduced the MKE 440 stereo microphone for DSLRs (see photo). Designed to mount on a camera’s hot shoe, the MKE 400 provides high quality stereo recording as opposed to the mono recording provided by most DSLR microphones, and should prove useful when recording an immersive soundscape with an on-camera mic is important.

Lytro Cinema Camera

The Lytro Cinema camera promises to change the way films are made, though at the moment it’s about the length of a VW minibus.

Lytro was the clear winner of the ‘Well, that was bigger than we expected…’ award at NAB. 

The company, which recently announced its exit from the consumer photography business, literally pulled the cover off its new prototype Cinema camera to a standing room only crowd. Featuring a 755MP imaging sensor that appears to be about a foot wide, the Cinema camera has the potential to change the way some films are shot. 

Lytro’s Jon Karafin gave a live demo illustrating the camera’s unique ability to alter creative choices in post-processing, such as plane of focus, depth of field and depth-based keying. And because all of the computational work is done by thousands of CPUs in Google’s cloud, he was able to run the entire demo off a laptop computer.

The prototype camera is huge (about the same length as a VW minibus, to our eye), but company representatives told us that smaller versions will follow. We think this technology has a lot of potential and look forward to seeing how it evolves. You can read our analysis of the Lytro announcement here.

Articles: Digital Photography Review (dpreview.com)

 
Comments Off on Highlight reel: top video trends from NAB 2016

Posted in Uncategorized


Winners of 2016 Sony World Photography Awards announced

25 Apr

$ (document).ready(function() { SampleGalleryV2({“containerId”:”embeddedSampleGallery_5299746697″,”galleryId”:”5299746697″,”isEmbeddedWidget”:true,”standalone”:false,”selectedImageIndex”:0,”startInCommentsView”:false,”isMobile”:false}) });

An Iranian photographer has won the $ 25,000 top prize in the 2016 Sony World Photography Awards with a collection of portraits taken to highlight the horrors of acid throwing and the plight of its victims. Asghar Khamseh, a photojournalist with Iran’s Mehr News Agency, was given the title L’Iris d’Or Photographer of the Year a ceremony in London last week, at which he was also named the winner of the Contemporary Issues prize. His ‘Fire of Hatred’ project portrays the shocking injuries that acid throwing inflicts and the mental trauma it can create, but also the pride, strength and dignity of the mainly women and children affected by these too-common attacks.

The ceremony also honored 15 other category-winning photographers across 14 professional competitions, an Open section for amateur photographers as well as student and youth contests. The Open winner, Kei Nomiyama from Japan, won a prize of $ 5000, and all category winners won trophies as well as Sony camera equipment. For the first time a photographer won two categories, with Canada’s Kevin Frayer coming out on top in both the Environment and People competitions.

The prize for Outstanding Contribution to Photography went to a Chinese and Japanese couple, RongRong and inri for their promotion of, and influence on, contemporary photography in China.

The ninth Sony World Photography Awards received 230,103 entries from photographers in 186 countries, and category winners, shortlisted and commended images will be exhibited in Somerset House in London until the 8th May. A book of images is also available.

For more information on the awards visit the Sony World Photography Awards website.


Press release:

Grand prize winners announced for the world’s largest photography competition – 2016 Sony World Photography Awards

Iranian photographer Asghar Khamseh wins L’Iris d’Or Photographer of the Year and $ 25,000 prize for powerful portraits of acid attack victims

London, 21st April 2016: The overall winners of the world’s largest photography competition, the 2016 Sony World Photography Awards, are named today by the World Photography Organisation. An exhibition of all the winning and shortlisted work will run at Somerset House, London from 22nd April – 8th May.

Following a record-breaking 230,103 submissions to its ninth edition, the awards’ Honorary Judging Committee has selected Iranian photojournalist Asghar Khamseh as the recipient of its most coveted prize, the L’Iris d’Or Photographer of the Year.

Chosen from the winners of the awards’ fourteen Professional categories, the winning work, ‘Fire of Hatred’, is a powerful portrait series tackling the social issues around the violent act of acid throwing. Khamseh was announced as the winner of the $ 25,000 (USD) prize at an awards ceremony in London in front of industry leaders. The winners and finalists of all fourteen Professional categories were also announced at the ceremony.

At the ceremony, the World Photography Organisation announced Kei Nomiyama, Japan, as the Open Photographer of the Year and recipient of $ 5,000 (USD). In addition, the organisation announced the winners of the Youth and Student Focus Photographer of the Year titles. All winners of the night received the latest Sony digital imaging equipment.

Scott Gray, CEO, World Photography Organisation comments: “The awards consistently provide an incredible array of work, from a multitude of countries, and most importantlyprovide the chance for photographers to be discovered and extend their careers. I hope that the winning work this year can provide an inspiration to other photographers, helping to push their creative boundaries, whilst also serving to build the wider appreciation of photography.”

The Sony World Photography Awards annually recognises the world’s best photography. Free to enter and open to all photographers, the awards are an authoritative voice in the photographic industry that has the power to shape the careers of its winning and shortlisted photographers.

L’IRIS D’OR PHOTOGRAPHER OF THE YEAR – ASGHAR KHAMSEH
Born in Tehran in 1963, Asghar Khamseh is a photojournalist with Mehr News Agency, Iran, whose work focuses on social issues.

The winning series ‘Fire of Hatred’ is a powerful series of portraits of the victims of acid attacks. This beautiful yet thought-provoking work examines the social issues around this violent crime – looking past the physical and psychological damages suffered, and towards the social stigma and blame the victims, who are mainly women and children, suffer.

Dominique Green, Chair, Documentary Jury said of the work: “Portraits of disfigurement resulting from social violence are undoubtedly a hard-hitting subject, and one which the longstanding tradition of documentary photography does not shy away from. The power of Asghar Khamseh’s imposing series ‘Fire of Hatred’ is such that he enables the viewer to face head-on intimate images, which could be testing to examine closely, with empathy and respect which in turn allows the viewer to become a witness and not just a spectator. The Jury were united in their admiration of this work and the light it shed on the tragic practice it exposes.”

PROFESSIONAL CATEGORY WINNERS AND FINALISTS
The winners of the seven Documentary and seven Art categories hail from 10 countries and, for the first time, two Professional categories have been won by one photographer in the same year. Photographers were judged on a body of work.

ART CATEGORIES
Architecture winner: Amélie Labourdette, France
2nd – Hui Zhang, China / 3rd – Stephan Zirwes, Germany
Candid winner – Kirstin Schmitt, Germany
2nd – Nick Ng, Malaysia / 3rd – Andrea Rossato, Italy
Conceptual winner – Julien Mauve, France
2nd – Alejandro Beltran, Venezuela / 3rd – Barbaros Kayan, Turkey
Landscape winner: Maroesjka Lavigne, Belgium
2nd Maoyuan Cui, China / 3rd Stefan Schlumpf, Switzerland
Portraiture winner: Marcello Bonfanti, Italy
2nd Fauzan Ijazah, Indonesia / 3rd Rubén Salgado Escudero, Spain
Staged winner: Alberto Alicata, Italy
2nd Cristina Vatielli, Italy / 3rd Kristoffer Eliassen, Norway
Still Life winner: Francesco Amorosino, Italy
2nd Oliver Schwarzwald, Germany / 3rd Hiroshi Watanabe, Japan

DOCUMENTARY CATEGORIES
Campaign winner: Jetmir Idrizi, Kosovo
2nd – David Chancellor, UK / 3rd – Antoine Repessé, France
Contemporary Issues winner – Asghar Khamseh, Iran
2nd – Kevin Frayer, Canada / 3rd – Simona Ghizzoni, Italy
Current Affairs winner – Angelos Tzortzinis, Greece
2nd – Andrea and Magda, Italy & France / 3rd – Andrew Burton, USA
Daily Life winner: Espen Rasmussen, Norway
2nd Sandra Hoyn, Germany / 3rd Stephanie Sinclair, USA
Environment winner: Kevin Frayer, Canada
2nd Li Feng, China / 3rd Lucy Nicholson, UK
People winner: Kevin Frayer, Canada
2nd Filippo Venturi, Italy / 3rd Alessandro D’Angelo, Italy
Sport winner: Nikolai Linares, Denmark
2nd Jens Juul, Denmark / 3rd Annick Donkers, Belgium

OPEN PHOTOGRAPHER OF THE YEAR – KEI NOMIYAMA, JAPAN
“Enchanted Bamboo Forest” by Kei Nomiyama was selected as the single best image in the world by a panel of judges chaired by Jael Marschner, former picture editor Time Out London / Sunday Times Travel. The photographer was awarded $ 5,000 (USD) at the London ceremony.

A Ph.D. Associate Professor in Environmental Chemistry at Ehime University, Japan, Nomiyama is keen wildlife and underwater photographer. His photograph was shot in the mountains of Shikoku Island and captures the Luciola parvula firefly at the beginning of the rainy season.
The photograph was selected from 10 Open category winners announced on 29th March. The Open competition asks for a single image and is open to all photographers.

YOUTH PHOTOGRAPHER OF THE YEAR – SAM DELAWARE, US
A beautiful portrait of the photographer’s sister won 18 year old student Sam Delaware the Youth Photographer of the Year title. Born in Freeport, Maine and currently attending school in Angwin, California, Delaware is a self-taught photographer who has been shooting since the aged of 12. The photographer was flown to London to attend the awards ceremony as part of his prize.

The winning image was selected from three Youth category winners announced on 29 March, the Youth competition is open to all photographers aged 12-19.

STUDENT FOCUS PHOTOGRAPHER OF THE YEAR
Sofia Jern, aged 23 of Novia University of Applied Sciences, Finland, secured the Student Focus Photographer of the Year title. She collected €30,000 worth of Sony photography equipment for her university at the awards ceremony in London. Jern’s winning work follows the lives of ‘glue boys’, young male drug users escaping reality on the streets of Kitale, Kenya.

Student Focus works worldwide with over 400 educational institutions with photography courses and is one of the world’s leading programmes for photography students. It is supported by the British Journal of Photography. www.worldphoto.org/student-focus

OUTSTANDING CONTRIBUTION TO PHOTOGRAPHY – RONGRONG & INRI
RongRong & inri, the influential photographic husband and wife team who have shaped contemporary photography in China and beyond, collected their Outstanding Contribution to Photography prize at the London awards ceremony. They were recognised by the World Photography Organisation for both their careers as artists and their significant impact on Asian photography.

RongRong & inri’s photography reflects the intimate world that they have created together and pushes the boundaries of traditional black-and-white darkroom techniques. Together they founded China’s first contemporary art space dedicated to the medium, the Three Shadows Photography Art Centre, and the 2015 Jimei x Arles Photo Festival in partnership with Les Recontres d’Arles.

The first major European showing of RongRong & inri’s work, celebrating their careers will be presented at Somerset House as part of the Sony World Photography Awards Exhibition.
The Outstanding Contribution to Photography prize has previously been awarded to Mary Ellen Mark, William Eggleston, Eve Arnold, Bruce Davidson, Marc Riboud, William Klein, Elliott Erwitt and Phil Stern.

EXHIBITION AND BOOK
All the winning and shortlisted images will be exhibited at Somerset House, London from 22nd April – 8th May. The exhibition will also include a special dedication to Outstanding Contribution to Photography recipients, RongRong & inri.

The exhibition is accompanied by a book of the winning and selected shortlisted works, available to buy from www.worldphoto.org

Articles: Digital Photography Review (dpreview.com)

 
Comments Off on Winners of 2016 Sony World Photography Awards announced

Posted in Uncategorized


Student takes 2016 Zeiss Photography Award top prize

13 Apr

$ (document).ready(function() { SampleGalleryV2({“containerId”:”embeddedSampleGallery_3406645931″,”galleryId”:”3406645931″,”isEmbeddedWidget”:true,”standalone”:false,”selectedImageIndex”:0,”startInCommentsView”:false,”isMobile”:false}) });

A 25-year-old photojournalism student beat a host of professionals to Zeiss’s €15,000 top prize in its first Zeiss Photography Awards. Tamina-Florentine Zuch’s project about train travel in India took her six weeks to shoot, and explores how the nation behaves on the world’s most extensive railway network. Zuch wins Zeiss lenses to the value of €15,000, and will receive her prize during the Sony World Photography Award ceremony in London this month.

Zeiss says its inaugural competition, with the theme ‘Meaningful Places’, attracted 22,000 images from 3139 photographers across 116 countries and was successful enough that the company will repeat the exercise next year.

Runners up in the competition included Melanie Hübner (Germany), Francisco Salgueiro (Portugal), Patricia Ackerman (Argentina), Helen Mountaniol (Ukraine), Jorge Lopez Munoz (Spain), Erez Beatus (Australia), Lasse Lecklin (Finland) and each of them will have their work shown at the Sony World Photography Awards exhibition.

For more information on the awards, and to see the entries of all of those shortlisted, visit the Zeiss Photography Award website.


Press release:

ZEISS award for new perspectives

The winner of the first-ever ZEISS Photography Award has been chosen. The prize goes to Tamina-Florentine Zuch from Hannover with her photo series documenting a train journey through India.

“Meaningful Places” was the theme of the first-ever ZEISS Photography Award “Seeing Beyond,” which invited professional photographers and ambitious amateurs to showcase for the first time their talent to a renowned jury and to the broader public. The contest attracted 3,139 photographers from 116 countries – from Albania to Zimbabwe. A total of 22,000 images were submitted. “The results are superb – we were really excited by the breadth and quality of the applications,” praised Scott Gray, CEO of the World Photography Organisation, which organizes the ZEISS Photography Award.

In Tamina-Florentine Zuch, 25, the ZEISS Photography Award has found a worthy winner. Zuch, a student of photojournalism and documentary photography in Hannover, traveled through India by train last year for a period of six weeks. Her pictures show children sleeping in hammocks in stuffy train carriages, men risking their lives as they ‘surf’ railway cars, and exotic landscapes as they pass by. Her “Indian Train Journey” brings this journey to life. Some of the images, which are very intimate, demonstrate Zuch’s photographic mastery at such a young age, her patience, and her sensitivity and tact in dealing with subjects from a completely different culture. “Tamina Zuch has an incredible eye for composition, light and a feel for the right moment. She combines these characteristics again and again in her pictures,” said Steve Bloom, one of the three jurors, enthusiastically. “‘Indian Train Journey’ is a very personal and poetic journey that is told by a fresh, young voice,” added Hans-Peter Junker, juror and editor-in-chief of the reportage magazine View.

As the winner, Zuch will receive ZEISS lenses of her choice for a total value of EUR 15,000, as well as an offer to cooperate further with ZEISS. Seven other photographers – Melanie Hübner (Germany), Francisco Salgueiro (Portugal), Patricia Ackerman (Argentina), Helen Mountaniol (Ukraine), Jorge Lopez Munoz (Spain), Erez Beatus (Australia), Lasse Lecklin (Finland) – made it to the shortlist, which gives them the opportunity to present their work at the Sony World Photography Awards Exhibition at Somerset House in London from April 22 to May 8, 2016.

In 2017 the ZEISS Photography Award will enter a new round, with a different theme. “We want to create a platform for photographers to show their art and their idea of creation to an interested public, and to pay tribute to that,” said Dr. Winfried Scherle, Executive Vice President Consumer Optics Business Group of Carl Zeiss AG. And Scott Gray praises: “The ZEISS Photography Award provides photographers with an exciting opportunity to expand their creative boundaries. We look forward to working with ZEISS on more contests in the coming years.”

Articles: Digital Photography Review (dpreview.com)

 
Comments Off on Student takes 2016 Zeiss Photography Award top prize

Posted in Uncategorized