Quick video of how to an image in Adobe Photoshop ACRusing the Tone Curve and Detail tabs in Adobe Camera RAW. Model in the video is Tamara from Kenosha, WI. Larger version of video at www.studiomlp.com
Video Rating: 4 / 5
Quick video of how to an image in Adobe Photoshop ACRusing the Tone Curve and Detail tabs in Adobe Camera RAW. Model in the video is Tamara from Kenosha, WI. Larger version of video at www.studiomlp.com
Video Rating: 4 / 5
Most people who have experimented in Photoshop, especially those who shoot in raw, will have some experience of trying to sharpen an image. Sharpening increases the contrast between neighbouring pixels resulting in the visual effect of a crisper image. It is typically the last processing step that should be performed on an image and is often used to enhance already well-focussed images or in desperation to try and rescue elements of a photograph that weren’t captured in-focus when the shutter was pressed.
There are numerous ways to sharpen images in Photoshop, so much so that there is a whole sub-menu of filters dedicated to sharpening, each offering a different amount of control and different levels of success. However, one of the most overlooked filters that can help you achieve better results with more control isn’t found in the Sharpen sub-menu, but is in fact found in the, usefully named, Filter -> Other menu: the high pass filter.
I’ll take you through a step-by-step guide to using high pass filter and hopefully show you how simple and effective image sharpening can be.
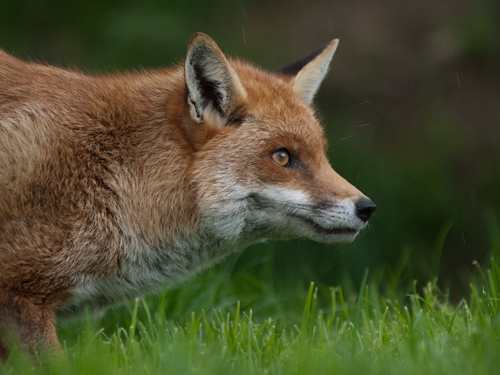
Start by opening the image that you want to sharpen – ideally, the image will have come from a raw file so not to over-sharpen an ‘out-of-camera JPEG’. Make sure that you have completed all other processing steps that you wish to perform. Here I’ll use this image of a fox to illustrate the process (feathers and fur often react well to a bit of sharpening).
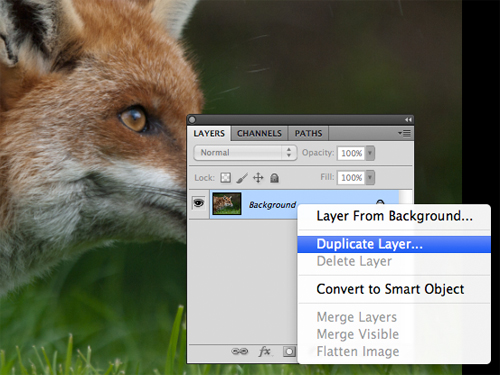
In the layers palette, right click the Background layer, select Duplicate and click OK. This creates a copy of the original layer and is a key step for the application of the high pass filter.
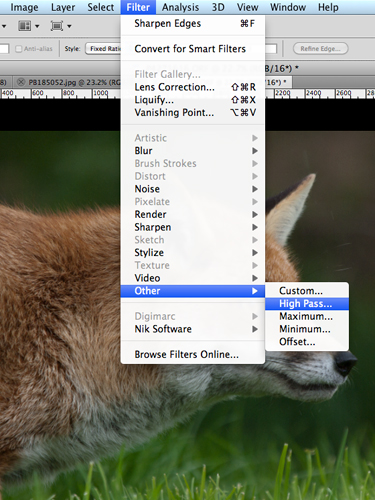
With the duplicate layer selected, select Filter -> Other -> High Pass
This will bring up a high pass window with a small preview of the results and a Radius control. If you can see the whole image behind this window, you will notice that the Duplicate layer has turned grey – don’t panic, it’s supposed to.
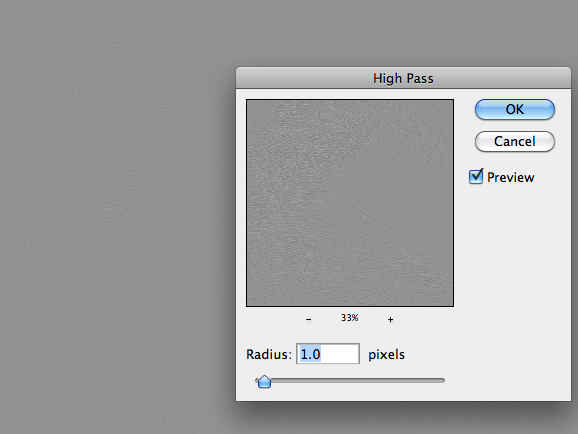
Set the Radius value and click OK. The higher the Radius, the more sharpening will be applied to the image. If you play around with the Radius slider, you will notice that at low values, e.g. 1.0 pixels, only high-contrast edges are visible in the grey layer, whereas if you move the Radius slider up to 10 pixels, you will notice that more edges within the image will be highlighted.
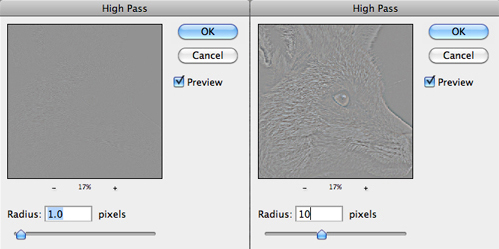
The precise Radius value that will result in optimal sharpening will be image dependant, but somewhere in the range 1.0 to 5.0 pixels will suffice. Generally, 5.0 pixels will be too much, but given that we are performing this action on a duplicate layer gives us the flexibility to be heavy handed with the high pass filter, I’ll explain more shortly.
In the layers palette, set the blending mode of the duplicate layer to Overlay.
The Overlay mode ‘multiplies’ the blacks and ‘screens’ the whites of the layer below – that is, makes the dark areas darker, and the light areas lighter. Up on application of the high pass filter, our image was turned grey (neutral grey in fact), and when setting the Radius value, edges were picked out in light/darker shades of grey. Therefore, when the blending mode is set to Overlay, the neutral grey areas of the image have no effect, yet the lighter/darker edges screen/multiply the edges of the layer below, increasing the contrast, resulting in a sharper image.
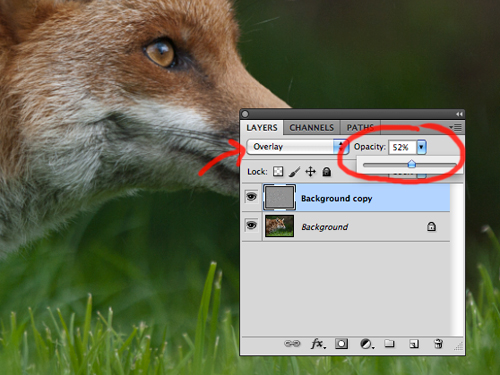
Change the Opacity of the duplicate layer to achieve the desired sharpness. I mentioned that you can be heavy handed with the high pass filter – that is because you can tone back any over sharpening using the Opacity slider. It is often a good idea to set the Opacity to zero and work your way up to an acceptable level of sharpness so not to over sharpen and introduce artefacts.
It is advisable to try and print off a section of your image, at the same scale as you intend to print the full photograph, to get a feel for how much sharpening an individual image requires and adjust the Opacity slider as appropriate.
And that’s it, image sharpened!
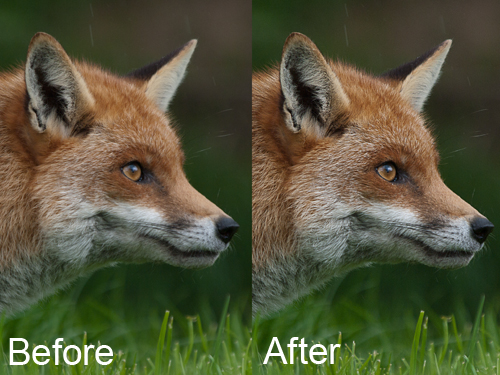
The benefit of using this method to sharpen your images is that the sharpening effect is applied in a non-destructive fashion, on a duplicate layer, with a very simple to understand parameter (in the Radius value) that controls the magnitude of the sharpening, as well as giving you the ability to fine tune the final effect using the Opacity slider.
In addition, given that the sharpening is entirely controlled by the duplicate layer, you can have further control for where the sharpening is applied within the image by applying a layer mask to the duplicate layer.
So there you have it, a quick yet effective method for sharpening your images that gives you full control.
Post originally from: Digital Photography Tips.
Check out our more Photography Tips at Photography Tips for Beginners, Portrait Photography Tips and Wedding Photography Tips.
Take control sharpening in Photoshop
www.sarakiesling.com http NOTE: I do not offer retouching services to others. I do have a good friend who is a professional retoucher though (and an amazing one at that), and is available for outsourcing – as well as teaching! More information on his classes is available at retouchingclasses.com and his portfolio can be seen at www.solsticeretouch.com Thanks to everyone who has commented on the video, and who has emailed me as a result of this video! I am doing my best to get back to all of your messages, and I sincerely apologize if it takes a while!! I would love to make more videos – please comment below telling me what kinds of things you are interested in learning about! Basic skin retouching using frequency separation and dodging & burning. I use this process on every photo that I do, and I usually spend about 4-5 minutes on headshots like this (and less time on full body shots when there is obviously less detail in the face). This is not intended to be a high-end retouching tutorial – but techniques that can help people who want to do natural-looking retouching while maintaining most of the natural skin texture! Here is the final photo – www.flickr.com The final editing was done with one of my Photoshop actions, available at www.sarakiesling.com 🙂
Video Rating: 4 / 5
A wet day doesn’t stop photography expert Gavin Hoey www.gavtrain.com from taking and making a cross processed style of image.

Sometimes you’ll capture an image that should be rectangular but is anything but. In this example I shot an image of a 6 x 6 inch sheet of paper for a project. The aim at the time was to have a reference image before the project was shipped.

Later I found I need to do more with the image and because it had been shot so casually the proportions were all wrong and the image does not look like a square sheet of paper. I also no longer have the project so reshooting is out of the question.
Luckily Photoshop and Photoshop Elements both share a similar tool for adjusting perspective which will go a long way towards fixing an image like this.
To do this choose Filter > Lens Correction in Photoshop and then click the Custom tab to access the custom tools. In Photoshop Elements choose Filter > Correct Camera Distortion.

Make sure the Show Grid option is checked and you may want to adjust the grid size so it is useful for determining the straightness of the edges in the image.
The Vertical Perspective adjustment will fix this image’s perspective problems so drag it to the left to increase the width at the top of the image to adjust for the incorrect perspective.

When you do this you may notice that the image has some geometric distortion. In this case it’s barrel distortion and the edges of the subject are billowed out.
To remove this adjust the Remove Distortion slider to counteract the distortion. It won’t be possible to get it perfect but it will be possible to reduce it to acceptable levels.

In this same dialog you may occasionally want to adjust the Vignetting slider if your lens causes dark vignettes in the corners of the image. In most cases you will drag to the right to slightly lighten the edges of the image.

Once you’re done click Ok to return to Photoshop.
The only problem that cannot be fixed in the lens correction filter is the one that would stretch the image so the subject looks closer to its original proportions which are of a 6 x 6 inch page.
For this you’ll need to click the Move tool and drag up or down on the image to stretch it.
If you need to stretch the image beyond the current image canvas dimensions, do so and confirm the change. Then choose Image > Reveal All to reveal the area of the image off the side of the canvas. While the final image isn’t perfect it looks a lot better than the original.

This same tool can be used to adjust perspective on buildings which show a keystoning effect where the building appears to be narrower at the top than at its base.
Post originally from: Digital Photography Tips.
Check out our more Photography Tips at Photography Tips for Beginners, Portrait Photography Tips and Wedding Photography Tips.
Correcting Perspective in Photoshop and Photoshop Elements

When it comes to fixing images in Photoshop or Photoshop Elements the ability to use masks to do your edits is invaluable. By using a mask instead of, for example, the Eraser you get an edit which can be changed or even removed any time in the future.
However masks aren’t easy to use or even understand when you first get started. In fact they can be downright scary. To help you get started here is a quick and easy technique that can be achieved using masks. Doing it will show you a situation in which a mask is a good editing choice. You will see how to add a mask to a layer and how to use it to edit the image. By the end of the process you will be on your way to understanding how to use masks in your photo editing workflow.
The effect that I’ll be creating is one that you see in a lot of wedding albums and advertisements. It is an element of color in an otherwise black and white image. It can be achieved using masks and that’s what we’ll do here.
Start by opening an image that has some colorful element of interest that you can show in color while you turn the remainder of the image into black and white. Here I’ll turn this graffiti image black and white and leave the bike in color.

Make sure your Layers palette is visible. If not, choose Window > Layers to display it.

Right click the Background layer in the Layers palette and choose Duplicate Layer and click Ok. This makes a duplicate of the image layer.

With this layer selected, choose Image > Adjustments > Desaturate to turn the image into black and white.

Notice that the Layer palette contains a black and white layer and a color layer. The black and white layer is at the top of the stack which is why you are seeing a black and white image.
At this point we’ll add the mask so we can use it to bring back the color in a specific are of the image. To do this with the Background Copy layer still selected choose Layer > Layer Mask > Reveal All.

This adds a white filled layer mask to the layer – notice the white box which appears in the layer palette next to the image thumbnail – that’s the mask.

Right now all you need to know about masks is that you can paint on them with black, white or shades of gray.
When you paint with white on a mask you reveal any content on the current layer – in our case that is the black and white layer.
If you paint with black you’ll reveal the content on the layer below the current layer – in this case the color layer. You might like to think of it as poking a hole in the top layer so that you can see part of the layer below.
If you paint with a shade of gray you’ll be seeing part of the layer below and part of the current layer. The hole that you’re punching through the top layer will be semitransparent.
To work on this image, select the brush tool and select a small brush with a hardness of around 75%. Make sure black is set as the foreground color and click on the white mask thumbnail in the Layers palette to target the mask. It should have a border around it as in this image:

Now paint on the photo over the areas that you want to bring back color in. Instead of seeing black paint on your image as you might expect to see, you will see the color coming back.

Look at the mask thumbnail in the Layers palette and notice it has some black markings in it where you painted on the image.
If you make a mistake and paint back too much color, switch the paint color so that you are painting with white and paint out the areas that you want to return to black and white.
If you are working with a mask and find that the brush is painting black or white paint on your image it is because the image thumbnail is selected in the Layers palette and not the mask thumbnail. When you select the mask thumbnail it will have a small white border around it so you can tell it is active and selected.
The benefit of using a mask for this type of effect is that you can paint the effect on or off the image as desired. This gives you a lot more flexibility in editing your image. While this is a very simple example it does give you a starting point for learning to use masks in your photo editing.
When you save this photo, save it as a psd format file if you want to be able to come back later and adjust the mask – the psd format saves layers and layer masks.
If you are familiar with using Adjustment Layers in Photoshop you could apply this effect using an adjustment layer to desaturate the image and paint on the Adjustment Layer’s mask to bring the detail back. If you are not familiar with using Adjustment Layers then the process that I have outlined will give you the same results but just a different way of achieving it.
Post originally from: Digital Photography Tips.
Check out our more Photography Tips at Photography Tips for Beginners, Portrait Photography Tips and Wedding Photography Tips.
Photoshop Masks 101

Brushes are used a lot in photo editing from removing blemishes and smoothing skin to dodging and burning and painting on masks. Here are five important features of the brush tool in Photoshop.
When a brush is selected you can adjust its size without having to open the Brushes palette by clicking the [ and ] keys on your keyboard.
Provided a brush is selected you can change its Opacity by typing a number. For example, type 5 to set Opacity to 50%, type 1 for 10% and 0 for 100%.
To adjust the hardness of the brush hold the Shift key as you tap either the [ or ] keys on the keyboard. Each tap increases or decreases the hardness by 25% in the range 0%-100%. The results of doing this are harder to see as there is no hardness indicator on the tool options bar. However, if you have the Painting Cursor set to Normal Brush Tip in preferences you will see a difference in the brush size as you do so

When you have a brush configured with your preferred settings, save it as a Tool preset. To do this from the Brush Preset list in the top left of the screen click the Create New Tool Preset button and type a name for the preset. Click Ok.
In future you can select this saved preset from the list and just start painting with it.

One of the very annoying things that will happen to most of us at one time or another is to have the brush appear to disappear. Instead of the regular brush cursor which shows the size and style of the brush you will see a crosshair cursor.
The issue is not with the brushes themselves but is with the Caps Lock key. If you disable Caps Lock on your keyboard the more visual brush cursor will reappear.

To paint in a straight line, click at one end of the line, hold the Shift key and click at the other end of the line. This draws a continuous brushstroke between both points.
If you adjust the spacing of your brush by using the Brush panel Spacing option to make it more than 100% you can create a line of dots this way.
This can also be used to remove power lines with the Spot Healing Brush Tool. Click at one end of the power line, Shift + Click at the other end to paint a straight line over the power line and it will be removed automatically.

You can quickly show the Brush panel so you can choose a brush to use by first selecting a tool that uses a brush such as the Brush Tool, Dodge, Burn, Eraser tool and so on.
Then right click on the image and the brush panel appears automatically. To select a brush and exit the panel in one step, double click the brush to use.

And now it is over to you. What other features of Brushes do you think are valuable for photographers to know?
Post originally from: Digital Photography Tips.
Check out our more Photography Tips at Photography Tips for Beginners, Portrait Photography Tips and Wedding Photography Tips.
5 Things to Know About Photoshop Brushes
www.adorama.com AdoramaTV presents Adobe Photoshop CS6. Rich Harrington describes the key features of the newly released digital imaging software. From the Look Up Tables to the all new Crop Tool, Join Rich as he demonstrates the benefits Adobe Photoshop CS6 has to offer to your post production workflow. AdoramaTV features talented hosts including: Mark Wallace, Gavin Hoey, Joe McNally, Joe DiMaggio, Tamara Lackey, Bryan Peterson, and Rich Harrington. Related Products: Adobe Photoshop CS6 www.adorama.com www.adorama.com www.adorama.com www.adorama.com PhotoshopCAFE Instructional DVD: Photoshop CS6 for Digital Photographers By Colin Smith www.adorama.com If you have questions, share them with us at: Adotv@adorama.com
Video Rating: 4 / 5
Hey guys! Thanks for watching this basic Photoshop CS5 Extended tutorial on how to do a bit of color effects on an image. Leave a comment on anymore tutorials you’d like me to do in either Lightroom 3, Photoshop CS5, of After Effects CS5. By the way in case any of you were wondering, this was shot with a Canon 7D at: f/2.2, ISO-100, 1/200th shutter speed, and shot with a 50mm f/1.8 prime lens at 18mp (3456 X 5184). EXCELLENT lens, SUPER sharp and it’s high enough quality where you can actually max out the 7D’s full 18mp with NO grain, buy that lens if you don’t have it already, it’s only 0 new. TOTALLY worth it, I will never disown that lens no matter how nice of lenses I get. Here it is on amazon: www.amazon.com Please comment, rate and subscribe if you haven’t already, thanks!
Drawing realistic people in Photoshop requires you to build ellipses and other shapes using the lasso, rectangle and other tools, using a photo image as your guide. A professional artist demonstrates figure drawing techniques in this free video on computer art basics. Expert: Matt Gavenda Contact: mattgavenda.com Bio: Matt Gavenda creates graphic animation for NeoSci and also works as a freelance graphic artist. Filmmaker: Nathanael Rittichier Series Description: To master the basics of computer art you have to know how create shapes, templates and vectors in Adobe Photoshop, and now you can learn these and other techniques from a professional artist. Brush up your computer art skills with the help of this free video series.
Video Rating: 2 / 5
You must be logged in to post a comment.