RSS
 

Posts Tagged ‘Photoshop’

20+ Fantastic Free Photoshop Actions for Your Photography Toolkit

11 Feb

Photoshop actions are an amazing tool that can help you to automate your workflow and to add creativity to your photo library. Using actions, you can apply a photo effect to one or many images from your collection. It’s extremely useful when you need to edit a lot of images from the wedding photo shoot, for example, and make them Continue Reading

The post 20+ Fantastic Free Photoshop Actions for Your Photography Toolkit appeared first on Photodoto.


Photodoto

 
Comments Off on 20+ Fantastic Free Photoshop Actions for Your Photography Toolkit

Posted in Photography


Serif launches Affinity Photo, a Photoshop alternative for Mac

11 Feb

Serif has launched Affinity Photo software, an alternative to Adobe Photoshop for Mac users. The company touches on a couple different notable selling points: its software is considerably cheaper than Photoshop, but no less robust, and comes with the added benefit of silky-smooth operation, at least according to its maker. Additionally, because it is newly created for the latest hardware, Serif says Affinity Photo offers performance that Photoshop struggles to match. Read more

Articles: Digital Photography Review (dpreview.com)

 
Comments Off on Serif launches Affinity Photo, a Photoshop alternative for Mac

Posted in Uncategorized


How to Make a Photoshop Collage in 9 Simple Steps

10 Feb

We all aim to tell a story through one single image. For many occasions, though, a well-assembled collage is an excellent way to pull the viewer in for a full experience. Consider this method for sharing photos from an event, a real estate shoot, or even a family photo session!

Collage4

Collages are easy to put together in Photoshop, so let’s walk through the steps. Note that I am working on a Mac with Photoshop CS3, so your system may have slight variations in the key commands needed.

Photo selection is crucial. You want to select a mix of scales that will span the entire event. That means you pick some wide shots that show the entire scene, and some detail photos that show lots of texture and personality. Without one or the other the story will not be complete, and won’t carry the same emotion that it could.

Step 1. Open the selected images in Photoshop

Open all selected photos in Photoshop. You’ll want to pick a minimum of three, but avoid getting cluttered with too many also. Typically, I limit my photo selection to no more than eight. Keep in mind that the more photos you select, the tougher it will be to see details of each one.

Step 2. Create a new file

Create a new file (File -> New). Be sure to make it a bit larger than the size you want in the end. I always make it 20×30″ at 150ppi.

Collage1

Step 3. Add your images one at a time

Go to one of the open photos and, using the marquee tool, select all (or press command+A). Press Command+C to copy. Click into the new document and press Command+V to paste. This will bring the photo into the new document on its own layer. Depending on the size and resolution of the photo you brought in, you may need to adjust the size. To do this, press Command+T to transform. Use the corner node and, while pressing Shift, adjust the scale of the photo until it is small enough to comfortably move around on the new document canvas.

Note: if you convert the image layer to a Smart Object first it will maintain integrity of the image quality as you size up and down.

Step 4. Create your layout

After you have added all images that you want in the collage, it’s time to lay out the photos! This is where you will shift the photos around until you feel they tell your story best. You’ll discover a style of your own after doing several collages. I generally like to either have symmetry in layouts, or make it look like an interlocking puzzle. That being said, each story has slightly different needs.

Collage2

Step 5. Add image spacing

When you have the layout figured out and the photos are all sized as they should be, you can create a thin white border between images to give a bit of visual space. This step is optional, and the amount of white space you put between photos is a personal preference.

To do this, select the image layer that you want to move then use the arrow keys to shift it in the direction you want. Using the arrow keys rather than shifting with the mouse will help keep track of distance so that the spacing in between photos is even.

Alternatively you can butt them up against one another and using a Layer Style (select Stroke > Inner) add a white or black border around each image. See screen capture below.

Screen Shot 2015 02 06 at 3 01 27 PM

Step 6. Merge all layers

Once you have your collage laid out and the photos are spaced as you want them, you are ready to merge all layers. To do this, press Command+Shift+E.

Step 7. Crop the final image

Once your collage is merged into one layer, crop any extra white space around edges so that it’s even. This outside white border is typically very narrow on my collages, so I don’t bother measuring. Be sure that it looks even all around.

Collage3

Step 8. Resize for online usage

To make sure your collage fits your social media needs, you may want to resize it once complete. I recommend saving your original flattened collage as a JPEG for possible future re-use.

To resize your collage and bring it down to social media friendly dimensions, press Opt+Command+I. Sizing varies per social media platforms, but I typically save it at 1000 pixels on the short edge and 150ppi.

Step 9. Add a watermark if desired

If you want to put a watermark on your masterpiece, now is the time. Bring in your watermark and be sure to merge all layers once more to save as a JPEG. You are now ready to share it with the world.

Collage4

Have you made any collages? Have any additional tips? Please share in the comments below.

googletag.cmd.push(function() {
tablet_slots.push( googletag.defineSlot( “/1005424/_dPSv4_tab-all-article-bottom_(300×250)”, [300, 250], “pb-ad-78623” ).addService( googletag.pubads() ) ); } );

googletag.cmd.push(function() {
mobile_slots.push( googletag.defineSlot( “/1005424/_dPSv4_mob-all-article-bottom_(300×250)”, [300, 250], “pb-ad-78158” ).addService( googletag.pubads() ) ); } );

The post How to Make a Photoshop Collage in 9 Simple Steps by Natalia Robert appeared first on Digital Photography School.


Digital Photography School

 
Comments Off on How to Make a Photoshop Collage in 9 Simple Steps

Posted in Photography


Natural Looking HDR in Photoshop and Lightroom in 5 Easy Steps

06 Feb

HDR (High Dynamic Range) photography was developed out of necessity to overcome limitations of photography equipment, mostly in digital cameras’ sensors. From the beginning, the technology was intended to make photographs as close as possible to human experience by bridging the gap between what the human eye perceives, and what the digital camera can actually capture.

NaturalLookingHDR Photo 1

Montreal, Canada – HDR processed, five exposures, tripod.

Think of HDR as a sophisticated, software based, ND (Neutral Density) filter. Instead of placing it in front of the lens at the moment of capturing photos, HDR allows you to accomplish it in post-processing. It sounds practical and convenient, right? There is no need for extra equipment and you can work on extending the dynamic range of the scene without rush, at your own pace, in the comfort of your home.

NaturalLookingHDR Photo 2

Montreal, Canada – HDR processed, three exposures, hand-held.

Why is HDR photography getting such bad press lately?

I believe that the main reason for this is the misconception in defining what HDR actually is. Somehow, there is a notion, that HDR is a new style in photography, which is completely false. HDR is not a style or genre; it is a technique of post-processing. It is a tool. The way the final photo looks is absolutely up to you, as you have full control over the entire process.

There are many different tools and techniques for creating HDR photographs and each one has its own advantages and limitations. If you are going for a surrealistic, edgy look in your images, Photomatix is your best friend.

But, if you are like me and your main goal is to achieve images that are as natural as possible and reflect the best aspects of the original scene, I definitely have a solution for you – one that I’ve successfully used for years and love.

On my blog, dedicated to travel and landscape photography (see my bio below for a link), you can find a detailed breakdown of my shooting and processing techniques for almost every photograph. In most cases where I used this technique, it is not easy to tell if the photo was processed as HDR unless you read the description. They look that natural.

NaturalLookingHDR Photo 3

Big Sur, California – HDR processed, three exposures, tripod.

The technique is somewhat underappreciated, but it is very powerful and easy to master. The beauty of it is that you do not have to learn additional software and there is no learning curve. You use familiar and powerful Adobe tools, Lightroom and Photoshop, and nothing else.

NaturalLookingHDR Photo 4

Cayo Coco beach, Cuba – HDR processed, three exposures, tripod.

This technique leverages the power of 32-bit processing in Photoshop HDR Pro, the module of Photoshop that was established in version CS3.

Below is the infographic that illustrates the schematic view of the entire process, from the time you take the photo to the moment you are ready to save the final image.

NaturalLookingHDR Photo 5

The Technique

1. Bracketing Photographs

Before you can start processing photos for HDR you need to take a series of bracketed shots with different exposure values. Normally, you take between three and five shots in each series but, in extreme lighting conditions (example: shooting directly into the sun), you might need to take anywhere from seven to even nine shots.

Ideally, you take multiple shots on a tripod but, since Photoshop has an extremely effective alignment tool, it is possible to take hand-held photos and let Photoshop align them.

2. Lightroom: Preprocessing

This is very simple step that should not take longer than one to two minutes. Import photos into Lightroom and only apply the following adjustments in the LENS CORRECTIONS panel:

  • Enable Profile Corrections. Lightroom detects the model of your lens and applies corrections to fix any type of distortions.
  • Remove Chromatic Aberration. Lightroom automatically cleans the edges in your photographs.

3. Photoshop: Tone Mapping

This is an almost completely automated process and should not take longer than two minutes.

In Lightroom, select the bracketed photos that you want to merge to HDR. Right click (option click on Mac) and go to Edit In > Merge to HDR Pro in Photoshop.

NaturalLookingHDR Photo 6

Your bracketed photos will open in Photoshop and will be placed on separate layers. Immediately, the complex algorithm will be applied in order to align the layers. This comes in handy if you took the photos hand-held, without a tripod.

Next, the HDR Pro interface is triggered. All you have to do here is select the tone mapping mode. Opt for the 32-bit option to ensure that you preserve as much information as possible from the original images. Click OK.

NaturalLookingHDR Photo 7HDR Pro will merge the bracketed photos into a new 32-bit image and open it in Photoshop’s main interface. The tone mapping is complete. All you have to do now is save the document (File > Save). The new HDR image will be saved and automatically imported back into Lightroom. You can find it next to the original bracketed photos.

4. Lightroom: Main Processing

This is the most exciting step. You edit the newly tone mapped HDR image with enormous bit depth (32-bit) to give it the desired look and feel you want. Use standard Lightroom workflow to achieve your artistic vision.

Here is the photograph I took in Cuba and processed using this technique. Below the photograph, you can find a screenshot of the Lightroom interface with all of the adjustments I performed in order to achieve the final look.

NaturalLookingHDR Photo 8

Cayo Santa Maria, Cuba – HDR processed, three exposures, tripod.

NaturalLookingHDR Photo 9

At this point, HDR processing is done. If you are happy with the way your photo looks, you can save it as a JPEG directly from Lightroom (“Export” in Lightroom).

5. Photoshop: Final Touches (Optional Step)

In some cases, HDR photos require additional edits, such as selective sharpening, noise reduction and HDR artifacts cleaning. Photoshop is your best friend for selective editing.

Select the HDR photo in Lightroom, right click and select Edit > Edit in Adobe Photoshop. In Photoshop, do what is necessary to improve your final photo. In the majority of cases, all you will need is to reduce noise and nothing else.

That is it. This is how you achieve natural looking HDR images in five easy steps or less.

NaturalLookingHDR Photo 10

Manhattan, New York – HDR processed, three exposures, hand-held.

PROS of 32-bit HDR processing in Photoshop HDR Pro

  • It does not require stand-alone HDR software
  • The learning curve is minimal
  • Tone mapping and editing are completely two separate processes and it is easy to achieve a natural look
  • This technique takes advantage of 32-bit editing

CONS of 32-bit HDR processing in Photoshop HDR Pro

  • In some cases when there are multiple moving objects in the scene (trees, leaves, water), it can cause artifacts that require additional cleaning.

Have you tried this method before? How do you process your HDR images? Please share in the comments below.

googletag.cmd.push(function() {
tablet_slots.push( googletag.defineSlot( “/1005424/_dPSv4_tab-all-article-bottom_(300×250)”, [300, 250], “pb-ad-78623” ).addService( googletag.pubads() ) ); } );

googletag.cmd.push(function() {
mobile_slots.push( googletag.defineSlot( “/1005424/_dPSv4_mob-all-article-bottom_(300×250)”, [300, 250], “pb-ad-78158” ).addService( googletag.pubads() ) ); } );

The post Natural Looking HDR in Photoshop and Lightroom in 5 Easy Steps by Viktor Elizarov appeared first on Digital Photography School.


Digital Photography School

 
Comments Off on Natural Looking HDR in Photoshop and Lightroom in 5 Easy Steps

Posted in Photography


How to Use the Text Tool in Photoshop

01 Feb

royal-albert

There are  many reasons that you might want to add words over your images. Text on photos makes great promotional items such as postcards; you can create your own social media messages with quotes or inspirational  sayings; and you can add your name or your website URL. I’m sure that once you understand all the creative options for adding text, you’ll come up with hundreds of other things you can create with your photos.

This article will guide you through the many ways you can work with text in Photoshop to create beautiful and eye-catching messages with your photos.

Basic Text Tools

It may seem like a pretty simple topic, but Photoshop has a really versatile selection of tools for working with text. Like so may other Photoshop goodies though, some of the best ones aren’t really obvious. So, in this section you’ll learn the various ways to add, adjust, and work with text.

Here are the basic text tools in Photoshop:

tools_

  • When you click the Text Tool in the Tools Palette (#1), the context menu on top will display most of your text tools.
  • #2 Select your font  (the typeface ), font style, bold, italic, etc.
  • #3 Font size (TIP: you can type any number in here, you’re not limited to the numbers that are displayed so your text can be ANY size you like – type 500 into this space and see what happens!)
  • #4 Anti-aliasing options
  • #5 Alignment of the text
  • #6 Text adjustments pop out

There are a few more tools in here but we’ll talk about them later. So now that you know the lay of the land, lets add some text and play with it.

Playing with Text

There are 2 ways of adding text, and it’s critical that you know when to use one way, and when to choose the other.  The first way is how most people use text, by using what is called the Point text tool. You simply click on the Text Tool in the tools palette, click back on your image and start typing. The second way is to use Paragraph Text. Let’s try both.

Open a new document in Photoshop, and click on the Text tool (keyboard shortcut = T). Start typing. you’ll see something like this:

point-text

Your text will have an underline and a cursor will show where you are inserting the next letter.  If you keep typing, the text will continue along in one long single line. To get text on a new line you have to hit ENTER. You have just created text using the POINT TEXT tool. Save this and call it “point text.”

Open another document, click on the Text tool if it’s not already clicked, now take the text tool and DRAG it out to make a rectangle. You should see something like this.

paragraph-text-box

paragraph-text

Go ahead and type. Type a lot of text. See how the text is constrained by the size of the box? This is Paragraph text. You can grab the text box handles (the little boxes on the middles and corners) to define the size of the area in which you want the text to appear. You can see this is great for larger areas of text. Because you can change the size of the text box, you have great flexibility using paragraph text.

You can use the MOVE tool to position the entire block of text anywhere on your page.

Paragraph text is also easier to center on your page. To center your text, just grab one of the handles and drag it to the right edge of your page. Drag the left box to the left edge of your page, then up in the context menu, click the CENTER text icon where number 5 is on the diagram above. It’s a little miracle! Your text is now precisely centered horizontally on your document. No more guessing.

Transforming letters in text

To give your text variety, you can also change the spacing of the individual letters, the height of the letters, and the width of letters. You can also instantly change a block of upper case text to lowercase, and vice versa. Sometimes the font you are using might be missing the italic version. You can create faux italic in Photoshop. So let’s explore the Text Character pop up box where you can try out all the nifty tricks.box

You’ll find this box in the context menu – so make sure you have your Text Tool selected, and look where number 6 is in the diagram above. Click the icon that looks like a sheet of paper (above the #6 above). This will open the Character Transform panel.  If you’re editing Point text, your text layer needs to be selected for these edits to work. If you’re using Paragraph text, you’ll need to select the text you want to transform. So, choose your text, and try going through all these options. Hovering over an item will cause a tool tip to pop up that gives you a brief explanation of what each does.

Transforming blocks of text

You can easily create attention-grabbing text by angling or slanting it. With your text layer or text selected, go to the main menu, and select EDIT>Transform>Skew. Grab a handle one of the corners and drag. You should see something like this:

skew

You can do the same with Edit>Transform>Scale and Edit>Transform>Rotate. Easy peasy!

To make text follow a curve, use the Warp Text tool (select the text tool in the tools palette and look between 5 and 6 on the context menu – it looks like the letter T with a curve underneath).

Create some text, and  make sure you are on the text layer. Click the Warp Text Tool to open the section popup box. Here you can select what type of shape to give your text, it’s so easy!

warp-tool


Three simple ways to make text really pop

Sometimes when you add text to a photo it can get a bit lost in the image. Even if you make it larger it just doesn’t seem to be crisp or clear. There are a few options:

A) It may be your anti-aliasing settings, #4 on the top context menu. Make sure this drop down is NOT set to None. This is particularly important on images that you will be using online. Select any of the other options and see how they change the edges of the text. These chooses are personal preferences, as to what type of smoothing look you prefer.drop

B) It may be your choice of colors. Often white works best as it has a clean, elegant look. But it’s easy for white text to get lost in the details of the image. Here’s an old web designer’s trick to make light colored text really pop. Add a drop shadow of black. But not just any random drop shadow. This one will be almost invisible but the subtle punch it adds is tremendous. Here’s how:

First select the text layer you want the drop shadow on. Go to your layers palette and select the Layer FX icon at the bottom, then select Drop Shadow.

In the Drop Shadow dialog box make your drop shadow with these settings. If you are working on a high res image from print, change the shadow size from 1 to 10. You may need to adjust these setting depending on the size of your image, just make sure they are both the same number.

drop2

See how the white text pops in this image even though the image is all soft shades? No cheesy 1990’s drop shadows here.  It gives just enough edge separation and dimension to make the text obvious, without being obnoxious.

_DSC8453---W

C) Finally, another text popping trick from the graphic design world  – add a “secret” layer behind your text and use layer blending modes to darken it down just a bit, to give your text a darker background for more contrast.

In the example below, you want to get rid of the clouds behind the text, and make the sky just a touch darker to make the text stand out more.   Select a soft-edged brush, and use the eye-dropper tool to select a mid-tone brush color – in this image I selected the sky just above the “P”. Make the brush diameter equal to the height of the letters. Now add a new layer between the photo and your text, this is your secret layer, and just brush over the text – which will really be under the text as your layer is “under” the text. Change the blending mode to Darker Color or Darken ( this will depend on the color you’re using) and then you can adjust the layer’s opacity to suit.

secret-layer

_DSC7232--

Text before the secret layer. 

With the secret layer added.

With the secret layer added.

Text embellishments and decorations

One of the most common questions I get asked about text on photos is how did I make the swooshes and swirly decorations and embellishments. These in most cases are simply fonts that are decorations rather than letters. There are hundreds of free fonts like this. Here’s one place you can get started: Embellishment fonts.  Be sure to check the licensing restrictions on free fonts  – some require payment or donations if you are selling your images.

_DSC8194---

So there you go – the basics of adding creative text you your photographs. You can now elegantly add messages, taglines, quotes, and verses to your images. You can make text grab your viewers’ attention by  placing it at an angle or on a curve; you can make it really stand out by using a few simple techniques, and you can add interest and artistic flair by adding embellishments and decorations. Unleash your inner graphic artist – you have the technology!

Give it a try – I’d love to see what kinds of messages you add to your images!

googletag.cmd.push(function() {
tablet_slots.push( googletag.defineSlot( “/1005424/_dPSv4_tab-all-article-bottom_(300×250)”, [300, 250], “pb-ad-78623” ).addService( googletag.pubads() ) ); } );

googletag.cmd.push(function() {
mobile_slots.push( googletag.defineSlot( “/1005424/_dPSv4_mob-all-article-bottom_(300×250)”, [300, 250], “pb-ad-78158” ).addService( googletag.pubads() ) ); } );

The post How to Use the Text Tool in Photoshop by Alex Morrison appeared first on Digital Photography School.


Digital Photography School

 
Comments Off on How to Use the Text Tool in Photoshop

Posted in Photography


4 Ways to Use the Warp Command in Photoshop

27 Jan
Custom-mode-warp-command

Warp command in Photoshop, showing the grid over a selection and the presets

What is Warp?

The Warp command was introduced in Photoshop CS2 along with Vanishing point feature. This meant an image, or part of one, could now be distorted or transformed into a new shape. You may have seen popular online tutorials where the warp command was used to create a realistic page curl in Photoshop?

How useful is the Warp Command as a photographer?

Honestly, to answer this question it will depend on the type of photography you specialize in, and to what degree you post-process your images. For a lot of photographers, the less time in front of the computer editing the better. I include myself in this group. That said, I rarely get that perfect in-camera shot that requires minimal processing after the fact. If you composite images together, do a lot of retouching, or you just simply want to know what this command does in Photoshop, then read on. I’ve put together five tips that you may find useful.

How do you access the Warp Command?

To access the Warp Command, you need to first have a selection or a layer selected (you cannot use your background layer, you must duplicate it first). Go up to Edit>Transform>Warp.

Screen Shot 2015-01-09 at 8.02.21 PM

Alternatively, CMD+T on a Mac or CTRL+T on a PC. This brings up the Free Transform command. Click on the Warp mode button in the tool Options bar or right click within the Free Transform bounding box.

warp-mode-toggle

A grid with nine boxes appears with control points on the perimeter. The four corner square control points are similar to the bezier handles when using the pen tool. As you drag on those points, the handles appear. You can drag on the other points, and within the boxes to change the shape of the selection in any direction. There are also a number of built-in presets (see below).

Custom-mode-warp-command


Are the Puppet Tool or Liquify Filter alternatives to the Warp Command?

Well not exactly. Both have their merits when it comes to distortion but each have their own characteristics and differ again to the Warp Command. The Puppet Warp tool allows you to place points or pins systematically around a displayed mesh (polygons) which will create bending or warping points. The object or subject selected must be isolated from the background first. Puppet Warp can also be applied to a Smart Object.

The Liquify Filter will work on ordinary layers but If you convert your layer to a Smart Object, then the Liquify Filter won’t work in Photoshop versions up to CS6. However, Liquify does work with Smart Objects in Photoshop CC. The Liquify filter takes a bit of getting used to. When you open it, a separate dialog box appears, like a plug-in of sorts with its own set of warp tools. It works on pushing and pulling the pixels around, similar to a smear effect.

4 Ways of using the Warp Command

1. Wrapping

The Warp Command is great for wrapping text, logos, or even textures around cylindrical objects such as bottles to give it that 3-D look. For example, a bike has a lot of cylindrical shapes on it, the front forks, frame, etc. So any logos on a bike will look bendy to fit the shape it sits on. In the photo of the BMX bike which I deliberately shot wide(focal length-10mm) to emphasize the cylindrical shape of the tube. I removed part of the existing logo to illustrate how I wrapped some text around the front tube. Type ‘BMX’ on a separate later and convert this to a smart object. You will need to do this to access the custom mode of the Warp Command. By using the existing Logo as a guide, I was able to warp ‘BMX’ in place. I then applied the Blend-if layer style to the underlying layer to give it a more authentic look.

bmx-bike

A wide angle shot of a BMX type bike

bmx-logo-removed

I removed the centre part of the logo on the bike

text-wrapped-bmx-bike

I wrapped the letters ‘BMX’ around the front tube area of the bike using the Warp Command

Blend-if-mode-applied-to-BMX

Holding down the ALT key on Mac, Option key on a PC, will split the slider arrows to get a finer adjustment.

The Warp Command can also be used to wrap texture around an object.

Owl-peacock-texture-wrapped-around-leg

I used an image of a Peacock to add texture and realism to the owl’s leg

2. Duplicating a similar element in an image and distorting it to make it look different

When you use the Clone Tool to replicate a similar object or element in an image, it does a fantastic job. However, if you don’t want the cloned look, this is where the Warp Command is great for changing the shape of a duplicated element in an image, to give the appearance of a completely different one. I found this particularly useful when I used the same heron claw to replicate four Owl’s talons.

Owl-with-Heron-talons

I used the same heron claw to manipulate four owl talons

3. Retouching – adding elements

Retouching an image can mean many things. Usually, it means removing or taking away parts of a photo so that the final image looks better. This includes removing imperfections and blemishes from a model or subject’s skin. It could also mean removing distracting elements from a photo, and the list goes on.

But what about adding to an image to enhance it? For example, you have a shot of a subject but you want to add volume to his or her hair. You can do this using the Warp Command by selecting part of their existing hair. Put the selection on a separate layer, make sure you convert that layer to a Smart Object (working non-destructively). You will then need to apply a layer mask to hide hard seams or obvious cloned areas.

Jacket-original

Photo of a jacket with a fur hood

Jacket-hood-fuller

This is the same jacket but I’ve added more volume of fur to the hood by using the Warp Command

4. Retouching – removing things

The Liquify Filter is a choice for many retouchers. It is very powerful, but as I mentioned before, it does take a bit of mastering and Smart Objects cannot be applied to this filter, unless of course you use Photoshop CC. I find the Warp Command quick and easy to use. It does a great job of slimming areas on the body. Sometimes due to the angle of how a model or subject was photographed, it might require that you raise or lower a shoulder, for example to give symmetry or balance to the shot.

Take the Love Handles for example in the photo below. Make a quick selection using the Marquee Tool. Use CMD+J on a Mac or CTRL+J on a PC. This puts the selection on its own layer. Right click on the layer and convert it to a Smart Object. Hit CMD+T/CTRL+T, to bring up the Free Transform Tool, then click on the Warp mode button in the Options bar. Distort just enough to keep it real. Add a layer mask to hide any hard seams.

Love-handles

Even sport models can have slight ‘Love Handles’

Love-handles-removed

Love Handles removed using Warp

Warp-grid-love-handles

Careful nudging of the Warp Command to get rid of Love Handles

When using any of the distortion tools or commands in Photoshop, do so with restraint. A slight adjustment is often all that is required. It is this small change that can sometimes add a big difference to your image.

Just for a bit of fun, I produced the animated cow.gif to illustrate a slight adjustment where I made the nose smaller. I then went on to show no restraint by enlarging the eyes and making the jowls slimmer!

cow

googletag.cmd.push(function() {
tablet_slots.push( googletag.defineSlot( “/1005424/_dPSv4_tab-all-article-bottom_(300×250)”, [300, 250], “pb-ad-78623” ).addService( googletag.pubads() ) ); } );

googletag.cmd.push(function() {
mobile_slots.push( googletag.defineSlot( “/1005424/_dPSv4_mob-all-article-bottom_(300×250)”, [300, 250], “pb-ad-78158” ).addService( googletag.pubads() ) ); } );

The post 4 Ways to Use the Warp Command in Photoshop by Sarah Hipwell appeared first on Digital Photography School.


Digital Photography School

 
Comments Off on 4 Ways to Use the Warp Command in Photoshop

Posted in Photography


How to Crop Like a Boss in Photoshop

21 Jan

I have a habit of shooting for the crop (see my previous article ‘No Telephoto lens No Problem – Shoot for the crop‘) which often means that my final vision is a 4:2 proportion, or even a 4:1 panorama style image, instead of the most common 3:2 that is the default for most digital cameras.

With Photoshop’s latest crop tool this has never been easier, so let me show you how to crop like a boss!

How to crop like a boss in Photoshop

Step 1 – Load the Crop Tool in Photoshop

With your image open in Photoshop, press the ‘C’ button on your keyboard. This loads the crop tool; you’ll know this by the appearance of the marquee (square) which has been drawn around your image. You can now begin to draw the crop shape you want simply by dragging the corners of the crop marquee, but I’m going to show you a cleaner way to do this.

How to Crop in Photoshop CC

Step 2 – Choose an Aspect Ratio

If you want to keep your existing aspect ratio but simply want a smaller crop you can hold down the shift key while dragging one of the corners of the marquee. But, what if you want to get creative and want a different aspect ratio?

We do this by clicking in the very first drop down menu in the crop tool properties (usually displayed at the top under your main Photoshop menu).

Photoshops Crop Tool

For now I’ll specify an aspect ratio of 2:1 and I do this by entering the number 2 in the ‘width’ box and the number 1 in the ‘height’ box.

2:1 Ration in Photoshop crop tool

I’ve also specified the ‘Rule of Thirds’ grid (image below) because it closely matches the grid that I use on my camera when shooting. There are several to choose from, pick a grid that works for you.

Rule of Thirds grid in Photoshops crop tool

What About Custom Sizes?

You may decide that you’d rather not conform to an industry norm so you’re free to crop to a custom size and ratio. Either leave the aspect ratio boxes empty or press Clear if you’ve already played around. You can then drag the marquee tool to whatever size or shape you like. If however, you intend to send your image to a print lab, you’ll discover that they charge more for custom sizes so it’s often a good idea to choose the closest aspect ratio to your artistic vision. I just saved you $ $ $ $ , you’re welcome.

Step 3 – Place the Crop

The really cool thing about Photoshop crop tool is that now you’ve specified your aspect ratio you can then move the image around within those crop constraints. All I do is click on the image and drag to position. In this case all I’m doing is dragging the image slightly higher so that the bridge is perfectly centred in the middle box of the grid.

Drag Photoshops crop tool to place your crop

Step 4 – Now Experiment

Before you decide to apply the crop, it’s worth playing around a little to see if you can spot a better composition. For fun, I’m going to reverse the aspect ratio by entering 1 in the width box and 2 in the height box. This gave me a crop like this:

Vertical Crop in Photoshop

Step 5 – Apply the Crop

When you’re happy with the crop you’ve found, it’s time to apply it. You need to decide on whether or not you’d like to commit to this crop or if you’d like to keep the ‘cropped’ pixels. There’s a checkbox entitled ‘Delete Cropped Pixel’ which is ticked by default. Simply apply the crop by hitting ‘enter’ on your keyboard.

Delete cropped pixels

If you uncheck this box it doesn’t really crop your image, it just displays the cropped version while you view it in Photoshop. This is called ‘non-destructive’ editing.

With this option, you can save the image after you’ve cropped and although you’ll be looking at the cropped version in Photoshop, the original is still intact. If you want to recall the original (uncropped) image, just open the image file, load the crop tool and then enter the original aspect ratio to revert back to its original crop state (3:2 in most cases).

Confused? Yeah, it sounds kind of silly if you’re not used to Photoshop logic. I personally prefer to have the ‘Delete Cropped Pixel’ checked and then I simply save the cropped image as a separate TIFF file, leaving the original image unsaved and untouched. That’s just good old fashioned file keeping.

To Cancel the Crop

If you get nervous and want out of the crop tool, just hit your ESC key repeatedly until the crop tool vanishes. You can also press the M key to go back to the ‘Rectangular Marquee Tool’ which cancels the crop tool quicker.

How to Use Aspect Ratios

There’s a brilliant article by Elliot Hook called Aspect Ratios in Landscape Photography where he explains all of the standard aspect ratios that most print labs can handle. Try some of the ones that he mentions to see if they work for your image crops.

Try it with Your Images

I’d love to see some great examples of images that you have cropped using this technique. I often say that you can learn a lot about composition simply from carefully cropping existing images to create new compositions. It’s fun and easy to get busy with the crop tool and now you’ve learned how to crop like a boss!

googletag.cmd.push(function() {
tablet_slots.push( googletag.defineSlot( “/1005424/_dPSv4_tab-all-article-bottom_(300×250)”, [300, 250], “pb-ad-78623” ).addService( googletag.pubads() ) ); } );

googletag.cmd.push(function() {
mobile_slots.push( googletag.defineSlot( “/1005424/_dPSv4_mob-all-article-bottom_(300×250)”, [300, 250], “pb-ad-78158” ).addService( googletag.pubads() ) ); } );

The post How to Crop Like a Boss in Photoshop by Gavin Hardcastle appeared first on Digital Photography School.


Digital Photography School

 
Comments Off on How to Crop Like a Boss in Photoshop

Posted in Photography


The No-Fuss Way to Straighten Your Horizons in Photoshop

14 Jan

No matter what type of photography you create, nothing screams “snapshot” more than an off-kilter horizon. This is especially true for landscape images where sloping horizons, even if just a few degrees off, distract from all your painstaking composition and patience for the right light. Unless your viewers can tell that you’ve shot at an extreme angle on purpose, the horizons in your images need to be horizontal.

An off kilter horizon, not a pretty sight.

An off-kilter horizon, not a pretty sight.

If you weren’t able to get your horizon straight in camera, when you shot (because the ferry chain jerked big time right as I clicked the shutter in this shot!) you can relax – there is an easy ,and accurate way to do this in Photoshop.

The One-click Tool for Straightening the Horizon

The Photoshop Toolbox palette is a wondrous and often confusing place. Just like your old grandpa’s toolbox, it contains many mysterious things, many that rarely get used. But let me introduce you to the simple Ruler Tool. What would a tool box be after all, without a ruler?

The Ruler is “conveniently” hidden in the Eyedropper fly-out menu in the Tool Box Palette.

Untitled-1 ruler

Now let’s see how easy this horizon straightening job is with the right tool. With your image open, and the Ruler Tool selected, drag the ruler along the crooked horizon.

rulertoolinaction

No go to the Image>Image Rotation menu and select Arbitrary. Accept the default angle and hit OK.

rotate

You’ll see your horizon is now straight. All you need to do now is crop.

straight

Here’s a short video of this in action so you can see how quick and easy it is:

Have you got any other super quick methods?

googletag.cmd.push(function() {
tablet_slots.push( googletag.defineSlot( “/1005424/_dPSv4_tab-all-article-bottom_(300×250)”, [300, 250], “pb-ad-78623” ).addService( googletag.pubads() ) ); } );

googletag.cmd.push(function() {
mobile_slots.push( googletag.defineSlot( “/1005424/_dPSv4_mob-all-article-bottom_(300×250)”, [300, 250], “pb-ad-78158” ).addService( googletag.pubads() ) ); } );

The post The No-Fuss Way to Straighten Your Horizons in Photoshop by Alex Morrison appeared first on Digital Photography School.


Digital Photography School

 
Comments Off on The No-Fuss Way to Straighten Your Horizons in Photoshop

Posted in Photography


3…2…1…Actions!! A Guide to Using Photoshop Actions to Speed-Up Your Workflow

06 Jan

Do you find yourself doing the same processes in Photoshop over and over again? Do you wish you knew a way to quickly do amazing things to your photos without going through a bunch of steps? If you haven’t entered the world of ACTIONS yet, let me be your guide! I’m going to teach you how to install Photoshop Actions that you purchase or download on the web, and even better, how to create your very own Actions.

197

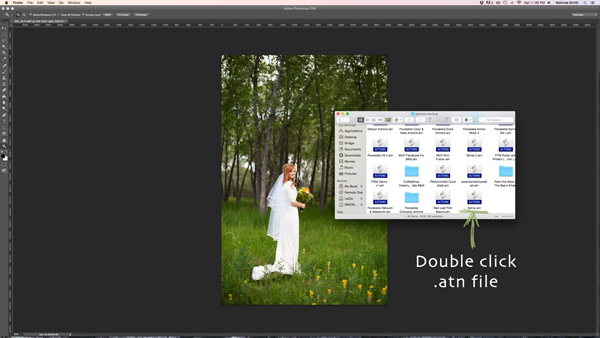
Find the “.atn” file and double-click it.

There are tons of places to find Actions on the web. Some cost a lot, some are free. There are a lot of great ones, and a lot that aren’t really worth using. I look for Actions that fit my style, and are fully adjustable. Which means that I can turn every layer off or on, adjust the opacity of each layer, and customize to fit my style and each individual photo.

Installing Photoshop Actions

Once you’ve purchased and downloaded your Action, make a backup file somewhere, just in case. Then, open the folder, find your Action (it will be a file with .atn extension), and double click it.

(You do not need to have a photo of a gorgeous bride open in Photoshop as you do this, but it never hurts!)

198

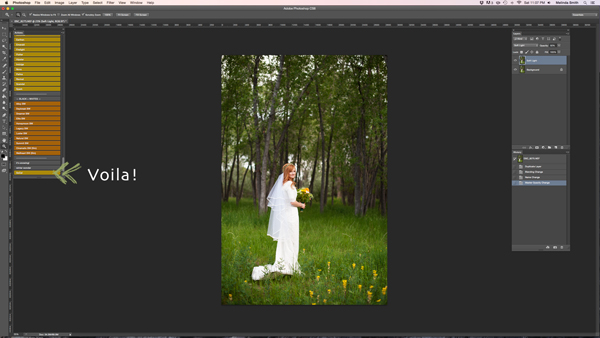
This might seem too easy to be true, but most of the time this works. It’s automatically installed into Photoshop when you double click. Easy as that! If for some reason that doesn’t work, or you like to do things the hard way, you can use the following method.

199

Make sure your Actions Palette is open. You can do this by clicking “Window” at the top of Photoshop, and making sure the check mark next to “Actions” is on. If you don’t see a check mark, just click on “Actions” and your Action Window will appear.

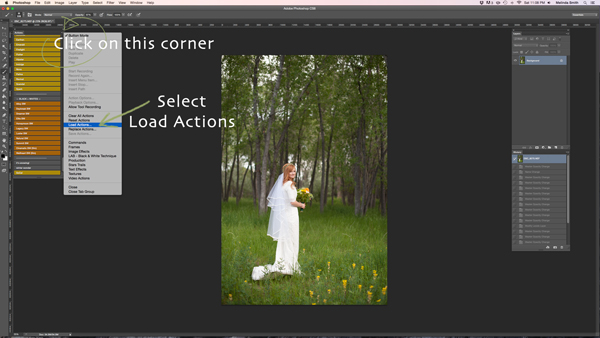
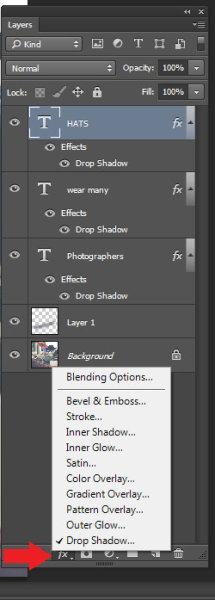
Click on the upper right hand corner of your Actions palette, and a drop down menu will appear. Select “Load Actions”.

200

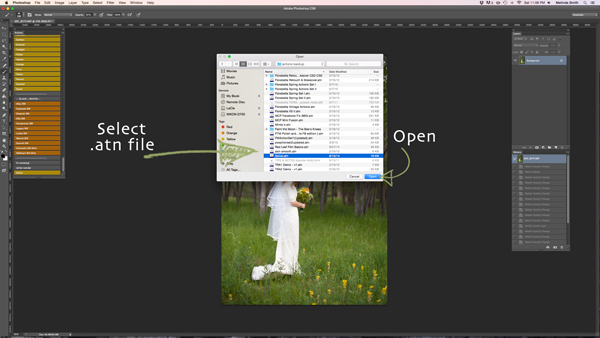
Then, you’ll navigate to find and select that .atn file, click “Open”, and it will be installed. Now your Action is ready to be used. All you have to do is open a photo, click on your Action, and it will run through a bunch of steps in a very short amount of time (running times may vary based on the number of steps in the Action and the speed of your computer). Be aware that not every Action will look great on every photo, and many times Actions need to be adjusted before they look right. Be careful not to overuse Actions. They are great tools, but can ruin a photo quickly if you don’t practice adjusting and learning what Actions work with different types of photos.

How to create Photoshop Actions

Now that you know how to install someone else’s Actions, I want to teach you how to be a Photoshop rock star and create an Action of your own. You can create Actions for so many different things, from a simple sharpening Action, to a complex multi-step stylized Action.

184

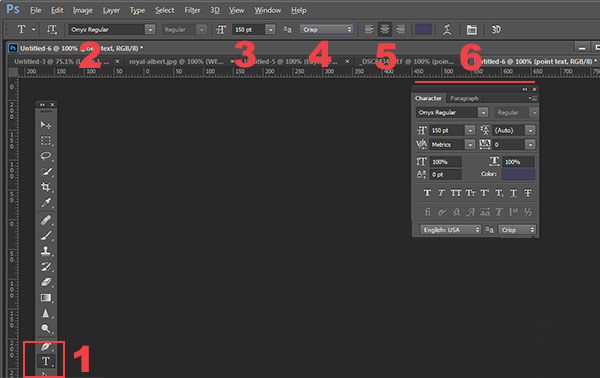
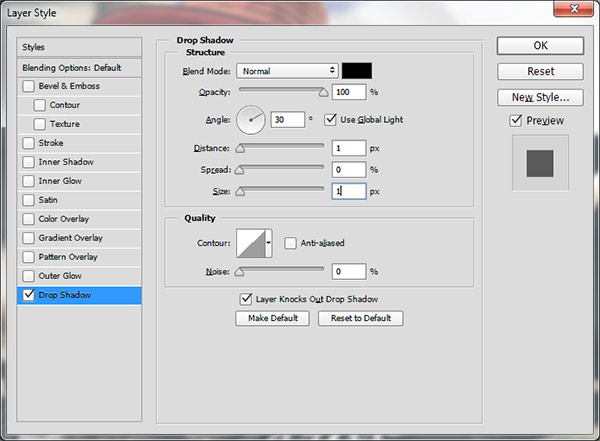
For this demonstration I’m going to show you how to make a simple “soft light” layer to add a boost to your photos. Go ahead and open Photoshop and make this Action along with me. Once you see how the steps work, you can experiment with making more Actions for all the things that you find yourself doing over and over again. You will need to have a photo open when creating your Action, so choose a beautiful bride, or any photo you’d like.

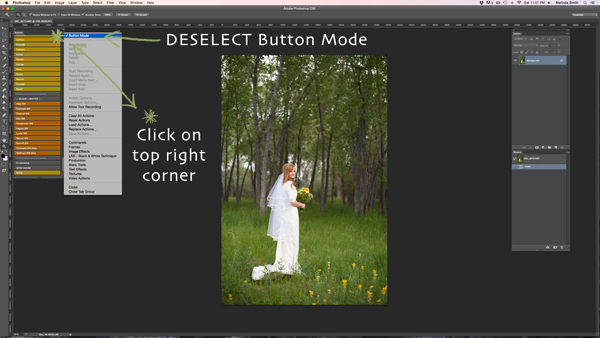
Your Actions palette may be in button mode, or it may not. I like mine in button mode for normal use, but you have to change out of button mode to create Actions. Click on the top right corner in your Actions palette, and make sure that the check mark next to “Button Mode” is deselected.

185

Before you create an Action, you will want to make your own Action folder set, so that everything stays organized. Select “New Set” from your drop-down menu.

186

You can name your set anything you’d like. A great set to start with would be a simple “My Actions”, so you will know which ones you created. Later you can divide them into multiple categories if you’d like.

187

Right in the Actions palette is your very own set of Actions. You are now that much closer to Photoshop rock star status! Make sure your set is selected for the next step. If it’s highlighted, you’re ready to go.

188

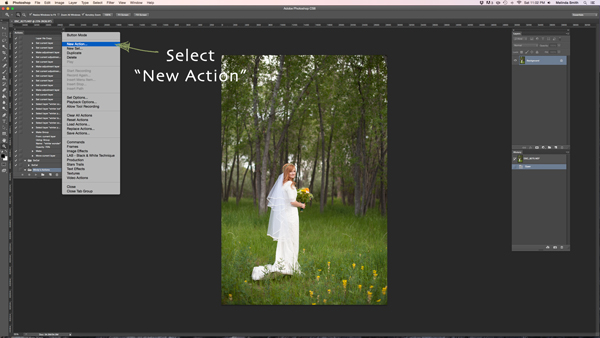
Select “New Action” from the menu. We are going to create an Action inside your Action set.

189

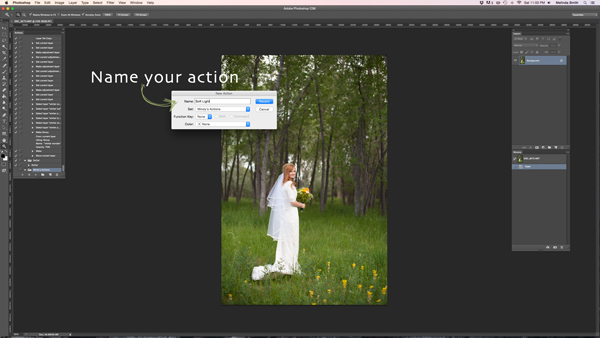
Now you’re going to name your Action. It’s good to pick a name that lets you know exactly what it does, or describes the results of the Action well, so you won’t be wondering later. Since this Action will be a “Soft Light” layer, I just named it “Soft Light”.

190

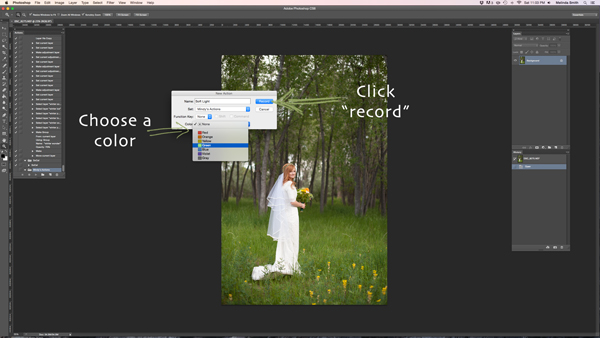
If you’d like to, you can also choose a color for your Action, this only applies if you are in Button Mode. This helps with Action organization. You can make all of your Actions within your set the same color, so you can easily find different sets of Actions, or you could only choose a color for your frequently used actions, so they are quick to find. Now you’re ready to start recording. Just click record. Don’t worry, you can go as slow as you need to. It just records the process that you are going through, but doesn’t record the time it takes you to do it. It will play much faster than it takes you to record it.

191

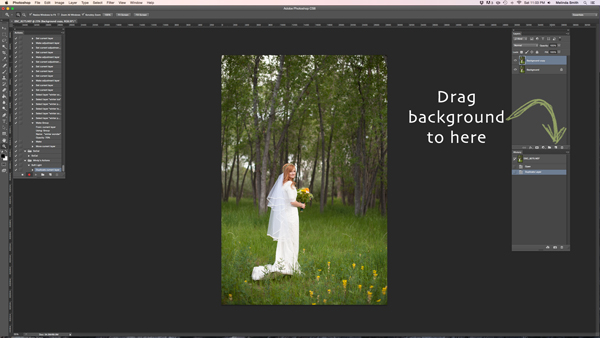
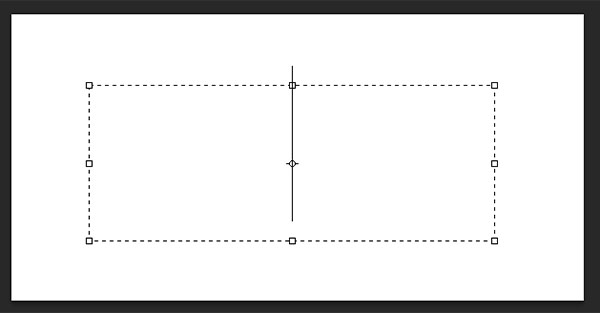
We are going through the steps of making a Soft Light layer right now. It’s super simple, but it’s a great one to make for your very first Action. Just drag your background to the “create a new layer” icon (the square with a corner folded over), and it will make a duplicate of your background.

192

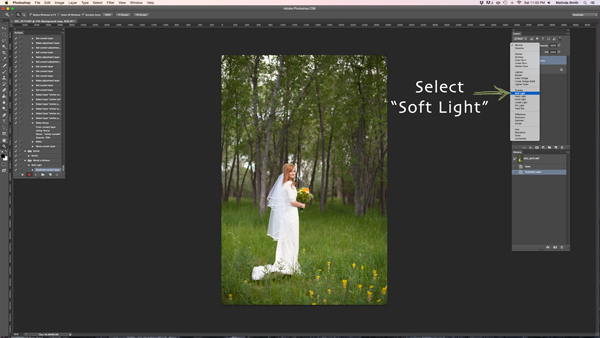
Make sure your “background copy” layer is selected, then click on the Blending Mode menu. (It will say “normal” on the button. It’s at the top left of your Layers Palette.) Find “Soft Light” and select that blending mode.

193

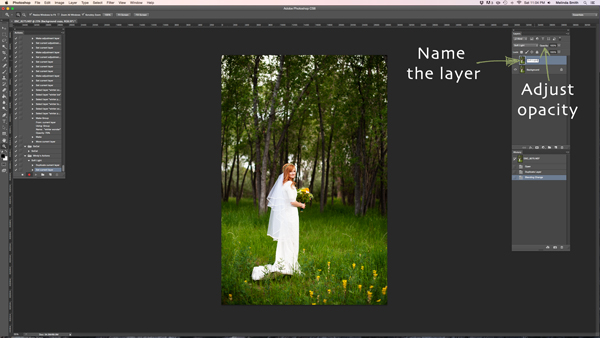
I like to name the layer when I make Actions, so that I can easily know what each layer does when I run the Action later. Just double click on the name of that background copy and type in a new name for that layer. I went with “Soft Light” because I’m very original and creative.

I also adjusted the opacity to around 50%, just because I know that on most photos I won’t want it 100% strong (adjust to your own taste and style). When you run the Action, you can always adjust the opacity to suit the individual photo, but I suggest you put the opacity at a level that you use most, because often that will save a step when you run it later.

194

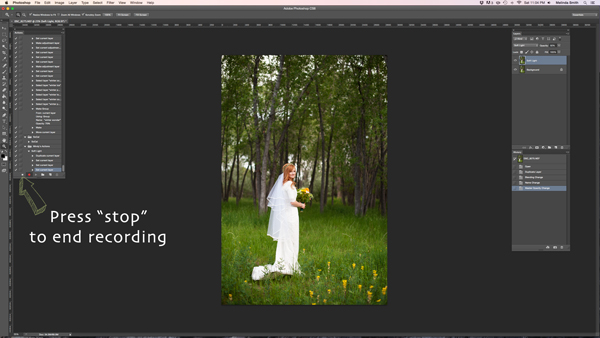
Now we are done with our Action and we just need to press “stop” to end the recording. It is the square just to the left of the red recording button.

195

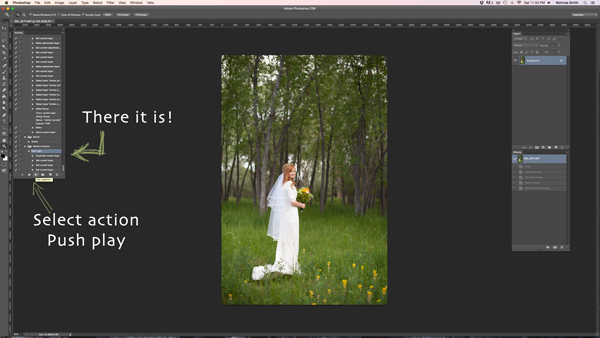
There’s your Action. Pretty exciting, isn’t it? You can try it out by making sure your Action is selected, and pushing “play” at the bottom of the actions palette. You’ll be amazed how quickly your “soft light” action goes through those steps. It doesn’t take long to do all those steps without an Action, but it’s almost instantaneous with one. Once you get a lot of your regular go-to steps turned into Actions, you’ll find that it takes a lot less time to edit each photo.

196

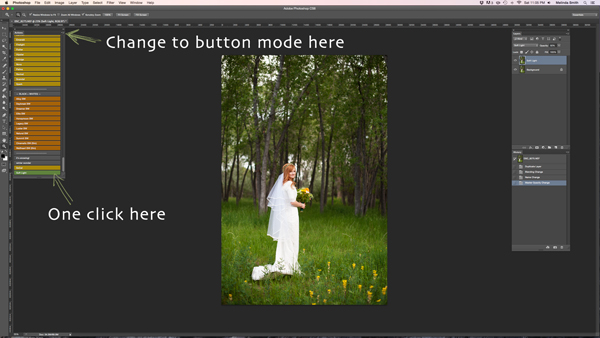
If you want to change back to button mode, it will really streamline things. All you have to do is click once on the Action. You don’t have to push play, or scroll a lot through open steps to find your Action. Give it a try.

Let me know how you did creating your first Action along with me. If you’re an Action-creating enthusiast, I’d love to hear what Actions you have made, and which Actions have been most helpful to your workflow.

googletag.cmd.push(function() {
tablet_slots.push( googletag.defineSlot( “/1005424/_dPSv4_tab-all-article-bottom_(300×250)”, [300, 250], “pb-ad-78623” ).addService( googletag.pubads() ) ); } );

googletag.cmd.push(function() {
mobile_slots.push( googletag.defineSlot( “/1005424/_dPSv4_mob-all-article-bottom_(300×250)”, [300, 250], “pb-ad-78158” ).addService( googletag.pubads() ) ); } );

The post 3…2…1…Actions!! A Guide to Using Photoshop Actions to Speed-Up Your Workflow by Melinda Smith appeared first on Digital Photography School.


Digital Photography School

 
Comments Off on 3…2…1…Actions!! A Guide to Using Photoshop Actions to Speed-Up Your Workflow

Posted in Photography


How to Design A Photography Business Card In Photoshop (Tutorial)

26 Dec

Designing a business card doesn’t have to be difficult or time-consuming. Most business cards are simple enough: they contain, in readable type, a list of information about you, what you do, and how to get in touch. They stay in tune with your branding — the colors, fonts and general message you want to convey to people about your business Continue Reading

The post How to Design A Photography Business Card In Photoshop (Tutorial) appeared first on Photodoto.


Photodoto

 
Comments Off on How to Design A Photography Business Card In Photoshop (Tutorial)

Posted in Photography