RSS
 

Posts Tagged ‘Photoshop’

How to Add a Lens Flare Effect in Photoshop

13 Mar

Do you put a hood on your lens to avoid lens flare? Are you always moving and reframing so that the light source is behind you? Then you have missed out on some great creative opportunities. But not to worry, in this tutorial you can learn how to add a lens flare effect in Photoshop.

Before after lens flare effect tutorial

What is lens flare?

A lens flare usually occurs when you have an intense light source hitting the camera either directly or by reflection. This light then gets scattered inside the lens and creates visible marks on your photo like colored circles, starbursts or a haze that covers the image.

How it’s manifested and how big the flare is depends on the intensity of the light, the angle at which it hits the camera, and also the elements inside the lens that cause the refraction. You can recreate a lens flare in Photoshop by going to Menu > Filter > Render > Lens Flare.

Photoshop Lens Flare Filter Tutorial -

A window will pop up where you’ll see a thumbnail of the picture, just click on the area where you want to place the source of the flare, typically in the brightest point. You can also adjust the brightness of the flare, just by dragging the slider.

Finally, you can choose the type of lens. As I mentioned at the beginning, lens flare is caused by the scattering of light inside the different parts of the lens and therefore lenses with different components will cause different kinds of flares. When you are done just click OK.

Photoshop Lens Flare Filter Tutorial Menu

That’s pretty straightforward right? But the result is pretty basic.

35mm Prime lens flare effect Photoshop tutorial

Well, there’s a bit more to it in order to really make the most of this effect. You probably noticed that you set up your flare only with a thumbnail preview, therefore you would probably want to go back to it for adjustments after you see it in the full-size screen, but this is not possible.

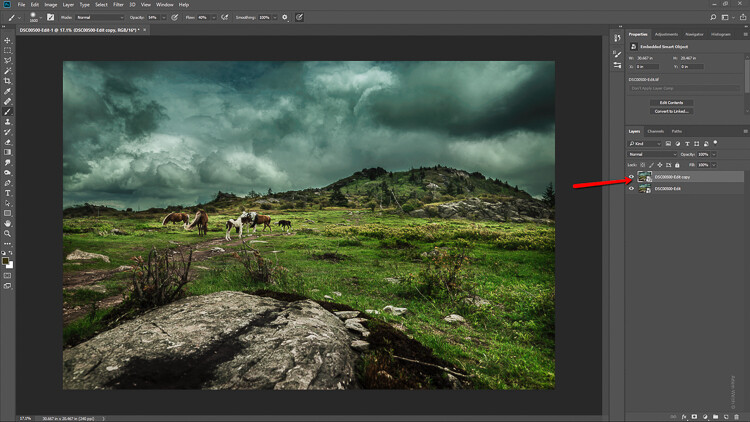
So the first trick to mastering the lens flare effect is to turn it into a Smart Filter.

What is a Smart Filter?

Smart Filters is a tool to apply filters in a non-destructive way, so you can adjust, remove, or hide it as many times as you like. To do this go to Menu > Filter > Convert for Smart Filters. A warning window pops up to tell you that in order to make your filters Smart, it needs to convert the layer into a Smart Object, click OK.

To learn more about Smart Objects you can read about them in my previous tutorial How to Create with a Good Workflow Using Smart Objects in Photoshop.

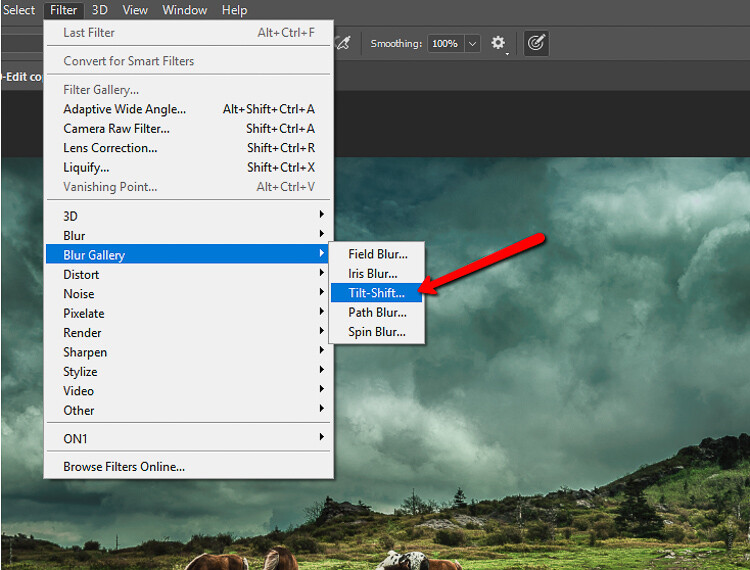
Now you can now go back to apply the filter as you did before: Menu > Filter > Render > Lens Flare. Each time you want to go back to change anything you just have to double-click on the filter.

Photoshop Lens Flare Smart Filter Tutorial

You can now go back and adjust the brightness, type of lens and re-position the light source. That’s better don’t you think?

50 300mm zoom lens flare effect Photoshop tutorial

Map out where to put your flare using coordinates

However, you still have to do this in the small thumbnail which can be difficult to do if you want to place the flare in a really specific spot. To overcome this problem, there is a simple way to get around it.

Before you open the filters, decide where you want to put the source, zoom into the image and check the coordinates. If your Info tab is not already opened, you can get to it by going to Menu > Window > Info or just pressing F8. There you will see all the color information for each pixel but also the exact coordinate of it in the spaces called X and Y.

Just hover over the place where you want to place your source and take a note of the coordinates.

Info Coordinates Photoshop Lens Flare Filter Tutorial

Now that you know where you want to put your lens flare you can go ahead and do your filter normally. Setup the filters as Smart Filters and then go to Render > Lens Flare filter. Adjust the brightness and type of lens that you want.

To position the source this time though, hold the Alt key when you click on the thumbnail and a new window will open. You can then enter the exact coordinates you selected before.

Position Photoshop Lens Flare Filter Tutorial

In the end, just process the image as you would normally for exposure and color and you’re done!

105mm Prime lens flare effect Photoshop tutorial

One last trick!

When you want to change the direction of the flare, you won’t find this as an option offered in the adjustments of the filter. What you can do is apply it separately and then move it.

First, create a new layer by going to Menu > Layer > New Layer and fill it with black. You can do this by going to Menu > Edit > Fill and choose to use Black as Content. This new empty black layer is where you’re going to apply your Lens Flare without turning it into a Smart Filter because there’s no information to protect in this layer.

Photoshop Lens Flare Filter Tutorial New Layer

With the Lens Flare being independent of the main image, you can move it around as you want. Just select the layer by going to Menu > Edit > Free Transform and then you can rotate and move it until you’re satisfied.

Photoshop Lens Flare Filter Tutorial New Layer Free Transform

There you have it, three tips to really master the Lens Flare in Photoshop. Please show us your best results in the comments section below.

Lens flare effect tutorial Photoshop

The post How to Add a Lens Flare Effect in Photoshop by Ana Mireles appeared first on Digital Photography School.


Digital Photography School

 
Comments Off on How to Add a Lens Flare Effect in Photoshop

Posted in Photography


How to Make Your Digital Photo Look Like a Polaroid Using Photoshop

06 Mar

Nostalgic for the printed photos? Polaroids are coming back as trend as are many vintage things. Do you want to achieve this effect while still maintaining the advantages of the shooting digital? In this tutorial, I’ll show you how to make your digital photo look like a Polaroid and even like a stack of Polaroids in a very easy way using Photoshop.

From digital to Polaroid effect intro

Make a new document in Photoshop

The size of the image in an original Polaroid (just the image without the white frame) is 3.1 inches by 3.1 inches. Therefore, you need to open a new document in Photoshop with those measurements. If you are going to keep the result digital then you can leave it at 72 dpi (dots per inch). If you want to print it then set it to 300 dpi. Make sure the background color is black and then click OK.

Polaroid effect tutorial size document

Double-Click on this background so that you make it a layer, that is by default called Layer 0. Then make a new empty layer by going to Menu > Layers > New Layer.

Add the white frame

Now you need to do the outer frame which is the white border of the Polaroid. In order to make sure it’s centered, you can do it in two steps. First, go to Menu > Image > Canvas Size and this will open a pop-up window. The original Polaroid has a width of 3.5 inches, regardless you put it as both width and height. Make sure the point in the grid below is on the center square.

Polaroid effect tutorial canvas size white frame

Now you just need to make the bottom part of the frame larger. For that, go again to the Canvas Size but this time the point should be in the top square. Now fill this layer with white color by going to the paint bucket tool, make sure white is the foreground color and then click on the layer.

Polaroid effect tutorial canvas size white frame2

Add the background and a drop shadow

Create a new layer that will be your background. It can be white for now, but you can also add a texture like wood, for example, if you want to make it look like a table top, and so on. Go to Canvas Size and make it bigger once again. You can choose the size that’s best for you, here I’m doing 5.5×6.5 inches.

Select the layer that contains the frame (the white rectangle) and click the Add a Layer Style button at the bottom of the palette (fx). Select Drop Shadow and in the window that will pop-up, you can choose your settings. I’m using a 45-degree angle, with a distance of 30, a size 10, and setting the opacity to 29. You can set all these however you want, just move them around until you like how it looks. Make sure the preview option is ticked so that you see what you’re doing.

Polaroid effect tutorial drop shadow

Put your image inside the frame

Up until now, you have prepared your Polaroid and you can use this process for any photo or save it as a template.

To put your photo inside the frame you need to open your raw image and make the adjustments you want until you are satisfied, as you would do normally.

Now open the image as a Smart Object by holding Shift to make the Open Image button turn into Open Object and click on that. Another way to do it is to click the link at the bottom of the image window and in the pop-up window tick the option “Open in Photoshop as Smart Object”.

For more information about Smart Objects you can see my previous article on that topic here: How to Create with a Good Workflow Using Smart Objects in Photoshop.

Polaroid effect tutorial open as smart object

Now drag the thumbnail of that image into the layers palette of the Polaroids document you’ve been working on and it will be added as a Smart Object there as well. Now you can choose the image and keep working on the Polaroids.

Make sure the Smart Object (your image layer) is on top of all the other layers (with your black square directly underneath). Right-click on the image layer and select Create a Clipping Mask from the menu. Then use the Move tool to position the image to best compose it within the square.

Polaroid effect tutorial clipping mask

Oops, notice my layers are in the incorrect order here. Make sure your image is on TOP of the black square.

Try out some backgrounds to make it more interesting!

How to make a stack of Polaroids

If you want to make a stack of Polaroids follow these directions.

Select all the layers except the background and put them into a group by going to Menu > Layers > Group Layers. Now make as many copies of it as you’d to have like in your stack. You can do this just by dragging the group into the New Layers button at the bottom.

Finally just give a little twist to each one (use Edit > Transform > Rotate). There you go!

Digital to Polaroid Stack Effect tutorial

Digital to Polaroid Effect tutorial

Or you can play around with the composition. Remember you can also change the image that appears in each frame.

Digital to Polaroid Stack wide Effect tutorial

Extra effects

If you like to give your digital photo a printed quality but you don’t want to do a Polaroid, try curling the corner as if it was a page turning in only three steps.

1. Draw a square selection in the corner and draw a Gradient inside it with the Gradient tool set to go from black to white.

Tutorial Curl Turn Page effect 1

2. Go to Menu > Edit > Warp and drag the corner to create a curl.

Tutorial Curl Turn Page effect 2

3. Add a Drop Shadow like you did with the Polaroids.

Tutorial Curl Turn Page effect

Give it a try

So have fun making Polaroids in Photoshop and share your questions, comments and Polaroid compositions in the comments section below.

The post How to Make Your Digital Photo Look Like a Polaroid Using Photoshop by Ana Mireles appeared first on Digital Photography School.


Digital Photography School

 
Comments Off on How to Make Your Digital Photo Look Like a Polaroid Using Photoshop

Posted in Photography


How to Create with a Good Workflow Using Smart Objects in Photoshop

25 Feb

Do you want to make sure you get the most details out of your shot? How about making sure none of your post-processing is destructive? It sounds like a really smart way to set up your workflow right?

A workflow is a process that goes from initiation to completion. In the case of photography, that implies from the time of shooting to post-processing. So the first thing you need to do is to ALWAYS shoot in RAW mode. This is a format that changes file extension with every manufacturer but they all share one common thing: raw files store all the un-processed and un-compressed data received on the sensor of your camera when you make a picture.

Intro before after - How to Create with a Good Workflow Using Smart Objects in Photoshop

Why shoot RAW?

What is the point of that? Well this means that your file can tolerate more post-processing adjustments and that you can alter some of the settings from the image in a non-destructive way.

As I mentioned before, RAW files have different file extensions and therefore need special software to process them. Your camera surely came with a software that handles your files. However, in this article, I am going to show you how to get the most out of them in Photoshop which supports most raw formats either by default or by using a plug-in.

When you open a RAW file in Photoshop you will see that you can adjust the image with the sliders on the tool palette on the right. Start moving those around to recover the most detail you can from both the highlights and the shadows so you can even out the exposure as much as possible. You can also control the tone of the white balance, the saturation and vibrancy of the colors, and so on.

Raw Window - How to Create with a Good Workflow Using Smart Objects in Photoshop

Tweak the image using the sliders and local adjustments in ACR

Once you have the overall settings adjusted, you can start working the settings in different areas to fine-tune your image.

Use the Adjustment Brush that you’ll find in the Menu bar on the top; you can change its settings like size and hardness on the right. Whatever adjustments you make to contrast or exposure will be applied only to the part where you paint with the brush. This is very useful when you are processing images with a lot of contrast. You can keep going with the other tools like the gradient for other local adjustments.

Raw Brush - How to Create with a Good Workflow Using Smart Objects in Photoshop

Open as a Smart Object

If you are already familiar with processing RAW files, these are likely your normal post-processing steps, after which you would click the Open Image button so that the photo opens in Photoshop with the applied adjustments. However, there is one more step you can add to your process to really make your images pop. You can open your photo as a Smart Object.

Open Object - How to Create with a Good Workflow Using Smart Objects in Photoshop

Here’s how to do it. Instead of clicking Open Image, just press the Shift key and that same button will become Open Object, now you can click it. Having done this, the image will open in Photoshop as a Layer. Now right-click the layer thumbnail and choose New Smart Object via Copy and a second layer, containing a second smart object will be created.

IMPORTANT: Don’t just duplicate the layer or you won’t be able to process them independently; every adjustment would be applied to both smart objects!

You can now rename the layers to identify which adjustments you are going to do in each one. For example, I’m doing Highlights and Shadows for my image but maybe for another image, it’s better to call the layers Background and Foreground, it depends on your image and what it needs.

Double processing

Double processing - How to Create with a Good Workflow Using Smart Objects in Photoshop

The cool part about Smart Objects is that when you double-click the layer, it will open again in the RAW editor, which means that you are back to all the data to keep processing without loss. You can make the adjustments that you need for a specific part of the image.

Finishing up

Now that you have done the best post-processing for each part is time to integrate it all into one amazing picture! Add a mask to the top layer by clicking the Layer Mask button on the bottom of the Layers Palette. With the layer mask selected you can start hiding the parts you don’t need. Remember that whatever appears in black on the mask means that you will see the layer underneath; whatever is white will show the top layer. I’ll turn off the bottom layer so that you can see what I mean below.

Layer Mask - How to Create with a Good Workflow Using Smart Objects in Photoshop

If you find it necessary, you can keep going with your adjustments, as you would normally do in Photoshop. You can add a filter or adjustment layer by clicking on the buttons at the bottom of the Layers Palette. Have a look at these before and after examples!

Before- How to Create with a Good Workflow Using Smart Objects in Photoshop

Before

After - How to Create with a Good Workflow Using Smart Objects in Photoshop

After

Before2 - How to Create with a Good Workflow Using Smart Objects in Photoshop

Before

After2 - How to Create with a Good Workflow Using Smart Objects in Photoshop

After

The post How to Create with a Good Workflow Using Smart Objects in Photoshop by Ana Mireles appeared first on Digital Photography School.


Digital Photography School

 
Comments Off on How to Create with a Good Workflow Using Smart Objects in Photoshop

Posted in Photography


How to Turn Your Photo into a Cartoon Drawing Using Photoshop

17 Feb

Photography can be traced back all the way to the camera obscura; which was an aid for artists who could then draw their subjects from the projection created by the light passing through the pinhole. Following that tradition, in this tutorial, I’m going to show you how to create a drawing by outlining the subject from your digital photo to create a fun, cartoon-like image.

Deer cartoon - How to Turn Your Photo into a Cartoon Drawing Using Photoshop

Getting started

You can use this technique on any photo you want and apply it to any subject you like. However, I find it best, especially for your first attempt, that the subject is well defined or isolated so it’s easier for you to outline it. I also personally prefer and recommend that the image is not too busy. So, once you have chosen your photo, open it in Photoshop.

Outline the subject

To trace your subject you are going to use the Pen tool. The way it works is that you create anchor points with each click. A straight line then connects those points. Do this all around the subject.

Once you have this, change the Pen tool to the Convert Point Tool, which you can find by holding down on the Pen until the drop-down menu opens. With the Convert Point, you can curve the straight lines to make it fit the silhouette best. Just click on the anchor point and start dragging it. From each anchor point, you will have to handles, each one to control the line in each direction of the anchor.

Pen Outline - How to Turn Your Photo into a Cartoon Drawing Using Photoshop

This will help you get a smoother silhouette and avoiding unnecessary bumps that you would get if you only trace by adding anchor points.

Straight lines - How to Turn Your Photo into a Cartoon Drawing Using Photoshop

A straight line.

Curve - How to Turn Your Photo into a Cartoon Drawing Using Photoshop

Using curved lines.

Create your outline

Once you have outlined the silhouette of the subject, create a new layer. You can do this by going to the top Menu > Layer > New Layer. You can rename it as “silhouette” or “outline” just to keep things tidy, as you will be creating more layers further along.

What you’re going to do next is turn this path into a drawing, more precisely, the line that borders your drawing. Therefore, you can choose which color it will be and how thick you want it. To set it you need to go to the Brush tool and select a hard brush as thick as you want. I’m doing 8px in this case.

You can also choose the color by clicking on the foreground color at the bottom of the tool palette, for this example, I’m using black. Turn off the background layer (click the little eye icon) so you can see how it will look like and then choose your settings.

Silhouette - How to Turn Your Photo into a Cartoon Drawing Using Photoshop

Now that you have this ready, leave the new layer active go to the path palette. If it’s already opened you can open it by going to the top Menu > Windows > Path. In there you will see that a Work Path has been created, the icon will show the image as a grey rectangle and the path is the silhouette you traced.

Next, right-click on the Work Path and choose Stroke Path. A pop-up window will appear, make sure the Brush option is selected and click OK.

Stroke Path - How to Turn Your Photo into a Cartoon Drawing Using Photoshop

Adding details

You have a border or a silhouette now, but you still need details. Each one will be a new layer and a new path, that way you have it separated and can, therefore, control it more precisely.

If you want two details on the same layer, for example, to keep the two ears in one layer so that any changes apply equally, then you keep working in the same layer. But you do need to create a new path for each one.

Notice here that I have my background layer which is my original image; a Layer 1 that corresponds to the Work Path which is the outline; and a Layer 2 that contains Path 1 and Path 2 which are the two details of the ears. This is why I suggested earlier that you should rename the layers and the paths to keep track of them easier. Continue doing this as many times as you need to finish your drawing.

Layers and Paths - How to Turn Your Photo into a Cartoon Drawing Using Photoshop

Apply a filter

Once you’re finished with this, duplicate the background layer. With this new layer active, go to the Work Path (the one that has the outer line of the drawing) and right-click it. From the drop-down menu, choose Make Selection. This will select your subject so that the filter you’ll apply next doesn’t affect the background, otherwise the entire will turn into a cartoon.

Now go to the top Menu > Filter > Filter Gallery. A window will appear with all kind of filters that you can apply and a preview image. In this case, you’re going to select the one called Cutout from the Artistic Filters. On the right side there are sliders to refine the effect, just move them around until you are satisfied. I’m going to do it as Number of levels 7, Edge simplicity 5 and Edge fidelity 2. When you’re done just click OK.

Cutout - How to Turn Your Photo into a Cartoon Drawing Using Photoshop

Other tricks

You can also multiply your cartoons, apply modifying layers to change colors or saturation, and anything else you can think of! And the best part is that you can do this to any kind of photo, here are some other examples; share yours as well in the comments!

Three deers - How to Turn Your Photo into a Cartoon Drawing Using Photoshop


The post How to Turn Your Photo into a Cartoon Drawing Using Photoshop by Ana Mireles appeared first on Digital Photography School.


Digital Photography School

 
Comments Off on How to Turn Your Photo into a Cartoon Drawing Using Photoshop

Posted in Photography


How to Easily Simulate a Tilt-Shift Effect Using Photoshop

03 Feb

You might not know it, but even if you’ve never heard of tilt-shift photography you have probably seen a photograph that was captured in just such a way. A few years ago tilt-shift photos exploded into the mainstream with oddly miniaturized images of cities, cars, and even landscapes going completely viral seemingly overnight.

How to Easily Simulate a Tilt-Shift Effect Using Photoshop

Tilt-shift photography, in itself, is nothing more than a literal optical illusion. Essentially, it is nothing more than adding a strip of sharp focus to an otherwise blurred image. Even the name itself refers not to the type of photograph but rather the camera or lens movements needed to achieve the effect.

Yes, tilt-shift photos have their roots in large format photography but don’t worry, I’ll only touch on that as much as needed to in order to get the point across. What I will focus on (get it?) is showing you how the tilt-shift photo effect can be very closely and easily simulated using Photoshop. Oh, and don’t think that in-camera tilt-shift photos can only be made with large format cameras. There are quite a few tilt-shift lenses available for your SLRs and DSLRs.

What is Tilt-Shift?

The best way to understand the concept behind tilt-shift photography work is to understand what “tilt” and “shift” actually mean as they relate to photography. As I mentioned earlier, they refer to the movements of a large format camera.

The tilt aspect refers to the physical tilting, either forward or backward, of the front or rear part of the camera. This tilt impacts the focus plane.

How to Easily Simulate a Tilt-Shift Effect Using Photoshop

Front and rear tilts demonstrated with a large format camera.

Without going too far into large format camera movements, tilting the front and/or rear of the camera allows for very selective depth of field control.

The “shift” is less important for our purposes today, but since I like being thorough, shifting the front or back of the camera simply means it is moved from side-to-side (or up and down) and literally shifts the image from left to right or up and down.

How to Easily Simulate a Tilt-Shift Effect Using Photoshop

Right and left shift movements on a large format camera.

The tilt effect is what you’re about to learn how to simulate in Photoshop right now.

How to use the Tilt-Shift Filter in Photoshop

To begin, first, select an image that is conducive to the tilt-shift effect. Photos which have a relatively isolated subject with large areas of foreground and background usually work best. Make most if not all of your basic edits before you start your tilt-shift, including sharpening. Here is my image after I’ve made some core adjustments.

How to Easily Simulate a Tilt-Shift Effect Using Photoshop

Open the image in Photoshop

I like to start off in Lightroom and then pitch the image over to Photoshop as a Smart Object to apply the tilt-shift effect. I’ll show you why in just a bit.

How to Easily Simulate a Tilt-Shift Effect Using Photoshop

Now that you have the image opened in the loving hands of Photoshop the fun can begin! Yes, I think this is fun….

Duplicate the Layer

The first step in applying the tilt-shift effect is to duplicate the base image layer. Use the keyboard shortcut Ctrl/Cmd+J. It’s this duplicate layer to which you’ll apply the tilt-shift blur.

How to Easily Simulate a Tilt-Shift Effect Using Photoshop

Applying the Blur

Tilt-shift is essentially a blurring effect, so it makes sense that it is located along with the other blur filters in Photoshop. Click on Filters > Blur Gallery >Tilt-Shift.

How to Easily Simulate a Tilt-Shift Effect Using Photoshop

This brings you into the tilt-shift blur module of Photoshop. You’ll notice that you can also add other forms of blur here, but ignore all that as we are just going to work with tilt-shift.

When the module opens you will see a masking tool already on top of your image. It resembles a dual graduated filter tool. In fact, it works very similarly to the graduated filter. The effect will feather out to the top and bottom from the central axis dot in the center of the filter. The solid lines control the border of the effect with the dotted lines determining the feathering. Here’s a breakdown.

How to Easily Simulate a Tilt-Shift Effect Using Photoshop

The tilt-shift filter overlay.

The intensity of the blur is controlled by the Blur slider or by adjusting the intensity dial. Keep in mind that the entire filter can be moved either simultaneously or the top and bottom portions can be moved and adjusted separately. This happens to be the final position of my tilt-shift filter.

How to Easily Simulate a Tilt-Shift Effect Using Photoshop

Click Ok and allow Photoshop to render the blur.

A few tips for you

While we’re waiting…this is a good time to go over a couple of things that will help make your tilt-shift more effective.

Always remember that, if you’re going for realism, an accurate tilt-shift simulation should adhere as closely as possible to the optical principles of photography. This means that since tilt-shift controls the depth of focus, your effect should also follow those rules. Be careful you don’t have significant irregularities at the borders of the blurred areas. Also, pay special attention to the elements within your photo and their spatial relationship to one another to avoid an overly artificial appearance.

Keep in mind that there are quite a few other sliders to be seen here in the tilt-shift module; namely those for distortion, bokeh, and light range. (Of course if you’re feeling adventurous then, by all means, try out those sliders but I generally leave them as is for virtually all of my work.) Distortion can be added to varying degrees to the blurred areas as well as bokeh enhancement/coloration. The light range slider allows control over blur based on specific luminance values. However, in most cases, the default settings for these sliders will be just perfect for your image.

After your tilt-shift effect is complete the image will automatically reopen in the main Photoshop window with your edits applied.

Tweaking the Effect

Just because you have to loosely adhere to some rules of optics doesn’t mean you are totally bound by them. I actually attempt to never use the word “rules” when it comes to photography. If you find you need to adjust the tilt-shift effect just remember that this is Photoshop after all and you, the intrepid post-processor, wield great power!

Remember how you imported your image as a Smart Object earlier? Well, this is where having your image available as a Smart object really comes in handy.

How to Easily Simulate a Tilt-Shift Effect Using Photoshop

You’ll notice the tilt-shift has already been scooped into its very own layer mask. So now, you are free to paint the blur effect in or out until it is just right. This allows you to go beyond the constraints of filters in the tilt-shift module. With this image, I used a little judicious painting on the Smart Filter layer mask to make the effect look a little more natural.

How to Easily Simulate a Tilt-Shift Effect Using Photoshop

Finish in Lightroom

After I’m completely finished with the tilt-shift I kick the image back over to Lightroom. I add in one last edit to help harmonize the tilt-shift and that is a graduated filter at the bottom of the frame to darken it ever so slightly.

How to Easily Simulate a Tilt-Shift Effect Using Photoshop

And that’s it! You should now have a genuine imitation tilt-shift image. Have a look at the before and after.

Before

After

Final Thoughts on the Tilt-Shift Filter…

Tilt-shift photography in Photoshop is easy and can add some amazing effects to your photos. As with most post-processing effects, it’s important to keep things within the realm of reality unless your goal is to deliberately skew things.

The effects achieved in Photoshop aren’t perfect, of course, but you can get very close to the look and feel of real tilt-shift photography. All this without needing to use a real tilt-shift lens or moving into large format photography. Experiment with the tilt-shift blur in Photoshop and keep these important tips in mind:

  • Remember tilt-shift is just a manipulation of depth of focus.
  • Try not to break the rules…I mean, the guidelines of optics.
  • Pick images that have larger areas of foreground and backgrounds with isolated subjects.
  • Don’t forget to tweak the tilt-shift effect or even add additional edits.

Try out the lessons in this article and stretch your creative legs with tilt-shift blur in Photoshop. And as always remember to have fun with your editing and please share your results and any questions you have in the comments area below.

The post How to Easily Simulate a Tilt-Shift Effect Using Photoshop by Adam Welch appeared first on Digital Photography School.


Digital Photography School

 
Comments Off on How to Easily Simulate a Tilt-Shift Effect Using Photoshop

Posted in Photography


How to Use Layers and Masks in Photoshop to Add Text to Your Photos

02 Feb

Do you want to make a photo-card for your loved one? Or maybe a flyer for your business? Or add some personalized notes to your photos that turn your album into a scrapbook? If you ever tried to add text on your photos and ended up just covering up the image, this article is for you.

How to Use Layers and Masks to Add Text to Your Photos

Although Photoshop is not a software specially-made for design, it does have some design functions, one of which is the text tool. You don’t need to learn any extra software to integrate text into your photos, you’ll learn how to use layers and masks in Photoshop to overlap the text and the image so that they interact which results in integrated and elegant images.

Since Valentine’s Day is so close, I’ll give you some easy-to-do examples to make a card for your loved one. However, you can apply the same steps to any image to add text for any other purpose.

Overlapping

In this first technique, you won’t apply any effects to the text itself, therefore the result is a clean and simple design.

First open an image of your choosing in Photoshop, one that goes well with the message you want to convey. You can later move the text to make some final arrangements, however, you do need to start with an idea for the text placement. This is because you need to select the part of the subject that you want to overlap with the text. I used the Quick Selection tool, but you can use whichever is best for you.

Selection - How to Use Layers and Masks to Add Text to Your Photos

Then duplicate the layer by dragging it to the new layer icon at the bottom, or by going to Menu > Layer > Duplicate Layer (you can also use the keyboard shortcut Cmd/Ctrl+J). Then you will need to add a mask to the new layer by clicking on the layer mask button from the bottom of the Layers palette.

Whatever was selected is now the only thing visible from that layer. You can also refine the edges of this selection if you right-click the layer and select Refine Edge.

Layer mask - How to Use Layers and Masks to Add Text to Your Photos

Add your text

Then, select the Text Tool and write your message. You can choose the font, size and color from the menu as you would in any word processor like Microsoft Word. Now your text is blocking your image but all you need to do to create the overlapping is to drag the text layer in between the background and the selected layers.

Text tool - How to Use Layers and Masks to Add Text to Your Photos

You can move or transform the text to make it fit better as well. Finally, if you want to have a part of the text appear to be behind the image and part in front, to make it more integrated, you can paint on the layer mask with a black brush (black conceals – white reveals) to hide the parts “behind”.

I love you - How to Use Layers and Masks to Add Text to Your Photos

Picture in Picture

Another way to integrate text and image is to use the same background photo as a pattern for the letters and just change the blend to give it a personalized effect.

Open an image of your choosing in Photoshop. Then using the Text tool, write your message in a font that is wide enough to show the image inside, in this case, I used Braggadocio.

Text Love - How to Use Layers and Masks in Photoshop to Add Text to Your Photos

Add the photo

Now go to Menu > File > Place and choose the same photo that you are using in the background. Adjust its size to fit the text.

Place - How to Use Layers and Masks in Photoshop to Add Text to Your Photos

Go back to the Layers palette and right-click the text layer. In the drop-down menu choose “Make a work path”. Then from the Path palette, right-click the work path and click on “make selection”. This will create a selection around the letters, but it will keep the path to make the selection later in other layers where you are going to need it.

Path Selection - How to Use Layers and Masks in Photoshop to Add Text to Your Photos

Then go back to the Layers palette and select the layer with the second image (the one you placed and added a layer mask to); this will have the shape of the letters.

If you want to rearrange the image inside the letters you can make the original text invisible by clicking on the eye icon on the left side of the layer name, and then unlink the mask by clicking the chain in between the thumbnails. That way you can just drag the photo until you are satisfied with how it looks (see below).

Unlink - How to Use Layers and Masks in Photoshop to Add Text to Your Photos

Once the image is placed the way you want it, you can apply any effect that you like. In this case, I added an adjustment layer with a Gradient map, this can be done by going to Menu > Layer > New Adjustment Layer > Gradient Map; or by clicking the shortcut button at the bottom of the palette. From there I chose a greyscale gradient.

Finishing up

Finally, I changed the blending mode of the layer to Multiply. You can do this or choose any other blending mode from the drop-down menu on the top part of the layer palette. Then I activated the original text layer (which was white if you remember) and I moved it a little bit so that it would show underneath and it gave it a border to separate it.

Love - How to Use Layers and Masks in Photoshop to Add Text to Your Photos

The post How to Use Layers and Masks in Photoshop to Add Text to Your Photos by Ana Mireles appeared first on Digital Photography School.


Digital Photography School

 
Comments Off on How to Use Layers and Masks in Photoshop to Add Text to Your Photos

Posted in Photography


Tutorial: Master the Photoshop Pen Tool in under 8 minutes

02 Feb

Ahh, the Pen Tool! When it comes to making complex selections and cutting objects out of an image, there is no better tool for the job. And while the Lasso Tool or Magic Wand Tool might make selections faster and easier (and are still quite useful depending on the situation), the Pen Tool reigns supreme when it comes to accuracy and precision.

So, what’s the drawback? Well, it’s pretty tricky to get the hang of it. Even with all of the helpful videos and guides out there (including a handful of our own), we still get questions all the time on how to master this extremely versatile tool within Photoshop. In our most recent tutorial on the Pen tool, we focused on the absolute need-to-know fundamentals so that you can follow along and start practicing immediately.

Not only does the Pen Tool provide unparalleled accuracy and control, but it’s extremely flexible as well. Photoshop will store any Paths you create under the Paths tab. If you ever need to adjust a selection as you work, you can simply select the Path you wish to edit, make the changes that you need, and then convert that Path into a new selection.

Before editing a Path, be sure to check Auto Add/Delete in the Pen Tool options bar. This will tell Photoshop to automatically swap to the Add Anchor Point Tool (when you’re hovering over a line segment) or the Delete Anchor Point Tool (when you’re hovering over an Anchor Point). This setting makes the process of making changes to a Path much easier.

Avoid using the Delete or Backspace keys to remove Anchor Points! These shortcuts will delete the selected point as well as the line segments that connect to it!

Another key to mastering the Pen Tool is making sure that your precision selections look realistic within the context of an image. I know that we use the Pen Tool for its clean lines and curves, but rarely in the real world will you find a completely hard edge. To maintain realism in your selections, be sure to add a bit of feathering to account for the naturally occurring softness in photographs. It’s a subtle change that will help avoid that “Photoshopped” look.

And if you ever feel lost, just remember your “home base” keyboard shortcuts:

  • Use CTRL or CMD to toggle the Direct Selection Tool which will allow to move a Point or a Curve at any time.
  • Use ALT or OPTN to convert a Point into a Curve or vice versa.

For an even smoother workflow, toggle the Hand Tool by using the Spacebar. The Hand Tool allows you to navigate around your image by clicking and dragging, eliminating any need for you to have to zoom out, scroll, and zoom back in to continue a Path.

And most the most important tip of all: practice, practice, practice! The Pen Tool completely changed how I work within Photoshop and if you put in the time, I’m confident that you’ll see a considerable improvement in your own work as well.


About the Author: For over seven years, Aaron Nace has been teaching photography and photo manipulation on PHLEARN.com to millions of users across the world at every skill level. You can subscribe for his professional videos or view the free tutorials as well.

Articles: Digital Photography Review (dpreview.com)

 
Comments Off on Tutorial: Master the Photoshop Pen Tool in under 8 minutes

Posted in Uncategorized


Preset Brewery drag-and-drop tool converts Lightroom presets for Photoshop

27 Jan

An application for macOS 10.10+ called Preset Brewery makes it possible to convert Lightroom presets into Camera Raw presets for use in Photoshop by simply dragging and dropping them—it really doesn’t get any simpler than that.

Preset Brewery was recently updated to version 1.1, which adds support for exporting the presets directly into Camera Raw so that they’re immediately available; however, the option remains to save the converted presets into the folder where the Lightroom presets are located.

Preset Brewery was created by developer Adam Bardon, who tells Fstoppers that a future update will add support for batch processing presets. Unfortunately, the application is not available for Windows, but Mac users can purchase Preset Brewery through the company’s website for $ 7.90 USD.

Articles: Digital Photography Review (dpreview.com)

 
Comments Off on Preset Brewery drag-and-drop tool converts Lightroom presets for Photoshop

Posted in Uncategorized


Tips for Doing Digital Painting with the Mixer Brush in Photoshop

26 Jan

If you have ever felt the need to be a bit more creative with your photos, then Photoshop contains a multitude of ways to make that happen. In fact, it offers such a variety of options it can be a bit overwhelming to figure out which one might be the right one for you in a given situation. In this article, I will go over a method of digital painting using Photoshop to give you one technique you can add to your toolbox.

Mostly you can get some great effects without having to purchase any other software or features, but those options are available and can extend your portfolio of choices.

Perhaps you might want to create a birthday card or give someone an extra special present. This digital painting technique is ideal for use on an image which is not 100% in focus. Everything else might be perfect but if it’s a tiny bit blurry, apply a painting technique and no one will notice.

Tips for Doing Digital Painting Techniques with Photoshop

NOTE: Please be advised I am using CS6 so things may be in different places if you are using the CC subscription model.

Mixer Brush

The Mixer Brush is a very effective way of getting a painted look for your image because you actually paint over your image in Photoshop. It can be quite fiddly and time-consuming but the end result can look really good. My recommendation would be to do this with a graphics tablet and a pen, otherwise, you will get a cramp in your hand from the mouse. Plus you have more control in areas of fine detail with a tablet.

Any image can be used, but because the mixer brush picks up colors from your image and adds paint texture, you need to keep that in mind. All the brush strokes will be visible so the direction in which you paint may affect the final visual outcome. It took me 2-3 goes before I finally got the hang of this, so stick with it.

STEPS

Step #1. Open your image, add a new layer and select that one as your active layer. You can delete this later if you need to without affecting the original image.

Step #2. The Mixer Brush is found on the toolbar, left mouse click on the Brush icon, it should be in the drop-down box.

Mixer Brush open, showing settings on Adjustment Tool Bar

Step #3. On the top toolbar, you can make adjustments to the settings. Set them up as follows (as a starting point):

  • The drop-down box set to Custom.
  • Wet: 100%.
  • Load: 1% (this sets the paint color load on the brush to a minimal setting).
  • Mix: 100% (this uses the color from the original file – Load and Mix work opposite each other that way).
  • Flow: 50% (medium pressure on the brush).
  • Airbrush set to OFF.
  • Sample All Layers must be ticked – this is important as it allows us to pick up the color from the original image.

NOTE – all these settings are adjustable depending on what works for you, so feel free to experiment.

Choose your brush, make sure you are working on the new layer, and begin to paint.

Tips

  • Start with the dark areas of the image first.
  • Use the textures in the image to help direct the flow of the brush strokes.
  • The paint is very wet and colors will mix and blend readily which can be used to your advantage where colors change in the image. It can be a bit tricky to get the hang of at first.
  • Adjust your Flow value to get harder or softer strokes.
  • You may want to use a layer mask to show fine details like eyes or whiskers after painting to bring back a bit of sharpness in those areas.
  • Adjust the brush size to suit the areas you are working in, fine detail needs a smaller brush, and larger areas may support bigger brush strokes (a bigger brush covers more area quicker which is an added bonus).
  • If the background is not ideal, you can also replace it with a painterly texture instead. This is a great treatment for when you have a really good shot but not the cleanest background. So do a background replacement, add the painting and it becomes artistic instead.

Image results using the Mixer Brush

Tips for Doing Digital Painting Techniques with Photoshop

Photo of a Jabiru bird, with digital painting done over the feathers.

This image of a Jabiru I quickly painted for this article. The lovely colors in the feathers, plus all the different directions they lay in made it a good choice for digital painting.

Tips for Doing Digital Painting Techniques with Photoshop - Jabiru bird

Original Jabiru image

This is the original photo for comparison. You can see how the feathers around the eyes are much smaller and finer and you can see the different directions in which the feathers lie. In the painted image where the rainbow colors are on the top of the head, it’s visible how they have blended in softly, even picking up the hints of gold in the purple feathers at the top.

Tips for Doing Digital Painting Techniques with Photoshop

When you view the digitally painted layer by itself, you can see all the brush strokes, plus the areas that might have been missed. This is a useful step to check and make sure you have enough coverage. Additionally, this layer can have its opacity adjusted down if you wanted to bring back some of the original feather detail.

I tend to adjust the flow down to around 30% and fill in the gaps. It can also help to soften the transitions in direction as well. Also useful for extra blending across areas where colors change.

My first experiment with using the Mixer Brush was this portrait of my cat Cognac. You will notice I have left the whiskers, eyelashes and fine hairs around his ears unpainted as I felt it looked better that way. I was careful to follow the flow of the fur so it looked natural and picked up the subtle color differences.

This was probably my third go at this technique – so be patient with yourself if you aren’t happy with the first one you try. Keep at it.

Summary

This technique isn’t complicated, is fully contained within Photoshop and requires only one extra layer. A graphics tablet will make it much more comfortable to do as it is a lot easier to use than a mouse. The thing you need most is time and a careful steady hand. With those things you can elevate your photo to a new creative level, perhaps print it out on canvas as a gift.

Have you tried this method of digital painting before? Please share your results in the comments below.

The post Tips for Doing Digital Painting with the Mixer Brush in Photoshop by Stacey Hill appeared first on Digital Photography School.


Digital Photography School

 
Comments Off on Tips for Doing Digital Painting with the Mixer Brush in Photoshop

Posted in Photography


Photoshop CC update adds AI-powered subject selection tool and more

24 Jan

The AI-powered Select Subject feature that Adobe demoed back in November has finally arrived in Photoshop CC! The feature was officially released just minutes ago in Photoshop CC version 19.1, which also includes the addition of a Decontamination slider to the Select and Mask workspace and some significant compatibility updates for Windows users.

The major update is, obviously, the arrival of Select Subject to Photoshop CC. When it was first demoed in November, the Photoshop team touted the tool—which is powered by Adobe Sensei AI technology—as a way to “select prominent subjects in an image with one click.” That’s what they hope to deliver today.

A single click of the Select Subject button in the Quick Select tool should easily isolate your subject in images like the one below:

Of course, more difficult scenarios where the subject isn’t so obviously delineated against the background will give Select Subject more trouble—the original demo video, embedded below, showed that—but it promises to “let you get started with your selections faster than ever before.”

In addition to Select Subject, Adobe also added a Decontamination slider to the Select and Mask workspace that allows you to select the amount of color decontamination applied to an image:

For Windows users, version 19.1 brings much-requested support for Windows High Density Monitors—allowing you to switch between displays of varying resolutions and sizes seamlessly. Jerry Harris, principal scientist on the Photoshop team and himself a Windows user, explains what this means in the Adobe blog post:

With this release, Photoshop on Windows 10 Creator’s Edition now offers a full range of choices for UI scale factors from 100% through 400%, in 25% increments. This means that the Photoshop user interface will look crisp, beautiful, and the right size no matter the density of your monitor. Photoshop will now automatically adjust itself based on your Windows settings, making it simple to set up.

[…]

In addition, we worked very closely with Microsoft to provide per-monitor scaling across monitors with different scale factors. This means that a high resolution (HiDPI) laptop now works seamlessly alongside a lower resolution desktop monitor (or vice versa). One monitor can have a scale factor of 175% and another a scale factor of 400%.

And finally, Windows users also get advanced support for the Windows dial, which can now adjust brush settings while you paint. Before this, you could only adjust settings between brush strokes, but you can now adjust brush size, opacity, and other settings as you draw:

As of publication, this update should be live and ready to download if you’re already a Creative Cloud subscriber. If you want to learn more about any of the features above, or dive into bug fixes and other minutia, head over to the Adobe blog. Otherwise, just update your copy through the Creative Cloud app and you’re ready to go.

Articles: Digital Photography Review (dpreview.com)

 
Comments Off on Photoshop CC update adds AI-powered subject selection tool and more

Posted in Uncategorized