RSS
 

Archive for October, 2020

Mobile by Peak Design is a new line of smartphone cases and accessories with unique ‘SlimLock’ design

20 Oct

Peak Design is back with its latest crowdfunding campaign. This time, the San Francisco-based accessory manufacturer has found a way to put a unique spin on a new line of cases and accessories for smartphones.

The legs of the tripod accessory fold out wide to create a sturdy base. If you’re using larger, heavier devices, the case even has a built-in hex tool for tightening the joints of the ball mount and legs.

The new Mobile by Peak Design lineup consists of smartphone cases and universal mounts that use Peak Design’s ‘SlimLink’ hardware to easily connect an ecosystem of accessories, including an ultra-compact tripod, various magnetic and locking mounts, a wallet and even wireless charging mounts.

The tripod accessory is tapered and easily snaps into place on the rear of the case or universal mount.

What makes the SlimLink connection on each of the cases and adapters unique is its ability to work with both hard-locking (mechanical) and soft-locking (magnetic) mounts. This means some of the accessories, such as the mobile tripod, can connect with a quick snap of the built-in magnets, while mounts that need a more secure hold, such as the bike and moto mounts, can lock into place for a more secure hold.

A close-up shot of the proprietary SlimLock system.

The SlimLink connection is made of ceramic-zirconium, meaning it will still allow Qi charging to work through the case. At launch, the Mobile by Peak Design lineup will offer dedicated Peak Design Everyday Cases for the following devices (other phones will work using the universal adapter):

  • iPhone 12 (6.1” + 5.4”), Pro Max, Pro
  • iPhone SE2
  • iPhone 11, Pro, Pro Max
  • Samsung S20, S20 Ultra, S20 +
The universal mount ensures nearly any older device—even those with cases—should be able to be adapted to work with the Mobile by Peak Design system.

Peak Design is also supporting cross-compatibility between its mounting system and the new MagSafe connection found in Apple’s latest iPhone 12 devices. Specifically, Peak Design says its soft-locking mounts and accessories (tripod, wallet, charging stand, wall mount and car mounts) will work with Apple’s MagSafe phones and cases. Peak Design also says iPhone 12 devices in the Peak Design Everyday Case will work with Apple’s MagSafe charger and notes Apple’s MagSafe accessories, such as their wallet, will be able to be connected to a Peak Design Case, but it doesn’t specify how exactly that will be achieved.

As of the announcement of the Kickstarter campaign, Peak Design lists four different cases or adapters and eleven different accessories. An infographic overview of the ecosystem is shared below:

You can find out more information on the Mobile by Peak Design lineup by heading over to the Kickstarter campaign. Below is an infographic with a pricing breakdown for the various accessories, adapters and cases. As with all of Peak Design’s other products, all cases and accessories are individually serialized and guaranteed for life.

This is Peak Design’s 10th Kickstarter campaign and should, if it reaches its goal, ensure Peak Design surpasses smartwatch manufacturer Pebble for the all-time most money raised through Kickstarter campaigns — $ 43.4M.

After a successful funding and launch on Kickstarter, the Mobile by Peak Design system will be available to purchased through Peak Design’s online shops as well as partnered retailers in Spring 2021.


Disclaimer: Remember to do your research with any crowdfunding project. DPReview does its best to share only the projects that look legitimate and come from reliable creators, but as with any crowdfunded campaign, there’s always the risk of the product or service never coming to fruition.

Articles: Digital Photography Review (dpreview.com)

 
Comments Off on Mobile by Peak Design is a new line of smartphone cases and accessories with unique ‘SlimLock’ design

Posted in Uncategorized


7artisans releases $255 35mm F0.95 manual prime for APS-C mirrorless camera systems

20 Oct

7artisans has announced yet another affordable ultra-fast manual prime lens, the 35mm F0.95 APS-C lens for Canon M, Fuji X, Micro Four Thirds, Nikon Z and Sony E mount camera systems.

The lens, which retails for just $ 255, is constructed of 11 elements in 8 groups, has an aperture range of F0.95–16, offers a minimum focusing distance of 37cm (14.5”) and has a 12-blade aperture diaphragm. It offers a 43º angle of view, has a declicked aperture dial and weighs just 369g (13oz).

Photo Rumors, who is an authorized 7artisans retailer, has shared a gallery of sample images taken with the lens attached to a Sony a7 III:

7artisans 35mm f/0.95 sample photos

The 7artisans 35mm F0.95 APS-C lens is available to purchase for $ 255 through 7artisan retailers, including Photo Rumors.

Articles: Digital Photography Review (dpreview.com)

 
Comments Off on 7artisans releases $255 35mm F0.95 manual prime for APS-C mirrorless camera systems

Posted in Uncategorized


Adobe Lightroom Classic 10.0 released, includes Color Grading and more

19 Oct

Adobe has released Lightroom Classic version 10.0, ushering in a variety of performance improvements and new features, including new controlled color grading adjustments for shadows, midtones and highlights.

With Lightroom Classic’s new color grading tool, users can control the color separately in midtones, shadows and highlights, or adjust the color of your entire image with a global control. The Color Grading panel replaces Split Toning and offers additional control overall color. Within Color Grading, you can adjust hue, saturation and luminance by moving the point in each color wheel. When making adjustments, if you hold the Shift key or Command key, you restrict wheel movement for Saturation or Hue adjustments, respectively.

Image credit: Adobe

The Color Grading panel also includes Blending and Balance sliders. The Blending slider ‘adjusts the amount of overlap between the shadows and highlights.’ The Balance slider balances the effect of sliders between highlights, midtones and shadows. If the value is greater than zero, the effect of highlights will be increased. A value below zero increases the effect of the shadows. If you want to recreate the effect of the old Split Toning effect, set the Blending slider to 100.

A few weeks ago, Adobe showed a sneak peek at the new Color Grading feature. You can view the early look at the feature below.

Lightroom Classic version 10 includes performance improvements as well. Adobe promises faster editing when using brushes and gradients when GPU acceleration is enabled. Further, the new version delivers faster scrolling through the Library Grid, Folders and Collections, particularly for users with large catalogs.

When using the Loupe, Compare and Reference views in Lightroom, there is improved control over zoom levels with new Scrubby zoom and Box zoom options. Scrubby Zoom can be used while dragging your move left or right while pressing the Shift key. This is only available when GPU acceleration is enabled. The Box Zoom is available in Library and Develop modules by pressing Ctrl on Windows or Command on macOS while drawing a box with your cursor. The Navigator panel has been updated as well, it now offers Fit/Fill, 100% and Zoom percent options (ranging from 6% to 1600%).

A summary of Lightroom Classic version 10.0’s new features. Click to enlarge. Image credit: Adobe

For Canon camera users, you can see what you are shooting in real-time when tethered to Lightroom Classic version 10. Your connected camera’s live view will appear in a new, resizable window with orientation options. The tether bar includes focus control buttons and an autofocus button. To learn more about this feature, check out this article.

In addition to new tethered support, Lightroom Classic 10.0 includes new camera and lens profile support. The Fujifilm X-S10, Panasonic Lumix S5, Sony A7C and Sony A7S Mark III are all now supported. A variety of Sigma lenses and Voigtlander lenses have new support in Lightroom Classic 10.0. You can view the full list of supported cameras and lenses via the following links: Supported cameras and supported lenses.

When you update Lightroom Classic to the latest version, you will be prompted to upgrade your catalog. When doing so, a new feature will allow you to control the name of your catalog. To learn more about the new features in Adobe Lightroom Classic version 10.0, click here.

Articles: Digital Photography Review (dpreview.com)

 
Comments Off on Adobe Lightroom Classic 10.0 released, includes Color Grading and more

Posted in Uncategorized


Fujifilm Announces the Mirrorless X-S10, With 20 FPS and IBIS

19 Oct

The post Fujifilm Announces the Mirrorless X-S10, With 20 FPS and IBIS appeared first on Digital Photography School. It was authored by Jaymes Dempsey.

Fujifilm X-S10 announcement

Last month, we were fortunate enough to get a major camera announcement from Sony: the a7C, a compact-yet-full-frame option designed for vloggers, hybrid shooters, and anyone looking to gain top-notch image quality in a smaller body.

But now it’s Fujifilm’s turn to offer a camera guaranteed to impress vloggers, hybrid shooters, and more.

Just last week, Fujifilm announced the X-S10, an APS-C mirrorless model that combines a compact design with standard Fujifilm performance, while also sporting impressive video capabilities, continuous shooting speeds, and in-body image stabilization.

The X-S10 will feature a 26.1-megapixel X-Trans sensor, which is in line with Fujifilm’s current flagship options (the X-T3 and X-T4) and will undoubtedly perform well. You also get a decent viewfinder (2.36M-dot) which, while not quite as high resolution as the new X-T4, should satisfy most photographers.

And the 3” rear LCD is fully articulating, for anyone looking to shoot at awkward angles or do some inconspicuous photography from the hip.

Fujifilm promises lightning-fast autofocus, claiming that the X-S10 is adept at “achieving focus in as fast as 0.02 seconds in some cases, even at -7.0 EV.” And the X-S10 is also “equipped with high-precision Tracking AF for moving subjects and Face-Eye AF function to track a subject’s face and eyes.”

When it comes to continuous shooting speeds, Fujifilm has never been a company to let its customers down. The X-S10 continues this trend, featuring a walloping 20 frames-per-second continuous shooting speed when using the electronic shutter (though this drops to 8 frames per second when working with the mechanical shutter).

And as for image stabilization:

Fujifilm found a way to keep the IBIS down to a reasonable size, stating that the “camera’s IBIS mechanism is approximately 30% smaller in volume and weight than the previous, similar X series model” (here, Fujifilm is referring to the X-T4). This means that Fujifilm was able to successfully slip its IBIS technology into the X-S10, which is a huge deal, especially for photographers who frequently find themselves in low light situations. The handholding boost provided by a bit of IBIS can be the difference between sharp and blurred images.

Finally, we have the X-S10’s video capabilities to consider. While there’s no 4K/60p recording, you do get a respectable 4K/30p. Combine this with the image stabilization and the fully-articulating screen (discussed above) and you have yourself a useful little camera for vloggers and video hobbyists.

So if you’re a vlogger, a hybrid shooter, or simply a photographer looking for a compact mirrorless option, consider the Fujifilm X-S10.

The camera will begin shipping toward the end of November for $ 1000 USD (body only), $ 1400 USD (with an 18-55 f/2.8-4 kit lens), and $ 1500 USD (with a 16-80mm f/4 kit lens). But you can preorder your copy right here.

Now over to you:

What do you think of the Fujifilm X-S10? Would you rather have the Fujifilm X-S10 or the Sony a7C? Share your thoughts in the comments!

The post Fujifilm Announces the Mirrorless X-S10, With 20 FPS and IBIS appeared first on Digital Photography School. It was authored by Jaymes Dempsey.


Digital Photography School

 
Comments Off on Fujifilm Announces the Mirrorless X-S10, With 20 FPS and IBIS

Posted in Photography


DPReview TV: The quality of light, and how different types of lights affect your photos

19 Oct

Having light is critical for photography, but what about the quality of light? Our resident mad scientist, Don Komarechka, explains how different light sources can impact your photos.

Subscribe to our YouTube channel to get new episodes of DPReview TV every week

Articles: Digital Photography Review (dpreview.com)

 
Comments Off on DPReview TV: The quality of light, and how different types of lights affect your photos

Posted in Uncategorized


Video: How to create ‘mind-bending’ drone photos with a little creative thinking

19 Oct

The Cooperative of Photography, better known as COOPH, has shared ‘Droneception,’ a quick tutorial video that breaks down how to create ‘mind-bending’ drone images using two-shot, three-shot and more advanced multi-shot methods.

The video is three-and-a-half minutes long with only visuals and text overlays for instructions, but it’s succinct and manages to effectively convey the steps required to get the shots and make the final compositions. These methods should work with nearly any drone, so whether you’re using the newest DJI or a few year old no-name brand, the magic happens with the creative thinking ahead of time and the post-processing done afterwards.

For more videos, head over and subscribe to COOPH’s YouTube Channel.

Articles: Digital Photography Review (dpreview.com)

 
Comments Off on Video: How to create ‘mind-bending’ drone photos with a little creative thinking

Posted in Uncategorized


10 Tips for Improving Your Wildlife Photography

18 Oct

The post 10 Tips for Improving Your Wildlife Photography appeared first on Digital Photography School. It was authored by Guest Contributor.

A guest post by wildlife photographer Morkel Erasmus.

wildlife photography tips

Ever since DSLRs became readily available, more photography enthusiasts have started venturing into wildlife photography.

It seems that wildlife photography, in conjunction with landscape photography, has really seen a huge growth spurt over the last few years, at least as it pertains to the number of people practicing it as serious hobbyists or budding professionals.

This is especially true in my native country of South Africa, where it’s long been many a family’s tradition to visit legendary self-drive safari locations such as Kruger National Park. Having neighboring countries like Namibia, Botswana, and Zimbabwe doesn’t affect this trend negatively!

Yet spend some time on your favorite online photography forum (at least those that allow the posting of photos) or on other sites like Facebook or Flickr where photosharing is common, and you might notice that not every photo taken of a wild animal really speaks to you.

I’m not sure whether many folks just snap away and hope the image comes out half-decent, or whether many just think they’re doing their subjects justice (when that is not at all the case). Let me say outright that no offense is intended, and I also take photos that fall into the above categories.

In fact, I do it on every photographic trip I take.

But it’s stepping beyond that and getting a rare wildlife image that ticks all the right boxes that we all need to strive for. And we must be prepared when the opportunity comes along.

zebras fighting

In today’s article, I will attempt to provide you with some easy-to-apply tips and advice for improving your wildlife photography.

Some of these tips might seem like common sense, and you’ve probably read a similar list of “how-tos” elsewhere. But remember that common sense is not so common at all these days and that everyone has their own take on things, however similar it may be.

I do think I will cover a few points that are not just based on pure technical skill; photography is, after all, an art-form. Sometimes we need to be freed up to capture the vision we have in our mind’s eye, rather than stick to conventions and norms.

Here is a quick overview of the points I will cover in this article:

  1. Know your gear
  2. Know the wildlife
  3. Know the wildlife photography “rules;” break the wildlife photography “rules”
  4. Work the light
  5. Shoot wider; shoot closer
  6. The more, the merrier
  7. How low can you go?
  8. The content-technical dichotomy
  9. Patience isn’t a virtue; it’s a necessity
  10. Be there and enjoy it

These are the points that I try to cover when leading a photographic safari or presenting a workshop.

(Also note that I include the genre of bird photography in my definition of wildlife photography.)

Let’s get cracking!

a wildlife photography example of a lion on a dune

1. Know your gear

This sounds like the biggest cliché, but you know that it’s true.

The really great, action-packed moments in wildlife photography last, on average (based on my experience), between 5 and 20 seconds. If you are not deeply familiar with the settings of your camera or the abilities of your chosen lens, you will either miss the shot or blow the images you do manage to capture.

Here’s what’s important:

  • Know the minimum shutter speed at which you can obtain a sharp image with your camera/lens combo
  • Know any added margins that the in-camera or in-lens stabilization gives you
  • Know how to quickly toggle between focus points or focus modes
  • Know how high you can push your camera’s ISO setting and still achieve acceptable results

In general, I like to say that you need to be able to make most, if not all, of the necessary adjustments to your exposure/focus settings without lifting your eye from the viewfinder.

The action you see between the cheetahs in the following image lasted all of 10 seconds, even though we sat with them for more than an hour:

cheetahs playing

2. Know the wildlife

This goes without saying, right? Since much of wildlife photography is based upon capturing fleeting moments of natural history (read: interesting poses or behavior), it pays to be able to somewhat predict your subject’s behavior beforehand.

Granted, not every species is as predictable as the next. But there are patterns of behavior ingrained into every animal species. Knowing your subject can make the difference between being ready and prepared for capturing that “golden moment” and watching in agony as it flies by.

Now, there is only one way to get to know wildlife:

Spend time with it. Don’t just hang around for a few minutes and seek out the next subject if the one you are observing or photographing isn’t delivering the goods. Sit with wildlife. Watch wildlife. Wait.

(This also ties into patience, which I will discuss in more detail later.)

This image was captured by knowing what the Lilac-breasted Roller was going to do to its grasshopper-lunch, and being ready for it:

roller eating lunch

3. Know the wildlife photography “rules;” break the wildlife photography “rules”

There are certain unwritten rules that form the foundation of good photography, regardless of genre. And, of course, then there are certain “rules” that find their application mostly in the genre of wildlife photography.

Understanding proper exposure and the use of the histogram, as well as creating proper compositions using a guideline such as the rule of thirds, are all important to ingrain in your subconscious. You want to be able to instantly capture that fleeting moment properly.

In wildlife photography, much is made about eye contact with the subject, as this gives life to the image. In the case of avian photography (birds), you can take this a step further: the head angle in relation to the camera’s imaging sensor needs to be at least perpendicular to it, but ideally turned a few degrees towards the sensor (and therefore turned towards the viewer, who ultimately gets to view the image captured by the sensor).

The image below, for example, follows strong rule-of-thirds compositional guidelines:

wildebeest on a dune as stunning wildlife photography

Once you know the “rules” and the guidelines, and once you know when and how to apply them, it’s time to start breaking them. You should test the boundaries a bit, you know? You don’t want your photos to always look like the standard images that every photographer is getting.

Take a look at the image below. I mentioned the “need” for eye contact. Yet sometimes it can work to shoot an image in which the subject is not giving the photographer eye contact (this often means the animal is busy with something else and too busy to turn its attention to you).

thirsty Zebra foal makes for intimate wildlife photography

4. Work the light

The first piece of advice I got from a professional wildlife photographer when I started shooting is to stick to the hours of golden light.

This means getting up early in the morning and being in the field before sunrise, and going out in the afternoon to make the most of the last hours of sunlight. The light at midday (mostly between 11:00 and 16:00, at least where I live) is generally harsh and robs images of that spunk that they need. The exception is on overcast days, when the clouds act like a massive softbox and filter out the light evenly.

On days like that, I shoot all day (as long as there are willing subjects!).

Since photography is all about painting with light, you need to know how to use the light to your advantage in wildlife photography. Often, we will find ourselves in a position where the light isn’t ideal or, heaven forbid, the light is sweet but from the wrong direction (and we aren’t in a position to move to a better spot).

The good news is that light from the wrong direction can add lots of mood to an image. Shooting into the light is tricky to pull off, but if you adhere to my first tip (to know your gear), you can get some pretty interesting images from a less-than-ideal light position. The image below is one such photo:

backlit sprinboks at dawn

5. Shoot wider; shoot closer

Too many wildlife photographers get fixated on what I call the “focal-length debacle,” where it becomes an obsession to have the longest/biggest lens possible.

Now, I know this is location-dependent, as you might need more than 600mm just to get any shot at all in certain wide-open spaces. But the issue I want to tackle is more related to our obsession to get as close as possible to the animals and isolate them totally from their environment. The result is often an image that looks like it could be taken of a captive subject in a controlled location, with a perfectly smooth background and no idea of the real environment in which the animal finds itself.

Instead, challenge yourself to shoot at a wider angle to give the viewer a better idea of where you took the image and where your subject has to eke out a living in the wild. This is applicable to any species you photograph, from a squirrel to a deer to an elephant.

The elephant below was photographed with a wide-angle lens and a polarizing filter to give you a sense of the environment, as well as to make the most of the clouds and sky:

elephant in the landscape as wildlife photography

The flip side to shooting wider is (you guessed it!) shooting closer.

And I mean way closer. Get in-your-face close (by changing your position or by using a longer lens with an optional teleconverter) to create different and interesting studies of the animals and birds you photograph. This will also help you think in terms of more abstract compositional arrangements.

Have a look at this photo of a Cape buffalo, for example:

buffalo abstract close-up of ear

6. The more, the merrier

No real intricate explanation needed on this one. In wildlife photography, one is company and two is often a crowd, especially when there’s food or shelter involved. If you have a good view of more than one member of a species, stay a while!

Look at the images below. First up: a solitary African spoonbill, minding its own business on a perch, happy as can be. Throw another spoonbill into the mix, and you have a recipe for good interaction:

spoonbills in the trees; the more the merrier wildlife photography tip

7. How low can you go?

This is not a trick question, nor is it a call to do the limbo. The point of view of a wildlife photograph is just about everything. How you portray your subject can make all the difference in the world.

In short, try to get an eye-level perspective (or go even lower if you can). This brings the viewer of your image right into the scene and confronts them with the view of the world from your subject’s perspective.

Obviously, what counts as eye-level is relative (you will pretty much always be at a lower perspective than a giraffe, for example), but you get the idea.

Always bear in mind the constraints of your environment. In most reserves in South Africa, you are not allowed to get out of your vehicle in the field. This restricts you to a certain perspective.

Look at the images below for illustration. The first African painted dog was photographed from an open game viewer. The result is a somewhat bland shot; it’s nothing special to my eyes.

The second image, however, was taken lying flat on my stomach in a sandy riverbed not 20 meters from the pack of canines, and the alpha male was checking me out. This perspective makes the image come alive.

wild dogs

8. The content-technical dichotomy

This is an interesting one. Does great content trump a technically great image that includes average content every time?

It may be different where you live, but I am particularly relating this one to the African safari experience. Every tourist wants to see the “big 5,” or at least a lion. But if you’ve ever spent time around wild lions in the daytime, you will know that they are actually shoddy models for photography. They sleep up to 20 hours per day.

Conversely, I have had great photo opportunities from impala, who are the most common ungulate you’ll come across down here in the bush. My advice to the discerning photographer would be to look for great opportunities regardless of the species when the light is good!

Have a look at the contrast between these two images: an impala jumping gracefully and a “standard” portrait of a male lion, both in good light. Which do you prefer?

a lion (above) and a leaping impala (below)

Let’s use a second example, lest it look like I am becoming blasé about the subjects I am fortunate to be able to photograph in our wonderful part of the world:

Squirrels.

Everyone photographs squirrels, right? In the images below, the top squirrel is munching something with nice soft light and a nice low angle. And at the bottom, a mommy is carrying her youngster at a precarious height over a large branch at speed by biting down on the youngster’s stomach flap with it holding on for dear life. The light in the tree canopy wasn’t the best, but this is clearly a case of content trumping a technically good image.

squirrels

The jury is still out on this one. Awesome sightings of lions won’t always provide awesome images. Learn to see the potential in the mundane to create amazing photographic moments, then go out and make good images.

The obvious ideal is to capture a wildlife image with great content in great light shot with just the right settings: the utopian photo that most of us will never get right.

9. Patience isn’t a virtue; it’s a necessity

As a wildlife photographer, your images are predicated on the fact that things in nature are unpredictable.

Anything can happen at any time, but most things happen only rarely. Or, at the very least, they rarely coincide with the exact time that you are in that specific spot.

It is therefore imperative that you become patient. Very patient.

Now, I sometimes catch myself being very impatient out in the field. It’s something you constantly have to work on.

In fact, it’s almost a culmination of many of the things we’ve discussed so far. Observing your subjects and getting to know their behavioral patterns requires a great deal of patience.

Often, the implication is that you need to return to the same spot for days before things start to happen. And even if you do that, you run the risk of nothing happening and wasting your time.

The image below was captured after staking out the tree with the impala kill for more than five hours. I had also driven past this tree many times earlier that day to see if there was any action. I knew the leopard would return, but I had no guarantee that it would return before nightfall.

a leopard ascends a tree to find its kill

10. Be there and enjoy it

I will conclude this lengthy article with the following advice (I do hope you haven’t been bored to tears reading this!):

Be there and enjoy it!

running cheetah wildlife photography example

By this, I don’t just mean that you need to physically show up and be at the right place at the right time (although of course that applies).

I actually mean that you need to be present in the moment. Don’t get so caught up in the technical issues and your settings that you don’t take in the moments you are witnessing while out photographing birds and wildlife. We need to be mindful of the privilege of spending time in nature and being in places where humans haven’t quite exerted their full force.

landing kingfisher wildlife photography example

Maybe for you this is just the most isolated spot in your local park where you can sit and observe and photograph squirrels and birds. Or maybe it’s facing a wild Kodiak bear on the Alaskan floodplains.

giraffe with a rainbow in the background wildlife photography

Regardless, enjoy what you are doing! Have fun doing it! How does it help us to spend so much time on this amazing hobby cum art form if we are not enjoying the time spent?

I hope these wildlife photography tips will stand you in good stead out there in the field. They have for me. Good light and good sightings to you all!

About the author: Morkel Erasmus

After having been an avid naturalist from a very young age, picking up a camera for the first time early in 2009 proved to be a pivotal moment in the life of Morkel Erasmus. Since then, he has been infused with an unbridled passion for capturing forever fleeting moments of natural history and sharing them with people to showcase the wonderful natural heritage of his native Southern Africa, and to create awareness to conserve this heritage for future generations.

“I absolutely love being in the wild and unspoiled places of this world,” says Morkel, “and living in South Africa means there are plenty of those to choose from.”

An industrial engineer by profession and an accomplished artist across many genres, from music to poetry, Morkel has always enjoyed whatever allows him to express his creativity to the fullest. Photography turned out to be the perfect marriage of his engineering brain and artistic soul. Showing off God’s glorious creation is something he enjoys immensely. He is also a Nikon South Africa ambassador.

Besides being widely published, Morkel has been honored for his commitment to his craft with various awards in the short span of his photographic career, most notably by receiving a “Highly Commended” award for one of his images in the 2010 BBC Veolia Wildlife Photographer of the Year competition. Morkel is a devoted husband and a proud father of a beautiful daughter and soon-to-be-born son.

See more from Morkel on his homepage or blog, and connect with him on Facebook, Twitter, 500px, and on Instagram.

The post 10 Tips for Improving Your Wildlife Photography appeared first on Digital Photography School. It was authored by Guest Contributor.


Digital Photography School

 
Comments Off on 10 Tips for Improving Your Wildlife Photography

Posted in Photography


‘Who am I and what am I doing here?’ Introducing Roger Cicala

18 Oct
I like big optics.

A fair number of you probably know me as the Roger who started Lensrentals.com, and some may know I used to be a physician before that. A few know I sold most of my share in Lensrentals.com years ago and since then I’ve hung out as their director of Quality Assurance, Lovely and Talented Spokesmodel, and a major contributor to the blog. Other than QA, I haven’t actually managed anything for years.

When I started Lensrentals I had a lot of conversations with service centers that went like this. Me: “That lens you repaired still sucks”. Person at service center: “No, it’s within specs”. Me: “What are the specs?” Service center: “We can’t tell you”. One day, after I raised hell with a factory service manager, he patted me on the head and said, “testing lenses is complicated; you don’t have the background to understand.”

Any of you who has ever seen a physician after someone says something like ‘you wouldn’t understand; it’s complicated’ knows what happened next. I had no option but to spend a couple of years buying testing equipment, offering internships to really smart optical engineering students, and developing a lens testing center and methodology that was as good as anything in the industry.

Pictured: A lens testing center and methodology that was as good as anything in the industry. This machine doesn’t give us numbers, it’s used to optically adjust lenses in real time.

That probably sounds ridiculous, but the reality is that in 2010, everybody (manufacturers included) was still doing metrology (lens testing) the same way that they’d done it with film cameras in the 60s and 70s. In my previous life I’d done clinical research, and my first hobby was writing medical books for non-medical people; putting complex medical terms in plain words. When I started Lensrentals, I started writing again, blogging about the stuff we were doing.

I ended up doing testing and consulting for several major manufacturers, and a fair number of specialty manufacturers

So a few years later, when a service center told me “it’s within spec” I could send them their specs (because we’d tested enough lenses to know them) and the results from the lens in question and say, “NOPE, it’s not.” If you look back to my blog posts in those days, you’ll see I even posted some examples of what service centers claimed was ‘in spec’ versus what was really happening as well as posting actual MTF (as opposed to computer generated) data. As you might expect, this made me rather unpopular with manufacturers.

We then entered the traditional ‘exchange of threats and legal posturing’ period. I managed to convince most manufacturers that we were just reporting facts (emphasis on most). Eventually they started sending engineers to look at our testing methods. I ended up doing testing and consulting for several major manufacturers, and a fair number of specialty manufacturers. I don’t do that much anymore, since we gave our software and methodology to any that were interested, and most then started doing it themselves.

Test results for a lens that isn’t as sharp as it should be in the center, which actually is unusual. Usually the problems are away from center.

I still have a lab in one of Lensrentals’ buildings, but I just do whatever interests me at the moment. They let me put stuff up on their blog but much of what I write only gets widely seen when DPReview reposts it. I’ve worked behind the scenes with the DPReview staff for years, so when Barney offered me the chance to write directly for DPR we sat down and negotiated. I think the terms are fair; they aren’t going to pay me anything, but they won’t tell me what to write about or to STFU [Editor’s note: we offered to pay Roger but he said ‘I already have enough money’ and I didn’t push the matter in case I misheard].

I expect you might see a disclaimer about ‘the opinions expressed in this article don’t necessarily reflect those of DPReview, anybody who works here, or anybody we even know’ every so often. But otherwise I’ll be writing op-ed pieces here when the mood strikes me and when DPReview has a slow news day.

Roger


The opinions expressed in this article don’t necessarily reflect those of DPReview, its parent company, affiliates, anybody who works here, or anybody we even know.

Articles: Digital Photography Review (dpreview.com)

 
Comments Off on ‘Who am I and what am I doing here?’ Introducing Roger Cicala

Posted in Uncategorized


Slideshow: Winners of the 2020 Wildlife Photographer of the Year competition

18 Oct

Winners of the 2020 Wildlife Photographer of the Year competition

Over 49,000 images were submitted to the 56th annual Wildlife Photographer of the Year competition, put on by the Natural History Museum in London. The Duchess of Cambridge and Patron of the museum, Kate Middleton, announced the Grand Title Winner during the live-streamed ceremony which aired on October 13th.

Sergey Gorshkov spent over 11 months on his overall winning image, ‘The Embrace,’ depicting the rare sighting of an Amur tigress hugging a Manchurian fir. ‘Hunted to the verge of extinction in the past century, the Amur population is still threatened by poaching and logging today. The remarkable sight of the tigress immersed in her natural environment offers us hope, as recent reports suggest numbers are growing from dedicated conservation efforts,’ says Dr. Tim Littlewood – Natural History Museum’s Executive Director of Science.

All winning images will be showcased in an exhibition at the Natural History Museum, starting October 16th. Entries for the next Wildlife Photographer of the Year competition are open on Tuesday, October 19th.

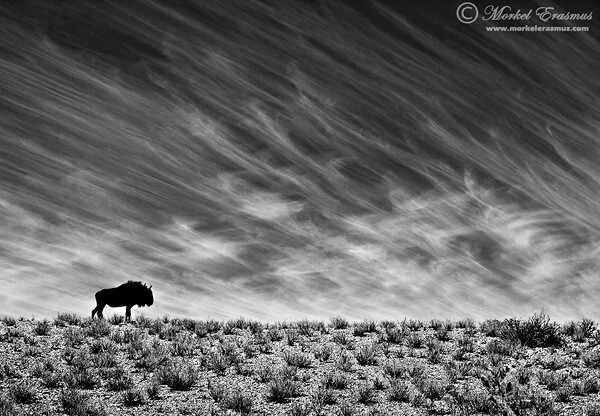
GRAND TITLE WINNER: ‘The Embrace’ by Sergey Gorshkov (Russia)

Sergey Gorshkov/Wildlife Photographer of the Year

Artist Statement: With an expression of sheer ecstasy, a tigress hugs an ancient Manchurian fir, rubbing her cheek against bark to leave secretions from her scent glands. She is an Amur, or Siberian, tiger, here in the Land of the Leopard National Park, in the Russian Far East. The race – now regarded as the same subspecies as the Bengal tiger – is found only in this region, with a small number surviving over the border in China and possibly a few in North Korea.

Hunted almost to extinction in the past century, the population is still threatened by poaching and logging, which also impacts their prey – mostly deer and wild boar, which are also hunted. But recent (unpublished) camera?trap surveys indicate that greater protection may have resulted in a population of possibly 500–600 – an increase that it is hoped a future formal census may confirm. Low prey densities mean that tiger territories are huge.

Sergey knew his chances were slim but was determined to take a picture of the totem animal of his Siberian homeland. Scouring the forest for signs, focusing on trees along regular routes where tigers might have left messages–scent, hairs, urine or scratch marks–he installed his first proper camera trap in January 2019, opposite this grand fir. But it was not until November that he achieved the picture he had planned for, of a magnificent tigress in her Siberian forest environment.

Gear and Settings: Nikon Z-7 + 50mm f1.8 lens; 1/200 sec at f6.3; ISO 250; Cognisys camera-trap system.

Winner, Animal Portraits: ‘The Pose’ by Mogens Trolle (Denmark)

Mogens Trolle/Wildlife Photographer of the Year

Artist Statement: A young male proboscis monkey cocks his head slightly and closes his eyes. Unexpected pale blue eyelids now complement his immaculately groomed auburn hair. He poses for a few seconds as if in meditation. He is a wild visitor to the feeding station at Labuk Bay Proboscis Monkey Sanctuary in Sabah, Borneo–‘the most laid-back character,’ says Mogens, who has been photographing primates worldwide for the past five years.

In some primate species, contrasting eyelids play a role in social communication, but their function in proboscis monkeys is uncertain. The most distinctive aspect of this young male –sitting apart from his bachelor group –is, of course, his nose. As he matures, it will signal his status and mood (female noses are much smaller) and be used as a resonator when calling. Indeed, it will grow so big that it will hang down over his mouth –he may even need to push it aside to eat.

Found only on the island of Borneo and nearby islands, proboscis monkeys are endangered. Eating mainly leaves (along with flowers, seeds and unripe fruit), they depend on threatened forests close to waterways or the coast and –being relatively lethargic –are easily hunted for food and bezoar stones (an intestinal secretion used in traditional Chinese medicine). Mogens’ unforgettable portrait, with the young male’s characteristic peaceful expression–‘quite unlike anything I’ve ever seen on another monkey’–connects us, he hopes, with a fellow primate.

Gear and Settings: Canon EOS-1D X + 500mm f4 lens; 1/1000 sec at f7.1; ISO1250; Manfrotto tripod + Benrogimbal head.

Winner, Behavior, Amphibians and Reptiles: ‘Life in Balance’ by Jaime Culebras (Spain)

Jaime Culebras/Wildlife Photographer of the Year

Artist Statement: A Manduriacu glass frog snacks on a spider in the foothills of the Andes, northwestern Ecuador. As big consumers of invertebrates, glass frogs play a key part in maintaining balanced ecosystems. That night, Jaime’s determination to share his passion for them had driven him to walk for four hours, in heavy rain, through the forest to reach the frogs’ streams in Manduriacu Reserve. But the frogs were elusive and the downpour was growing heavier and heavier. Ashe turned back, he was thrilled to spot one small frog clinging to a branch, its eyes like shimmering mosaics.

Not only was it eating – he had photographed glass frogs eating only once before –but it was also a newly discovered species. Distinguished by the yellow spots on its back and lack of webbing between its fingers, the Manduriacu frog is found only in this small area. The reserve is private but seriously threatened by mining activities permitted by the government (open-pit mining for gold and copper), as well as illegal logging, and the new frog is considered critically endangered.

Serenaded by a frog chorus in torrential rain – he held his umbrella and flash in one hand and the camera in the other – Jaime captured the first ever picture of this species feeding.

Camera + Settings: Sony ILCE-7M3 + 90mm f2.8 lens; 1/100 sec at f16; ISO 320; Yongnuo flash + trigger; softbox.

Winner, Behavior, Birds: ‘Great Crested Sunrise’ by Jose Luis Ruiz Jiménez (Spain)

Jose Luis Ruiz Jiménez/Wildlife Photographer of the Year

Artist Statement: After several hours up to his chest in water in a lagoon near Brozas, in the west of Spain, Jose Luis captured this intimate moment of a great crested grebe family. His camera floated on a U-shaped platform beneath the small camouflaged tent that also hid his head. The grebes are at their most elegant in the breeding season–ornate plumage, crests on their heads, neck feathers that they can fan into ruffs, striking red eyes and pink-tinged bills. They build a nest of aquatic plant material, often among reeds at the edge of shallow water.

To avoid predators, their chicks leave the nest within a few hours of hatching, hitching a snug ride on a parent’s back. Here the backlings will live for the next two to three weeks, being fed as fast as their parents can manage. Even when a youngster has grown enough to be able to swim properly, it will still be fed, for many more weeks, until it fledges.

This morning, the parent on breakfast duty – after chasing fish and invertebrates under water–emerged with damp feathers and a tasty meal, just when not a breath of wind rippled the water and the stripy-headed chick stretched out of its sanctuary, open?beaked, to claim the fish. In soft light and muted reflections, Jose Luis was able to reveal the fine detail of these graceful birds and their attentive parental care.

Camera + Settings: Nikon D4S + 600mm f4 lens + 1.4x teleconverter; 1/800 sec at f6.3; ISO 500; floating hide.

Winner, Behavior, Invertebrates: ‘A Tale of Two Wasps’ by Frank Deschandol (France)

Frank Deschandol/Wildlife Photographer of the Year

Artist Statement: This remarkable simultaneous framing of a red-banded sand wasp (left) and a cuckoo wasp, about to enter next-door nest holes, is the result of painstaking preparation. The female Hedychrum cuckoo wasp –just 6 millimetres long (less than 1/4inch) – parasitizes the nests of certain solitary digger wasps, laying her eggs in her hosts’ burrows so that her larvae can feast on their eggs or larvae and then the food stores.

The much larger red-banded sand wasp lays her eggs in her own burrow, which she provisions with caterpillars, one for each of her young to eat when they emerge. Frank’s original aim was to photograph the vibrant cuckoo wasp, its colors created by the refraction of light from its cuticle (tough enough to withstand the attack of the wasps it parasitizes). In a sandy bank on a brownfield site near his home in Normandy, northern France, he located tiny digger wasp burrows suitable for a cuckoo wasp to use and out of full sun, which would have let too much light into the camera.

He then set up an infrared beam that, when broken by a wasp, would trigger the super fast shutter system he had built using an old hard drive and positioned in front of the lens (the camera’s own shutter would have been too slow). Despite the extremely narrow depth of field and tiny subjects, he captured not only the cuckoo wasp but also the sand wasp. Though these two species don’t regularly interact, Frank was gifted a perfectly balanced composition by the insects’ fortuitous flight paths to their nest holes.

Camera + Settings: Canon EOS 5D Mark II + 100mm f2.8 lens + close-up 250D lens + reverse-mounted lens; 5 sec at f13; ISO 160; customized high-speed shutter system; six wireless flashes + Fresnel lenses; Yongnuo wireless flash trigger; Keyence infrared sensor + Meder Reed relay +amplifier; Novoflex MagicBalance + home-made tripod.

Winner, Under Water: ‘The Golden Moment’ by Songda Cai (China)

Songda Cai/Wildlife Photographer of the Year

Artist Statement: A tiny diamondback squid paralarva flits below in the blackness, stops hunting for an instant when caught in the light beam, gilds itself in shimmering gold and then moves gracefully out of the light. The beam was Songda’s, on a night?dive over deep water, far off the coast of Anilao, in the Philippines. He never knows what he might encounter in this dark, silent world.

All sorts of larvae and other tiny animals –zooplankton–migrate up from the depths under cover of night to feed on surface-dwelling phytoplankton, and after them come other predators. Diamondback squid are widespread in tropical and subtropical oceans, preying on fish, other squid and crustaceans near the surface. In November, hundreds gather off Anilao to spawn.

A paralarva is the stage between hatchling and subadult, already recognizable as a squid, here 6–7 centimetres long (21/2inches). Transparent in all stages, a diamondback squid swims slowly, propelled by undulations of its triangular fins (the origin of their name), but by contracting its powerful mantles, it can spurt away from danger.

Chromatophores (organs just below the skin) contain elastic sacs of pigment that stretch rapidly into discs of color when the muscles around them contract; recent research suggests that they may also reflect light. Deeper in the skin, iridophores reflect and scatter light, adding an iridescent sheen. From above, Songda captured the fleeting moment when, hovering in perfect symmetry, the diamondback paralarva turned to gold.

Camera + Settings: Nikon D850 + 60mm f2.8 lens; 1/200 sec at f20; ISO 500; Seacam housing; Seaflash 150D strobes; Scubalamp lights.

Winner, Earth’s Environments: ‘Etna’s River of Fire’ by Luciano Gaudenzio (Italy)

Luciano Gaudenzio/Wildlife Photographer of the Year

Artist Statement: From a great gash on the southern flank of Mount Etna, lava flows within a huge lava tunnel, re-emerging further down the slope as an incandescent red river, veiled in volcanic gases. To witness the scene, Luciano and his colleagues had trekked for several hours up the north side of the volcano, through stinking steam and over ash-covered chaotic rocky masses –the residues of past eruptions. A wall of heat marked the limit of their approach.

Luciano describes the show that lay before him as hypnotic, the vent resembling ‘an open wound on the rough and wrinkled skin of a huge dinosaur’. It was 2017, and he had been on the nearby island of Stromboli to photograph eruptions there when he heard news of the new vent on what is Europe’s largest volcano. He took the very next ferry, hoping he would arrive in time to see the peak of the latest show.

Mount Etna, which lies on the boundary between the African and Eurasian continental plates, has been erupting continuously for almost 30 years, with shows that include lava flows and lava fountains – just the most recent phase in 15,000 years of volcanic activity, but a warning of its power.

What Luciano most wanted to capture was the drama of the lava river flowing into the horizon. The only way to do that was to wait until just after sunset–‘the blue hour’–when contrasting shadows would cover the side of the volcano and, with a long exposure, he could set the incandescent flow against the blue gaseous mist to capture ‘the perfect moment.’

Camera + Settings: Canon EOS 5D Mark III + 24mm f3.5 lens; 1 sec at f16; ISO 320; Leofoto tripod + ball head.

Winner, Wildlife Photojournalism, Single Image: ‘Show Business’ by Kirsten Luce (United States)

Kirsten Luce/Wildlife Photographer of the Year

Artist Statement: One hand raised signaling the bear to stand, the other holding a rod, the trainer directs the ice-rink show. A wire muzzle stops the polar bear biting back, and blue safety netting surrounds the circus ring. It’s a shocking sight–not because of the massive predator towering over the petite woman in her ice-skating outfit but because of the uneven power dynamic expressed by the posture of the bear and the knowledge that it is not performing by choice.

But for the visitors to the traveling Russian circus –here in the city of Kazan, Tatarstan – it is entertainment. They are ignorant of how the polar bear has been trained and what it might endure behind the scenes – including the fact that, when not performing, it probably spends most of its time in a transportation cage. The polar bear is one of four females, reportedly captured in Russia’s Franz Josef Land when two years old (‘abandoned’, according to the trainer) and still performing 18 years later – valuable property for the Circus on Ice, the only circus known to own polar bears.

For the photographer, who has spent a couple of years reporting on animal exploitation and abuse, this was the most symbolically shocking of all the scenes of exploitation she has shot, featuring as it does such an Arctic icon of wildness.

Camera + Gear: Canon EOS 5D Mark IV + 70–200mm f2.8 lens; 1/500 sec at f4; ISO 2000.

Winner, Wildlife Photojournalist Story Award: ‘Backroom Business’ by Paul Hilton (United Kingdom/Australia)

Paul Hilton/Wildlife Photographer of the Year

Artist Statement: A young pig-tailed macaque is put on show chained to a wooden cage in Bali’s bird market, Indonesia. Its mother and the mothers of the other youngsters on show, would have been killed. Pig?tailed macaques are energetic, social primates living in large troops in forests throughout Southeast Asia. As the forests are destroyed, they increasingly raid agricultural crops and are shot as pests. The babies are then sold into a life of solitary confinement as a pet, to a zoo or for biomedical research.

Having convinced the trader that he was interested in buying the monkey, Paul photographed it in the dark backroom using a slow exposure. Much of the illegal wildlife in the open?air bird market is traded in the backroom areas. Macaques can be legally sold; banned species such as baby orangutans are kept boxed out of sight. Such animal markets facilitate the international illegal trade, supplying on demand what isn’t in stock. So many animals stacked so close together also facilitates the spread of disease.

Camera + Gear: Canon EOS-1Ds Mark II + 16–35mm lens at 16mm; 1/10sec at f3.2; ISO 1600.

Winner, Rising Star Portfolio: ‘Eleonora’s Gift’ by Alberto Fantoni (Italy)

Alberto Fantoni/Wildlife Photographer of the Year

Artist Statement: On the steep cliffs of a Sardinian island, a male Eleonora’s falcon brings his mate food – a small migrant, probably a lark, snatched from the sky as it flew over the Mediterranean. These falcons – medium-sized hawks – choose to breed on cliffs and small islands along the Mediterranean coast in late summer, specifically to coincide with the mass autumn migration of small birds as they cross the sea on their way to Africa.

The males hunt at high altitudes, often far offshore, and take a wide range of small migrants on the wing, including various warblers, shrikes, nightingales and swifts. Outside the breeding season, and on windless days when passing migrants are scarce, they feed on large insects. When the chicks are fledged, they all head south to overwinter in Africa, mainly on Madagascar.

Alberto was watching from a hide on San Pietro Island, from where he could photograph the adults on their cliff-top perch. He couldn’t see the nest, which was a little way down the cliff in a crevice in the rocks, but he could watch the male (much smaller and with yellow around his nostrils) pass on his prey, observing that he always seemed reluctant to give up his catch without a struggle.

Camera + Gear: Canon EOS 7D Mark II + 500mm f4.5 lens; 1/2000 sec at f7.1 (+1 e/v); ISO 800; hide.

Winner, Wildlife Photographer of the Year Portfolio Award: ‘The Last Bite’ by Ripan Biswas (India)

Ripan Biswas/Wildlife Photographer of the Year

Artist Statement: These two ferocious predators don’t often meet. The giant riverine tiger beetle pursues prey on the ground, while weaver ants stay mostly in the trees–but if they do meet, both need to be wary. When an ant colony went hunting small insects on a dry riverbed in Buxa Tiger Reserve, West Bengal, India, a tiger beetle began to pick off some of the ants. In the heat of the midday sun, Ripan lay on the sand and edged closer.

The beetle’s bulging eyes excel at spotting invertebrate prey, which it sprints towards so fast that it has to hold its antennae out in front to avoid obstacles. Its bright orange spots – structural color produced by multiple transparent reflecting layers–may be a warning to predators that it uses poison (cyanide) for protection. At more than 12 millimetres long (half an inch), it dwarfed the weaver ants. In defence, one bit into the beetle’s slender hind leg. The beetle swiftly turned and, with its large, curved mandibles, snipped the ant in two, but the ant’s head and upper body remained firmly attached.

‘The beetle kept pulling at the ant’s leg,’ says Ripan, ‘trying to rid itself of the ant’s grip, but it couldn’t quite reach its head.’ He used flash to illuminate the lower part of the beetle, balancing this against the harsh sunlight, as he got his dramatic, eye-level shot.

Camera + Gear: Nikon D5200 + Tamron 90mm f2.8 lens; 1/160 sec at f8; ISO 160; Viltrox ring flash.

Winner, 10 Years and Under: ‘Perfect Balance’ by Andrés Luis Dominguez Blanco (Spain)

Andrés Luis Dominguez Blanco/Wildlife Photographer of the Year

Artist Statement: In Spring, the meadows near Andrés’ home in Ubrique, in Andalucia, Spain, are bright with flowers, such as these sweet-scented sulla vetches. Andrés had walked there a few days earlier and seen European stonechats hunting for insects, but they were on the far side of the meadow. He regularly sees and hears stonechats, their calls like two stones tapping together.

They are widespread throughout central and southern Europe, some – such as those around Andrés’ home–resident year round, others overwintering in northern Africa. Andrés asked his dad to drive to the meadow and park so he could use the car as a hide, kneel on the back seat and, with his lens on the window sill, shoot through the open windows. He was delighted to see stonechats flying close by, alighting on any stem or stalk as a vantage point to look for worms, spiders and insects.

It was already late in the day, and the sun had gone down, but it seemed that the low light intensified the birds’ colors. He watched this male closely. It often landed on branches or the top of small bushes, but this time it perched on a flower stem, which began to bend under its delicate weight. The stonechat kept perfect balance and Andrés framed his perfect composition.

Camera + Gear: Fujifilm X-H1 + XF 100–400mm f4.5–5.6 lens; 1/50 sec at f5.6; ISO 800.

Winner, 11 – 14 Years Old: ‘A Mean Mouthful’ by Sam Sloss (Italy/United States)

Sam Sloss/Wildlife Photographer of the Year

Artist Statement: On a diving holiday in North Sulawesi, Indonesia, Sam stopped to watch the behavior of a group of clownfishes as they swam with hectic and repeated patterns in and out and around their home, a magnificent anemone. He was intrigued by the expression of one individual, the result of its mouth being constantly open, holding something.

Clownfish are highly territorial, living in small groups within an anemone. The anemone’s stinging tentacles protect the clownfish and their eggs from predators – a clownfish itself develops a special layer of mucus to avoid being stung. In return, the tenants feed on debris and parasites within the tentacles and aerate the water around them and may also deter anemone?eating fish.

Rather than following the moving fish in his viewfinder, Sam positioned himself where he knew it would come back into the frame. It was only when he downloaded the photos that he saw tiny eyes peeping out of its mouth. It was a ‘tongue-eating louse’, a parasitic isopod that swims in through the gills as a male, changes sex, grows legs and attaches itself to the base of the tongue, sucking blood. When the tongue withers and drops off, the isopod takes its place. Its presence may weaken its host, but the clownfish can continue to feed.

Sam’s image, the reward for his curiosity, captures the three very different life forms, their lives intertwined.

Camera + Gear: Nikon D300 + 105mm f2.8 lens; 1/250 sec at f18; ISO 200; Nauticam Housing + two INON Z-240 strobes.

Winner, 15 – 17 Years Old: ‘The Fox that Got the Goose’ by Liina Heikkinen (Finland)

Liina Heikkinen/Wildlife Photographer of the Year

Artist Statement: It was on a summer holiday in Helsinki that Liina, then aged 13, heard about a large fox family living in the city suburbs on the island of Lehtisaari. The island has both wooded areas and fox-friendly citizens, and the foxes are relatively unafraid of humans. So Liina and her father spent one long July day, without a hide, watching the two adults and their six large cubs, which were almost the size of their parents, though slimmer and lankier.

In another month, the cubs would be able to fend for themselves, but in July they were only catching insects and earthworms and a few rodents, and the parents were still bringing food for them –larger prey than the more normal voles and mice. It was 7pm when the excitement began, with the vixen’s arrival with a barnacle goose.

Feathers flew as the cubs began fighting over it. One finally gained ownership–urinating on it in its excitement. Dragging the goose into a crevice, the cub attempted to eat its prize while blocking access to the others. Lying just metres away, Liina was able to frame the scene and capture the expression of the youngster as it attempted to keep its hungry siblings at bay.

Camera + Gear: Nikon D4 + 28–300mm f3.5–5.6 lens; 1/125 sec at f5.6 (-0.3 e/v); ISO 1600.

Articles: Digital Photography Review (dpreview.com)

 
Comments Off on Slideshow: Winners of the 2020 Wildlife Photographer of the Year competition

Posted in Uncategorized


Photography as Therapy: How To Keep Your Mind Positively Occupied

17 Oct

The post Photography as Therapy: How To Keep Your Mind Positively Occupied appeared first on Digital Photography School. It was authored by Kevin Landwer-Johan.

Using your camera as a tool for photography as therapy is a healthy habit to develop. Often artists produce some of their best work when they are feeling pressured or stressed. Creative expression is a fabulous way to release tension when you are feeling down.

Creative minds tend to be more sensitive and respond differently to the stresses life can bring. By picking up your camera and engaging in the creative expression of photography, therapy happens.

photography as therapy meditating
© Kevin Landwer-Johan

Why it’s good to engage in photography as therapy

By picking up your camera and taking photos, you are helping your mind focus on something other than what’s causing you stress.

(Unless your camera or creative process is the cause of your angst, that is. Hopefully, that is not the case.)

I know that, whenever I am taking photos of a subject I find interesting, I am in a very different mental space. I concentrate more intensely and can easily forget about what might be worrying me.

Focus on what you enjoy and it will be therapeutic. As you have your camera in hand and give your attention to being creative, your mind will give more space to positive, constructive thoughts than the negative ones you may have been dwelling on.

Meditate on what you are doing. The more you can clear your mind of thoughts that are worrying you and concentrate on taking photos, the more you will see great results. If you can, follow your feelings as you are taking photographs. Infuse the feelings into your pictures, and you may soon begin to feel better as your mood changes.

Being creative generally requires positivity to a certain degree for most artists. As you put your energy into taking photos, you will hopefully notice a change as you stick to your constructive thoughts. The more you focus on taking photos, the more your negative thoughts and feelings will diminish.

Woman taking a photo for photography therapy
© Kevin Landwer-Johan

Regularly practice photography therapy

The more frequently you do anything, the better you become at doing it. Photography as therapy, when practiced frequently, can help improve how you feel.

Concentrating when you’re stressed can be challenging. By committing to regularly taking photos, even for 15 minutes a day, you’ll most likely find that you can concentrate better and for longer. You’ll also see an improvement in your photography skills and creative expression.

Make time to take photos. Photography therapy will not happen unless you commit time and energy. As you press on and make a daily habit of photography, you will experience being more satisfied and will feel free from what’s been bothering you.

Photography is not likely to eliminate all your problems, but it can at least give your mind a break from them. 

You may also find that, as you have your camera in hand and your attention is given to positive thoughts, potential solutions to your problems will come to mind. 

Woman with a film camera for photography as therapy
© Kevin Landwer-Johan

Work on a photography project

To help keep yourself engaged in photography, having a project to regularly work on is beneficial. Knowing each day what you’ll photograph means you can grab your camera and take photos without having to search for a subject.

If you’re someone who finds it challenging to find new subjects, creating a project for yourself will enable you to be more productive. That way, you won’t waste time trying to decide what to photograph.

Pick a theme for your photography project that you know you’ll enjoy. Photographing what you love will naturally help you take more creative photos. By capturing the same subject or theme over a period of time, you’ll make more diverse photos than if you only photograph a subject occasionally.

Working on a photography project will help you develop as an artist. Once you’ve been working on your project for a while, you’ll be able to look back over the body of work you’ve created and see how you are progressing.

Take the time to study the photos you’ve made. Analyze them and consider how you’d like to progress with your project. By reflecting on the photographs you are making, you can discover new ways of seeing and expressing yourself through your photography.

I love gardening and being in my garden, but I have never been particularly interested in photographing it. Now I am challenging myself to take photos in my garden often because I want to get better at this style of photography.

Without commitment and without pushing myself to photograph my garden regularly, I know I’ll never get better at it. I’m not expecting to take masterpiece photos as I begin. But I do hope that, in time, I’ll be able to capture some images that I’ll be satisfied with. 

Pressing forward with this project has challenged me to improve my photography. The deliberate concentration helps me to remain focused on my creative expression. When I have time, or when I see that the light is particularly beautiful, I can pick up my camera and begin photographing without having to stop and think about what to take pictures of.

tricycle taxi project photo
© Kevin Landwer-Johan

Get inspired by the photography of others

If you’re not sure where to start, pick up a book or look at the websites of some of your favorite photographers. 

When you are stressed and in need of some photography therapy, it can be difficult to find inspiration on your own. At times like this, it’s helpful to look at the work of other photographers with an open mind; that way, you can find new ideas. 

Don’t confine your sources of inspiration to photography. Draw ideas from music and other art forms. You might pick a theme to photograph based on one of your favorite songs or movies. Think outside the box a little more than normal as you look, listen, and feel the art you love.

Learn by mimicking, in some ways, other creatives you admire. Picasso said, “Good artists copy, great artists steal.” Take ideas from others and make them your own. Don’t merely copy something that you like. Put your own expression into it so that you truly own it.

Two Kayan long neck girls
© Kevin Landwer-Johan

Share your photography therapy experience

Many photographers prefer to work alone. Being with your camera and having no one else around can help you concentrate better. But, at times, being with other photographers and comparing notes is helpful, too. Group photography therapy can help you develop your creative expression in new ways.

Find a few people who enjoy the same style of photography and subject matter as you. Plan photography sessions together and engage with each other as you are taking your pictures.

Get together over a coffee and discuss your photos. This will help you all grow as you discover how others see and photograph the same subjects. It’s not a competition. Don’t make it one. Treat it as an encouraging time to build each other up, and you’ll all begin to see an improvement in the pictures you’re taking. 

Two cameras for photography therapy
© Pansa Landwer-Johan

Photography as therapy: Conclusion

Be purposeful about photography as therapy. Practice being mindful and having your camera in your hands frequently. 

As you make yourself take photographs regularly, you’ll begin to notice how much easier it is to concentrate on what you are doing. You’ll start to see your creativity increase, your photography improve, and the stresses of life begin to fade away.

The post Photography as Therapy: How To Keep Your Mind Positively Occupied appeared first on Digital Photography School. It was authored by Kevin Landwer-Johan.


Digital Photography School

 
Comments Off on Photography as Therapy: How To Keep Your Mind Positively Occupied

Posted in Photography