RSS
 

Archive for August, 2020

Blackmagic adds Windows support for BRAW 2.0 with DaVinci Resolve 16.3 update

10 Aug

Blackmagic Design has released DaVinci Resolve 16.3 Beta 2, DaVinci Resolve 16.3 Studio Beta 2 and Blackmagic RAW 2.0 Beta 2. Together, these updates add support for viewing and editing Blackmagic RAW 2.0 footage on Windows computers.

Just last month, Blackmagic Design released the Blackmagic RAW 2.0 Beta 1, which added Blackmagic’s new fifth-generation color science, support for dual card recording and support for the new URSA Mini Pro 12K. In addition to general performance and stability improvements, this second beta also adds support for Blackmagic RAW 2.0 on Windows computers.

To accompany the Blackmagic RAW 2.0 update, Blackmagic has also released the second beta of its DaVinci Resolve 16.3 and DaVinci Resolve 16.3 Studio programs. For those unfamiliar, the non-Studio version of DaVinci Resolve is free to use, but limits project mastering and output to Ultra HD (UHD 4K) resolution or lower, and doesn’t offer additional support for multiple GPUs, advanced editing tools and more.

The highlighted area on this page contains the download links for the latest updates.

You can find both macOS and Windows downloads for DaVinci Resolve 16.3 Beta 2, DaVinci Resolve 16.3 Studio Beta 2 and Blackmagic RAW 2.0 Beta 2 on Blackmagic Design’s support page, halfway down on the left-hand side, under the section labeled ‘Latest Downloads.’

Articles: Digital Photography Review (dpreview.com)

 
Comments Off on Blackmagic adds Windows support for BRAW 2.0 with DaVinci Resolve 16.3 update

Posted in Uncategorized


Drone filmmaker Nathan McBride on DJI Mavic Air 2: ‘it’s like nothing else’

10 Aug

The DJI Mavic Air offers 48MP stills and 4K/60p video recording in an ultra-compact, folding body. A significant update to the original Mavic Air, the Air 2 is DJI’s smartest drone to date, and includes HDR capture, scene recognition to optimize the look of footage depending on your subject, as well as a suite of safety features, including front, rear and underside object avoidance sensors. Meanwhile, Spotlight 2.0 keeps the camera locked on a subject, and ActiveTrack 3.0 keeps subjects automatically centered, letting you concentrate on flying.

Should your flight still somehow get into trouble, DJI Care Refresh* (available separately or bundled with the Mavic Air 2 on Amazon for a special price of $ 1,049) covers up to two replacement drones per year.

Adventure filmmaker Nathan McBride was one of the first people to use the Mavic Air 2, and had just started working on a promotional video when the COVID-19 pandemic hit the US. In this interview he talks about the challenges of working with the Mavic Air 2 as the country shut down around him.

* DJI Care Refresh+ is also available, covering one more replacement drone for an additional year, for a small surcharge. Click here for more details.


What’s your background in photography and videography?

I started working in video about four or five years ago, doing action sports and story-based content. I also worked in the short film world for a while and then moved into commercials. For the last five or so years that’s been my full-time job.

The last two years I started diving into drone photography and videography pretty heavily.

Nathan McBride is a photographer and videographer based in Phoenix Arizona. He’s been using drones in his filmmaking for several years, and recently had the opportunity to create a launch video using the new DJI Mavic Air 2.

See more of Nathan McBride’s work on his website, Instagram and on YouTube.

What are the primary ways in which the technology has evolved since you’ve been using drones?

Size is the obvious one, and it’s so important. These days, so much filmmaking is run-and-gun style. How fast you can get up and running, and how safely, is really important. With these new drones, you can be hiking up a volcano with it in your backpack, pull it out, and you can be filming in minutes.

Build quality has improved over the generations, and battery life, too. Drone operators five or six years ago did not have the same flexibility and mobility as we do now. And it’s so much more affordable now, to become a drone pilot. It’s unreal.

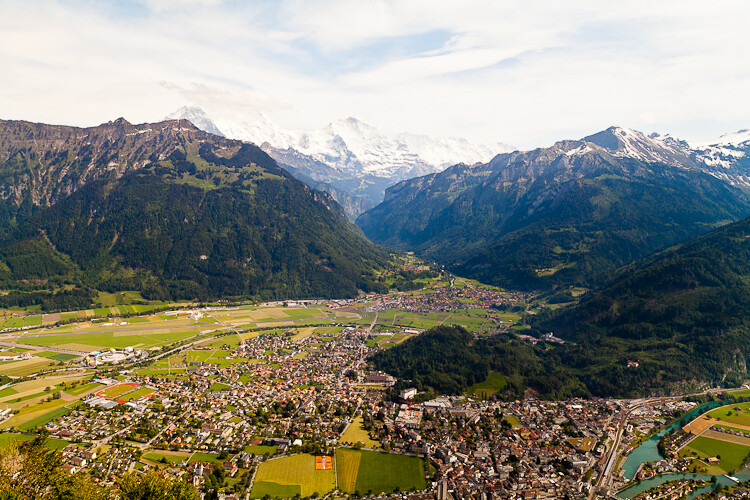
Put a drone up in the air, and you can get a whole different perspective

What does working with a drone let you do, that a conventional camera rig wouldn’t?

Drones are cameras in 3D space. You can put a drone wherever you want. I love the potential you have with drones for movement. I started diving into the drone space just thinking ‘what could this look like?’ And instead of the conventional kind of drone shot, from high up, moving slowly, I decided that I was going to fly my drone like it was a gimbal, or get footage that looks like a hyperlapse.

There are only a certain number of angles you can get from ground level. But put a drone up in the air, you can get a whole different perspective. It’s like nothing else. You can put the camera wherever you want. That’s what I love about drones, and I want to keep pushing my filmmaking using that technology.

Nathan pictured in the desert near Hanksville, Utah.

How does preparing for a drone shoot differ from preparing for a normal stills or video shoot?

Weather is a massive factor. If the weather isn’t right, you can’t fly. There’s a lot of planning involved. I’m very much an ‘on the fly’ kind of creative, and I like working quickly, but it’s important to have a general sense of what you want to get out of a location before you go.

I’ll often do discovery flights. For example I went to a spot in Texas recently, and we shot a video there. I had the Mavic Air 2, and I knew I wanted to get really low to the water, through the trees. There were certain textures I was looking for, so I did a discovery flight, just to look around, see what looked good, where the sunlight was coming from, and to get a feel for how safe it was to fly, where the gaps were between the trees and things like that. Once I’ve done that, I’ll put in a fresh battery and start filming.

I ended up with three weeks to shoot, and decided I was just going to have to use every single day, and hit every location I could

What’s your favorite of the drone projects you’ve worked on?

Probably this video, with the Mavic Air 2. I was originally meant to fly to Brazil to shoot, but then the coronavirus hit, and things got really bad, really fast. The project turned into a road trip around the US – Arizona to Utah, then Oregon, then down the California coast. That was the plan, but then everything started falling apart.

Often I’d drive for hours to shoot at locations that ended up being closed, but I didn’t want to fail, so I decided just to do as much as I could, wherever I could. I ended up with three weeks to shoot, and decided I was just going to have to use every single day, and hit every location I could until I got what I needed. A lot of it was very last-minute.

The DJI Mavic Air 2 is a tiny, powerful drone which folds up to be very compact. This makes it ideal for travel and outdoor adventure work.

In the video you describe shooting in your ‘back yard’. That’s a big back yard!

Yeah! I live in Phoenix Arizona, and I was shooting everywhere from within a few minutes from my house, all the way out across the state. I think the farthest I went was about seven hours north. People see the video, and see that part of it was filmed in the snow, and part was filmed in the desert, and they don’t believe that it was all shot in the same area, but those two locations were probably only about 45 minutes away from one another.

It was fun to have a month, basically, where I didn’t shoot anything else.

The snow was just good luck – I had driven to Flagstaff to get my buddy back to the airport, and we woke up to about three feet of fresh snow. So we made the most of it. Because I was shooting every day, I knew I’d win eventually!

It was fun to have a month, basically, where I didn’t shoot anything else. I didn’t pick up my DSLR, I didn’t pick up my other drones, I just shot with the Mavic Air 2. The first time I took the Mavic Air 2 up, I was amazed by how smooth it was, and the quality of the footage, especially at night. The handling is so good, it doesn’t feel like a consumer product.

Nathan’s road trip took him across the southwest states of the US, shooting with the Mavic Air 2.

Where’s your favorite location to shoot?

Bali, Indonesia. It’s one of those spots where you can find shots everywhere you look. It was a real eye-opener. I was able to get so many different shots there. I’d say that Nusa Penida, which is an island just off the coast of Bali, is my favorite place.

What’s your advice for someone just getting into drone shooting?

Always shoot H.265 if you can. There’s definitely a difference when it comes to post-production. And make sure you have enough light. Get a good set of ND filters – hitting your optimal shutter speed is key. And if it’s safe, and you’re not around people, fly as low as you can. Having foreground detail in your shots is a game-changer. The motion blur from having foreground elements makes the footage look so filmic. Obviously it’s risky, and you’ll need to practice.

Droning is all about immersing yourself in the environment that you’re in

Also don’t rush – leave yourself enough time. Droning is all about immersing yourself in the environment that you’re in. Slow down, actually take a breath, and find the angles that you want to explore. And do it safely.

Always have someone with you, to be a spotter, and be respectful. Don’t fly near people, and don’t go where you’re not meant to go. But most importantly, go out and explore and have fun because in the end that’s what it’s all about.


This is sponsored content, created with the support of DJI. What does this mean?

Articles: Digital Photography Review (dpreview.com)

 
Comments Off on Drone filmmaker Nathan McBride on DJI Mavic Air 2: ‘it’s like nothing else’

Posted in Uncategorized


Olympus Announces the OM-D E-M10 Mark IV, With 20 MP and an AF Boost

10 Aug

The post Olympus Announces the OM-D E-M10 Mark IV, With 20 MP and an AF Boost appeared first on Digital Photography School. It was authored by Jaymes Dempsey.

Olympus OM-D E-M10 Mark IV announcement

Earlier this year, Olympus made news with the reveal that it will be selling off its camera division, yet it seems that the company plans to go full steam ahead (at least for now).

Because Olympus has just unveiled its latest Micro Four Thirds camera model, the OM-D E-M10 Mark IV, a compact, low-cost, travel-ready option for entry-level photographers and successor to the well-received OM-D E-M10 Mark III.

Olympus cameras are known for their small size and limited weight, thanks to the compact dimensions of a Four Thirds sensor. This makes Olympus models a favorite of travel and street photographers, especially when you factor in the size of the lenses (which are some of the most compact options on the market, and will feel positively dainty in your hands).

But the OM-D E-M10 Mark IV takes portability to a new level, coming in at just 0.85 lbs (0.385 kg), which is the lightest of any Olympus mirrorless model to date. It’s perfect for anyone looking to shave off weight from their camera bag, and stays featherlight even when combined with some of Olympus’s longer zoom lenses.

The main drawback to a Micro Four Thirds system is limited resolution, which is why the OM-D E-M10 Mark III only offered a 16 MP sensor. But Olympus has finally decided to give the Mark IV a megapixel boost, up to 20 MP for added detail, which increases both cropping capabilities and printing possibilities, though you should also expect a potential hit to high ISO performance and dynamic range.

Personally, I’d like to see a 24 MP MFT sensor, but this still isn’t a spec offered by Olympus’s higher-end models, so I doubt we’ll see it on a camera like the OM-D E-M10 anytime soon. Plus, 20 MP really is enough for most purposes, including relatively large prints, so there’s not really much worth complaining about.

Moving along, Olympus offers the best in-body image stabilization in the business, which is why you can expect up to 4.5 stops of IBIS on an entry-level model like the OM-D E-M10 Mark IV. This will allow for tack-sharp images at shutter speeds far beyond what would normally be considered possible, as well as smooth video recording (and did I mention that the camera offers 4K?).

As for additional noteworthy specs, the OM-D E-M10 promises improved autofocus over the E-M10 Mark III, thanks to upgraded tracking algorithms, as well as 8.7 fps continuous shooting speeds; also relevant is an interesting flip-down LCD design, which allows you to see previews of images and footage from in front of the camera, but by tilting the LCD below the camera.

Olympus OM-D E-M10 Mark IV

Oh, and you get Olympus’s now-standard electronic viewfinder resolution, at 2.36M dots. I didn’t expect anything better (there are only so many upgrades you can make to a camera at a sub-$ 1000 USD price), but Olympus’s EVF game is frustratingly limited, even on its higher-end models, and I’d ideally like to see a resolution boost here.

The Olympus OM-D E-M10 Mark IV will debut in late September, for a relatively cheap MSRP of $ 699.99 (body only). It is available for preorder here.

Now over to you:

What do you think of Olympus’s latest mirrorless model? Are you impressed? Disappointed? Are there any features that the E-M10 Mark IV is lacking but that you’d like to have seen? Share your thoughts in the comments!

The post Olympus Announces the OM-D E-M10 Mark IV, With 20 MP and an AF Boost appeared first on Digital Photography School. It was authored by Jaymes Dempsey.


Digital Photography School

 
Comments Off on Olympus Announces the OM-D E-M10 Mark IV, With 20 MP and an AF Boost

Posted in Photography


Interview: Photographer Cath Simard talks about developing your own unique style

10 Aug

Introduction

Above: El Chaltén, located in the Argentine side of Patagonia, is known as the National Capital of trekking.

I first stumbled across Cath Simard’s work on Instagram and was instantly mesmerized by its beauty. Not only does the Canadian photographer capture stunning and unsullied locations around the globe, she’s developed a distinctive style. Every photographer serious about making a living with their work especially needs to focus on creating an aesthetic that makes them instantly recognizable.

Simard’s humble, down-to-earth demeanor and grace dealing with the occasional critic is also refreshing. I got a chance to catch up with the former model and find out how she got into photography, why she’s passionate about teaching others her methods, and how traveling solo altered her outlook.

What inspired you to get into photography?

Above: This campsite, located at an altitude well above 4,000 meters, was the perfect site to capture the night sky against the Andes Mountains in Peru.

I started in the creative industry as a model when I was 15 years old. I modeled for ten years and worked as an Art Director and fashion stylist for four years. I’ve always been attracted to the visual arts but I would have never thought I’d be a photographer one day. Then, back in 2014, I got tired of the fashion industry. I decided to sell all my belongings and buy a one-way ticket to Australia with very little money in the bank.

I did farm work for two years over there, documenting my journey with my iPhone. I was approached by an Australian bandana company to take photos of their products. I said yes, immediately, even if I had no experience using a camera or in professional shooting. I decided to purchase a Sony a6000 with a 35mm F1.8 lens and started photographing people wearing bandanas doing outdoor activities.

Why did you gravitate toward nature?

Above: After a long evening hike, the best was made of a foggy morning in the mountains of Peru.

After completing my farm work, I decided to go on a three-month solo trip covering Indonesia, Hawaii, and Western Canada. Never before had I seen such huge mountains as when arriving in Alberta. The feeling I got when I saw them for the first time is indescribable. It was in Alberta I discovered my passion for hiking and I was introduced to scrambling, which allowed me to access more remote areas and reach viewpoints that have never been photographed before.

I started to document my adventures and fell in love with photographing the mountains, specifically. It was the first time in my life I found something that made me feel whole and brought me so much joy and energy.

How were you inspired to grow into offering workshops?

Above: Here are the Cerro Yerupajá and Siula Grande mountains, in Peru, amongst other giants, captured between 2:00 and 3:00 am.

Three years ago, a company from Quebec (my hometown) asked me if I would be interested in teaching photography to a group of 10 people for one day. It was something I have never done before and I was curious to find out if it is something I’d enjoy, so I said ‘yes.’ That day was quite a revelation for me – the amount of excitement, satisfaction, and the feeling of accomplishment I got from teaching each student was indescribable. A new passion was born.

After this experience, I decided to combine my passion for teaching, hiking and traveling into unique international photography workshops for people to learn photography while completely immersing themselves in nature. I highly enjoy spending time with people that have similar interests, sharing my knowledge, and giving as much insight as possible so they can return home with images they are proud of.

Which photo are you most proud of and why?

Above: My favorite photo to date was captured at Jasper National Park in the Alberta province of Canada.

I don’t have one in particular but, in general, the images I’m the proudest of are the ones where I followed my own personal creative vision. They often involve a lot of physical work and perseverance. Being unique is also something I value and prioritize a lot, so I’d say that my favorite images usually have a unique and original compositional component or mood along with a great story behind them.

What gear are you using lately?

Above: I wanted to capture this ice cave in Iceland at night. Although I didn’t get Northern Lights when I took this particular image, I decided to composite it with a night sky I captured a couple of days before.

I use the Sony a7R III + 16-34mm F2.8 lens for 80% of my images. I also love the Sony 100-400mm F4.5-5.8 lens for tighter shots of mountain peaks and compression.

What is your favorite photo editing software?

Above: This image was taken with a drone at El Chaltén National Park. It’s important to note that you need a permit to fly inside the borders of a National Park, or you need to take off outside the border.

I used to say Lightroom Classic CC, but I’ve been experimenting much more with Photoshop over the last year. I like to combine both software programs for my editing.

You’ve traveled extensively. Do you have a favorite place? If so, why?

Above: My favorite image from 2019 was taken at Torres del Paine National Park in Chile’s Patagonia region.

I simply cannot choose between Patagonia and Peru. I love the variety in landscape and wilderness that Patagonia offers and the remoteness and untouched beauty of Peru. Both places demand that you put work into creating great images – especially Peru, since you need to trek in high altitude for many days to reach interesting viewpoints.

Any destinations you wish to visit?

Above: Also captured in El Chaltén, I challenged myself to get out of my comfort zone by creating something interesting out of an average foreground and backdrop.

I would love to explore Alaska – especially its giant snow-covered peaks, glaciers, lakes, and ice caves. It seems this part of the world has it all!

What grounds you and keeps you inspired?

Above: I spent all night photographing the Andes Mountains in Peru. Obviously the Milky Way doesn’t bend in an arch but I had some fun with compositing to create this effect.

Traveling solo multiple times allowed me to do discover hidden parts of myself through self-reflection and introspection. I think that introspection is essential for becoming a better person and it is the single most powerful tool for internal self-awareness and how to find true happiness.

When you take the time to become an expert, you make better decisions, you are more confident, you learn to respect your limits which all brings you closer to live the life you want. You worry less about what other people think of you, you become more empathic to others, and have a more positive attitude towards life.

This is definitely easier said than done. You need to find a time and space for this, and to me this happens whenever I’m alone hiking in the mountains. It’s like a meditation that grounds me and helps me get back to what’s important in life.

Other tools that help are self improvement books such as How to Win Friends and Influence People by Dale Carnegie and What to Say When You Talk to Yourself by Dr. Shad Helmstetter, to name a few.

What advice do you have for someone looking to develop their own style?

Above: A final perspective of El Chaltén, located in Patagonia.

Pick three photographers that inspire you and analyze their images. Why do they speak to you? Try to identify the elements that you like in their photos and look for them when you are shooting or editing. I do believe that imitating – not copying – is a great way to learn and find your own personal style.

Another thing is to listen and trust your creative instinct. For example, I started creating composites at a very early stage of my learning process. Compositing has always been a creative way for me to express myself but it has always attracted negative comments. I’ve often been told that my images were too contrasting, too blue or too Photoshopped.

If I would have left these comments get to me and influence the way I create, I would never be where I am today as an artist. The moral of the story for me is to ignore negative comments and only take constructive criticism from people you trust and who you know truly believe in you.

Lastly, developing your style takes time. A lot of a time. So be patient, learn new techniques and practice as much as you can.


Catherine Simard is a Canadian-born self-taught travel/landscape photographer and digital artist with a passion for the outdoors and the wilderness. She is a Sony Artisan of Imagery. Simard will be resuming workshops at various international destinations in 2021.

Articles: Digital Photography Review (dpreview.com)

 
Comments Off on Interview: Photographer Cath Simard talks about developing your own unique style

Posted in Uncategorized


12 Tips to Help You Capture Stunning Landscape Photos

09 Aug

The post 12 Tips to Help You Capture Stunning Landscape Photos appeared first on Digital Photography School. It was authored by Kav Dadfar.

Whether you are an experienced photographer or just getting started, the amazing landscape photographs you see have all got a few things in common. The reality of landscape photography is that not only are you reliant on your own ability and skill of seeing and composing an image, but also on Mother Nature. But regardless of whatever weather you encounter, there are countless opportunities to be able to capture spectacular landscape photographs.

Here are 12 tips that you can follow if you want to capture stunning landscape photos.

KD-2016-DPS-Landscape Tips-7

1. Location, location, location

Landscape photography is as much about planning as it is about the actual process of photography. You should always have a clear idea of where you are planning to go, and at what time of the day you will be able to capture the best photograph. Learn how to read maps, and understand how you can utilize them to find the perfect location. By planning your exact location, you will be able to maximize your time there, and ensure not only that you get to your location safely and in plenty of time, but also that you find your way back (usually after sunset).

2. Be patient

It’s amazing the number of times that the elements conspire to ruin a perfectly composed photograph. Landscape photography requires patience, just in case that white cloudy sky disperses just long enough to allow the sun to break through for you to take your shot. The key is to always allow yourself enough time at a location so that you are able to wait if you need to. Forward planning can also help you hugely, so make sure to check weather forecasts before leaving, maximizing your opportunity for the weather you require.

KD-2016-DPS-Landscape Tips-4

3. Don’t be lazy

One of the reasons we are often stunned by impressive landscape photos is because it is a view taken in a way that we have never seen before. A photo taken from the top of a mountain which requires a huge amount of time and effort to get to is a view that most people won’t get to see for themselves. So don’t rely on easily accessible viewpoints that everyone else can just pull up to and see. Instead, look for those unique spots (provided they are safe to get to) that offer amazing scenes, even if they require determination to get there.

4. Use the best light

Light is one of the most important factors in any photograph, but even more so in landscape photography. It really doesn’t matter how great the location, is or how you compose your photo – if the light doesn’t do the scene justice, then the image will fail. The best light for landscape photography is early in the morning or late afternoon, with the midday sun offering the harshest light.

But part of the challenge of landscape photography is about being able to adapt and cope with different lighting conditions; for example, great landscape photos can be captured even on stormy or cloudy days. The key is to use the best light as much as possible, and be able to influence the look and feel of your photos with it.

KD-2016-DPS-Landscape Tips-3

5. Carry a tripod

Simply put, if you want to capture the best photographs, at the best time of the day, at the highest quality possible, then a tripod is an essential piece of equipment. Photography in low light conditions (e.g. early morning or early evening) without a tripod would require an increase in ISO to be able to avoid camera shake, which in turn means more noise in your images. If you want to capture a scene using a slow shutter speed or long exposure (for example, to capture the movement of clouds or water) then without a tripod you simply won’t be able to hold the camera steady enough to avoid blurred images from camera shake.

6. Maximize the depth of field

Choosing your depth of field is an important part of capturing stunning landscapes. Landscape photos usually require the vast majority of the photo to be sharp (the foreground and background) so you need a deeper depth of field than if you are taking a portrait of someone. But a shallower depth of field can also be a powerful creative tool if used correctly, as it can isolate the subject by keeping it sharp, while the rest of the image is blurred. As a starting point, if you are looking to keep the majority of the photo sharp, set your camera to Aperture Priority (A or Av) mode so you can take control of the aperture. Start at around f/8 and work up (f/11 or higher) until you get the desired effect.

KD-2016-DPS-Landscape Tips-4

7. Think about the composition

As much as possible you should always aim to get your composition right when taking the photo, rather than relying on post-production. If the scene doesn’t look right when you look at it through your viewfinder, then it won’t look good in the final output. There are several techniques that you can use to help your composition (such as the rule of thirds), but ultimately you need to train yourself to be able to see a scene, and analyze it in your mind. With practice this will become second nature, but the important thing is to take your time.

8. Use neutral density and polarizing filters

Neutral Density filters and polarizers are an essential piece of kit for any landscape photographer. Often you will need to manipulate the available light, or even try to enhance the natural elements. For example, if you are taking photos which include water, you may find you get unwanted reflections from the sun, which is where a polarizing filter can help by minimizing the reflections and also enhancing the colors (greens and blues). But remember, polarizing filters often have little or no effect on a scene if you’re directly facing the sun, or it’s behind you. For best results position yourself between 45° and 90° to the sun.

One of the other big challenges of landscape photography is getting a balanced exposure between the foreground, which is usually darker, and a bright sky. Graduated ND filters help to compensate for this by darkening the sky, while keeping the foreground brighter. This can be replicated in post-production, but it is always best to try and capture the photo as perfectly as possible in-camera.

KD-2016-DPS-Landscape Tips-2

9. Use the histogram

Histograms are an essential tool in photography, which you should aim to learn how to read and utilize the findings to improve your photos. A histogram is a simple graph that shows the different tonal distribution in your image. The left side of the graph is for dark tones and the right side of the graph represents bright tones.

For instance, if you find that the majority of the graph is shifted to one side, this is an indication that your photo is too light or dark (overexposed or underexposed). This isn’t always a bad thing, and some images work perfectly well either way. However, if you find that your graph extends beyond the left or right edge, this shows that you have parts of the photo with lost detail (pure black areas if the histogram extends beyond the left edge and pure white if it extends beyond the right edge). This is something you should avoid, so by seeing the evidence in the histogram, you are able to correct it by either recomposing the image or compensating for the exposure.

10. Never settle for a good photo

This is true of any photograph that you are taking. It doesn’t matter if it is a landscape or a portrait; if you can do it better, then you should. But often because of the time and effort that landscape photography requires, people settle for a good photo, rather than waiting or coming back to take a better one. You should always aim to photograph anything at the best possible time, in the best possible way, even if that means waiting or coming back later.

KD-2016-DPS-Landscape Tips-1

11. Shoot in RAW format

Simply put, if your camera is capable of capturing photos in RAW format, then I recommend that you always capture RAW files. They contain much more detail and information, and give far greater flexibility in post-production without losing quality. Remember, you can always save RAW files in whatever other formats you require, but you will not be able to save JPEGs as RAW files, so ultimately you are limited to the quality at which the JPEG was shot.

12. Experiment

For all the techniques and rules that exist to help aid composition and the process of taking the photo, there is always room to experiment. Digital photography means that taking a photo isn’t wasting a negative (and costing money), so there is ample opportunity to break the rules and your own style sometimes. Even if the majority of the time it doesn’t work and the image doesn’t look great, every now and again you might uncover a gem.

KD-2016-DPS-Landscape Tips-5

Landscape photography is one of the most common genres that amateur and professional photographers get into. With practice, hard work, and patience you can capture stunning landscape photos that will look great in your portfolio.

So come on, show us your great landscape shots, and don’t forget to share your tips and experiences below.

The post 12 Tips to Help You Capture Stunning Landscape Photos appeared first on Digital Photography School. It was authored by Kav Dadfar.


Digital Photography School

 
Comments Off on 12 Tips to Help You Capture Stunning Landscape Photos

Posted in Photography


This 3D-printed accessory makes it possible to shoot split double exposures on Instax Mini 90 cameras

09 Aug

One of the accessories you can purchase for some of Lomography’s instant cameras is the Splitzer, an add-on component that makes it possible to shoot multiple exposures on the same frame. Unfortunately, the accessory isn’t available for the Fujifilm Instax Mini 90, but photographer Guillermo Hernandez has managed to create his own 3D-printed version for the popular camera.

Like the Splitzer, the 3D-printed component simply attaches to the front of the lens. To capture a double exposure, simply cover the half of the frame you don’t want exposed, take a shot, then rotate the Splitzer 180-degrees before taking another shot.

As you can see in the sample photos below, this allows you to create unique compositions wherein a single subjects can be in two places at once or frame the same object side-by-side.

$ (document).ready(function() { SampleGalleryV2({“containerId”:”embeddedSampleGallery_9993708725″,”galleryId”:”9993708725″,”isEmbeddedWidget”:true,”selectedImageIndex”:0,”isMobile”:false}) });

It’s undoubtedly a novel accessory, but it’s a fun way to get a little more out of a Fujifilm Instax camera. Hernandez is selling his Instax Mini 90 Splitzer in multiple colors for $ 5 on eBay with $ 3 shipping, but if you have access to a 3D printer and know some basic CAD tutorials you could probably whip up one yourself. Hernandez has other 3D-printed photo-related products on his eBay store, too.

Articles: Digital Photography Review (dpreview.com)

 
Comments Off on This 3D-printed accessory makes it possible to shoot split double exposures on Instax Mini 90 cameras

Posted in Uncategorized


Sigma announces 85mm F1.4 DG DN Art for E-mount and L-mount

08 Aug

$ (document).ready(function() { SampleGalleryV2({“containerId”:”embeddedSampleGallery_9099655589″,”galleryId”:”9099655589″,”isEmbeddedWidget”:true,”selectedImageIndex”:0,”isMobile”:false}) });

Sigma has launched its 85mm F1.4 DG DN Art, a fast portrait prime for Sony E and Panasonic/Leica/Sigma L-mount. The lens features 15 elements, including one aspherical and five SLD (special low dispersion). It has 11 aperture blades and its focus unit is driven by a high-speed stepping motor. The minimum focus distance of the 85mm F1.4 is 0.85m (34″) and the maximum magnification is 0.12x.

The lens’ aperture ring has a ‘click switch’, allowing users to choose between ‘clicky’ and smooth rotation, as well as a ‘lock switch’ to prevent accidental operation. As one would expect from a modern lens in Sigma’s ‘Art’ collection, it’s very well built and weather-sealed. Despite that, the lens weighs just 630 grams (1.4 pounds).

The 85mm F1.4 DG DN Art will go on sale later this month for $ 1199.

Go hands-on with the Sigma 85mm F1.4

Press release

Sigma Announces the 85mm F1.4 DG DN | Art Lens, the Definitive Portrait Prime for the Mirrorless Age

  • Fast-aperture full-frame prime lens that is surprisingly compact
  • Dust and Splash-proof construction
  • Completely new optical formula with 5 SLD and 1 Aspherical element
  • Stepping motor optimized for contrast and phase detection autofocus
  • Clicked and de-clicked aperture ring with Iris Ring Lock Switch
  • Available in L-Mount and Sony E-Mount
  • MSRP: $ 1199
  • Anticipated Shipping Date: Late August 2020

Ronkonkoma, NY – August 6, 2020 – Redefining the portrait lens category, the Sigma 85mm F1.4 DG DN | Art lens is a completely new design for full-frame mirrorless cameras, as the “DN” designation indicates. Announced today by Sigma Corporation, this is a complete reinvention of the definitive fast-aperture portrait prime that pairs class-leading optical performance with a compact, dust-and splash-proof design. Offered in both L-Mount and Sony E-Mount, this lens features a completely new optical formula that includes five Special Low Dispersion Elements and one aspherical element for exceptional edge-to-edge image sharpness. This new optical formula also thoroughly corrects aberrations, resulting in visually pleasing images with no color bleed, even at maximum aperture. Plus, the 11-blade rounded diaphragm ensures smooth, attractive bokeh. The 85mm F1.4 DG DN | Art lens is handcrafted to the most exacting optical and mechanical tolerances in Sigma’s Aizu, Japan production facility.

“Briefly put, the Sigma 85mm F1.4 DG DN | Art pairs large-aperture, professional-caliber optical performance with a lightweight, sturdy, and compact body, a combination which has long been difficult to achieve,” reports Mark Amir-Hamzeh, President of Sigma Corporation of America. “This vision is finally realized with the new 85mm F1.4 DG DN | Art lens.”

A smaller focusing lens is paired with the stepping motor, which is optimized for both phase detection and contrast detection autofocus, allowing for this lens to be notably smaller than the 85mm F1.4 DG HSM | Art lens — over an inch shorter and more than a pound lighter than the previous version — while achieving a higher degree of edge-to-edge sharpness from F1.4 and through the entire aperture range.

The Sigma Art line has been consistently redefining both imaging excellence and pleasing in-the-hand experience, and this new lens continues that legacy. Dust and splash-proof design, aluminum and TSC (Thermally Stable Composite) construction, a brass bayonet, plus well-damped switches and rings demonstrate the level of build quality that the Art name represents. Additional benefits include an aperture ring that allows for clicked and de-clicked operation, a programmable AFL button on the lens barrel, and a new Iris Ring Lock Switch that prevents unintended movement of the aperture ring during image capture.

This combination of imaging characteristics, build quality, and compact size for its focal length and aperture combine to make this the class-defining portrait lens for full-frame mirrorless camera systems.

The lens will begin shipping late August 2020. / MSRP: $ 1,199.00

View the worldwide product announcement replay here.

SIGMA 85mm F1.4 DG DN

Designed exclusively for full-frame mirrorless cameras

Redefining the Classic

  1. The record-high performance worthy of the name of 85mm F1.4 | Art
  2. Lightweight & compact – A new perception of F1.4
  3. A full range of functionalities and excellent build quality

Mark a new chapter of the Art line F1.4 in the mirrorless age.

Large-diameter, unparalleled optical performance, compact and lightweight, and high-speed AF ? all in your hand.

The 85mm F1.4 DG DN | Art combines a clear and delicate rendering performance, which is requisite for portrait photography, with beautiful, rich bokeh effects only possible with lenses such as a large-diameter F1.4, at a level that will satisfy both professional and advanced amateur photographers. The focal length of 85mm and significant bokeh effect at F1.4 brightness allow the users’ subjects to stand out in a complementary fashion, which is one of the essences of taking portrait photography, so users can enjoy it to the fullest.

In addition to the fast and consistent AF response, the mirrorless-exclusive design of the 85mm F1.4 DG DN | Art has realized a lightweight and compact lens body that defies convention. And its small body is packed with a range of functionalities, including a dust- and splash-proof structure, supported by an excellent build quality.

The 85mm F1.4 DG DN | Art is SIGMA’s new “ultimate portrait lens” for the mirrorless age. And with it, SIGMA proposes a whole new world of possibilities provided by this “85mm F1.4 lens for everyday use,” thanks to the unprecedented level of portability, free from size- or weight-related limitations.

[Key features]

  1. The record-high performance worthy of the name of 85mm F1.4 | Art

85mm F1.4 is a specification almost synonymous with a portrait lens. With the Art line lenses, SIGMA pursues the highest optical performance possible and has devoted the latest optical design technologies, as well as the production technologies of the Aizu factory, SIGMA’s only production site, to the development of these lenses. The result is a detailed image critical for portrait photography that is achieved at a level that will satisfy both professional and advanced amateur photographers.

In addition to five SLD (Special Low Dispersion) elements and one aspherical lens, the 85mm F1.4 DG DN | Art has incorporated the latest high refractive index glass, which works to thoroughly correct aberrations that cannot be handled by the correction functionality on the camera side. With a particular emphasis given to the correction of axial chromatic aberration, users will enjoy sharp images with no color bleeding, all the way up to the maximum aperture of F1.4.

The high resolving power that covers the entire image from the center to the edges ensures sharpness of the area in focus, and coupled with the significant bokeh effect produced by the F-value of 1.4 brings out the users’ subject in an evocative way.

The numerous rounds of ray-trace simulation, as well as repeated real-world testing, have given the 85mm F1.4 DG DN | Art its ability to minimize ghosting, ensuring clear, sharp images even when shooting in backlit conditions.

With the ability to shoot from the maximum aperture of F1.4 without worrying about image quality, users can focus on the camera operations to realize their artistic expressions, such as the adjustment of exposure and depth of field. This new lens indeed delivers a level of optical performance truly worthy of the name of 85mm F1.4 Art.

  1. Lightweight & compact – A new perception of F1.4

The 85mm F1.4 DG DN | Art weighs 630g/ 22.2oz., with a filter size of 77mm and a body length of 94.1mm/ 3.7in.*. Designed exclusively for mirrorless cameras, it has a “large lens diameter and superb optical performance” and “a lightweight and compact body,” a combination which has long been difficult to achieve.

The AF motor system employs a stepping motor which is optimized for both phase detection AF and contrast AF. Not only does this provide a smooth shooting experience only possible with a mirrorless camera, such as face/eye detection AF, but it has also made the lens body itself much smaller, as the focus lens has been made small to better suit a stepping motor. Furthermore, by making the most of the in-camera aberration correction functionalities, SIGMA was able to concentrate on the correction of aberration that could be handled by the optical system alone, which further contributed to making the lens smaller in size.

With such a lightweight and small body, users can now take out a large-diameter 85mm F1.4 lens for an everyday use such as taking snapshots. The 85mm F1.4 DG DN | Art invites users to enjoy photography in an unconventional way.

* For L-mount.

  1. A full range of functionalities and an excellent build quality

This compact lens is packed with a range of functionalities that will satisfy both professional and advanced amateur photographers.

The 85mm F1.4 DG DN | Art has newly introduced an “Iris ring lock switch.” This prevents from unintended movement of the iris ring during shooting, allowing users to devote their attention to the creation of their image. The “Focus Mode Switch” on the lens body and the “AFL button*” that allows various functions to be assigned from a camera body will also assist users’ shooting.

In addition to the dust- and splash-proof structure, the lens uses materials such as aluminum and TSC (Thermally Stable Composite) where they are best suited, achieving a level of build quality that is worthy of the Art line. In addition to the durability of the body, the lens pursues quality in terms of how users “feel” as well, such as the smooth motion in which each ring or switch works, and the precise hand feeling. The 85mm F1.4 DG DN | Art helps ensure users a smooth shooting experience in every condition.

*Limited to compatible cameras. Also, the functions depend on the camera.

[Additional features]

  • Lens construction: 15 elements in 11 groups, with 5 SLDs and 1 aspherical lens
  • Compatible with high-speed autofocus
  • Compatible with lens-based optical correction

*Only on camera models that support this functionality. Scope of correction varies depending on

  • Iris ring
  • Iris ring click switch
  • Iris ring lock switch

*When turned ON at the position A, the iris ring is locked at A. When turned ON at a position other than A, it is locked within the range between the maximum to minimum apertures and will not engage at the position A.

  • AFL button
  • Focus Mode Switch
  • Dust-and splash-proof
  • Hood with lock
  • Compatible with SIGMA USB DOCK UD-11 (sold separately / for L-Mount only)
  • Designed to minimize flare and ghosting
  • Every single lens undergoes SIGMA’s proprietary MTF measuring system “A1”
  • 11-blade rounded diaphragm
  • High-precision, durable brass bayonet mount
  • “Made in Japan” craftsmanship

To learn more about SIGMA’s craftsmanship, please visit SIGMA website at

https://www.sigma-global.com/en/lenses/

Sigma 85mm F1.4 DG DN Art specifications

Principal specifications
Lens type Prime lens
Max Format size 35mm FF
Focal length 85 mm
Image stabilization No
Lens mount Leica SL, Sony FE
Aperture
Maximum aperture F1.4
Minimum aperture F16
Aperture ring Yes
Number of diaphragm blades 11
Optics
Elements 11
Groups 15
Special elements / coatings 1 aspherical + 5 SLD elements
Focus
Minimum focus 0.85 m (33.46)
Maximum magnification 0.12×
Autofocus Yes
Motor type Stepper motor
Full time manual Yes
Focus method Internal
Distance scale No
DoF scale No
Physical
Weight 630 g (1.39 lb)
Diameter 83 mm (3.27)
Length 94 mm (3.7)
Materials Magnesium alloy
Sealing Yes
Colour Black
Filter thread 77 mm
Hood supplied Yes
Tripod collar No

Articles: Digital Photography Review (dpreview.com)

 
Comments Off on Sigma announces 85mm F1.4 DG DN Art for E-mount and L-mount

Posted in Uncategorized


Sigma 85mm F1.4 DG DN sample gallery (DPReview TV)

08 Aug

$ (document).ready(function() { SampleGalleryV2({“containerId”:”embeddedSampleGallery_8484004248″,”galleryId”:”8484004248″,”isEmbeddedWidget”:true,”selectedImageIndex”:0,”isMobile”:false}) });

Our team at DPReview TV has been busy shooting a summer portrait gallery with the new Sigma 85mm F1.4 DG DN Art lens. Check out our sample images to see what this lens can do.

Articles: Digital Photography Review (dpreview.com)

 
Comments Off on Sigma 85mm F1.4 DG DN sample gallery (DPReview TV)

Posted in Uncategorized


Hands-on with the Sigma 85mm F1.4 DG DN Art

08 Aug

Hands-on with the Sigma 85mm F1.4 DG DN Art

The Sigma 85mm F1.4 DG DN Art is the latest in the company’s ‘DN’ (Digital Native) lens lineup, designed specifically for use with mirrorless interchangeable lens cameras. Like previous DN-series lenses, the 85mm F1.4 is available in two mounts: L (Sigma, Leica and Panasonic), and Sony E-mount.

Click through this article for a closer look at Sigma’s latest portrait prime lens.

New optical formula

The Sigma 85mm F1.4 DG DN Art might share a focal length and maximum aperture with the older 85mm F1.4 DG HSM Art (released in 2016) but the similarities end there. This is a completely new optical design, comprising 15 elements in 11 groups, with five SLD (super low-dispersion) elements and one aspherical element.

Sigma claims that this combination results in excellent sharpness at all apertures, and very well-controlled flare and ghosting: claims that appear to be born out in our initial shooting. Like all of the lenses in Sigma’s ‘Global Vision’ line (Art, Contemporary and Sport) each copy of the 85mm is tested using Sigma’s proprietary ‘A1’ MTF measuring system prior to shipping.

Smaller and lighter than previous 85mm F1.4 Art

Despite its ambitious optical construction, the new 85mm F1.4 is more than an inch shorter (94mm/3.7″, compared to 127mm/5″) and more than a pound lighter (635g/1.4lb), compared to 1.1kg/2.5lb) than the previous-generation 85mm F1.4 Art. Many of Sigma’s Art-series primes have felt rather heavy and bulky, but the new 85mm gives an impression of compactness and light weight, helped by its tapering barrel.

Build quality has not been sacrificed for the sake of weight though, and construction is in-line with what we’d expect: a mixture of aluminum and Sigma’s TSC (Thermally Stable Composite), complete with a brass mount. The lens is rated as ‘dust and splash-proof’.

Physical aperture ring

All of Sigma’s ‘DN’ lenses have been designed with video, as well as stills, in mind. As such, the new 85mm features a ‘clicky’ physical aperture ring, which can be ‘de-clicked’ if desired, for video use. If you’d rather adjust aperture via the camera, this ring can be locked in the ‘A’ position using a dedicated switch, to avoid accidental inputs.

This image also shows the lens’s ‘AF-L’ button, which locks autofocus by default, but can be customized via the menu system on a compatible camera.

Stepping motor for autofocus

The 85mm F1.4 is optimized for use with both contrast detection (Leica, Sigma and Panasonic) and phase detection (pretty much everyone else) autofocus systems, and uses a stepping motor, coupled with a small, lightweight focusing group. Unlike some other fast 85mm lenses we could mention, autofocus is fast, and it’s also quiet enough for use during video shooting. Although we haven’t been able to perform a side-by-side test, our impression is that focus is a little faster than the previous-generation 85mm F1.4 Art.

77mm filter thread and included hood

With the generously-sized hood attached, the 85mm F1.4 suddenly looks a whole lot bigger, but it can be reversed on the lens when you’re not shooting. The front filter ring is a very reasonable 77mm.

Sigma is aiming this lens at enthusiast and professional portrait photographers, and as such, it is equipped with 11 rounded aperture blades, to ensure circular apertures at wide-to-medium F-stops. Don’t plan on many closeups though: Much like its peers, minimum focus is 85cm (33.5″) and the maximum magnification ratio of 1:8.4 (0.12x) means you’re not going to be using the Sigma 85mm F1.4 DN for macro photography.

Compatible with Sigma USB DOCK UD-11

The L-mount version of the Sigma 85mm F1.4 DG DN is compatible with Sigma’s UD-11 USB dock (not pictured). This mounts like a camera body onto the lens, and provides an easy way to update lens firmware and customize some aspects of operation.

The Sigma 85mm F1.4 DG DN will be available later this month, in L and E-mounts, for $ 1199.

Articles: Digital Photography Review (dpreview.com)

 
Comments Off on Hands-on with the Sigma 85mm F1.4 DG DN Art

Posted in Uncategorized


Nikon releases beta Webcam Utility for Windows with support for select DSLR, mirrorless cameras

08 Aug

Today, Nikon has announced the release of a beta version of its Webcam Utility software for numerous Nikon DSLR and Z series mirrorless cameras.

Similar to the webcam utility software released by Canon, Nikon and others, Nikon’s Webcam Utility makes it possible to use the live view from your camera as a webcam feed for use with video conferencing programs such as Skype and Zoom, as well as livestreaming production programs such as OBS Studio.

For now, Nikon’s Webcam Utility is available only for computers running 64-bit versions of Windows 10. Below are the Nikon DSLR and mirrorless cameras currently supported:

  • Z7
  • Z6
  • Z5
  • Z50
  • D6
  • D850
  • D780
  • D500
  • D7500
  • D5600

Being this is a beta (version 0.9.0 — not even a version 1.0 product), don’t be surprised if you come across a bug every once in a while. You can find out more information and download the beta Webcam Utility for free from Nikon’s website.

Articles: Digital Photography Review (dpreview.com)

 
Comments Off on Nikon releases beta Webcam Utility for Windows with support for select DSLR, mirrorless cameras

Posted in Uncategorized