RSS
 

Archive for May, 2020

The Flashpoint XPLOR 300 Pro is a Profoto B10 competitor for 1/3rd the price

07 May

Adorama’s house brand Flashpoint has formally announced the much-anticipated XPLOR 300 Pro. The 300W/s battery-powered monolight, which is a rebranded version of the Godox AD 300 Pro, is available starting today for $ 499.

As its name alludes to, the CPLOR 300 Pro offers 300W/s of power with nine stops of control, a minimum flash duration between 1/220 and 1/11490, a recycle time between 0.01 and 1.5 seconds depending on the power level and a 2,600Ah battery that can fire off up to 320 max-power flashes on a single charge. The light also features a bi-color 12W LED modeling light, TTL metering, high-speed sync up to 1/8000th of a second and a 328-foot range when used with Flashpoint’s R2 Pro Mark II trigger.

The XPLOR 300 Pro measures in at 19cm (7.48”) long, and 10cm (3.94”) in diameter, and weighs just 1.25kg (2.76lbs). It comes with a Bowens S-Type bracket, but Flashpoint also offers a number of adapters for mounting lighting modifiers from Broncolor, Elinchrom and Profoto.

Below is an overview video of the Flashpoint XPLOR 300 Pro from Adorama:

As is the case for many of Flashpoint and Godox products, the XPLOR 300 Pro is meant to be a direct competitor to Profoto’s more expensive 250W/s B10 monolight, which retails for $ 1,695—more than three times the price. You won’t get all of the extra controls or fine-tuning the B10 offers, but for less than 1/3rd the price, Flashpoint drives a hard bargain.

$ (document).ready(function() { SampleGalleryV2({“containerId”:”embeddedSampleGallery_9385927183″,”galleryId”:”9385927183″,”isEmbeddedWidget”:true,”selectedImageIndex”:0,”isMobile”:false}) });

The Flashpoint XPLOR 300 Pro is currently available to purchase at Adorama for $ 499 and comes with the monolight, a single rechargeable Li-Ion battery, the flashtube, a charger with a power adapter, a basic reflector, a protective cap and a case to carry it all in. While the light is also sold as the Godox AD 300 Pro, the Flashpoint unit carries a two-year warranty when purchased in the United States through Adorama.

Articles: Digital Photography Review (dpreview.com)

 
Comments Off on The Flashpoint XPLOR 300 Pro is a Profoto B10 competitor for 1/3rd the price

Posted in Uncategorized


Filmmaker uses COVID-19 work lull to make and sell $10 3D-printed camera battery cases

07 May

A documentary film maker from Utah has designed and built a series of battery holder magazines that he says help to solve the problem of knowing which batteries are fresh and which are depleted. The 3D printed magazines hold three or four batteries from common cameras and allow the batteries to be inserted contacts up for dead batteries and down for fresh ones.

Tim Irwin, who is printing the magazines in his basement, had been meaning to come up with a solution to this problem for a while, and had tried downloaded plans for 3D printed magazines in the past, but found they always broke. ‘I originally found files on Thingiverse that worked for a bit. But all the designs I tried from there ended up breaking because of a weak point in the print’ he explains. ‘When the travel restrictions around Covid 19 hit every one of my gigs was cancelled or postponed, so it seemed like prefect time to dive into this side mission. I designed my own from scratch and refined it over a long period of time until I was happy with the product. I’m always looking for ways to make my kit more efficient, quick, and organized. The Battery Mag was born out of that.’

Tim has designed the magazine so that when fresh batteries are loaded with their contacts down they are isolated from each other and from anything else the magazine might come into contact with, so the risk of shorting is avoided. And with deads loaded with the contacts facing up it is easy to see at a glance which battery to reach for next in fast moving situations.

Tim, who owns Functional Films, makes commercial video documentaries and says he is usually on the road shooting about 140 days a year. That has all stopped due to the coronavirus out-break, so this is how he is filling his time.

The Battery Mags are available for Panasonic DMW-BLF19, Canon LP-E6/N, Pentax DLI90, Sony NP-FZ100, Sony NP-FW50 batteries and he says a unit for Panasonic S cameras is also in production. The magazines are $ 9, $ 10 and $ 14 each, respectively, and can be ordered via the Battery Mag website.

For examples of Tim’s work see his Instagram page.

Articles: Digital Photography Review (dpreview.com)

 
Comments Off on Filmmaker uses COVID-19 work lull to make and sell $10 3D-printed camera battery cases

Posted in Uncategorized


SLC-2L-11: The “Magic” of Medium Format

07 May

There's something about shooting medium format — especially in black and white. The look is unmistakeable: creamy highlights supported by lush, detailed shadows.

So it's perfectly understandable why many photographers shell out big bucks for pricey medium format gear. In fact, it's possible that some of you are at this very moment casually thinking about how cool it would be to shoot with a MF camera system.

And why not? I mean, don't you deserve it?

Except for, a) the photo above was shot with a small-chip Fuji, and b) those shadow gradients were made with a second, $ 69 speedlight.
Read more »
Strobist

 
Comments Off on SLC-2L-11: The “Magic” of Medium Format

Posted in Photography


Adobe’s 12th Annual 99U Creative Conference will be free and virtual this year

07 May

Adobe has announced its 12th Annual 99U Creative Conference, which is usually a paid, in-person event, will be hosted on Adobe Live for free as a virtual event this year amidst the ongoing COVID-19 pandemic.

Tickets for the annual event normally cost around $ 1,000, so being able to take in the event for free, in the comfort of your own home, is quite the discount. This year’s event will take place on Wednesday June 17 and will feature a mix of keynotes, creative workshops and masterclasses throughout the day. The presentations will be available stream via Adobe Live or available on-demand shortly after completion of each event.

A few of the individuals who will be presenting at this year’s virtual conference.

You can find out more information and register to ‘attend’ the event for free on Adobe’s Behance website.

Articles: Digital Photography Review (dpreview.com)

 
Comments Off on Adobe’s 12th Annual 99U Creative Conference will be free and virtual this year

Posted in Uncategorized


How to Create a Pep Ventosa Inspired Still Life

06 May

The post How to Create a Pep Ventosa Inspired Still Life appeared first on Digital Photography School. It was authored by Charlie Moss.

pep-ventosa-inspired-still-life

Pep Ventosa is a Catalan artist who creates incredible images that explore the boundaries of photography. Made from multiple layers of similar photographs, they create an abstract and often surreal effect with a painterly feel. Ventosa usually creates pictures outside, but you can borrow his ideas to create a Pep Ventosa inspired still life.

How to Create a Pep Ventosa Inspired Still Life

This is an ideal experiment for someone new to working with layers in Photoshop who wants to try and create a fine art inspired still life. You’ll find that even the most mundane objects can create beautiful, ghostly images.

Shoot your base images

First of all, you’ll need your base images. I started with a simple tabletop set up next to a window so that I could work with natural light. You could also use studio lights or lamps for this technique, and different lighting will produce quite different results!

How to Create a Pep Ventosa Inspired Still Life

Once you have your camera set up and an interesting object in place to photograph, take your first image. Then rotate the object a small amount and shoot another. I like to take at least ten images, which seems to always create a good effect. If you choose to start working with lots more images, you begin to run into Photoshop’s file size limitations quite quickly!

Make sure that you place your camera on a tripod the first time you try this out. This will keep your background consistent and allow you to move the object without worrying about having your camera in the same place each time. Once you’ve mastered the technique, you can experiment with moving the camera as well as the object in a different variation of the Pep Ventosa inspired still life.

Work in Lightroom Classic

You can choose to import the images straight into Photoshop and layer them into a stack manually if that’s your preferred workflow. However, I really like the Lightroom Classic functionality that can do all this for you.

How to Create a Pep Ventosa Inspired Still Life

As you can see, the images are all very similar, but each one is slightly different from the last. I’ve tried not to blow out any highlights or get too much black in the shadows. Having the images quite flat in this respect can be helpful when you start to work with the layer blending modes in Photoshop.

Take this opportunity to also clean up any blemishes or marks on the backdrop. Anything left in now will be harder to tidy up later.

How to Create a Pep Ventosa Inspired Still Life

When you’re ready to start layering your images, select them all in Lightroom Classic and then select the “Open as Layers in Photoshop” option. This will create an image file that has all of your base photographs stacked on Photoshop layers. Now you’re ready to start the fun bit of editing your Pep Ventosa inspired still life.

Work with Photoshop blend modes

Blend modes can be intimidating if you’ve never used them before, but this experimental image can be a great time to play with them. There are 27 different blending modes in total, which gives you lots of options for your Pep Ventosa inspired still life.

How to Create a Pep Ventosa Inspired Still Life

At the top of the layer stack is a drop-down box that is available as long as you have a layer highlighted. This is where the blend modes are hiding. Each option allows the layers underneath to show through according to different computer algorithms.

For the image above, I set each layer to “multiply” blend mode and changed the opacity to between 25% and 50%. This results in an extremely dark image at the end (because the colors multiply together mathematically), so I also added a Curves Layer to bring the exposure back up to something normal.

Spend some time experimenting with different blending modes. In my experience, Soft Light and Overlay also give interesting results. Some of the others might, too depending on your base images.

Finishing your image

Once you’ve finished adjusting your layers, you can save the image, close Photoshop, and open Lightroom Classic back up. Now you can polish the image, adjusting the colors and tone to suit your style.

Once you’ve edited an image in Photoshop and taken it back into Lightroom Classic, you can treat it as you would any other image. That means you can apply any effects, filters, or presets to the image.

How to Create a Pep Ventosa Inspired Still Life

If you’ve never worked with presets in Lightroom Classic before consider buying a large set to get you started. As you experiment with them and use them more and more, you’ll get to know how the settings work, and then you can start building your own.

Changing the colors in Lightroom Classic can change the whole mood of a photo. A dark, shadowy blue image can feel quite melancholy and introspective, while a warmer-toned image can feel more hopeful and even joyous.

When you shoot a still life image, it’s not just the subject that conveys emotion, but the colors too. So while you’re finishing off the colors in Lightroom Classic, make sure that they’re helping to communicate your message.

Consider how you’ll print your image

These kinds of images are really begging to be printed quite large on beautifully textured paper. And there are plenty of labs that will do this for you. A textured paper can really enhance the fine art feel of a Pep Ventosa inspired still life, working sympathetically with the multiple layer effect that you’ve created in Photoshop.

If you don’t intend to print your image, you could try adding textures to your work instead. Open the image (again) in Photoshop and try out different textures until you get an effect that you’re happy with. Remember, textures are always best kept subtle!

How to Create a Pep Ventosa Inspired Still Life

Conclusion

There are so many different ways you could use this technique. You could combine it with other photographic techniques, or different post-processing. And of course, there is an infinite number of different subjects that you could photograph.

Please do try your own Pep Ventosa inspired still life. And don’t forget to post your results in the comments – I’d love to see the different ways that we all interpret this idea!

The post How to Create a Pep Ventosa Inspired Still Life appeared first on Digital Photography School. It was authored by Charlie Moss.


Digital Photography School

 
Comments Off on How to Create a Pep Ventosa Inspired Still Life

Posted in Photography


Capture One teases upcoming Capture One 20 update, including new heal and clone brushes

06 May

Earlier today, Capture One showed off a trio of major new features coming via a free update to Capture One 20 later this month. The announcement came in a live stream, which you can watch the replay of below, hosted by Product Manager Alexander Flemming and Business Development Manager David Grover.

In the live demo below, the first major new feature coming to Capture One 20 later this month is a revised healing brush for retouching images and removing unwanted spots. In the current version of Capture One 20, the healing workflow comprises creating a new heal layer, select your brush and pick a source point. Further, you can only select a single source point per layer.

In the upcoming update, the software will be able to quickly and intelligently select a source point for each instance of using the heal brush on a single ‘Heal Layer’. Per Flemming, there will be no limit to how many different heal points you can have on a single layer nor has the team found any performance issues when utilizing many heal points.

In the livestream, Flemming and Grover shared a few interesting tidbits about how the new healing brush operates. The first time you use the brush on an image, the software caches the entire image, so that all subsequent uses of the heal brush are much faster. Further, the new healing technology is adept at adjusting the luminosity of your source point to match the area you wish to heal or touch up. For example, if an area in the image with the best match for texture is brighter or darker than the area you are trying to heal, the software can match the source area by brightening or darkening it.

In addition to the new healing brush, there’s also a new clone brush. The clone brush works similarly to the new heal brush, but it creates a ‘Clone Layer’ rather than a ‘Heal Layer’. The clone brush creates a pixel-for-pixel clone, rather than replacing a healing area via a source selection. Basically, the clone brush allows you to copy a selected set of pixels from one area of your image to another area.

In this screenshot from Capture One’s presentation, the new clone brush is being used. Image credit: Capture One

Another addition is the new before and after button, which can be found on the toolbar. In prior versions, seeing a before and after comparison was done via a convoluted process whereby you reset the image and then undid the reset. Now you will be able to simply press the before/after button, which creates a sliding before/after split view, showing before on the left and after on the right. This works at all zoom levels and can be used across multiple images. Users will even be able to edit in this view if they so desire. There’s also a secondary before/after mode where you can view the entire image in its before and after state, rather than using a slider.

The upcoming free update to Capture One 20 includes a new before/after view. You can use this view across multiple images at once as well, as can be seen here. Image credit: Capture One

As mentioned, the update is scheduled to arrive by the end of the month. The update will be free for all existing Capture One 20 users, including those who use Capture One Fujifilm and Capture One (for Sony). For more information on Capture One 20, including pricing information for both subscriptions and perpetual licenses, click here.

Articles: Digital Photography Review (dpreview.com)

 
Comments Off on Capture One teases upcoming Capture One 20 update, including new heal and clone brushes

Posted in Uncategorized


Slideshow: Winners of All About Photo Awards, the Mind’s Eye, 2020

06 May

Winners of All About Photo Awards, the Mind’s Eye, 2020

The 5th Annual Mind’s Eye competition from All About Photo attracted submissions from all over the world. Even though a majority of the entries were color photographs, 4 out of the 5 top category winners are black and white and came from women. The Photographer of the Year 2020 was awarded to Monica Denevan (United States) for her image ‘Across the River, Burma’ from the series ‘Songs of the River: Portraits from Burma.’ She received a $ 5,000 cash prize.

A panel of 7 jurors selected the 40 winning and finalist images. Compared to previous years, they were more inclined to choose calming images compared to those depicting unsettling or violent situations. ‘Perhaps a subconscious need has arisen in each one of us to escape the terrible events that are happening in the world right now,’ reads the official press release.

In a field dominated by men, women received a majority of the top honors in this competition. Elena Paraskeva was recognized in the Particular Merit Mention category for her image ‘The Lost Swimmer.’

Winners will be showcased on the daily fine art photography site Lenscratch, art streaming platform Daylighted, All About Photo’s online gallery, and in the print edition of AAP Magazine. All About Photo hosts a variety of competitions, year round, that can be found on their ‘Photo Contests’ page.

1st Place Photographer of the Year: ‘Across the River, Burma’ by Monica Denevan (United States)

Artist Statement: From the series ‘Songs of the River: Portraits from Burma.’

2nd Place Winner: ‘Florida’ by Gabriele Galimberti (Italy)

Artist Statement: Avery Skipalis (33) – Tampa, Florida / THE AMERIGUNS – In the States there are more guns than people. ‘120.5 registered firearms for every 100 residents’ and the statistic doesn’t count ‘not-registers firearms.’ As a European, I started wondering if owning many weapons by a single person or family is a common habit in the US. I traveled across the US and created a series of 45 portrait of families or single individuals, including all races and beliefs, together with their firearms.

3rd Place Winner: ‘Philomena’ by Rebecca Moseman (United States)

Artist Statement: A little Irish Traveler girl looks out of her family car before going home to her family’s Illegal encampment.

4th Place Winner: ‘Sustenance 4’ by Nadia De Lange (Switzerland)

Artist Statement: Desert: ‘a waterless, desolate area of land with little or no vegetation, typically one covered with sand.’ And yet, there is life in the desert. More than most people realize. In the Namib this is thanks to the wonderful miracle of fog – the clouds that roll in from the Atlantic Ocean bring with them moisture that sustain the fauna and flora living in this beautiful, harsh landscape.

5th Place Winner: ‘Jump of the Wildebeest’ by Nicole Cambre (Belgium)

Artist Statement: Annual migration of the wildebeest at Northern Serengeti, Tanzania. This wildebeest did not wait for its turn and jumped on top of the others.

Particular Merit Mention: ‘Polarbearpet’ by Marcel Van Balken (Netherlands)

Artist Statement: Climate change, and the loss of sea ice habitat, is the greatest threat to polar bears. More and more polar bears are being forced ashore, away from their sea-ice hunting grounds. But it does not make sense to make your home (or bathroom) available as a haven for the polar bear. It’s better to spread awareness about the real and pressing threat of climate change.

Particular Merit Mention: ‘Untitled’ by Kosuke Kitajima (Japan)

Artist Statement: A monkey entering a Japanese hot spring. Had various expressions like a person.

Particular Merit Mention: ‘Break Away’ by Tony Law (Australia)

Artist Statement: A man falling off a bull in a rodeo event held in Taralga, Australia.

Particular Merit Mention: ‘Untitled’ by Yoni Blau (Israel)

Artist Statement: This image was taken while on a trip to the Suri tribe in the Omo Valley in Southern Ethiopia.
The model was not dressed, simply recorded as is. No artificial lighting was used.
The picture was taken within a dark tent with the light coming in from the entrance of the tent.

Particular Merit Mention: ‘Woman Mursi’ by Svetlin Yosifov (Bulgaria)

Artist Statement: The Mursi tribe are an African tribe from the isolated Omo valley in Southern Ethiopia near the border with Sudan.

Particular Merit Mention: ‘Eye Sea’ by Anuar Patjane (Mexico)

Artist Statement: A school of Bigeye trevaly and divers at Cabo Pulmo National Park, Mexico.

Particular Merit Mention: ‘Beyond the Wall’ by Francesco Pace Rizzi (Italy)

Artist Statement: Sometimes a shot cannot contain emotions, memories, moods…you need more … you have to ‘chisel’ the image to make that evolutionary-creative leap necessary to reach the right size.

This photo is intended as a small tribute to a great Master: Henri Cartier Bresson, the one who first knew how to show me the reality of ever with new eyes: more human, artistic, poetic. His photos taken between the 1950s and 1970s in Basilicata (my homeland) and around the world have changed the perspective of things in me, creating a fantastic ‘imprinting’ and becoming a source of great inspiration.

Particular Merit Mention: ‘Untitled’ by Chin Leong Teo (Japan)

Artist Statement: The Wallace’s Flying Frog is a moss frog found in Malaysia and western Indonesia. It is generally quite photogenic given its large size, brilliant colors and calm temperament. This is a shot taken of a specimen swimming in water, with full extension of its beautiful long legs.

Particular Merit Mention: ‘Step by Step’ by Mustafa AbdulHadi (Bahrain)

Artist Statement: Impression Lijiang is a cultural show which demonstrates the traditions and lifestyle of local Naxi, Yi, and Bai ethnics of the area. It is the second outdoor production of famous film director, Zhang Yimou, which debuts an open-air performance at the foot of Yulong Xueshan (Jade Dragon Snow Mountain) about 3,500 meters above sea level. The performance stage is specially designed to showcase the mountain as the best backdrop of the show. More than 500 local people from ten ethnic groups (participate).

Articles: Digital Photography Review (dpreview.com)

 
Comments Off on Slideshow: Winners of All About Photo Awards, the Mind’s Eye, 2020

Posted in Uncategorized


15 Tips for Documenting Home Life

06 May

The post 15 Tips for Documenting Home Life appeared first on Digital Photography School. It was authored by Mat Coker.

Tips for documenting home life through photography

Documenting home life and capturing family moments is what inspired many of us to pick up a camera. But upon picking up a camera, we discovered just how challenging it is to capture those moments.

These 15 tips are ones that I’ve used over the years to capture my family moments. They will help you capture your moments more creatively, overcome lighting challenges, and use simpler camera settings.

The best part is, these tips work whether you’re using a DSLR or just your phone to take pictures.

15 Tips for Documenting Home Life
Learn to spot moments before they happen, what angles make your photos look best, and how to freeze action in dim indoor light.
ISO 6400 f3.8 1/200 sec

Moments

It’s important to capture a good moment because the moment overshadows everything else in your photo. Surprisingly, people will often overlook bad lighting and sloppy composition in your photo simply because you captured a powerful moment.  

The question is, how do you capture a moment well?

Remember that these tips apply to every photo you take, even if you’re using your phone.

1. Distinguish between two major types of moments

There are two types of moments; posed and candid.

With posed moments, you are in control of the details. You decide exactly what or who is in your photo, how they’re positioned, and how everything is interacting together.

When it comes to documenting home life, most of us prefer candid moments. Candid moments are spontaneous events that just happen naturally. By definition, you can’t force these moments to happen, you just see a great moment that happens spontaneously and you want to capture it. Of course, you can easily ruin the natural moments by stepping in and interrupting them.

But candid moments have a special problem, you don’t see them coming until it’s too late!

documenting home life posed moment
A classic example of a posed moment. See the tips below for the use of window light. ISO 1000 f/3.5 1/500 sec

2. Learn to see the future

You’ll be able to capture better moments when you develop the technical skill of seeing the future. Don’t worry, it’s not as impossible as you think.

The key to seeing the future is spotting patterns. When you see a pattern repeating itself, you can reliably predict what is going to come next. Look for patterns as you document home life, and you’ll be ready to capture the moment before it happens.

Documenting home life candid moment
My son spends a few minutes every day deeply engaged in picture books. As long as I don’t let him see the camera, I can sneak a few photos. I used his feet and the book as a frame around his face. This picture was backlit using a window. ISO 1600 f/4.7 1/400 sec

3. Take your camera and go looking for moments

You know that when things go strangely quiet, something interesting is happening. So pick up your camera and go see what your kids are up to. If you don’t take your camera with you, by the time you go find it, the moment will have passed. It will be too late. When the house is quiet, pick up your camera, then go looking.

Candid moments
I discovered him asleep, and it was the perfect time to photograph his curls before his first hair cut. ISO 1600 f/2.0 1/10 sec

4. Include action and emotion

One key to capturing better moments while documenting home life is to make sure that they include action or emotion. Again, if everything else goes wrong, the action or emotional element will make your photo stronger.

capturing action
Both the kite and the girl are in action. ISO 200 f/2.8 1/500 sec

Composition

As you improve your skill of capturing moments, you can begin to compose better photos as well.

Start with angles. They are one of the best compositional tools because they completely change the way your photo looks and feels.

5. Bug’s eye view

This angle is wildly dramatic. Get really low, look straight up and see things tower above you. When you take all your pictures from the same angle, they are boring to look at. So make 1 out of 10 a bug’s eye view.

Bug's eye view photo
Taken with an old iPhone. ISO 320 f/2.8 1/20 sec

6. Low angle

Low angles take your photos to a new level by adding drama to your photo. Use it when photographing action moments like the child jumping across beds in the photo above.

low angle photo
Taken during a wind storm. ISO 2000 f/2.8 1/200 sec

7. Face-to-face

This angle puts you eye to eye with your subject and makes your photo more captivating. This angle works especially well when combined with emotional moments.  

15 Tips for Documenting Home Life

8. High angle

High angles are great for capturing the cuteness of little kids. Partly because a higher angle can make people look a little smaller. It’s a friendly angle.

high angle photo
ISO 250 f2.8 1/160 sec

9. Bird’s eye view

Our last angle is the bird’s eye view. You get right up there and look straight down. You don’t have to be high up in the air for this angle, just higher than your subject.

bird's eye view photo angle
ISO 50 f2.4 1/20 Sec

Background 

10. Avoid cluttered backgrounds

A cluttered background will weaken your photo. There are two ways to deal with a cluttered background in your photo. The first is to change your angle slightly to avoid distracting elements. The second is to actually clean up your house. Of course, maybe a messy background is part of documenting home life!

15 Tips for Documenting Home Life

Use Frames

Look for objects that will frame your subject in an interesting way. Try shooting through cracks in doorways or window frames.

documenting home life framing
This photo is symmetrical, with the door in the background framing her. The funny expression on her face breaks the order of this photo. ISO 800 f/2.8 1/250 sec

Light

12. Use natural window light

Windows are a great source of natural light. You can use them for portraits, silhouettes, and just generally good lighting. Try to capture moments close to a window.

15 Tips for Documenting Home Life
It is window light that contributes to the contrast and depth of this photo.

13. Pay attention to the direction of light

Consider what direction the light is coming from. Front and sidelight are great for portraits, backlight is great for drama.

15 Tips for Documenting Home Life
Sidelight skims across his face and brings out the texture of the couch.
15 Tips for Documenting Home Life
The backlight in this photo creates a dramatic silhouette.

Think of all these elements as a stack. A couple of these elements will improve your photos, but the more of these elements you stack together, the stronger your photo will become. You don’t have to be an expert in light, moment, and composition. You only need to take small steps in each of these elements and the power is when you combine those small steps together.

Camera settings for dim light

One of the biggest problems you’ll run into indoors is dim lighting. Dim lighting can leave your photos looking dark or blurry from motion.

14. Open curtains and blinds

If it’s daytime, make sure to open curtains and blinds.

15. Help your camera see in the dark

  • Try increasing your ISO to 1600, 3200, or 6400.
  • Open your aperture all the way (look for a smaller number like f/1.8) to let in more light.
  • Consider purchasing a 35 mm or 50 mm prime lens with an aperture of f/1.8.
  • Zoom lenses usually have smaller apertures and don’t let in his much light.

These settings will help your camera let more light in and have a quicker shutter speed so that your photos are less likely to be blurry. 

15 Tips for Documenting Home Life
You’ll need to hold very steady with such a slow shutter speed. ISO 5000 f/2.0 1/15 sec

Checklist for documenting home life

Remember, you don’t have to become an expert in every single one of these areas. As you stack these elements together, a slight bit of improvement in each of these areas will give you much better photos.  A bit of emotion, from the right angle, with some interesting light, just might produce a work of art.

Settings to help with dim light

  • ISO 1600, 3200, 6400
  • Aperture f1.8

Moments

  • See moments before they happen by spotting patterns
  • Include emotion or action

Composition

  • Angles
  • Background
  • Frames

Light

  • Use windows
  • Direction of light

Feel free to add your ideas about documenting home life, or share your images in the comments below!

15 Tips for Documenting Home Life

The post 15 Tips for Documenting Home Life appeared first on Digital Photography School. It was authored by Mat Coker.


Digital Photography School

 
Comments Off on 15 Tips for Documenting Home Life

Posted in Photography


Stay creative in lockdown with these fun photo projects

05 May

A version of this article (‘Fun winter photo projects for the long, dark days of winter’) was first published in late 2019. Following the global restrictions on movement as a result of the coronavirus pandemic, this article has been updated with some additional ideas for photography in isolation.


It might feel that this lockdown situation has left our cameras totally superfluous while we can’t get out to shoot the things we would usually take pictures of. Not being able to go out means we have nothing to take pictures of. Right?

Wrong!

Just because we can’t get out and about like we normally would, doesn’t mean we have to stop taking pictures. There’s still plenty you can do, provided you’re prepared to use some imagination. Here are a few ideas to keep you shooting until normal life resumes.

Start a photo diary

A few months ago if you saw someone shopping for groceries wearing a respirator, you’d probably have called the police. As well as providing a creative outlet, a photo diary will serve as a reminder of the current weirdness, when things finally get back to normal.

Most photographers love to shoot the unusual, and you don’t get much more unusual than These Unprecedented Times. Right now everything counts as out of the ordinary.

There are a number of remarkable things about these lockdown days that are worth photographing now so we can remember them when it is all over. Streets empty that are usually busy are remarkable and can evoke the sense of historical pictures from before the invention of the motorcar. Other things that are different at the moment will be queues to get into stores and the lines marked out on the floor to show how far apart we should be.

For this abstract shot, I framed a social distancing guide inside the lattice of my shopping cart at a local grocery store.

People wearing masks and gloves – and sometimes full-body chemical suits – in the street, in stores and out exercising are also a sure reflection of the times we are in. There are signs too of social distancing, with people chatting from further apart than seems natural, delivery people standing at the end of the garden path waiting for someone to answer the door, and of course people at home making video calls to friends and family. And baking – suddenly everyone is making cakes, bread and cookies.

Perhaps start by making a list of all the things that have changed about your life, the lives of those around you and your environment, and then think about how you can record those changes with your camera.

Of course the project doesn’t need to be presented literally as a diary when this is all over, but if you think of it as a diary while you’re working, it will remind you to try shooting something every day.

Abstracts at home

It’s likely that there are abstract photographs to be had all over your house or apartment, if you use some imagination.

Most photographers find it hard to see interesting pictures in places in which they are most familiar. A trip somewhere new seems always exactly what our photography needed, as shooting away from home consistently inspires us to new artistic heights. The truth of course is that everywhere else isn’t more interesting than the place we are in, it just seems that way because over time it’s easy to become blind to the things staring us in the face at home.

Our houses, apartments, sheds, garages, bathrooms, stairways, windowsills and shoe cupboards are all harboring an infinite number of stunning, interesting, intriguing and fascinating pictures that, on a daily basis, we fail to see. If someone else came into our house they would see all those opportunities (which would be very annoying) and we would see them in theirs, but finding them in our own is a much more challenging matter.
Finding the interesting abstracts in your own home requires you to look with new eyes.

Here, the frosted glass window on a bathroom cabinet provides a frame for a simple abstract shot, without the need to go outdoors.

Pretend everything is new and that you haven’t seen it before, and then you will be free to notice the leading lines, the places where one edge meets another in delightful geometric harmony, and how the ordinary things in the kitchen are transformed when the light is on or off.

The trick here is to look slowly, and then look again. Take the time to look in detail and to look at the same thing from different angles, with different light, long lenses and wide lenses. Then move to the left a bit. You may never feel the need to leave the house again.

Country and urban landscapes

You don’t have to travel far to find nature. It doesn’t occur to a lot of photographers that there may be beautiful photographs waiting for them in their home towns and villages.

When it comes to landscapes, you should be careful, because the rules and regulations are different for each country. If you’re considering venturing out, be aware of what is allowed and not allowed where you live. In some places people aren’t allowed out of the house for any reason other than shopping for food or medical supplies. In others parts of the world, taking a walk for exercise is positively encouraged.

Where I live there are more people out exercising than ever before, so the popular places are, well, popular and too crowded for my liking. I’ve been avoiding those and walking in less obvious areas where the lack of traffic and the usual bustle has made for some interesting and unusual sights. I go early too, as it seems everyone else is taking the opportunity to stay in bed a little longer. I get the early morning light as well as empty places all to myself.

Where I live it is okay to take a camera with you when you are going out to exercise, but it’s not acceptable to just head off on a photo expedition with tripods, big bags and a pile of paraphernalia. I’ve actually been shooting a lot more with my phone, as I feel that is easier to justify to myself and I know it will delay me much less than having a proper camera with me.

Landscape photography doesn’t have to mean driving for hours to get to a beauty spot. This photograph was taken within walking distance from where I live. An emblematic image of lockdown: A completely empty highway, in the middle of the day.

Be conscious of what is acceptable in your region and don’t risk your health, or that of anyone else, by being out too long, standing in one place for ages waiting for the light, or putting yourself somewhere in which others can’t pass you without getting too close.

I live in an urban area in a mostly flat county, so I’m not expecting rolling hills and distant mountains, and I’m making do with roads, bridges, patches of green and the occasional field of crops. Landscape pictures don’t have to be of beautiful scenery, but you can usually find something aesthetically pleasing in an ordinary scene when you look hard enough.

Still life

I used a gold sheet of card from a craft store to send a little warmth back into the subject from the left hand side. The diffused flash was positioned on the right, and contrasting the white light from the flash with the gold light from the reflector emphasizes the warm effect

A good mastery of still life photography should help improve your photography across the board, and this is a good time to get some practice in. Working with a few objects on the table top with just a single light and a reflector is an ideal way to teach yourself more about lighting, exposure and composition.

If you are new to still life photography I suggest starting with just an orange and a table lamp, moving the lamp around the orange to see how the direction of the light changes the way the orange looks. Once you’ve done that and looked carefully at the way highlights and shadows control the sense of three dimensions in the image you can move on to everyday objects laying around the house.

Keep things simple by using just one or two objects in your scene, and try lighting with just one source and a couple of reflectors to moderate the shadows.

Here I used a single LED panel at the top of the frame, and a couple of mirror tiles to the left and right of the handle to throw some light back in the opposite direction. A wide aperture created a shallow depth-of-field to draw the eye diagonally up the handle to the point of focus.

The blueberry doesn’t need to be sharp for us to know it is a blueberry, and it is used as a counterweight to the main area of interest

Knives, forks and spoons offer interesting shapes and compositional challenges, and natural objects saved from the autumn, like nuts or dried leaves, give you the chance to bring nature into your work. The supermarket is also filled with interesting fruit and vegetables, and home stores and hardware stores stock nice cups, glasses and industrial looking bolts, screws, springs and fascinating sheets of metal/plastic/wood that will make interesting backgrounds.

One of the nice things about still life is that you can take your time and there is usually no rush, so you can look really carefully, try things out and try again when it doesn’t work the first time.

Tips:

  • Work slowly and really look at the effect of the light on your subject
  • Use silver, gold, white and black cards to bounce/block light
  • When used as a reflector, mirrors throw back so much light they can save you having to buy a second flash

Macro

Here a little light either side is used to demonstrate the three-dimensional qualities of the seed head and the stem, and to lift it from the black-cloth background. I used a pair of hotshoe flash units fired through mini-softboxes attached to an adapter ring

An extension of still life, macro photography will test your ability to see details and to look more closely than usual. Successful macro photography is all about finding hidden textures, patterns and features of everyday objects as well as capturing tiny plants and animals that might otherwise escape our attention.

Macro does require at least some specialist equipment, whether that’s a reversal ring, a coupling ring to mount one lens backwards on another or an actual dedicated macro lens. Using a lens designed for macro will make your life a lot easier and will deliver the best quality without too much effort, but high-quality macro lenses can be costly.

Extension tubes are very affordable, and can be added to a standard lens to help you get a little, or a lot, closer, and a micro adjustment platform for your tripod head can help when it comes to getting accurate focus in the closeup range without having to move the tripod.

Lights don’t need to be expensive. This was lit with a small pocket flashlight positioned to make these pasta shells glow in the dark. A sheet of white paper under the lens was enough to throw a touch of light back to reveal some of the details of side of the shells closest to the camera

Cable and remote release devices will help to avoid camera shake with dramatic magnifications and tethering software will allow a bigger preview to ensure anything is perfect before you trip the shutter. How about using these months of isolation to teach yourself focus stacking so you can control exactly what is and isn’t sharp in your images?

Tips:

  • Having a dedicated macro lens will make your life easier
  • Use a tripod or support, don’t think you can do this handheld
  • Be aware that depth-of-field is tiny in macro work, so add lots of light if you need small apertures

Window portraits of family

Late afternoon light on a winter’s day softly passing through a bay window was all that was needed for this portrait. I kept the sitter well back from the window to produce nice soft contrast but still retaining enough to show the shape of her head and features. Using the white balance in Daylight mode shows the coolness of the light and lets us know this is a winter image

It doesn’t matter what time of year it is – daylight gliding through a north-facing window will always provide some of the best kind of lighting for natural-looking portraiture. On rainy and overcast days the light levels might be lower but that light will also be softer and more flattering.

Position your subject close to the window if you want more contrast and further away for less, and try turning them 3/4 against the light to get a more dramatic effect. Using a black card on the unlit side of the face can help to deepen shadows if there’s more light than you want bouncing around the room. A net curtain or sheet of thin paper across the window can diffuse the daylight on a sunny day or when you only have south-facing windows to play with.

Positioning the subjects directly in front of a sunny window gives them this stark and very direct frontal lighting. I stood with my back to the window and pulled the shutters across to create the stripes on the groom’s jacket. The light on his face is reflected from the white top-side of the shutters.

As he is close to the window the light drops off quite quickly, leaving his friends visible but much darker. This helps to express who is the most important player in the scene, and who are the secondary elements.

Extra diffusion will also cut down the light making it easier to achieve a wide aperture if you want shallow depth-of-field.

Try experimenting with white balance too, so you can create a warm or cool effect whatever the conditions outside.

Tips:

  • Try positioning the sitter at different distances from the window to vary contrast
  • Move your sitter between each end of the window to alter how the light wraps around their face
  • Use net curtains, bubble wrap or paper to diffuse the light even more

Home studio

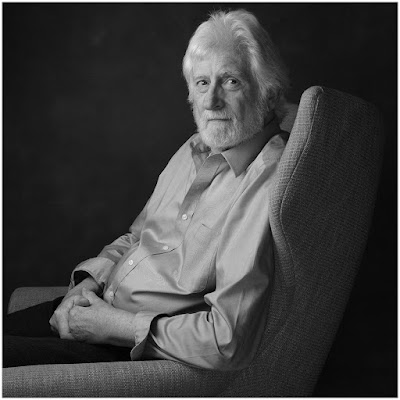
Using quite a small soft light creates strong direction but avoids razor-sharp edges to the shadows. The small light also allows a rapid fall off, so the subject’s head is lit more brightly than her body, and positioning the light just slightly behind illuminates the front of her face while leaving the side closest to the camera dark – drawing attention to her closed eyes. A small direct light from behind her lifts her shoulders from the background and helps to create a sense of depth in the picture.

Opera singer Golda Schultz for the BBC Proms Magazine

When there’s not too much natural light coming through the windows, or we need more for smaller apertures and lower ISO settings, it’s a good time to think about alternative light sources. Domestic lights can be very useful for lighting in a home studio but they don’t always deliver enough power, so sometimes we need to look at flash.

There have never been so many flash units available for photographers so we have plenty of choice. Big studio monoblock type studio flash offer the advantage of power and a modeling bulb so we can see what we are doing, but they can feel expensive for the enthusiast. A useful alternative is to use one of the host of hotshoe flash units that are available – either from the manufacturer of your camera or from one of the many independent brands that have sprung up over the last ten or so years.

This is the setup for the shot above. You can see that I believe in keeping things simple. The lights are Rotolight Annova Pro on the left and the Neo2 on the right. I used a Veydra Mini Prime 35mm T2.2 cinema lens – for a softer feel – on the Panasonic Lumix DC-G9

Modern hotshoe flash units are remarkably powerful, flexible and easy to use, and with auto and TTL modes they can be set to do all the work for you. In manual mode they offer more straight forward options and with wireless control becoming the norm you don’t have to leave the camera position to make your changes – or to check the results of any adjustments you’ve made.

What makes hotshoe style flash units so useful now is the mass of accessories and modifiers that can transform their light to be indistinguishable from that of a professional studio flash. I use adapter clamps so that my flash units can fit inside the softboxes, dishes and snoots that I use with my main studio units, and enjoy the convenience, the shorter set-up time and that they fit in smaller spaces.

Tips:

  • Keep the flash/light source away from the camera for a more three-dimensional effect
  • Bounce light from a white wall/ceiling to create a larger/softer light
  • Use an adapter that allows you to use soft-boxes and accessories with your flash head for a wider range of lighting looks

Summing up

Lockdown doesn’t have to mean putting down your camera. All that’s required is a little imagination and (ideally) a tripod. So take a look around your home to see what/who you can aim your camera at, start a photo diary, and keep on shooting until we can all get outside again.

Articles: Digital Photography Review (dpreview.com)

 
Comments Off on Stay creative in lockdown with these fun photo projects

Posted in Uncategorized


Report: B&H furloughs 20% of its staff amidst COVID-19 pandemic

05 May

According to a report from the New York Post, B&H Photo furloughed ‘about 400’ of its 2,000 employees last Wednesday, more than a month after the iconic photo and electronics superstore was forced to shut its doors due to the COVID-19 pandemic.

The New York Post cites ‘sources close to the company’ and managed to obtain a memo sent out to employees by B&H human resources director Izzy Friedman. The New York Post writes:

In a memo to affected employees, human resources director Izzy Friedman said B&H “waited as long as possible” before making the cuts, and noted the company had been paying and providing benefits for affected workers “through the Passover holiday break, and beyond to make this easier.”

B&H was likewise waiting to “evaluate the various stimulus benefits available,” but was forced in the end to furlough workers because the “crisis has continued with no clear end in sight,” Friedman added.

The New York Post also spoke with a B&H employee, who said the company’s call center is ‘busy as hell [filling orders for] computers, movie cameras and accessories for setting up a home office’ amidst the global stay-at-home directives in place around the globe. As it stands, customers can still place orders online and pick up orders pick up products curbside, but the inside remains closed at this time.

We have contacted a B&H spokesperson for confirmation of this news and other details. We will update this story with additional details if we receive a response.

Articles: Digital Photography Review (dpreview.com)

 
Comments Off on Report: B&H furloughs 20% of its staff amidst COVID-19 pandemic

Posted in Uncategorized