The post A Step-by-Step Guide to Using Light in Flower Photography for Awesome Photos appeared first on Digital Photography School. It was authored by Simon Ringsmuth.

Flowers are brilliant subjects for photography. They are bright, colorful, and are stay perfectly still for you as long as the wind is calm. You don’t need any special equipment or lenses to take great photos of flowers either. You can get great photos with just a mobile phone or a basic DSLR with a kit lens. If you really want to elevate your flower photography to the next level, you need to pay very close attention to one thing – the sun – because the light in flower photography is everything.
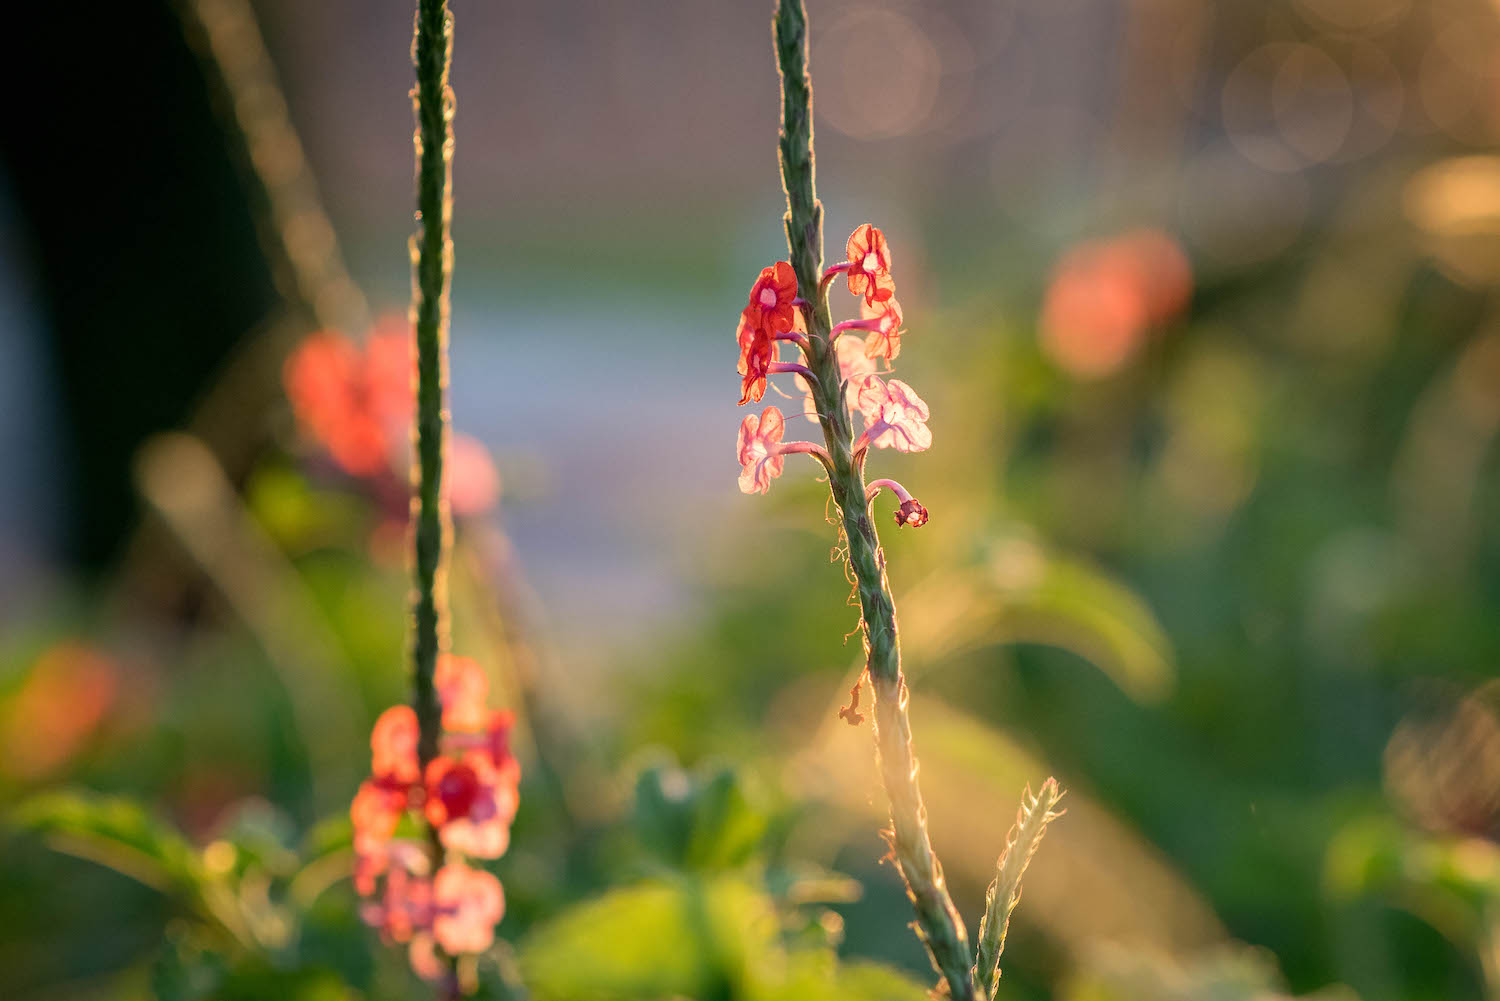
85mm, f/2.8, 1/3000 second, ISO 2200
Of course, there are other sources of light besides the sun, but this is the most obvious and easily-accessible one when considering flower photography. Unfortunately, you can’t position the sun exactly where you want it, but you can position yourself to make the best use of it. You can also take note of the lighting conditions when you go out to shoot flower pictures. Understanding how the sunlight, and your angle of view, affect the finished product is key to getting great shots.
Don’t let anyone tell you that if you want to get good pictures of flowers you have to do it in certain conditions like a cloudy day or the evening. In truth, you can get great flower photos almost any time as long as you pay attention to the sun and the shot you are trying to get. Let’s take a look at some different scenarios and see how they affect flower photography.
Time of day
The time at which you shoot, such as early morning or mid-afternoon, can have a huge impact on your flower photos. In addition to altering the amount of light available, shooting in the morning or evening changes the type of light. It also changes the angle at which it hits your flowers and the surrounding area.
I shot the picture below just as the sun was coming up. The blurry triad in the background is a street lamp that had not yet turned off. It added a nice background touch to the picture. This would have looked entirely different had I taken the picture a few hours later.

50mm, f/1.8, 1/180 second, ISO 400.
If you want your flowers gently illuminated for a soft, almost hazy appearance, then early morning or late evening is going to work great. However, if you want your flowers bright, sharp, and punchy, then harsh overhead lighting is ideal.
It all depends on the type of picture you want to take and knowing how the lighting conditions affect the final image.

50mm, f/2.8, 1/1500 second, ISO 200
A monarch butterfly joined me as I was taking the above picture in the afternoon. The bright overhead sun made the reds, yellows, and greens bright and crisp, which doesn’t happen in the early morning or late in the day.
The sun was directly overhead when I took the picture below. This caused each of the colors in this picture to shine. It turned out I wasn’t the only one interested in this particular magnolia flower.

50mm, f/1.8, 1/6400 second, ISO 200
You can get great pictures of flowers at any time of the day. Just make sure you know where the sun is and how it will impact your pictures. Armed with that knowledge, you’ll be able to make better choices about the pictures you are going for.
Types of light in flower photography
Backlighting vs. front lighting
Backlight is when the main source of light comes from behind your subject. This can lead to some creative scenarios, especially when used to shoot subjects with rim lighting. Conversely, front light is when the main source of light comes from the front of your subject, usually behind the photographer.
Either one of these types of lighting works great for flower photography. However, you need to understand how backlighting and front lighting affect your flower pictures, so you know which one to use. I photographed the flower below with front lighting. The sun was behind me as I took the picture.

85mm, f/1.8, 1/3000 second, ISO 100
Front lighting makes the purples really stand out, especially against the background. There are also some prominent shadows along the left-hand side and at the base. These are neither good nor bad, just a result of using front lighting.
A similar flower, shot in the same location a few minutes later, reveals a much different image when employing backlighting.

85mm, f/2.8, 1/500 second, ISO 560
Notice how the petals almost look like they are glowing as the sun shines through them. The shadows are more diffused, which is also due to the late hour of the day at which this was shot. Both pictures are good but in different ways. If you traditionally shoot flowers with front lighting, try doing some backlit shots and see if you like the results.

Another backlit flower, where the shining sun made the yellow flower appear bright and radiant.
Sunny vs. overcast
There’s a common perception among photographers that cloudy, overcast skies make for some of the best lighting conditions. While I certainly enjoy shooting on days like that, the truth is, you can make any lighting condition work for flower photography. You just need to know how the light will affect your images.
One of my favorite flower photos I have ever taken was in the middle of the day just after a bit of rain. It’s a few coneflowers low to the ground. The overcast sky led to even lighting across the entire frame and rich, deep colors. There are no harsh shadows, no translucent petals, and no bright spots in the background. Instead, the frame is a mix of saturated greens, purples, and reds that I really like.

50mm, f/1.8, 1/640 second, ISO 200
Another example of this is the following picture, which I took in the morning after a night of thunderstorms. The clouds overhead dispersed the sunlight into all directions, which gave me an evenly-lit scene that worked great for this particular show.

85mm, f/1.8, 1/200 second, ISO 125
However, these two pictures don’t mean you can’t take great flower pictures in bright sunlight. Far from it! Just know that flower images in bright sunlight will look much different than their cloudy-skied counterparts. The picture below is similar to the one above, but I took it on a bright sunny day.

50mm, f/1.8, 1/8000 second, ISO 360
This picture is neither better nor worse than the one above it, just different. Bright sunlight makes the red petals leap out of the frame. The rich blue sky and deep shadows of the grove of trees add a sense of space and depth that is missing in this picture’s counterpart.
Similarly, I photographed the purple magnolia flower below on a bright sunny day, but with just a bit of cloud cover. It’s kind of a cross between sunny and overcast and yields an interesting picture.

85mm, f/1.8, 1/200 second, ISO 140
The sun was off to the left, making the white inside of the flower petal shine out and compete with the purple in the foreground for the viewer’s attention.
I show all these examples as an illustration that you can get great shots of flowers in a variety of lighting conditions. The key is to use the sunlight (however it happens to be at the moment) to your advantage by knowing how it will affect your flower photos.
A comparison
If you can’t control the light in your flower photography, you can still control the angle from which you shoot your pictures. This has an amazing impact on how your flower photos turn out.
I shot the three photos below on a bright sunny day in about three minutes. The same flower is in each shot, and I used a 50mm lens with an f/2.8 aperture. The only difference is the angle from which I took each photo but that one simple thing changes each picture a great deal.
In this first picture, the flower is front-lit, meaning the sun was behind me and almost directly overhead as I took the photo. Notice the bright orange colors and stark shadows, which create a sense of depth and isolation. The background is shrouded in shadow because of the overhead light and the angle from which I took the picture. I see a lot of pictures similar to this online, especially on social media sites.

50mm, f/2.8, 1/2000 second, ISO 100
For this next photo, I stood in the exact opposite spot, looking up from below into the sun. Notice how the petals have become brilliantly translucent, and the greenery on the left is bursting with blurry bokeh.
It’s an entirely different version of the same flower and didn’t require anything on my part other than a simple perspective change.
Unlike the first picture, I don’t often see flower shots like this on social media. This is most likely because it’s just not something a lot of people think about doing.

50mm, f/2.8, 1/2000 second, ISO 100
I photographed this final image from the side, and what’s interesting here isn’t necessarily the flower but the background. From this angle, the background was entirely green, making the oranges and reds of the flower scream out by comparison. The lighting is similar to the first image, but this one is a lot more interesting to me because it’s a mix of colors instead of a flower against a mostly black background.

50mm, f/2.8, 1/2000 second, ISO 100
I really want to stress that none of the pictures in this tutorial are objectively better than any others. What I hope to have illustrated is that paying attention to the light in flower photography, as well as considering alternative viewpoints from which to shoot, can dramatically impact your flower photos.

23mm, f/5.6, 1/160 second, ISO 200. I had to hold my camera high above my head and fire off a series of shots hoping one of them would turn out. It did, and I’m so glad I didn’t just shoot a single sunflower from my normal eye level.
If you enjoy taking pictures of flowers, hopefully these images will give you some new ideas to consider. And if you haven’t spent much time out in nature capturing the beauty of blossoms like this, I hope you can find some time to go out, look at the lighting in flower photography and give it a try. You might be surprised at what you can get!
I’d love to see some of your shots – please share them with us in the comments below.
The post A Step-by-Step Guide to Using Light in Flower Photography for Awesome Photos appeared first on Digital Photography School. It was authored by Simon Ringsmuth.

Digital Photography School


You must be logged in to post a comment.