RSS
 

Archive for August, 2018

How to do Light Painting and Illuminate Your Photography

17 Aug

The first time I did light painting was by mistake. It was New Year’s Eve, it was cold and dark, my brother was holding a sparkler, and I was playing with my camera.

Midwinter light painting - How to do Light Painting and Illuminate Your Photography

I was immediately fascinated by the result. Until then, I had always thought of and used photography as a way to capture what I saw. But there was a photo of something ephemeral I hadn’t perceived with my eyes but could see only thanks to the camera.

That was a long time ago, but it’s when I started appreciating the camera not just as a tool to record what I saw, but as an additional sense that could help me see even more. My appreciation of light painting has only grown since then.

Light painting with lights from a broken monitor - How to do Light Painting and Illuminate Your Photography

What is light painting?

Light painting is a pretty broad term that includes everything from using a light source to illuminate specific parts of a scene, to using the light itself as the main subject.

The light source can be everything from a flashlight or a phone to light panels or headlights or even the moon! Basically, it can be anything that emits light.

Light painting with the moon - How to Write with Light and Illuminate Your Photography

The light source in this photo is the moon; instead of moving the light source, I moved the camera.

Light painting is a fun way of taking your photography to the next level. Even if it isn’t something that you think would fit your style of photography, it’s worth trying both for the fun of it and for the things you’re guaranteed to learn about your tools and the art.

In this article, I hope to give you some inspiration and the basic information you need to start experimenting. I’ll be focusing on the kind of light painting where the light itself is the main subject, and specifically on something that might more accurately be described as light scribbling. You’ll see what I mean.

Light painting and light scribbling on a piano: the Pythagoras theorem

What’s the point?

There is always a point to try something you’re going to learn from, and that you’re going to enjoy doing.

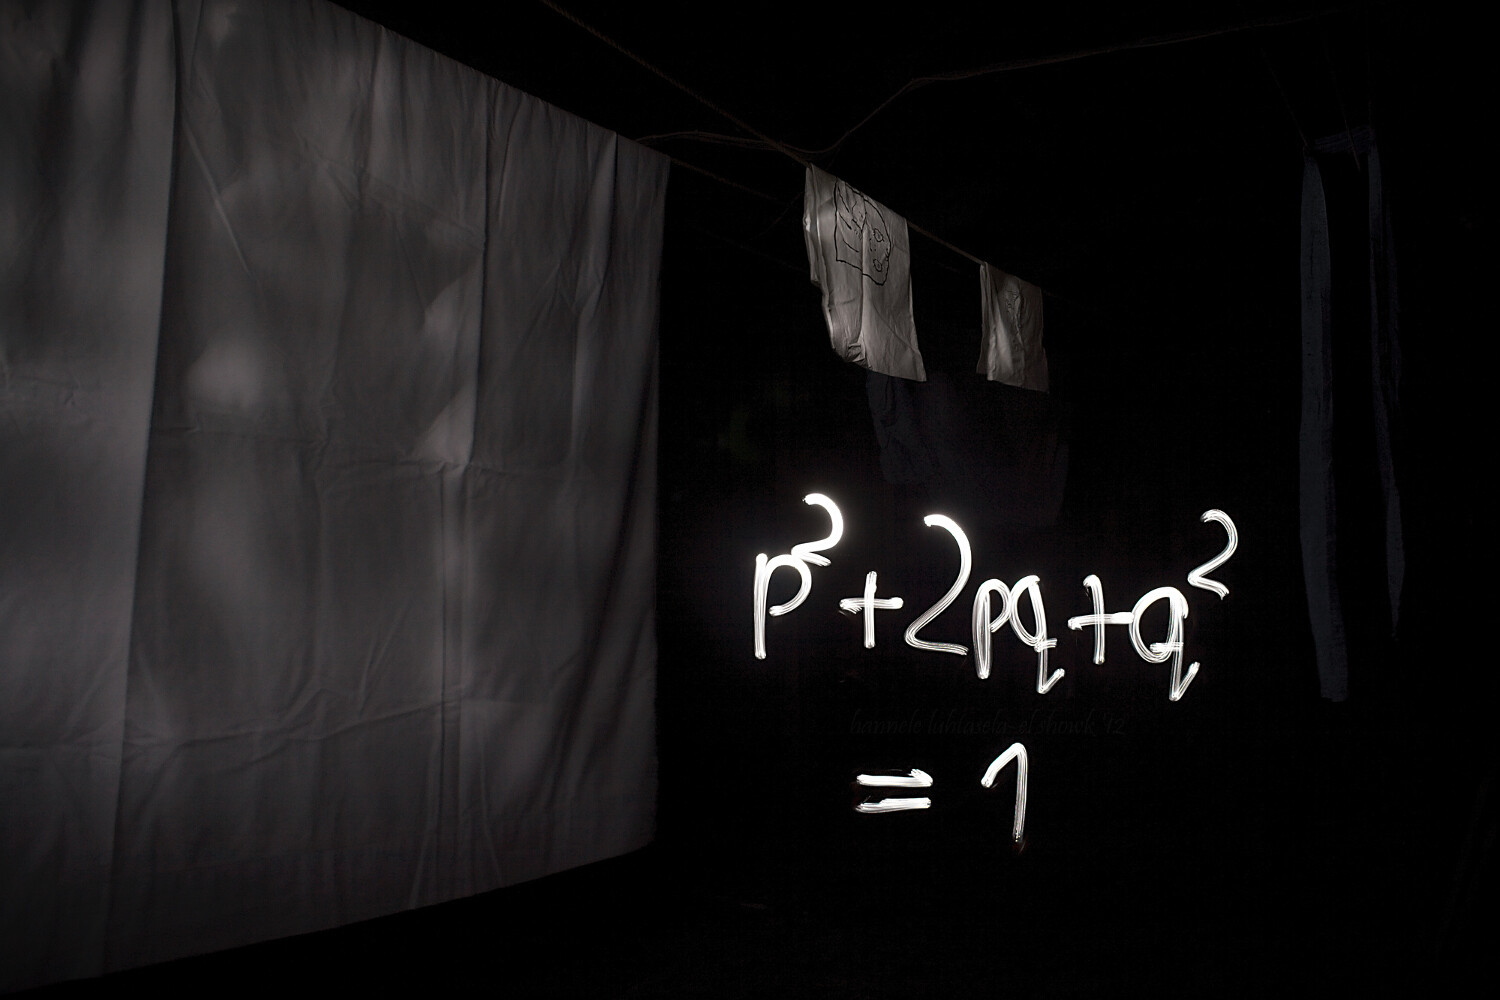
I’m mainly illustrating this article with some light scribbled equations that I made some time ago. What was the point? Geeking out, finding something to do on a dark winter’s night, getting familiar with my new tripod, practicing manual exposure, and getting better at writing backward.

I accomplished most of it.

Einstein's famous equation made by light painting.

Doing light painting is indeed a great way to learn about camera modes and settings you might not commonly use. For most kinds of light painting, you’ll need darkness, and darkness brings with it a whole new set of challenges.

You’ll need to do quite long exposures and to find a way to illuminate the parts of the scene you want while avoiding capturing yourself in the picture. You’ll often also need to focus manually and figure out the best exposure for your photo, which can be quite different from that for most other scenes.

A physiogram made with a head lamp. - How to do Light Painting and Illuminate Your Photography

A physiogram is made by hanging a light source and photographing its movement.

I’m mostly using light scribbled equations in this article, but the technique can also be used for creative birthday cards, unique wedding portraits, and a non-permanent kind of street art.

Your imagination is the limit!

How complicated is it?

It’s surprisingly easy to get started with light painting or scribbling, and the basic tools are nothing fancy. At its most basic, you’ll need a camera, a tripod, and a mobile light source. That’s all.

To get you started, I’ll be using my equations to explain the process and the tools. Use this as a starting point to extrapolate from and to experiment with to get what you want.

Light painting an equation: the circumference of a circle

Setup

To get a photo like the one above, you’ll need your camera and a tripod (or a stable surface to keep your camera on), and a dark night. Since it takes a while to write, your shutter speed should be on Bulb, which means that the shutter stays open until you close it.

Making many of these long exposure photos will use up your battery quite quickly, especially if it’s also a bit cold outside, so bring an extra battery or two. You need to change the drive mode to self-timer/remote, so you don’t shake the camera when it starts exposing and to help you with focusing.

Often you don’t need to stress about standing ready to scribble, though. Uou can just walk into the frame after you start the exposure.

Capturing fire with a long exposure. Light painting tips

Focusing

Focusing takes a bit of effort, but it’s nothing too tricky. The difficulty comes from the darkness of the scene, which means that the camera might have a hard time focusing automatically.

You can focus manually, but what I usually do is let the camera focus automatically. I mark the spot where I’m going to stand to do the scribbling, go to that spot in front of the camera (or ask a helper to do it), turn on my light source and use the remote trigger to take a test shot.

Then, before doing anything else, I turn the focus to manual so the camera doesn’t start focusing again when I want to take the real photo. This way the camera will stay focused on the spot you chose, as long as you don’t touch the lens.

Light painting scribbling in the attic: the Hardy-Weinberg equation.

After that, all that’s left to do is the scribbling!

Make sure to wear something dark if you don’t want to be visible in your photo. For writing, you want a light source, such as a flashlight, that can be easily turned off and on. This way, you can make separate symbols without too much effort.

Before you open the shutter and start taking the photo, think about what you’re doing. If you’re writing something, practice the motion you want to do in the air so you get a feel for it. Then start taking the photo, scribble, draw, paint or do whatever it is you want to with your light, and stop the exposure.

It will probably take a few tries to get it right, so be patient and enjoy the process. You’ll definitely be creating something unique.

NOTE: You don’t necessarily need to write backward. If there is nothing else in the scene with words you can simply flip the image later on the computer. 

Light painting equations at night: the Lotka-Volterra equation.

In this one, the boat worked as a canvas: instead of drawing in the air I could draw straight onto the boat.

Conclusion

Drawing or painting with light is a really fun and rewarding exercise that requires some patience, but not much else.

I’d love to see your photos of light painting and scribbling and hear your thoughts in the comments below.

The post How to do Light Painting and Illuminate Your Photography appeared first on Digital Photography School.


Digital Photography School

 
Comments Off on How to do Light Painting and Illuminate Your Photography

Posted in Photography


Wellcome international photography competition seeks health and medicine images

16 Aug
Main image: Anne-Katrin Purkiss, Wellcome Image Award winner 2009.

Wellcome, a charitable foundation based in the UK, has launched a new international photography competition seeking images related to health, medicine, and science. Called the Wellcome Photography Prize 2019, the competition is open to submissions until December 17, 2018, with winners announced on July 3, 2019.

The photography competition seeks “pictures that show the importance of health in society and the impact health issues have on people and communities worldwide,” according to the contest Web page. A total of four categories are presented:

  • Social perspectives – explore how health and illness affect the way we live
  • Hidden worlds – reveal details hidden to the naked eye
  • Medicine in focus – show health and healthcare up close and personal
  • Outbreaks (2019 theme) – capture the impact of disease as it spreads.

Photographers and other “image makers” may submit an unlimited number of images, but the same image cannot be submitted under multiple categories. In addition to photography, the competition is open to other techniques, including medical imaging from devices like MRIs, microscopy, data visualization, 3D printing, mixed media, and more.

Each category winner will receive a £1,250 prize; the overall competition winner gets £15,000. All prizes are presented in London on July 3, 2019, at an awards ceremony. As well, all shortlisted entries and winners will be showcased at Lethaby Gallery at the University of the Arts London.

The Wellcome Photography Prize 2019 terms and conditions are available here. Entries can be submitted on Wellcome’s website.

Via: The Guardian

Articles: Digital Photography Review (dpreview.com)

 
Comments Off on Wellcome international photography competition seeks health and medicine images

Posted in Uncategorized


Unlocking the Power of the Basic Panel in Lightroom

16 Aug

Lightroom is anything but intuitive for new photographers. Its multitude of panels, sliders, menus, and buttons are enough to make your head spin. But fortunately, there’s hope for even the most beleaguered beginner.

Amid all the options and icons is a single panel in the Develop module that can handle most of the basic editing tasks you are likely to need on any given image. Appropriately titled “Basic,” this one panel contains a plethora of sliders each with its own unique effect.

Once you get the hang of these you’ll start to feel right at home with the way Lightroom works. The first step in becoming familiar with the Basic panel is understanding what each of the sliders does, so let’s examine each of them in detail.

maternity photo - Unlocking the Power of the Basic Panel in Lightroom

You and Lightroom: A match made in heaven

The Lightroom Basic Panel

The Basic panel is broken into three general areas; WB (or White Balance), Tone, and Presence.

Each has a few sliders that control specific types of edits and it’s not uncommon for 95% of your editing to be done right within this one panel.

Despite its meek-sounding name, the Basic panel is a powerful and highly effective tool that you can use to give your images the type of punch visual appeal you need.

Unlocking the Power of the Basic Panel in Lightroom

These sliders are in the Basic panel, but they can do quite a lot.

The Temp Slider

Lightroom’s nomenclature can seem somewhat daunting, especially if you don’t have a background in photography or image manipulation. Temp is the abbreviated form of Temperature, though a true beginner would be forgiven for thinking it simply meant Temporary (Lightroom is not good at helping people learn these sorts of things.)

The temperature of an image, broadly speaking, is how warm or cool it appears. If you really want to dig deeper with White Balance this article is a good place to start.

Move the slider to the left and it will give your image a blue tint, but move it to the right and it will appear to have a yellow cast. If you are editing a JPG image this slider will let you change the value to ± 100, whereas shooting in RAW lets you go from 2,000 to 50,000.

The reason it’s called Temp is that you are adjusting the degrees Kelvin temperature of the white level of the photo. But you don’t need to know all the technical terminology to get good results. If a picture feels too cold or too warm, adjusting this one slider can go a long way towards fixing your photo.

Unlocking the Power of the Basic Panel in Lightroom - white balance temp slider

The Tint Slider

This slider works in tandem with Temp to give your image just the right color cast. As you slide Temp back and forth, your White Balance will get closer to where you want it, but it might result in an image that looks somewhat green or red. You can then use the Tint slider to fix that, giving your image just the right look and feel.

If you prefer Lightroom to do a bit of the heavy lifting for you, you can use the large eyedropper icon in the top-left corner of the Basic panel to get your image most of the way towards a proper White Balance and Tint.

Click the eyedropper and then click on a light gray (not pure white) area of your image. Lightroom will adjust the Temp and Tint sliders to what it thinks are the best values for your image. It’s a good starting point and will often get you pretty close to the look you want.

tint slider magenta to green - Unlocking the Power of the Basic Panel in Lightroom

Exposure Slider

Move this slider and you’ll quickly get an idea of what it does. It simply makes your picture brighter or darker. This is a global adjustment that affects all areas of the image including the light parts, mid-tones, and dark portions all get brighter or darker when you move the slider left or right. (Note: The Exposure slider mostly affects mid-tones although other tones are also affected.)

You can see this reflected in the histogram above the Basic panel. Move the slider to the left or right and the entire graph moves to the left or right.

Exposure is often used to compensate for when a picture doesn’t come out right from the camera. This usually happens if the camera wasn’t metering the scene properly or exposure compensation was enabled by mistake.

Exposure is like a blunt instrument that goes a long way towards making dark images lighter or light images darker. Then you can use additional sliders in the Tone section to fine-tune your picture.

exposure slider - Unlocking the Power of the Basic Panel in Lightroom

Contrast Slider

You might have seen a slider like this on your TV. If you have ever adjusted the values, you probably noticed that as contrast increases, the picture also gets more vivid and punchier. That’s because higher contrast results in a greater degree of variance between light and dark areas.

The same holds true for the Contrast slider in the Lightroom Basic panel. Move the Contrast slider to the right and the bright areas will get brighter while simultaneously making the dark areas darker.

Contrast can also have a negative value which makes your image seem almost hazy since the farther you move the slider to the left the less difference there is between light and dark areas.

Most photographers don’t find negative contrast values particularly useful. But it can come in handy depending on the type of style you are going for in your image editing.

contrast slider - Unlocking the Power of the Basic Panel in Lightroom

Highlights Slider

This slider, in conjunction with Shadows, works especially well if you shoot in RAW format. That is because much of your image data that might be discarded in a JPG file is still available to you when editing RAW files.

When you move the Highlights slider to the left it makes only the bright parts of your image darker. Conversely, when you move it to the right the bright parts get even brighter.

This works wonders on images where some parts are properly exposed but other parts are blown out and you want to decrease the exposure of just the bright parts.

Highlights slider - Unlocking the Power of the Basic Panel in Lightroom

Shadows Slider

Whereas the Highlights slider only affects the bright portions of an image, the Shadows slider lets you adjust the degree to which the dark areas get lightened.

Many photographers begin their editing by moving the Highlights and Shadows sliders, often by moving Highlights to the left just a bit and Shadows to the right. This will make dark portions of the image brighter while simultaneously making bright portions darker.

Some image editing programs only allow you to bring the highlights down and shadows up, but Lightroom takes a slightly different approach. You can, if you so choose, make the bright areas even brighter and the dark areas even darker by moving the sliders to the right and left, respectively.

Most photographers don’t take this approach but it’s nice to know you have it available if you want to use it.

Shadows slider - Unlocking the Power of the Basic Panel in Lightroom

Whites Slider

While the Whites slider might seem somewhat similar to Highlights, it doesn’t actually adjust the brightness of lighter portions of an image. Rather, it makes the whiter areas more white. The effect might seem subtle, but careful adjustment of the Whites and Blacks sliders can have a similar effect to the Contrast slider but it offers you more fine-grain control over the outcome.

I often begin with a +25 adjustment on the Whites slider just to give my images a bit more punch and brightness and then adjust it as needed.

It’s easy to overdo it when adjusting the Whites slider. You might find that going much past 50 will give your images a strange and unnatural look so take care when editing that you don’t overdo it.

You can also get good results by moving the Whites slider to the right while also moving the Highlights to the left. This tends to result in a bit more even-handed editing while giving your images the added spark you might be looking for.

whites slider - Unlocking the Power of the Basic Panel in Lightroom

Blacks Slider

The Blacks slider works just like the Whites slider but in reverse. It makes the dark portions of an image more pure black which can give a nice sense of contrast and tone to a photo.

When you first adjust this slider it might seem like it has the same effect as the Shadows slider, but careful examination reveals a subtle difference in that it is not actually making the dark portions brighter or darker, but adjusting the intensity how black the darkest portions are.

Similar to the Whites slider you might get good results by lowering the black levels and then increasing shadow detail just a bit.

blacks slider - Unlocking the Power of the Basic Panel in Lightroom

Clarity Slider

Of all the sliders in the Basic panel, Clarity is probably the one that is the least understood and depending on who you talk to, the most abused. Clarity does not adjust the overall contrast of an image but instead, it adjusts what’s known as edge contrast.

Whenever there are harsh lines or edges, adjusting the clarity slider to the right will make them stand out and have a little more pop or visual punch than they otherwise might. Moving it too far to the right will result in images that look artificial and unnatural, but it can be useful to use high values if they get you the result you want.

Conversely, you can move Clarity to the left to make your images appear softer and almost a bit ethereal.

Keen image editors will note that the Adjustment Brush tool contains an option called Skin Smoothing which is merely a -40 Clarity adjustment that you can paint in wherever you want. Using this on a person’s face has the effect of removing the appearance of pores and even small hairs that can, if overused, lend an unnaturally smooth look that you might see in magazines or other media.

Clarity slider - Unlocking the Power of the Basic Panel in Lightroom

Dehaze Slider

Arriving a few years ago for Lightroom Creative Cloud users, the Dehaze slider does pretty much what its name suggests, although the results are not always as good as what users might want.

The idea of the Dehaze slider is that by moving it to the right on images with a bit of a foggy or hazy appearance, you can mitigate some of the issues causes lens imperfections or atmospheric intrusions.

It’s not a perfect solution, but if used in the right conditions it can go a long way towards fixing an image that might have otherwise ended up in the rejected pile.

dehaze slider - Unlocking the Power of the Basic Panel in Lightroom

Vibrance Slider

Have you ever taken a picture that you thought would look awesome, but after importing it into Lightroom, just seemed kind of dull and boring? As if the lifeblood had somehow been sucked out of its colors? Vibrance aims to fix that and it works especially well on images of nature and landscapes.

Whereas saturation adjusts the overall color intensity of an entire image, Vibrance works by making duller colors more vivid. It’s also smart enough to leave skin tones alone which means you can make a scene look a little more interesting and colorful without resulting in portraits that are unnatural or oversaturated.

Vibrance slider - Unlocking the Power of the Basic Panel in Lightroom

Saturation Slider

This option can take even the dullest and most boring image and add a massive punch of color. Or it can be used to turn vibrant pictures into faded black-and-white versions.

When you slide the Saturation slider to the right it increases the value of all the colors in an image, whereas moving it to the left has the opposite effect and can eliminate all color entirely.

Similar to the clarity slider, saturation is powerful but easy to overuse and I find that it’s best when adjusted in relatively small amounts.

saturation on a portrait - Unlocking the Power of the Basic Panel in Lightroom

Conclusion

If you are new to Lightroom and unsure of where to even begin, the Basic panel is a great way to get you where you might be trying to go.

Even though the goal of this guide was to give you a good understanding of the sliders in this panel the best way to learn is to try it out for yourself. Open up some images and start using the sliders and see what you can do with them. You might be surprised at your results!

Remember that Lightroom is non-destructive so you can always undo your changes which makes it even easier to edit or just experiment for fun.

The post Unlocking the Power of the Basic Panel in Lightroom appeared first on Digital Photography School.


Digital Photography School

 
Comments Off on Unlocking the Power of the Basic Panel in Lightroom

Posted in Photography


Magnum Photos partners with Scottish distillery to release limited-edition whisky

16 Aug

To celebrate the construction of a new $ 178 million distillery, Scottish whisky distillery Macallan has partnered with the international photo cooperative Magnum Photos and six of its photographers to create the Macallan Masters of Photography: Magnum Edition. The limited-edition box-set includes input and images from some of Magnum’s most well-known photographers, including Steve McCurry, Martin Parr, Paolo Pellegrin, Mark Power, Gueorgui Pinkhassov and Alec Soth.

Inside the vibrant portfolio-style packaging is bottle of highland single malt whisky, crafted by drawing from eight different casks, each of which was chosen ‘to reflect the photography style of each of the Magnum photographers and to represent Magnum itself.’ The whisky’s color is a ‘deep amber with rose gold hues’ and smells of ‘hints of peat layered into warm spiced ginger with mellow oak notes.’

Six 11×14-inch signed prints from each of the Magnum Photos photographers are included inside the box, which was designed to look like the ‘classic photographic portfolio boxes on display at the Magnum studio.’

As part of the collaboration, each of the six photographers went to Scotland to capture images of the new distillery in various stages of construction. Magnum Photos has shared a wonderful post highlighting the photographs each artists captured.

This isn’t the first time Macallen has partnered with photographers, either. The Macallan has released multiple limited-edition Masters of Photography Series, celebrating the achievements and work of photographers including Annie Leibovitz, Elliot Erwitt, Mario Testino, Steven Klein, Albert Watson and Rankin.

The Macallan Masters of Photography: Magnum Edition is limited to 2,000 units and is currently available around the world for $ 3,500.

Articles: Digital Photography Review (dpreview.com)

 
Comments Off on Magnum Photos partners with Scottish distillery to release limited-edition whisky

Posted in Uncategorized


App-based camera triggers compared: Alpine Labs Spark & Miops Mobile Dongle

16 Aug

Introduction

From left, the Alpine Labs Spark and the Miops Mobile Dongle.

Finger. Shutter button. Click. Next.

That sequence is so ingrained in our idea of “taking a photo” that it’s pure muscle memory. Many situations call for more than just the press of a finger to capture a shot, though, which is where remote triggers come in.

Plenty of us have a remote release cable buried in our camera bags that activates the shutter from a foot or two away. But what about when you want to trigger a night sky shot in the bitter cold from within the comfortable confines of a sleeping bag? Or hours of time-lapse long exposures? What about automatically tripping the shutter when something moves in front of the camera?

These are exactly the needs that app-based triggers are designed to meet. And while there are traditional accessory triggers that’ll individually accomplish one of the above tasks, none do it all.

Key features of app-based remote releases

  • Remotely trigger a camera’s shutter
  • Automate time-lapse capture sequences
  • HDR capture that’s more flexible than some cameras’ built-in modes
  • Activate the camera shutter using external stimuli such as sound or movement (Miops only)
A photo shot using the Miops Mobile Dongle’s sound trigger function.

Devices to enable remote capture aren’t new, but the popularity of smartphones has shifted attention to app-based solutions. With a small activation device or cable connected to the camera, software on the phone can handle the details—and be easily updated for fixes or new features. I looked at two recent products that connect your camera and smartphone, the Alpine Labs Spark and the Miops Mobile Dongle.


Alpine Labs Spark
$ 74 | AlpineLaboratories.com

The Alpine Labs Spark can sit in the camera’s hot shoe.

The Alpine Labs Spark ($ 74) is a triple-purpose remote trigger. The unit itself sits on top of your camera in the hot-shoe and connects via USB – you need to make sure you have the right cable for your camera model – with a single button on top that can activate the shutter when pressed. Or, for compatible cameras with infrared ports, the Spark on its own can trigger a shot wirelessly.

Things get more interesting with the third connection method, paired with a smartphone running the Spark app via Bluetooth wireless networking. When both devices are within range (up to 100 feet), the app can trigger the shutter remotely, or you can set a timed or manual long exposure capture. The Spark includes a battery that Alpine Labs says is good for more than 2,000 hours.

The trigger options in the Spark app. Setting a long exposure in the Spark app.

You also have control over creating time lapse images, setting an interval and total duration of the shoot, such as one frame every 30 seconds over the course of an hour. Or, you can capture a series of HDR brackets with the option of choosing the number of images and the exposure adjustment between each shot. There’s even a Photo Booth mode that dictates how many photos to capture and the delay between each shot.

Commands are sent and stored in the battery-powered Spark, so for long exposures or time lapse sequences, the app doesn’t need to stay engaged and drain your phone’s battery.

With the Spark connected to my Fujifilm X-T1, I couldn’t get the Time Lapse mode to work at all

Although the Bluetooth connection promises more interesting uses, “interesting” can go in a few different directions, and not always forward. With the Spark connected to my Fujifilm X-T1, I couldn’t get the Time Lapse mode to work at all; even more annoying is a bug that repeatedly pops up a dialog exclaiming that the time lapse is finished. Similarly, the HDR mode was spotty during my time with the unit; sometimes it worked, sometimes it didn’t.

The Spark offers exposure adjustments in full stops, not partial ones, and for whatever reason, when I’m capturing three shots with one-stop difference between them, I end up with three identical one-second exposures. It also assumes you’re only shooting in dark conditions, because the fastest shutter speed it offers is 1/10 (the camera needs to be in bulb mode).

Ultimately, the Spark shows promise, but Alpine Labs needs to work through some software issues.

What we like:

  • Compact and easy to pack
  • Device sits in camera’s hotshoe
  • Camera can be triggered via USB, infrared or Bluetooth (using a smart device and the Spark app)

What we don’t:

  • Overall, unreliable
  • Buggy mobile app
  • Only full stop exposure adjustments offered


Miops Mobile Dongle
$ 37 | Miops.com

Unlike the Spark, the Miops Mobile Dongle ($ 37) is literally just a cable that connects your camera to a smartphone. The cable has two sections: one attaches to your camera’s USB port (you need to specify your camera mode when ordering), and the other attached to the headphone port on your mobile phone. If you own a recent iPhone or Android phone that doesn’t offer a dedicated headphone port, you can use the adapter that came with your phone – yes, that means a dongle for the dongle (see image below).

The Miops Mobile Dongle is a pair of cables (assisted by the Lightning port adapter that came with the iPhone X), which communicates using the Miops app.

With the connection made, the Miops Mobile app presents 15 different ways to trigger the camera’s shutter. There are the usual methods, like Cable Release, Self Timer, and Basic Timelapse, but those are just basics. With the Miops app, the phone plays a much more interactive role.

Some of the options in the Miops app.

For example, you can trip the camera shutter when the phone’s microphone registers a sound above a specific volume level, or when the phone’s built-in camera registers movement. Or take advantage of the phone’s accelerometer and grab a shot when it detects vibration. The Road Lapse feature uses the phone’s GPS to record a shot every X number of meters or feet as you travel, up to a specific number of frames.

Some of the features automate other tasks to make things easy for you, such as HDR Timelapse, which captures brackets at set intervals, or Bulb Ramping Timelapse, which lets you set an initial exposure and a final exposure so the shots remain evenly exposed even as light levels drop or rise (during sunset or sunrise, for instance).

Running a Bulb Ramping Timelapse in the Miops Mobile app. The Miops Mobile app uses the phone’s microphone to trigger the shutter by sound.
Whacking the underside of the table provided the sound needed to trigger the shutter using the Miops dongle. Here’s the setup for capturing a shot based on sound.

A ‘Scenario’ feature enables you to combine modes like a recipe, such as firing an HDR once a sound level is reached. As a bonus, there’s also a Neutral Density Calculator to figure out ideal shutter speeds when using ND filters, and a Solar Calculator that lists sunrise and sunset times.

The downside to the Miops Mobile Dongle is that the phone has to be physically connected
to the camera

The downside to the Miops Mobile Dongle is that the phone has to be connected by the cable to the camera. So, even if the camera is set up on a tripod, you’re still juggling the phone. I solved that by purchasing an inexpensive mini ball head mount that fits into the camera’s hot shoe, and then screwing a Studio Neat Glif onto it to hold the phone in place.

Even without a wireless connection, though, the Miops software offers plenty of remote-triggering options at an affordable price.

A sample time-lapse video shot using the Miops Mobile Dongle and a Fujfilm X-T1.

What we like:

  • Compact and easy to pack
  • The Miops app’s many triggering methods, including sound and motion
  • Reliability
  • Affordability

What we don’t:

  • The dongle’s physical connection requires juggling a phone
  • Some modern phones that lack headphone ports require that you add a dongle to the dongle

Miops also sells the $ 125 Mobile Remote, which is a wireless device akin to the Spark, and the $ 219 Miops Smart, with additional triggering modes like a laser sensor.

Articles: Digital Photography Review (dpreview.com)

 
Comments Off on App-based camera triggers compared: Alpine Labs Spark & Miops Mobile Dongle

Posted in Uncategorized


Review: the GoPro Fusion is a different kind of action camera

16 Aug

Introduction to the Fusion and OverCapture

The GoPro Fusion ships with an extendable selfie stick that doubles as a small tripod.

GoPro may have jump started the action camera market, but the Fusion is different than all the GoPros that came before it: it’s a true 360 camera. Instead of using a single forward-facing lens, its two ultra-wide angle lenses capture a full 360 spherical image of everything around it.

Unlike most 360 cameras, the Fusion is designed to create both spherical and standard HD videos, potentially offering action camera users more capability than they can get from their current action camera – something that’s become progressively difficult in a highly commoditized market. If action/adventure is your game and your workflow is geared towards mobile and web, the GoPro Fusion may be the camera you’re looking for.

Key features

  • 360 video: 5.2K/30p, 3K/60p
  • 360 photo: 18MP 5K 360 photos (5760 x 2880)
  • OverCapture for creating HD videos
  • Image stabilization
  • Spatial audio (4 microphones)
  • Waterproof (5m/16ft.)
  • GPS
  • Wi-Fi + Bluetooth
  • Smartphone app + desktop software
  • Includes two 32GB SD cards (75 minutes record time)
  • Removable battery (75-80 minutes record time)
A view of the Fusion’s twin offset lenses.

What makes the Fusion most exciting, and what is arguably its main selling point, is ‘OverCapture’, a feature that allows you to pull standard 1080p HD videos from anywhere within the 360 sphere.

This is an entirely different way of producing video content. Since you’re capturing every single direction at once, you can frame your shot after you’ve shot it. For an action camera user, this unshackles you from the confines of recording a single, unchanging perspective and opens the doors to generating complex camera moves for more compelling footage.

OverCapture is an entirely different way of producing video content. You can frame your shot after you’ve shot it.

To be fair, the Fusion isn’t the first consumer camera to provide this functionality. The Rylo Camera offers a similar feature, and as we discussed in our review of the Rylo it works impressively well. (The main difference between the Fusion and the Rylo comes down to how you edit over-captured video: the GoPro lets you pan/tilt your phone to follow the action, whereas the Rylo provides excellent subject tracking to follow the action. Both methods work well.)

Let’s take a look at a real world example. To create the two videos below, I set the camera in the middle of a skate-park and asked Colin Flynn, founder of Fool’s Gold Surf, to skate around it. In the first video, you can drag around to see all the angles or, if you’re watching using a VR headset, you can just look around in any direction.

This is an example of 360 video captured with the GoPro Fusion. You can drag around the image to look in different directions.

The second video was created from the exact same camera footage, but using OverCapture to follow Colin’s movement on the mobile app (literally by moving my phone around as if I was recording in real-time), then exported as a standard HD video.

This video was created from the exact same clip as the one above, except that I used OverCapture to follow the action on my phone after the clip was recorded, then exported it as a standard HD video.

You can do all of this – and share it – from the mobile app. You can do the same with the desktop software, though as we’ll see, there are some glaring differences between the two and OverCapture does have its limitations.

Despite being GoPro’s first foray into the 360 camera space, the Fusion gets a lot of things right and performs well.

In fact, one important consideration when using OverCapture is that while the camera may be high resolution, you’re exporting a 1920×1080 HD video (if shot on 5.2K), or 1280×720 HD video (if shot in 60fps 3K). Furthermore, if you zoom in, you’re losing more resolution relative to how much you’re punching in on that OverCapture frame, so if 4K is essential to your needs, or you’re interested in the Fusion primarily for action footage using OverCapture, those are things you might want to think about.

Despite being GoPro’s first foray into the 360 camera space, the Fusion gets a lot of things right and performs well. The things it doesn’t do well could, for the most part, be remedied by firmware and software updates, and we’ll take a look at some of those things in the following pages.

Articles: Digital Photography Review (dpreview.com)

 
Comments Off on Review: the GoPro Fusion is a different kind of action camera

Posted in Uncategorized


New Nikon teaser hints at ‘Noct-Nikkor’ lens for mirrorless

16 Aug

Nikon’s series of video teasers continues with a look at some classic Nikkor glass and an unmarked lens at the end of the video. Astute readers may notice that the first lens shown is a Noct-Nikkor 58mm F1.2 – one of Nikon’s most famous manual focus lenses, made in limited numbers for about 20 years from the 1970s before being discontinued in the late 90s.

Beloved by fans of low-light photography (and, inevitably, collectors), the rare Noct-Nikkor is hard to find, and good copies sell for very high prices on the used market (see earlier point about collectors). Nikon has already hinted that its new mirrorless lens mount is something special – could it support high-performance F1.2 or even faster lenses? We’ll find out on August 23rd.

Articles: Digital Photography Review (dpreview.com)

 
Comments Off on New Nikon teaser hints at ‘Noct-Nikkor’ lens for mirrorless

Posted in Uncategorized


Sony claims top spot in full-frame interchangeable lens camera market, launches ‘Be Alpha’ campaign

16 Aug

In a press release issued this morning, Sony announced it has sold more full-frame cameras than any other brand in the US over the past six months, measured both by units sold and by value.

Perhaps more impressively, the company is also celebrating occupying the top position in the overall mirrorless market, a spot it has owned for the past six years thanks to the huge success of the a6000, as well as sales of the a7 series.

That’s all good news for Sony, yes, but it’s probably no coincidence that Sony was the last brand to release a mass-market full frame camera. It’s been a year since Canon’s last entry in the category, and a similar amount of time since Nikon announced the D850. And either way, we don’t recommend getting too invested in brand market share, but that’s just us.

Sony’s also taking the opportunity to launch a brand new ‘Be Alpha’ campaign, which will comprise a number of in-person events in major cities, starting on August 19th in New York City to celebrate World Photography Day. The initiative also includes an ‘Alpha Female’ program, which will include grants, mentorship and events to address “the imaging industry’s well-documented diversity challenges.”


Sony Celebrates No.1 Overall Position in U.S. Full-frame Cameras with Launch of Historic “Be Alpha” Campaign

SAN DIEGO, Aug. 15, 2018 – Sony Electronics, Inc. – a worldwide leader in digital imaging and the world’s largest image sensor manufacturer – today announced that it has overtaken and held the No. 1 overall position in the United States full-frame interchangeable lens camera market in the first half of 2018, in both dollars and units1. In fact, four out of every 10 full-frame cameras sold during this time period have come from the Sony brand1.

Additionally, Sony has announced that within the overall mirrorless market, it has held the No. 1 position in both dollars and units for more than six years2. These strong results can be attributed to the company’s leadership in transitioning the market from older DSLR technology to next-generation mirrorless cameras.

Much of Sony’s recent success has been driven by sales of the acclaimed ?7R III and ?7 III models, as well as the rapid adoption of the ?9 camera amongst professional sports photographers and photojournalists. The brand’s extremely active community has played a major part as well, as evidenced by the strong engagement on key social platforms like Instagram, where the official @SonyAlpha page has just surpassed the coveted one million followers count.

As a celebration of these historic achievements, Sony has announced the launch of its extensive “Be Alpha” campaign that will connect creators of all types with the brand and its ever-growing roster of talented photographers and videographers.

“We’re extremely proud of achieving No. 1 overall share in Full-frame cameras in the US market, as well as holding a strong No. 1 share in the mirrorless market for six years running” said Neal Manowitz, vice president of Digital Imaging at Sony Electronics. “More than anything, we owe this to our community. It is our pleasure to create for you, the true creators. You pushed us to innovate, to change, to continually adapt, and your voice remains core to everything we do.”

Manowitz added, “To ‘Be Alpha’ is to be a leader, to be an innovator, to stand out amongst the crowd. It represents everything we stand for as a brand. Our campaign will celebrate the extended Sony community, while also shining a light on the topics that that we are most passionate about – diversity, conservation, equality and much more.”

Sony’s “Be Alpha” movement will be headlined by a series of community events in major markets throughout North America in 2018 and beyond, beginning with the official launch event on August 19th, World Photography Day, in New York City. The campaign will encourage all creators to get involved by sharing their own “Be Alpha” content on all relevant social platforms while tagging #BeAlpha.

The “Be Alpha” campaign will also feature programs that are designed to foster growth in both the current and next generations of imaging professionals, the most notable of which being the flagship “Alpha Female” program. This multi-tiered, female exclusive program is Sony’s thoughtful response to the imaging industry’s well-documented diversity challenges. It will include a variety of grants and mentorship opportunities for female photographers and videographers, as well as the production of several large-scale industry events. Additional details to be released soon.

All key information regarding Sony’s “Be Alpha” movement, including the campaign launch video, will be hosted at www.alphauniverse.com/BeAlpha. This page will be continually updated with information on new events, content pieces and more.

A variety of additional stories and exciting new content shot with Sony products can be found at www.alphauniverse.com , Sony’s community site built to educate, inspire and showcase all fans and customers of the Sony ? brand.

A chart summarizing Sony’s rapid growth in Full-frame market is included below:

  1. Source: The NPD Group, Inc., U.S. Retail Tracking Service, Detachable Lens Camera, Sensor Size: Full Frame, Based on dollar and unit sales, Jan. – June 2018.
  2. Source: Sony internal historical data sources.
  3. Source: The NPD Group, Inc., U.S. Retail Tracking Service, Detachable Lens Camera, Sensor Size: Full Frame, Based on dollar sales, Jan.- Dec. 2017 vs. Jan.- Dec. 2016.
  4. Source: The NPD Group, Inc., U.S. Retail Tracking Service, Detachable Lens Camera, Sensor Size: Full Frame, Based on adjusted dollar sales, Jan.- June 2018 vs. Jan.- June 2017. Sales are adjusted for 5wk Jan. 2018 vs. 4wk Jan. 2017.

Articles: Digital Photography Review (dpreview.com)

 
Comments Off on Sony claims top spot in full-frame interchangeable lens camera market, launches ‘Be Alpha’ campaign

Posted in Uncategorized


Video: How Nikon tests its D850 DSLR against the elements

16 Aug

If you’re sensitive to gore, you might want to turn your head. Nikon Asia has published a video on its YouTube channel that dives into the brutal depths the company goes to in order to test the ruggedness of its DSLR cameras — specifically the Nikon D850.

In the two-minute video, Nikon ambassadors and workers detail the amount of thought, research and methods that go into practically testing how its cameras will handle tough environments. Although there are plenty of automated tests going on, this particular video, titled ‘True Reliability’ takes a look at the more hands-on testing.

Specifically, the video shows how Nikon tests its cameras in dusty conditions, wet environments and extreme temperatures, all well beyond what you could reasonably expect from even the most challenging shoots. There’s even a few drop tests in there for good measure.

It’s not as long or in-depth a look as we would like, but it goes to show how few stones are left unturned when checking for resiliency in Nikon cameras.

Articles: Digital Photography Review (dpreview.com)

 
Comments Off on Video: How Nikon tests its D850 DSLR against the elements

Posted in Uncategorized


Kodak begins shipping Ektachrome film to select photographers for testing

16 Aug
Kodak via Instagram

During CES 2017, Kodak announced plans to resurrect its Ektachrome film, which was discontinued in 2012. Though the first batch of film isn’t available to purchase yet, Kodak released sample images shot on the new Ektachrome in June, and now it has started shipping test film to select photographers.

Images and videos of the new Ektachrome film have surfaced on Kodak’s Instagram page, where it points toward its beta film test team. One video by @benjhaisch shows a brick of packaged film boxes being removed from its shipping box; another (embedded below) by beta tester @michaelturek shows the same package with eight boxes of new film.

Thank you @michaelturek

A post shared by Kodak Professional (@kodakprofessional) on

Glimpses of the product are similarly present on the Kodak Professional Facebook page, where the company shared a shot of one of the Ektachrome film boxes unwrapped, as well as an unboxing video. In June, Popular Science editor Stan Horaczek was given a look inside the Kodak factory where Ektachrome is produced.

Kodak originally planned to release its new Ektachrome film for purchase by the end of 2017, but the timeline has since been updated to the end of 2018.

Via: Koso Foto

Articles: Digital Photography Review (dpreview.com)

 
Comments Off on Kodak begins shipping Ektachrome film to select photographers for testing

Posted in Uncategorized