RSS
 

Archive for February, 2018

How to Easily Simulate a Tilt-Shift Effect Using Photoshop

03 Feb

You might not know it, but even if you’ve never heard of tilt-shift photography you have probably seen a photograph that was captured in just such a way. A few years ago tilt-shift photos exploded into the mainstream with oddly miniaturized images of cities, cars, and even landscapes going completely viral seemingly overnight.

How to Easily Simulate a Tilt-Shift Effect Using Photoshop

Tilt-shift photography, in itself, is nothing more than a literal optical illusion. Essentially, it is nothing more than adding a strip of sharp focus to an otherwise blurred image. Even the name itself refers not to the type of photograph but rather the camera or lens movements needed to achieve the effect.

Yes, tilt-shift photos have their roots in large format photography but don’t worry, I’ll only touch on that as much as needed to in order to get the point across. What I will focus on (get it?) is showing you how the tilt-shift photo effect can be very closely and easily simulated using Photoshop. Oh, and don’t think that in-camera tilt-shift photos can only be made with large format cameras. There are quite a few tilt-shift lenses available for your SLRs and DSLRs.

What is Tilt-Shift?

The best way to understand the concept behind tilt-shift photography work is to understand what “tilt” and “shift” actually mean as they relate to photography. As I mentioned earlier, they refer to the movements of a large format camera.

The tilt aspect refers to the physical tilting, either forward or backward, of the front or rear part of the camera. This tilt impacts the focus plane.

How to Easily Simulate a Tilt-Shift Effect Using Photoshop

Front and rear tilts demonstrated with a large format camera.

Without going too far into large format camera movements, tilting the front and/or rear of the camera allows for very selective depth of field control.

The “shift” is less important for our purposes today, but since I like being thorough, shifting the front or back of the camera simply means it is moved from side-to-side (or up and down) and literally shifts the image from left to right or up and down.

How to Easily Simulate a Tilt-Shift Effect Using Photoshop

Right and left shift movements on a large format camera.

The tilt effect is what you’re about to learn how to simulate in Photoshop right now.

How to use the Tilt-Shift Filter in Photoshop

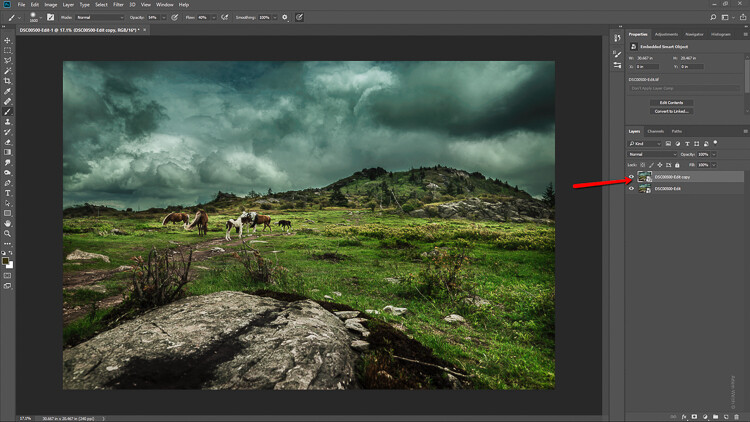
To begin, first, select an image that is conducive to the tilt-shift effect. Photos which have a relatively isolated subject with large areas of foreground and background usually work best. Make most if not all of your basic edits before you start your tilt-shift, including sharpening. Here is my image after I’ve made some core adjustments.

How to Easily Simulate a Tilt-Shift Effect Using Photoshop

Open the image in Photoshop

I like to start off in Lightroom and then pitch the image over to Photoshop as a Smart Object to apply the tilt-shift effect. I’ll show you why in just a bit.

How to Easily Simulate a Tilt-Shift Effect Using Photoshop

Now that you have the image opened in the loving hands of Photoshop the fun can begin! Yes, I think this is fun….

Duplicate the Layer

The first step in applying the tilt-shift effect is to duplicate the base image layer. Use the keyboard shortcut Ctrl/Cmd+J. It’s this duplicate layer to which you’ll apply the tilt-shift blur.

How to Easily Simulate a Tilt-Shift Effect Using Photoshop

Applying the Blur

Tilt-shift is essentially a blurring effect, so it makes sense that it is located along with the other blur filters in Photoshop. Click on Filters > Blur Gallery >Tilt-Shift.

How to Easily Simulate a Tilt-Shift Effect Using Photoshop

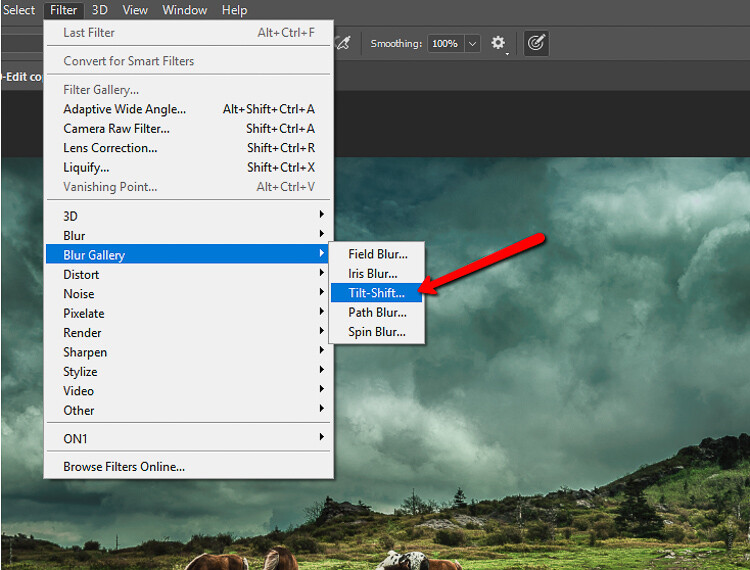
This brings you into the tilt-shift blur module of Photoshop. You’ll notice that you can also add other forms of blur here, but ignore all that as we are just going to work with tilt-shift.

When the module opens you will see a masking tool already on top of your image. It resembles a dual graduated filter tool. In fact, it works very similarly to the graduated filter. The effect will feather out to the top and bottom from the central axis dot in the center of the filter. The solid lines control the border of the effect with the dotted lines determining the feathering. Here’s a breakdown.

How to Easily Simulate a Tilt-Shift Effect Using Photoshop

The tilt-shift filter overlay.

The intensity of the blur is controlled by the Blur slider or by adjusting the intensity dial. Keep in mind that the entire filter can be moved either simultaneously or the top and bottom portions can be moved and adjusted separately. This happens to be the final position of my tilt-shift filter.

How to Easily Simulate a Tilt-Shift Effect Using Photoshop

Click Ok and allow Photoshop to render the blur.

A few tips for you

While we’re waiting…this is a good time to go over a couple of things that will help make your tilt-shift more effective.

Always remember that, if you’re going for realism, an accurate tilt-shift simulation should adhere as closely as possible to the optical principles of photography. This means that since tilt-shift controls the depth of focus, your effect should also follow those rules. Be careful you don’t have significant irregularities at the borders of the blurred areas. Also, pay special attention to the elements within your photo and their spatial relationship to one another to avoid an overly artificial appearance.

Keep in mind that there are quite a few other sliders to be seen here in the tilt-shift module; namely those for distortion, bokeh, and light range. (Of course if you’re feeling adventurous then, by all means, try out those sliders but I generally leave them as is for virtually all of my work.) Distortion can be added to varying degrees to the blurred areas as well as bokeh enhancement/coloration. The light range slider allows control over blur based on specific luminance values. However, in most cases, the default settings for these sliders will be just perfect for your image.

After your tilt-shift effect is complete the image will automatically reopen in the main Photoshop window with your edits applied.

Tweaking the Effect

Just because you have to loosely adhere to some rules of optics doesn’t mean you are totally bound by them. I actually attempt to never use the word “rules” when it comes to photography. If you find you need to adjust the tilt-shift effect just remember that this is Photoshop after all and you, the intrepid post-processor, wield great power!

Remember how you imported your image as a Smart Object earlier? Well, this is where having your image available as a Smart object really comes in handy.

How to Easily Simulate a Tilt-Shift Effect Using Photoshop

You’ll notice the tilt-shift has already been scooped into its very own layer mask. So now, you are free to paint the blur effect in or out until it is just right. This allows you to go beyond the constraints of filters in the tilt-shift module. With this image, I used a little judicious painting on the Smart Filter layer mask to make the effect look a little more natural.

How to Easily Simulate a Tilt-Shift Effect Using Photoshop

Finish in Lightroom

After I’m completely finished with the tilt-shift I kick the image back over to Lightroom. I add in one last edit to help harmonize the tilt-shift and that is a graduated filter at the bottom of the frame to darken it ever so slightly.

How to Easily Simulate a Tilt-Shift Effect Using Photoshop

And that’s it! You should now have a genuine imitation tilt-shift image. Have a look at the before and after.

Before

After

Final Thoughts on the Tilt-Shift Filter…

Tilt-shift photography in Photoshop is easy and can add some amazing effects to your photos. As with most post-processing effects, it’s important to keep things within the realm of reality unless your goal is to deliberately skew things.

The effects achieved in Photoshop aren’t perfect, of course, but you can get very close to the look and feel of real tilt-shift photography. All this without needing to use a real tilt-shift lens or moving into large format photography. Experiment with the tilt-shift blur in Photoshop and keep these important tips in mind:

  • Remember tilt-shift is just a manipulation of depth of focus.
  • Try not to break the rules…I mean, the guidelines of optics.
  • Pick images that have larger areas of foreground and backgrounds with isolated subjects.
  • Don’t forget to tweak the tilt-shift effect or even add additional edits.

Try out the lessons in this article and stretch your creative legs with tilt-shift blur in Photoshop. And as always remember to have fun with your editing and please share your results and any questions you have in the comments area below.

The post How to Easily Simulate a Tilt-Shift Effect Using Photoshop by Adam Welch appeared first on Digital Photography School.


Digital Photography School

 
Comments Off on How to Easily Simulate a Tilt-Shift Effect Using Photoshop

Posted in Photography


DJI reveals the winners of the 2017 SkyPixel aerial photography contest

03 Feb
“Above the polar bear” by Florian Ledoux — SkyPixel Photo Contest 2017 Grand Prize winner

Chinese drone-maker DJI and aerial photography website SkyPixel have announced the winners of the 2017 SkyPixel aerial photography contest, which was launched back in October. Winners span three categories—Landscape, Portrait, and Story—split between a “professional group” and “enthusiast group.”

The Grand Prize this year went to “Above the polar bear” captured with a DJI Phantom 4 Pro drone by Arctic and wildlife photographer Florian Ledoux.

As the Grand Prize winner, Ledoux will receive an impressive collection of gear valued at more than $ 15,000 USD, including a DJI Inspire 2 with a Zenmuse X7 and lens, iPhone X 256GB, Nikon D850 DSLR camera body, and more. The contest also awards thousands of dollars’ worth of gear to other contest winners.

A total of 18 other winning images were announced, three per group in both the professional and enthusiast categories. SkyPixel also revealed nine nominated images and 10 “Popular Prize” images. Overall, more than 40,000 people from 141 countries entered images in the contest.

You can check out all of the winners for yourself in the gallery and list below:

$ (document).ready(function() { SampleGalleryV2({“containerId”:”embeddedSampleGallery_3283891052″,”galleryId”:”3283891052″,”isEmbeddedWidget”:true,”selectedImageIndex”:0,”isMobile”:false}) });

Landscape – Professional Group

1st Prize: Sun’s Up, Nets Out by Zay Yar Lin
2nd Prize: Comet into Darkness by Drone Hikers
3rd Prize: Santa Maddalena village in front of the Geisler or Odle Yolo… by Valentin Valkov

Landscape – Enthusiast Group

1st Prize: Lobsters Farm by Trung
2nd Prize: GEOMETRY OF LIQUID GOLD by Javier del Cerro
3rd Prize: Raising Ducks by caokynhan

Portrait – Professional Group

1st Prize: Balmoral Ball by Petra Leary
2nd Prize: ???? by ??
3rd Prize: The Rebirth by andrea

Portrait – Enthusiast Group

1st Prize: Dancer by cocoanext
2nd Prize: Free Wheeling by nigelkwan
3rd Prize: ??? by ????

Story – Professional Group

1st Prize: ????”——??????? by ????????
2nd Prize: ??????? by ??
3rd Prize: ??? by lalienware

Story – Enthusiast Group

1st Prize: 1??????? by ???
2nd Prize: ???????? by ???
3rd Prize: The Long Ride by Jesper Guldbrand

Nominated Entries:

Landscape: The Path of Camels across the Sands by Abdullah Alnassar
Landscape: ELEMENTS by olivier…
Landscape: ??????? by LENG_VISION
Portrait: FANCY FINISH by Martin Sanchez @ zekedrone
Portrait: Lost in by Marc Lamey
Portrait: Untitled by Bobo
Portrait: ?? by ????
Story: Elemental by Max Foster
Story: ??????? by ???

Popular Prize – Top Ten

?????????? by ?????
????? by 7555486
???????? ????“??” by ???
????? Pointing to the light tower by henter liu
???? by Anter
?? by ?????
????????????–??? by ????????
Plane in the Forest by mark calayag
white wonderland by Eberhard Ehmke
Barcelona by David

Articles: Digital Photography Review (dpreview.com)

 
Comments Off on DJI reveals the winners of the 2017 SkyPixel aerial photography contest

Posted in Uncategorized


NatGeo’s George Steinmetz on capturing Africa ‘from a flying lawn chair’

03 Feb

During a new 10-minute TED Talk, famed National Geographic aerial photographer George Steinmetz talks about his experiences photographing Africa while flying around in a motorized paraglider. This vantage point gives Steinmetz a unique look at the world below, including its various cultures and landscapes.

The motorized paraglider is composed of a wing in the style of a parachute and a backpack motor, holding 10 liters of fuel and offering a speed up to 30MPH / 48KPH. Steinmetz explains that he gets a flight time of about two hours, during which he gets an “unobstructed view both horizontally and vertically.”

“It dawned on me that this crazy little aircraft I was flying would open up a new way of seeing remote parts of the African landscape in a way that had never really been possible before,” Steinmetz explains in the video, pointing out that a typical airplane moves too fast for this type of photography, and a helicopter is too loud with too much downdraft.

He goes on to introduce a video of how the paraglider works before highlighting some of the most striking aerial footage and photos taken from it.

For most of us, a drone presents photographers with the closest we can get to Steinmetz style of capture, but that’s still not quite the same as a paraglider. As Steinmetz explains in the video, the motorized paraglider’s long flight time and capabilities makes it possible to not just photograph the immediate landscape, but explore the wider world around it.

Check out the full video above for a dose of Friday inspiration.

Articles: Digital Photography Review (dpreview.com)

 
Comments Off on NatGeo’s George Steinmetz on capturing Africa ‘from a flying lawn chair’

Posted in Uncategorized


Arri introduces Alexa LF ‘large-format’ 4K camera and LPL mount

03 Feb

Cinema camera manufacturer Arri has launched a completely new, ‘large format’ 4K system comprising a camera with a new lens mount and 16 new lenses to go with it. The Alexa LF camera uses a sensor fractionally larger than what stills shooters would consider ‘full frame’ and can record in resolutions up to 4.5K and at frame rates of 150 fps.

Arri introduced the new system today at London’s BSC Expo, and claims the new system is smaller and lighter than current full frame models. The camera’s sensor measures 36.70 x 25.54mm and uses 4448 x 3096 pixels – all of which users will be able to utilize in open gate mode. When used in 16:9 mode a 31.68 x 17.82 mm area is exposed with a full 4K resolution of 3840 x 2160 pixels. This is a 36.3mm diagonal, so is fully compatible with lenses such as Zeiss’s Compact Prime and Cinema Zoom series of lenses.

A 2.39:1 ratio mode uses 4448 x 1865 pixels and a 39.8mm diagonal.

In all of these modes the camera can shoot at up to 90fps in Arriraw, but it can manage 150fps when used in 2.39:1. Arri says the sensor has an exposure latitude of ‘14+ stops’. Newsshooter is reporting that the sensor is essentially two of its existing, 8-year-old ALEV-III sensors stitched together.

Large PL mount

A new lens mount has been introduced with the system that uses a wider throat and a shallower flange so that lenses can be made with large maximum apertures that would not be possible with the narrow throat of the PL mount. It should also allow lenses to be slightly smaller and lighter. The LPL (‘Large PL’) mount is 62mm in diameter and has a depth of 44mm, so existing PL lenses can also be mounted via an adapter. Arri says it is making the LPL available under licence to other camera manufacturers and third party lens makers.

Its own collection of Arri Signature Prime lens system will comprise 16 lenses of between 12mm and 280mm. All will have a maximum aperture of T1.8 and will be compatible with the new LDS-2 lens data protocol, which Arri says it will also license. The mount will be able to read data from LDS-1 and /i lenses.

According to the Cinema 5d website pricing will start at €76,608.37 plus tax, adding ‘if you think it’s expensive, it’s probably not aimed at you…’

For more information and more show reel samples see Arri’s Alexa LF microsite.

Press release

ARRI launches large-format camera system

The ALEXA LF camera, ARRI Signature Prime lenses and LPL lens mount together comprise an entirely new system, offering an immersive, emotionally engaging look.

At the 2018 BSC Expo in London, ARRI has unveiled a complete large-format system that meets and exceeds modern production requirements, delivering unprecedented creative freedom while also being backwards compatible with existing lenses, accessories and workflows.

Featuring a large-format sensor slightly bigger than full frame, ALEXA LF records native 4K with ARRI’s best overall image quality. Filmmakers can explore a large-format aesthetic while retaining the ALEXA sensor’s natural colorimetry, pleasing skin tones and proven suitability for HDR and WCG workflows. Different sensor modes cover any deliverable requirement and versatile recording formats-including efficient ProRes and uncompressed, unencrypted ARRIRAW up to 150 fps-provide total flexibility.

Accompanying the ALEXA LF camera are 16 large-format ARRI Signature Prime lenses, ranging from 12 mm to 280 mm and fitted with the new ARRI LPL mount. While the Signature Primes exemplify state-of-the-art optical precision, they render organic, emotional images, gently softening and texturizing the large format. A fast T-stop of T1.8 facilitates shallow depth of field and the smooth focus fall-off gives subjects heightened presence in the frame.

In the lead-up to the release of its new large-format system, ARRI asked a number of cinematographers to shoot with the camera and lenses in real-world situations. Among them was Dan Laustsen ASC, DFF, who is Oscar-nominated this year for his work on THE SHAPE OF WATER. After shooting with the system, Laustsen commented, “We were trying to tell a story about wideness and freedom; the ALEXA LF worked really well. The depth of field is so small, creating its own world. It’s fantastic.” Of the Signature Primes, he noted: “The lenses are lightweight and are not too sharp, but with a certain softness and very specific. With the 25 mm lens, you feel like you are there in the scene with the actors.”

The new LPL lens mount has a wider diameter and shorter flange focal depth, allowing the ARRI Signature Primes and all future large-format lenses to be small and lightweight, with a fast T-stop and pleasing bokeh-a combination of features that would not be possible with the PL lens mount. The LPL mount will also be available for other ARRI cameras and is being licensed to third-party lens and camera manufacturers.

Another cinematographer to shoot with the system prior to its release was Wang Yu, who used it to explore the atmospheric studio and creative inspirations of the celebrated Chinese artist and furniture-maker, Shao Fan. “The results got me really excited,” he says. “The camera and lens captured every tonal nuance with unmatched detail, gradation and color. I love how the out-of-focus areas are rendered, contributing to a rich and vivid overall look.”

Although the camera, lens mount and lenses are new, full compatibility with existing PL mount lenses and ALEXA accessories is a cornerstone of the system’s design. A PL-to-LPL adapter offers backwards compatibility with all PL mount lenses, whether Super 35 or full frame. The adapter attaches securely to the LPL lens mount without tools, allowing crews to rapidly switch between PL and LPL lenses on set, and offering cinematographers an unlimited lens choice.

Tom Fährmann BVK, who also got a sneak preview, chose to shoot a diverse palette of faces and skin tones against a white background, under varying portrait lighting conditions. He reports: “To me, the system embodies typical ARRI quality, but there is a new level of emotion to the images-a smoothness to the way the camera and lenses work together.”

ALEXA LF offers the same tried-and-true, versatile workflows as other ALEXA cameras. Existing ARRI Look Files can be used, and the entire range of ARRI workflow software tools will support ALEXA large-format images. Lens metadata can be recorded from LDS-1, LDS-2 or /i capable lenses.

Shooting wide open with ARRI Signature Prime lenses for shallow focus and gorgeous bokeh, French cinematographer Matias Boucard worked purely with natural light and available sources when he tried out the new system in Thailand. “The ALEXA LF camera and Signature Prime lenses are an elegant combination,” he says. “I love the lenses; they strike a wonderful balance between modernity and character.”

Articles: Digital Photography Review (dpreview.com)

 
Comments Off on Arri introduces Alexa LF ‘large-format’ 4K camera and LPL mount

Posted in Uncategorized


Tips for Better Smartphone Photography

03 Feb

Everyone has a camera nowadays. If you have a smartphone, you have a camera. Many of them take great photos, full of color and clarity. But what can you do to take your smartphone photography to the next level? Here are 3 videos with some tips to help you out.

7 Smartphone Photography Tips & Tricks

In this video from Serge Ramelli, you get some practical and easy to apply tips to help you elevate your smartphone photography.

??

The 101 of Smartphone Photography from COOPH

Here are a few more ideas from the crew over at COOPH who consisting have great video tips.

?

9 Smartphone photography tips from B&H Photo Video

Finally, here are 9 more tips from Larry Becker and B&H Photo Video.

?

If you still haven’t gotten enough tips for better smartphone photography here are some dPS articles to help:

  • 9 of the Best Apps to Help You Do Awesome Mobile Phone Photography
  • 9 More Great Apps You Need for Your Smartphone
  • How to Get Stunning Macro Photos with Your Mobile Phone
  • Lightroom Mobile – The Secret to Shooting and Editing on Your Smartphone
  • Review: Struman Lenses for Mobile Phones

The post Tips for Better Smartphone Photography by Darlene Hildebrandt appeared first on Digital Photography School.


Digital Photography School

 
Comments Off on Tips for Better Smartphone Photography

Posted in Photography


Weekly Photography Challenge – Your Best Smartphone Shot

03 Feb

Likely you have a smartphone as well as your main camera – whether that be a DSLR, mirrorless or other. This week your challenge is to come up with the best shot you can using just your smartphone. So you can’t rely on fancy lenses or advanced settings – you’ll need to use light and composition and creativity to your advantage here!

If you need some help check out: Tips for Better Smartphone Photography

Weekly Photography Challenge - Your Best Smartphone Shot

Weekly Photography Challenge – Smartphone Shots

Simply upload your shot into the comment field (look for the little camera icon in the Disqus comments section) and they’ll get embedded for us all to see or if you’d prefer, upload them to your favorite photo-sharing site and leave the link to them. Show me your best images in this week’s challenge. Sometimes it takes a while for an image to appear so be patient and try not to post the same image twice.

So get creative, let’s see what you can do?

Share in the dPS Facebook Group

You can also share your images in the dPS Facebook group as the challenge is posted there each week as well.

The post Weekly Photography Challenge – Your Best Smartphone Shot by Darlene Hildebrandt appeared first on Digital Photography School.


Digital Photography School

 
Comments Off on Weekly Photography Challenge – Your Best Smartphone Shot

Posted in Photography


New Alexa large-format 4K cinema system introduced by Arri

03 Feb

Cinema camera manufacturer Arri has launched a completely new, ‘large format’ 4K system comprising a camera with a new lens mount and 16 new lenses to go with it. The Alexa LF camera uses a sensor fractionally larger than what stills shooters would consider ‘full frame’ and can record in resolutions up to 4.5K and at frame rates of 150 fps.

Arri introduced the new system today at London’s BSC Expo, and claims the new system is smaller and lighter than current full frame models. The camera’s sensor measures 36.70 x 25.54mm and uses 4448 x 3096 pixels – all of which users will be able to utilize in open gate mode. When used in 16:9 mode a 31.68 x 17.82 mm area is exposed with a full 4K resolution of 3840 x 2160 pixels. This is a 36.3mm diagonal, so is fully compatible with lenses such as Zeiss’s Compact Prime and Cinema Zoom series of lenses.

A 2.39:1 ratio mode uses 4448 x 1865 pixels and a 39.8mm diagonal.

In all of these modes the camera can shoot at up to 90fps in Arriraw, but it can manage 150fps when used in 2.39:1. Arri says the sensor has an exposure latitude of ‘14+ stops’. Newsshooter is reporting that the sensor is essentially two of its existing, 8-year-old ALEV-III sensors stitched together.

Large PL mount

A new lens mount has been introduced with the system that uses a wider throat and a shallower flange so that lenses can be made with large maximum apertures that would not be possible with the narrow throat of the PL mount. It should also allow lenses to be slightly smaller and lighter. The LPL (‘Large PL’) mount is 62mm in diameter and has a depth of 44mm, so existing PL lenses can also be mounted via an adapter. Arri says it is making the LPL available under licence to other camera manufacturers and third party lens makers.

Its own collection of Arri Signature Prime lens system will comprise 16 lenses of between 12mm and 280mm. All will have a maximum aperture of T1.8 and will be compatible with the new LDS-2 lens data protocol, which Arri says it will also license. The mount will be able to read data from LDS-1 and /i lenses.

According to the Cinema 5d website pricing will start at €76,608.37 plus tax, adding ‘if you think it’s expensive, it’s probably not aimed at you…’

For more information and more show reel samples see Arri’s Alexa LF microsite.

Press release

ARRI launches large-format camera system

The ALEXA LF camera, ARRI Signature Prime lenses and LPL lens mount together comprise an entirely new system, offering an immersive, emotionally engaging look.

At the 2018 BSC Expo in London, ARRI has unveiled a complete large-format system that meets and exceeds modern production requirements, delivering unprecedented creative freedom while also being backwards compatible with existing lenses, accessories and workflows.

Featuring a large-format sensor slightly bigger than full frame, ALEXA LF records native 4K with ARRI’s best overall image quality. Filmmakers can explore a large-format aesthetic while retaining the ALEXA sensor’s natural colorimetry, pleasing skin tones and proven suitability for HDR and WCG workflows. Different sensor modes cover any deliverable requirement and versatile recording formats-including efficient ProRes and uncompressed, unencrypted ARRIRAW up to 150 fps-provide total flexibility.

Accompanying the ALEXA LF camera are 16 large-format ARRI Signature Prime lenses, ranging from 12 mm to 280 mm and fitted with the new ARRI LPL mount. While the Signature Primes exemplify state-of-the-art optical precision, they render organic, emotional images, gently softening and texturizing the large format. A fast T-stop of T1.8 facilitates shallow depth of field and the smooth focus fall-off gives subjects heightened presence in the frame.

In the lead-up to the release of its new large-format system, ARRI asked a number of cinematographers to shoot with the camera and lenses in real-world situations. Among them was Dan Laustsen ASC, DFF, who is Oscar-nominated this year for his work on THE SHAPE OF WATER. After shooting with the system, Laustsen commented, “We were trying to tell a story about wideness and freedom; the ALEXA LF worked really well. The depth of field is so small, creating its own world. It’s fantastic.” Of the Signature Primes, he noted: “The lenses are lightweight and are not too sharp, but with a certain softness and very specific. With the 25 mm lens, you feel like you are there in the scene with the actors.”

The new LPL lens mount has a wider diameter and shorter flange focal depth, allowing the ARRI Signature Primes and all future large-format lenses to be small and lightweight, with a fast T-stop and pleasing bokeh-a combination of features that would not be possible with the PL lens mount. The LPL mount will also be available for other ARRI cameras and is being licensed to third-party lens and camera manufacturers.

Another cinematographer to shoot with the system prior to its release was Wang Yu, who used it to explore the atmospheric studio and creative inspirations of the celebrated Chinese artist and furniture-maker, Shao Fan. “The results got me really excited,” he says. “The camera and lens captured every tonal nuance with unmatched detail, gradation and color. I love how the out-of-focus areas are rendered, contributing to a rich and vivid overall look.”

Although the camera, lens mount and lenses are new, full compatibility with existing PL mount lenses and ALEXA accessories is a cornerstone of the system’s design. A PL-to-LPL adapter offers backwards compatibility with all PL mount lenses, whether Super 35 or full frame. The adapter attaches securely to the LPL lens mount without tools, allowing crews to rapidly switch between PL and LPL lenses on set, and offering cinematographers an unlimited lens choice.

Tom Fährmann BVK, who also got a sneak preview, chose to shoot a diverse palette of faces and skin tones against a white background, under varying portrait lighting conditions. He reports: “To me, the system embodies typical ARRI quality, but there is a new level of emotion to the images-a smoothness to the way the camera and lenses work together.”

ALEXA LF offers the same tried-and-true, versatile workflows as other ALEXA cameras. Existing ARRI Look Files can be used, and the entire range of ARRI workflow software tools will support ALEXA large-format images. Lens metadata can be recorded from LDS-1, LDS-2 or /i capable lenses.

Shooting wide open with ARRI Signature Prime lenses for shallow focus and gorgeous bokeh, French cinematographer Matias Boucard worked purely with natural light and available sources when he tried out the new system in Thailand. “The ALEXA LF camera and Signature Prime lenses are an elegant combination,” he says. “I love the lenses; they strike a wonderful balance between modernity and character.”

Articles: Digital Photography Review (dpreview.com)

 
Comments Off on New Alexa large-format 4K cinema system introduced by Arri

Posted in Uncategorized


Photographer struck by rally car while standing near track corner

03 Feb

An incident involving a photographer struck by a car during the outdoor racing event Sno*Drift Rally has spurred discussion and criticism over shooting practices in risky situations. Photographer G David LaClair was standing near a corner of the outdoor racing track when a vehicle lost control and spun out, slid into the brush, and directly impacted the photographer.

The collision was captured in a pair of videos, both of which are graphic in nature. In a post shared via a screenshot on Facebook, the photographer LaClair reports that he suffered a lacerated liver and broken scapulas, as well as many bruises. The incident has resulted in many pointing out that better attention to safety would have prevented the collision.

Photographers were reportedly warned not to stand on the outside of a track corner due to the risk of a car losing control

In a Facebook comment left on a video of the accident, photographer Adam Bachi explains that a mandatory safety meeting for media personnel was held before the event. During this safety meeting, photographers were reportedly warned not to stand on the outside of a track corner due to the risk of a car losing control. Whether LaClair was present in that meeting and why he chose to stand in that spot is unclear.

Discussions have focused, in part, on how future incidents like this can be avoided, including potentially having experienced photographers follow inexperienced photographers, posting warning signs in dangerous shooting spots, and having safety personnel monitor dangerous spots to turn away anyone who unwittingly positions themselves there.

Via: Fstoppers

Articles: Digital Photography Review (dpreview.com)

 
Comments Off on Photographer struck by rally car while standing near track corner

Posted in Uncategorized


New flash storage standard opens the way for 8K video capture on smartphones

02 Feb
Photo by veeterzy

Storage speeds on smartphones, Chromebooks, VR headsets and automotive devices are about to make a huge leap forward. Standards group JEDEC has announced the new UFS 3.0 flash storage standard, which doubles the theoretical speed of the current UFS 2.1 standard to 2.9 GB/s, all while lowering power consumption and allowing for operation at a greater range of temperatures.

This theoretical maximum likely won’t be achieved by production devices, but the standard does require the host device to use hardware that supports these blistering fast transfer rates.

What does this actually mean for smartphone cameras? If you are only capturing still images, you won’t see much of a difference; but for video shooters, this could be huge. The new standard allows for 4K video capture at 60 frames per second or even 8K resolution without putting nearly as much stress on your device.

In combination with larger storage capacities—Samsung, for example, has promised to include 512GB modules in its upcoming smartphones—this new standard could make ultra high-resolution video recording on mobile devices standard. If you later want to transfer the recorded footage to another device or computer, the faster speeds help with that, too.

And, finally, the new standard also offers lower power consumption and increased reliability in a wider range of operating temperatures.

As usual, it’s not clear when we will see the first UFS 3.0 ready devices; the new standard will probably take a while to implement on a wider scale. But given Samsung is by far the biggest NAND memory module manufacturer, there is a good chance the Korean company will be among the first to offer the new standard in its smartphones. Something to look forward to in the Galaxy S10, perhaps?

Articles: Digital Photography Review (dpreview.com)

 
Comments Off on New flash storage standard opens the way for 8K video capture on smartphones

Posted in Uncategorized


This video shows that everyone takes the exact same Instagram travel photos

02 Feb

After reading our recent coverage on Instagrammers hurting an iconic tree in New Zealand just to snap the same photo everyone else has already taken, photographer and videographer Oliver KMIA decided to put together a short video with a single, tongue-in-cheek purpose:

I wanted to show how people take the same picture over and over again while traveling.

The result is Instatravel, a video slideshow made out of thousands of Instagram travel photos that look pretty much identical. All of the typical tropes are covered: the passport photo, the pretty girl leading you by the hand, the airplane wing, and all of the most iconic landmarks being photographed from the same old locations in the exact same way.

We can’t decide if the video is funny or depressing, so we’ll let you do that. Alternatively, this is probably a good video to reference the next time you find yourself tempted to take one of these cliché travel shots. We’ve all done it, but a few seconds of hesitation might just yield something a bit more unique.

Articles: Digital Photography Review (dpreview.com)

 
Comments Off on This video shows that everyone takes the exact same Instagram travel photos

Posted in Uncategorized