RSS
 

Archive for September, 2017

Yashica teases ‘Unprecedented Camera’: Coming to Kickstarter in October

23 Sep

Last week’s Yashica teaser was met with a lot of excitement. But it didn’t take long for people to claim that teaser had nothing to do with a camera. In fact, they said, Yashica was just teasing a clip-on smartphone lens they had already released. Womp womp…

But not so fast! Another teaser video released yesterday seems to hint at the big return to the camera market we were all actually hoping for.

The teaser, titled “The Prologue,” shows more of the same girl walking around with an old Yashica film camera (maybe?) and even a brief scene with that clip-on smartphone lens. All unremarkable, except the whole thing starts with this tagline:

Expect the Unexpected

The Unprecedented Camera by YASHICA

And later on a date floats onto the screen:

October 2017, Kickstarter

It looks like Yashica may be making a grand return after all. Hopefully they don’t disappoint us after all this teasing. If you’re claiming to release an “unprecedented” camera, you’d better deliver.

Articles: Digital Photography Review (dpreview.com)

 
Comments Off on Yashica teases ‘Unprecedented Camera’: Coming to Kickstarter in October

Posted in Uncategorized


This Kodak Moments chatbot digs through your old photos and tries to sell you prints

23 Sep

Kodak has created a new Facebook Messenger chatbot called ‘Kodak Moments’ that tries to get users to buy physical products by digging through and resurfacing their old photos.

The AI algorithm works by searching through the mass of images a user has uploaded to Facebook and suggesting ones that may have been forgotten in hopes the user, when suddenly presented with this fond old memory (or Kodak moment… if you will), will order it as a physical print or photo product like a coffee mug.

Facebook users are given the option of either dismissing the chatbot’s suggested image, requesting other images that contain the same people as the first image, or requesting a print or product containing the selected image. All you have to do to join this ‘fun’ game that tries to sell you things is search for Kodak Moments in the Messenger app.

Unfortunately, the chatbot—at least in its current iteration—doesn’t support any sort of filtering options, making it impossible to prevent the bot from digging up photos of old memories better left forgotten. Consider yourself warned.

Joining this Messenger chatbot is a new Kodak Moments app (Android | iOS) that goes a bit further. After being given permission, the app will search through a Facebook or Google account and camera roll to find images it thinks users may want to turn into physical products.

The goal behind the new Kodak Moments technology is (obviously) to increase the company’s print sales while reviving the idea of a ‘Kodak Moment’ and helping customers sort through their possibly massive photo albums. We’ll let you decide if the concept is fun, annoying, or maybe a bit traumatizing.

Articles: Digital Photography Review (dpreview.com)

 
Comments Off on This Kodak Moments chatbot digs through your old photos and tries to sell you prints

Posted in Uncategorized


Video Tutorial – How to Work a Scene to Find the best Light and Composition

23 Sep

In this short video tutorial, photographer Mike Brown takes you on a photo walk looking for images. Watch as he scans the scene and finds the best camera angle, waits for the right light, and frames the shot for the best composition.

Go on a photo walk and see how Mike goes about working a scene, before quickly snapping a photo and moving on. Take your time, look around. If you see something interesting explore the scene a little. Have patience as well.

Some key points you can learn from this tutorial include:

  • Sometimes you need to wait for the light to change.
  • Simplification is often a good thing.
  • Move around the scene, and put things in the foreground as well.
  • Use shadows for more creating more dramatic images.

The post Video Tutorial – How to Work a Scene to Find the best Light and Composition by Darlene Hildebrandt appeared first on Digital Photography School.


Digital Photography School

 
Comments Off on Video Tutorial – How to Work a Scene to Find the best Light and Composition

Posted in Photography


Weekly Photography Challenge – Square

23 Sep

This week for the photography challenge let’s keep it simple and look for shapes. One in particular – the square.

Weekly Photography Challenge – Square

Look for square subjects. You can even crop your image into a square and make a composition that is suitable for that format. Shooting for a square is a bit different than using the regular camera format – try it and see how you do.

Share your images below:

Simply upload your shot into the comment field (look for the little camera icon in the Disqus comments section) and they’ll get embedded for us all to see or if you’d prefer, upload them to your favorite photo-sharing site and leave the link to them. Show me your best images in this week’s challenge. Sometimes it takes a while for an image to appear so be patient and try not to post the same image twice.

Share in the dPS Facebook Group

You can also share your images on the dPS Facebook group as the challenge is posted there each week as well.

The post Weekly Photography Challenge – Square by Darlene Hildebrandt appeared first on Digital Photography School.


Digital Photography School

 
Comments Off on Weekly Photography Challenge – Square

Posted in Photography


The iPhone 8 Plus is the best smartphone camera DxOMark has ever tested

23 Sep
Photo: Apple

Apple fans who were hopeful the iPhone 8/Plus would represent a big step up in camera quality over the already-respectable iPhone 7/Plus have something to celebrate. DxOMark just released the results of its iPhone 8 and 8 Plus tests, and the new Apple smartphones represents a significant improvement over the previous versions.

In fact, the iPhone 8 Plus is now the best smartphone camera DxOMark has ever tested, and the iPhone 8 comes in a close second, pushing the Google Pixel down from the top stop into the #3 position.

You can read full iPhone 8 and iPhone 8 Plus reviews by clicking on the respective links, but the conclusion from DxOMark’s review of the Plus just about tells you all you need to know:

Overall, the Apple iPhone 8 Plus is an excellent choice for the needs of nearly every smartphone photographer. It features outstanding image quality, zoom for those needing to get closer to their subjects, and an industry-leading Portrait mode for artistic efforts. It is at the top of our scoring charts in nearly every category — and in particular, its advanced software allows it to do an amazing job of capturing high-dynamic range scenes and images in which it can recognize faces.

‘Nuff said? Now we wait to see how much better (or not) the iPhone X is… and what Google’s response will be when the company reveals its new smartphone on October 4th.

Articles: Digital Photography Review (dpreview.com)

 
Comments Off on The iPhone 8 Plus is the best smartphone camera DxOMark has ever tested

Posted in Uncategorized


Craigslist poster raises the bar on terrible car photography

23 Sep

A Craigslist post offering a 1990 Mazda RX-7 for sale is going viral today thanks to the photos of the car… and it’s not because they’re good.

For whatever reason, the ad’s author decided the best way to photograph his or her car for this ad was to take pictures of the car with their cell phone, and then take pictures of the pictures displayed on their cracked, hazy smartphone screen.

The original Craigslist post, a link to which hasn’t been shared publicly to avoid disrupting the seller’s efforts, was spotted by Murilee Martin and shared with Autoweek. And yes, the pictures are exactly as bad as described.

The reasoning behind this photographic decision aren’t known and probably never will be. But instead of sharp, colorful, detailed photos of a car what we get are hazy, in some cases out-of-focus shots of a red vehicle that is difficult to make out through the cracks in the screen.

Even by Craigslist standards these are bad. By car photography standards? It’s like something out of a horror film.

Articles: Digital Photography Review (dpreview.com)

 
Comments Off on Craigslist poster raises the bar on terrible car photography

Posted in Uncategorized


Incredible Grain Silo Transformation: Zeitz Museum of Contemporary Art Africa

22 Sep

[ By SA Rogers in Architecture & Public & Institutional. ]

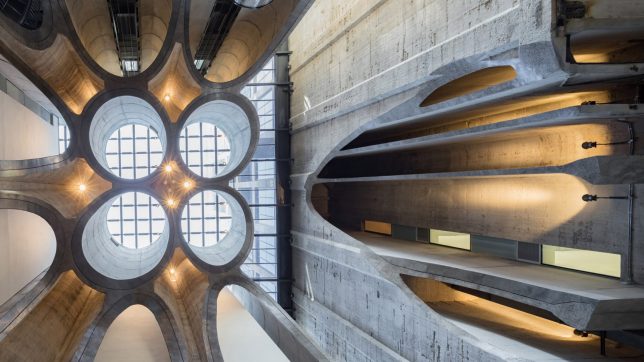
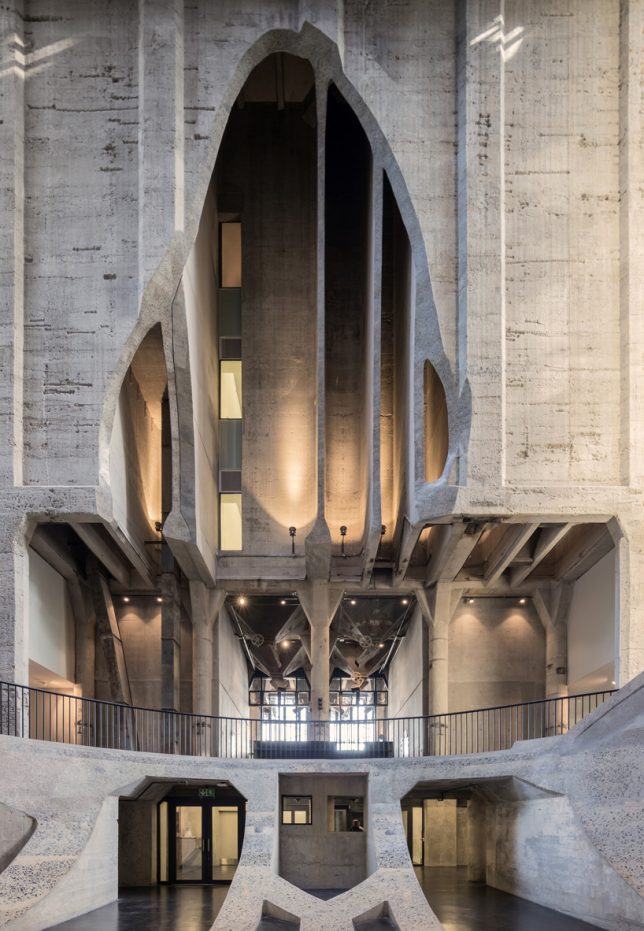
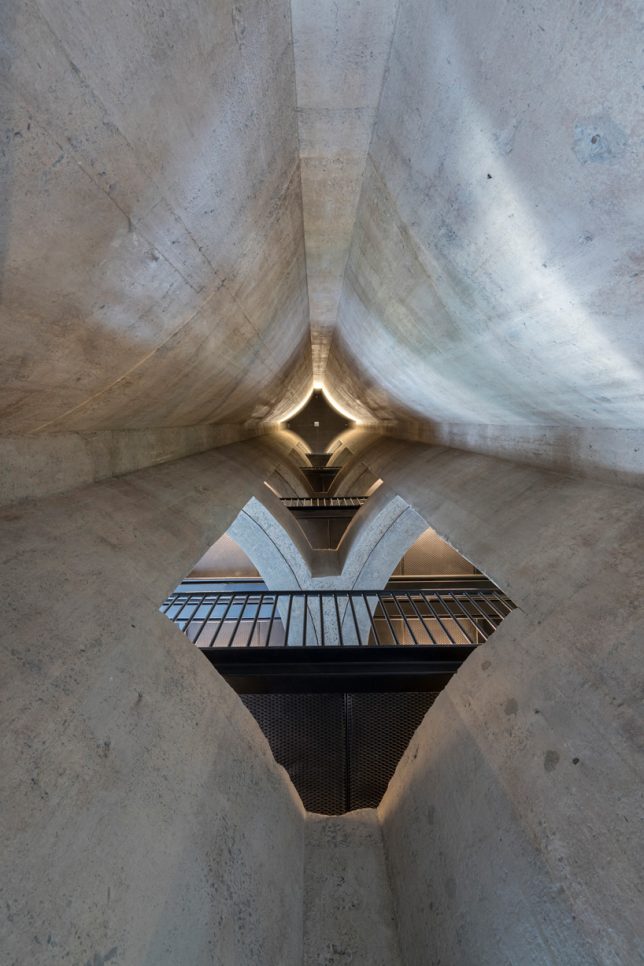
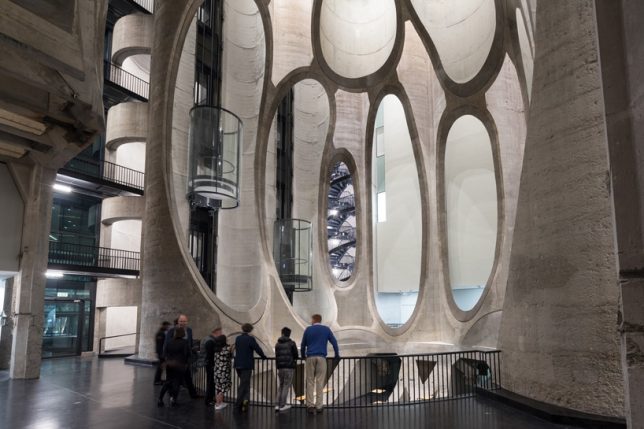
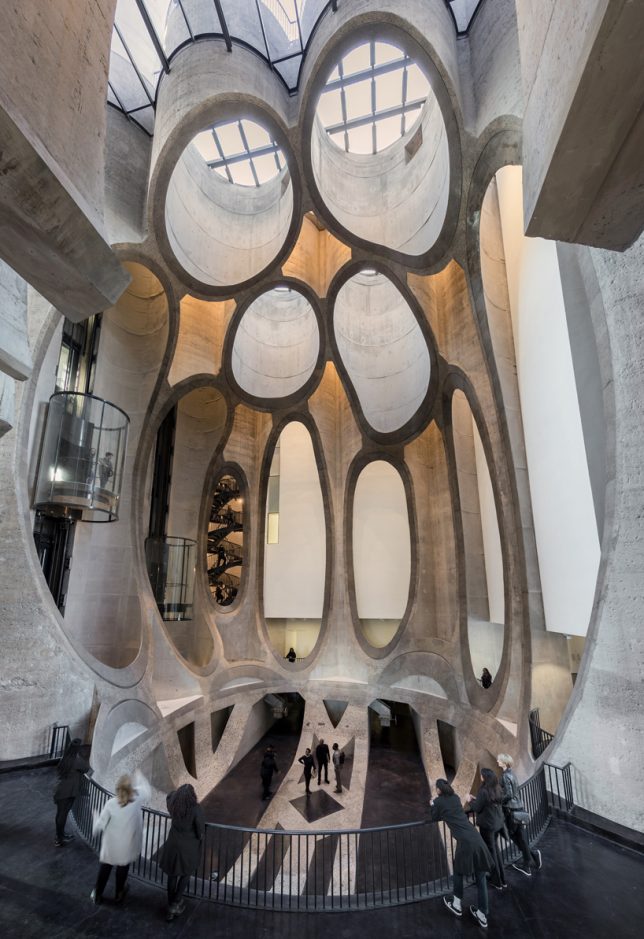
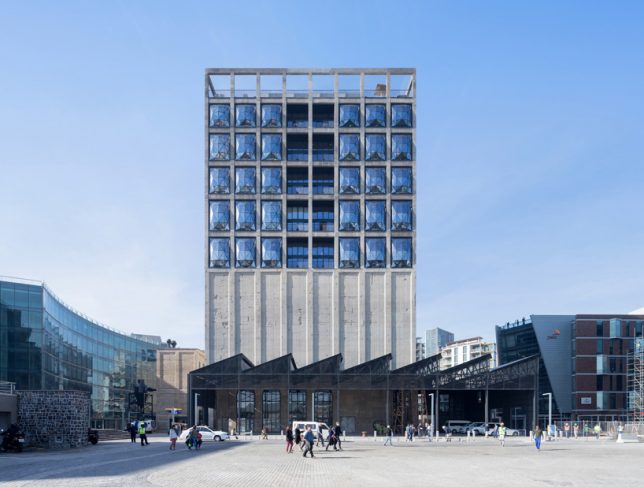
106 vertical concrete tubes making up a massive disused grain silo in Cape Town, South Africa are sliced and carved from the inside out to produce cathedral-like spaces in this incredible transformation. Architect Thomas Heatherwick and his firm contrasted the cold, aging industrial appearance of the complex with faceted glass and organic shapes for a futuristic looking result, a fittingly monumental setting for the Zeitz Museum of Contemporary Art Africa (MOCAA), the world’s largest museum dedicated to African contemporary art.

The silo once stood as a symbol of economic progress in 20th century Cape Town, but as the world around it changed, it was abandoned. Sitting empty since the 1990s, the silo had become a bit of an eyesore, especially as the waterfront around it modernized, but remained historically important. Heatherwick’s project creates 6,000 square meters ((64,583 square feet) of exhibition space in a total of 80 individual galleries along with a rooftop garden, book store, restaurant, bar and conservation laboratories.

“We were excited by this opportunity to unlock this formerly dead structure and transform it into somewhere for people to see and enjoy the most incredible artworks from the continent of Africa,” says Heatherwick. “The technical challenge was to find a way to carve out spaces and galleries from the ten-story high tubular honeycomb without completely destroying the authenticity of the original building.”

‘Tubular honeycomb’ is a good way to describe it. The interior photos reveal voids carefully carved out of the bases of the concrete tubes, revealing their geometries in whole new ways. Some of these tubes act as skylights, while others hold glass elevators or spiraling staircases. The museum stands as an awe-inspiring example of how adaptive reuse can reveal qualities you might never have expected in existing structures.

Share on Facebook


[ By SA Rogers in Architecture & Public & Institutional. ]

[ WebUrbanist | Archives | Galleries | Privacy | TOS ]


WebUrbanist

 
Comments Off on Incredible Grain Silo Transformation: Zeitz Museum of Contemporary Art Africa

Posted in Creativity


Affinity Photo for iPad adds extremely useful drag-and-drop feature with iOS 11 update

22 Sep

One of the useful features added to the iPad with the update to iOS 11 this week was drag-and-drop between the operating system’s “Files” app and other applications on the tablet. And popular photo editor Affinity Photo has already updated its iPad app to take advantage of this really handy feature.

Now, if you want to edit a photograph in the Affinity Photo app, all you have to do is drag it from the files app into Affinity… that’s it. No need to get the image onto your iPad in some other, more convoluted way—as long as it’s accessible from your Files app (read: in a cloud-connected folder on your Apple computer) you can drag it into the app.

What’s more, you can drag multiple files in at once for HDR merging, panorama creation, and focus stacking. Here’s the description direct from Serif, the makers of Affinity Photo:

Thanks to iOS 11’s new Files app you can now drag and drop multiple images straight into Affinity Photo for iPad and start editing. This is tremendously useful when working with HDR merge, image stacking and panoramas and will provide an instant boost to your workflow. And if you ever receive images, or even PSD files, via email, you can now open and edit that file – with all layers intact – by simply dragging it in.

Affinity Photo made a big splash with their iPad release, calling it “the first full blown, truly professional photo editing tool to make its way onto the Apple tablet.” As Serif builds more and more functionality into the app, they’re hoping to close the gap between mobile and desktop editing. This represents a big step in that direction.

Learn more about Affinity Photo for iPad by clicking here. And if you’re more of a desktop editor sort of person, don’t forget to check out our review of Affinity Photo 1.5.2 posted this week!

Full Review: Affinity Photo 1.5.2 for Desktop

Articles: Digital Photography Review (dpreview.com)

 
Comments Off on Affinity Photo for iPad adds extremely useful drag-and-drop feature with iOS 11 update

Posted in Uncategorized


Synology launches its first 6-bay NAS tower, updates more affordable options

22 Sep

Storage solution company Synology has introduced its first six-bay NAS device: the DS3018xs. The new model holds six drives of its own, but if that’s still not enough storage for your epic photo library, it can combine with the company’s DX1215 expansion units to control up to thirty.

The company has used the Pentium D1208 dual-core 2.2GHz processor that can boost to 2.6GHz, and provides a PCle slot for users to install an optional dual M.2 SATA SSD adapter to shift processing onto solid state drives for speed and efficiency. The DS3018xs comes with 8GB of RAM installed, but has two memory slots for expansion up to 32GB, and an optional 10GbE network card can provide 2230MB/s sequential read speeds.

At the same time, Synology has launched four other DS and DS+ models that replace existing NAS enclosures. The new DS918+ and DS718+ are upgrades of the DS..16+ models, and bring more memory capacity and options for adding extra slots via DX517 expansion unit. These models and the DS218+ and DS418 get new processors as well, while all are said to be capable of transcoding 4K video on the go.

Synology has started a series of workshops around the world that demonstrate some of these models and show off the company’s technology. They are free to attend to anyone registered via the Synology 2018 events page. For more information about the new NAS enclosures visit the Synology website.

Pricing

DS3018xs – £1298.18 (including VAT), €1190 (excluding taxes)
DS918+ – £518.18 (including VAT), €475 (excluding taxes)
DS718+ – £414.55 (including VAT), €380 (excluding taxes)
DS218+ – £310.90 (including VAT), €285 (excluding taxes)
DS418 – £387.91 (including VAT), €351 (excluding taxes)

Press Release

From Home to Business: Synology® Unveils New XS/Plus/Value-Series Product Lineup

Storage solutions designed to meet a multitude of needs

Synology® Inc. announced the official launch of new product lineup featuring:

DS3018xs: Synology’s first 6-bay tower NAS with optional 10GbE and NVMe SATA SSD supports

Plus-series DS918+, DS718+, and DS218+: Designed to meet your intensive daily workloads

Value-series DS418: Featuring optimized 4K online transcoding capability

To allow for ultra-high performance using SSD cache without occupying internal drive bays, DS3018xs features a PCIe slot, which can be installed with a dual M.2 SATA SSD adapter card (M2D17). DS918+ comes with dedicated dual M.2 NVMe slots at the bottom where you can directly install M.2 NVMe SSDs. DS418 features 10-bit H.265 4K video transcoding, and while supporting the next-generation Btrfs file system in DSM 6.2 official, expected to release in early Q1 next year. Btrfs provides reliable data protection through its cutting-edge self-healing and point-in-time snapshot features.

DS3018xs, Synology’s first 6-bay tower NAS, is compact yet powerful as it features the Intel’s advanced Pentium D1508 dual-core 2.2GHz processor (Turbo Boost up to 2.6GHz) with AES-NI encryption engine; offering scalability of RAM up to 32 GB and storage capacity up to 30 drives with two Synology DX1215. In addition to four Gigabit LAN ports, DS3018xs takes advantage of boosting maximum throughput with an optional 10GbE network interface card, delivering stunning performance at over 2,230 MB/s sequential reading and 265,000 sequential read IOPS.

DS918+ and DS718+ are powered by Intel‘s Celeron® J3455 quad-core processor. DS218+ is powered by Intel’s Celeron® J3355 dual core processor. Both models are equipped with AES-NI hardware encryption engine and support up to two channels of H.265/H.264 4K video transcoding.DS918+’s RAM is scalable up to 8GB, while DS718+ and DS218+ are scalable up to 6 GB, allowing you to operate more intensive tasks at once. DS918+ and DS718+ are equipped with two LAN ports, and their storage capacity can be scaled up to 9 and 7 drives, respectively, with Synology’s DX517 expansion unit.

“Responding to the demands from our customers, DS3018xs is built as a comprehensive business-ready desktop NAS. Running mission-critical applications or planning virtualization deployment with DS3018xs has never been easier.” said Katarina Shao, Product Manager at Synology Inc. “The new DS918+, DS718+, and DS218+ are optimized to be your digital video libraries, and will bring you an excellent viewing experience with high definition live video transcoding, regardless of device limitations.”

DS418 is equipped with a 1.4GHz quad-core processor with hardware encryption engine, 2 GB RAM, and two LAN ports. Powered by the hardware transcoding engine, DS418 supports H.265 4K transcoding allowing it to serve as your media library. Combined with Btrfs and Snapshot supports, DS418 is delivers more efficient data storage and more reliable data protection.

For more information on DS3018xs, please visit https://www.synology.com/products/DS3018xs

For more information on DS918+, please visit https://www.synology.com/products/DS918+

For more information on DS718+, please visit https://www.synology.com/products/DS718+

For more information on DS218+, please visit https://www.synology.com/products/DS218+

For more information on DS418, please visit https://www.synology.com/products/DS418

Articles: Digital Photography Review (dpreview.com)

 
Comments Off on Synology launches its first 6-bay NAS tower, updates more affordable options

Posted in Uncategorized


My 5 Favorite Lightroom Sliders

22 Sep

Lightroom is a mature, fully featured photo-processing app. It has tools bursting out at the seams, from lens corrections to color corrections and even camera styles and mode emulations. That doesn’t stop you from having some favorites though. These are the ones that I seem to use on every photo that I choose to edit.

My five favorite Lightroom sliders

So, here are my five favorite Lightroom sliders in no particular order. I’ll use two different photos to walk through but will give other examples as well. Here’s our two starting photos, both raw files that have been exported as JPEG with no settings applied.

My 5 Favorite Lightroom Sliders

My 5 Favorite Lightroom Sliders

#1/2 – Shadows/Highlights

My first two favorite sliders are used as a pair. The Shadows slider changes luminosity of the darker areas in the photo. The sliders in the Basic panel are all interactive and affect each other, so pushing the Shadows sliders to the right will also affect the darkest part of the photo typically controlled by the Blacks. Because of this, you’ll often need to bring the Blacks slider down a bit to compensate.

My 5 Favorite Lightroom Sliders

The first photo with Highlights at -100 and Shadows at +100. Notice how it resembles HDR tone mapping.

The Highlights slider affects the brighter parts of the image. I use this most often to bring back detail in these areas. A great trick for underexposed photos is to increase Exposure to brighten the photo, then bring down the Highlights slider to rescue lost highlight detail.

Together the Shadow/Highlights pair act as tone mapping controls in Lightroom. By bringing Shadows to +100 and Highlights to -100, you can get a natural look faux HDR photo from a single photo. In fact, the Auto control in Lightroom’s HDR tool sets Shadows to +70 and Highlights to -100 most of the time, which isn’t too far off this cool look.

My 5 Favorite Lightroom Sliders

The second photo with our faux HDR settings applied.

I’ll generally apply this to any landscape or cityscape as a Lightroom Preset, and then refine it as needed.

#3 – Clarity

During the development of Lightroom, the Clarity slider was called Punch, which is a great way of describing what it does. Contrast work across the whole image. Clarity, on the other hand, tends to increase or decrease edge contrast on the tones that are neither the darkest nor lightest tones in the photo. 

My 5 Favorite Lightroom Sliders

Clarity slider set +43.

My 5 Favorite Lightroom Sliders

Basic panel settings so far for photo number one.

Pushing it to the right intelligently creates more punch in the image, without increasing contrast in the blacks and whites.

My 5 Favorite Lightroom Sliders

Clarity +25

On portraits, Clarity is like a grit slider, bringing character to male portraits.

My 5 Favorite Lightroom Sliders

Before and after Clarity +52 has been added to this male portrait (right).

Moving Clarity to the left softens out those mid-tones. While I’ve seen other mention that it doesn’t affect the colors, I feel that it does add a small amount of saturation. This soft look is great for skin, especially female portraits. I don’t use it globally in those case though, I use it as a local adjustment with the Adjustment Brush tool, allowing me to apply it only to specific areas.

My 5 Favorite Lightroom Sliders

Here’s what negative Clarity looks like. While it’s softened the skin, it’s also softened all the mid-tones in the photo.

My 5 Favorite Lightroom Sliders

Here’s the same setting, but only applied to the skin. It makes a huge difference and provides an effective way to retouch skin in Lightroom.

#4 – Vibrance

Sticking to the Basic panel, Vibrance is located in the Presence section right below Clarity. Vibrance is a special form of Saturation. Saturation works by increasing the intensity of each color until they’re a pure tone. Too much can be garish, and this is where Vibrance steps in.

Vibrance works on a more relative scale. It affects colors that are already saturated less than muted ones. This means it takes a lot longer to look garish and balances out the saturation of all colors in the photo.

My 5 Favorite Lightroom Sliders

Our first photo with +31 Vibrance added to the previous settings.

Our second photo with Vibrance +23.

The Vibrance slider in Lightroom has one other trick up its sleeve though. It prevents skin tones from becoming saturated. This means you get to increase the saturation of your portrait location, without giving an Oompah Loompah tone to your subject. That’s a big win in my opinion.

My 5 Favorite Lightroom Sliders

Even with Vibrance of +50, the skin tone still looks reasonably natural, avoiding the orange look that Saturation would have at a similar setting.

For landscape photos this does mean Vibrance pushes greens and blues more than reds and oranges, so for sunsets and sunrises, I usually mix Vibrance and Saturation evenly.

#5 – Dehaze

Dehaze is a Lightroom CC only feature. You can use it in Lightroom 6 with presets though. It’s not as convenient, but access to the feature via presets is still useful even if you don’t have the Dehaze slider. 

The Dehaze slider is located in the Effects panel.

My 5 Favorite Lightroom Sliders

Dehaze of +60 on a foggy shot from Venice.

Dehaze is aptly named as it removes haze from an image. That sounds simple, but it’s really doing a lot of work to figure out what’s happening in the photo, so it knows which areas are affected by haze, and applying the correction based on the haze at that point in the photo.

My 5 Favorite Lightroom Sliders

Photo one with Dehaze +30

My 5 Favorite Lightroom Sliders

Photo two with Dehaze applied.

It works as an effect on images without haze as well, where it increases contrast and saturation. It does tend to darken the photo, so you generally need to boost exposure as well when you’ve used it. Dehaze can also be used in reverse, to increase the haze in a photo, giving it more atmosphere.

My 5 Favorite Lightroom Sliders

Negative Dehaze can make a photo look foggy.

Haze in and of itself isn’t a bad thing and does add mood to a photo. It’s when areas of the photo are more substantially affected than others that it comes into its own. For these times, Dehaze is available as a local correction via the Adjustment Brush, Graduated Filter, and Radial Filter.

My 5 Favorite Lightroom Sliders

Develop settings for our second photo.

And you?

So those are my five favorite Lightroom sliders. Do you have any favorites that you use all the time? Please add a comment below and let us know.

The post My 5 Favorite Lightroom Sliders by Sean McCormack appeared first on Digital Photography School.


Digital Photography School

 
Comments Off on My 5 Favorite Lightroom Sliders

Posted in Photography