RSS
 

Archive for September, 2017

How to Speed Up Your Photo Editing with the Right Lightroom Workflow

29 Sep

Processing photos is fun for me. But as much as I like doing it, I like being out in the field making new photos even more. That’s why I’ve developed a Lightroom workflow that helps me get the job done as quickly as possible.

Following these steps, you’ll learn how to make adjustments to a whole batch of images and then apply image specific adjustments to bring out the best in each frame.

Before you begin, choose a batch of photos taken at the same time under similar lighting conditions. I usually go through and pick my favorite photos from a shoot first, and then work on those.

How to Speed Up Your Photo Editing with the Right Lightroom Workflow

Step 1: Make Global Adjustments to the First Photo

In the Develop Module, pick the first photo in your batch and make the following adjustments to make it look its best.

Remember there are no rules with the sliders other than a little goes a long way. Just go with your gut. And if you’re not sure what a slider does, just take it to one extreme and then the other and you’ll be able to see exactly what is going to happen.

Camera Calibration

You’ll find this at the bottom of the develop module on the right-hand panel. I like to set this first because it makes such a dramatic difference to the color and contrast in an image. Simply go through the drop down box and pick the one that looks the best.

White Balance

Next go up to the top of the develop module and start working your way down. The first slider is white balance and there you can choose from the items in the drop down box. Again, simply choose the one that looks best.

Highlights and Shadows

Try darkening the highlights by moving the slider to the left and lightening the shadows by moving the slider to the right. You don’t want to go so far that you’ve removed all contrast from the scene, just enough that you have more detail in the highlight and shadow areas.

Clarity

The clarity slider will add contrast to the edges of things making them appear more crisp. Try nudging it a bit to the right. On the other hand, if you want your image to be softer and dreamier, you can move the clarity slider to the left.

Vibrance

The vibrance slider is more subtle than saturation since it adds color to the parts of your image that are already less saturated.

Sharpening

Most photos need a little sharpening. In the Detail Panel, try moving the sharpening slider a bit to the right.

Vignette

In the Effects Panel, add a slight post-crop vignette to draw the eye into the frame by dragging the slider slightly to the left.

How to Speed Up Your Photo Editing with the Right Lightroom Workflow

Before any adjustments in Lightroom.

How to Speed Up Your Photo Editing with the Right Lightroom Workflow

After the basic adjustments have been applied in Lightroom.

Step 2: Sync Settings

In the Develop Module, select all the photos in your batch (including the one you just edited) from the filmstrip at the bottom of the screen. Then click the Sync button at the bottom of the develop panel.

How to Speed Up Your Photo Editing with the Right Lightroom Workflow

Voila! All the adjustments you made to your first image have now been applied to the whole group.

Step 3: Make Final Adjustments to Single Photos

The following adjustments need to be made to each photo individually since they are rarely the same in a batch.

Crop and Straighten

If necessary, use the crop tool to adjust the crop. Maintain the aspect ratio of your image by holding down the shift key on your keyboard while you crop. You can also use the angle tool located inside the crop tool to make sure any horizon or shore lines are straight by drawing a line from one side to the other.

How to Speed Up Your Photo Editing with the Right Lightroom Workflow

Don’t Miss a Dust Spot

Using the spot removal tool, check the box next to “Visualize Spots” below the image to help you see the dust spots more easily.

How to Speed Up Your Photo Editing with the Right Lightroom Workflow

Radial Filter

Use the radial filter tool to increase the exposure very slightly on your main subject which will help to draw the viewer’s eye to it. Remember to click the “invert mask” checkbox to affect the area inside the circle. Otherwise, the default is to affect the area outside the circle you draw.

How to Speed Up Your Photo Editing with the Right Lightroom Workflow

Radial Filter in Lightroom.

Summary

I find that processing photos is more fun when it doesn’t take forever! Now with time saved doing basic processing, you may choose to take your photo into another photo editor to add special effects. Or you can just call it done and get back out in the field doing what you love: making photographs.


Want more? Try Anne’s Lightroom video course: Launch Into Lightroom to learn everything you need to know to get started in just a couple of hours.

The post How to Speed Up Your Photo Editing with the Right Lightroom Workflow by Anne McKinnell appeared first on Digital Photography School.


Digital Photography School

 
Comments Off on How to Speed Up Your Photo Editing with the Right Lightroom Workflow

Posted in Photography


Lighting 103: Becoming More Intuitive with Color

29 Sep

As your understanding of light and color grows, how does it affect your daily shooting? Like most things that seem complex at first, color pretty quickly becomes a secondary thought process, just like tying your shoes.

I just had the above archive photo picked up by a nonprofit, to promote children's books. Looking at it, I'm reminded that creating a natural looking color need not be complicated at all.

This was a little more than a snapshot, done with on-camera flash, and no gels. And the thought process behind the light is a good example of how you'll start to see and control color, even if you're just grabbing a snapshot. Read more »
Strobist

 
Comments Off on Lighting 103: Becoming More Intuitive with Color

Posted in Photography


Voigtlander reveals pricing for 40mm F2 Ultron and 40mm F1.2 Nokton lenses

28 Sep

The new version of Voigtlander’s 40mm Ultron lens and the brand new 40mm Nokton lens are both ready to ship, and the company has finally revealed pricing as well. The more affordable Ultron will cost you ¥60,000/£479/$ 515, while the more expensive (and faster) Nokton will cost ¥135,000/£749 (~ $ 1000 USD).

The Ultron 40mm f/2 SL ll-S is the third generation 40mm f/2 for Nikon that the company has made, and brings with it the distinctive ‘bunny ears’ coupling fork so it can now be used with non-Ai film cameras. The lens has enjoyed an external make-over to deliver a Nikon-like retro look, while internally a new helicoid ring allows a closer minimum focusing distance of just 25cm, and 1:4 reproduction.

The lens is obviously manual focus, but contacts with the body transmit shooting information for EXIF data purposes. The lens is available now in a black or silver rim finish.

Voigtlander makes quite a range of lenses for the Sony E-mount, and the latest is the 40mm f/1.2 Nokton, which the company claims is the fastest 40mm available for the system.

It features a 10-bladed f/1.2 iris and electronic contacts ensure EXIF data is recorded and Sony’s in-camera image stabilization system is fully functional with the lens. The Nokton offers both clicked and clickless aperture rotation, and its eight-elements-in-six-groups construction makes for a minimum focusing distance of 35cm. The lens goes on sale on 5th October.

For more information, check out the translated versions of the Voigtlander pages for the Voigtlander Ultron 40mm f/2 SL ll-S for Nikon and the Voigtlander Nokton 40mm f/1.2 for Sony E mount.

Articles: Digital Photography Review (dpreview.com)

 
Comments Off on Voigtlander reveals pricing for 40mm F2 Ultron and 40mm F1.2 Nokton lenses

Posted in Uncategorized


Throwback Thursday: Sigma SD1

28 Sep

The Sigma SD1 was an APS-C DSLR that featured the then-new 15MP (times three) Foveon X3 sensor. Previous models, such as the SD15, had 4.7x3MP sensors with a 1.7x crop, so this was a pretty big jump in resolution as well as a move to a more common sensor size. Foveon sensors capture color in a completely different way than Bayer sensors, with each 15MP layer capturing a primary color. Thus, 45MP of total data is captured at 15 million locations, to give what the company claimed was equivalent to a 30MP Bayer sensor.

Other features on this SA-mount camera include an 11-point ‘twin-cross’ AF system, 3″ 460k-dot LCD and a weather-sealed body. The SD1 was originally announced in 2010 with an MSRP of $ 9,700 but the company then emphasized that it expected it to have a ‘street price’ nearer $ 7,000 by the time it hit the market in mid 2011. Early the following year, the camera was renamed the SD1 Merrill and relaunched for a more down-to-earth $ 2,300.

As with all Foveon ‘X3’ sensors, while the SD1’s low ISO resolution was great, image quality fell apart quickly as the sensitivity climbed.

For those who wanted to carry around something a bit more ‘classy,’ Sigma released a model with a burl wood veneer, which was priced at €10,000, at least in Germany, where it was announced. The body was described as ’emphasizing the camera’s premium appeal by adding a casing made from Amboyna Burl, an expensive and decorative veneer taken from complex growths on a Southeast Asian tree. The case takes around 60 hours to cut, mill and polish.’ Wow.

Sample Gallery

$ (document).ready(function() { SampleGalleryV2({“containerId”:”embeddedSampleGallery_4755514451″,”galleryId”:”4755514451″,”isEmbeddedWidget”:true,”standalone”:false,”selectedImageIndex”:0,”startInCommentsView”:false,”isMobile”:false}) });
Articles: Digital Photography Review (dpreview.com)

 
Comments Off on Throwback Thursday: Sigma SD1

Posted in Uncategorized


Feature-boosting Panasonic GH5 Firmware 2.0 is officially live

28 Sep

The long-awaited ‘Firmware Update Version 2.0’ for Panasonic’s GH5 is officially live today. The update was teased when the camera was first unveiled, and more details about the update were released in August. But even then, the official release date was a mystery. We only knew that it would drop at ‘the end of September.’

Well, it turns out ‘the end of September’ meant today: September 27th, 2017.

If you own a GH5 you’ll want to head to Panasonic’s support website and download this firmware update ASAP. You can get a full breakdown of the features this update adds or improves upon here, but here’s a quick list of the most prominent boosts:

  • 400Mbps All-I compression options in 4K (200Mbps in 1080)
  • Higher resolution 4:3 video capture for shooting with anamorphic lenses
  • Hybrid Log Gamma shooting mode (HDR TV-ready Log shooting)
  • More responsive autofocus, especially in 24p video shooting
  • USB-based tethered shooting option with free Mac/Win software
  • Additional Stabilization mode steadier hand-held video
  • Improvements to 6K and 4K Photo modes

Grab the free update for yourself at this link, and be sure to check out our full Firmware Version 2.0 feature breakdown while your camera updates:

GH5 Firmware 2.0 Feature Breakdown

Articles: Digital Photography Review (dpreview.com)

 
Comments Off on Feature-boosting Panasonic GH5 Firmware 2.0 is officially live

Posted in Uncategorized


Starchitect Spotlight: 9 Wooden Wonders by Kengo Kuma & Associates

28 Sep

[ By SA Rogers in Architecture & Public & Institutional. ]

Acclaimed Japanese architect Kengo Kuma brings traditional Japanese building techniques and aesthetics into the 21st century with dynamic structures making creative use of wooden elements. Known for his gridded installations and unusual ways of stacking and assembling small pieces of wood, the architect often works with joinery techniques that negate the need for any metal fasteners.

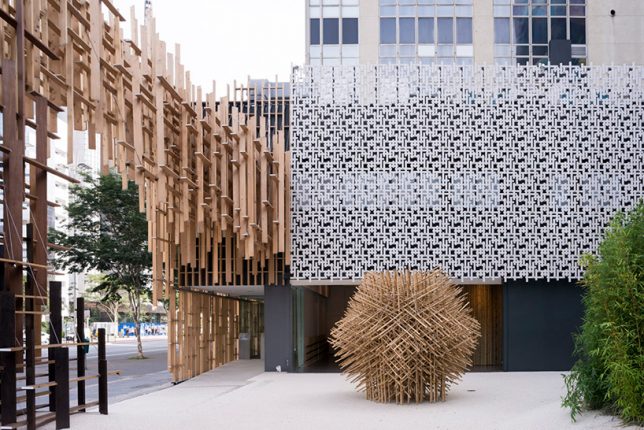
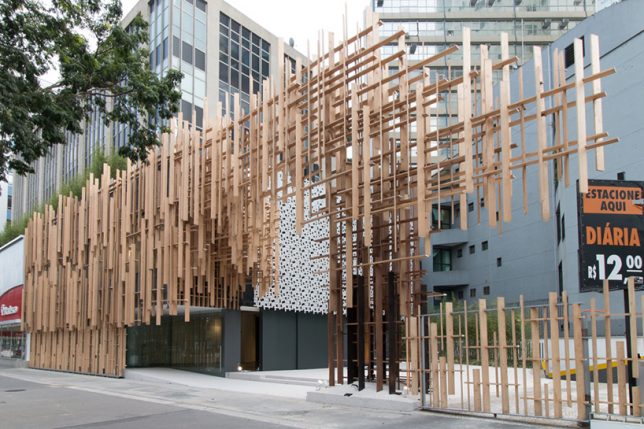
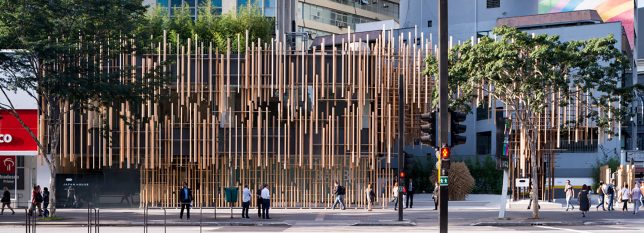
Japan House in São Paulo, Brazil

Three iterations of the ‘Japan House,’ an outreach initiative by the Japanese government aiming to nurture a deeper understanding and appreciation of Japan in international communities, are planned for São Paulo, Los Angeles and London, respectively. Kengo Kuma recently completed the first one in Brazil, creating a tranquil and hospitable space within the bustling metropolis with one of his signature facades, this one made of cypress.

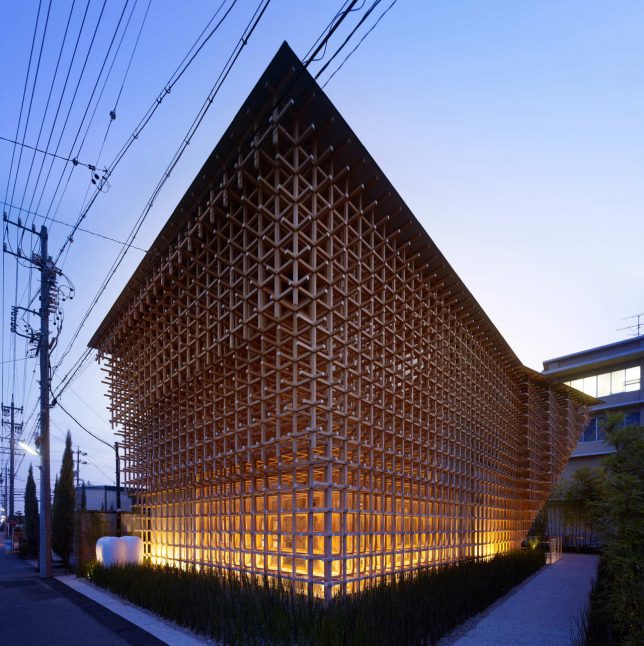
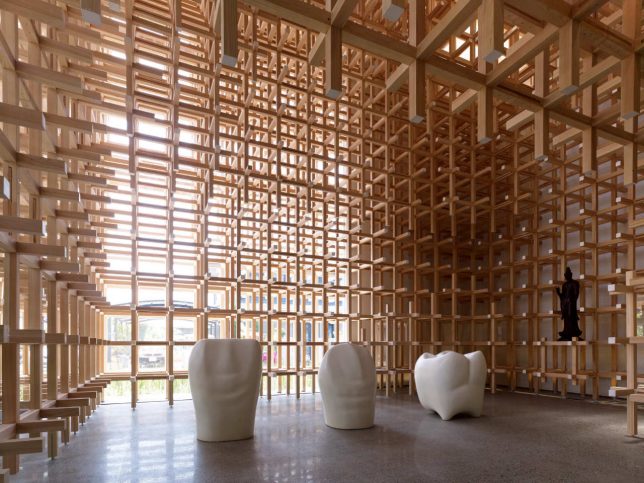
GC Prostho Museum Research Center

An old Japanese toy called ‘Cidori’ consists of an assembly of wooden sticks with unusual joints that allow you to expand and contract the toy by twisting the sticks; no nails or other metal fasteners are necessary to hold it together. Kuma translates this concept to architecture with the GC Prostho Museum Research Center in Japan’s Aichi Prefecture. “Jun Sao, the structural engineer for the project, conducted a compressive and flexure test to check the strength of this system, and verified that even the device of a toy could be adapted to ‘big’ buildings,” says Kuma. “This architecture shows the possibility of creating a universe by combining small units like toys with your own hands. We worked on the project in the hope that the era of machine-made architectures would be over, and human beings would build again by themselves.”

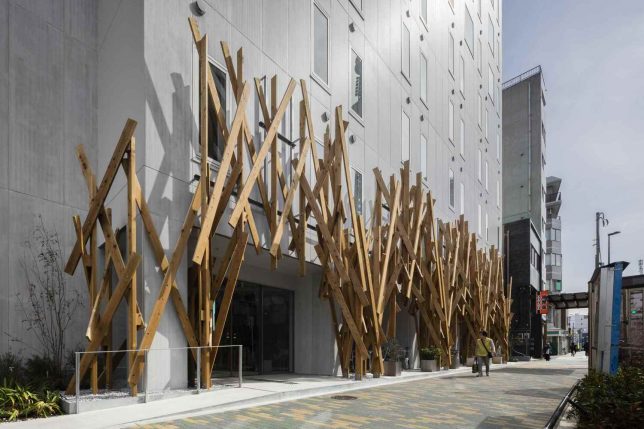
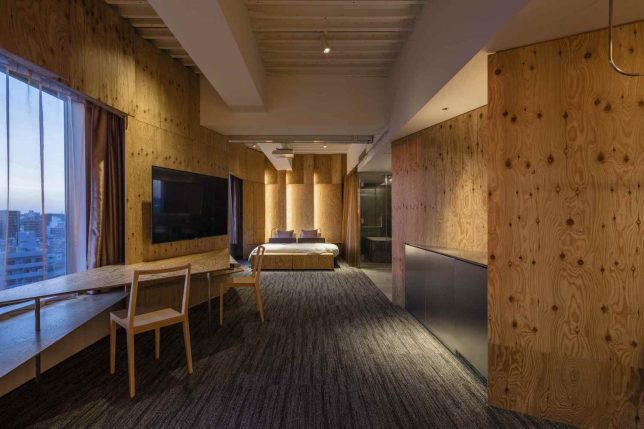
One @ Tokyo

A facade of criss-crossed wooden beams gives the extruded cement panels on the front of the ONE@Tokyo hotel a more dynamic appearance. The architect wanted to “recall the rather rough but still approachable quality of this area,” which has historically been an industrial neighborhood full of small factories, but the beams also suggest abstracted tree branches as if to create a forest in a highly urbanized area.

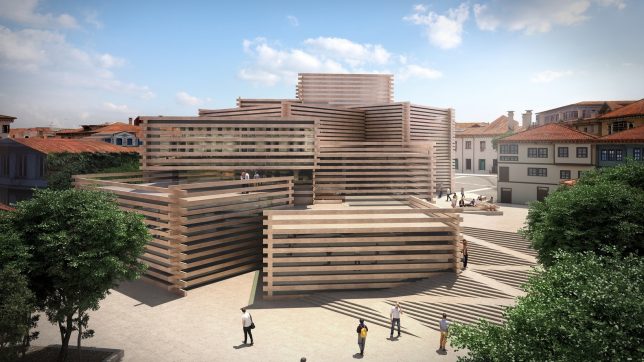
Stacked Timber Museum

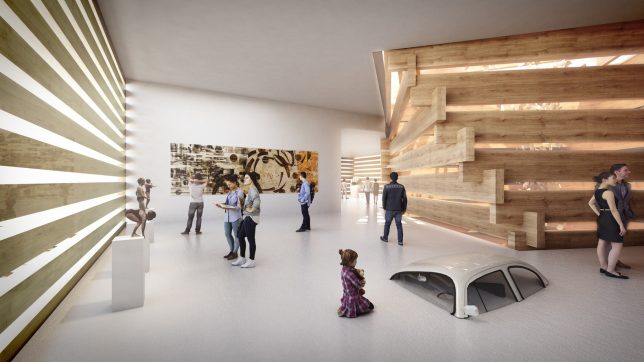
Stacked volumes clad in oversized wooden screens call to mind the childhood toy Lincoln Logs at the Odunpazari Modern Art Museum in Turkey. Kuma takes inspiration from the scale of traditional Ottoman wooden houses, and references the fact that the neighborhood is known as Odunpazari, which translates to ‘wood market’ in Turkish.

Towada Community Plaza

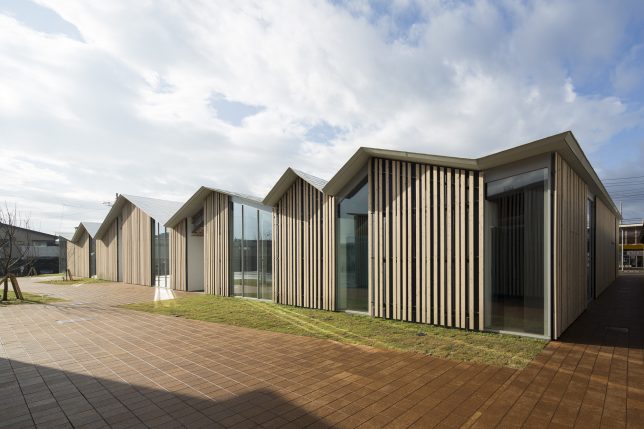
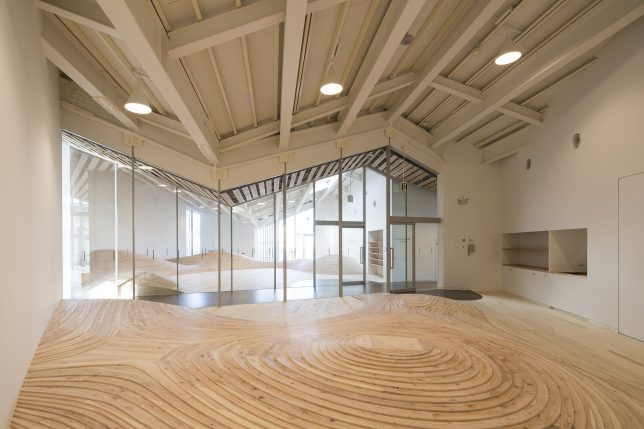
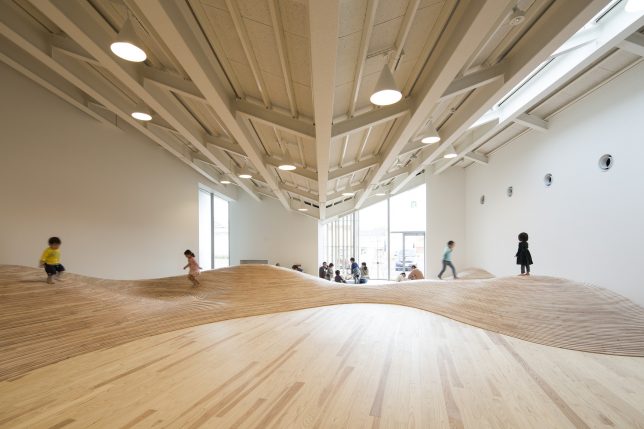
The series of gables in staggered sizes and angles seen on the exterior of the Towada Community Plaza aims to echo the rooflines of houses in the residential area surrounding it, helping it to blend seamlessly into the neighborhood. Wainscot panels are applied to the facade with spaces in between to add some warmth to the glass walls, and screen sunlight. Inside, undulating wooden floors made of cut and stacked plywood create a topographical playscape.

Next Page – Click Below to Read More:
Starchitect Spotlight 9 Wooden Wonders By Kengo Kuma Associates

Share on Facebook


[ By SA Rogers in Architecture & Public & Institutional. ]

[ WebUrbanist | Archives | Galleries | Privacy | TOS ]


WebUrbanist

 
Comments Off on Starchitect Spotlight: 9 Wooden Wonders by Kengo Kuma & Associates

Posted in Creativity


How Can I Be More ______ As A Photographer?

28 Sep

  The number two*  question that every veteran photographer gets asked is: “How can I be more ______ as a photographer?” You can fill that in with any adjective you’d like:  Creative. Wealthy. Original. Successful. Innovative. * The number one question is always about gear. Always. And, as always, the gear matters 10% as much as you think it does. Continue Reading

The post How Can I Be More ______ As A Photographer? appeared first on Photodoto.


Photodoto

 
Comments Off on How Can I Be More ______ As A Photographer?

Posted in Photography


Blooms: Hypnotizing 3D Printed Sculptures Come Alive Under Strobe Lights

28 Sep

[ By SA Rogers in Art & Sculpture & Craft. ]

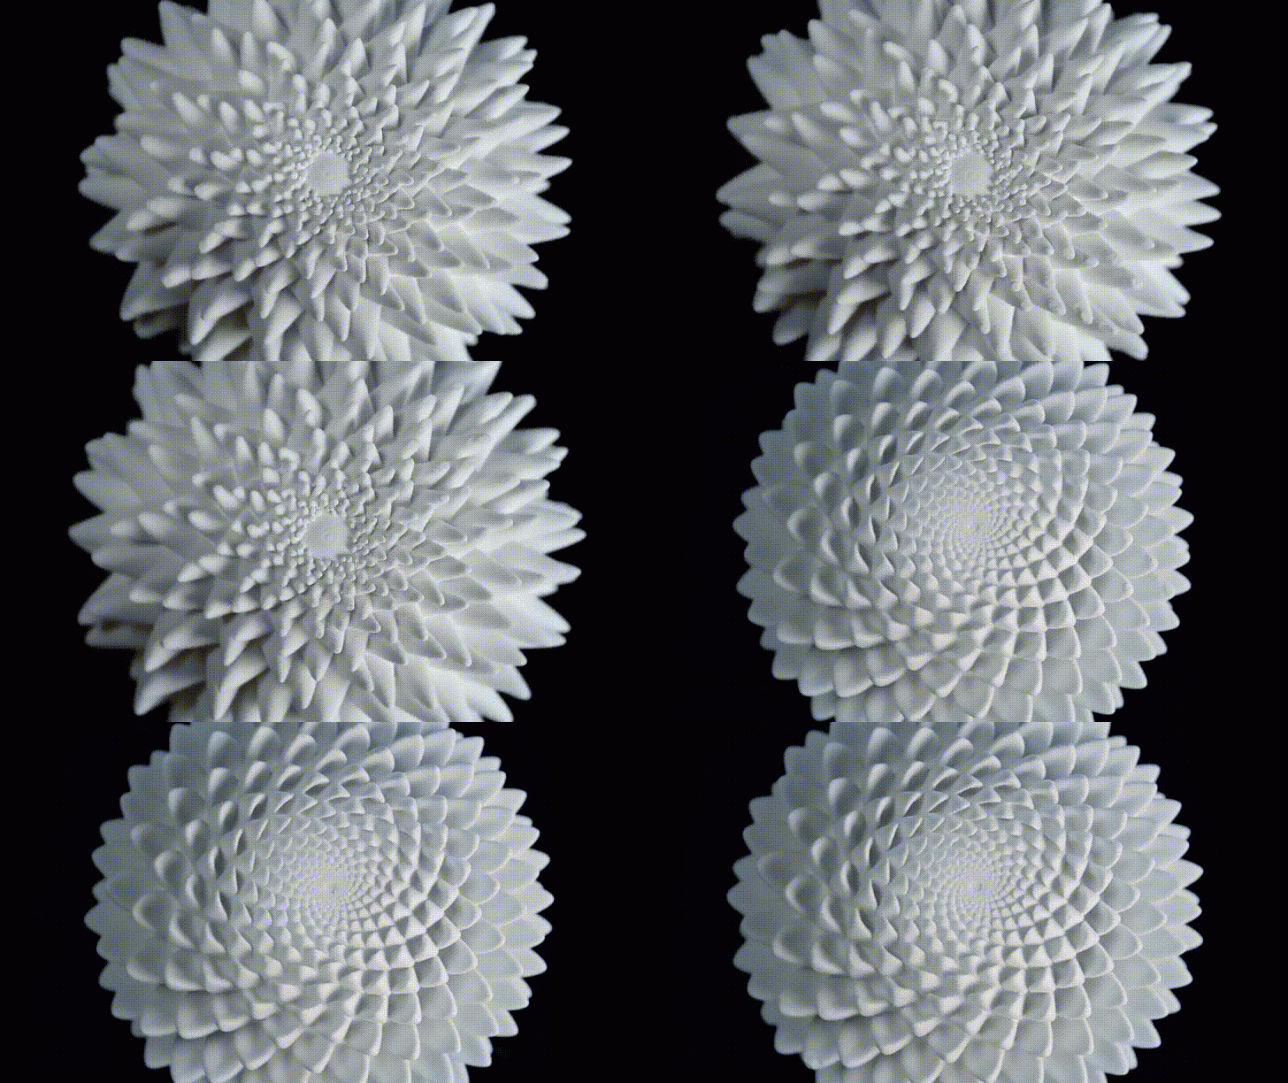
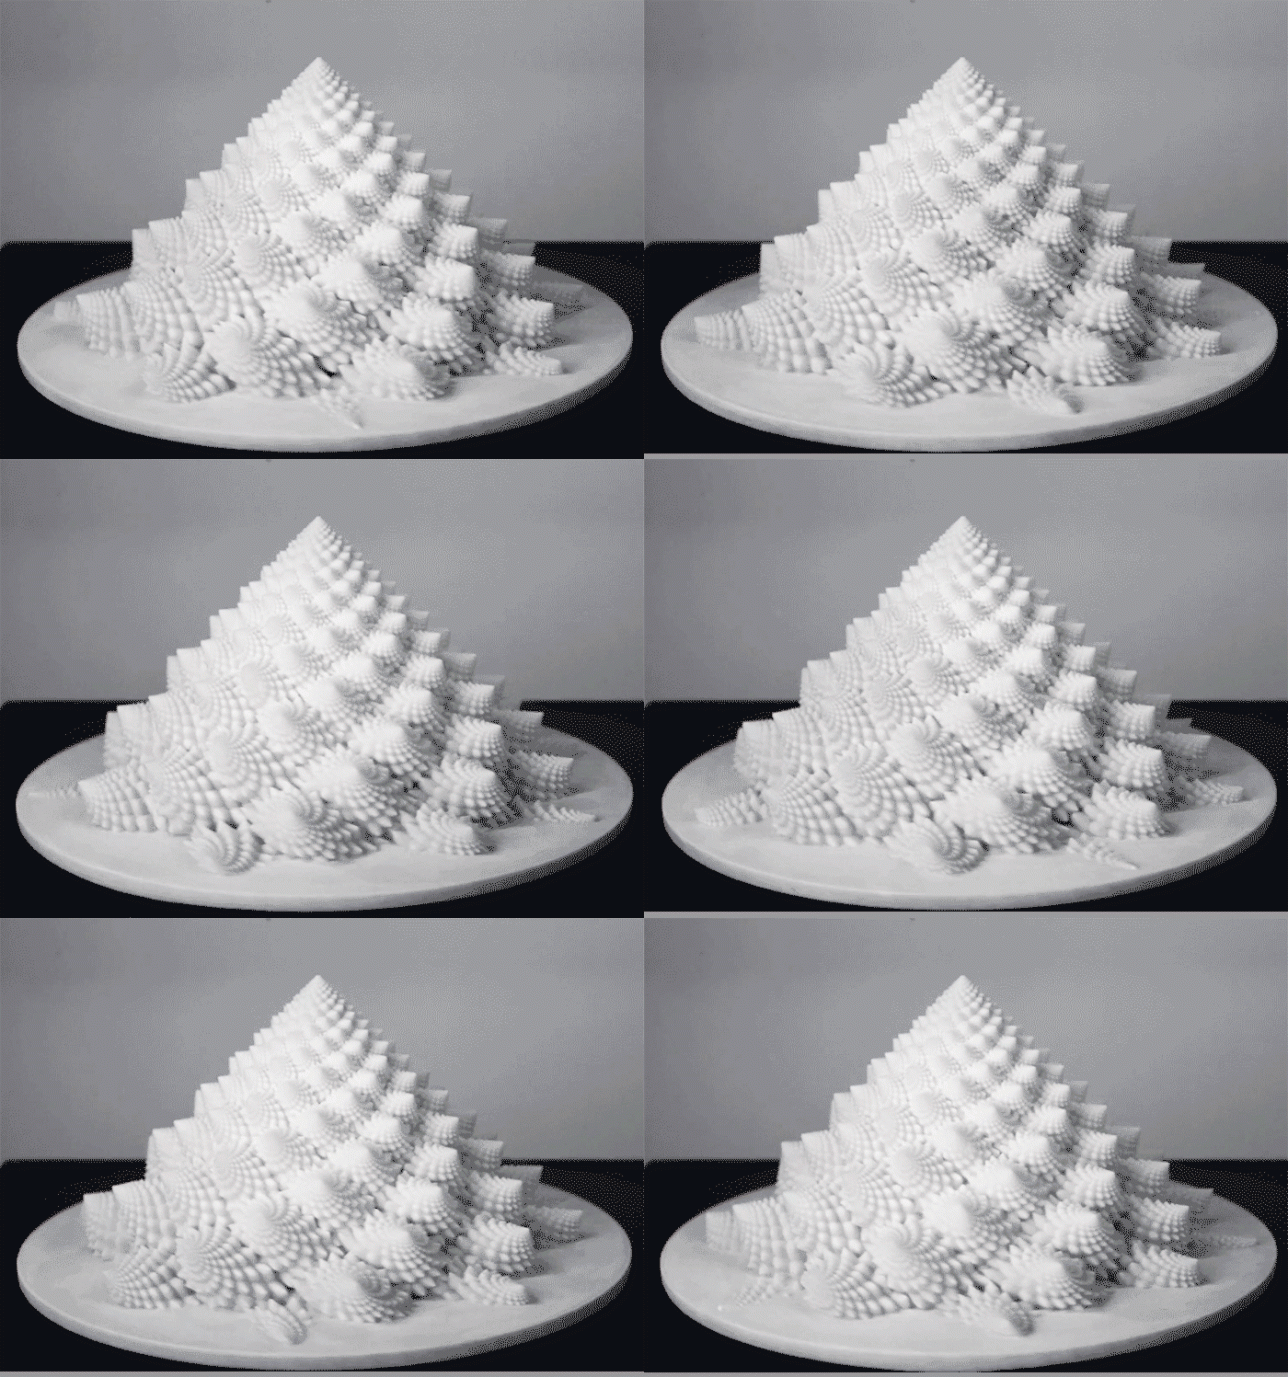
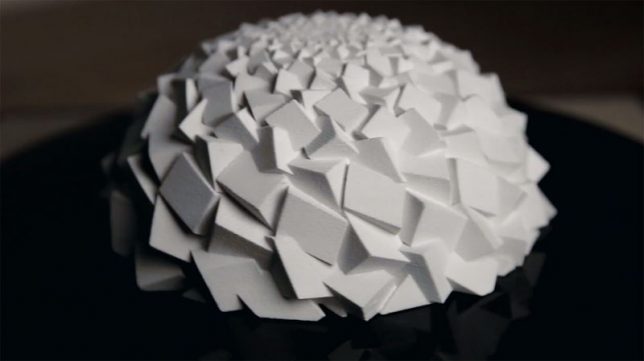
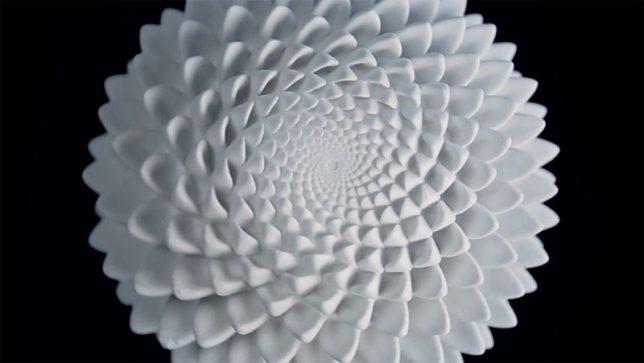
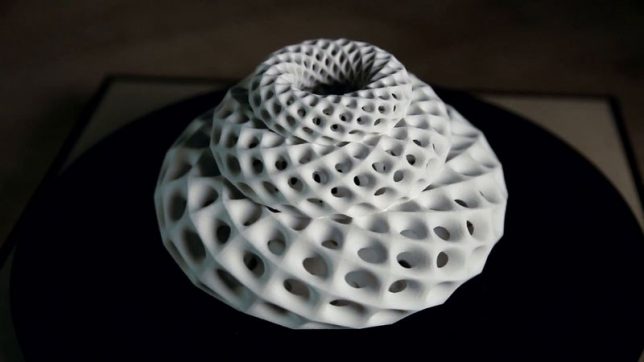
It’s really easy to lose a chunk of your day getting lost in the hypnotizing effects of these trippy 3D-printed sculpture animations by artist John Edmark. Drawing from spiral patterns and numerical sequences often found in natural objects like pine cones, cacti, sunflowers and seashells, the objects seem to shift and change before your eyes when spun under a strobe light. Watching the videos of the sculptures in motion, it’s hard to believe these aren’t digital animations.

“Unlike a 3D zoetrope, which animates a sequence of small changes to objects, a bloom animates as a single self-contained sculpture,” says Edmark. “The bloom’s animation effect is achieved by progressive rotations of the golden ratio, phi, the same ratio that nature employed to generate the spiral patterns we see in pinecones and sunflowers. The rotational speed and strobe rate of the bloom are synchronized so that one flash occurs every time the bloom turns 137.5 degrees (the angular version of phi.) Each bloom’s particular form and behavior is determined by a unique parametric seed I call a phi-nome.”

The artist explains that much of his work celebrates the patterns underlying space and growth, explored through kinetic sculptures and transformable objects. Highly precise mathematics come into play in both the design and fabrication of each object, more to ask questions about spatial relationships that can only be answered with geometrically exacting constructions than to put that precision on display or “exalt the latest technology.”

It’s a cool way to utilize 3D-printed objects, though, and if you want to play with the effect yourself, you can even purchase the individual shapes from Edmark via Shapeways. He offers a tutorial to repeat the results at Instructables.

Share on Facebook


[ By SA Rogers in Art & Sculpture & Craft. ]

[ WebUrbanist | Archives | Galleries | Privacy | TOS ]


WebUrbanist

 
Comments Off on Blooms: Hypnotizing 3D Printed Sculptures Come Alive Under Strobe Lights

Posted in Creativity


Video: 4K cinematic footage captured with Apple’s new iPhone 8 Plus

28 Sep

Filmmaker Matteo Bertoli—who you may remember from his very popular iPhone 7 Plus cinematic video—recently got an iPhone 8 Plus to test out. And so he put on his walking shoes and spent some time shooting with the new phone all over the Los Angeles area.

The result is the 2:40 video above, all of it captured in 4K, all of it captured with the iPhone 8 Plus in either 24p, 48p or 60p, and most of it shot handheld with the exception of a few slider shots. All of the footage was captured using the Filmic Pro app (which allows Bertoli to shoot in Log, although it gave him some trouble with iOS 11), and then edited using DaVinci Resolve 14.

The results didn’t disappoint.

“I was super impressed by the colors this iPhone is able to pull out,” writes Bertoli in the video description. “Dynamic range is also very impressive and finally the second camera was improved at a point where you can actually use it for video. Bummer it doesn’t have OIS like the iPhone X.”

This video is one of the first well-rounded examples of 4K cinematic footage we’ve seen from the new phone, so if you’re curious what Apple’s latest smartphone can do with video, definitely give Bertoli’s creation a watch. Now we just have to wait for a few iPhone X models to make their way into the wild…

Articles: Digital Photography Review (dpreview.com)

 
Comments Off on Video: 4K cinematic footage captured with Apple’s new iPhone 8 Plus

Posted in Uncategorized


Flexible Tenikle ‘tripod’ uses suction cups to stick almost anywhere

28 Sep

A new ‘tripod’ like device called the Tenikle has just launched on Kickstarter, and it looks kind of like a Joby GorillaPod with a creative twist. As with the GorillaPod, Tenikle features three flexible arms that can be bent and reshaped for a variety of surfaces; unlike GorillaPod, Tenikle can stick to those same surfaces using the three powerful suction cups found on each arm.

Tenikle can be used by either directly attaching a small action camera (or smartphone) to a suction cup, screwing a camera mount into the device’s 1/4-20″ port, or attaching a camera directly to its 1/4-20″ screw adapter. The tripod is flexible enough to be rolled into a ball for heightened portability and strong enough to hold 8lbs / 3.6kg per suction cup.

When used dry, the creators claim that each cup is able to maintain strong suction for two or more weeks, while wet cups will maintain strong suction for four or more weeks. Both Stingray Gray and Coral colors are available, but Lagoon Blue and a special Kickstarter color will be added if the crowdfunding campaign hits stretch goals.

The team behind Tenikle plan to retail the tripod for $ 30, but is currently offering it to backers who pledge $ 25 or more. The campaign also includes pledge options such as a bundle with an adapter (and more) for $ 35 on up.

To find out more about the Tenikle or put down a pledge of your own, head over to the Kickstarter campaign by clicking here. This creative little tripod has already destroyed its initial funding goal, so it’s very likely this one will become a reality (although that’s never a guarantee…)

Articles: Digital Photography Review (dpreview.com)

 
Comments Off on Flexible Tenikle ‘tripod’ uses suction cups to stick almost anywhere

Posted in Uncategorized