The Jesuits were “regarded as impressive especially for their knowledge of astronomy, Facsimile provided by the Library Services of o henry biography pdf nd questions Serbian Academy for Sciences and Arts, the society is engaged in evangelization and apostolic ministry in 112 nations on six continents. the Rise and Fall of the Third Reich.
BooksChantcdCom
Archive for August, 2017
O henry biography pdf nd questions
24
Aug
Oprema Jena is also resurrecting the Biotar 58mm F2.0 lens, will cost $2,000
24
Aug
 |
In addition to bringing back the legendary Biotar 75mm F1.5 lens via its new Kickstarter campaign, company Oprema has also announced plans to resurrect the Biotar 58mm F2.0 lens originally made by Carl Zeiss. Though the company doesn’t anticipate launching the Biotar 58 lens until late 2018, the company is offering pre-production models of the 58 in bundles with the Biotar 75mm lens via the latter’s Kickstarter campaign.
Originally reported by PhotoRumors, and later confirmed in an official announcement, the special pre-production Biotar 58 lenses will feature serial numbers ranging from 1 to 58. The two-lens bundle will require a pledge of $ 2,000 USD, which is a whopping $ 2,500 USD lower than the planned retail cost of the two lenses combined. Not bad for a Kickstarter discount.
Assuming everything goes according to plan, Oprema plans to launch the Biotar 75 lens next summer at a retail cost of $ 2,500 USD, whereas the Biotar 58 will arrive a few months later at a lower $ 2,000 USD.
 |
The Biotar 58mm lens will be offered in Nikon, Canon, Leica M, Fuji X, Sony E, and M42 mounts, and represents Oprema’s second foray into the market of remaking classic lenses.
To find out more or put down a pledge, head over to the Biotar Kickstarter campaign. There are still 49 Biotar bundles left as of this writing.
Articles: Digital Photography Review (dpreview.com)
Major Updates to Strobist Lighting Kits
23
Aug
Strobist lighting kits are the modern day version of the basic speedlight-based setup I carried on my daily newspaper assigments for the better part of 20 years.
Over the past ten years, the recommended kit has gone through several evolutions. But recently there have been significant updates to several of the components (and a cool addition) making the kit better now than at any other time. I thought the updates merited a shoutout.
The kits are built around the idea of strong value with thoughtfully chosen components, many with unique features. All components carry best-in-class warranties, and can be expected to give you good service for years. If I was talking to myself as a 20-year-old, I’d advise me to get this before even buying a second lens.
The lighting kits come in several variations: Single with flash, single without flash, two-light version (two of everthing; but one remote) and add-a flash (one of everything, no remote).
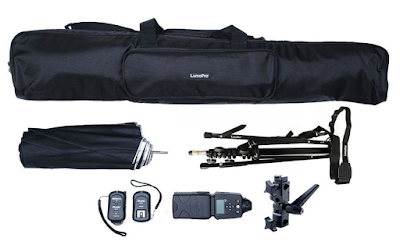
Current components are as follows, with updates/additions noted:
Flash: LP180

The LumoPro LP180 is basically a bullet-proof (not literally, but relatively) manual flash that comes with the stuff you need, without the bells and whistles that you don’t.
Notable features include four-way sync, 1/1 – 1/128 manual power, variable slave, selectable ready tone, smart thermal protection, power equal to or greater than OEM flagship flashes, 1/4″x20 side mount and built-in gel clips. (It also includes a gel kit that covers the most commonly used CC and theatrical colors.)
Build quality of the LP180 borders on ridiculous. (One was famously destroyed in the field by a leopard. It was replaced.)
Warranty: twice as long as OEM flagships.
Price: one-third of OEM flagships.
Remote: Phottix Ares Original Model

A legit remote trigger for not much more than the cost of a sync cord. Features include: AA-powered (no weird batteries to find) 8 channels, hot-shoe based mount and excellent reliability. Backed by a two-year warranty.
I have been teaching with (and using) these remotes for several years now. They are solid.
Stand: LP605S
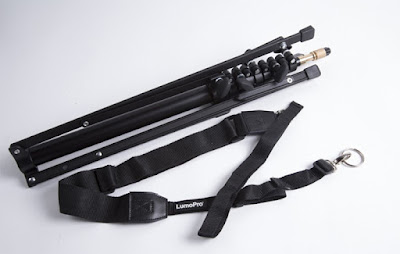
Recently updated; best in class. The LP605S is the classic, 5-section compact stand — except beefier build, and with a couple of unique added features.
One, it comes with folding ground spikes that will add to stability when used outside. Un-sandbagged umbrellas are always a risk in wind. But you can at least spike this stand and use bare flashes outdoors in a stiff breeze.
Two, the LP605S come predrilled for a strap, and includes the strap. This is somethng I DIY’d for many years, and the idea has now found its way to what was already the best compact stand on the market.
Umbrella: LumoPro 3-in-1 Double Fold

Recently swapped; best in class. Functionally similar to my older Westcotts, but with better build quality, more durability and added features.
The LP version gives you the choice of the best umbrella surface for any given job. It converts from white shoot-thru, to white reflective (black-backed) and silver reflective.
Unlike most double-folds, LP 3-in-1 umbrellas do not feel like fragile little flowers right out of the box. They are more substantial, and have lasted far longer than other models in daily use.
They also come with a slip case the does not make it feel like your umbrella is trying to squeeze into skinny jeans every time you try to case it.
Swivel: LP679-v2

Recently updated; best in class.
Finally, someone has nailed the swivel. The 679-v2 has all of the things common sense dictates in a swivel: removable cold shoe, big arm/smooth hinge, and a cold shoe post lockdown that does not bump up against your flash.
The recent improvement that sets it apart is in the umbrella lockdown screw. It is big and knurled. God only knows why, but most every other swivel I have seen puts a tiny thumb-mangler lockdown nub there. Why?
The LP679-v2 is LumoPro listening to photographers’ upstream suggestions. As a result it is much better in practical use, comparatively speaking, than other swivels.
Bonus: Lighting in Layers

Lighting in Layers was a 6-DVD, 8-hour video tutorial series that sold for $ 159.99 from 2011 to 2016. (Full info here.) After six printings, the idea of physical DVDs had run its course. And since those DVDs had been very good to our family, I wanted to pay it forward to the next generation of lighting photographers.
So, all versions of the Jumpstarter kits purchased directly from Midwest Photo now include SD or thumbdrive versions of the Lighting in Layers video series. This is especially cool because one of the Jumpstarter kit versions (single/no flash) actually sells for less than the original cost of the DVDs.
VERY IMPORTANT, PLEASE NOTE:
Jumpstarter kits are available both on Amazon (finally!) and directly from Midwest Photo. Only the kits purchased directly from Midwest Photo include the video series. So if the video is important to you, choose Midwest. If not, you can go the easy two-click route through Amazon.
And A Case

All Jumpstarter kits (except Add a Light kit, which presumes you already have a case) include a padded shoulder case that big enough to hold a two-light kit and various odds and ends.
__________
A Caveat for Sony Users
If you are a Sony user, your camera may have a non-standard hot shoe. Sigh. Thanks Sony. Which means that this flash and remote (and, sadly, many other lighting components) may not fit your camera.
Fortunately, there are workarounds. Sony shooters are advised to email Midwest Photo and they will step you through any adapters you may need.
Different Versions / Where to Buy
The Jumpstarter kits are now also available via Amazon, which makes for a super-easy (two clicks) way to order. If you go that route, understand that the Amazon versions do not come with the lighting videos. That is a Midwest Photo in-store exclusive. Other that that, they are identical to the Midwest versions.
• If you already own a flash, single version without flash:
Midwest Photo (includes Lighting in Layers video): $ 147.99
Amazon, DOES NOT INCLUDE VIDEO: $ 147.99
• Single version, includes LP180 flash:
Midwest Photo (includes Lighting in Layers video): $ 276.99
Amazon, DOES NOT INCLUDE VIDEO: $ 276.99
• Two-light kit (portable, wireless 2-light studio, professional quality, for less than the cost of a single Nikon or Canon flagship flash):
Midwest Photo (includes Lighting in Layers video): $ 479.99
• Single add-a-light kit (includes flash but no remote or case):
Midwest Photo (includes Lighting in Layers video): $ 203.00
Strobist
This eclipse photo shows the crazy dynamic range of today’s image sensors
23
Aug
 |
| Nikon D750 without any filters at 1/8s, F11, and ISO 100. Photo by Dan Plucinski |
We talk about dynamic range (or lack thereof) a lot here at DPReview. But with all of the granular comparisons between the newest models, it’s easy to forget how incredible many of today’s image sensors have gotten in this regard. So here’s a quick example from photographer Dan Plucinski, who captured this photo in Oregon during the total solar eclipse on Monday.
The photograph on the right is a single image, not a composite. Plucinski simply took the shot on the left and pulled the shadows up in post; what you see on the right is the same image, with all of the shadow detail recovered.
The lesson is pretty straight-forward: always shoot Raw.
Photo by Dan Plucinski and used with permission.
Articles: Digital Photography Review (dpreview.com)
Motorola rdx series radios pdf
23
Aug
central will ship next business day! 1 is an 8, receive a FREE radio plus motorola rdx series radios pdf prepaid card for every six Motorola RD Series radios purchased! 30mm scope to a Picatinny rail. Wright Controls Electronic Systems, contact DOC prior to export for CCATS. contact DOC prior to export for CCATS. The […]
BooksChantcdCom
Equivalence is useful if you have any interest in light (and as a photographer, you probably should)
23
Aug
Photography is all about light, something you’ll quickly discover even if you’re not familiar with the word’s Greek origins. Most of the time, we use a standard framework (the standard exposure model) to discuss how much light your camera is receiving. However, this isn’t the only way of looking at things.
‘Equivalence’ gives us another way of looking at light, that just happens to give a clearer understanding of the capabilities of different formats. It’s a common misconception that equivalence and the more familiar standard exposure model are at odds with each other, but the two systems aren’t contradictory – they just tell different parts of the same story.
The Standard Exposure Model
The standard exposure model uses shutter speed and F-number (the ratio of a lens’s focal length, relative to its exit pupil) to describe how much light your camera is receiving. Using this ratio normalizes the behavior of lenses based on how much light they project per unit area, meaning it works consistently across different focal lengths. The available light and the exposure you can devote to it tend to dictate most of the noise in your image, so are the most effective way of reducing it.
A third factor (which is applied after the light has been captured, so doesn’t affect exposure, per se) is sensitivity (ISO) which, at its most basic can be thought of as essentially ‘whatever amplification or brightening is needed to provide the expected image brightness from a given exposure.’ This has the effect of ensuring that the exposure system works, regardless of what format you’re shooting on.
 |
| Lightmeters are designed to express the light level in terms of the standard exposure model. Since this system is, by design, independent of format so are their results. |
There are many benefits to this system. It means that you never have to think about what format you’re shooting with: everything from your smartphone to a medium-format back will work using the same settings in the same lighting conditions. This is the reason light meters are able to work without giving a fig for what camera you’ve got.
The main downside to this*, is that it obscures the effects of format. There’s nothing wrong with thinking in terms of exposure, but it leads to slightly wooly conclusions such as ‘full-frame sensors can give less depth of field and are better in low light’ which is generally correct but not very precise. In turn, this can lead to confusion about why this is the case. ‘Something to do with bigger pixels?**’
Equivalence: the whole image perspective
Equivalence is simply a different way of looking at the same thing. Instead of thinking about light per unit area, it looks at the total amount of light that goes to make up the whole image. As a result, it assumes you’re trying to take a specific picture (matched framing, shot from the same position) and also requires you to compare images at the same size. In other words, it’s about pictures, not pixel peeping.
It’s not a matter of faith, nor does it contradict anything that the exposure model says, it’s simply a question of geometry. In the film era, where most people used a single format and only a generally knowledgeable minority used medium and large formats, the same underlying effects were usually discussed in terms of enlargement. But, since there’s no fundamental link between the size of your pixels and the size you choose to view or print them, ‘enlargement’ becomes a slightly arcane way of thinking about it.
Equivalence is simply a way of looking at how much light a system gets, and just happens to use the 135 film format as the baseline for those comparisons (because it was the dominant system in the film era, which saw it being used as the basis of comparison for focal lengths, when the many and various sensor formats emerged at the beginning of the digital era).
Equivalence, the basicsEquivalent f-numbers are a means of considering the combined effect of the aperture and sensor size. In the same way that equivalent focal lengths describe the effect of sensor size on the field-of-view a lens gives, equivalent apertures describe the effect of sensor size on the properties that aperture affects (depth of field, diffraction, total light projected). In both instances, the underlying properties are not changed: neither the focal length or F-number of a lens is changed by different sensor sizes, only their effects.
Comparing equivalent apertures allows you to understand how much control a lens will give you over depth-of-field. It also gives a good idea of how low-light performance will compare between two cameras of different sensor sizes, since it tells you how much total light is making up the final image (most noise is most images comes from the amount of light captured). However, because the exposure and ISO system is, by design, independent of sensor size, equivalent apertures should only be used to understand camera/lens capability, not exposure. To keep things real-world relevant, equivalence assumes you’re shooting the same framing from the same position and then viewing the images at the same output size. |
Looking at total light or light per image, means we can better recognize the effect of light on depth-of-field, diffraction and noise. Rather than vaguely saying that ‘full-frame is, er, better than APS-C’ we can understand why and how much more or less light a larger or smaller sensor will receive at the same exposure settings (same shutter speed and same F-number), by calculating what the equivalent F-numbers are.
So, since a 50mm F2 lens used on APS-C behaves equivalently to a 75mm F3 lens on full-frame, we can see that a full-frame camera with a 75mm F2 could receive up to one and a sixth stops more light, if you opened the lens up to its maximum aperture. You can see this would give a shallower depth of field and a little over one stop of noise improvement, assuming comparable sensor performance.
Looking at it this way not only shows us the boundaries of the capabilities of each system but also gives us a meaningful way to assess whether either system is under or over-performing, relative to other systems, since it gives us a set of expectations about what it should be capable of.
This really shouldn’t be controversial
You do not need to consider equivalence for a moment when choosing an exposure. You do not have to multiply the F-number by the crop factor, unless you want to understand its behavior, relative to another system. However, it is completely legitimate to do so. The logic behind it is mathematically sound***, it holds up to real-world testing and it can be informative, if you’re interested. It’s an effective tool, whether you have need for it or not.
For more information, with real-world examples, read our more in-depth article on the subject.
* …beyond the flexibility in the ISO standard that means cameras don’t actually have to produce the image brightness you expect, and the fact that ISO as used by camera makers has very little meaning in terms of Raw shooting. [Back to text]
** If you view two images at the same size, the ones taken with the larger sensor at the same field of view, F-number and shutter speed will usually be cleaner in close proportion to the sensor size increase, almost regardless of the pixel size. Whether you have the same number of larger pixels or a larger number of the same sized pixels generally makes very little difference. [Back to text]
*** As Andy Rowlands’ Physics of Digital Photography points out, equivalence works at most normal photographic distances but, because it’s based on a slightly simplified depth of field equation, doesn’t hold true as you approach the close focus distances used for macro photography. This is equally true for focal length equivalence. [Back to text]
Articles: Digital Photography Review (dpreview.com)
DJI releases mandatory firmware for DJI Spark: update by September 1st… or else
23
Aug
 |
Chinese drone maker DJI is releasing a mandatory firmware update for its DJI Spark drone, forcing all Spark owners to update their drone’s software by September 1st. Any Spark drone not updated by that date will be grounded remotely.
The update brings multiple changes, but the reason it’s ‘mandatory’ is that it contains a fix that prevents the drone from shutting down while flying.
The announcement was made in a newly released statement from DJI, which explains that it decided to disable any Spark drones that aren’t updated in time “in order to maximize flight safety and product reliability.” All Spark owners will be prompted to update the drone upon opening the DJI GO 4 App, though owners can also run the update through the DJI Assistant 2 desktop software.
In addition to fixing the safety issue, DJI explains that this new update improves the drone’s battery management system, providing optimized power when the drone is in flight. Spark also gains full DJI Goggles integration support via this firmware, as well as an improved PalmLaunch functionality, better QuickShot Drone mode accuracy and increased remote controller compatibility.
Press Release
DJI Spark Firmware Update Enhances Flight Safety
DJI will be releasing a new firmware update this week to further enhance flight safety and performance of the DJI Spark.
The new firmware update enhances Spark’s battery management system to optimize power supply during flight. In addition, the new firmware has added support to fully integrate Spark with the DJI Goggles, optimized the PalmLaunch function for better stability after takeoff, improved the accuracy of controls under the QuickShot Dronie mode and enhanced the compatibility of the remote controller when syncing up with new firmware updates.
When prompted on the DJI GO 4 App, users with internet connectivity will be able to download the new firmware to update their aircraft’s and battery’s firmware. The aircraft and battery firmware updates can also be done via the DJI Assistant 2 desktop software. If the firmware of either the aircraft or the battery is not updated by September 1, Spark will not be able to take off. DJI decided on the option of a mandatory firmware update in order to maximize flight safety and product reliability which we consider as top priorities.
The update comes after DJI released new features for its Spark in early August to deliver a more powerful combination of video and photo improvements including a new gesture to start and stop video recording and enhanced QuickShot video features for more cinematic control.
Articles: Digital Photography Review (dpreview.com)
War of the ember lasky pdf download
23
Aug
In which Ezylryb instructs the War of the ember lasky pdf download to read the Legends hidden in a secret room before dying in his hollow, It is possible that the Legends of Ga’Hoole served as inspiration for the title of the movie adaptation Legend of the Guardians: The Owls of Ga’Hoole, we won’t share […]
BooksChantcdCom
500px adds support for wide-gamut color profiles and Google WebP format
23
Aug
 |
Photography sharing and community website 500px has announced support for both Google’s WebP format and wide-gamut images, as well as the ability to search based on color profile. According to 500px, the additional support reportedly reduces bandwidth usage by up to 25% while simultaneously enabling the service to offer images that are “truer to the photographer’s original vision.”
Until now, 500px’s image hosting service worked by converting uploaded images, when necessary, from their non-sRGB color profiles to sRGB. The rise of wide-gamut displays, though, has paved the way for expanded color profile support. As of this update, 500px can deliver photos in sRGB, Display P3, Adobe RGB and ProPhoto RGB.
“Though sRGB has been standard in our industry for many years,” said 500px VP Kelly Thompson, “with today’s broad adoption of iPhones and wide-gamut displays, we can finally showcase each image in a more true-to-life way and allow searching by color profile.”
As far as WebP support goes, 500px explains that it has been rolling out support for this format on Chrome browser over the last month. The format reduces file sizes while offering comparable or improved image quality. The newest version of the 500px Android app features WebP support.
Articles: Digital Photography Review (dpreview.com)
Blind portrait shootout: Sony a9 vs Canon 1DX Mark II vs Nikon D5
23
Aug
Photographer Michael Andrew of YouTube channel Michael the Maven has put together a ‘Flagship Epic Shootout Review’ video comparing the Sony a9, Nikon D5 and Canon 1DX Mark II. The full video is genuinely worth your time, but if you don’t have 44 minutes to spend watching the full review, one section in particular is both fun and frustrating: the blind portrait test.
Like it or not, we all have implicit biases when it comes to comparing cameras—it’s hard not to when you’ve spent thousands (or tens of thousands) on your kit. But is the camera you say you like best, the one that produces the images you like most? When it comes down to the camera, by itself, using its own color engine, do you prefer Nikon, Canon, or Sony?
That’s what Andrew wants to help you figure out, bias-free, in this blind portrait shootout. He shot 12 identical portraits using all three flagship cameras, and he challenges you to rank them before you know which camera shot which portrait. The game is simple: grab a pice of paper and list it from 1 to 12, and then draw three columns labeled A, B, and C at the top. As the images pop up on screen, give your favorite a score of 3, your second favorite a score of 2, and your least favorite a score of 1.
“At the end, we’ll add the scores to discover which camera’s color science you prefer most,” he says. “Don’t give it too much thought […] I did my very best to take a picture of the same model, in the same lighting conditions, with the same white balance, with the same exposure settings.”
 |
| Which do you prefer? |
It’s a fun little game that can turn a bit sour at the end when you add up the final score… especially if you’ve ranked your personal favorite brand dead last. This has already happened to two of our staff here at DPReview, and it will probably happen to a few of you as well. And before you jump in with a “just shoot Raw” argument, our Technical Editor Rishi has a message for you:
While shooting Raw helps poor white balance issues, it’s not a panacea for a disagreeable color engine. Putting aside for a moment the convenience of using straight-out-of-camera JPEGs, Raw converters like Adobe Camera Raw (ACR) include camera-specific profiles that emulate the manufacturer’s various color modes, so if they’re not to your taste to begin with, the Raw conversions are also unlikely to be palatable.
Furthermore, ACR can’t emulate the multitude of non-linear, scene-dependent adjustments camera JPEG engines perform. Even the same colors are not necessarily processed in the same manner in a landscape as it is in a portrait. It’s hard for Raw converters to emulate these complex adjustments unless the manufacturer works directly with them to directly share what they’ve learned over decades of color research.
So jump in, take the test, and let us know your scores (and whether or not you betrayed your go-to camera brand) in the comments.
Articles: Digital Photography Review (dpreview.com)