RSS
 

Archive for September, 2016

Weekly Photography Challenge – Silhouettes

24 Sep

Let’s look at the definition of silhouette:

screen-shot-2016-09-14-at-10-15-44-pm

If you want to see some good examples have a look here:

Weekly Photography – Silhouette

Haricharan

By Haricharan

To complete your challenge this week to shoot a silhouette these articles may have some helpful tips for you:

  • 7 Steps to Create Street Photography Silhouettes
  • 5 Secrets to Create a Perfect Silhouette Portrait Outdoors
  • Create Powerful Silhouettes by Telling a Story
  • 5 Tips For Photographing Silhouettes
Roberto Trombetta

By Roberto Trombetta

AdA Durden

By AdA Durden

Jeff S. PhotoArt At HDCanvas.ca

By Jeff S. PhotoArt at HDCanvas.ca

Share your images below:

Simply upload your shot into the comment field (look for the little camera icon in the Disqus comments section) and they’ll get embedded for us all to see or if you’d prefer, upload them to your favourite photo sharing site and leave the link to them. Show me your best images in this week’s challenge. Sometimes it takes a while for an image to appear so be patient and try not to post the same image twice.

Share in the dPS Facebook Group

You can also share your images on the dPS Facebook group as the challenge is posted there each week as well.

???9? - Photographer No.9

By ???9? – Photographer No.9

Brian.abeling

By brian.abeling

googletag.cmd.push(function() {
tablet_slots.push( googletag.defineSlot( “/1005424/_dPSv4_tab-all-article-bottom_(300×250)”, [300, 250], “pb-ad-78623” ).addService( googletag.pubads() ) ); } );

googletag.cmd.push(function() {
mobile_slots.push( googletag.defineSlot( “/1005424/_dPSv4_mob-all-article-bottom_(300×250)”, [300, 250], “pb-ad-78158” ).addService( googletag.pubads() ) ); } );

The post Weekly Photography Challenge – Silhouettes by Darlene Hildebrandt appeared first on Digital Photography School.


Digital Photography School

 
Comments Off on Weekly Photography Challenge – Silhouettes

Posted in Photography


True Colors: Sony Glitter-Bombs an Abandoned Romanian Casino

23 Sep

[ By SA Rogers in Abandoned Places & Architecture. ]

screen-shot-2016-09-23-at-9-44-06-am

An abandoned Romanian casino long past its prime is infused with new life in the form of thousands of colorful glitter bombs in this striking ad by Sony for its range of BRAVIA 4K HDR televisions. The whole thing was shot in 4K, capturing every little piece of glitter as it explodes out of popping balloons packed floor-to-ceiling inside the aging structure. Over 4,000 balloons and 3,300 pounds of glitter were used to create the ad.

screen-shot-2016-09-23-at-9-42-30-am

screen-shot-2016-09-23-at-9-42-50-am

screen-shot-2016-09-23-at-9-43-02-am

Onlookers began to gather outside the casino on the day of the shoot, drawn by the strange sight of all those white balloons stacked up inside the elegant arched windows. In the film, a single balloon begins tumbling through the space until it’s almost entirely filled with them.

screen-shot-2016-09-23-at-9-43-17-am

screen-shot-2016-09-23-at-9-43-28-am

screen-shot-2016-09-23-at-9-43-37-am

screen-shot-2016-09-23-at-9-43-46-am

As you can probably imagine, it would have been hard for a photographer to hit the trigger fast enough to capture the action at just the right milliseconds – but they found a clever way around that. High-speed photographer Fabian Hefner attached a noise sensor to his camera shutter so it triggered every time a balloon popped.

screen-shot-2016-09-23-at-9-44-17-am

screen-shot-2016-09-23-at-9-44-40-am

screen-shot-2016-09-23-at-9-44-48-am

screen-shot-2016-09-23-at-9-45-06-am

Sony commissioned singer-songwriter Tom Odell to re-record the Cyndi Lauper song ‘True Colors’ for the ad, which will be released as a single on September 30th. Watching the whole video is definitely worth a few minutes of your time, just for the satisfaction of seeing glitter spew absolutely everywhere – in 4K, if your connection allows.

Share on Facebook


[ By SA Rogers in Abandoned Places & Architecture. ]

[ WebUrbanist | Archives | Galleries | Privacy | TOS ]


WebUrbanist

 
Comments Off on True Colors: Sony Glitter-Bombs an Abandoned Romanian Casino

Posted in Creativity


18 Shape Defining Silhouette Images

23 Sep

Doing a good silhouette requires a few things. A subject with a good shape, proper exposure, and position of the subject to best showcase its shape and define its outline.

Lighting is key, and contrast is essential to get a nice clean silhouette. Look at how these photographers pulled off some great silhouette images. Take note of the kinds of subjects make good silhouettes.

Club Med UK

By Club Med UK

Kenneth Garcia

By Kenneth Garcia

Grendelkhan

By grendelkhan

Darron Birgenheier

By Darron Birgenheier

Jqpubliq

By jqpubliq

Nicolas Alejandro

By Nicolas Alejandro

Iggyshoot

By iggyshoot

Grant

By Grant

Jonathan Camuzo

By Jonathan Camuzo

Deven Dadbhawala

By Deven Dadbhawala

Nattu

By Nattu

Matthew Roth

By Matthew Roth

Tara R.

By Tara R.

Andy Tolsma

By Andy Tolsma

Wheats

By Wheats

Jenny Downing

By jenny downing

Brian Gratwicke

By Brian Gratwicke

Chuck Holland

By Chuck Holland

googletag.cmd.push(function() {
tablet_slots.push( googletag.defineSlot( “/1005424/_dPSv4_tab-all-article-bottom_(300×250)”, [300, 250], “pb-ad-78623” ).addService( googletag.pubads() ) ); } );

googletag.cmd.push(function() {
mobile_slots.push( googletag.defineSlot( “/1005424/_dPSv4_mob-all-article-bottom_(300×250)”, [300, 250], “pb-ad-78158” ).addService( googletag.pubads() ) ); } );

The post 18 Shape Defining Silhouette Images by Darlene Hildebrandt appeared first on Digital Photography School.


Digital Photography School

 
Comments Off on 18 Shape Defining Silhouette Images

Posted in Photography


Photokina 2016: Olympus E-M1 Mark II overview video

23 Sep

With the Mark II version, Olympus’ new flagship comes with some big improvements despite remaining relatively compact. Between its impressive speed, autofocus system and video capabilities, almost every core specification has been bumped up a notch (or three). We sat down with Olympus’ Eric Gensel to go through some of those changes in more detail, from continuous shooting (and what its mechanical shutter sounds like at 15 fps) to just how effective Olympus’ image stabilization has become.

Articles: Digital Photography Review (dpreview.com)

 
Comments Off on Photokina 2016: Olympus E-M1 Mark II overview video

Posted in Uncategorized


Photokina 2016: Talking medium format mirrorless with Fujifilm

23 Sep

Toshihisa Iida, Fujifilm’s General Manager of the Sales and Marketing Group talks us through the new GFX medium format mirrorless camera, who it’s for and why it features a Bayer sensor.

We’ll be publishing details of a more in-depth interview conducted without the camera running, next week.

Articles: Digital Photography Review (dpreview.com)

 
Comments Off on Photokina 2016: Talking medium format mirrorless with Fujifilm

Posted in Uncategorized


Throwback Thursday: Photokina’s greatest hits

23 Sep

Photokina’s Greatest Hits

Every two years, all eyes in the photography world are focused on Cologne, Germany for the biennial Photokina tradeshow. The first Photokina was in 1950, and it moved into the giant Koelnmesse convention hall 16 years later. DPReview has been going to the show since 2000 and in this edition of Throwback Thursday, we’ll take a look back at some of the most interesting things Phil Askey and the growing DPR team saw in Cologne.

Photokina’s Greatest Hits

Way back in the year 2000 we saw the debut of the Canon PowerShot G1, which was truly one of the first enthusiast cameras on the market. It featured a 3.3MP CCD, 34-102mm equivalent lens, fully articulating 1.8″ LCD and, of course, an optical viewfinder. It had full manual controls, Raw support, and could capture QVGA (that’s 320 x 240) video. Heck, it even supported the IBM Microdrive.

Photokina’s Greatest Hits

One ‘lengendary’ camera shown at Photokina 2000 was the full-frame Pentax DSLR. Featuring a 6MP Philips-designed CCD, 6-point AF system, 2″ LCD and dual memory card slots, this un-named camera was a serious beast for that time period. But as Pentaxians know, this camera was not to be, and it would be another 16 years before the company finally shipped a full-frame DSLR.

Photokina’s Greatest Hits

There were a couple of interesting cameras at Photokina 2002, including the Canon EOS-1Ds as well as this beauty: the Panasonic Lumix DMC-FZ1. What made the FZ1 so impressive was not just its ‘Leica’ 35-420mm equivalent lens, but the fact that it had a constant F2.8 aperture. This 2MP camera had an electronic viewfinder and a fully articulating 1.5″ LCD. It captured QVGA video until you filled up your memory card, which took just 35 seconds with the included 8MB SD card.

Photokina’s Greatest Hits

One of the biggest draws at Photokina 2004 was the Konica Minolta Maxxum 7D. Most of its features were similar to what you’d find on other DSLRs of that era; the 6.1MP CCD, 9-pt AF system, and small (2.5″) LCD without live view. But it did have one big trick up its sleeve. The 7D was the first DSLR to have in-body image stabilization, a feature that continues to this day on Sony’s Alpha-mount cameras. While not quite as robust as modern IBIS systems, the sensor-shift IS system could still give you 2-3 stops of shake reduction.

Photokina’s Greatest Hits

Photokina 2006 was the largest show yet, with estimates of 160,000 visitors. Despite some tough competition from Nikon with its D80, the 10 Megapixel Pentax K10D turned a lot of heads. The K10D illustrates something about Pentax cameras  that continues to this day: they offer a lot of bang for the buck. The K10D’s body was fully weather-sealed (unlike its similarly priced peers) and it offered sensor-shift image stabilization, unique sensitivity and aperture+shutter priority modes and even in-camera Raw conversion. Not a bad deal for $ 899 body only.

Photokina’s Greatest Hits

2008 was a massive year for camera announcements in Cologne. It saw the debut of the video-capable Canon EOS 5D Mark II and Nikon D90, but the real game-changer was the Panasonic Lumix DMC-G1 and the Micro Four Thirds mirrorless system. As with Phil (and, by this stage, his team), I — as editor of DCResource.com — too was able to see the G1 before the show and was blown away. The G1 was compact, extremely responsive and its live view was way beyond what DSLRs offered at the time. The G1 used a 12MP Four Thirds sensor and had a fully articulating LCD and high-res electronic viewfinder. The one thing it couldn’t do: record video. That was for the G2.

Photokina’s Greatest Hits

The 2010 edition of Photokina was hyped as the ‘the year of 3D,’ and we all know how well that worked out. The show had some huge launches from Canon (EOS 60D), Nikon (D7000) and Olympus (E-5), but the most talked-about camera was the Fujifilm X100 concept. With its classic rangefinder styling, one-of-a-kind hybrid viewfinder, 12MP APS-C-size sensor and 35mm-equivalent lens, the X100 was hard to ignore. The X100 didn’t ship at the show, instead hitting store shelves until the following March.

Photokina’s Greatest Hits

There were a ton of new products at the 2012 show, so it’s hard to pick just one standout. Something we did see from both Canon and Nikon were budget-friendly full-frame DSLRs (and I use the term ‘budget-friendly’ loosely). Canon offered up the EOS 6D (which is still for sale), a smaller, lighter, cheaper version of the 5D Mark III. The Nikon D600, pictured above, was a more robust camera, with weather-sealing, dual card slots, and 100% viewfinder coverage.

Photokina’s Greatest Hits

That brings us to 2014 — our final stop on memory lane. Photokina 2014 delivered numerous exciting cameras, from mirrorless to DSLR to enthusiast compact. The three products that got the most buzz were the Samsung NX1 (gone, but not forgotten), Nikon D750 and Canon EOS 7D Mark II. Let’s not forget Panasonic’s Lumix DMC-LX100, which combined a Four Thirds sensor and fast lens, and the PowerShot G7 X, which marked Canon’s entry into the enthusiast compact.

We hope you’ve enjoyed a look at Photokinas past. For everything about this year’s show, head over to our Photokina 2016 hub.

Articles: Digital Photography Review (dpreview.com)

 
Comments Off on Throwback Thursday: Photokina’s greatest hits

Posted in Uncategorized


Instagram officially launches ‘save draft’ feature

23 Sep

Instagram has finally launched a ‘save draft’ feature following months of testing. With the feature, a post-in-progress can be saved as a draft when the user hits the back button, making it available for continued edits and eventual posting later on. Such functionality is common on many platforms, including Twitter, and has been requested by Instagram users for years.

Saving a draft is simple. Once the post creation process has started (a filter has been added to a photo, for example), hitting the back arrow in the upper left corner of the screen will pull up a “Save Draft” prompt. Tapping that prompt saves the draft, which can then be reopened later on within ‘Library’ under the ‘Drafts’ designation.

Via: Twitter (1), (2)

Articles: Digital Photography Review (dpreview.com)

 
Comments Off on Instagram officially launches ‘save draft’ feature

Posted in Uncategorized


Tips for Fast and Effective Studio Product Photography

23 Sep

This is the second part of a series that will explore a studio setup aimed at product photography. You can see the first here: Equipment Tips for Quick and Efficient Studio Product Photography.

Although this is built primarily for product photography you can use it for a few other genres. In this second part I will be going hands on with an actual shoot. I will show you how to set up a shoot based on the equipment from part one and go over some tips that I have gathered over the years of using it. If you haven’t read part one yet, head over there and give it a quick look so that you are up to speed with how we are about to implement that system.

PICTURE 1

Getting set up

Now that you are caught up let’s dive in. For almost every shoot I start by turning on my table lights. Those include the lights behind and beneath my table to allow the surface to glow from within (see photo above).

I have one of my Spiderlite TD6 heads above the table aimed straight down. This really helps fill in the top of the product and knock down the shadows caused by the table that underlights the product. My second TD6 light is the one that moves around my set. This is my main light as it is set brighter than the others and it is responsible for the main direction of light.

Settings for my lights will differ slightly from what you will need but this is a good starting point. The overhead TD6 is set for 30% power. The two Flashpoint lights under the table are set to 50% power. I have two small fluorescent softboxes behind the table at full power. My main TD6 is usually at 66% power (two switches turned on).

PICTURE 2 PICTURE 3

These are the settings I run on my lights, and they work for almost all of my clients that need photos shot for their Amazon, Ebay, Etsy stores or their online company catalog. You need to realize that all bulbs are not created equal and that if you are mixing different daylight balanced fluorescents that colors can come out altered in your shots.

Set the color balance

To counter this problem, invest in the Xrite color checker. Make a custom profile for your camera using your lights and this will ensure that colors are accurate. To find more information on incorporating the Xrite into your workflow check out this article by Andrew Gibson: How to Use the X-Rite ColorChecker Passport to Obtain Perfect Color.

PICTURE 4

Set the exposure

As for my camera, I have one of my custom buttons pre-programmed and ready to go, I simply switch to C2 and I am shooting in seconds. My C2 settings are fixed for Manual Mode at f/16 and 1/6th of a second, highlight detection on, and a square crop. This will get me very close with my studio setup. If I need a little more blowout on my white table I slow my shutter speed, or alternatively if any clipped whites creep into my product I can increase the shutter speed.

PICTURE 5

I also find that manual focus is much faster in this situation. Focus hunt happens a lot during shoots and it eats time quickly when you are shooting 20+ products with 4+ angles per part. With a quick flick of a button on the back of my camera, I can enter Live View mode, zoom in, and get the exact focus that I would like. I shoot with highlight detection on so that when the image comes up for review anything that is clipped will flash black.

PICTURE 7

From there I am able to determine if I obtained a proper exposure. The histogram doesn’t help very much here as it is always going to be spiked to the right because I am purposely blowing out the background. I have also set my camera to crop the image to a square as this tends to be the only format my customers want for this style of photography.

Make a raised platform

A big tip that I can share with you is to use a raised platform. The reason you need a raised platform is because when an object gets placed directly on the table surface it tends to add a glaring highlight to the bottom of the product. The tabletop and the highlight are so close in terms of power it becomes difficult to blow out your table and keep the highlight on the bottom of your product from clipping. I have a super easy solution to get around this dilemma. What I did was take two boxes, stack them on top of each other, and then wrapped both in regular old white printer paper.

PICTURE 8

PICTURE 9

If you leave them unwrapped then you will have black strips reflecting in your product. The next thing I did was get a sheet of clear acrylic from Lowes. It is a quarter inch thick, and is 18×24″. It cost me around $ 20. I place this acrylic on top of the wrapped boxes which raises the shooting surface by seven inches.

PICTURE 10

What this does is allow the table to blow out, but because of light falloff it prohibits the product from being overly lit on the bottom and clipping the highlight. While I was at it I wrapped two smaller boxes of different sizes in white paper as well. I use these quite often to bounce light back into the shadows.

PICTURE 11

Ready to place the subject

Now that we have gone over power settings for the lights, the configuration of my camera, and some tips on knocking down blown highlights by raising the surface, let’s set up an actual shoot. We will ease into it and start with something that doesn’t give you a whole lot to think about. Let’s do a regular coffee mug.

I placed the mug directly in the middle of the acrylic. The overhead light is directly over the mug aimed down. The other TD6 is at 90 degrees, hitting the mug from camera right.

PICTURE 12

Picture-13b

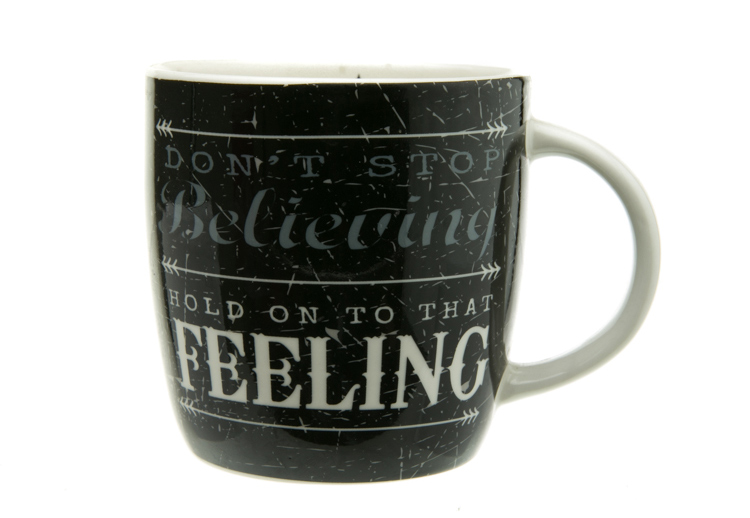
The resulting image is 95% ready to go online almost straight out of the camera. There are a few things you might want to obsess over, like adding more white reflection and narrowing the dark gap. But honestly, it’s ready to go as is. I did say this was an easy subject so let’s move onto something a bit harder, shall we?

Let’s try a harder subject

The next thing we will attempt is something that gives plenty of photographers fits; a white subject on a white background. Well, because we have a blown out table top and we are controlling the amount of light that the tabletop is introducing to our subject, it actually isn’t difficult to get great results.

Let’s start with the same lighting. Light from directly above, and one more light at 90 degrees to camera right. Straight out of camera we can see we did a pretty good job.

Picture-14b

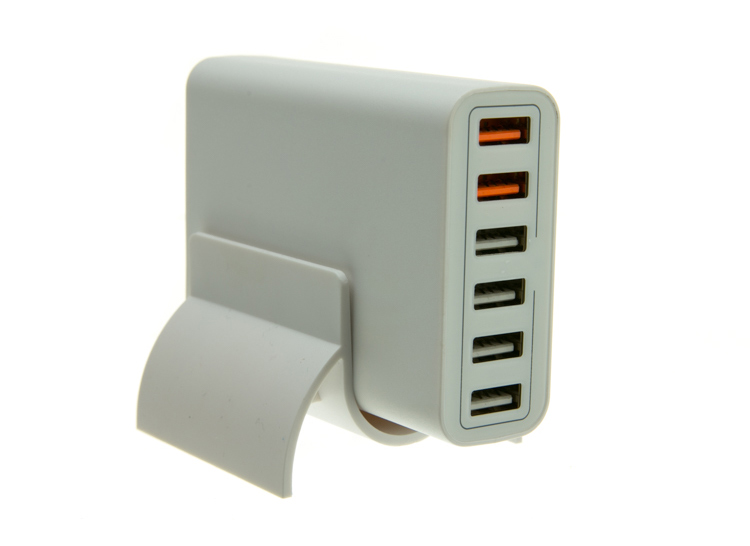
There is no major clipping going on the subject yet the background is completely white. There is not a lot of shape and dimension to the item, however. So let’s move the right light so that instead of 90 degrees it is 45 degrees. Now the light will hit the product on the front of this USB hub. Bingo.

Picture-15

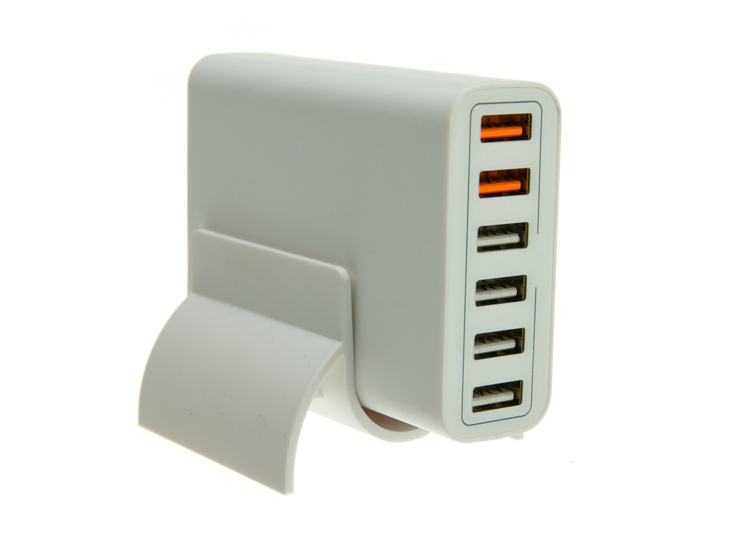
We now have highlights on the leading edges which helps give it shape and dimension. It’s very close, but we can still do a little better. Let’s add one of those white wrapped boxes we made earlier to the shadow side and bounce some of our key light back into the product.

PICTURE 16

Picture-17b

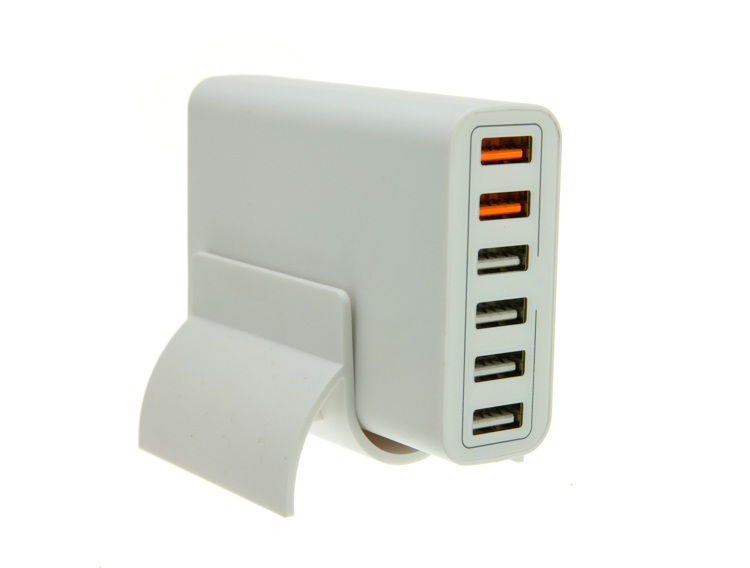
Now what we get is just a subtle fill in the shadow and that just about does it for this product. Yes, we could obsess further over some other details and finesse it some more, but remember this is a speed table. We are trying to get products on and off the table quickly. This image would pass for all of my clients.

Shooting reflective surfaces

For our final demonstration let’s do a reflective surface. Leaving the lights exactly the same as the previous shot (again because this is about speed) I will remove the white box that is acting as a fill and shoot this RCA adapter.

PICTURE-18b

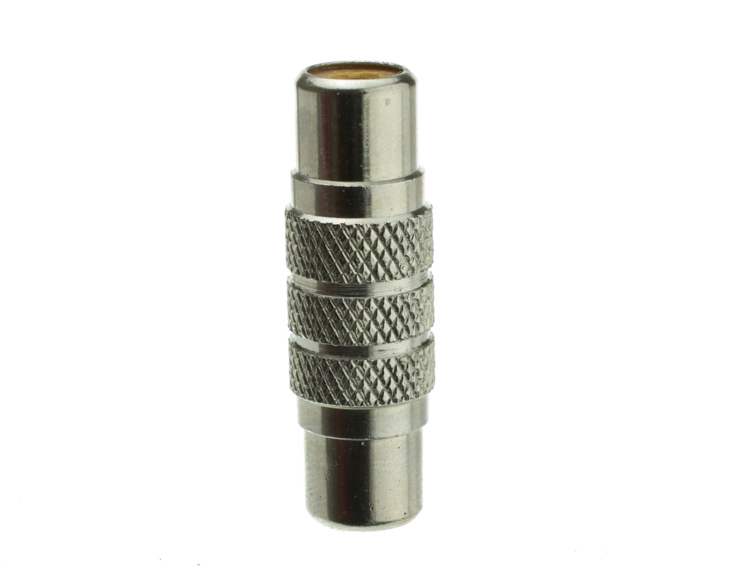
Again right out of camera it is pretty good. You can see some red reflecting on the shadow side in the lower left which is coming from a red bag out of frame, and there is a really dark strip running down the left/center side. Let’s clean those two things up and try again. I will remove the red bag from out of the frame and put the smaller white box fairly close to the adapter.

PICTURE 19

picture-20b

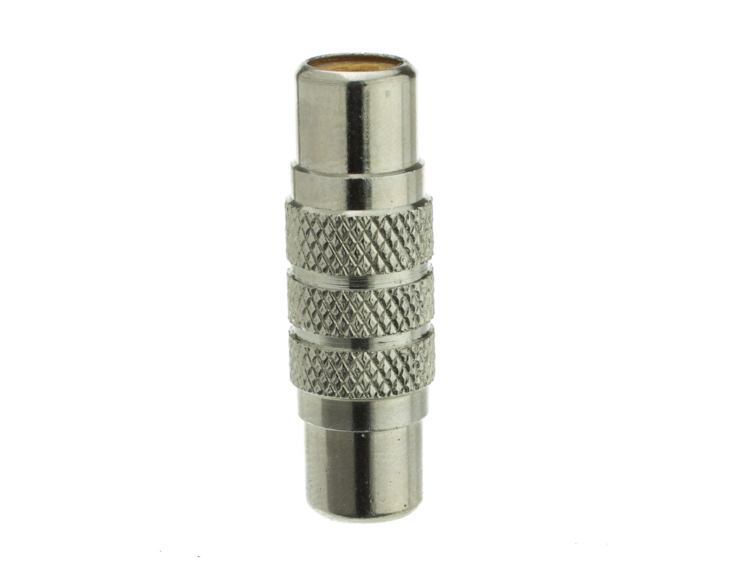
With just those two changes it has made a large difference in the shot. Let’s try and clean this up a tad more. The reason there is a black line is because it is reflecting the much darker room behind the camera. Using the angle of incidence I will use my large white box just below my lens and throw light back into the subject.

PICTURE 21

picture-22b

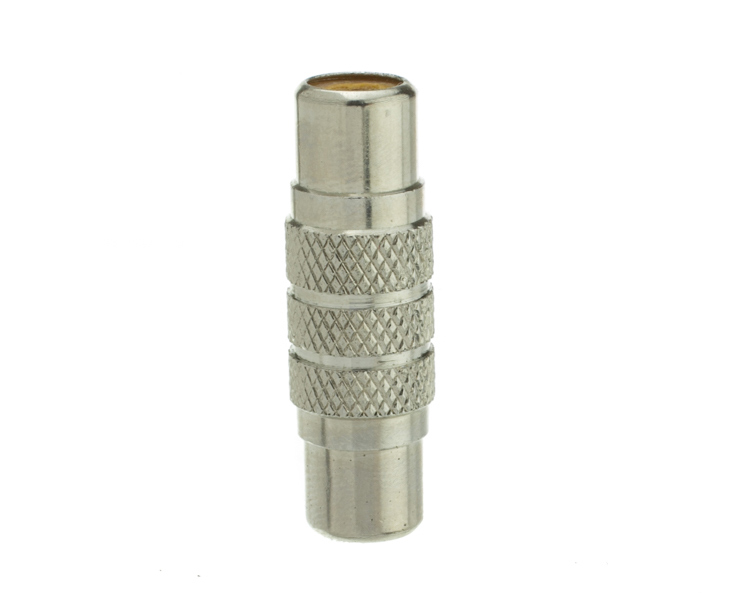
There we go! A perfectly acceptable image for an online catalog. The RCA adapter is cleanly lit, no harsh black lines, a fully white background and it is already squared because of our camera settings. This image is ready to go.

Read more info about shooting reflective surfaces here.

Summary

The reason I built this system is for speed. If you are trying to knock out 100 products a day, with this system you could absolutely do it. I know because I have done it.

Of course, there is the third and final part of the process and that is editing using your favorite software.

I use Lightroom, and it will really going up your product photography game. You need it to catalog all of your client’s images, keep track of the part numbers, export to their specification and clean up shoot errors using very little time.

Please share your questions and comments in the space below.

googletag.cmd.push(function() {
tablet_slots.push( googletag.defineSlot( “/1005424/_dPSv4_tab-all-article-bottom_(300×250)”, [300, 250], “pb-ad-78623” ).addService( googletag.pubads() ) ); } );

googletag.cmd.push(function() {
mobile_slots.push( googletag.defineSlot( “/1005424/_dPSv4_mob-all-article-bottom_(300×250)”, [300, 250], “pb-ad-78158” ).addService( googletag.pubads() ) ); } );

The post Tips for Fast and Effective Studio Product Photography by Jacob Macias appeared first on Digital Photography School.


Digital Photography School

 
Comments Off on Tips for Fast and Effective Studio Product Photography

Posted in Photography


Phottix introduces Canon RT version of its battery-powered Indra500 TTL studio flash head

23 Sep

Flash and accessory manufacturer Phottix has announced a new version of its Indra500 studio head that has a built-in TTL radio receiver for Canon’s RT flash system. The new head can be controlled directly from a Canon RT radio Speedlite in the hotshoe of a compatible camera or by using a Canon ST-E3 or Phottix Laso transmitter instead. The head can be used in flash networks alongside 600EX ll-RT and 430EX lll-RT radio-controlled Speedlites as well as non-RT flash guns that are fitted with a Laso receiver. The Laso receiver converts optically-triggered flashguns so that they can be controlled via 2.4GHz radio signals.

In all other ways the Indra500 LC TTL head is the same as Phottix’s standard Indra500 heads that offer TTL control with Canon, Nikon and Sony cameras via the Phottix Odin radio communication system. The heads have a maximum output of 500W/s and provide high speed sync options as well as manual output control across eight stops from 1/128th power. The heads take Bowens S-mount accessories and can be powered by the Phottix Indra 500mAh li-ion battery pack or via a mains adapter.

The company hasn’t announced a price for the Indra500LC TTL but the existing heads retail for $ 1419 including the battery, battery cable, a 5in reflector and a carry case.

For more information see the Phottix website.

Press release

Another Phottix First: Phottix Indra500LC TTL Studio Light compatible with the Canon RT System

Phottix presents the first studio light system compatible with Canon’s radio flash system. The Indra500 TTL, introduced in 2014, was the next generation of Phottix’s innovative TTL products – the Indra500LC takes that one step further – incorporating the radio control and triggering of the Canon RT and the Phottix Laso triggering systems. The Indra500LC gives photographers 500W/s of TTL power, opening up new possibilities and allowing photographers to shoot in shutter and aperture priority modes with incredible power.

High Speed Sync
With the Phottix Indra500LC TTL’s High Speed Sync function photographers can shoot at higher sync speeds* allowing wider apertures while still being able to control ambient light. In manual mode the Indra500LC offers 8 stops of power adjustments – from full power to 1/128 in 1/3rd stop increments. With Stroboscopic Mode, the Phottix Indra can be used for special effect and creative shooting with flash frequencies of 1-100HZ and flash counts of 1-100 times.

Built-in Triggering
The Phottix Indra500LC TTL has the power and control of the Canon RT and Phottix Laso triggering systems built-in. Switch between TTL and Manual modes, adjust EV and manual power levels and use high speed sync, all from the Canon ST-E3, compatible Canon RT Speedlites and the Phottix Laso Transmitter – no extra hardware is needed.

Canon non-RT Flashes
One of the best things of the Phottix Laso Triggering system is its ability to incorporate older non-radio Canon flashes into a photographer’s workflow. There’s no need to set aside older non-RT flashes such as the venerable 580 EXII – add a Phottix Laso Receiver and gain the ability to control and trigger it. Add legacy flashes, Canon RT-enabled flashes – and the Phottix Indra500 LC for a complete lighting solution.

“This the next logical step for the Indra series,” said Phottix CEO Steve Peer. “Canon users can now build on their current lighting system and retain the amazing functionality that system offers”

The Indra500LC comes with a Li-Ion battery, cables, charger, carrying bag and a new, smaller 5” reflector to make the Indra500 LC easier to pack and take on location.

*On compatible cameras.

Articles: Digital Photography Review (dpreview.com)

 
Comments Off on Phottix introduces Canon RT version of its battery-powered Indra500 TTL studio flash head

Posted in Uncategorized


Blackmagic Design shows off Video Assist monitor/recorders

23 Sep

We dropped in on indie/pro video camera and grading software maker, Blackmagic Design and were impressed by their Video Assist monitor/recorders.

Alongside demos of various cameras (which now range from Micro Four Thirds mount drone-ready cameras up to the PL-mount, 4.6K global shutter Super 35 URSA) and the latest version of its DaVinci Resolve grading software, Blackmagic Design has a display of its Video Assist models.

The Video Assist and Video Assist 4K are external monitors (HD and 4K respectively) that can be mounted on DSLR and mirrorless cameras to boost their video features and make them easier to work with.

The touchscreen panels are connected via HDMI or SDI connectors (with the option to then output the signal over either connection) and add zebra warnings and focus peaking, regardless of whether that feature is offered by the host camera. With the recently-announced firmware, they also add false color overlays for an alternative means of judging expose.

The units also act as external recorders, meaning you can capture your camera’s HDMI output to SD cards (UHS-II in the case of the 4K model) in more sophisticated codecs than most cameras can, including Apple ProRes 422 HQ or LT, or Avid DNxHD and DNxHR.

At a cost of €549/$ 495 and €979/$ 895 respectively, we think they make an interesting option for the videographer looking to expand beyond their camera’s immediate limitations. We’re hoping to get hold of a sample to see the results, as soon as we can.

Articles: Digital Photography Review (dpreview.com)

 
Comments Off on Blackmagic Design shows off Video Assist monitor/recorders

Posted in Uncategorized