RSS
 

Archive for December, 2015

How to Use the Canon Camera Connect App

22 Dec

Cameras with built-in Wi-Fi connectivity are all the rage today, but not necessarily the most intuitive feature to unlock. Luckily, Canon seems to have listened to 6D owners, and increased the ease of use of their Wi-Fi platform by switching up the free mobile phone app that comes with the 6D. Previous versions of the app where called EOS Remote and Canon CameraWindow, but earlier this year, a new improved app called Canon Camera Connect, became the main app endorsed by Canon.

This is a visual tutorial on how the new app works. Please note that the tutorial is written assuming you already know how to enable Wi-Fi shooting on your particular device.

Canon Wi-Fi App

Step 1: Check for compatibility and download the app

Currently, Canon Camera Connect is a free app available for download on Android and iOS devices. The app is compatible with a limited range of Canon digital cameras, including select PowerShot point and shoot cameras, the EOS M2, and the EOS 70D and 6D. You can check full compatibility specs here. This tutorial was created using the Canon 6D camera, and a Moto X Android phone.

Step 2: Enable the Wi-Fi function on your camera

This step will likely vary depending on your model of camera. For the Canon 6D, this is a somewhat complicated process that merits its own tutorial, but the methodology can be summarized as such: you are effectively turning your Canon 6D into a Wi-Fi hotspot, that your phone must connect to as a means of communicating with your camera, for either remote shooting or downloading images. Thus, you must first activate the Wi-Fi hotspot on the 6D (or one of the compatible models), then connect to it via your phone’s Wi-Fi networks. Be aware that this WILL temporarily disable your phone’s functionality until you disable the connection with your camera.

Step 3: Explore the interface of the Canon Camera Connect App

After you have successfully connected your phone to your camera, the app should launch, and show you the opening screen, as seen below. The app’s menu is minimal, and pretty straightforward. You will most likely stick to the top two options, which are described in more detail below.
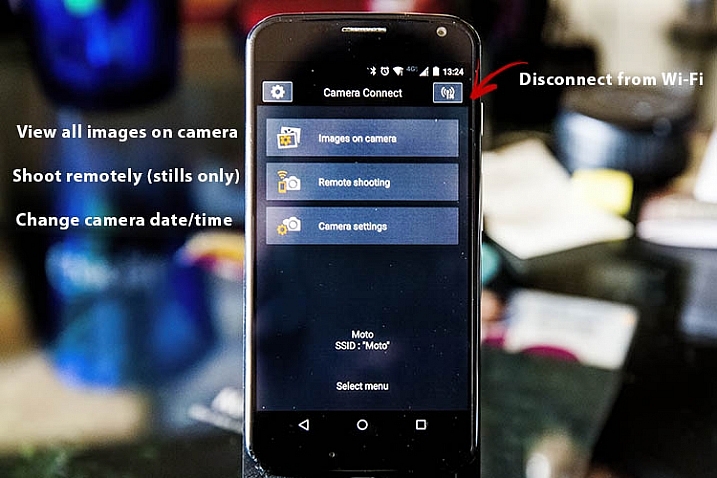
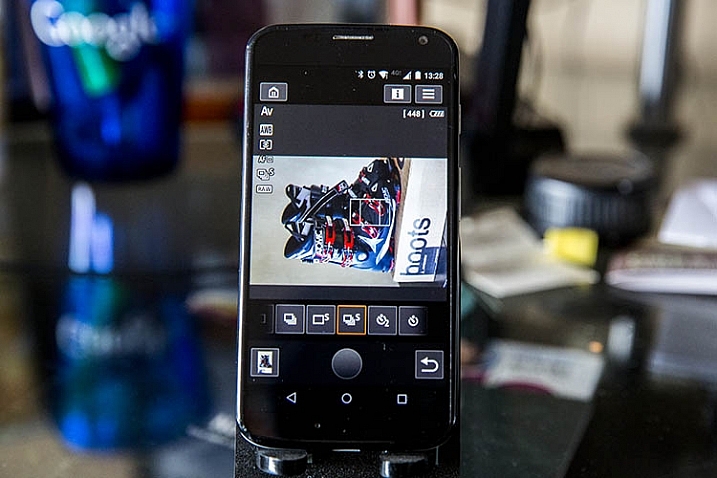
Canon Wi-Fi App

Images on camera

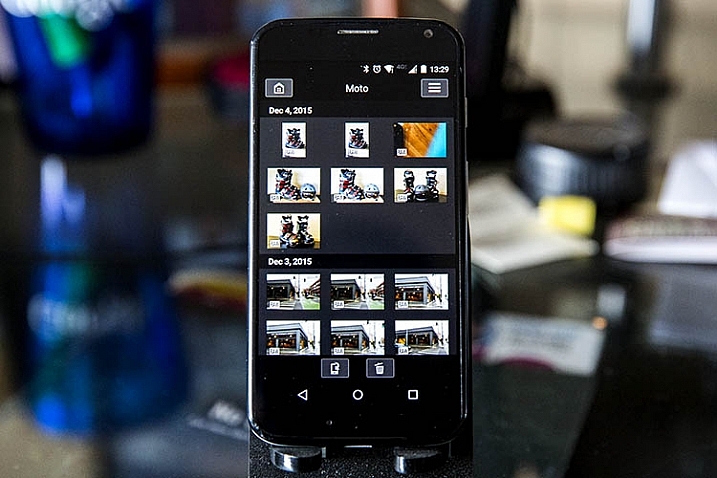
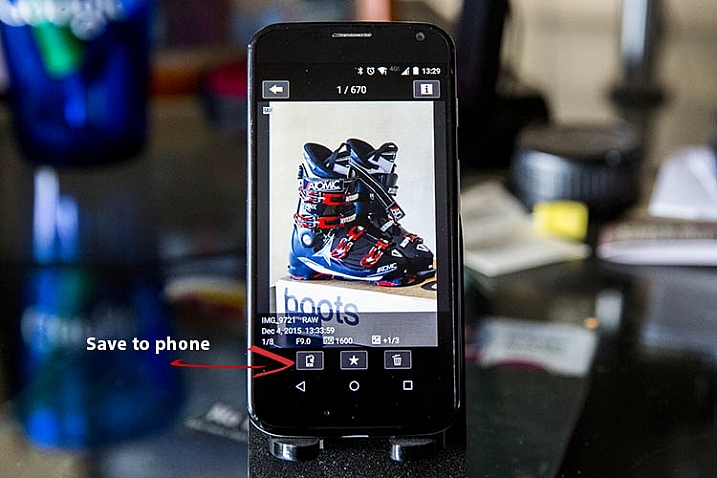
Pressing this will show you a gallery of all of the images on your connected camera, sorted by the date they were taken. To zoom in to any image, simply tap it with your finger. Three options will then appear at the bottom of the image: Save to phone, favorite (star), or trash. If you wish to share an image via email or social media, remember that you can’t do so without first disconnecting your phone from your camera. To work around this, choose the Save to camera option to store the photo on your phone, and then upload it when your phone has internet connectivity again.
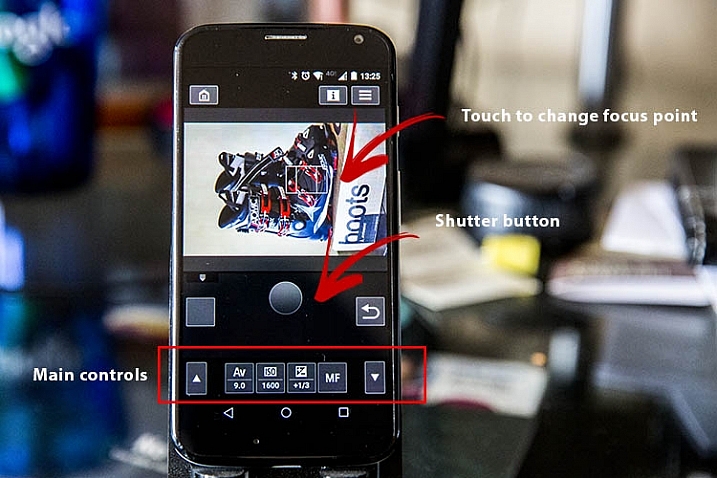
Canon Wi-Fi App

Canon Wi-Fi App

Remote shooting

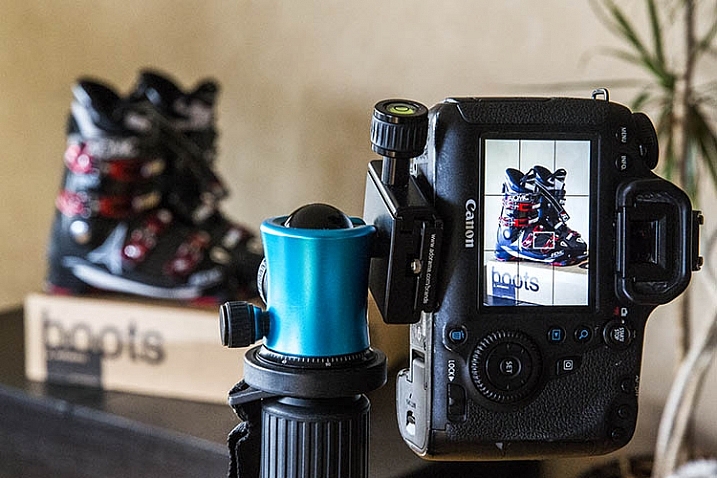
Selecting this option enables live view on your connected camera, and lets you control most of the settings from your phone. Controllable settings include: changing the shutter speed, aperture, ISO, exposure compensation, drive mode, focus mode, and of course the activating the shutter button to take a photo. All the controls can be adjusted and activated using touch screen control. There are a few shortcomings to the remote control settings as listed below, but off the bat the app provides quite a few options for remote shooting.
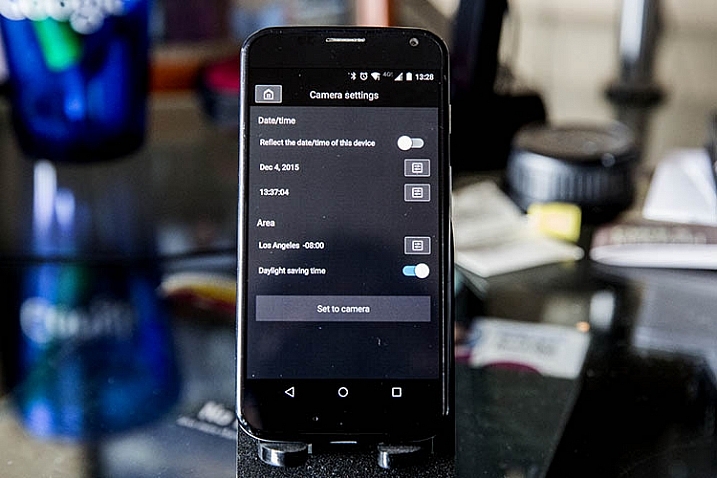
Canon Wi-Fi App

Canon Wi-Fi App

Camera settings

The third and final main menu option in Canon Camera Connect app is probably the most useless: it allows you to set the date, time, and time zone of your camera. This is a feature you probably won’t use often unless you take your camera traveling a lot.

Canon Wi-Fi App

What the app does

Shoots in JPG or RAW

The app is very quick and responsive, even when shooting in large RAW files. Also, it easily resizes RAW files to JPGs when you save images to your phone.

Will read JPG files taken from any camera

If you have JPG files taken from any other devices, the Canon Camera Connect will likely be able to read, and transfer them to your phone or tablet. I’ve done this using photos shot from an Olympus Tough TG-2 point and shoot, Fujifilm x100s mirrorless camera, and Canon 5D Mark III, so I would assume it would also hold true for other camera models.

What the app does not do

These are shortcomings, specific to using the app with the Canon 6D; some of these issues may not be points of contention when using the app with other compatible camera models.

Adjust to portrait mode while remote shooting

If the app does allow this, the user interface needs to be adjusted to make this feature more obvious. As is probably obvious from some demo shots above, I haven’t figured out how to enable it.

Remote shoot video

Whenever the Wi-Fi function on your Canon 6D is enabled, you cannot simultaneously activate video recording, so unfortunately remote video shooting cannot be achieved.

Time lapse

While you can set your camera to shoot in continuous or self timer mode with the app, there is not the option to shoot time lapses. This is a feature that Canon will hopefully implement in future iterations of the app.

Hopefully this overview will help you see if this app is useful for you. If you have one of the compatible cameras listed, give it a try and let me know what you think. Do you have any other uses for remote apps I haven’t thought of or mentioned?

googletag.cmd.push(function() {
tablet_slots.push( googletag.defineSlot( “/1005424/_dPSv4_tab-all-article-bottom_(300×250)”, [300, 250], “pb-ad-78623” ).addService( googletag.pubads() ) ); } );

googletag.cmd.push(function() {
mobile_slots.push( googletag.defineSlot( “/1005424/_dPSv4_mob-all-article-bottom_(300×250)”, [300, 250], “pb-ad-78158” ).addService( googletag.pubads() ) ); } );

The post How to Use the Canon Camera Connect App by Suzi Pratt appeared first on Digital Photography School.


Digital Photography School

 
Comments Off on How to Use the Canon Camera Connect App

Posted in Photography


DxOMark Mobile Report added to our iPhone 6s Plus review

22 Dec

DxOMark has just released its full report into the technical ins and outs and real-world performance of the iPhone 6s Plus’s 12MP camera. We’ve added DxO’s findings into our previously-published in-depth review of the iPhone 6s Plus and you can read the whole thing over at connect.dpreview.com

Articles: Digital Photography Review (dpreview.com)

 
Comments Off on DxOMark Mobile Report added to our iPhone 6s Plus review

Posted in Uncategorized


Holy Skate: Century-Old Church Converted to Colorful Park

22 Dec

[ By Steph in Architecture & Design & Fixtures & Interiors & Public & Institutional. ]

skate park main

A 100-year-old church in Spain is hosting pilgrimages of a new sort now that its interior is lined with skate ramps instead of pews, its soaring cathedral ceilings covered in vibrant murals. This stunning mashup of art and sport is known as Kaos Temple, a collaboration between La Iglesia Skate, Red Bull and street artist Okuda San Miguel. Located in the city of Ilanera, this stunning converted space has instantly earned its place among the most creative skate parks in the world.

skate park church 2

skate park church 4

skate park church 8

skate park church 9

Okuda transformed the walls and vaulted ceilings with rainbow-hued geometric paintings, while the skate collective built customized ramps running the width of the interior. The columns, ribs and other architectural elements of the space remain as they were before the project began, crumbling in some areas, their lack of polish contrasting with the bright new paint.

skate park church 3

skate park church 5

skate park church 6

skate park church 7

Spectators and fellow skaters convene on comfortable couches in the living-room-like lounge that formerly functioned as the pulpit.  The artist describes the project as being part of a ‘cultural upheaval’ that will “bring a new era to the spaces for art,” i.e. out of galleries and into common public spaces that everyone can enjoy. Okuda also produced a series of customized skateboards as rewards for the donors who helped crowd fund the project.

Share on Facebook


[ By Steph in Architecture & Design & Fixtures & Interiors & Public & Institutional. ]

[ WebUrbanist | Archives | Galleries | Privacy | TOS ]


WebUrbanist

 
Comments Off on Holy Skate: Century-Old Church Converted to Colorful Park

Posted in Creativity


Remodeling a Room? Think Like a Photographer

22 Dec

Long-time readers of this site are already familiar with my family, having watched my kids grow up in photos. Seen above, on the left, is my daughter Emily. You guys met her when she was eight.

She’s seventeen now, and headed off to college next year. Which meant this is the last time we’ll put up a Christmas tree while we are all living here together.

I have always tried take lots of photos around the holiday season. And even more so, now that the kids will be graduating soon. And as we have successively remodeled many of the rooms in our house, I have made it a point to pay special attention to the lighting.

Why? Because you can get a lot of bang for your buck when it comes how a room looks just by thinking like a photographer during the remodel. And another bonus is that your quick available light grab shots will look much better, too. Even if you are just using your iPhone to shoot it.

Take the living room, for instance. Before remodel, it was lit mainly by a small, four-bulb fixture attached to a ceiling fan. You can probably imagine just how flattering this wasn’t. And it was something that bugged me enough to lobby to get rid of the fan just so we could have more of a choice about our lighting.

In the end, I got the okay. And I have long been happy that we did it. Here’s a quick run-through on the decision process for this room, in the hopes that it’ll inspire you to think about how you can use your lighting skills to improve the quality of any room you might choose to remodel in the future.
__________

Here’s a photo of the living room as it exists now. Mind you, this is purposely shot available light, as that is kinda the point. The lighting in the room is not designed to exist in an overall interior shot. (In fact, that’s kind of impossible if the lights are part of the subject matter.)

But here it is, exposed for the room rather than for the light sources, to give you a sense of how the lights are distributed.

First and most important is the drum lamp hanging from the center of the ceiling. Remember the four-banger bare-lamp light I mentioned earlier? That’s long gone, and replaced by what is essentially a soft box pointing straight down. It’s three feet across; a legit beauty light.

And the arrangement of the room around the light means that anyone sitting in the room is sitting under a quality light source, and at a good angle. The only harsh place to be around this light would be directly under it. And you can’t go there. Because guess where we put the coffee table.

So if you are sitting on the sofa or the love seat or the chair, you look good. When you’re in the room the effect is not unlike sitting in a lounge in a nice hotel, where they have taken the time to design the light for the effect that they want.

And standing or sitting, pretty much anywhere in the room, a snapshot of you is gonna be reasonably flattering at the very least. And that’s true whether it was shot on a purpose-built camera or a smartphone. To wit, the example at top of the page.

Over at camera right are two wall lamps, which serve to fill the shadows of the overhead “key” light—or to become pretty nice rim lights for someone sitting on the couch. No major surgery here, as the lamps came with conduit assemblies to run the cords right down the wall. They’re just plugged in behind the couch.

At back are two “can” lights in the ceiling, washing down on the fireplace. They just keep it from going super dark back there. (And of all of the lights, they are the only ones that are built-in, and pre-dated the remodel.)

Two other items of note. One, the lights are all on dimmers. This gives us tons of control of both the absolute level of light and the lighting ratios between the different planes. You really can accomplish a lot of looks with a few different planned-out light sources and some dimmers.

And two, all of the lights are LEDs. Which means that this entire room—seven bulbs—totals only about 36 watts of energy consumption. And that is if they are on full-blast, which they almost never are. I just nuked them up to buy myself some exposure here. We normally keep them pretty subtle and balanced. But that also would look bad in a photo because a light cannot easily serve as both subject matter and light source.

But dialed down, I would guess we are typically lighting the room with around ten watts of power, total. It’s just well-distributed.
__________

Remodel Like a Photographer

When choosing lights for a room remodel, here are some things to think about.

• If you can spring for a big, soft main source, splurge. You won’t regret it. This could mean a drum lamp (we had ours made here) or a light that bounces off the ceiling. In our case, the main light does both. Unseen (from almost exactly my camera position) is a smaller version that hangs down over our dining table. The two light their assigned spaces beautifully and tie the double room together visually.

• Think of task lights as doing double-duty. First, they accent a room. Second, they fill the main light. Oh, wait, make that three—they can also create mood by dimming them down and using them without the main.

• LED bulbs are getting better and better—they have passed CFL lights—and will save you tons of money over their lifespan. Good quality ones are as low as $ 5 at Home Depot (these are Philips, FYI.) The room shot above is a poor representation of the light color/quality. That’s because the lights are serving as both light source and subject. If I chose one or the other (as in the top photo) they would look good. And to the eye they look great.

• Dimmers on each circuit and dimmable LED bulbs will give you lots of options to shape the room. Just make sure to use modern “triac” style dimmers (most all sold today are this type). Those work best with LED lights and also don’t just waste energy through resistors when you dim down.

• In the overall cost scheme of remodeling a room, decent lighting design (and the forethought of a photographer’s approach to lighting) is about the best value you can get for your dollar. I’ve done this with every single room we have remodeled, and have been really pleased with the results.
__________

While we’re here, from our family to yours, Merry Christmas.

Oh, and check back in next week if you get a chance. We are going to unwrap a project we’ve been hard at work on for three years.


Strobist

 
Comments Off on Remodeling a Room? Think Like a Photographer

Posted in Photography


How to Use Drones to do Stunning Aerial Photography

22 Dec

DPSLakeSheds

One of the most exciting developments in photography in the last year or two is the drone – high flying cameras that enable you to capture unique viewpoints of common subjects. Recently the cost of getting a camera into the air has dropped dramatically and if you decide to venture down this road I guarantee you won’t be disappointed. Apart from the amazing images you will capture, they are also tremendous fun!

DPSBeetWest

As with most modern technology there is a vast range of drones, or UAVs (unmanned aerial vehicles), on the market. Similar to camera equipment in general, how much you’re prepared to spend will determine the quality of camera on-board, and the flying characteristics of the drone itself. There are low-cost models that will take very basic images, up to the big boys toys that will happily lift your prized DSLR up into the heavens. You can even add your GoPro on to some units that will take advantage of camera gear you may already have. One company has a range of models that has a large percentage of the market – DJI. Their Phantom range of drones are the first choice for many, and though they do make some high end-models, the Phantom 3 series models are the most popular drone in the world, for good reason.

Getting Started

DPSSovHIll

One of the big advertising features of most drones these days is their ease of operation. “Fly Straight Out of the Box” is a common term you’ll see, and in fact it is also very true. Charge the battery, download the app to your smartphone, fire it up, and away you go.

However, it must be mentioned that as easy as these are to fly, common sense and care is a big part of aerial flying. It’s suggested you start with some limitations in place, easily set up on the smartphone app that runs the drone. This is usually along the lines of limiting the maximum height you can fly, and also how far away you can send the drone.

71yjfeMJWwL SL1500

Photo courtesy of DJI

Always start somewhere wide open, such as a local oval or park, and spend time getting a feel of the controls before you even think about pressing the shutter button. Always be aware of your location in relation to what’s around you. As these cameras usually have a wide angle lens (20mm equivalent) and it’s easy to mis-judge your positioning when in close proximity to objects such as trees and buildings, especially if viewing the smartphone screen is your prime.

Rules and Regulations

Most countries have rules to follow, and while they can’t all be mentioned here, usually they are along the lines of these:

  • Drone must always be in Line of Sight (LOS) – that basically means you should always be able to see it
  • Maximum Height 133 metres (400 feet)
  • Never fly over groups of people
  • Respect others privacy
  • No flying anywhere near airports and other no-fly zones as specified in each country

It’s suggested you check with your local air safety authorities for particular details in your area.

DPSBurrumbeet

A few months ago I was flying above my local railway station, looking for the perfect image at dusk, just as the lights came on that illuminate the tower every evening on this historic building. Happily flying for five minutes or so, I looked down to see two local policemen coming over to me. My first reaction in these circumstances is to gauge their reaction to drone flying, and if there are any concerns I bring the machine down immediately. Unfortunately drones have been getting some negative publicity in the press, certainly not helped by the person that crash landed one on the front lawn of the White House in Washington earlier in 2015. Luckily these two policemen were very interested in what I was doing. By showing them exactly on-screen what I was seeing, and explaining the whole procedure and the care I was taking in not flying directly above any people, they left with a very positive attitude.

I think it’s very important to fly with this attitude in mind. And one other thing about flying in public places….you will need to be prepared to become the centre of attention as people are generally quite intrigued by what you doing!

DPSRailStn

Its also tempting to think that aerial imaging is going to be a great new avenue for making some money from your photography. Once again this is another area where the rules vary from country to country, and you should look into the certification you may need in your area to undertake paid aerial work.

DPSWHeip

Amazing Technology

Todays drones have some amazing technology on board that has revolutionized aerial photography:

  • By connecting your smartphone to your handheld remote control unit, you can see on-screen exactly what the drone is viewing. This makes for perfect compositional adjustments.
  • Camera controls are extensive – auto or full manual control, RAW capture, even time-lapse
  • The drone will hover in the one spot with incredible stability, almost like an aerial tripod! You can take your hands off the controls and the drone will stay in that position.
  • Failsafe flight options. With an average 20 minutes flight time per battery charge, the drone can detect when your battery is getting low and will go into RTH mode (automatic return-to-home), ensuring the drone comes back to you! If for some reason the lightbridge connection between the remote control and the machine itself is lost (this can happen when flying behind buildings or trees), once again RTH is activated. Another great use for the RTH feature is when you have lost sight of the drone, which is quite easy to do once it gets some distance away from you, by pressing the RTH button your flying camera will happily return to you before you know it.

DPSGolden

Aerial Photography

When you first start flying, it’s very exciting to get home, load your images, and marvel at the amazing scenes you have captured. In my first few weeks of flying, everything I took was thrilling. However, I quickly realized that aerial photography is no different to other forms of photography – it’s still all about the light! So rather than just heading out randomly, I once again started to chase the light and conditions, which has always been the strength of my landscape photography.

As a landscape photographer I am always aware of weather conditions and what they might offer. Now even more so, as a drone pilot you will have to also take into account the wind forecasts. Drones are not something you fly in high winds (unless you have to get that amazing once-in-a-lifetime scene in front of you!) and you will find yourself looking for calm weather more than any other condition.

DPSWindfarm

At present the in-built cameras on most drones are nowhere near the quality you are used to with your ground level camera. However, I have found the images I have been able to capture are surprisingly good. Though only 12mps, the fact that you can shoot a RAW file gives you more options to work with later on. The jpg files are also surprisingly good, especially if you have been flying in good light.

Even when shooting in low light the quality has been amazing for such a small camera unit, and the stability of the camera at 300 feet can be quite astonishing. You can also shoot panorama images just as you would when down at sea level, once again creating something very unique. And why not try a time-lapse from 300 feet?! I have had images printed up to A3 size (roughly 8×10) and you would be hard pressed to tell they were taken with a 12mp camera.

DPSGlengower

I should also mention that most drones these days shoot high quality video, even up to 4K, which produces stunning aerial footage. In fact, at 4K resolution it’s possible to take a high quality frame directly out of the video.

Unique Views

One thing you will love is the amazing patterns you find in the landscape when viewed from above. Drones allow you to get into the area that most planes and helicopters are not allowed to – below 300 feet. Google Maps makes a great starting point for finding locations that look worth visiting.

It certainly beats putting your camera on the end of a ten foot pole (yes, I did that a few years ago).

DPScanola

As a landscape photographer for a number of years now, I can’t recommend highly enough aerial imaging as a unique way to add that extra aspect to your photography. Everyone you share your images with will be amazed and intrigued, and don’t forget how much fun it is. If you ever tire of it, you may like to try herding sheep with your drone – yes, it’s been done!

Have you tried out any drone or aerial photography yourself? Please share your tips and images in the comments below.

googletag.cmd.push(function() {
tablet_slots.push( googletag.defineSlot( “/1005424/_dPSv4_tab-all-article-bottom_(300×250)”, [300, 250], “pb-ad-78623” ).addService( googletag.pubads() ) ); } );

googletag.cmd.push(function() {
mobile_slots.push( googletag.defineSlot( “/1005424/_dPSv4_mob-all-article-bottom_(300×250)”, [300, 250], “pb-ad-78158” ).addService( googletag.pubads() ) ); } );

The post How to Use Drones to do Stunning Aerial Photography by Andrew Thomas appeared first on Digital Photography School.


Digital Photography School

 
Comments Off on How to Use Drones to do Stunning Aerial Photography

Posted in Photography


Car-Free Cities: 12 Pedestrian-Only Places from Venice to NYC

22 Dec

[ By Steph in Architecture & Cities & Urbanism. ]

car free 42 3

It’s funny how the idea of a purpose-built, car-free city where everything you need is easily accessible on foot seems so modern, yet it’s actually a return to our roots. To some, banning automobiles from densely populated urban centers is a radical concept, but European cities like Venice and Brussels are giving architects and urban planners fresh inspiration for contemporary equivalents. Here’s a mix of historic car-free places around the world, and pedestrian-only proposals for cities like New York, Los Angeles and Philadelphia.

NYC’s Broadway as a Pedestrian-Only Park
car free broadway

car free broadway 2

car free broadway 3

One of New York City’s best-known yet least-busy streets could transform into a pedestrian-only park, eliminating cars and trucks and providing green pathways to and from major public spaces like Times Square and Madison Square Park. The difference between converting a section of the city to a park and creating a car-free section is access to all of the businesses and public services residents need on a daily basis, so depending on how it’s handled, this could be a major, positive change to the way the city functions. The proposal, by Perkins Eastman, would also help Manhattan manage its drainage system, allowing water to be absorbed into the soil.

A Prime Pedestrian-Friendly Example: Venice, Italy
car free venice 1

car free venice 2

Quite simply the greatest pedestrian city in the world, Venice’s very walkable web of streets forbids almost all motor vehicle traffic, with dense buildings clustered around charming promenades and tranquil canals. Home to 70,000 residents and temporarily hosting many thousands more tourists year-round, Venice offers the same modes of transportation now as it did centuries ago, with its 118 small islands connected by over 400 bridges and accessible by boat.

Great City: China’s Car-Free Dream Oasis
car free china

car free china 2
Will China’s ‘Great City’ ever become a reality? There’s been no word on this project for a few years, but perhaps this entirely walkable city of 80,000 planned for a rural area outside Chengdu could still someday be built. The development bans motorized vehicles other than a mass transit system, and is organized around a series of high-rise towers surrounded by green public spaces. Walking from the center of the city to the parks takes just ten minutes.

Vision42: A New 42nd Street
car free 42

car free 42 2

car free 42 3

Citizens of Manhattan have come together to propose a reimagined and upgraded version of 42nd street in Midtown, adding a low-floor light rail system that travels through a landscaped pedestrian boulevard. Vision42 “welcomes pedestrians with space, greenery, and amenities, combined with speedy and efficient river-to-river travel, via a modern, at-grade, low-floor light rail line” adoptable within four years. The photos are downright utopian – imagine being able to navigate Manhattan on foot without the sound of honking horns and screaming cabbies.

Next Page – Click Below to Read More:
Car Free Cities 12 Pedestrian Only Places From Venice To Nyc

Share on Facebook


[ By Steph in Architecture & Cities & Urbanism. ]

[ WebUrbanist | Archives | Galleries | Privacy | TOS ]


WebUrbanist

 
Comments Off on Car-Free Cities: 12 Pedestrian-Only Places from Venice to NYC

Posted in Creativity


21. Dezember 2015

22 Dec

Das Bild des Tages von: Marina W.

© marina w

Im Ausblick: Klimawandel, Erdaufgang und eine Ruinen-Tour durch Detroit.
kwerfeldein – Fotografie Magazin | Fotocommunity

 
Comments Off on 21. Dezember 2015

Posted in Equipment


DPReview Gear of the Year part 5: Barney’s choice – Sony RX1R II

21 Dec
The Sony Cyber-shot RX1R II is a 42MP full-frame compact camera, with one of the best AF systems of any non-DSLR camera on the market. And I want one. 

Photo: Sam Spencer.

I’m a sucker for 35mm. I reckon that 90% of the pictures I like to take could be (or are) taken at this focal length. That’s why I have a Sigma 35mm F1.4 Art almost permanently attached to my DSLR, and why when I’m not shooting with that, I can probably be seen out and about using my old Fujifilm X100S. In fact it was the X100S that I wrote about for my last ‘Gear of the Year’ article, way back in 2013 (no offense, noble cameras of 2014. I guess I was just really busy this time last year. I’ll call you). 

It’s because I love 35mm that I really wanted to love the original Sony Cyber-shot RX1 and R. On paper they were perfect: a high-quality 24MP full-frame sensor (without an AA filter, in the case of the RX1R), 35mm F2 lens, with full manual control and the option to add a high resolution external EVF, in a compact body. What’s not to like?

I had a love / hate relationship when shooting with the original RX1R. In low-ish light, the camera’s AF system would routinely fail to accurately acquire focus. Both this image (and the one below) were shot in manual focus mode.  

Sony RX1R, ISO 640, F2.5, 1/80sec 

Quite a lot, as it turns out. Despite high hopes (and to be fair – after taking some pictures that I quite liked) I just didn’t get on with those cameras at all. The external viewfinder was almost essential, but clunky, and made a compact camera into a not-at-all-compact camera the minute it was attached. Battery life was fairly pitiful, and autofocus – dear God the autofocus… Fussy in bright light, unreliable in moderate light and downright unavailable in low light.

Until I tried to take nighttime shots with the RX1R I didn’t believe it was possible for an inanimate object to shrug, but I swear that’s what the damned thing did whenever I half-pressed the shutter button.

Taken by the light of a campfire, this image shows the strength of the original RX1R’s 24MP sensor, but like the previous image I had to resort to manual focus to get a sharp result (focused on the little girl’s face). 

Sony RX1R, ISO 6400, F2, 1/80sec

The original RX1 and RX1R were on the market for a long time, and just when I was beginning to give up hope of ever seeing an improved replacement, along came the RX1R II. 

Compared to the original RX1R, the Mark II version is a breath of fresh air. Inheriting the same 42MP BSI-CMOS full frame sensor (but with an all-new switchable anti-aliasing filter) and 399 phase-detection AF system from the Sony a7R II, the RX1R II is a significant step up.

What I love

  • Excellent resolution
  • High-resolution built-in EVF
  • Very accurate, flexible AF system
  • Compact, relatively lightweight form-factor
  • Large manual controls

Gone is the clumsy add-on FDA-EVM1K, replaced by a built-in, retractable 2.3 million dot OLED finder. I shoot with my eye to the viewfinder almost exclusively, so when Sony representatives first showed us the camera, I nabbed one of the new lockable rubber viewfinder hoods they brought along. The hood prevents the finder from being retracted, but after resorting – twice – to using needle-nosed pliers to loosen the locking screw* I decided just to leave it permanently attached.

With 42MP and a new BSI design, the sensor in the RX1R II is significantly more advanced than the already very good 24MP sensor in the older RX1R. Like all current Sony full-frame sensors it offers extraordinary dynamic range, allowing me to expose just shy of highlight clipping for this ISO 100 shot, and pull up the shadows very significantly in Photoshop. The final result shows a very wide dynamic range from bright to dark without feeling too ‘HDR’. 

Sony RX1R II, ISO 100, F6.3, 1/400sec

Just aesthetically, I really like the RX1R II, and it’s a camera that tends to attract admiring glances when I’m out shooting. Like the Fujifilm X100S, more than a few people have commented to me that it looks like a film camera, but the semi-retro styling doesn’t come at the expense of usability (keep walking, Nikon Df…). 

Cosmetics aside, the RX1R II also produces great images, exactly as we’d expect from a camera using such a high-quality sensor. Like recent a7-series cameras, Sony has included an uncompressed Raw option in the RX1R II.This gives maximum quality but at the expense of very large file sizes – roughly 80MB each, to be precise, compared to JPEGs which are typically less than ten. This slows the camera down, and eats through memory cards with frightening rapidity. 

While I didn’t much care for the original RX1/R overall but I did enjoy that 35mm F2 Zeiss lens. And although it was designed for a 24MP resolution it successfully keeps up with the much higher pixel density of the new sensor in the RX1R II. Sadly though, neither the sensor nor the lens is stabilized so with 42MP in play, even though sometimes I’ve gotten away with 1/30sec, I’m in the habit of treating 1/125sec as my safe ‘slowest’ shutter speed when hand-holding.

After dark, the RX1R II’s focus system is far superior to that of its predecessor. This shot was hand-held after dark, and shot wide open at F2.

Sony RX1R II, ISO 400, F2, 1/50sec

Alright, so the sensor is great, the AF system is transformed, and the built-in viewfinder is lovely. What about my one remaining major criticism of the original RX1R? – Battery life. 

Sadly, the RX1R II’s battery is the same NP-BX1 found in the first generation RX1R and all of Sony’s RX100 series compacts. Even just physically, the BX1 is comically small. Like, lose-it-in-your-pocket small. And while it’s rated for a modest 200 shots, in cold weather I’ve come to expect far less. 

In temperatures around freezing, I quickly fell into the habit of holding the battery slipped into a glove, and placing it in the camera only when needed. You know – like we had to do in the 1990s. Fortunately, Sony is shipping the RX1R II with a handy USB-powered charger, which means you don’t need to plug the camera in to charge the battery, as with other RX-series Sony compacts. So that’s one step forward, at least. 

Face detection worked well for this shot in one sense – it resulted in a nicely-balanced exposure, in a situation where my subject could easily be backlit. I should have activated Eye-AF though, because focus has fallen slightly short of my subject’s eyes.

Sony RX1R II, ISO 100, F4, 1/125sec

I’ve been using the RX1R II for a while now and I keep on having to remind myself that despite its high price-tag it is still a Cyber-shot camera, with a lot of the same quirks of much cheaper compact cameras in Sony’s lineup. In fact, it’s impossible to ignore. There’s the same lengthy startup time, the same lag – before – you – can – zoom – in to the images you’ve captured, the same confusing, rather passive aggressive error messages when you try to do something before the camera is ready or when it’s in the wrong mode, and the same somewhat confusingly-named array of AF modes.

Exposed to retain the very delicate warmth in the sky just above the horizon, this ISO 320 shot was converted from a Raw file, and the shadows lifted in Adobe Camera Raw. I performed some very slight noise reduction, but could still smooth out the midtones a lot more if I wanted to. 

Sony RX1R II, ISO 320, F2, 1/60sec

There are a couple of outright bugs, too. For example, despite not offering any form of SteadyShot image stabilization in still capture, the RX1R II will still blink a reminder at slow shutter speeds that this non-existent feature is turned off.

After shooting thousands of frames with the RX1R II, I’ve learned to live with these minor annoyances but I do with Sony had sprung for a couple of extra components. A more powerful processor would make a huge difference to the overall handling experience (especially in uncompressed Raw mode) and I wish it had a touchscreen. I’ve come to really value touch-sensitive screens over the past couple of years, mostly for AF placement when shooting from low angles.

This grabshot was taken on a tabletop, using live view. The RX1R II’s flip-out screen is very handy for pictures like this, but even handier would be a touch-sensitive screen, which would have allowed me to position the autofocus point precisely, by touch. 

Sony RX1R II, ISO 12800, F2, 1/60

All this being said, after a lot of thought, I picked the RX1R II as my personal choice for gear of the year. And I did that because it’s one of those cameras – like my Fujifilm X100S – that is capable of such good results that I am prepared to work around its quirks and largely forgive its faults. I should give an honorary mention to the Leica Q, though. In some ways the Q is a more pleasant camera to use but its sensor isn’t as advanced, I don’t love 28mm as much as 35mm, and my Christmas bonus* wasn’t generous enough to justify its higher cost.

Not that the RX1R II is cheap, of course. But if I have to move into a tent for a couple of months to save up enough to buy one, I’m willing to consider it. Once it’s stopped raining.


* Pliers were resorted to only after I broke a nail trying to do it with my fingers. Yeah, I know. Shut up.  
** Ha ha ha ha ha. 

Articles: Digital Photography Review (dpreview.com)

 
Comments Off on DPReview Gear of the Year part 5: Barney’s choice – Sony RX1R II

Posted in Uncategorized


DPReview Gear of the Year part 4: Barney’s choice – Sony RX1R II

21 Dec
The Sony Cyber-shot RX1R II is a 42MP full-frame compact camera, with one of the best AF systems of any non-DSLR camera on the market. And I want one. 

Photo: Sam Spencer.

I’m a sucker for 35mm. I reckon that 90% of the pictures I like to take could be (or are) taken at this focal length. That’s why I have a Sigma 35mm F1.4 Art almost permanently attached to my DSLR, and why when I’m not shooting with that, I can probably be seen out and about using my old Fujifilm X100S. In fact it was the X100S that I wrote about for my last ‘Gear of the Year’ article, way back in 2013 (no offense, noble cameras of 2014. I guess I was just really busy this time last year. I’ll call you). 

It’s because I love 35mm that I really wanted to love the original Sony Cyber-shot RX1 and R. On paper they were perfect: a high-quality 24MP full-frame sensor (without an AA filter, in the case of the RX1R), 35mm F2 lens, with full manual control and the option to add a high resolution external EVF, in a compact body. What’s not to like?

I had a love / hate relationship when shooting with the original RX1R. In low-ish light, the camera’s AF system would routinely fail to accurately acquire focus. Both this image (and the one below) were shot in manual focus mode.  

Sony RX1R, ISO 640, F2.5, 1/80sec 

Quite a lot, as it turns out. Despite high hopes (and to be fair – after taking some pictures that I quite liked) I just didn’t get on with those cameras at all. The external viewfinder was almost essential, but clunky, and made a compact camera into a not-at-all-compact camera the minute it was attached. Battery life was fairly pitiful, and autofocus – dear God the autofocus… Fussy in bright light, unreliable in moderate light and downright unavailable in low light.

Until I tried to take nighttime shots with the RX1R I didn’t believe it was possible for an inanimate object to shrug, but I swear that’s what the damned thing did whenever I half-pressed the shutter button.

Taken by the light of a campfire, this image shows the strength of the original RX1R’s 24MP sensor, but like the previous image I had to resort to manual focus to get a sharp result (focused on the little girl’s face). 

Sony RX1R, ISO 6400, F2, 1/80sec

The original RX1 and RX1R were on the market for a long time, and just when I was beginning to give up hope of ever seeing an improved replacement, along came the RX1R II. 

Compared to the original RX1R, the Mark II version is a breath of fresh air. Inheriting the same 42MP BSI-CMOS full frame sensor (but with an all-new switchable anti-aliasing filter) and 399 phase-detection AF system from the Sony a7R II, the RX1R II is a significant step up.

What I love

  • Excellent resolution
  • High-resolution built-in EVF
  • Very accurate, flexible AF system
  • Compact, relatively lightweight form-factor
  • Large manual controls

Gone is the clumsy add-on FDA-EVM1K, replaced by a built-in, retractable 2.3 million dot OLED finder. I shoot with my eye to the viewfinder almost exclusively, so when Sony representatives first showed us the camera, I nabbed one of the new lockable rubber viewfinder hoods they brought along. The hood prevents the finder from being retracted, but after resorting – twice – to using needle-nosed pliers to loosen the locking screw* I decided just to leave it permanently attached.

With 42MP and a new BSI design, the sensor in the RX1R II is significantly more advanced than the already very good 24MP sensor in the older RX1R. Like all current Sony full-frame sensors it offers extraordinary dynamic range, allowing me to expose just shy of highlight clipping for this ISO 100 shot, and pull up the shadows very significantly in Photoshop. The final result shows a very wide dynamic range from bright to dark without feeling too ‘HDR’. 

Sony RX1R II, ISO 100, F6.3, 1/400sec

Just aesthetically, I really like the RX1R II, and it’s a camera that tends to attract admiring glances when I’m out shooting. Like the Fujifilm X100S, more than a few people have commented to me that it looks like a film camera, but the semi-retro styling doesn’t come at the expense of usability (keep walking, Nikon Df…). 

Cosmetics aside, the RX1R II also produces great images, exactly as we’d expect from a camera using such a high-quality sensor. Like recent a7-series cameras, Sony has included an uncompressed Raw option in the RX1R II.This gives maximum quality but at the expense of very large file sizes – roughly 80MB each, to be precise, compared to JPEGs which are typically less than ten. This slows the camera down, and eats through memory cards with frightening rapidity. 

While I didn’t much care for the original RX1/R overall but I did enjoy that 35mm F2 Zeiss lens. And although it was designed for a 24MP resolution it successfully keeps up with the much higher pixel density of the new sensor in the RX1R II. Sadly though, neither the sensor nor the lens is stabilized so with 42MP in play, even though sometimes I’ve gotten away with 1/30sec, I’m in the habit of treating 1/125sec as my safe ‘slowest’ shutter speed when hand-holding.

After dark, the RX1R II’s focus system is far superior to that of its predecessor. This shot was hand-held after dark, and shot wide open at F2.

Sony RX1R II, ISO 400, F2, 1/50sec

Alright, so the sensor is great, the AF system is transformed, and the built-in viewfinder is lovely. What about my one remaining major criticism of the original RX1R? – Battery life. 

Sadly, the RX1R II’s battery is the same NP-BX1 found in the first generation RX1R and all of Sony’s RX100 series compacts. Even just physically, the BX1 is comically small. Like, lose-it-in-your-pocket small. And while it’s rated for a modest 200 shots, in cold weather I’ve come to expect far less. 

In temperatures around freezing, I quickly fell into the habit of holding the battery slipped into a glove, and placing it in the camera only when needed. You know – like we had to do in the 1990s. Fortunately, Sony is shipping the RX1R II with a handy USB-powered charger, which means you don’t need to plug the camera in to charge the battery, as with other RX-series Sony compacts. So that’s one step forward, at least. 

Face detection worked well for this shot in one sense – it resulted in a nicely-balanced exposure, in a situation where my subject could easily be backlit. I should have activated Eye-AF though, because focus has fallen slightly short of my subject’s eyes.

Sony RX1R II, ISO 100, F4, 1/125sec

I’ve been using the RX1R II for a while now and I keep on having to remind myself that despite its high price-tag it is still a Cyber-shot camera, with a lot of the same quirks of much cheaper compact cameras in Sony’s lineup. In fact, it’s impossible to ignore. There’s the same lengthy startup time, the same lag – before – you – can – zoom – in to the images you’ve captured, the same confusing, rather passive aggressive error messages when you try to do something before the camera is ready or when it’s in the wrong mode, and the same somewhat confusingly-named array of AF modes.

Exposed to retain the very delicate warmth in the sky just above the horizon, this ISO 320 shot was converted from a Raw file, and the shadows lifted in Adobe Camera Raw. I performed some very slight noise reduction, but could still smooth out the midtones a lot more if I wanted to. 

Sony RX1R II, ISO 320, F2, 1/60sec

There are a couple of outright bugs, too. For example, despite not offering any form of SteadyShot image stabilization in still capture, the RX1R II will still blink a reminder at slow shutter speeds that this non-existent feature is turned off.

After shooting thousands of frames with the RX1R II, I’ve learned to live with these minor annoyances but I do with Sony had sprung for a couple of extra components. A more powerful processor would make a huge difference to the overall handling experience (especially in uncompressed Raw mode) and I wish it had a touchscreen. I’ve come to really value touch-sensitive screens over the past couple of years, mostly for AF placement when shooting from low angles.

This grabshot was taken on a tabletop, using live view. The RX1R II’s flip-out screen is very handy for pictures like this, but even handier would be a touch-sensitive screen, which would have allowed me to position the autofocus point precisely, by touch. 

Sony RX1R II, ISO 12800, F2, 1/60

All this being said, after a lot of thought, I picked the RX1R II as my personal choice for gear of the year. And I did that because it’s one of those cameras – like my Fujifilm X100S – that is capable of such good results that I am prepared to work around its quirks and largely forgive its faults. I should give an honorary mention to the Leica Q, though. In some ways the Q is a more pleasant camera to use but its sensor isn’t as advanced, I don’t love 28mm as much as 35mm, and my Christmas bonus* wasn’t generous enough to justify its higher cost.

Not that the RX1R II is cheap, of course. But if I have to move into a tent for a couple of months to save up enough to buy one, I’m willing to consider it. Once it’s stopped raining.


* Pliers were resorted to only after I broke a nail trying to do it with my fingers. Yeah, I know. Shut up.  
** Ha ha ha ha ha. 

Articles: Digital Photography Review (dpreview.com)

 
Comments Off on DPReview Gear of the Year part 4: Barney’s choice – Sony RX1R II

Posted in Uncategorized


Our Perfect Portrait Pack of eBooks – 73% Off Today Only

21 Dec

It is day 9 of our 12 deals of Christmas and it is one we know many of you have been waiting for – crazy deals on our Portrait Photography eBooks by Gina Milicia.

We’ve got a brilliant bundle option for those new to Gina’s teaching or deals on each individual eBook for those who just want to complete the set.

Portraits bundle gina

Either way we’re so confident you’ll love them we’re offering a satisfaction guarantee.

We do this because they’ve already helped 10s of thousands of people improve their portrait photography.

It’s your turn today.

Any of our portrait ebooks just $ 7 (normally $ 19.95)

  • Portraits: Making the Shot $ 7 – Practical tips for bringing your portraits to life
  • Portraits: Lighting the Shot $ 7 – Discover the secrets of beautiful portrait lighting
  • Portraits: Striking the Pose $ 7 – Your go-to guide of natural posing positions
  • Portraits: After the Shot $ 7 – Master portrait post production and workflow

Learn more about each eBook and grab yours here.

Save Even More and Get a Bonus eBook When You Bundle Them

Pick up the whole set for just $ 21 and get our 14 Recipes for Amazing Portraits ebook as a special bonus. That’s 5 books at 73% off.

I think this deal speaks for itself and I know you’ll love these eBooks for years to come.

But don’t hesitate – this deal lasts just 24 hours and the clock is already counting down.

googletag.cmd.push(function() {
tablet_slots.push( googletag.defineSlot( “/1005424/_dPSv4_tab-all-article-bottom_(300×250)”, [300, 250], “pb-ad-78623” ).addService( googletag.pubads() ) ); } );

googletag.cmd.push(function() {
mobile_slots.push( googletag.defineSlot( “/1005424/_dPSv4_mob-all-article-bottom_(300×250)”, [300, 250], “pb-ad-78158” ).addService( googletag.pubads() ) ); } );

The post Our Perfect Portrait Pack of eBooks – 73% Off Today Only by Darren Rowse appeared first on Digital Photography School.


Digital Photography School

 
Comments Off on Our Perfect Portrait Pack of eBooks – 73% Off Today Only

Posted in Photography