RSS
 

Archive for December, 2015

Prefab Hobbit Homes: Build Your Own Shire Dwelling in Just 3 Days

25 Dec

[ By WebUrbanist in Architecture & Houses & Residential. ]

modular hobbit homes

Composed of vaulted panels covered with reinforced soil, these modular hobbit-worthy homes can be adapted to just about any site and constructed in a matter of days.

modular home construction

Produced in pieces by Magic Green Homes, then shipped to sites for assembly, each dwelling is made from prefabricated panels clad in green. The results looking much like something straight out of a Tolkien novel, but made out of shaped composite laminate, the same material approach taken to creating curves in some types of boat.

magic green house

green hoome interior

The process is designed for simplicity, eliminating the need for heavy machinery of specialized knowledge. Integral electrical, plumbing and ventilation channels come tucked inside the wall-to-roof modules as well, making systems installations easier as well.

green module warehouse

modular house construction

Overlapping flaps allow builders to join the various parts together while the integrated layers of green on top further hide any seams, making each house look like a seamless (w)hole. An interior layer of waterproofing ensures the attached modules do not leak.

green magic homes

modular green house

The overall modularity of this lends itself to easy incremental additions, expanding housing units over time. Designers or homeowners can also site the structures to blend into the surrounding landscape, much like the approach taken in underground homes and with many earthships. As with geodesic domes and other curved habitats, however, it may take a bit more than three days to decide how to finish and decorate the rounded interiors.

Share on Facebook


[ By WebUrbanist in Architecture & Houses & Residential. ]

[ WebUrbanist | Archives | Galleries | Privacy | TOS ]


WebUrbanist

 
Comments Off on Prefab Hobbit Homes: Build Your Own Shire Dwelling in Just 3 Days

Posted in Creativity


Lighting Up the Dark Side: Star Wars Shadow Art Portraits

24 Dec

[ By Steph in Drawing & Digital. ]

star wars shadow 1

Balls of aluminum foil transform into Darth Vader and irregular chunks of chocolate cookies covered in rainbow sprinkles become the Star Wars logo when a single light source is shined upon them in just the right way. Artist ‘Red’ Hong Yi of Malaysia created an entire series of Star Wars shadow art with a range of materials, from feathers to discarded computer guts.

star wars shadow art 7

The artist turns on a lamp and begins attaching her bits of materials to pieces of wire embedded in a base, watching the shadows on a plain white wall until her seemingly random compositions start to make visual sense. Some of the portrait are more complex than others; a Stormtrooper made of cotton is simple and graphic while a Yoda silhouette crafted of nothing more than a handful of leaves  and weeds seems as if it could spring to life.

star wars shadow art 5

star wars shadow art 3

star wars shadow art 4

“It started with a spark of curiosity and then a lot of tweaks and experiments,” says the artist on her Instagram. “As an artist/designer, I’ve learned to not be afraid of experimenting and failing; you’ll get better at what you do with each step you take. Our responsibility as creators is to sit down and create again and again. May the force be with you!”

star wars shadow art 2

star wars shadow art 6

Get inspired with 24 more amazing works of shadow art, and follow Red Hong Yi on Instagram for more creations made from unexpected materials, like tea bag portraits and intricate arrangements of edible items.

Share on Facebook


[ By Steph in Drawing & Digital. ]

[ WebUrbanist | Archives | Galleries | Privacy | TOS ]


WebUrbanist

 
Comments Off on Lighting Up the Dark Side: Star Wars Shadow Art Portraits

Posted in Creativity


Inching forward? Canon PowerShot G5 X review posted

24 Dec

Canon PowerShot G5 X Review

Key Features

  • 20.2MP 1″-type BSI CMOS sensor
  • DIGIC 6 processor
  • F1.8-2.8, 24-100mm equiv. lens
  • Optical image stabilization
  • Built-in ND filter
  • 3″ fully articulating touchscreen LCD
  • 2.36M-dot electronic viewfinder
  • 1080/60p video
  • Wi-Fi with NFC

The PowerShot G5 X is one of the latest members of Canon’s 1″-type sensor family, which began with the G7 X in 2014. It takes what made that camera appealing – namely its sensor, lens, and direct controls, and puts them into a body that adds an electronic viewfinder, fully articulating touchscreen LCD, hot shoe, and additional control dial – all without a large increase in size.

The G5 X’s 20.2MP 1″-type BSI CMOS sensor – designed by Sony and first used in its RX100 II and III – performs very well and, given that the image pipeline on the G5 X is the same as its predecessor’s, should continue to do so. The 24-100mm F1.8-2.8 optically stabilized lens is also the same as on the G7 X, so there shouldn’t be any surprises there, either.

From a feature standpoint, the G5 X is essentially the same as the G7 X. You’ve got your manual exposure controls, customizable buttons and dials, built-in neutral density filter, Raw support, 6 fps continuous shooting (JPEG only), a fun star trail mode, 1080/60p video recording and Wi-Fi with NFC. 

Sadly, two of the G7 X’s most disappointing traits have carried over to the G5 X, namely sluggish Raw shooting performance and lackluster battery life. 

Meet the Family

From left to right: the PowerShot G1 X Mark II, G3 X, G5 X, G7 X, and G9 X

There are now five members in Canon’s premium compact’ family: the G1 X Mark II, G3 X, G5 X, G7 X and G9 X. The G1 X Mark II is the flagship model, using a considerably larger 1.5″-type sensor instead of the 1″-types used by the rest of the group. 

The G7 X is Canon’s original 1″-type sensor camera, and the models that have followed are a variation on the same theme. The G3 X is the long zoom model, the G5 X is for the EVF crowd, and the G9 X is an ultra-compact model with a shorter, slower lens. 

Here’s a quick table to help you sort out the differences between the five models:

  G1 X Mark II G3 X G5 X G7 X G9 X
MSRP $ 799 $ 999 $ 799 $ 699 $ 529
Sensor 12.8MP 1.5″-type CMOS 20.2MP 1″-type BSI CMOS
Lens (equiv.) 24-120mm
F2.0-3.9
24-600mm
F2.8-5.6
24-100mm F1.8-2.8 28-84mm
F2.0-4.9
LCD size/type 3″ tilting touch 3.2″ tilting touch 3″ rotating touch 3″ tilting touch 3″ fixed touch
EVF Optional Yes No
Hot shoe Yes No
JPEG burst 5.2 fps 5.9 fps 6.5 fps 6.0 fps
Video 1080/30p 1080/60p
Audio in/out No Yes No
Battery life (CIPA) 240 shots 300 shots 210 shots 210 shots 220 shots
Dimensions 116 x 74 x 66mm 123 x 77 x 105mm 112 x 76 x 44mm 103 x 60 x 40mm 98 x 58 x 31mm
Weight 553g 733g 377g 304g 185g

That’ll do it for comparisons – let’s dive into the world of the PowerShot G5 X now.

Articles: Digital Photography Review (dpreview.com)

 
Comments Off on Inching forward? Canon PowerShot G5 X review posted

Posted in Uncategorized


How to Use Shadow and Contrast to Create Dramatic Images

24 Dec

shadow and contrast

You can use shadow and contrast to create dramatic images. The key is to forget about shadow detail. You don’t need it. Shadows are meant to be dark and mysterious. This is good – it leaves something to the viewer’s imagination.

Utilize the dynamic range of your sensor. Expose for the highlights, and let the shadows fall where they will. If the light is strong enough, the shadows will contain very little detail.

Harsh light can make dramatic images

I took the following photo in Bolivia. The sun was sinking behind me, casting a strong shadow that had started to touch the underneath of the old car. The shadow fills the bottom third of the image. We don’t need detail in the shadow, although a little doesn’t hurt. Shoot in Raw format, and in most cases you’ll be able to pull some shadow detail out in post-processing, giving you a choice.

shadow and contrast

When I see a dramatic image like this, with strong shadows, my immediate instinct is to convert it to black and white. High contrast scenes look great in monochrome. There’s something about removing colour that emphasizes the depth of the shadows, and the drama of the composition. You can add impact by increasing contrast in Lightroom and emphasizing texture using the Clarity slider. Here’s my black and white conversion of the photo above.

shadow and contrast

Look for naturally contrasty scenes

I took the next photo indoors, in an old manor house that had been converted to a museum. The apples were lit by light coming through a window. The windows were small, so the interior of the room was naturally dark, which is why there is so little detail in the background. It’s a high contrast scene – the area lit by window light ,is much brighter than the rest of the scene.

shadow and contrast

Here’s the same image converted to black and white. Without colour, the emphasis is on the textures and shadows.

shadow and contrast

Silhouettes

The following photo of an approaching storm uses also uses shadow and contrast. The mountains are backlit and silhouetted. The approaching storm clouds are dark and ominous. A brightly lit strip of sky fills the gap between the two dark areas. A silhouetted telegraph pole forms a natural focal point. The drama of the light has created a dramatic image.

shadow and contrast

The image is naturally monochromatic, and converts well to black and white.

shadow and contrast

There are lots of shadows in this seascape. But the ones that caught my eye were the silhouetted figures on the right. After I had set up the shot, two children walked across the beach, and climbed up on the rock. I used a long shutter speed (30 seconds) to blur the water, which also blurred the silhouetted children. I was fortunate because the figures add human interest and scale to the scene. They are a natural focal point that pulls the eye across the photo.

shadow and contrast

shadow and contrast

It also converted well to black and white.

The final image is also one that uses shadow to create mystery and drama. I focused on the grass on the foreground, set a wide aperture, and let the sun go out of focus. I adjusted the white balance in Lightroom to emphasize the warmth of the setting sun. This image is different from the others in that the colour is an important part of the composition and it doesn’t work as well in black and white.

shadow and contrast

Conclusion

One of my aims with this article is to dispel the idea that it is essential to capture lots of shadow detail, and that if you fail to do so, it is some kind of technical shortcoming. Not so – let’s celebrate the fact that camera sensors don’t capture the full range of brightness that our eyes are capable of seeing. Let’s use the interplay of light and shadow to create interesting and dynamic compositions. Let’s create some mystery and leave gaps for the viewer’s imagination to fill in.

Do you use shadows in your images? Please share your images with lots of shadow and contrast in the comments below.


Mastering Composition ebookMastering Composition

My new ebook Mastering Composition will help you learn to see and compose photos better. It takes you on a journey beyond the rule of thirds, exploring the principles of composition you need to understand in order to make beautiful images.


googletag.cmd.push(function() {
tablet_slots.push( googletag.defineSlot( “/1005424/_dPSv4_tab-all-article-bottom_(300×250)”, [300, 250], “pb-ad-78623” ).addService( googletag.pubads() ) ); } );

googletag.cmd.push(function() {
mobile_slots.push( googletag.defineSlot( “/1005424/_dPSv4_mob-all-article-bottom_(300×250)”, [300, 250], “pb-ad-78158” ).addService( googletag.pubads() ) ); } );

The post How to Use Shadow and Contrast to Create Dramatic Images by Andrew S. Gibson appeared first on Digital Photography School.


Digital Photography School

 
Comments Off on How to Use Shadow and Contrast to Create Dramatic Images

Posted in Photography


Museums of Tomorrow: 13 Out of This World Institution Designs

24 Dec

[ By Steph in Architecture & Public & Institutional. ]

future museums comic 4

We’re reaching a point in architectural history where the structures being built look like they could have come straight out of the concept artwork for a science fiction movie, or a video game set on another planet. Some look like flying saucers, others look like blobby aliens that landed on the roof of a traditional European building, but all of these museum designs – the real ones, and the ones that will remain concepts – have a strikingly futuristic feel.

Sci-Fi Museum for Washington by Flying Architecture
future museums sci fi

future museums sci fi 2

future museums sci fi 3

This concept looks just as sci-fi as its purpose with its facade wrapped in sharp-looking metal panels and ring-shaped interior plan. Submitted for an International Architectural Design Competition to design a museum for science fiction in Washington, the proposal is “a vessel of science fiction history and culture” with circular LED screens wrapping the inner face and space reserved for hologram performances.

MVRDV China Comic and Animation Museum
future museums comic

future museums comic 2

future museums comic 3

What looks like a gigantic cluster of textured eggs speckled in red houses a Comic and Animation Museum for China by MVRDV, including a massive comic book library, three cinemas and an interactive exhibition zone. MVRDV’s competition-winning design mimics the shape of speech bubbles for its eight interconnected ovoid volumes fulfilling every comic book lover’s fantasy.

Museum of the Future for Dubai
future museums dubai

future museums dubai 2

future museums dubai 3

This metallic ring-shaped building designed by architect Shaun Killa and set to be 3D-printed for its completion in 2017 looks like the kind of building an artist would envision for an alien planet. The flashy building will be covered in poetry written by Dubai ruler Sheikh Mohammed Bin Rashid Al Maktoum, the hole in its center representing “the unknown.” The exhibits will be changed every six months.

Kunsthaus Graz Art Museum
future museums kunst

future museums kunst 2

future museums kunst 3

future museums kunst 4

Is this a building, or an alien ship? The blobular Kunsthaus Graz Art Museum is an ultramodern landmark in the Austrian city of Graz by Sir Peter Cook and Colin Fournier, known to locals as the “friendly alien” That flowing roof is actually made up of 1,288 semitransparent acrylic glass panels generating energy with built-in photovoltaic cells.

Next Page – Click Below to Read More:
Museums Of Tomorrow 13 Out Of This World Institution Designs

Share on Facebook


[ By Steph in Architecture & Public & Institutional. ]

[ WebUrbanist | Archives | Galleries | Privacy | TOS ]


WebUrbanist

 
Comments Off on Museums of Tomorrow: 13 Out of This World Institution Designs

Posted in Creativity


PIX 2015: An interview with Joe McNally

23 Dec

Joe McNally took a photography course as a requirement for his journalism program at Syracuse University. Though his intent at the time was to become a writer, when he picked up a camera he knew immediately things were about to change for him. Find out more about more about how his career and the industry have evolved, and how being at the right place at the right time (with Peter Jennings) kickstarted his work as a freelancer.

Articles: Digital Photography Review (dpreview.com)

 
Comments Off on PIX 2015: An interview with Joe McNally

Posted in Uncategorized


Review: The Everyday Messenger Bag by Peak Design

23 Dec

I have had several camera and equipment bags over the years, ranging from simple backpacks to over-the-shoulder models, to free bags that came with gear I bought. While all of them have been effective to varying degrees, each one has had its own share of problems. Some are too bulky, while others are not big enough. Some have pockets in strange places, and others have no pockets at all. Some have nicely-padded straps and big cushions for gear, but these usually result in bags that are too cumbersome and awkward for everyday use.

In short, while all the bags I have used have been functional, none of them have been very well designed with a photographer’s needs in mind. Enter the Everyday Messenger Bag by Peak Design.

everyday-messenger-bag-front-closed

I first heard about this bag on an episode of This Week in Photo, where host Frederick Van Johnson interviewed Trey Ratcliff, a well-known photographer who was similarly frustrated with the state of modern camera carrying equipment. Ratcliff had been working with Peak Design to create a bag that was ideally suited for not just photographers, but anyone who would need to carry various things around on a daily basis. By the end of the podcast I was intrigue,d and within a few days my wife and I backed Ratcliff’s project on Kickstarter.

However, like some of the other projects we had supported, we were not sure if our pledge would result in a high-quality product, or simply evaporate into cyberspace never to be heard from again. Thankfully Ratcliff and Peak Design held true to their word, and at the end of November our Everyday Messenger arrived, and we have been using it quite a bit ever since.

Thoughtful Design

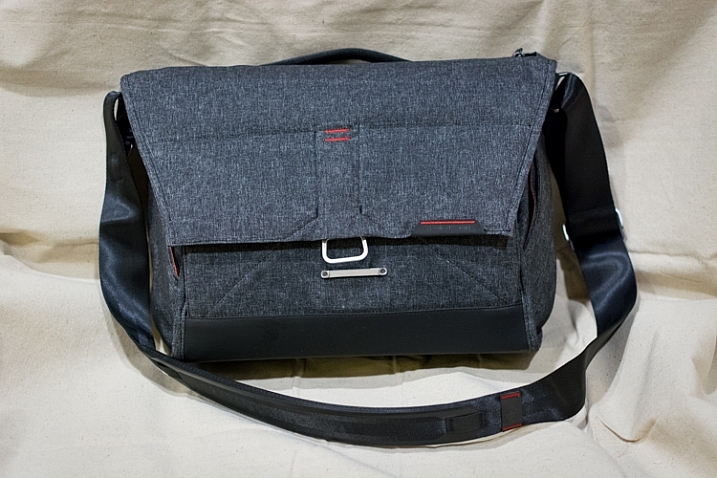
At first glance the Everyday Messenger looks just like any other bag of its kind; it’s big enough for some cameras, a lens or two, and a laptop and/or tablet. There are pockets, a padded strap, and some zippers to let you access everything. In fact my initial reaction to the bag was a bit of a disappointment. Why spend more than $ 200 on a bag that seems the same as a $ 50 bagthat  I could buy from Amazon or a department store?

The answer, I discovered after using it for a while, lies in the details. While not perfect, there are many subtle aspects to this bag that you just don’t normally see on other camera bags, which make the Everyday Messenger imminently more practical for photographers.

everyday-messenger-bag-front-open

“She may not look like much, but she’s got it where it counts” – Han Solo, describing either the Millennium Falcon or his Everyday Messenger bag.

One of the biggest hassles with my other camera bags has been actually getting things out of the bagUsually it involves unbuckling a clasp, and fiddling with a zipper that goes around a few sides of the bag, to reveal the gear stuffed inside. It’s a cumbersome maneuver that can be anywhere from mildly irritating to downright frustrating, especially in the middle of a photo shoot.

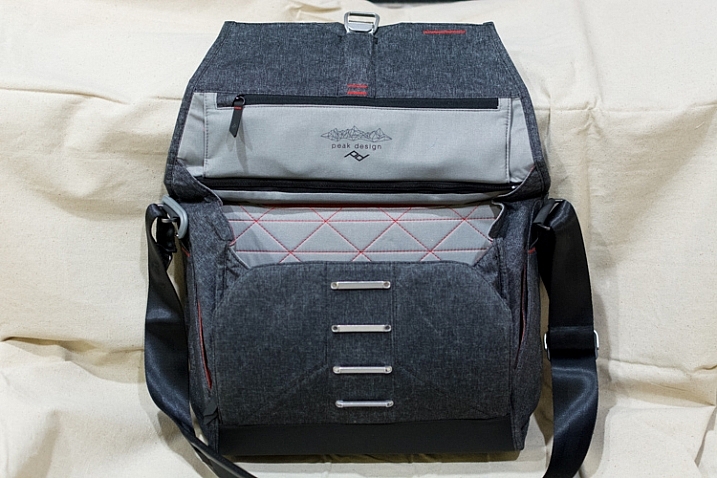
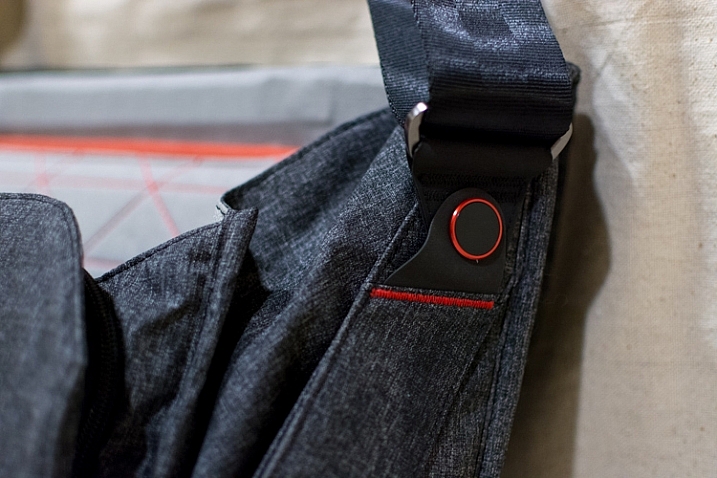
The Everyday Messenger solves this with a magnetic clasp that hooks to one of four positions, releases with a quick flick of your wrist, and snaps securely back in place with minimal effort. It also has two weather-sealed zippers on top; one which provides access to the main pouch and another for the laptop/tablet storage section in the back. All this adds up to a bag that is clearly designed to hold your equipment safe and secure, while letting you get at it as quickly as possible, and has quickly made all my other bags look archaic by comparison.

everyday-messenger-bag-front-clasp

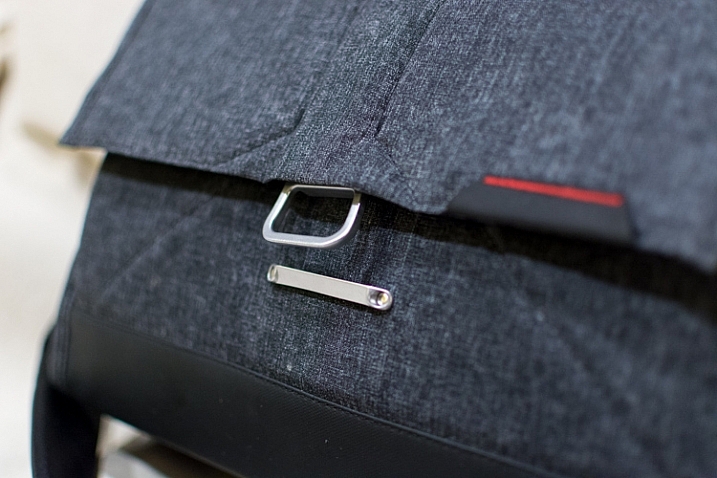
The front clasp opens and closes easily, but locks securely. I thought it would be gimmicky at first, but it has turned out to be surprisingly useful, and quite durable.

Attention to Detail

There are dozens of little examples like this scattered throughout the Everyday Messenger bag that make it incredibly useful for photographers, as well as anyone else who needs a bag to carry things around. In fact my wife, a college professor, has been using it to carry all manner of papers and books, along with her laptop, around campus. After a week of using it she said, and I quote, “My official verdict is – it’s awesome.”

The clasp on the shoulder strap adjusts with a quick release mechanism to make it longer or shorter, and even the strap itself is unique in its design. Instead of a shoulder pad that slides back and forth, a 15-inch section of the shoulder strap is padded from the inside. This not only eases much of the stress on my shoulder, but is far more comfortable than any other camera bag strap I have ever used. The strap seems well suited for those who like over-the-shoulder bags, but can also be made long enough to accommodate users who prefer to sling the bag across their chest.

everyday-messenger-bag-all-open

If you want pockets, this bag has plenty to spare.

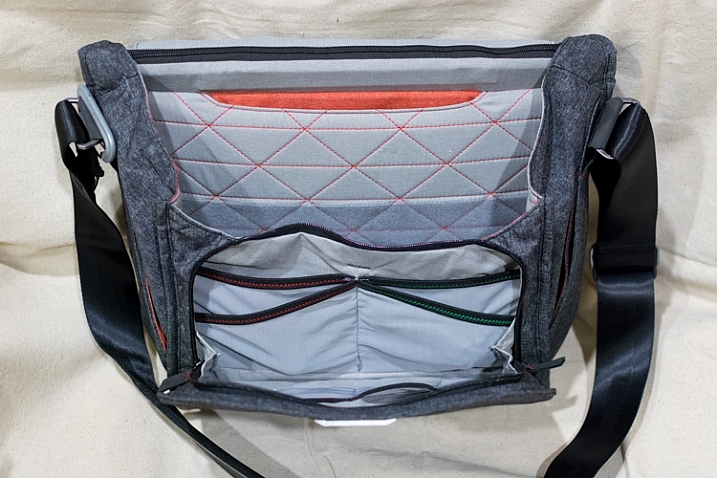
The little touches don’t stop with the shoulder strap and zippers. Two pockets on each side of the bag offer quick access to small things like lens filters, batteries, or even keys, which can be clipped to a security strap so they won’t get lost. Inner pockets in the lining of the bag are coded red and green, and are designed for memory cards or batteries that are either ready to go or all used up. The shoulder strap attaches to the bag itself with a rotating joint, instead of the common swivel style you see on most bags, which means the Everyday Messenger moves naturally at your hip instead of jostling back and forth. And unlike almost every other messenger-style bag I have used, this one stands perfectly upright whether empty or full, thanks to a thick underlining.

All of this adds up to a bag that carries your stuff like any other, but does so in a way that is more practical and easier to use than you might expect.

everyday-messenger-bag-strap-swivel

The shoulder strap rotates front to back where it is attached to the bag, which makes things far more comfortable on long walks than most other bags.

The inside of the Everyday Messenger looks like what you would expect – a big empty compartment, with velcro dividers to keep your larger gear items separate from each other. Unlike most other bags though, the creators added a somewhat unique twist on the dividers themselves; they are designed to fold and flex in order to accommodate oddly-sized equipment and even let you stack things on top of one another. If you have a larger lens it can be placed on the side, and multiple camera bodies can be put next to it, or stacked on top of each other, with everything padded on all sides. These dividers make the bag far more practical for photographers, as compared to traditional rectangular or messenger-style bags, but I should note that the dividers themselves do seem a tad flimsy compared to other bags I have used. Thus far they seem fine, but I wonder how well they will hold up after several months of daily use.

Of course a camera bag is more than the sum of its features, and all the padding, pockets, and clever nooks and crannies in the world don’t matter if the bag is uncomfortable out in the field. Thankfully the Everyday Messenger does quite well in this regard. The padded neck strap and thick cross-bracing on top distribute the weight of the bag evenly, and even with a laptop, a camera, and some lenses in the bag, it was still fairly portable and easy to use. As with other aspects of the bag, only time will tell how it handles in the long run, but for now I can safely say that this one is much more comfortable and user-friendly than almost every other I have used.

everyday-messenger-bag-gear-inside

Thanks to the folding dividers I can pack a DSLR with lens attached, another lens on the side, and still have a large padded cavity on top of the extra lens for my flash or other items.

The only reservations I have about wholeheartedly recommending this bag relate to its price, and overall durability. Peak Design claims it is made of: Weatherproof waxed 500D Kodra, which is used in many outdoor-related products, and even some military applications as well. It does feel a bit thin, so like the internal dividers, I do wonder if the bag is suited for the long haul. However, I don’t think it would necessarily be any worse than any other bag I have owned.


Finally, one of the most basic questions about this bag involves the price – is it really worth $ 250? That depends on your needs. Certainly that amount will fetch you one, or even several, perfectly fine camera bags from manufacturers like Lowepro, Ruggard, Crumpler, Tamrac, and many others. While all those bags are nice, and much less expensive, I have found the Everyday Messenger to be more enjoyable to use on a daily basis. It won’t hold as much equipment as some other bags, so if you are a professional who needs the most amount of space for all sorts of gear, you might want to look elsewhere. But if you’re a casual photographer, who likes to transport your gear on a regular basis, I can confidently recommend the Everyday Messenger Bag.

everyday-messenger-bag-divider

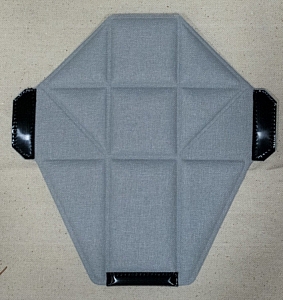
These oddly-shaped dividers are quite handy, though they do feel a bit thin and flimsy compared to some dividers in other camera bags.

Pros:

  • Well thought out design
  • Lots of storage for a variety of camera gear
  • Sturdy, rugged, and waterproof
  • Stands upright on its own, empty or fully loaded
  • Ingenious front clasp, along with top zippers, make accessing your gear very easy

Cons:

  • Material is slightly thin and might wear out over time
  • Price is a bit high

googletag.cmd.push(function() {
tablet_slots.push( googletag.defineSlot( “/1005424/_dPSv4_tab-all-article-bottom_(300×250)”, [300, 250], “pb-ad-78623” ).addService( googletag.pubads() ) ); } );

googletag.cmd.push(function() {
mobile_slots.push( googletag.defineSlot( “/1005424/_dPSv4_mob-all-article-bottom_(300×250)”, [300, 250], “pb-ad-78158” ).addService( googletag.pubads() ) ); } );

The post Review: The Everyday Messenger Bag by Peak Design by Simon Ringsmuth appeared first on Digital Photography School.


Digital Photography School

 
Comments Off on Review: The Everyday Messenger Bag by Peak Design

Posted in Photography


All dPS eBooks – $10 Today Only

23 Dec

It’s day 11 in our 12 deals of Christmas and today is huge – you can get any of our eBooks not already featured in our previous days for $ 10 USD (that’s between 50-80% off).

We’ve also got a bonus deal today from our friend Ed Verosky who is offering 6 of his eBooks for $ 25!

There’s lots to choose from so you’re best to head to our 12 Deals of Christmas page here to make your selection.

$ 10 dPS eBooks

10 ebooksThe $ 10 eBooks on offer are:

  • Going Pro Kit: our guide to making money from your photography (80% off)
  • The Essential Guide to Black and White Photography
  • Transcending Travel: A Guide to Captivating Travel Photography
  • Click! Kids Photography: How to Take Gorgeous Photos of Your Kids
  • Photo Nuts and Bolts: Know Your Camera and Take Better Photos
  • Photo Nuts and Shots: Tools and Techniques for Creative Photography
  • Photo Nuts and Post: Transform your Photos with the Power of Post Processing
  • Photo Nuts and Gear: Don’t spend a dime on gear until you read this eBook
  • Photo Magic: Special Effects Photography Made Easy
  • Captivating Color: Discover how to use Color effectively in your Photography
  • The Art of Self Portraiture: Explore your Creative Spirit
  • Printable Posing Guides: Printable Posing Sets

Buy one or create your own little bundle of learning for 2016 at our 12 Deals of Christmas page.

2 Great Bundles – $ 25 Each (Save 77%)

Today we’ve got a couple of great bundles for you too.

Ed Verosky eBook Bundle!

NewImageEd Verosky has put together a very special bundle deal for you – it includes his 6 best selling eBooks for just $ 25:

  • 15 Photo Projects That Will Boost Your Creativity – If you’re in a creative rut or just need some inspiration you’ll love this eBook!
  • Introduction to Close-up & Macro Photography – This guide gives you everything you need to get started with close-up & macro photography!
  • Boudoir Photography – the quick-start guide for professional photographers.
  • Advice for the Aspiring Portrait Photographer – This concise guide will help you build your portfolio, find great models and portrait subjects, and really delivers on helping you become a true portrait ‘artist.’
  • Successful Photo Shoots – Go behind-the-scenes with Ed Verosky as he talks you through every challenge, every thought, through hundreds of images, down to the final edits.
  • DSLR: The Basics – fundamental concepts of photography & using a DSLR to it’s full potential.

‘Photo Nuts’ eBook Pack

NewImageThe complete collection of Photo Nuts eBooks from Neil Creek for just $ 25 USD:

  • Photo Nuts and Bolts – Know your camera and take better photos
  • Photo Nuts and Shots – Tools and Techniques for Creative Photography
  • Photo Nuts and Post – Transform Your Photos with the Power of Post Processing
  • Photo Nuts and Gear – Don’t spend a dime on Gear Until You Read this eBook

These bundles and all our other $ 10 USD eBooks are available for you to purchase for one day only at our 12 Deals of Christmas page here

googletag.cmd.push(function() {
tablet_slots.push( googletag.defineSlot( “/1005424/_dPSv4_tab-all-article-bottom_(300×250)”, [300, 250], “pb-ad-78623” ).addService( googletag.pubads() ) ); } );

googletag.cmd.push(function() {
mobile_slots.push( googletag.defineSlot( “/1005424/_dPSv4_mob-all-article-bottom_(300×250)”, [300, 250], “pb-ad-78158” ).addService( googletag.pubads() ) ); } );

The post All dPS eBooks – $ 10 Today Only by Darren Rowse appeared first on Digital Photography School.


Digital Photography School

 
Comments Off on All dPS eBooks – $10 Today Only

Posted in Photography


DPReview recommends: Best Cameras for Kids 2015

23 Dec

If they’re young enough, your kids have always known a world in which smartphones are the most popular devices for taking photos. That’s too bad. To ensure that the next wave of young photographers understand the performance and ergonomic advantages of using a real camera, you’ll need to get one into their hands as soon as possible.

But wait! Before you sneak a Nikon D810 into your baby’s basket of toys, you’ll need to consider choking hazards and the fact that some children are a lot more careful than others when it comes to handling expensive electronics. If you want to buy a camera specifically for your child – or a camera that your entire family can share without worrying too much – durability and ease of use are just as important, if not more, as image quality and features.

And, of course, much of that depends on the age and maturity level of your child. We wouldn’t trust any toddler or the vast majority of 10-year-old boys with an advanced point-and-shoot, but for a teenager or pre-teen that’s wise beyond their years and genuinely interested in photography, a compact with a lot of zoom and manual controls to grow into might be a great fit.

So here’s a selection of some of what we think are the best camera options for your kids. Most of these models aren’t specifically for kids, and all of the obvious caveats apply. Batteries aren’t edible, memory cards are choke hazards, cameras can hurt when they’re thrown at people, etc. All prices are approximate street prices, correct at time of publication, and if you think we’ve missed a model that deserves consideration, let us know in the comments!

Younger Kids

If you’re shopping for kids 6 and under, you probably don’t want to spend a lot of money, and durability is likely to be important. You want something lightweight that won’t break the first time it gets dropped, and the simpler the operation the better.

Vtech Kidizoom Connect ($ 48)

1.3MP sensor | 4X digital zoom | 1.8″ LCD | 320 x 240 video | 128MB built-in memory | uses AA batteries

Baby’s first piece of kit should be tough and inexpensive, and the VTech KidiZoom fits the bill. This durable 1.3-megapixel camera/toy comes has a fixed lens with 4X digital zoom, 128MB of internal memory (with an option for MicroSD memory card expansion), a 1.8″ LCD and 320 x 240 video. There are even three photo-related games to keep your kids entertained.


Nikon Coolpix S33 ($ 99)

13.2MP CMOS sensor | 30-90mm equiv. lens | Waterproof to 32ft | Shockproof from 5ft | Full HD video

Cameras do get bumped and dropped (or worse), making Nikon’s inexpensive waterproof, shockproof and freezeproof Coolpix S33 worth a look. It features an easy-to-use interface and dedicated one-touch buttons for simple shooting. Although it’s 13.2 megapixel CMOS sensor is roughly the size of what’s in your smartphone, it can capture decent quality images. Its lens has a focal range of of 30-90mm – adequate for most purposes. A dedicated movie record button allows users to quickly shoot Full HD video clips. The S33 offers sixteen creative styles and effects options (including Underwater Face Detection) and an option to shoot videos with a miniature effect.


Fujifilm instax mini 8 ($ 80)

Makes card-sized instant prints | 60mm equiv. fixed lens | Uses AA batteries | Comes in several colors

Now your kids can relive the days of instant prints with the Fujifilm instax mini 8, one of several models available from the company. It’s definitely not rugged, but the thrill of getting a 2.4 x 1.8 inch print in about 2-3 minutes will excite both kids and adults alike. The mini 8 is a very basic camera, with a small optical viewfinder (and no LCD), dial-in exposure, and a flash that always fires. One important thing to know is that instax cameras are a bit of a money pit, with a ten pack of film priced at around $ 8.50, so your little photographers will need to be pretty selective before pressing that shutter release button.  


Viddy Pinhole Camera kit ($ 57)

DIY pinhole camera | Accepts 35mm or medium-format film | Available in four colors

For the creative kid with a do-it-yourself attitude, the VIDDY is a pinhole camera kit made from tough, durable recycled cardboard in four colors: green, black, blue or red. It accepts both medium format and 35mm film. Bonus: it’s a perfect project between parent and child. Pop out VIDDY’s screen printed parts and assemble in 30 minutes.


Polaroid Cube ($ 99)

6MP sensor | 35mm lens w/124° angle-of-view | Weatherproof | Full HD video | Numerous mounts available

The latest HD action camera from Polaroid combines a 6MP sensor with a lens with an impressive 124° field-of-view and puts it into a weatherproof body measuring just 35mm on each side. The camera has can record Full HD video onto an optional microSD card, and a 90 minute battery allows extended recording for every bike ride and beach adventure. Just like more expensive GoPros, there are numerous mounts available for the Cube, plus an underwater housing. And a magnet in the camera’s base opens up even more potentially interesting vantage points.

For those seeking Wi-Fi capabilities, the Cube+ offers that for $ 149.

Older Kids

Durability may be less important in a camera for this age group, but it really depends on the child. In our selection we’re assuming that you’re buying for a kid who’s learned not to throw precious things around, and most of the models we’ve chosen offer a little room for your child to grow away from the strictly auto-everything snap-shooting if they get more confident.

Olympus Tough TG-4 ($ 349)

16MP BSI CMOS sensor | 25-100mm equiv. lens | Waterproof to 50ft | Full HD video | Wi-Fi + GPS

For kids that are on the go – or have the tendency to drop expensive pieces of electronics, the Olympus TG-4 is a good choice. It’s well built, responsive, full-featured and produces excellent quality images for a small-sensor camera. It offers automatic shooting modes but opens up the world of manual exposure for older children ready to get their feet wet (no pun intended) in more serious photography. Other features include numerous ‘art filters’, Full HD video recording, and support for fisheye and telephoto conversion lenses. It has very good battery life as well, so it can make it through the day with ease.

The TG-4 is waterproof to 50ft, shockproof from 7ft, crushproof to 220lbf and freeze proof to +14F, so it can take a beating. Wi-Fi is built-in for easy photo sharing, and the GPS receiver will let young photographers check a map to see where a photo was taken.

Panasonic Lumix DMC-ZS50 ($ 250)

12MP BSI CMOS sensor | 24-720mm equiv. lens | Electronic viewfinder | Full HD video | Wi-Fi


For the child you trust with more fragile cameras, might we suggest the Panasonic Lumix DMC-ZS50. It’s a great camera to take on vacation, thanks to its long 24-720mm (30X) zoom lens and ultra-compact body. It offers speedy focusing and continuous shooting, and photos can be composed on either a 3″ LCD or a small (but still useful) electronic viewfinder. The camera can record Full HD video with ‘hybrid’ image stabilization to reduce severe camera shake. 

The ZS50 offers more advanced manual controls than the TG-4 above, so if you want to teach your budding photographer about aperture and shutter speed or how to manual focus, the ZS50 is a camera which can do it.


Apple iPod Touch ($ 199 and up)

Full-featured smart device | 8MP BSI CMOS sensor | F2.4, 29mm equiv. lens | 4″ Retina display | Full HD video

While it may be too early in their lives to buy your kids an iPhone, you might as well prepare for the inevitable by picking up an iPod Touch (2015). It’s essentially an iPhone without the phone, meaning that you get access to hundreds of thousands of apps, many photo-related, easy photo sharing over Wi-Fi, and all of the other things that have made iPhones a smash hit.

On the photo side, the iPod Touch sports a 8MP BSI CMOS sensor and an F2.4, 29mm equivalent lens, plus a lower resolution front-facing camera for selfies. It has the usual features you’d expect to see on a ‘regular’ camera, plus impressive Auto HDR and panorama features. The iPod Touch can also record Full HD video, with slo-mo and time-lapse options. You couldn’t ask for a better screen on which to compose photos, either, as the 4″ Retina display truly shines. You can even add extra lenses from companies like Olloclip for more flexibility.

Articles: Digital Photography Review (dpreview.com)

 
Comments Off on DPReview recommends: Best Cameras for Kids 2015

Posted in Uncategorized


DPReview Recommends: Best compact cameras for travel 2015

23 Dec

Whether you’re traveling the world or the next town over, having the right camera at your side makes all the difference. We’ve picked out our best picks for the photographer who wants to keep things simple by carrying a compact camera rather than one with interchangeable lenses. If you fall into that category, we’ve got great news for you – there are more high quality cameras with attached lenses than ever before, brimming with features tailored to your needs. 

Fujifilm X100T

$ 1099 | 16MP APS-C sensor | 35mm equiv F2 lens | Hybrid electronic / optical viewfinder | 3″ LCD

Few cameras in recent history have attracted as much of a cult following as Fujifilm’s X100 series. They’re the photographer’s darling – not just a good-looking camera, but a beautifully effective machine. The X100T is small and light, and won’t burden a weary traveler, and its low-profile lends itself to street shooting. If you don’t mind zooming with your feet, its 35mm F2 equivalent lens and 16MP X-Trans APS-C sensor will serve you well.

In addition to its travel-friendly size, the X100T offers a hybrid viewfinder with optical and digital views. That’s especially handy when the sun is high in the sky and the 1.04M-dot 3″ LCD becomes harder to see. Having been on the market over a year (at time of publication), its 16 megapixels are starting to feel quite low in comparison to some of its peers, but it also means that the price has dropped slightly since its launch. It is worth noting though that its movie mode, which was far from class-leading at launch, is now well behind the competition in terms of quality and 4K support.

With obviously classic design cues, the X100T’s controls and handling are timeless. Though it doesn’t offer the cutting-edge modern features of its newer peers, it won’t go out of style anytime soon. 

Also consider…

Ricoh GR II
Not a revolutionary update to the original by any means, but the Ricoh GR II’s 16MP APS-C sensor and 28mm F2.8 make the camera one of the best bargains on the market for under $ 600.

Panasonic Lumix FZ1000

$ 750 | 20MP 1″-type sensor | 4K video | 25-400mm equiv. focal range | XGA OLED viewfinder

You can zoom with your feet all day long, but some situations and shooting styles call for real zoom. The Panasonic Lumix FZ1000 doesn’t top its class in terms of massive zoom reach, but its 25-400mm equivalent zoom opens up plenty of options, and an F2.8-4.0 aperture is brighter than most of its peers. With a 1″-type 20.1MP CMOS sensor, it borrows some tech from the GH4 including 4K video recording at 30 fps. Its DSLR-style build includes a fully articulated 921k-dot 3″ LCD and a 2.4M-dot OLED viewfinder.

Also consider… 

Nikon Coolpix P900 
On the seventh day, the Nikon Coolpix P900 was created. And there was much zoom. An incredible 24-2000mm equivalent range, in fact. The P900 uses a considerably smaller 16MP sensor than the FZ1000, but its lens is impressive considering what it has to do, the image stabilization is amazing, and the built-in GPS won’t let you forget where you’ve been.

Sony Cyber-shot DSC-RX100 IV

$ 950 | 20MP 1″-type sensor | F1.8-2.8 24-70mm equiv. lens | Pop-up EVF | 4K video

It’s hard not to recommend the Sony RX100 IV to anyone buying a compact. It’s by no means a budget-friendly option, but it’s among the most capable pocket-sized cameras we’ve ever tested. Sony’s excellent 20MP 1″-type sensor is bigger than your garden-variety compact camera sensor with lots of dynamic range, and a 24-70mm equiv. F1.8-2.8 lens is much brighter than most of its competition. The camera’s tiny pop-up EVF is higher resolution than that of it predecessor and comes in very handy in bright outdoor light.

The RX100 IV really shines when you set the mode dial to movie mode. 4K/UHD recording is available, and at lower resolutions (upscaled to 1080p) high frame rates of 240, 480 and 960 fps can be used. Slow motion video is an awful lot of fun.

If you want to take control over your settings, shoot high quality video and make the most of your vacation Raw files, the RX100 IV is a solid choice. Of course, if you can live without 4K and high frame rates, the RX100 III will save you a couple hundred dollars and get you much of the same excellent image quality. Neither will get you a lot of zoom if that’s what you’re after, but their image quality is at the top of their class.

Also consider…

Panasonic Lumix DMC-ZS50 
Before there were fancy Sony point-and-shoots with 1″ sensors, Panasonic had the market cornered on premium zoom compacts for travelers. While its 12MP 1/2.3″ sensor looks a bit pedestrian in comparison, there’s something to be said for a 24-720mm equiv. zoom that just about fits in your pocket. And for under $ 300, it’s pretty much a steal for full manual controls, Raw support and Wi-Fi with NFC.

Panasonic Lumix DMC-LX100

$ 700 | 13MP Four Thirds sensor | 24-75mm equiv. F1.7-2.8 lens | Electronic viewfinder | 4K video

Why stop at a 1″-type sensor? That’s the question Panasonic engineers must have asked themselves, and lo and behold, the Lumix LX100 was born. It uses a cropped 13MP Four Thirds sensor coupled with a very fast 24-75mm equiv. F1.7-2.8 lens and offers great ergonomics and handling for the kind of photographer who wants quick access to exposure settings. It’s not as pocket-friendly as the RX100 IV, but its solid handgrip gives it a steady feel and its responsive user experience is one of the best we’ve encountered in a compact.

In addition to recording 4K video, the LX100 also offers a useful 4K Photo Mode, which lets you extract a high quality 8MB still from your clip. Its time-lapse and stop motion animation modes are also a lot of fun. Its zoom is certainly on the shorter side, and for someone who plans to stay in Auto mode the camera’s controls and customization will verge on overkill. But for the seasoned photographer wanting to give her shoulders a break from the big camera, the LX100 is a joy to carry and shoot with.

Also consider…

Canon PowerShot G5 X 
If you want just a bit more zoom (100mm at the top end) and a more traditional SLR-style body you may want to consider the Canon PowerShot G5 X. It sports a 20MP 1″-type BSI CMOS sensor (likely the same as in the RX100 III) and a 24-100mm equiv. F1.8-2.8 lens, along with a fully articulating LCD, high resolution EVF, and full set of manual controls. It’s not great for action shooting and it lacks 4K video, but the G5 X is still worth a look.

Olympus Tough TG-4

$ 350 | 16MP 1/2.3″ BSI CMOS sensor | 25-100mm equiv. F2.0-4.9 lens | Everything-proof

Nothing spoils a vacation like spilling a Mai Tai on your fancy new camera. The Olympus TG-4 isn’t just sealed against spills, its fully waterproof to 15m/50ft, as well as shockproof from 2.1m/7ft, crushproof to 100kg/220lbf and freezeproof to -10C/14F. Wherever your travels may take you, the TG-4 is up to the challenge.

Outside of its rugged specs, we like the TG-4’s ability to shoot Raw, making it possible to get very nice image quality with a little time invested in post-processing. Its moderate 25-100mm equiv. zoom, which is fast at its wide end, will get you a little closer to the action, and optional accessories like a macro LED ring light and waterproof fisheye lens open up more possibilities. It also provides the peace of mind of knowing your camera will survive just about anything your vacation throws at it.

Also consider…

Olympus Tough TG-860
The Stylus TG-860 is the TG-4’s more casual sibling, lacking buttoned-up features like Raw capture and Aperture priority mode, but provides identical rugged specifications with a flip-up selfie-friendly LCD. If you don’t anticipate doing extensive editing to your snapshots, the TG-860 is good, clean fun for a significantly cheaper price.

Articles: Digital Photography Review (dpreview.com)

 
Comments Off on DPReview Recommends: Best compact cameras for travel 2015

Posted in Uncategorized