Apple released a number of software updates yesterday including iOS 9.2. In addition to a large number of bug fixes, the update adds iPhone support for the company’s Lightning to USB Camera Adapter, making it possible now to transfer images directly from a camera to your iPhone. Previously, only iPads were supported. Read more
Month: December 2015
-
Epson announces mass production of 4.41m dot LCD likely used in Leica SL

Epson has announced its latest electronic viewfinder panel: a 4.41m dot SXGA+ display, a spec that may sound familiar to anyone who’s been reading about Leica’s SL full-frame mirrorless camera. Epson had shown a mockup of the panel at CP+ back in February 2015, and says the unit is now in mass production.
The 4.41m dot unit offers an SXGA+ display: 1,400 x 1,050 pixels. This equates to 1.87x as many pixels as the existing XGA viewfinders used in most high-end mirrorless cameras: a 36% increase in linear resolution. Everyone who’s used it at DPReview has been very impressed by the level of detail shown by the SL’s 4.41m dot viewfinder.
Leica has previously offered Epson-based EVFs as accessory finders for its X1 and X2 models, but these were likely to have been brought in from Olympus, given the similar styling and cross-compatibility with Olympus units. Considering the dot count and panel size (0.66″), it seems very probable that this is the LCD panel in the SL.

The Leica SL, as seen from behind At present, most high-end EVFs we’ve seen are XGA 2.36m dot displays, using either LCD or OLED technologies. Olympus used LCD panels in its earlier OM-D cameras but has shifted towards OLED in its latest generation. Likewise, Fujfilm used LCDs in its X-Pro1 and X100 series models, only to embrace OLED across the rest of its range. Despite this shift, we’d be surprised if we didn’t start seeing this LCD panel in some of the higher-end mirrorless cameras over the coming year or so, especially given the greater longevity of LCD panels that Leica mentioned as its reason for choosing the technology.
That said, the 0.66″ panel size could limit its usage, since this is considerably larger than the 0.48″ LCD and 0.5″ OLEDs currently in use.
-
Orbis is Going Away. Grab One (for Cheap) While You Can.

For those of you late to the party, the Orbis Ring Flash Adpater is a passive, add-on light shaping device that turns your speedlight into a ring flash. There are others, but for a slew of reasons the Orbis has long been my favorite of the lot.
And it is about to go away forever. This post is a quick heads-up to grab one while you can—and a pointer to a fantastic deal on the last units as they are closed out.
The Orbis was developed in 2008 as a sophisticated answer to the DIY efforts of the Strobist community. After seeing what was possible with cereal boxes, aluminum foil and gaffer’s tape, reader James Madelin wanted to build something better. Meaning nicer looks, better durability, more efficiency, more color correct and with a better quality of light. So that’s exactly what he did.
The Orbis is surprisingly complex on the inside in the way it bends light around the donut. It strikes the balance between lighting efficiency vs. evenness (both being very important) just about as well as possible.
Interestingly, of all of the best ring flash adapters, the Orbis was the only one that was never knocked off by the shady Chinese photo gear copiers. It’s not that they never thought of it. Lord knows, they put out crap versions of all the others.
My guess? They cut one open, took a look inside and said, “Eff this. Let’s knock off the Ray Flash instead.“
What it Will Do
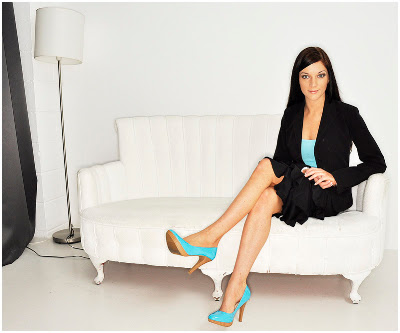
The Orbis Ring Flash Adapter is not a flash. It is a passive light mod that mounts onto your existing speedlight.
Used alone, on-axis (classic ring light position) it creates that signature glam ring light look as seen above. And because it retains any TTL functions of the speedlight crammed into it, the Orbis is very popular with club/event photographers. Stick on a wideangle lens, work two stops over the ambient in TTL mode, and the results look cool as crap.
And that’s fine for event shooters. But I prefer to use mine more in a way inspired by portrait shooters like Greg Heisler and Dan Winters.
In this mode, the Orbis becomes a very sophisticated fill light. You can use it in combo with another off-camera speedlight acting as key light, and it fills in the gaps—to whatever level you choose based on how you power it.
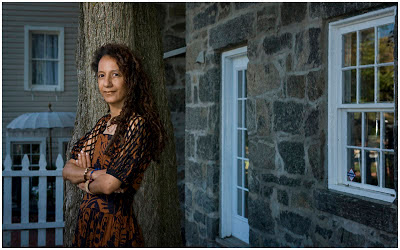
The photo above of poet Linda Joy Burke is a good example. The key light is coming from upper left. I am working well above the ambient with my flash exposure. So Linda’s shadow side would be very, very dark without the Orbis that is wrapped around my lens.
The light from the orbis reaches into the shadow side without really adding any footprint, and creates legibility. How much? Your choice. Just dial the power of the ring-fill light up or down as much as you want.
This is a common way for portrait photographers to create exactly the amount of legibility they want in the shadows. Which means you can get more creative and/or edgy with your key if you want. ‘Cause the ring is gonna save your ass in the shadows.

Same here with this photo of blogger Sian Meades, done in London. I am in full shade here, and this light is completely being created with two speedlights.
The key light is at hard left, raking across Sian’s face. The fill light, in an Orbis, stuck right on my lens, is creating the legibility in the shadows of the key.
The ambient component here is minimal. Without the flashes the photo would be near black. The on-axis Orbis gives me complete control of my shadow density.
(To learn more about lighting either of these two photos, click on either one.)
Now or Never
And the Orbis will soon be gone forever.
They sold over the last seven years for $ 200, rarely if ever discounted. But the remaining units are being closed out for $ 129 (w/free shipping in US.) Or you can get it with the hands-free arm for $ 139 (+$ 7.40 shipping in US.)
This is a great deal. Because not only will it work on nearly any speedlight (but not bigass Vivitar 285s, sorry) it is built to last you likely for the rest of your shooting life.
Which is a good thing, because you’re not gonna be able to replace it.
Amazon: Orbis Closeout: $ 129, free ship US
Amazon: Orbis Ring Flash Adapter w/Arm: $ 139 + $ 7.40 ship US
-
Brandalism: 600 Fake Ads Call Out Climate Conference Sponsors
[ By WebUrbanist in Design & Guerilla Ads & Marketing. ]
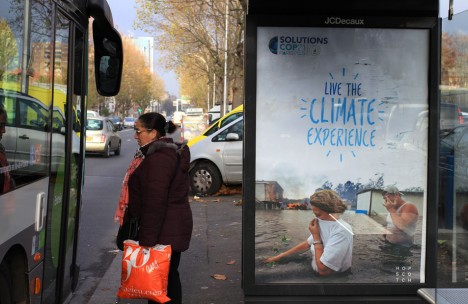
In a massive coordinating guerrilla marketing campaign, 82 artists from 19 countries produced and installed 600 convincing false advertisements around Paris, all targeting major polluters and corporate backers of the COP21 Climate Conference.
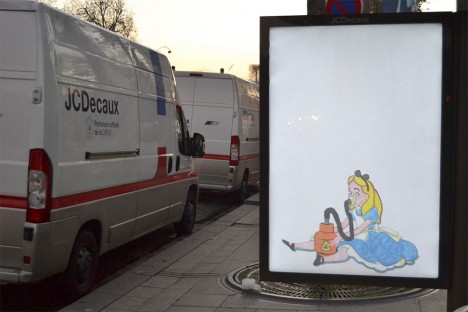
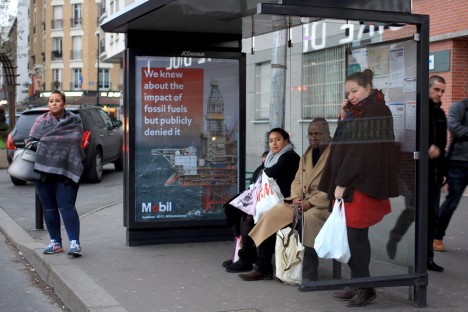
Orchestrated by Brandalism, these installations were professionally executed, placing real-looking adverts behind panes of glass at bus stops and street corners around the city. The aim: to raise awareness of corporate interests in the talks, particularly those with high fossil fuel consumption, and attempts by such companies to greenwash their behavior and appear to be on the side of sustainability.
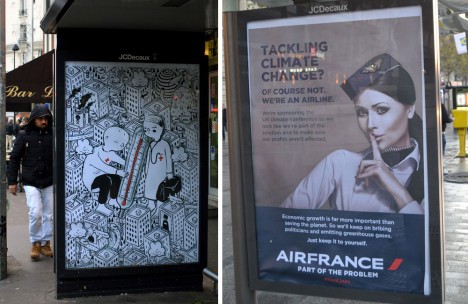
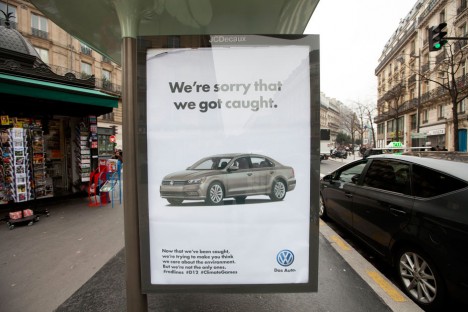
The works came in all forms, from political cartoons to stark photographs showing the realities of climate change and impacts around the world. Some highlighted the roles of specific brands while others spoke more generally to the consequences of global pollution left unchecked.
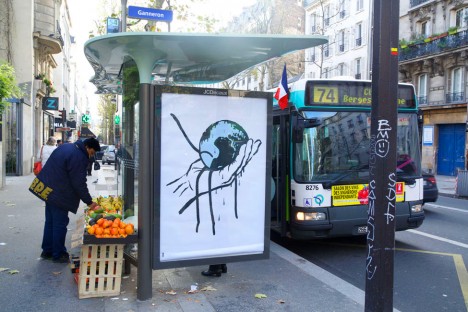
From the organizers: “Amidst the French state of emergency banning all public gatherings following the terrorist attacks on 13 November in Paris, the ‘Brandalism’ project has worked with Parisians to insert unauthorised artworks across the city that aim to highlight the links between advertising, consumerism, fossil fuel dependency and climate change.”
Want More? Click for Great Related Content on WebUrbanist:
Brandalism: Replacing Bus Shelter Ads with Art in the UK
Over three hundred bus shelter ads across the UK have been replaced with thought-provoking works criticizing capitalist culture by 40 street artists. The …
Click Here to Read More »»

5 COP14 Green Designs Address Climate Change
Green inventions and innovations from a dancing floor which produces electricity and fog catchers from the Cape Verde Islands to a no-waste city with zero CO2 …
Click Here to Read More »»

Postcards from the Future: London After Climate Change
Some of London’s most iconic landmarks, from Buckingham Palace to Piccadilly Circus, are dramatically transformed by climate change in this digital art series.
Click Here to Read More »»


[ By WebUrbanist in Design & Guerilla Ads & Marketing. ]
[ WebUrbanist | Archives | Galleries | Privacy | TOS ]
-
Gear Review – Glow QuadraPro Portable Softbox
There is no greater teacher in life than time and experience. If I could go back in time and teach myself some photography lessons, high on my list would be OCF – off-camera flash. Back when I was starting out in photography, I used to dread using my flash. In fact, I think for the first two years of my photography career, I did not even own one. If a client would enquire about a family photoshoot, I would promptly reply back saying I am strictly a natural light photographer and the best times to schedule the session would be a little after sunrise or around sunset. I think I might have even turned down some indoor photo sessions because I hated the look and feel of a flash.
Fast forward a few years, as I ventured into the genre of wedding photography, I started to get over my fear of using a flash. As I educated myself on studio lights, flashes, and all the other lightning paraphernalia out there, I stopped hyperventilating as much at the thought of using artificial light for my photos. Although I am now fairly comfortable using an on-camera flash, I still consider myself a novice artificial light photographer. The next step to mastering artificial lights is to get comfortable with off-camera flash. To that end, I knew I needed, at the bare minimum, a light stand, a soft box, and my flash. So when I got the opportunity to review the GLOW QuadraPop Portable Softbox from Adorama I jumped at the chance.
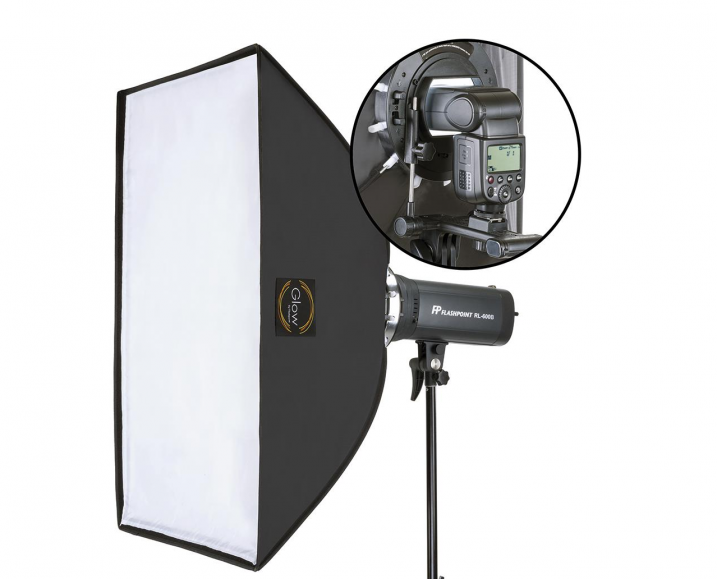
Let me preface this article by setting the record straight. I have never used an off-camera lighting system from the ground up. I have watched several online classes and tutorials on how a single light off-camera system works. In fact there are several wonderful articles on dPS that discuss off-camera flash like this one. But this is the first time I have handled such a setup ,and so, in essence, I am reviewing this product as a novice off-camera flash/softbox user.
Contents and what’s in the box
The QuadraPro comes fully equipped to use with a speedlight, as well as a studio strobe. Included in the box were the actual soft box, angle adjustment shoe bracket that can be adjusted for height and depth, removable inner and outer diffusers, removable cold shoe, and a protective bag to carry the QuadraPro on location. The only thing you will need to have is a light stand. I have a generic, lightweight stand that I had purchased from a local camera shop last year, and the GLOW QuadraPro worked perfectly with it.
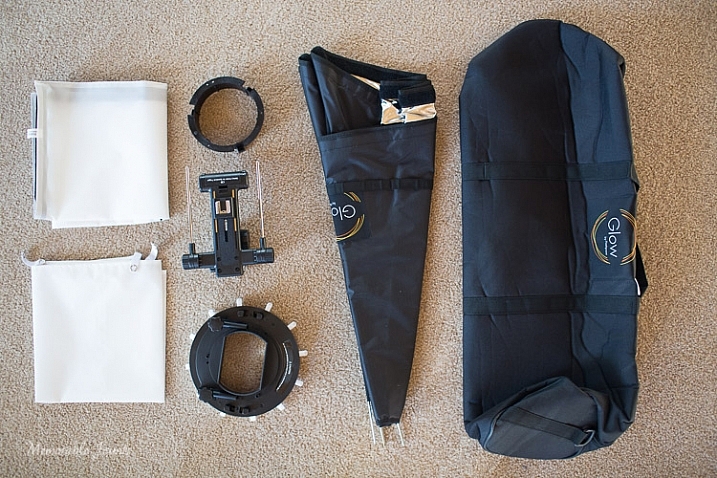
I have to admit that when I opened the box, I was a little nervous about how to set up the whole system. I am used to reading manuals and watching product videos prior to handling equipment, but for this softbox setup I decided to skip all the research and prep work, and start using the product right away. The setup did take me a few minutes to figure out, but once I read through the one page instruction sheet that comes with the GLOW QuadraPro, it was easy enough.
The flash cold shoe bracket was easy to use, but attaching the actual softbox to the QuadraPro ring did take me a couple of tries. Once I was able to secure the rods into the rings, it was easy to snap them in to place by adjusting the rings in a circular manner. The inner and outer diffuser panels are quite literally a snap to attach. The outer diffuser panel has a velcro attachment mechanism, while the inner panel snaps with push buttons.
Ease of use and comfort
The Glow QuadraPop line is perfect for mobile studios, on-location work, and also travel. The entire system is quite lightweight, and easy to set up and dismantle. This is ideal for individual portraits and product shots, as well as for use on location. The one I used is the QuadraPop Rectangular softbox that comes in two sizes – 28×38″ and 24×34″. I used the GLOW QuadraPop with both the internal, and external, diffuser panels. Additionally the flash shoe bracket has an angle adjustment knob for easy tilting, thereby adjusting the angle of light – perfect for photographing things from above.
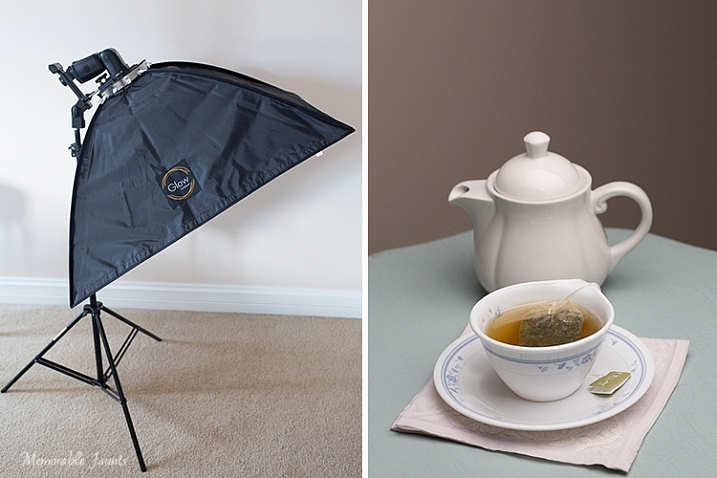
My afternoon tea was photographed with the softbox above and to the right of the tea cup, as seen in the reflection on the surface of the tea in the cup, and the light on the tea pot.
Basic setup and portability
I created a quick video on how easy it is to set up the softbox:
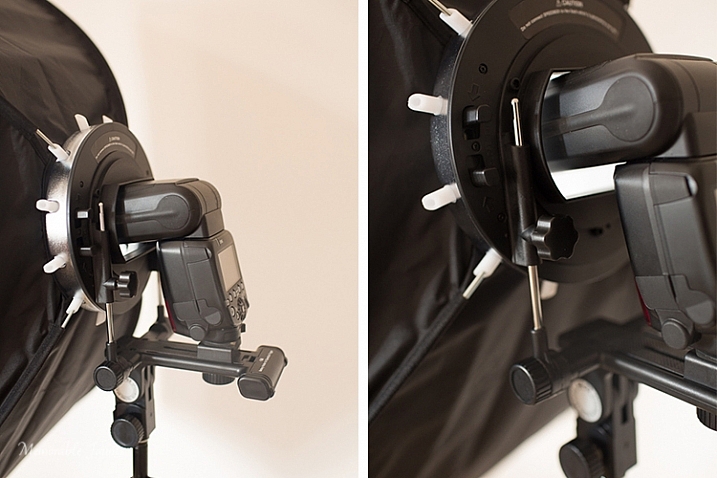
The softbox is mounted on the circular ring using the white clasps. The softbox is mounted on the light stand via the cold-shoe mount that also holds the flash.
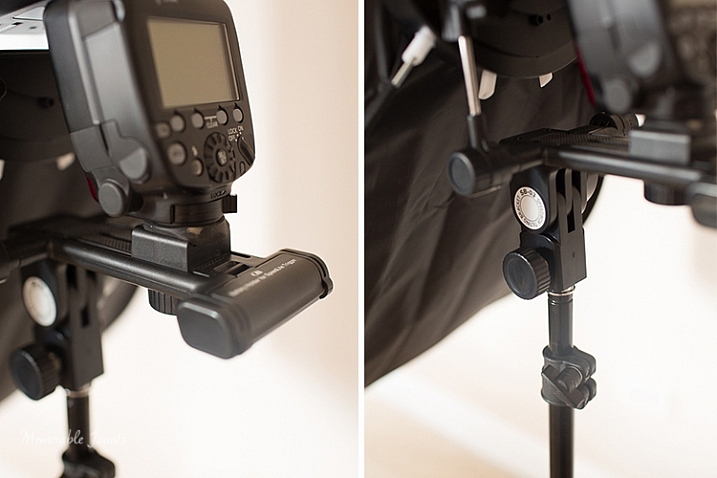
The cold-shoe mount has an adjustable screw that slides the flash forward or backward on the base.
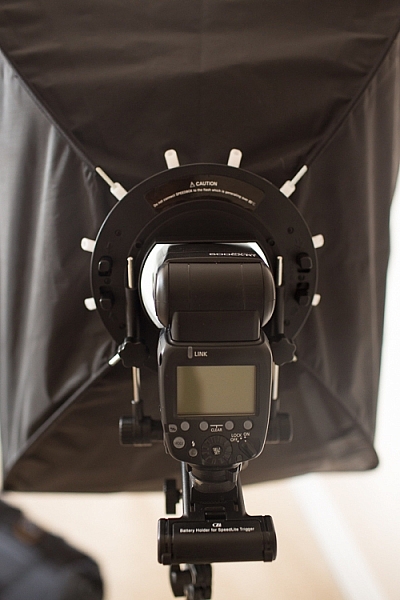
Back view of the fully assembled GLOW QuadraPro Softbox with the flash attached.
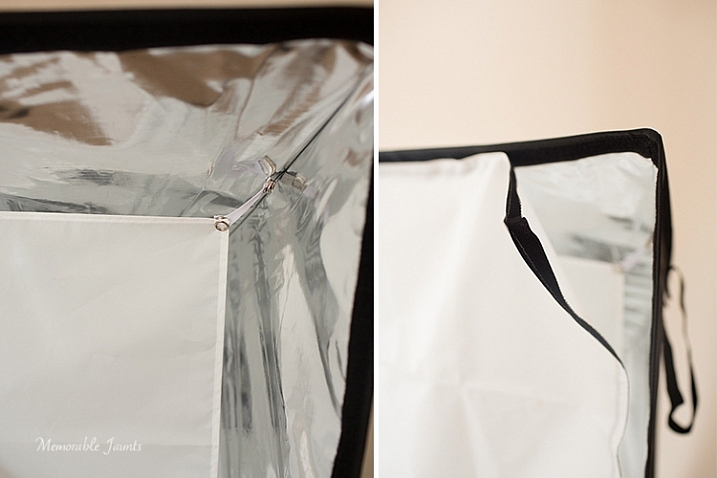
Inside diffuser panel that snaps into place, while the outside diffuser panel has velcro that attaches to the inside of the softbox close to the edge.
Indoor and outdoor use
I planned on putting the GLOW QuadraPop to the test with both indoor and outdoor use. But, just as I was writing this article, Chicago got the first major snow storm of the season. So, with subzero temps, I decided to forgo the outdoor test and just use it indoors with my obliging models, a.k.a my kids!
While indoors I moved the GLOW system from one room to the other, to see how easily I could manage carrying the system around. Before moving it, I removed the flash from the cold-shoe attachment, and also collapsed the softbox by squeezing the tabs on the sides of the ring. This did take some force, as the softbox rods were quite secure in their respective white sockets. I did not remove the diffuser panels as recommended, because I wanted the set up process to be easy at my next location (similar to what it would be like on a live on-location photoshoot). This made the set up, and take down process, much easier and faster.
Please note – I was experimenting with various softbox positions and had the flash on ETTL. My focus here was not on posing, but on the look and feel of a diffused lighting setup using a single softbox, i.e. the GLOW QuadraPro.
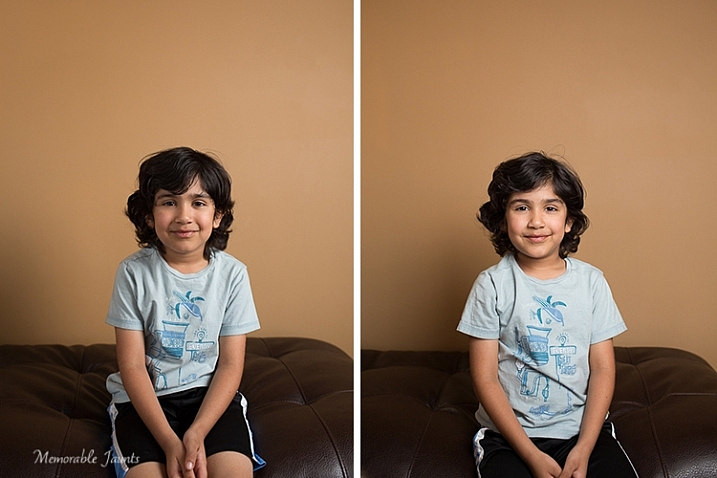
The image on the left has the softbox to the right of the camera. There is a slight shadow on the left hand side, and a nice drop-off of light on the background. The image on the right has the softbox placed directly in front of the model for a more even tone, and even lighting on the face.
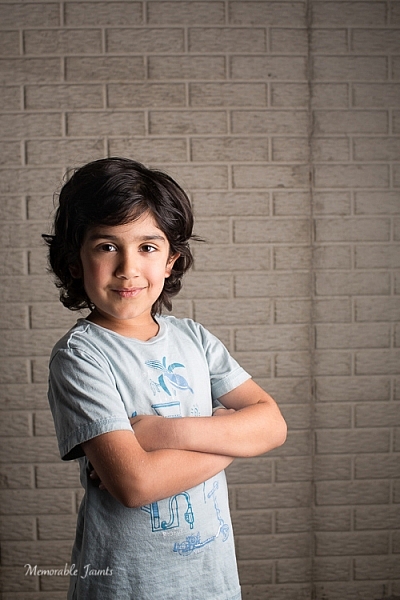
For this image, I moved to the basement where it was much darker. I quite like the effect of the dramatic lighting on the left side of his face, with some shadows on the other side. His body is turned slightly towards the softbox, which is at approximately at a 45 degree angle from the subject’s position.
Next up, my other willing model who had to be constantly bribed with treats and food!
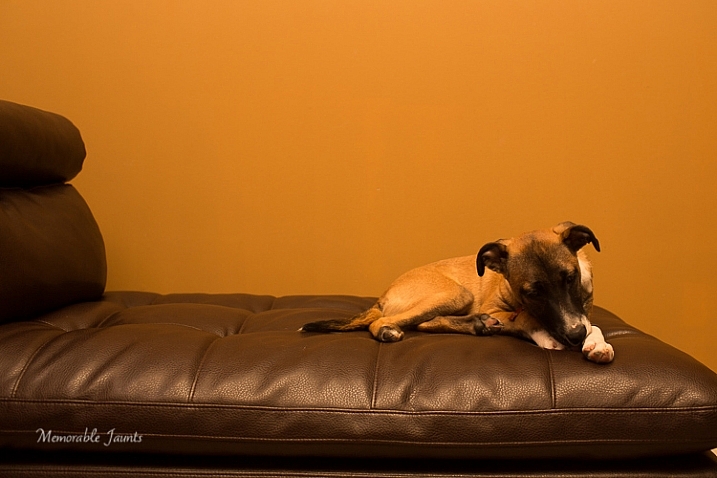
This image was taking WITHOUT the softbox. The flash was just bounced straight up without any additional diffusion. The image is quite dark and the color of the wall is quite terrible in this image.
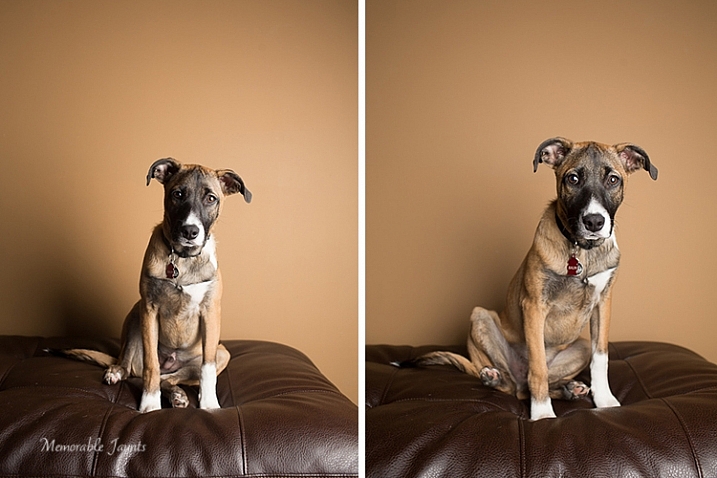
The image on the left had the softbox placed at a 45 degree angle to the dog. The image on the right has the softbox pointed straight ahead, giving a more even lighting and beautiful catchlights in his eyes. Plus the color of the wall is more true to its actual color!
Final Thoughts
In conclusion, the GLOW QuadraPro softbox is a fairly easy to use, lightweight and portable, flash diffusion system. I quite liked the convenience of having the setup all ready to use as I was experimenting with a single off-camera flash. Initially the softbox was a bit difficult to put together, and that was purely because I have never used this type of lighting system from the ground up. But once I got used to the clamps, they were very easy to assemble and dismantle.
googletag.cmd.push(function() {
tablet_slots.push( googletag.defineSlot( “/1005424/_dPSv4_tab-all-article-bottom_(300×250)”, [300, 250], “pb-ad-78623” ).addService( googletag.pubads() ) ); } );googletag.cmd.push(function() {
mobile_slots.push( googletag.defineSlot( “/1005424/_dPSv4_mob-all-article-bottom_(300×250)”, [300, 250], “pb-ad-78158” ).addService( googletag.pubads() ) ); } );The post Gear Review – Glow QuadraPro Portable Softbox by Karthika Gupta appeared first on Digital Photography School.
-
Alien Skin releases non-destructive photo editor Exposure X
Alien Skin has launched Exposure X, its non-destructive photo editor and film emulation software for Mac OS X and Windows. Exposure X is the successor to Exposure 7, and functions as both a plug-in for Adobe Lightroom and Photoshop as well as a standalone editor. Features include a revamped user interface, RAW image editing, and an import system that doesn’t use a catalog file.
Plans to release Exposure X were announced weeks ago. As promised, the software combines simplified design with non-destructive editing tools for organizing, editing, processing, and storing photos. Exposure X doesn’t use a catalog file, instead opening photos directly from the source folder. The interface, meanwhile, does away with separate modules, presenting a full set of tools at all times, according to Alien Skin. Analog looks can be applied to images, including Kodachrome, Lo-Fi, Daguerreotypes, and more.
Exposure X is a free upgrade for Exposure 7 owners and $ 99 USD for those with other Exposure versions. The software is $ 149 USD for new customers.
Via: Alien Skin
-
GoPro announces the name of its forthcoming camera-equipped drone
Action camera manufacturer GoPro has officially named its camera drone and announced that it will be available in 2016. Footage from the GoPro Karma is demonstrated in a video on the GoPro website, which is also the same movie the company showed before when it first teased teased the drone.
GoPro isn’t giving away much information at the moment, but it is giving away a Karma drone to 100 people signed up to the newsletter at the time of the product launch. All we know for now is that the drone will be ‘ultra portable’ and will fold for storage and transportation.
GoPro has UHD 4K video capability in its Hero 4 Black camera, but it is difficult to tell at this point whether the company will equip the Karma with 4K video, or choose to make it more accessible with a lower price point. Perhaps it will offer both 4K and HD versions.
In the original teaser movie the company claimed no post-capture image stabilization had been used, and as the same footage is being shown again it is safe perhaps to assume that the Karma will have some form of on-board or in-camera stabilization system.
For more information visit the GoPro website.
-
10. Dezember 2015
Das Bild des Tages von: Tim Cavadini

Im Ausblick: Duisburg, der europäische Naturfotograf 2015 und Fotobücher.
kwerfeldein – Fotografie Magazin | Fotocommunity -
US National Park Service looking for the next Ansel Adams

Photo by Jeff Keller If your dream job hasn’t come along so far and you fancy yourself as a bit of an Ansel Adams, you could do worse than to pay a visit to the US Government’s employment website. The National Parks Service is looking for a full-time photographer to record the glory of the country’s natural treasures, much as Ansel Adams did on contract to the Department of the Interior in the 1940s. The only hitch is that applicants will be expected to use equipment similar to that used by Adams himself, as the job involves shooting with large format film cameras as well as the latest digital kit.
You’ll need to be a US citizen, have a driving license and be subjected to a background check, but for your efforts you could earn up to $ 100,000 a year for doing what you love. The job isn’t all wandering around with a big camera and a box of film holders though, as you’ll be expected to make large scale prints, mount exhibitions and help review submissions for the service’s photographic collection. According to the advert, you’ll have to put up with ‘moderate discomfort’ out on location and ‘exposure to weather conditions’.
Keen enthusiasts though will already be familiar and well-experienced in ‘physical exertion such as long periods of standing; walking over rough or rocky surfaces; recurring bending, crouching, or stretching; and recurring lifting of moderately heavy equipment and materials.’
The job advert also specifically asks for the following:
- Knowledge of the principles and techniques of large format, black and white photography.
- Knowledge of published standards and guidelines for architectural, engineering and landscape documentation.
- Knowledge of film and digital photographic processes and techniques.
Those demands shouldn’t be too much of an issue for most photographers already working with large format equipment in the field. To apply for the job you’ll need to get moving as applications have to be in by 15th December. Santa might be coming early to someone.
-
DPReview Gear of the Year part 2: Carey’s choice – Fujifilm X-A2

Since joining the team at DPReview a few months ago, I’ve been doing my best to borrow and get my hands on as much gear as I possibly can. Like most working photographers, I am heavily invested in a single system, and beyond obsessive review-reading across far corners of the Internet, I didn’t come to DPReview with too much hands-on experience with other brands and their respective systems. In the process of trying to familiarize myself with all the cameras and systems I could, it’s the Fujifilm X-A2 that has surprised me the most and has become my personal pick for Gear of the Year.
What I love
- 16MP Bayer APS-C sensor promises great clarity, color and ISO performance
- Full X-mount compatibility for those wanting a system to grow into
- Twin control dials for rapid changing of settings
- Tilting screen with good visibility
- Cheap.
Fujifilm’s X-system is filled with fast lenses and quality bodies: the company knows how to make great cameras. But I’ll admit, even with the possibility of putting some gorgeous Fuji glass on the X-A2, I had pretty low expectations because the camera just feels so cheap. My fixed-lens X100 is made of metal, and it feels like it. By contrast, the X-A2 is made almost entirely of plastic, and… it feels like it. The surface is fairly slick and hard to get a good grip on, the controls have nowhere near the satisfyingly dense and damped action as those on higher-end Fuji’s, and while I appreciate a tilting display more than the average Joe, this one hangs somewhat loosely when it should be secure against the back of the camera.
So here comes the surprise: I don’t really care so much that this camera feels so cheap, simply because it is so cheap. It is among the lowest-priced interchangeable lens cameras, and yet, still packs a 16MP APS-C sensor that produces absolutely stellar files.

ISO 500, F5.6, 1/60 at 16mm on the kit lens. If not for the articulating screen, this would have been much more of a ‘spray and pray’ situation. Processed to taste from Raw. Glance over the spec list and you’ll note that this is the only Fujifilm camera in its current lineup that lacks an X-Trans sensor. Given that Fujifilm has put X-Trans at the heart of almost all of the X-series models, this also served to temper my expectations a bit. But make no mistake, the Bayer sensor in the X-A2 may not have a pixel-level detail advantage over an X-Trans, but I found that it still produces excellent colors and controls noise very well all the way through ISO 3200 (6400 is usable in a pinch). An added bonus: Raw file support is wider, thanks to the near-ubiquity of the Bayer pattern.
The included kit lens also feels very cheap, right down to the plastic mount, but as with the body, its build and appearance bely the ultimate results it’s capable of. It is pleasantly sharp for a kit zoom, offers swift, silent and accurate focusing in good light, and includes effective image stabilization. When you pair the X-A2 with one of Fuji’s compact primes, such as the 18mm F2 R or the 27mm F2.8, the setup is coat-pocketable and remains light enough to be handled with only a wrist-strap.

ISO 6400, F2.8, 1/56 on the Fujifilm 27mm F2.8 lens. Straight-out-of-camera JPEG. So while the large sensor and sharp kit lens are big selling points for most people looking at a new and affordable ILC, this little camera keeps on going with additional features that only serve to further enrich the shooting experience, even for seasoned DSLR shooters. Integrated Wi-Fi, above-average battery life, twin control dials, a tilting screen and a bounce-capable pop-up flash make for a camera that is both flexible and responsive for a wide variety of shooting scenarios. There’s also incredibly useful one-button 100% magnification feature during playback, something that is annoyingly omitted on many competing entry-level models.
The X-A2 is kind of like that kid that skipped a grade in school. He’s the odd one out, maybe a little immature and doesn’t quite belong, but hey, he keeps up with the bigger kids just fine. So yes, the camera and bundled lens are built more cheaply than I’d like and it lacks the X-Trans sensor, but the Bayer sensor is still a treat.
Shooting with the X-A2 reminded me a lot of shooting with my X100, which is a good thing (yes, I have the latest firmware). As long as you don’t often drop or abuse your cameras too heavily, the X-A2 represents a solid investment in the Fuji X-system, and its image quality can easily hang with its bigger and pricier brethren. With its well-implemented controls, it’s also a great choice for those who are considering taking more manual control over their photography, and is an excellent camera to grow into.

ISO 800, F2, 1/60 on the Fujifilm 18mm F2 R lens. Straight-out-of-camera JPEG.
